Identity Lifecycle Management (ILC)
The Identity lifecycle processes are common identity management scenarios. This section of the demo will demonstrate the processes that are delivered out-of-the-box with Omada Identity.
The demo has an HR system that we use to add, transfer and offboard an employee. The script uses the same user throughout the lifecycle, but you can choose different users if you want to. It is more important that you choose to use the same org. units as in the example. These are Invest Chicago or Internal Accounts Chicago.
Onboarding a contractor and delegate access is also a part of the identity Lifecycle process section of the demo. These processes are handled in the Portal.
Onboard Employee (ILC01.01)
This section of the demo shows the onboarding activities for an identity, in this case an employee.
Employee records are usually sourced from an HR system, such as SAP HR.
-
Click the HR System link on the desktop. This opens the Global Banking Group HR system.
-
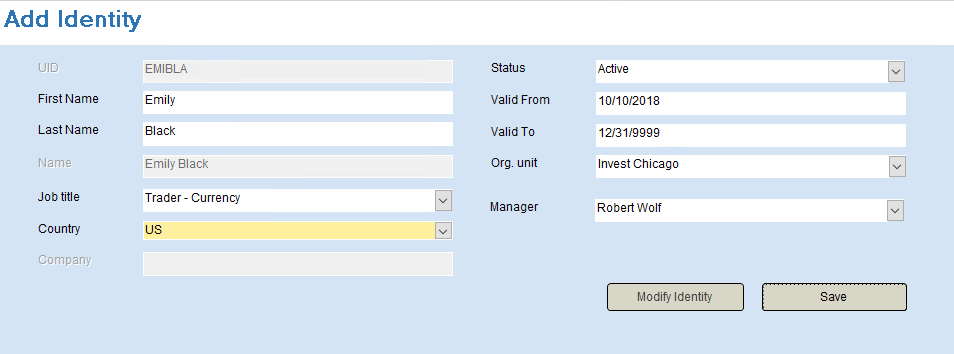
In the Add Identity form, enter a new employee. The demo script uses the name Emily Black, but any name is fine. If you choose another name, take note of the generated UID.
-
Give the employee a First Name and Last Name. The UID fields is automatically populated.
-
Give the employee a Job Title, it is recommended to use Trader – Currency as there is an assignment policy defined for that Job Title.
-
Use US as country.
-
In the Org. unit drop-down, select Invest Chicago.
-
In Manager, select Robert Wolf – the manager is derived from the Org. Unit, but the manager selected in this attribute will be copied into the Employment Context for the new Identity. Leave the other fields as is. Employment Contexts are used to support multi affiliation – they are personal, have validity periods and managers assigned.
-
Click Save. Click OK in the confirmation dialog.
-
Close the HR system.
-
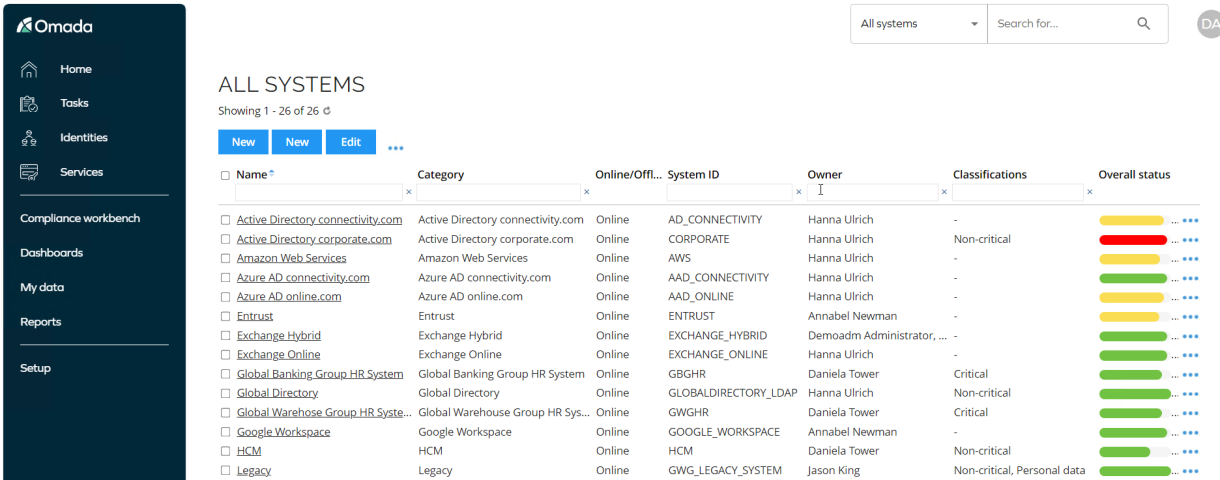
Log in to the Portal as System Administrator and go to Setup > Master Data > Systems.
-
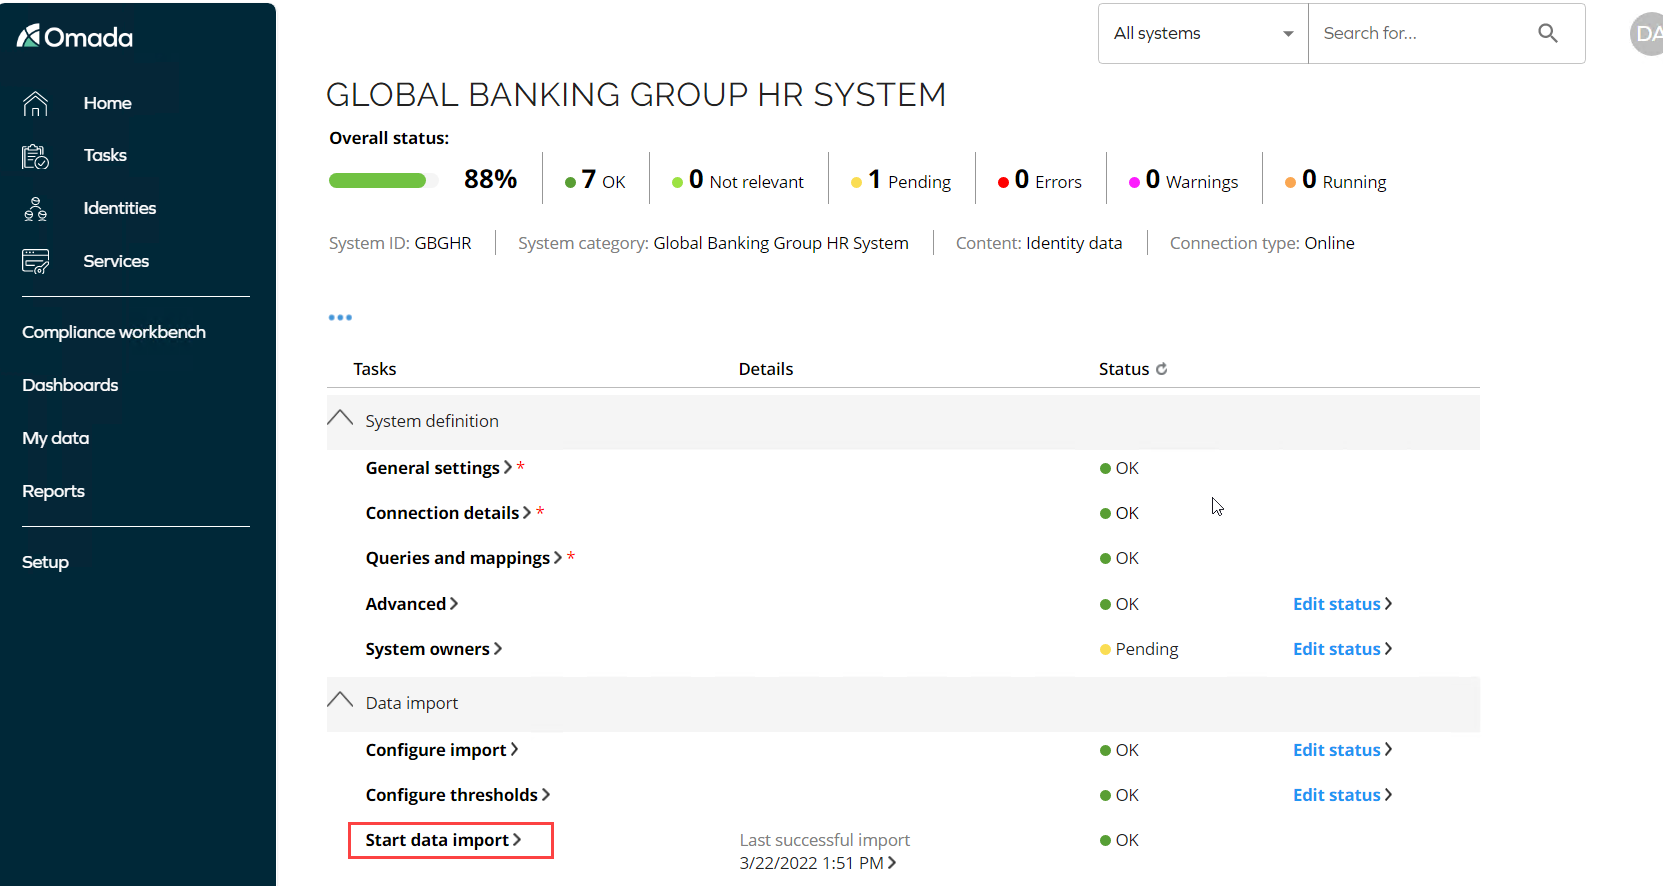
Select the Global Banking Group HR System.
-
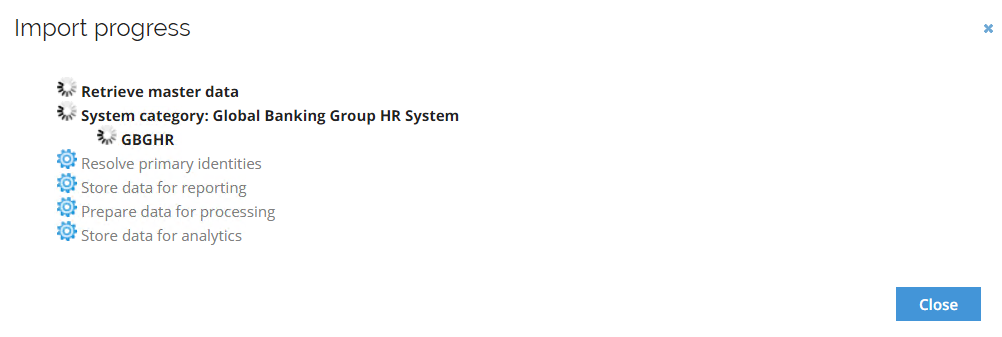
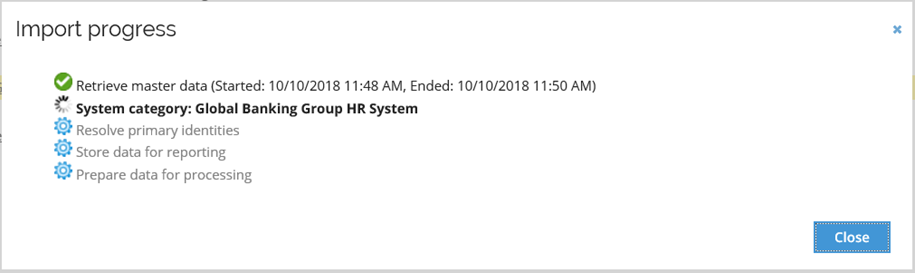
Click Start data import.
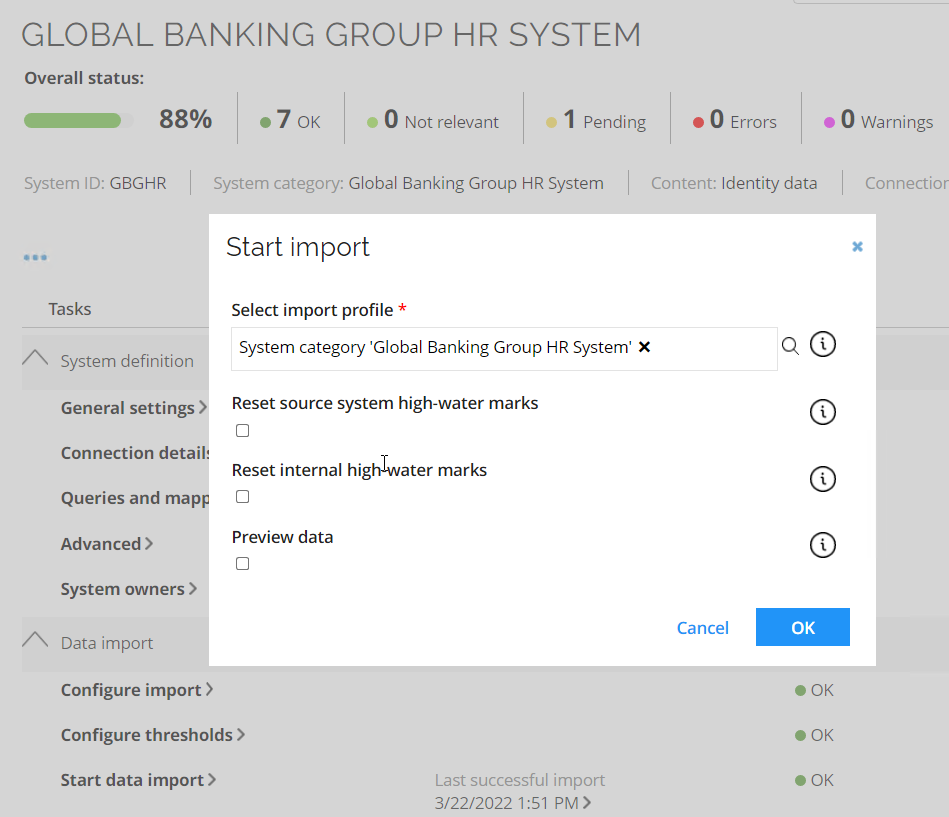
-
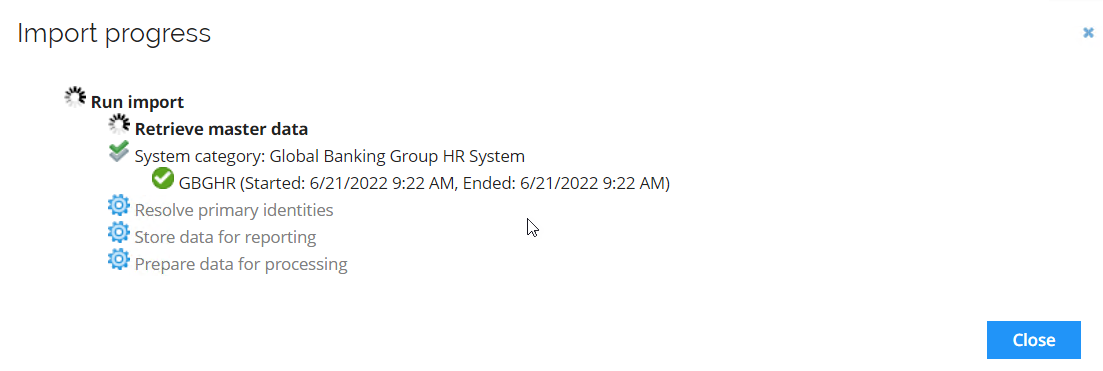
Click OK to start the import from the HR System. An Import progress pop-up will appear, it is safe to close the pop-up, and while the import is running, you can talk about the system onboarding that has taken place prior to running the import.
-
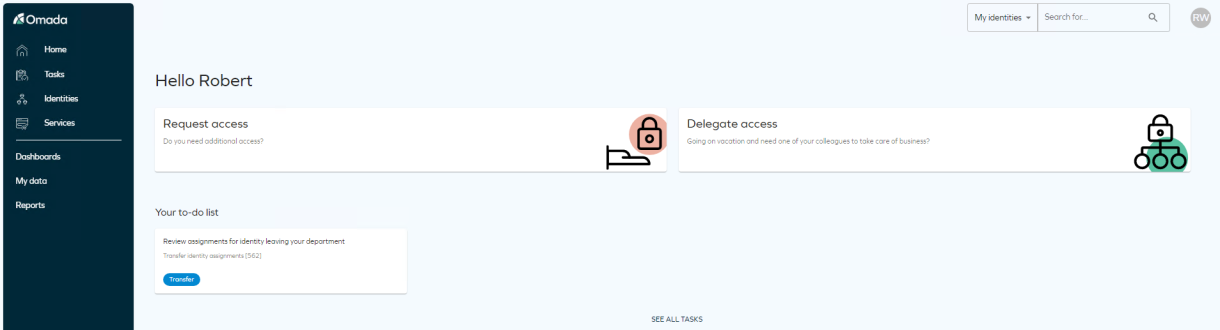
Log in to the Portal as Robert Wolf.
-
Click My Data > Manage > My Contexts. He is the manager of six departments including Invest Chicago and is therefore Emily Black’s manager.
-
The Business Context feature makes it possible to manage other business contexts in addition to, or instead of, the organizational structure. Using the feature allows for managing (for example) a Project hierarchy. Each project can have one or more Owners with the responsibility of managing who are assigned to the project context. Identities assigned to a project context can request access to be used while performing project duties. Once an identity is no longer assigned to a project, the system will automatically revoke it.
-
Business benefits include:
- Ability to manage other business contexts in addition to the organizational structure.
- Delegated management of who is assigned to a context.
- Self-service requests for access to be used in a specific context with the following approval of the context owner.
- Automatic revocation of access granted for use in a context when an identity is no longer in it.
-
-
When the import has finished, click Identities and search for Emily Black, who is now visible in the list of Managed Identities.
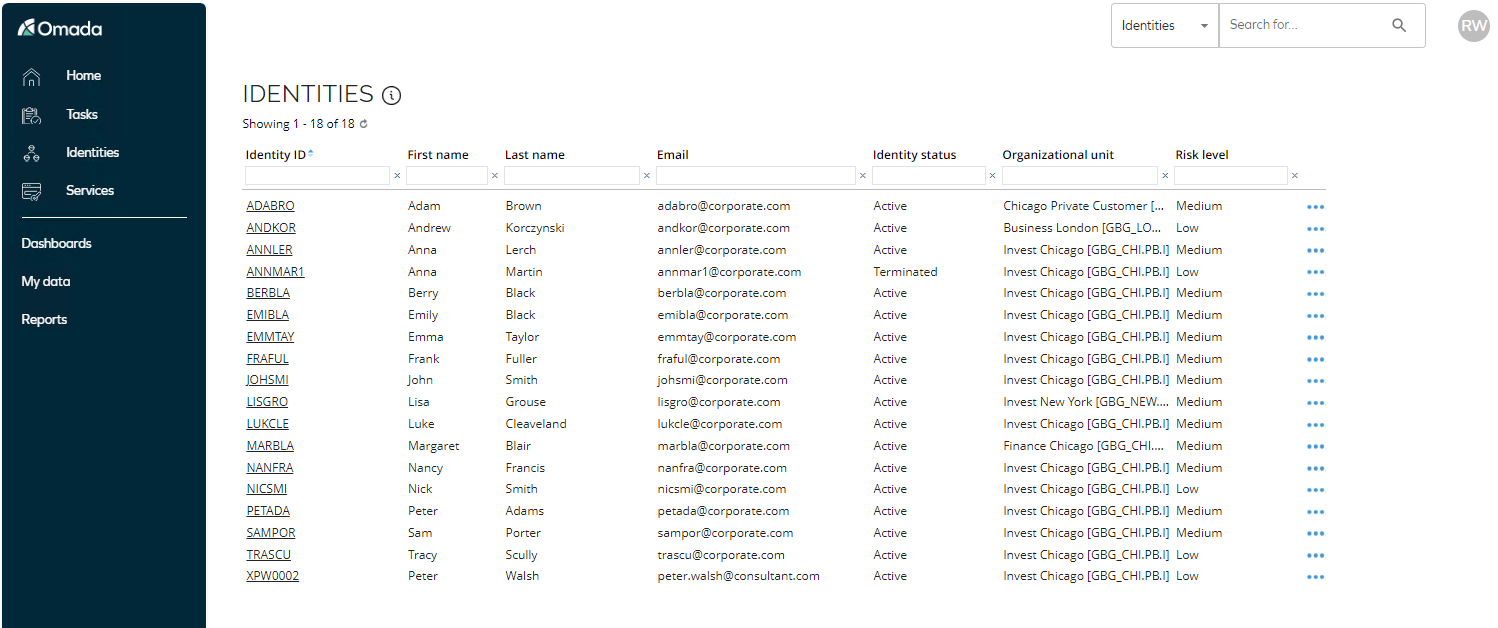
-
Click EMIBLA in the list. The View Identity page opens. If the Identity is awaiting calculation, wait some time and refresh.
-
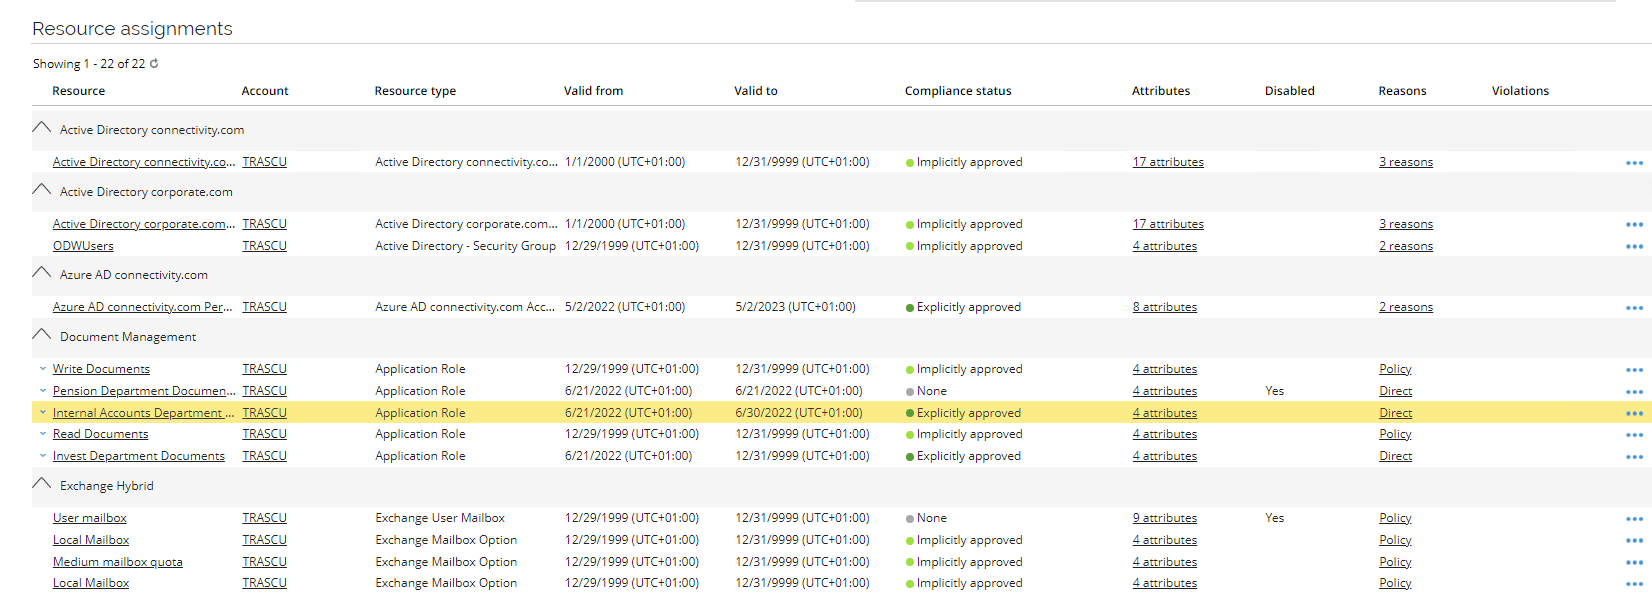
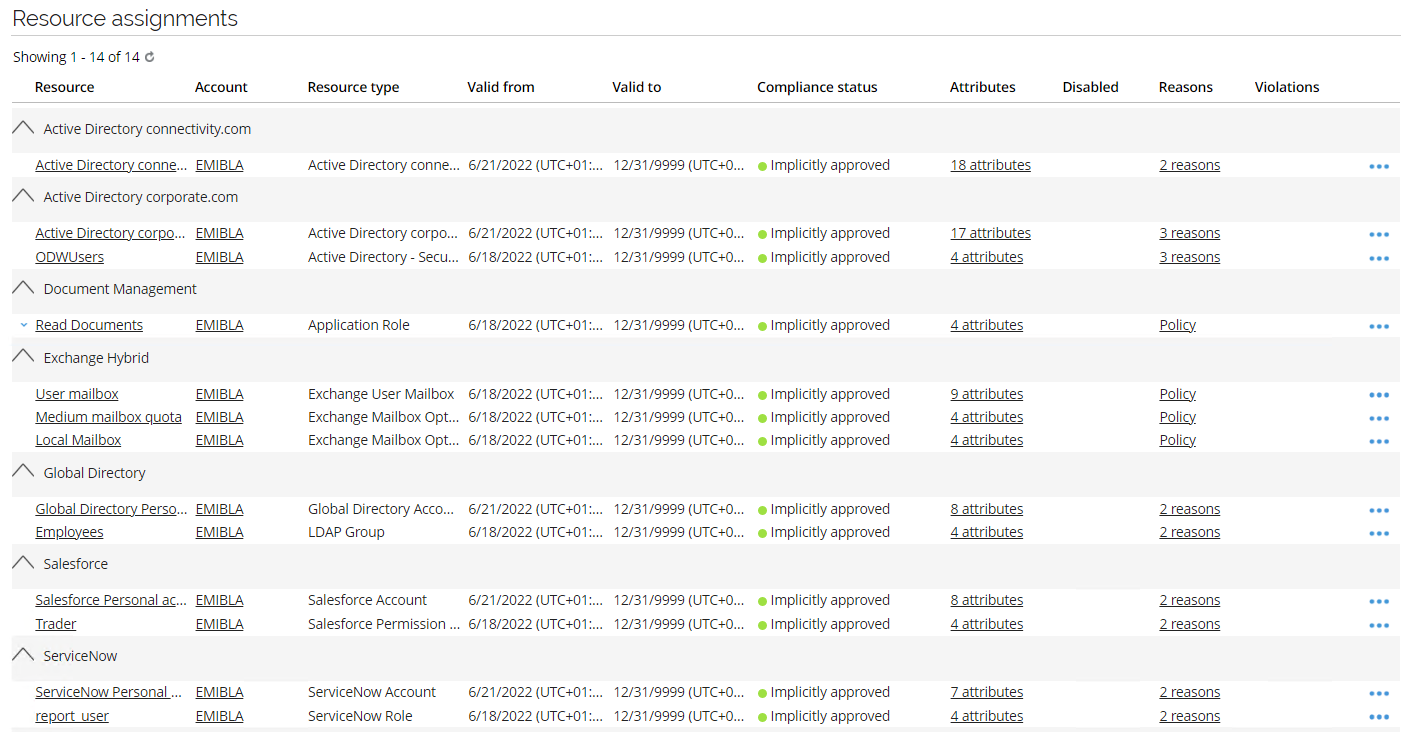
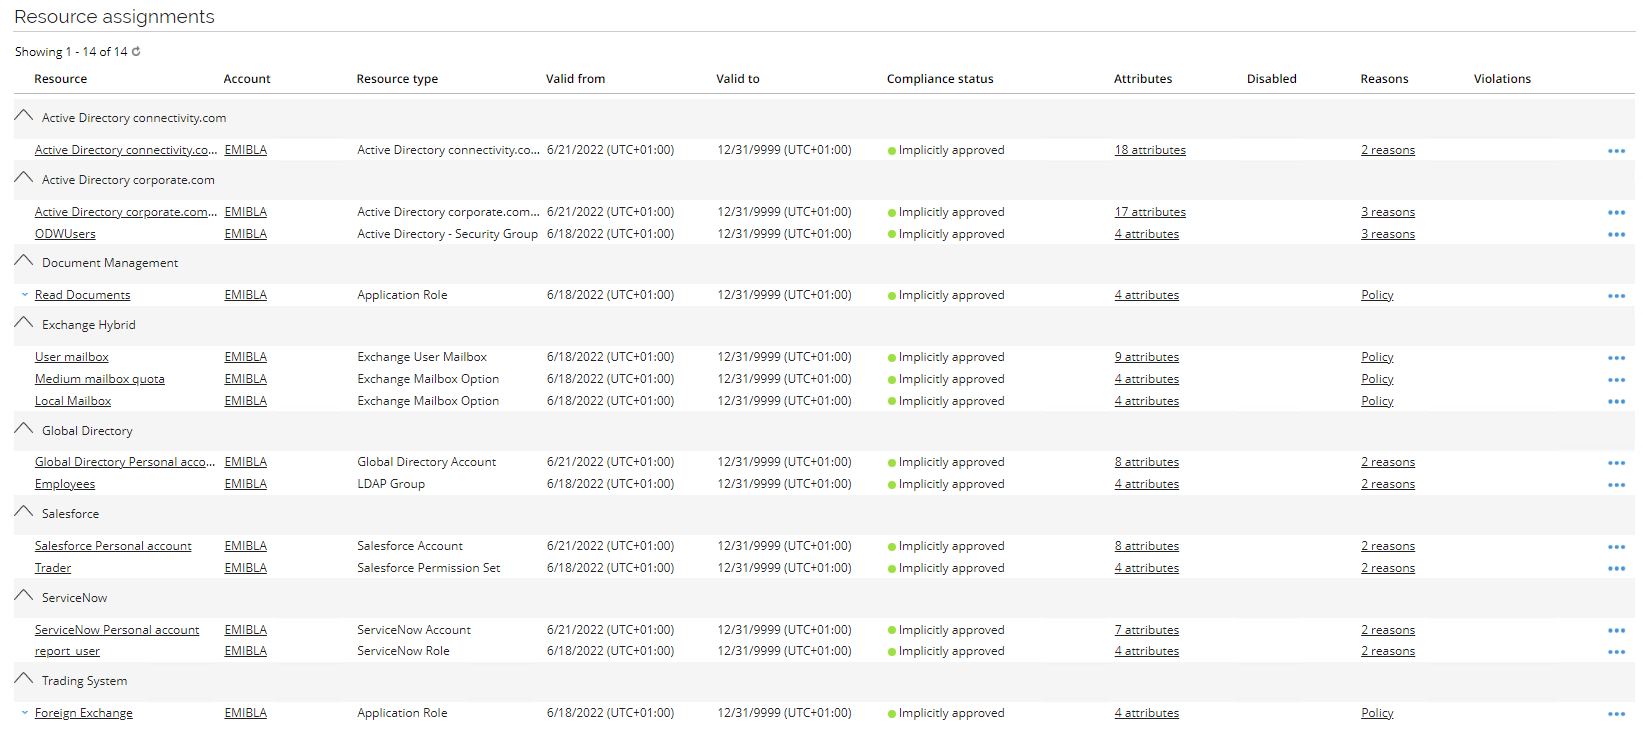
Below the Identity Details, the Resource Assignments grid shows all calculated resource assignments for an identity.
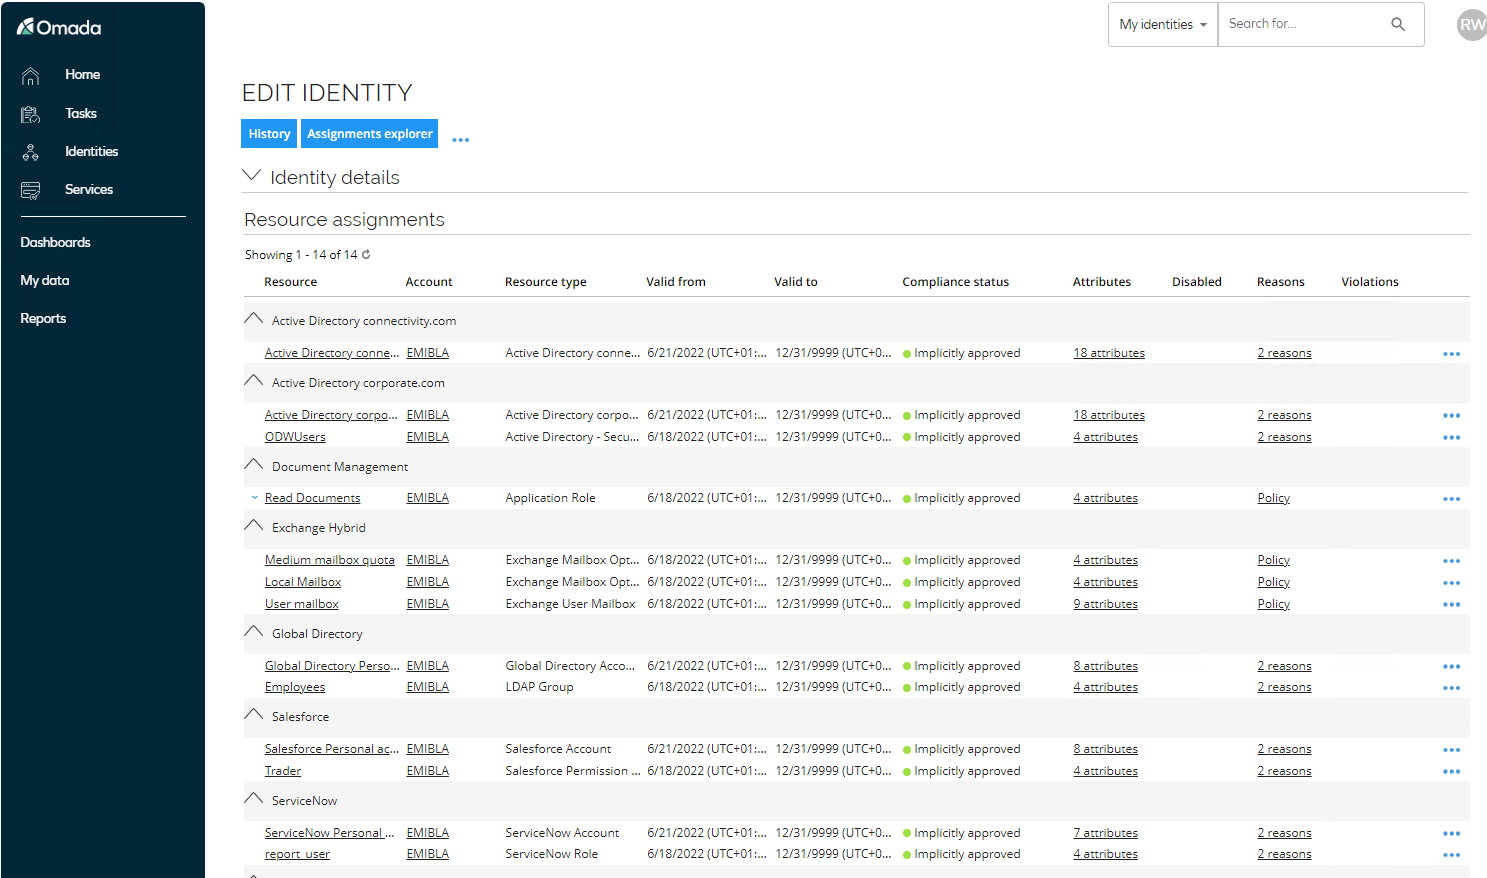
-
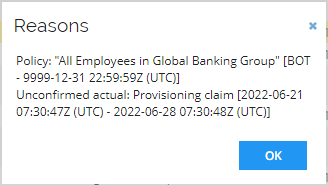
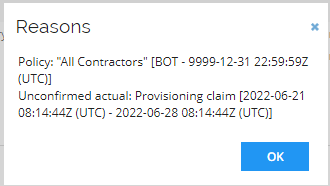
Notice that she already has some basic access assigned. The resources are assigned via Assignment Policies ~ inherited from the org. structure and her Job Title. The Compliance Status is calculated as Implicitly Approved because all assignments are assigned via Assignment Policies. Click the Reasons value for Active Directory corporate.com Personal account.
-
The reason for the assignment is: Policy: All Employees in Global Banking Group, this is what we refer to as Desired State. The other reason is: Unconfirmed Actual: Provisioning claim
[<timestamp>], this is what we refer to as Actual State. The reason status is unconfirmed is because the Omada Provisioning Service has claimed it has successfully provisioned the user account in AD, but we are pending the confirmation – which will happen at the next reconciliation import from AD to the Data Warehouse. When import is completed, the status will change to: Actual Direct: Actual Assignment[<timestamp>]. -
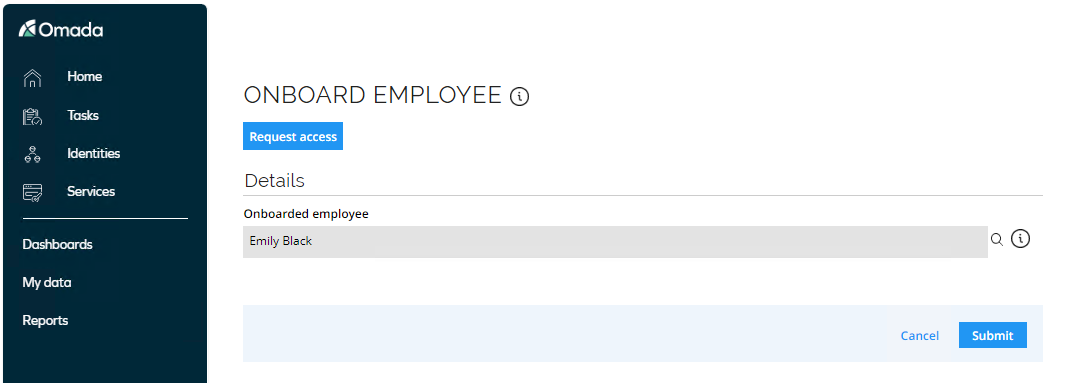
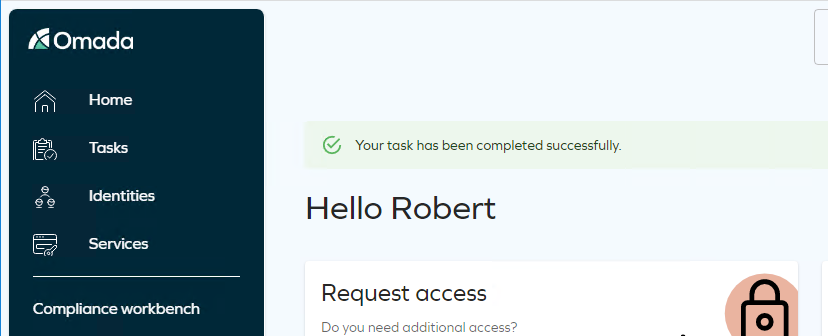
Return to the start page. Notice that there is a task called Onboard employee in the Tasks section. Open the task.
-
The Onboard employee activity opens.
-
If you want to see more details about the Identity, click the name and a pop-up window with details (imported from HR System) appears, click Close to return. The manager can now choose to request access for the new employee, but we will perform the request in the Access Request scenario.
-
Click Submit and Reconciliation.
-
Log in to the Portal as System Administrator and go to Setup > Administration > Connectivity > Import Profiles. Select System Active Directory corporate.com and click Start import. This will execute the import from AD to Data Warehouse, after successful import you can perform the same task for System category Global Directory. This task is required if you want to verify the update of the Reasons after the reconciliation has taken place.
-
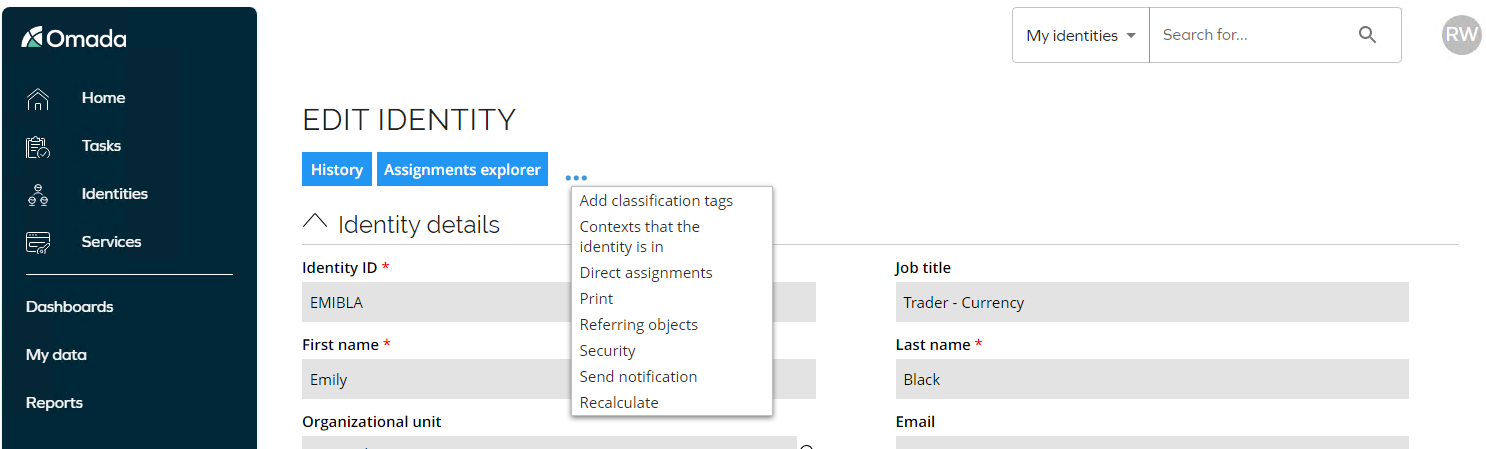
Log back into the portal as Robert Wolf. Go to Identities and search for and click Emily Black. Click the … and select Recalculate to trigger a recalculation of the Identity.
-
When calculation is completed, click the Reasons value for Active Directory Personal account.
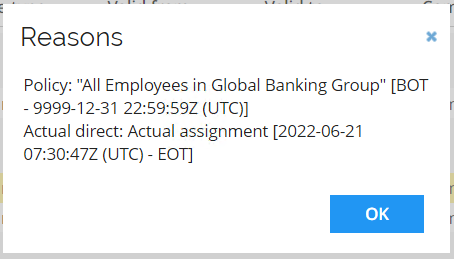
The status has now changed to: Actual Direct: Actual assignment
[<timestamp>]because of the reconciliation import.Alternatively, you can decide to show the Onboard Employee process first and then go to Identities to show which assignments is assigned automatically.
Email notifications
You can click the papercut icon in the taskbar or notifications area to open the Papercut inbox all emails will be shown here. There will be three email notifications regarding the new employee:
- Employee onboarded, Account created, Initial password information
Onboard Contractor (ILC01.03)
Contractors are people who will be working in the company for a limited period. Omada has a standard process used for onboarding a contractor.
As contractors are not sourced from the HR system, the identities are imported to the Warehouse from Enterprise Server via the auditing database.
-
Log in to the Portal as Robert Wolf.
-
To have access to the onboard contractor process, a user must be a manager.
-
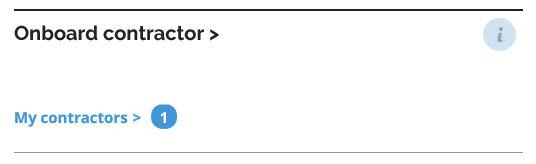
From Services, click Onboard contractor.
-
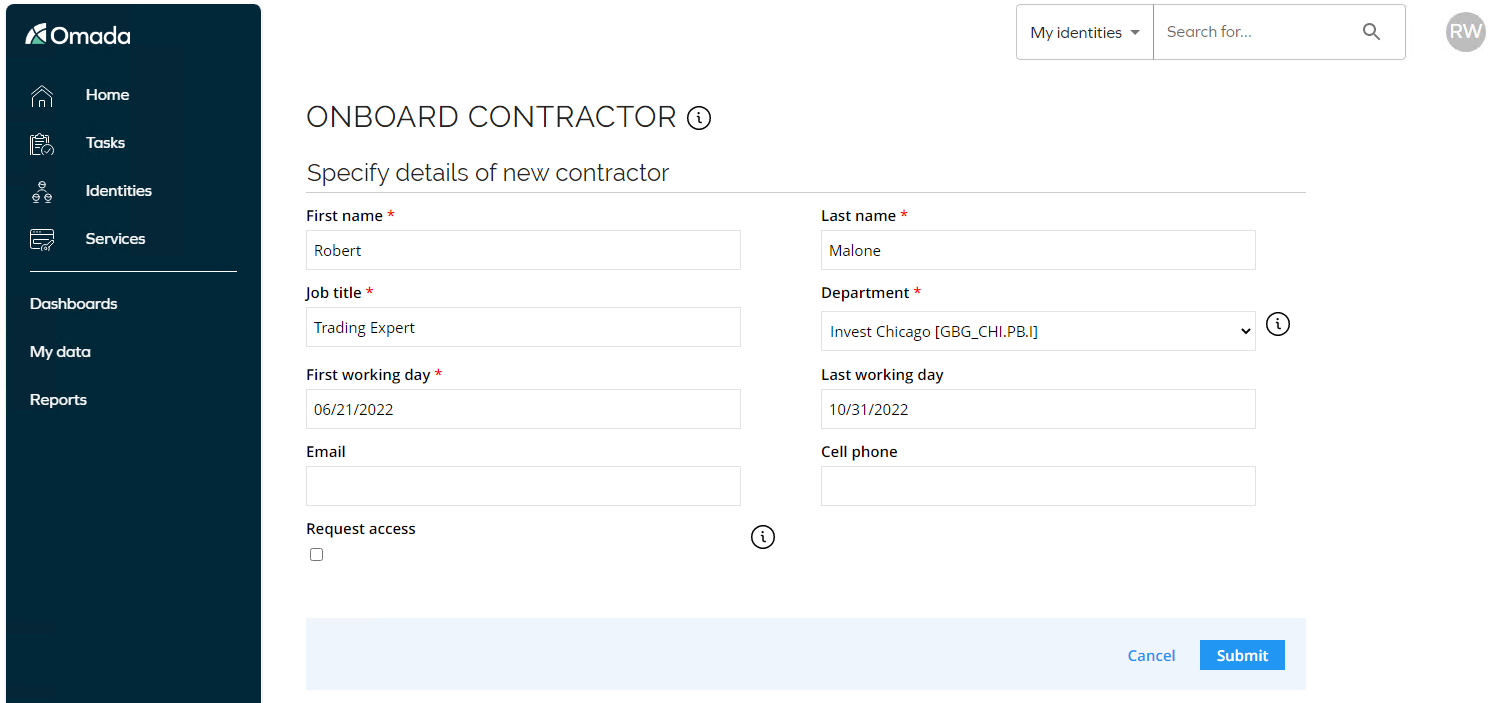
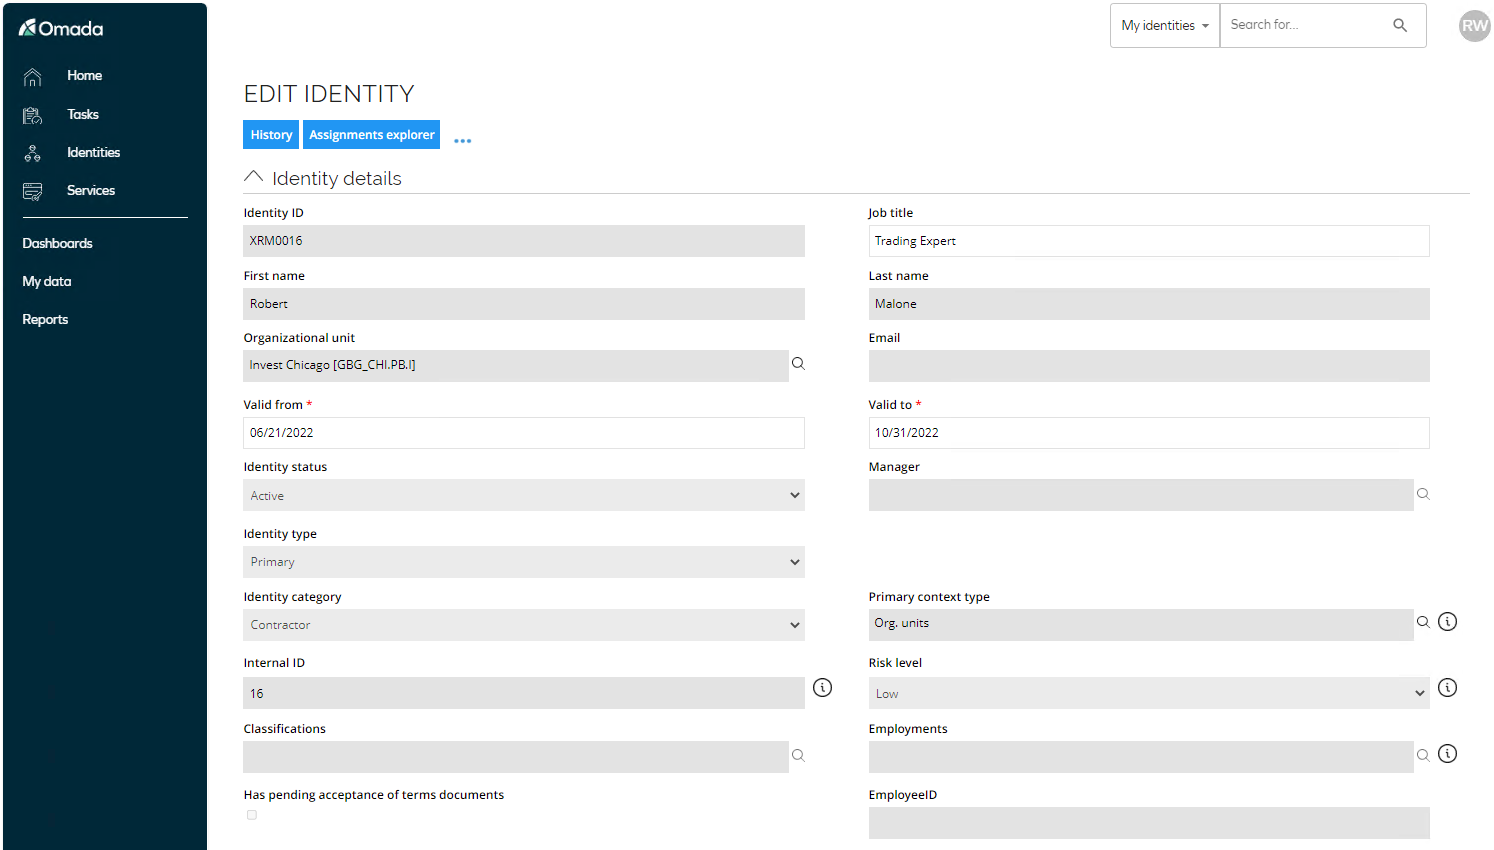
In the Onboard contractor activity, enter a name and job title for the identity. The example uses Robert Malone, Trading Expert.
-
In the Department drop-down, select Invest Chicago.
-
By default, the First working day is set to today’s date.
-
Select a date in Last working day. There is a customer setting which prevents to assign a future date higher than 180 days, which will be checked when you Submit.
-
If the Request access checkbox is selected, an instance of the Request access process is started when the form is submitted. If you choose to select this checkbox then refer to the Access Request scenario for details about the request process.
-
Email and Cell phone fields are not mandatory fields and can be left blank.
-
Click Submit.
-
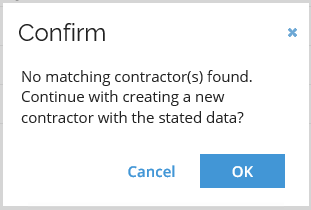
Omada Identity will check for duplicate entries, click OK to continue.
-
After submitting the request, you should receive a confirmation that it was successfully submitted.
-
Go to My Data > My Contractors. Here, you can see a list of Contractors you are responsible for. The new contractor has been given a user ID that looks different to the other user IDs we have seen.The algorithm that calculates the UID is different for contractors and the UIDs start with X.
-
Click on the new contractor to see the details.
-
Collapse the Identity Details to see the Resource Assignments.
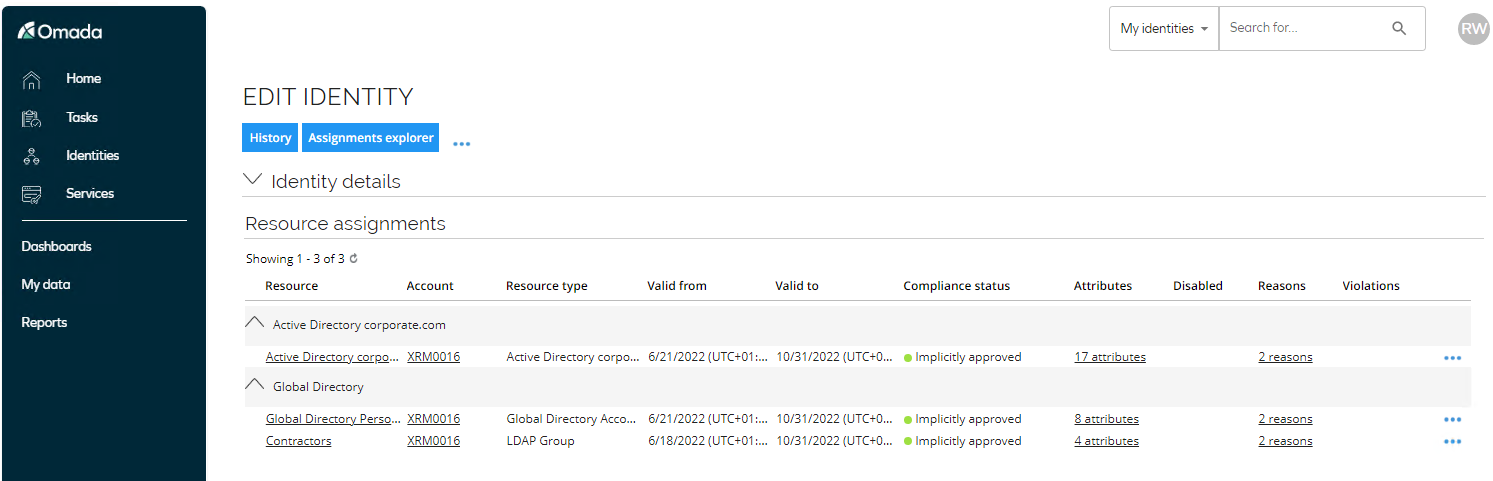
-
The Compliance status is Implicitly Assigned due to an Assignment Policy. By clicking Reasons, you can see the Desired and Actual State including which policy is used.
Transfer Identity (ILC02.02)
Before executing the Transfer Identity process, make sure that the identity being transferred already has at least one direct assignment from a request process. In this demo script, we expect to have already requested access to Invest Department Documents, Pension Department Documents, and Internal Accounts Department Documents in the Document management application.
This section demonstrates transfer activities for an employee changing departments. In the example we use Tracy Scully, a Trader – Stocks in Invest Chicago:
-
Double-click the HR System icon on the desktop. Click Modify Identity.
-
Search for “helbon” (or replace with the uid of the identity you want to use).

-
In the Job title drop-down, select Investment Advisor and in the Org. unit, select Invest New York.
-
Click Save and OK in the confirmation dialog.
-
Close the HR system.
-
Log in to the Portal as System Administrator and go to Setup > Administration > Connectivity > Import Profiles.
-
Select the import profile System category Global Banking Group HR System and click Start Import. The Import Progress will appear.
-
Click Ok and Close when completed.
-
Log in to the Portal as Robert Wolf.
-
Open the Review Assignments for Identity leaving your department task . The purpose of this task is to remove any irrelevant access and transfer relevant access to the new department.
-
Here the former manager can decide to Transfer, Remove, or Remove with grace for each assignment in the task. Only assignments requested based upon the employee’s previous context assignment (Org. Unit = Invest Chicago) or those without a context are shown.
-
Select to remove the assignments Pension Department Documents and set Internal Accounts Department Documents to Remove with grace. You need to set a date in Expiration date for any assignments where the decision is Remove with grace. Set all others to Traders and Invest Department Documents to Transfer.
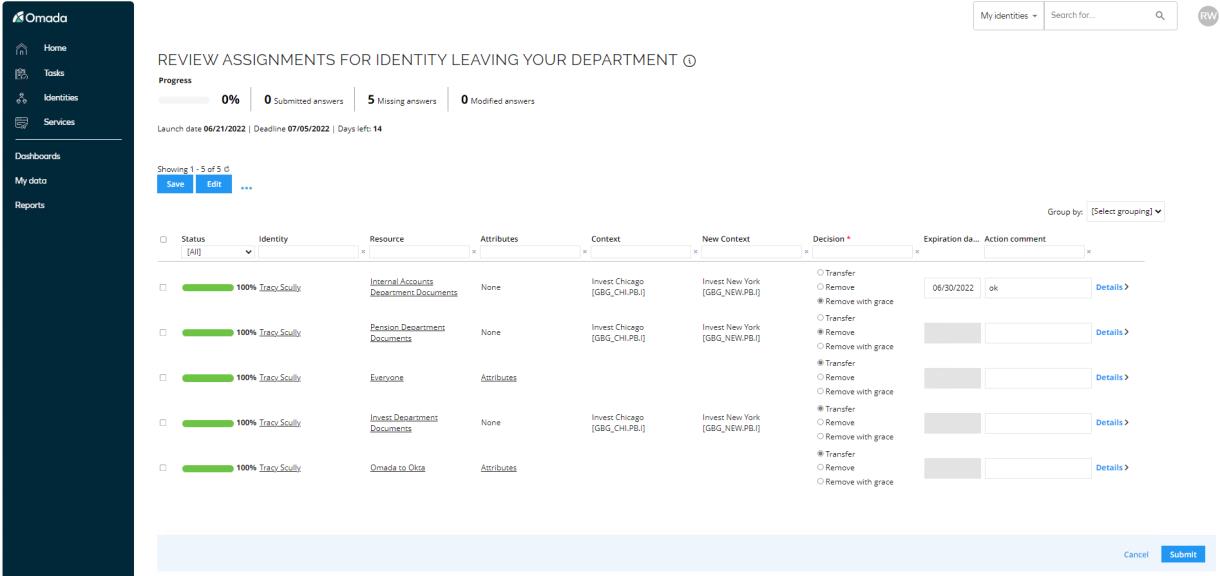
-
Click Submit to complete the process.
-
Log in to the Portal as Robert Scott.
-
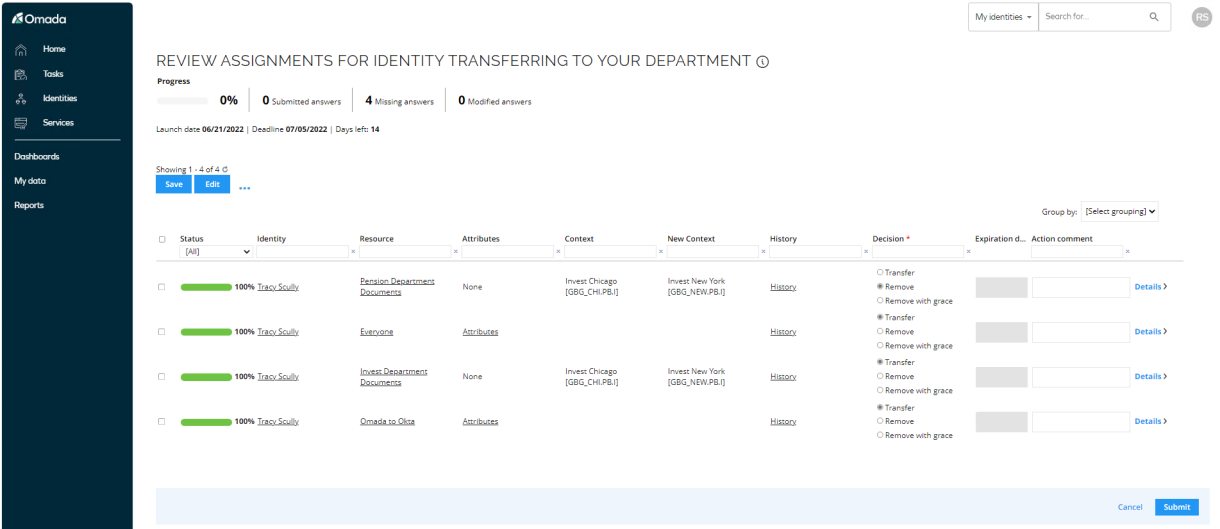
Open the Review Assignments for Identity transferring to your department task. The purpose of this task is to remove any irrelevant access and transfer relevant access to the new department.
-
Here the new manager can decide to Transfer, Remove or Remove with grace for each assignment in the task. Only assignments requested based upon the employee’s previous context assignment (Org. Unit = Invest Chicago) or those without a context are shown.
-
You can click History to see what the former manager answered. Those that were set to Remove with grace are not included.
-
Select to remove the assignments Pension Department Documents. Set Transfer for the remaining assignments.
-
You can add a comment if you wish.
-
Click Submit to complete the process.
-
Go to Identities and open Tracy Scully identity record.
-
Notice that the valid to date for the Internal Accounts Department Documents is set to the Expiration date set in the transfer process. This is because we set the assignment to be removed after a grace period. After the grace period, the assignment will be removed.
-
Notice that a new resource assignment for Write Documents has been assigned automatically due to the employee’s new job title – in the reason column you can click on Policy to see the name of the assignment policy.
Offboard Identity (ILC03.01)
This section of the demo shows the activities for offboarding an employee.
-
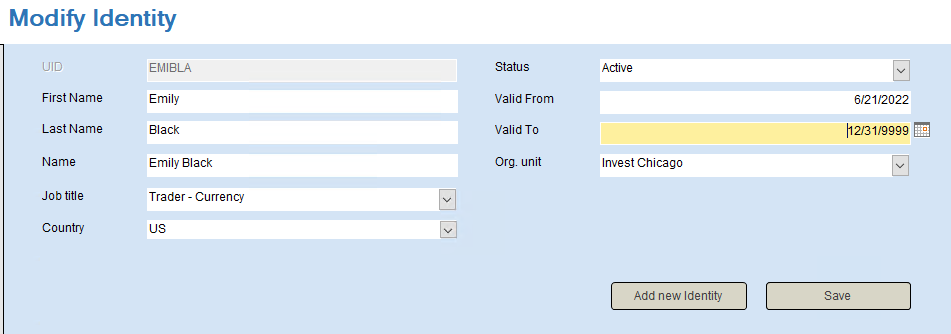
Double-click the HR System icon on the desktop. Click Modify Identity.
-
Search for emibla in the search field in the bottom of the form.
-
Select the same job title and org. unit as in the transfer scenario.
-
In Valid to, click Today, and then change the date to yesterday’s date. The date format is MM/DD/YYYY.
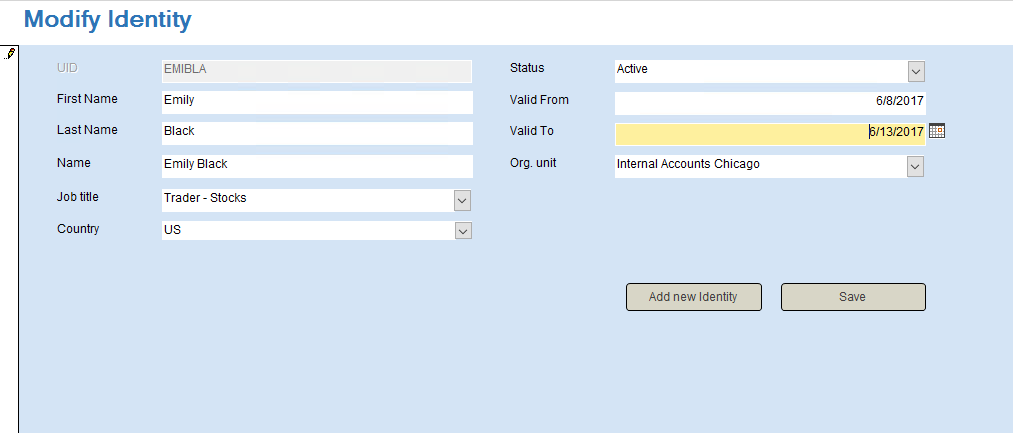
-
Click Save and OK in the confirmation dialog.
-
Log in to the Portal as System Administrator and go to Setup > Administration > Connectivity > Import Profiles.
-
Select the import profile System category Global Banking Group HR Systemand click Start Import. Close the HR system and double-click the Import Export icon on the desktop.
-
After the import is completed, log in to the portal as the manager Robert Wolf. Go to Identities and search for and open EMIBLA.
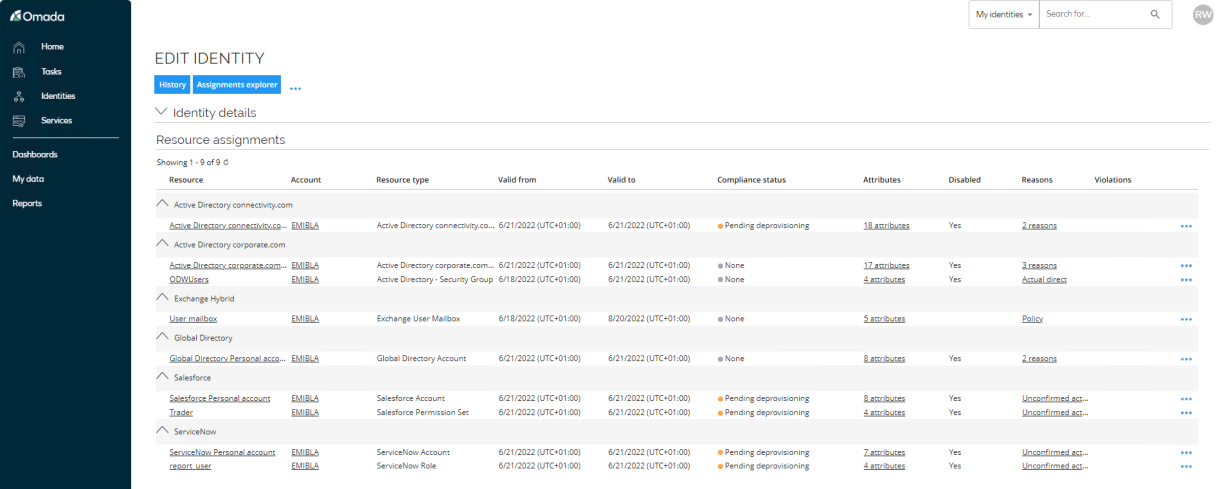
-
Notice the assignments for the logical applications are all removed. The accounts for AD, LDAP, and the Mailbox are still available – we have set a post validity period on those resource types, so they are not removed when the identity is expired.
-
You can maintain the post validity period in the portal as System Administrator under Setup > Master Data > Resource Management > Resource Types.
-
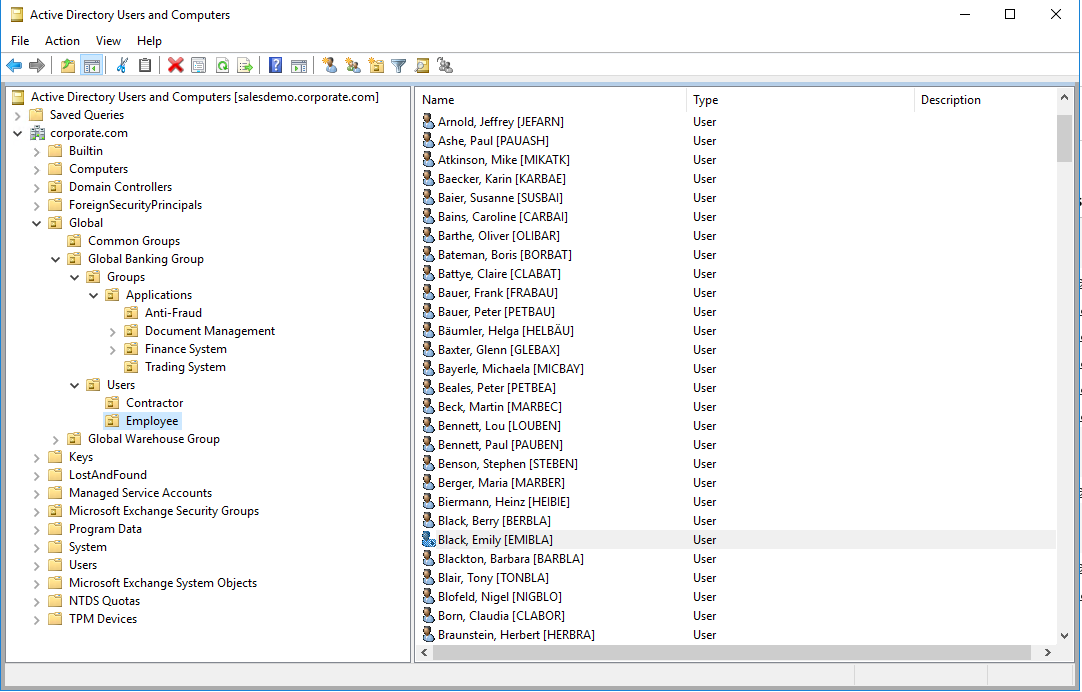
Open Active Directory from the desktop go to below ou. Notice that Emily Black is disabled, after 90 days the account will be deleted.
Re-hire Identity (ILC01.02)
This scenario is used to demonstrate when an identity is returning to the organization after, for example, parental leave, the previous assignments are being allocated automatically again – if the employee returns to the same department and has same job title.
-
Double-click the HR System icon on the desktop. Click Modify Identity.
-
Search for emibla in the search field in the bottom of the form.
-
Select the same job title and org. unit as in the transfer scenario.
-
In Valid to, change the date to 12/31/9999.
-
Click Save and OK in the confirmation dialog. Log in to the Portal as System Administrator and go to Setup > Administration > Connectivity configuration > Import Profiles.
-
Select the import profile System category HR – Global Banking Group and click Start Import. The Import Progress will appear.
-
Click Ok and Close when completed.
-
After the import is completed, log in to the portal as the manager Robert Wolf. Go to Identities and search for and open EMIBLA.
-
Notice that the employee has automatically been assigned her previous assignments.
Create Technical Identity (ILC01.04)
The Request technical identity process is available for system owners to request that a new technical identity is created for service accounts related to their system.
Highlights:
- The active user can only select systems for which they are the owner.
- Identity owner is prefilled with the identity of the active user.
- Last name is prefilled with the system name when a system is selected.
- The system calculates the Identity ID by using the pattern
T<sequence number>, for example, T0012. You can configure the prefix (T) and the number of digits (4).
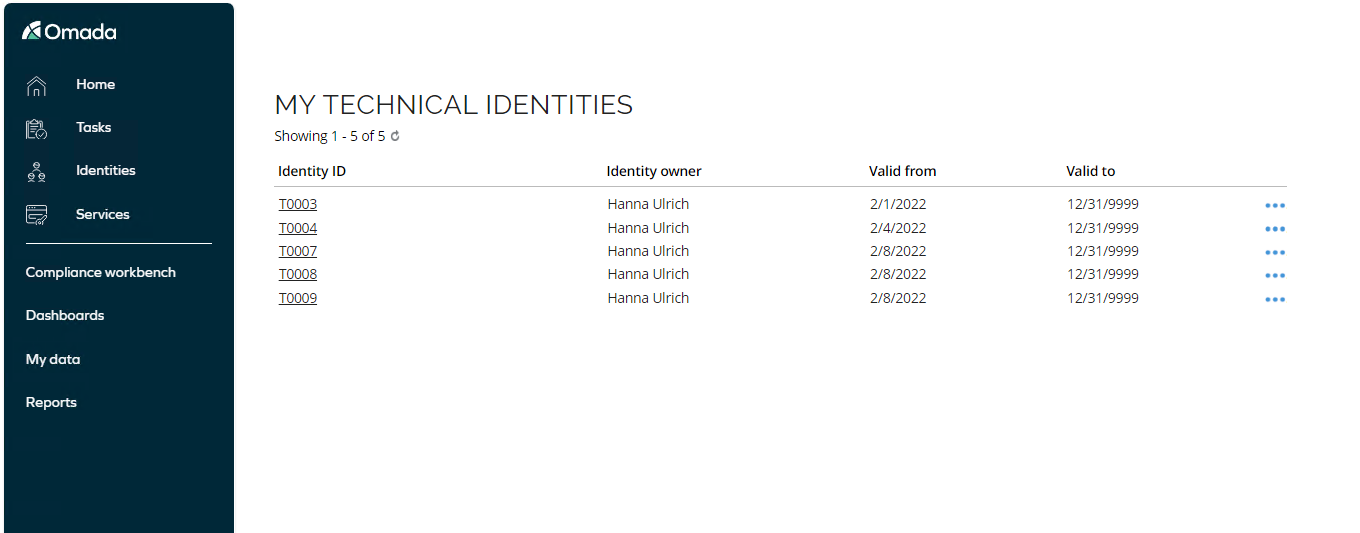
A new view called My technical identities is available from the My Data and from the Services menu.
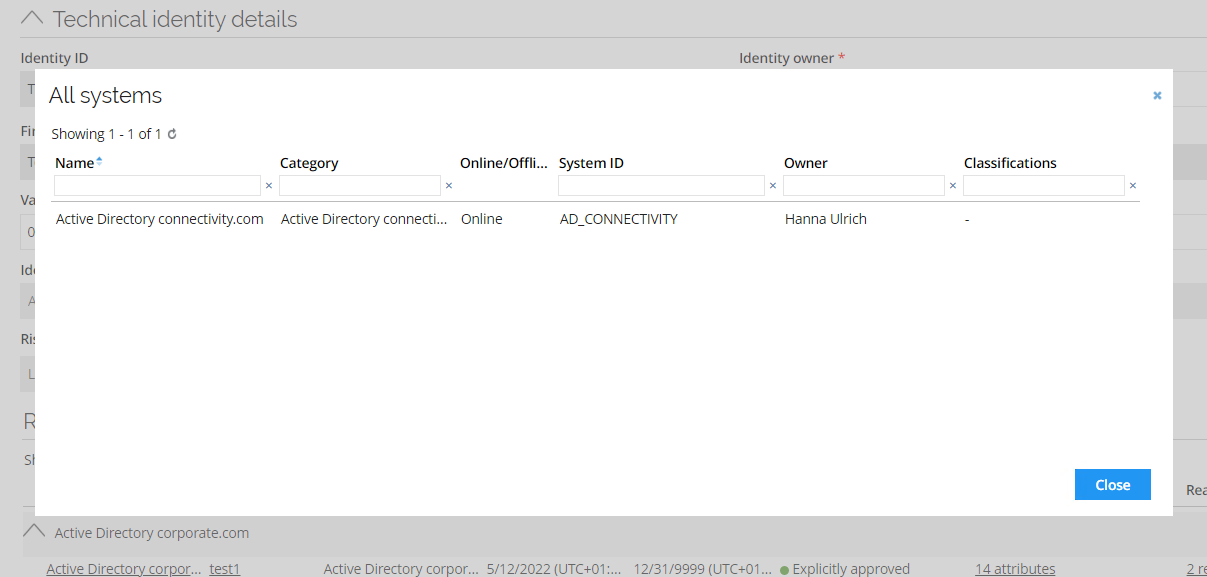
Data administrators have a toolbar menu item in the Identity form to see related systems for a technical identity:
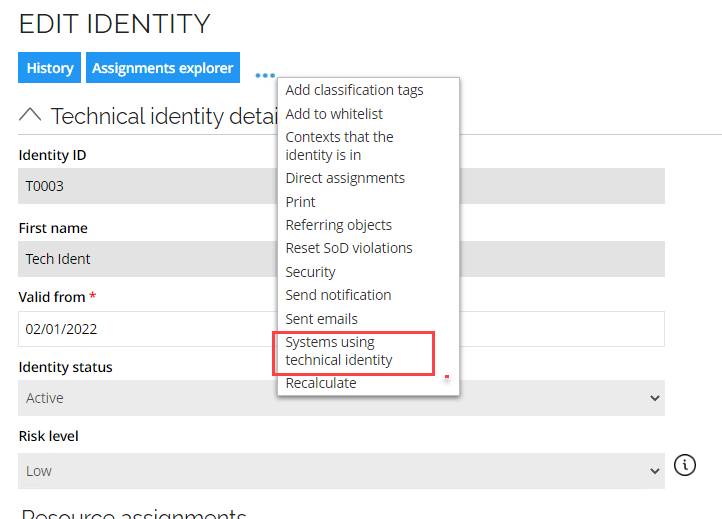 \
\
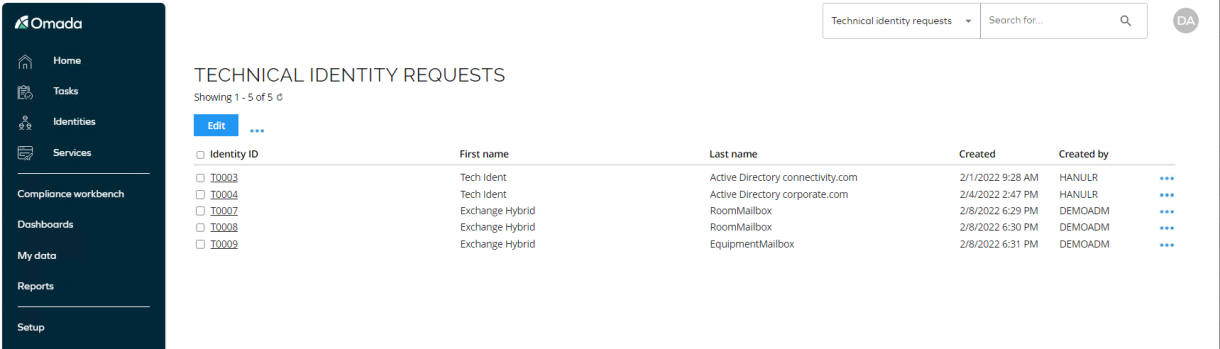
The Technical Identity Requests view is located under Setup > System operation > Requests.
From the Access request, an identity owner can select owned technical identities:
-
Log in to the portal as Hanna Ulrich, owner of Active Directory and Exchange.
-
Select Services > Request technical identity.
-
In Systems, select Active Directory corporate.com, the rest of the properties are auto-populated and can be left with default values.
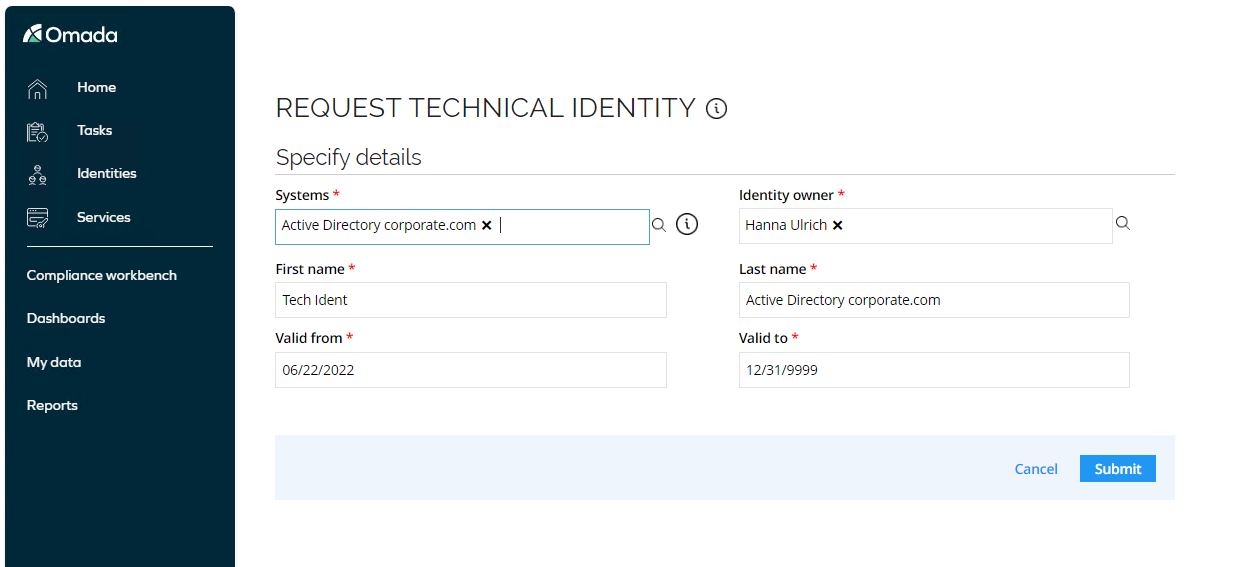
-
Click Submit to create the technical identity.
-
Go to My Data > My Technical Identities to display the new identity.\

-
Use the Request Access scenario to assign accounts and resources to the identity.
Transfer Ownership (GOV02.04)
The feature is designed to run when a regular human identity is no longer with the company (terminated), after which the organization must transfer the objects that the no-longer employed human identity owned to another human identity.
The survey starts automatically, and the assignees are calculated based on the type of each of the owned objects.
The survey currently manages the following ownerships:
- Technical identity - the system owner for the related system.
- (Human) identity - the manager of the identity.
- OrgUnit - the manager of the org.unit.
- Resource - he manager of the resource owner.
- Resource folder - the manager of the resource folder owner.
- System - the manager of the system owner.
- Constraints - the owner of constraints.
If the ownership of an object is under control of the Omada Identity management feature, and the owner is stated as an explicit owner that originates from the ODW, you cannot use the survey for removing the current ownership.
The assignee must appoint a new owner for the object. The new owner gets an approval task to accept the ownership. If the new owner does not accept the ownership, the ownership of the object is transferred to a member of the Data administrators’ group.
-
First, we need to terminate an identity. Log in to the portal as System Administrator.
-
Go to Setup > Master Data > Identities. Search for Nancy Francis and select the identity. Click the … icon.
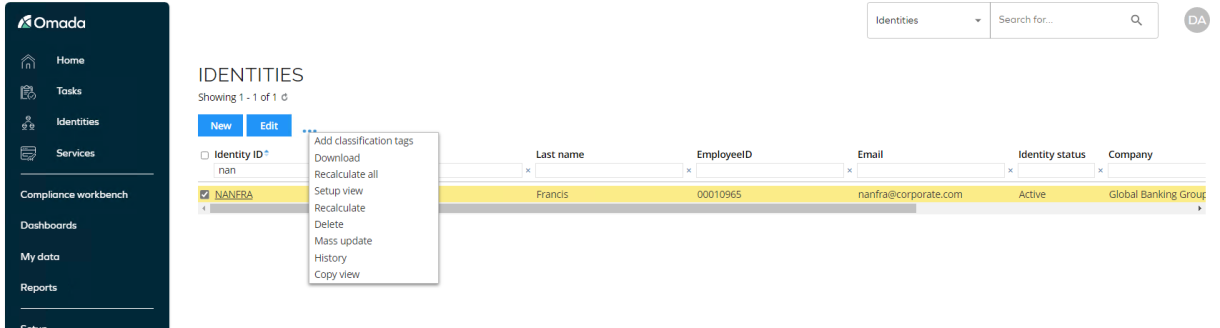
-
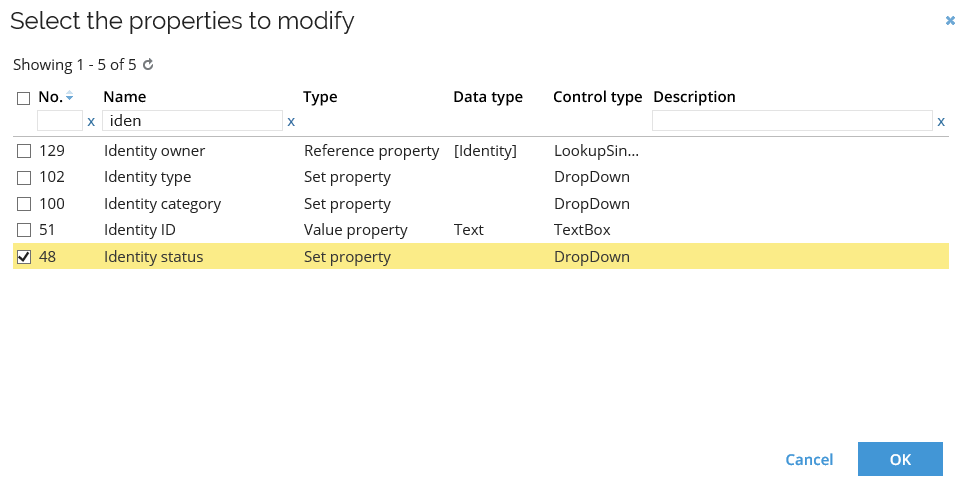
From the dropdown menu, select Mass update. Search for and select Identity status.
-
Click OK and set Identity Status to Terminated.
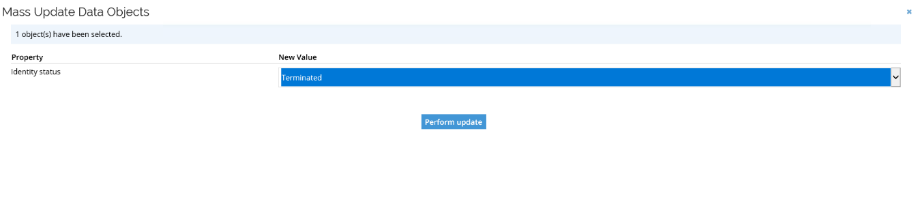
-
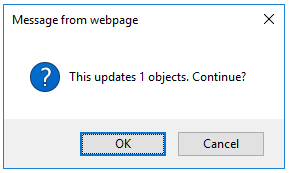
Click Perform update and OK.
-
Nancy Francis is now set to Terminated and a Transfer ownership survey is automatically launched based on an event definition.
-
Log in to the portal as Nancy’s manager, Robert Wolf.
-
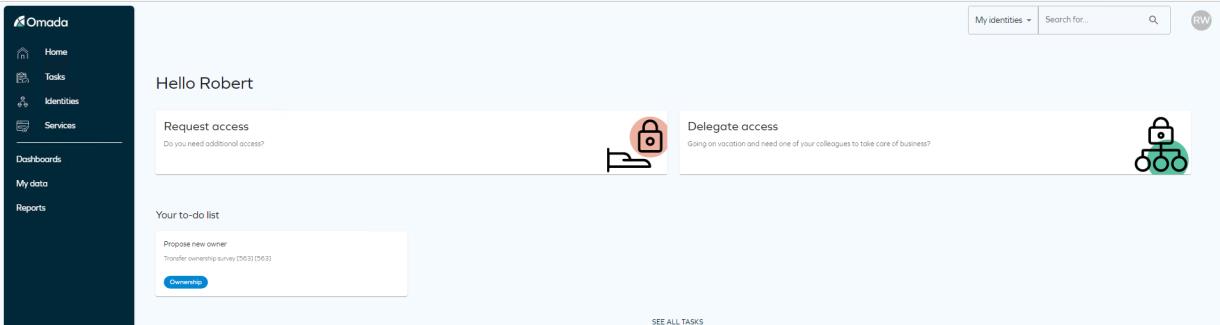
Execute the task Propose new owner for the Transfer ownership survey.
-
Robert Wolf is presented with a list of objects, for which Nancy Francis was assigned as owner.
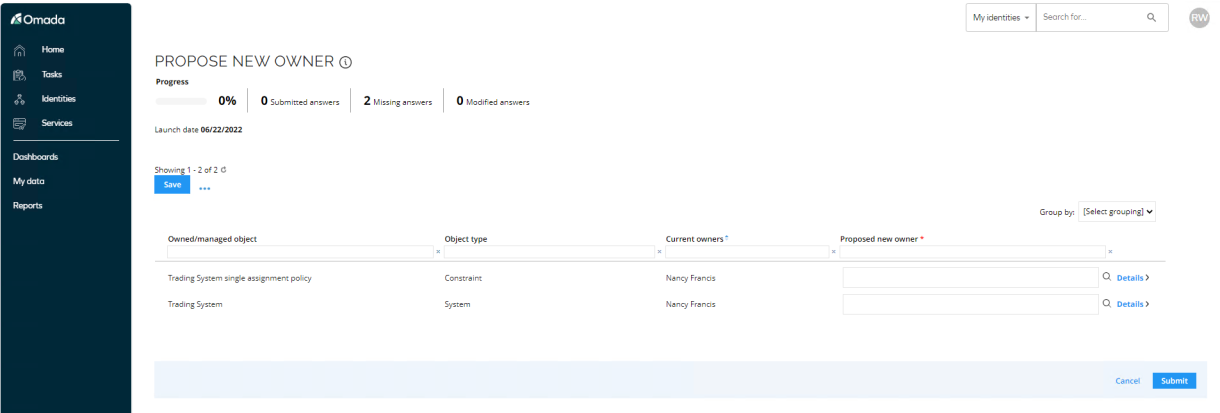
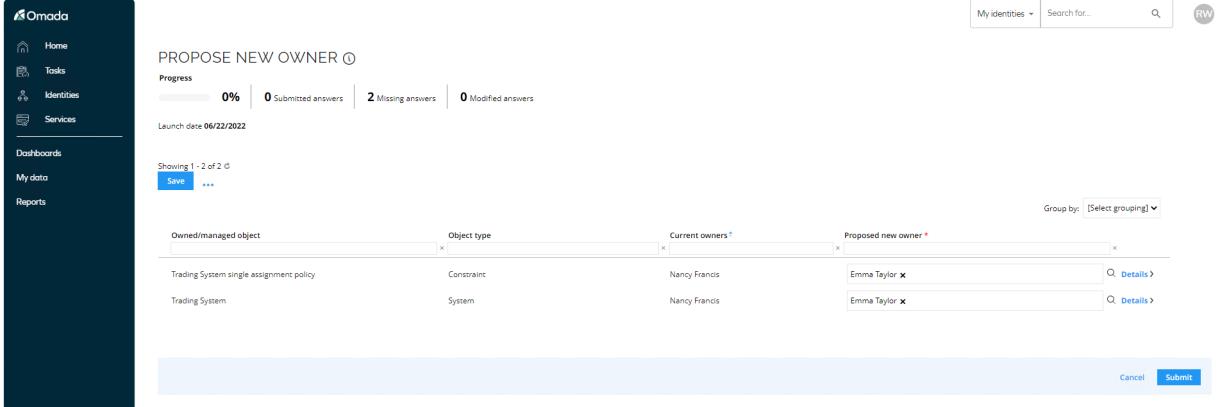
-
To avoid logging in as too many different owners, choose Emma Taylor as owner for all the objects.
-
Click Submit.
-
Log in to the portal as Emma Taylor, execute the task Proposed owner approval.
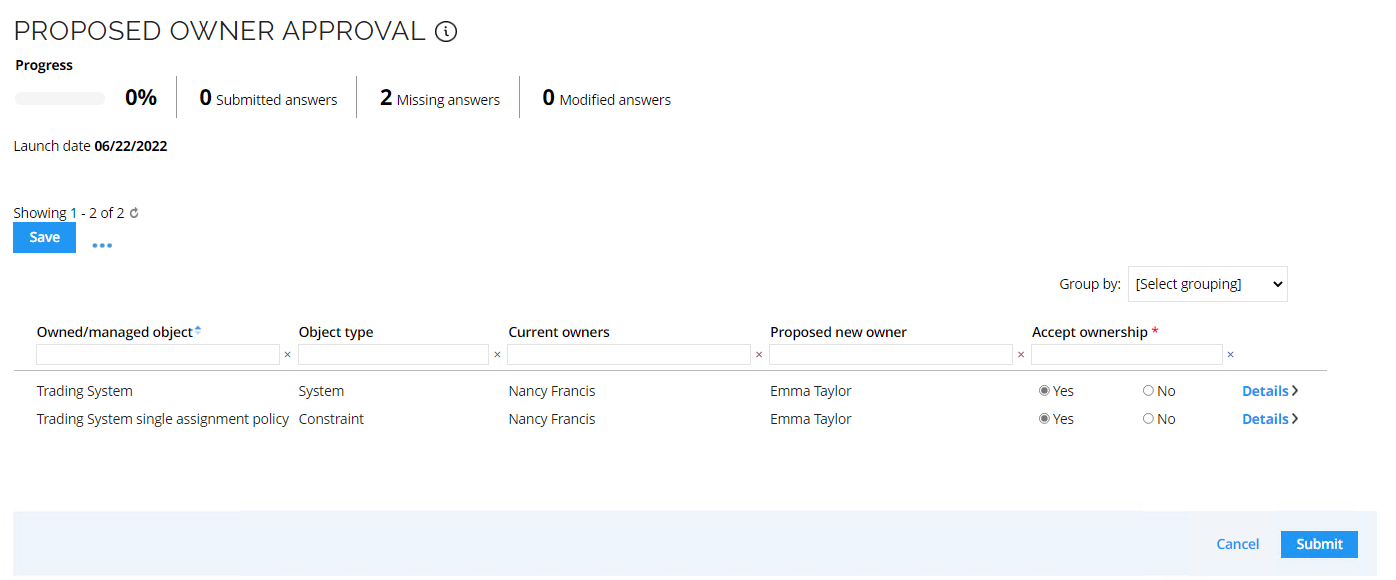
-
Accept ownership of all objects and click Submit, the ownership will now be transferred to Emma Taylor.
-
Go to My Data and display the new objects assigned to Emma Taylor. Look at My applications.
Emergency lockout (ISB01.01)
In some cases, it may be necessary to lock out one or more identities from using any type of system connected to Omada Identity, typically in case of a security breach or other system irregularities. Use the emergency lockout feature to handle such types of incidents.
Omada Identity includes a package named Emergency lockout. It contains two process templates for locking out identities and for revoking the lock of locked out identities:
- Emergency lockout
- Revoking emergency lockout
You can use and access both processes from the All Services menu, which you can find in Setup > Administration > More… > Services….
You can use the emergency lockout process to disable accounts for multiple identities. Members of the Managers user group and members of the Operation admins user group can start the process. You must specify two fields to complete the process.
-
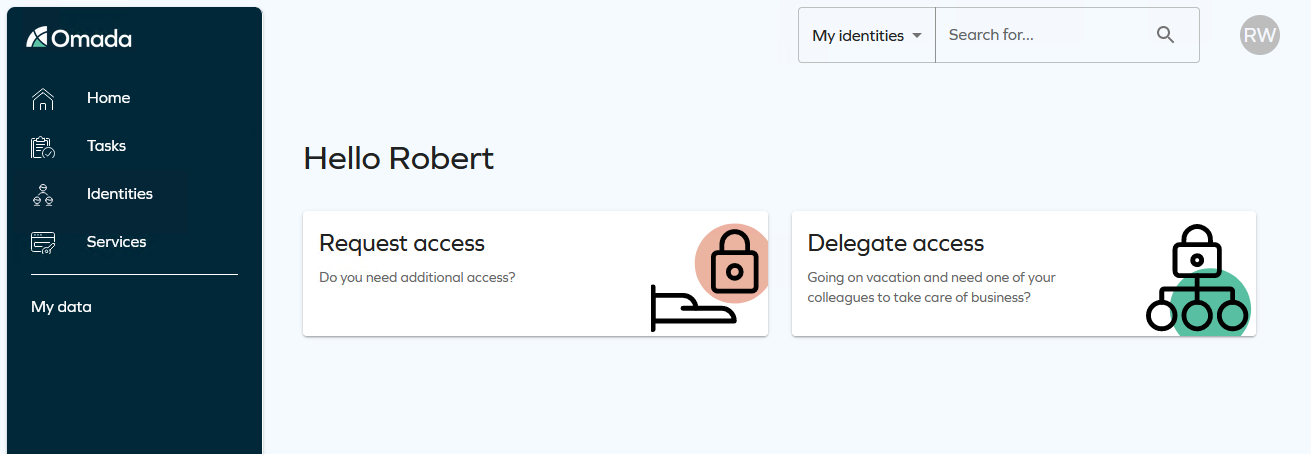
Log in to the portal as Robert Wolf. Go to Services > Emergency Lockout.
-
Select Emily Black, provide a reason, and click Submit.
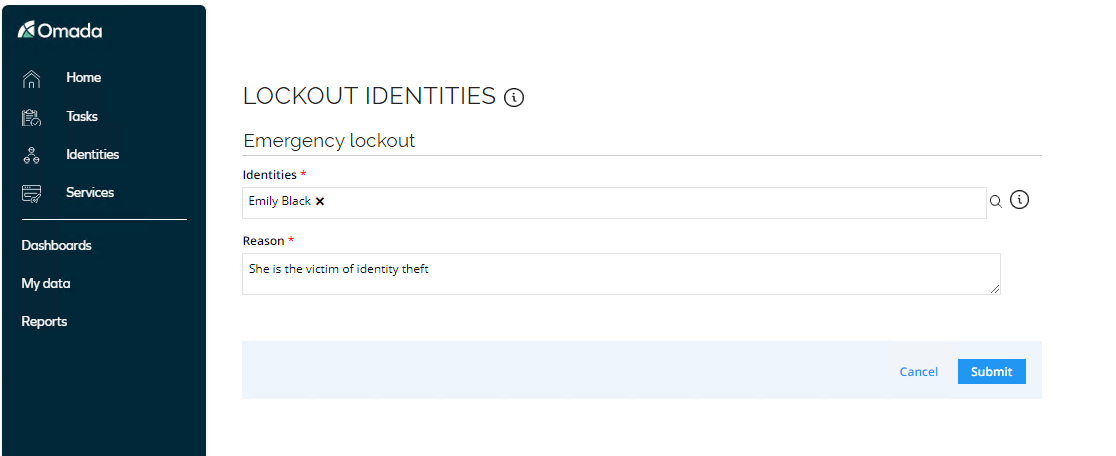
The identity status value of the locked-out identities is then set to Locked.
-
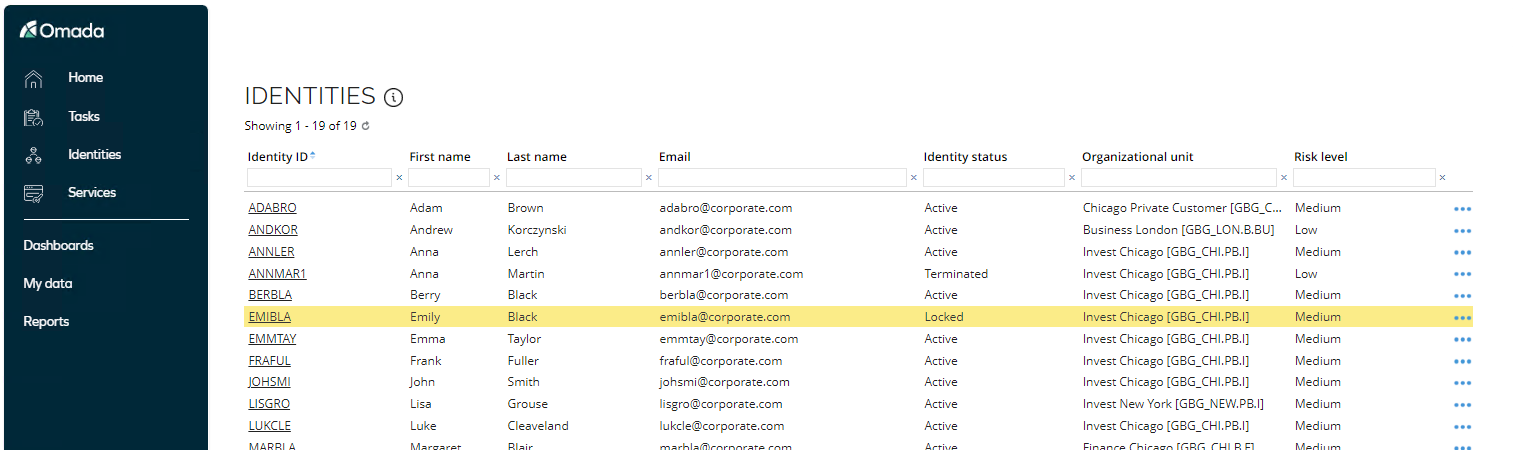
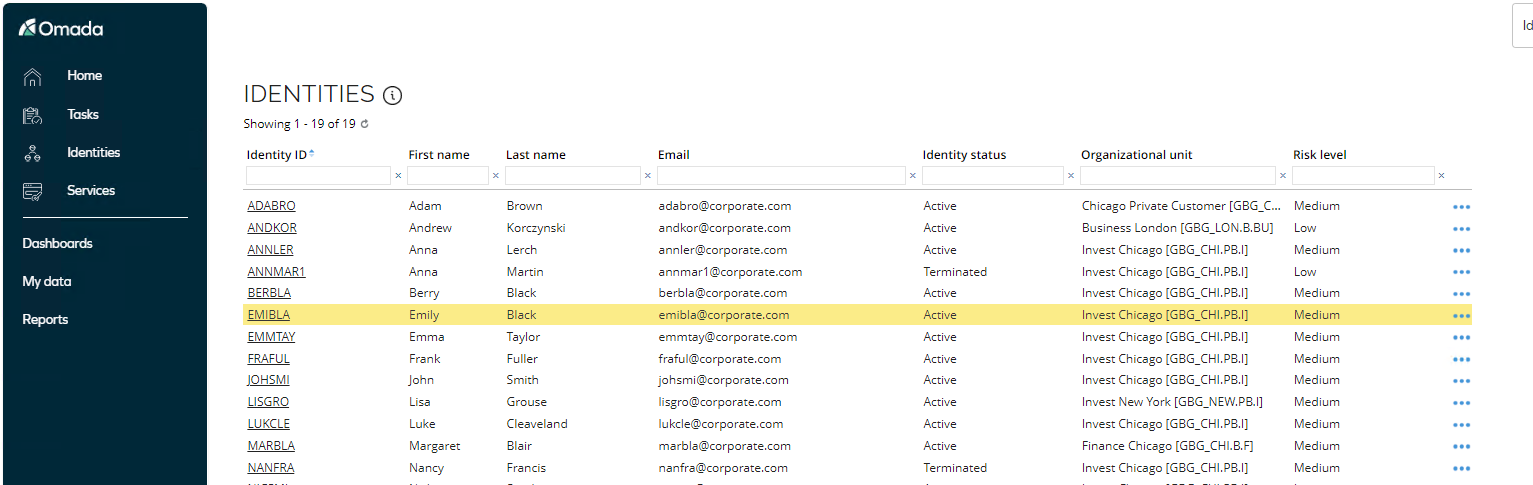
Go to Identities to verify that Emily Black is now set to Locked.
-
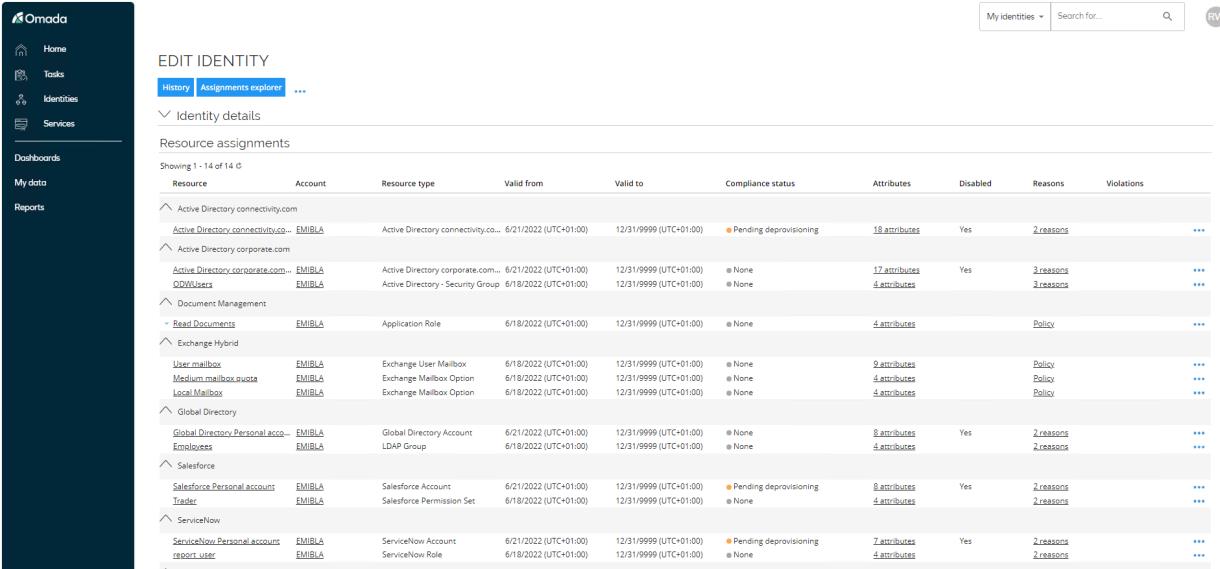
Open Emily Black to see the resource assignments are disabled, and if you check in Active Directory User and Computers you will see her user account has been disabled.
Revoking emergency lockout (ISB01.02)
Use the emergency lockout process to re-enable accounts for multiple identities that have been set to Locked. Members of the Managers user group and members of the Operation admins user group can start the process. You must specify two fields to complete the process.
-
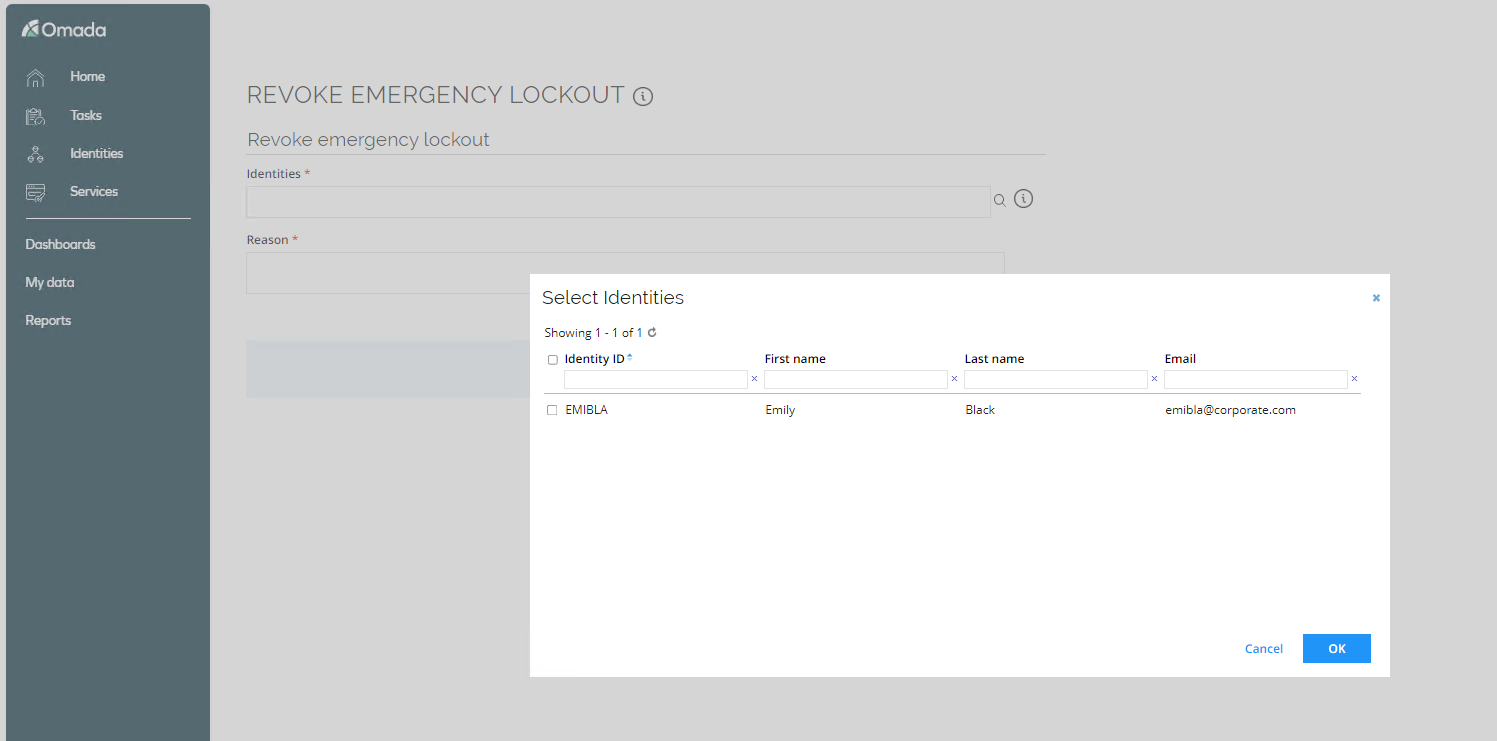
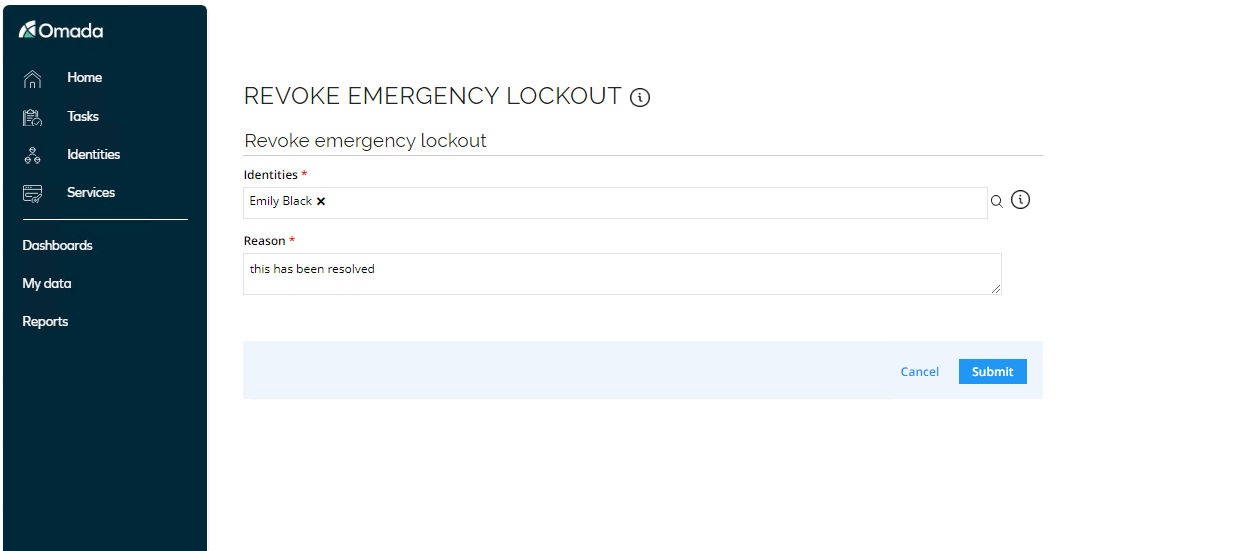
Log in to the portal as Robert Wolf. Go to Services > Revoke Emergency Lockout.
-
Select Emily Black and click OK. Notice you can only select identities which has previously been locked out.
-
Provide a reason and click Submit.
-
Go to Identities to verify that Emily Black is now set to Active.
-
Open Emily Black to see the resource assignments are enabled again, and if you check in Active Directory User and Computers you will see her user account has been enabled again.
My lockout and revocations view
Access the My lockout and revocations view from My data > Manage. This view contains an entry for each lockout and revocation that the active user has made.
The Type column displays either Lockout or Revocation, depending on the type of process that the user has run for that specific identity.

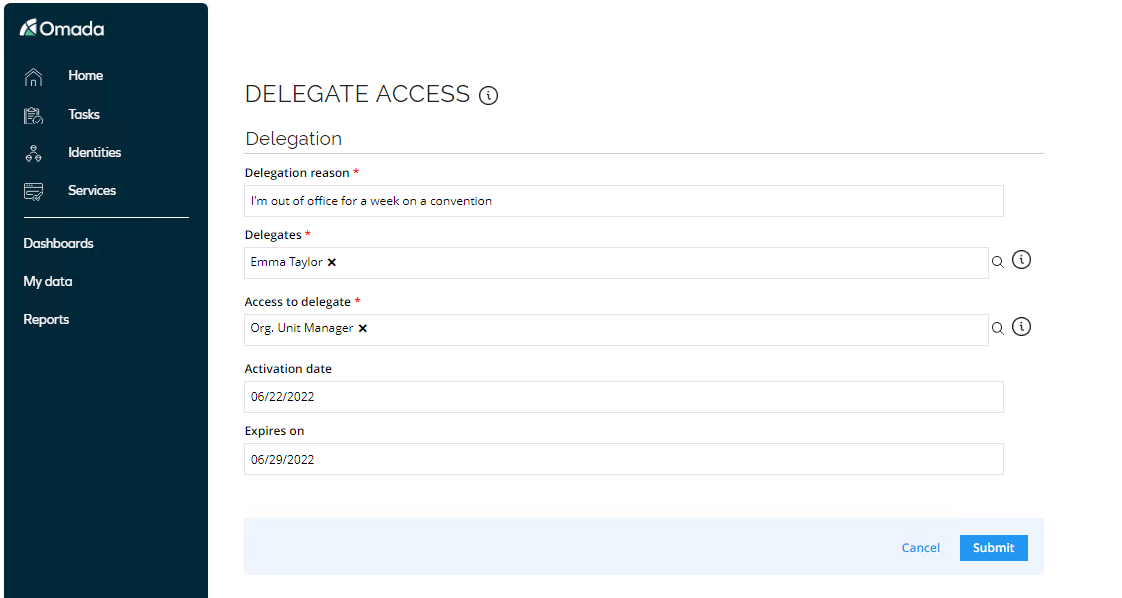
Delegate Access (AM02.03)
The Delegate access process allows identities to delegate their access to someone else for a limited period, such as vacations and leaves of absence. It is typically used by managers/owners to delegate their approval responsibility.
This ensures that duties can be performed by someone else, and at the same time provide an audit trail to document who had access to what at any given time.
It is a prerequisite that the relevant resource types are allowed to be delegated. Verify that via Setup > Master Data > Resource Management > Resource Types. Only the Omada Identity roles has been set to allow delegation.
-
Log in to the Portal as Robert Wolf.
-
Click Delegate access.
-
The user delegating access needs to fill in the following information:
- Delegation reason – a comment that describes the reason for delegating the access rights.
- Delegates – the identities to delegate to.
- Select George Dunne.
- Access to delegate – the access to delegate to the delegates.
- Select Org. Unit Manager. This is the only resource assignment which Robert Wolf can delegate.
- Activation date – the date the delegation becomes active.
- Set the Activation date to today.
- Expires on – the end date of the delegation. After this, the access is removed from the delegate(s).
- Set the Expires on to a week from now.
-
Click Submit.
-
Log in to the Portal as System Administrator. Go to Setup > Identities and search for and open Emma Taylor. Collapse Identity Details and click Reasons next to the resource assignment for Organizational Org Unit Manager.
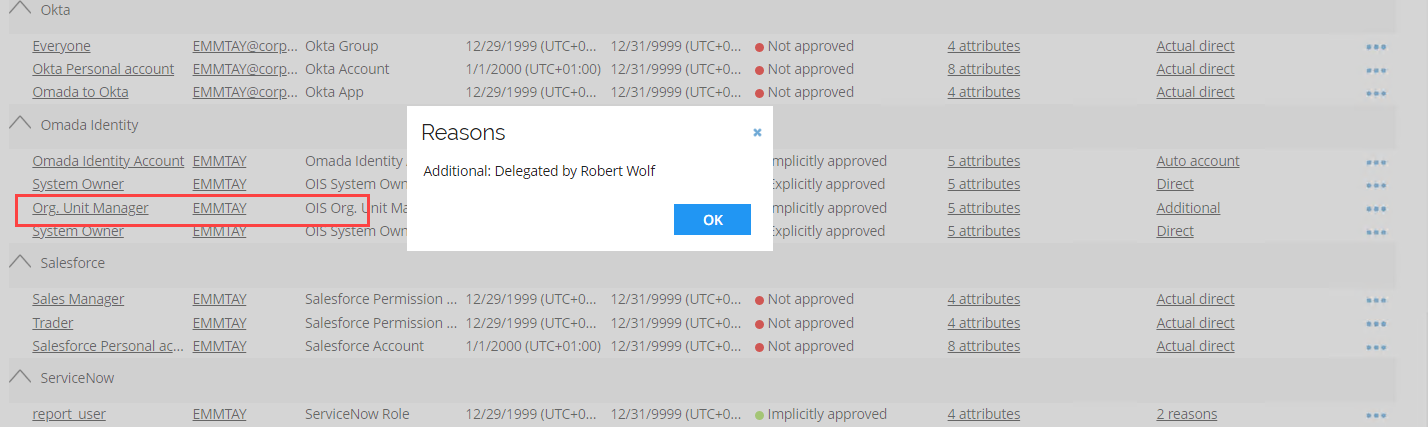
Notice the additional assignment which was delegated by Robert Wolf.
Signup Identity (ILC01.05)
The Signup Identity scenario is about providing an external facing portal for customers, business partners, and other audiences who are not part of the company’s own organization – to allow them to self-register for access to IT services.
The CIAM portal can use an external Identity Provider (IdP) for authentication using SAML or OpenID Connect, amongst others Azure AD, Azure AD B2C, PINGFederate, and Identity Server are supported.
For the demo, we have decided to install and use the open-source solution Identity Server, to not have any dependencies regarding licenses and connectivity to external IdP’s.
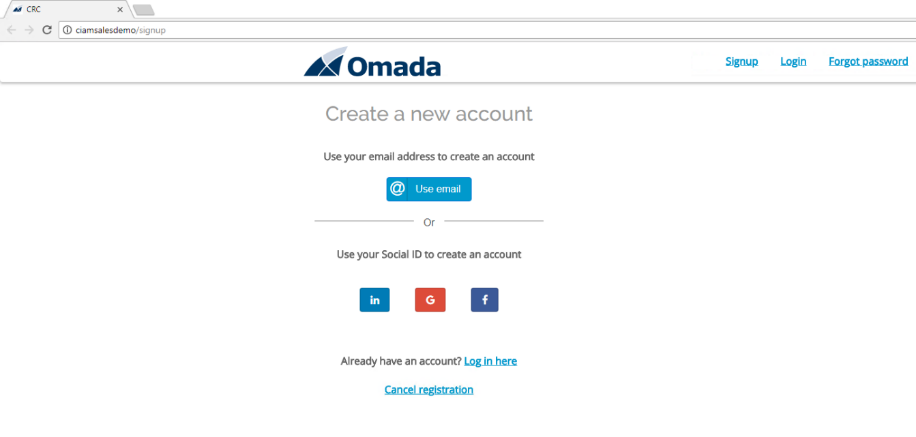
Register (Signup) Identity
-
Launch Chrome from the task bar in Windows.
-
Chrome will automatically open the below frontpage of the CIAM portal.
-
Click Use email to register a new Identity.
-
Type in an email address who have not used before from the range mentioned in the Preparations section and assign a password (i.e. Omada1234!).
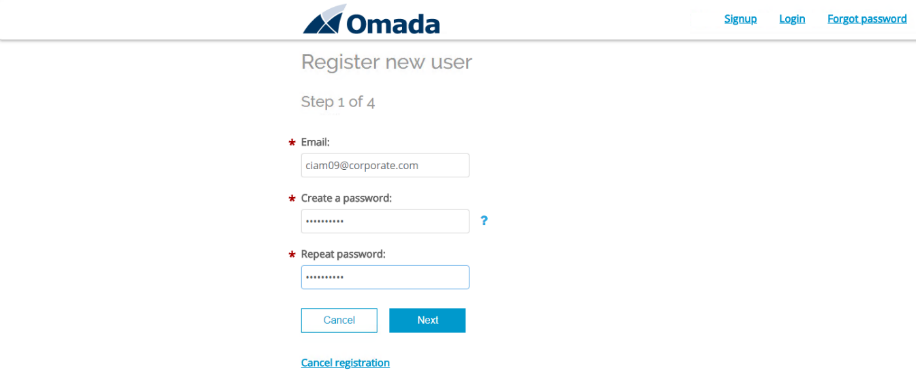
-
Click Next.
-
Fill out as a minimum the required fields and click Next.
-
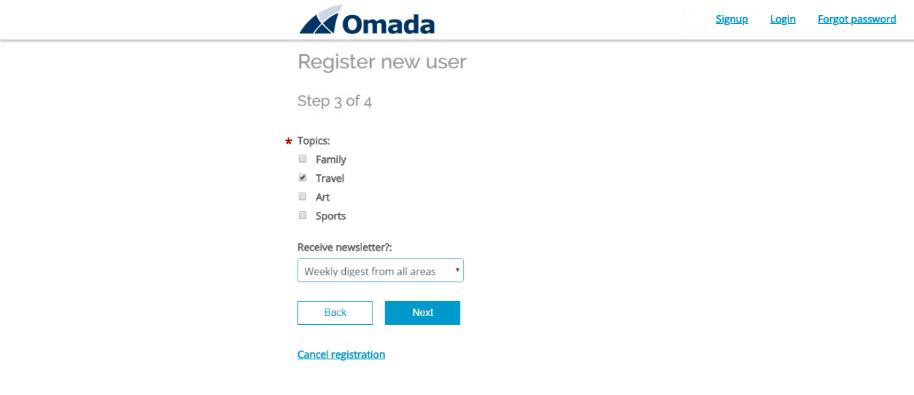
. Select at least one topic and decide regarding receiving newsletter.
-
Click Next.
-
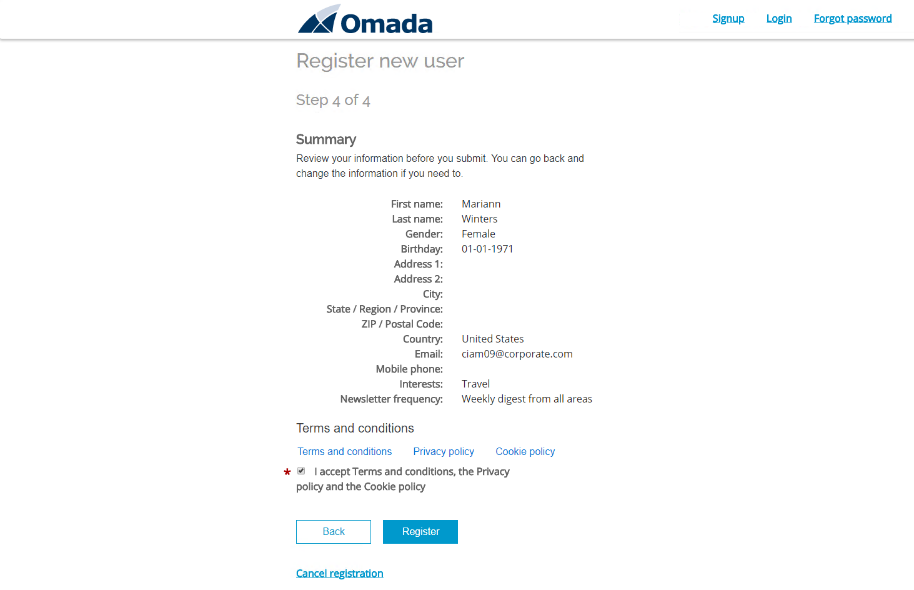
You are presented with a summary – read and accept the Terms and conditions.
-
Click Register.
-
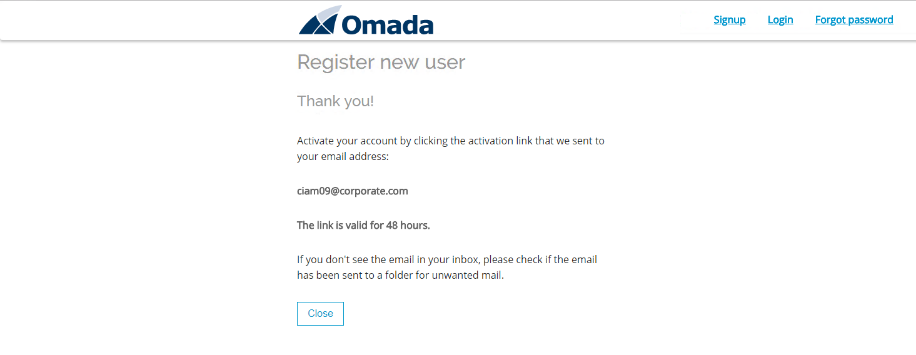
Confirmation is returned. Click Close which will return you to the frontpage. Close the browser.
-
Open the inbox to verify the registration email is received – open Papercut SMTP from the taskbar.

-
Open the account activation email.
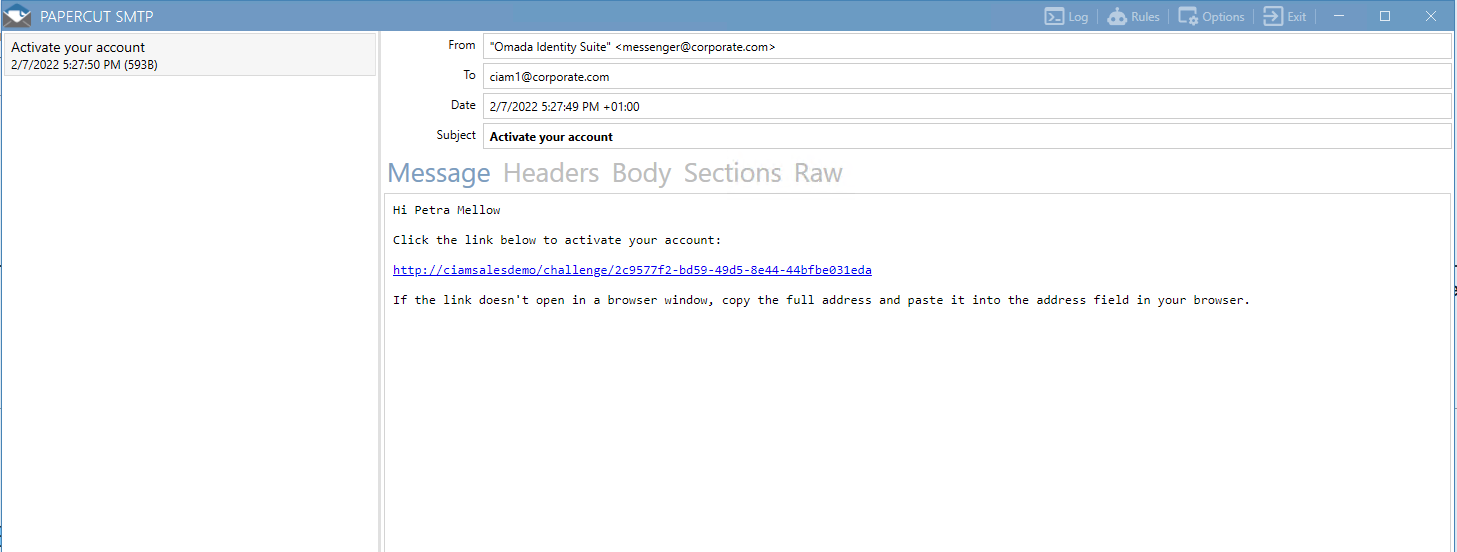
-
Click the link to activate the account. Log in to the portal - it redirects you to the Identity Server and asks you to authenticate with your username (email) and password (Omada1234!).
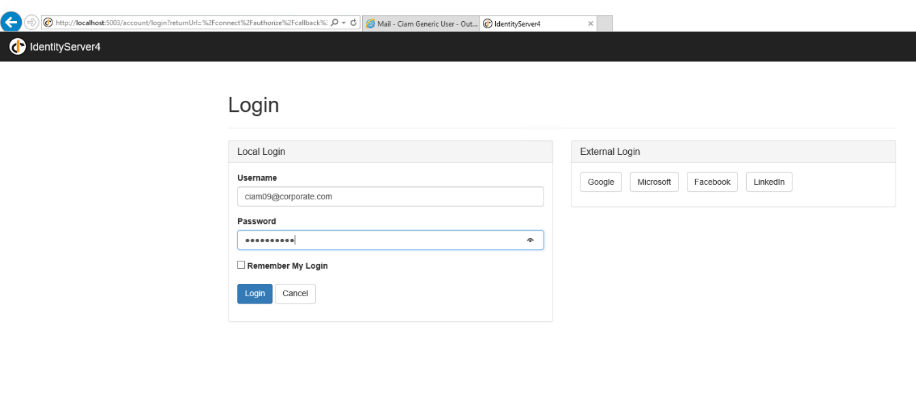
-
After logging in, you are redirected to the CIAM Portal.
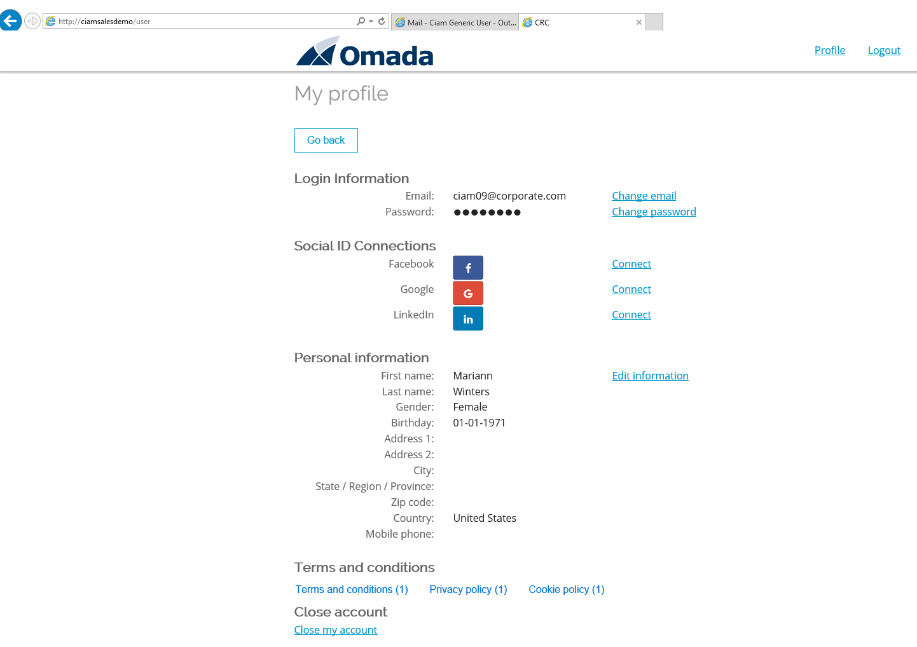
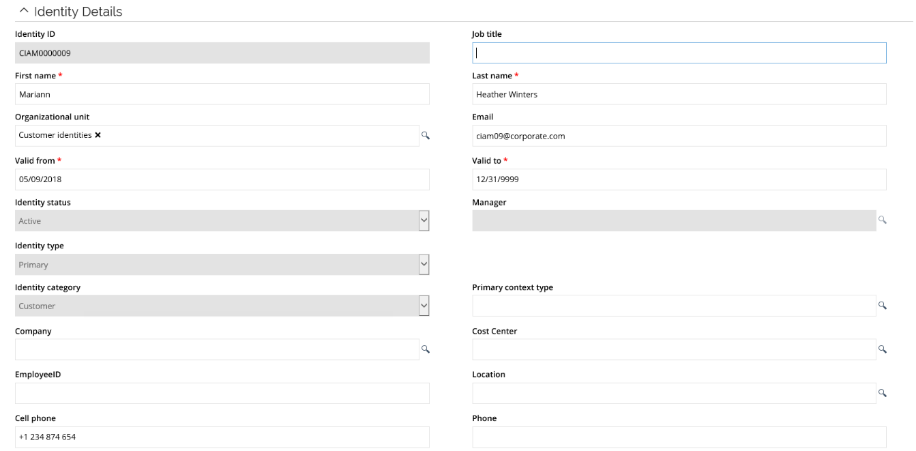
Maintain Profile (ILC02.07)
After you have successfully completed the sign up process, you are able to perform the Maintain Profile scenario:
-
Log in to the CIAM portal.
-
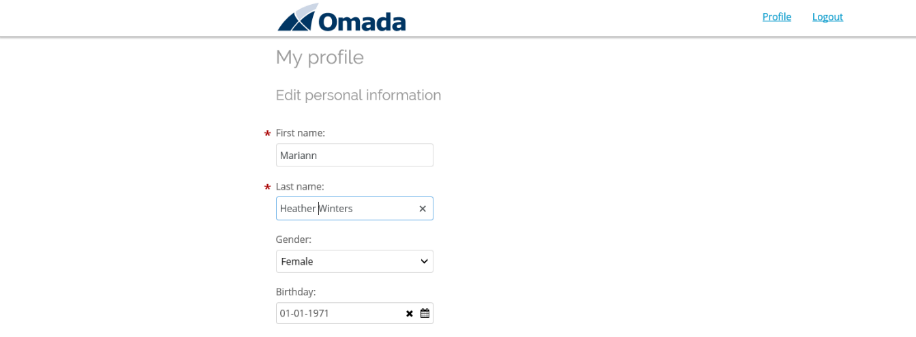
Select Edit information. You can now maintain most of the properties of the identity (which properties can be maintained are controlled in ES Portal).
-
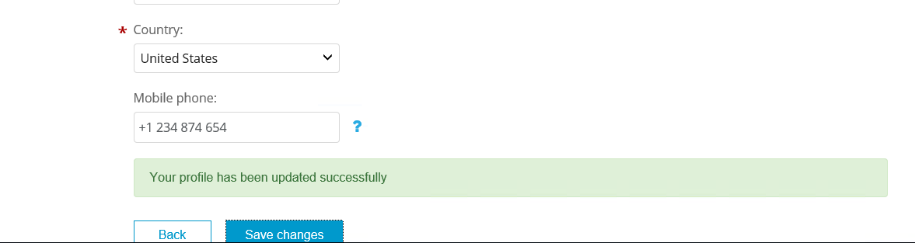
Modify the last name, scroll down, and add a new entry in mobile phone.
-
Click Save changes. A confirmation will appear.
-
Optionally, log into the Enterprise Server as Administrator. Go to Setup > Master Data > Identities and search for the identity for which the profile was updated. Verify it has taken effect also in the Enterprise Server.