Target system
Omada provides several Enterprise Services for reading and updating data in SAP. In addition, the custom transaction codes are also made available for the configuration of the employee extraction. The Enterprise Services can be imported directly into SAP HCM.
Prerequisites
Before you start to generate the Web services for the interfaces or object types, following prerequisites
-
Activate the required services in transaction SICF:
- sap/bc/webdynpro/sap/APPL_SOAP_MANAGEMENT
- sap/bc/srt (including sub-nodes)
-
Omada SAP Connectivity Add-On package must be imported with the ABAP Proxies.
Minimum required permissions
SAP HCM Connectivity in Omada Identity requires access to run transaction code SOAMANAGER in the backend system.
Required authorizations in SAP��
For configuration and execution of the Omada SAP HCM Connectivity package, you can use the SAP Connectivity Interface template role:
For the SAP HCM system:
- Y_OMADA_SAPMA_DEVELOPER_ECC
- Y_OMADA_SAPMA_CONSUMER_ECC
The SAP Connectivity Interface composite role for developers enable you to administer and configure service providers and consumer proxies for your local backend. The roles provide only normal SAP developer system access for the SAP backend.
The consumer role is to be assigned to the user used by OPS and ODW, and who connects to SAP and reads/updates/creates objects in SAP.
These roles are delivered as part of the Add-on package provided by Omada.
Role details
Y_OMADA_SAPMA_DEVELOPER_ECC
The SAP ECC composite role, Y_OMADA_SAPMA_DEVELOPER_ECC, contains the following single roles:
| Role name | Description |
|---|---|
| Y_OMADA_SAPMA_CONSUMER_ECC | Master role for Omada SAP MA, OPS, and ODW |
| Y_OMADA_SAPMA_WEBS_ADMIN | Web Service Administrator |
| Y_OMADA_SAPMA_WEBS_ADMIN_BIZ | User Role for Business Administrator |
| Y_OMADA_SAPMA_WEBS_ADMIN_TEC | Standard Role for Technical Administration of Web Services |
| Y_OMADA_SAPMA_WEBS_CONSUMER | Web Service Consumer |
| Y_OMADA_SAPMA_WEBS_DEBUGGER | Template Role for Web Service Debugger |
| Y_OMADA_SAPMA_WEBS_OBSERVER | User Role for Viewing All Web Service Information |
| Y_OMADA_SAPMA_WEB_SERVICE_USER | Pattern Role for Web Service Runtime Background User |
Y_OMADA_SAPMA_CONSUMER_ECC
The SAP ECC role, Y_OMADA_SAPMA_CONSUMER_ECC is a single role which contains all required authorizations for the user who are to connect to SAP from Omada Identity.
Network requirements
The TCP/IP ports used by the SAP system are customer specific, typically the SAP Basic administrator can provide this information. The port numbers are maintained in the SAP NetWeaver Application Server profile.
![]()
SAP Add-ON
- Installation
- Uninstallation
As the first step in preparing the SAP backend, you must import the enterprise services and extract program provided by Omada.
After upgrading all web services are already configured and no additional configuration is required.
Omada's SAP HCM Connectivity utilizes the SAP Add-On installation Tool (SAINT) to install the Omada components into the SAP system(s).
The screenshots below are based on SAP NetWeaver Application Server 7.50. There may be differences in older versions.
-
Download the .sar file, that is relevant for your SAP solution, from the Omada Help Desk and copy it to the folder on your local PC.
-
Log into client 000 in SAP via SAP GUI and execute transaction SAINT.
-
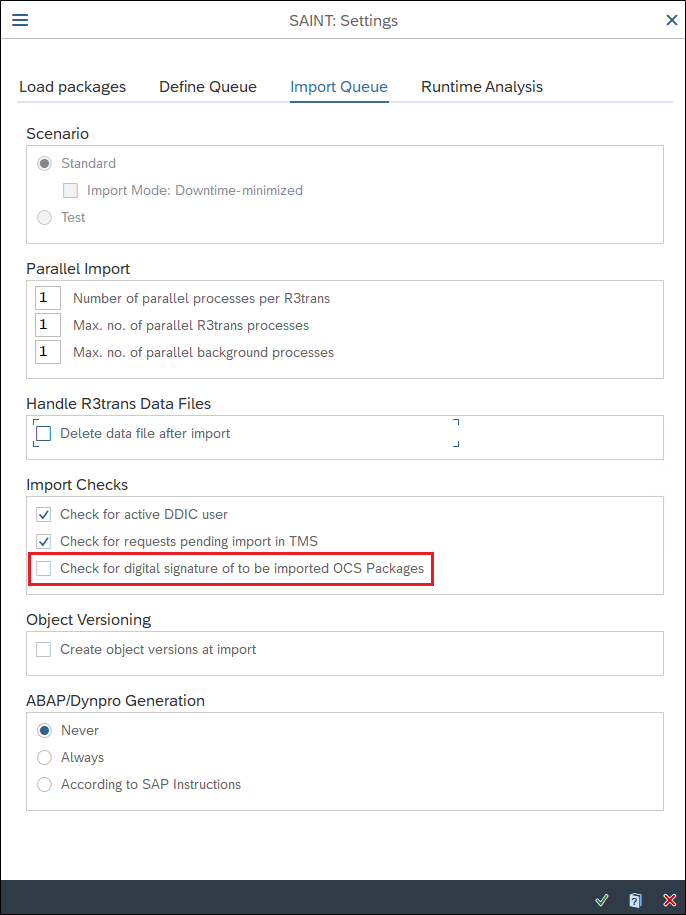
Select the menu More > Extras > Settings and deselect the Check for digital signature of to be imported OCS Packages option marked below.
-
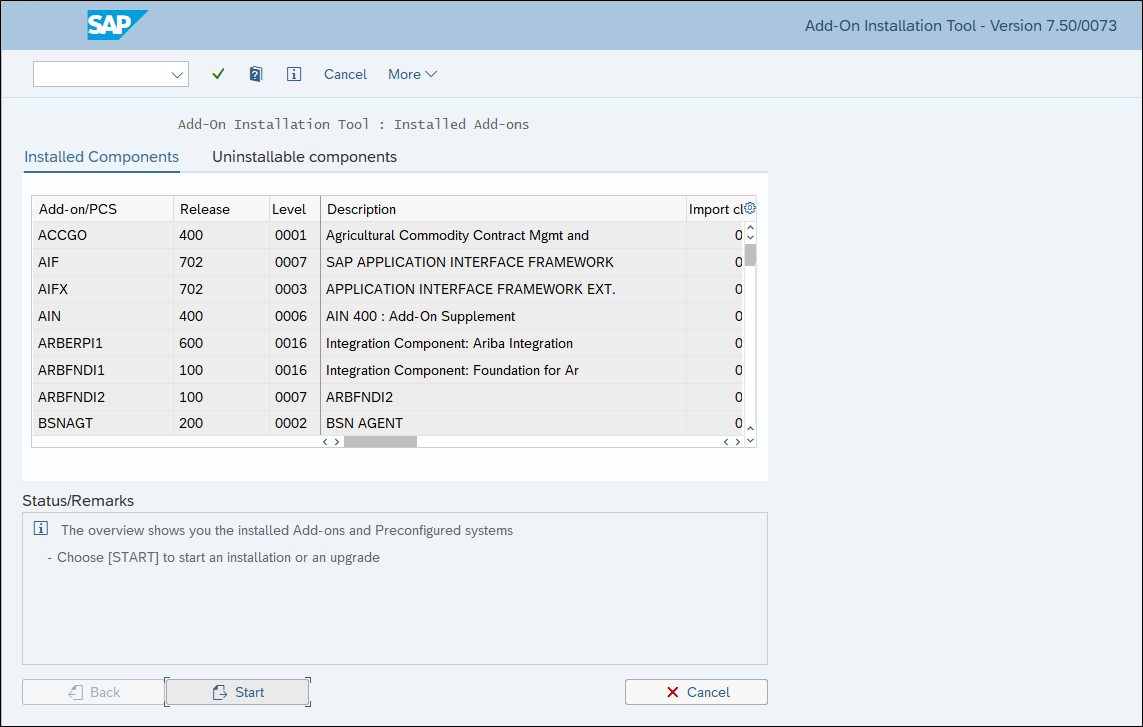
The list of installed components is displayed.
-
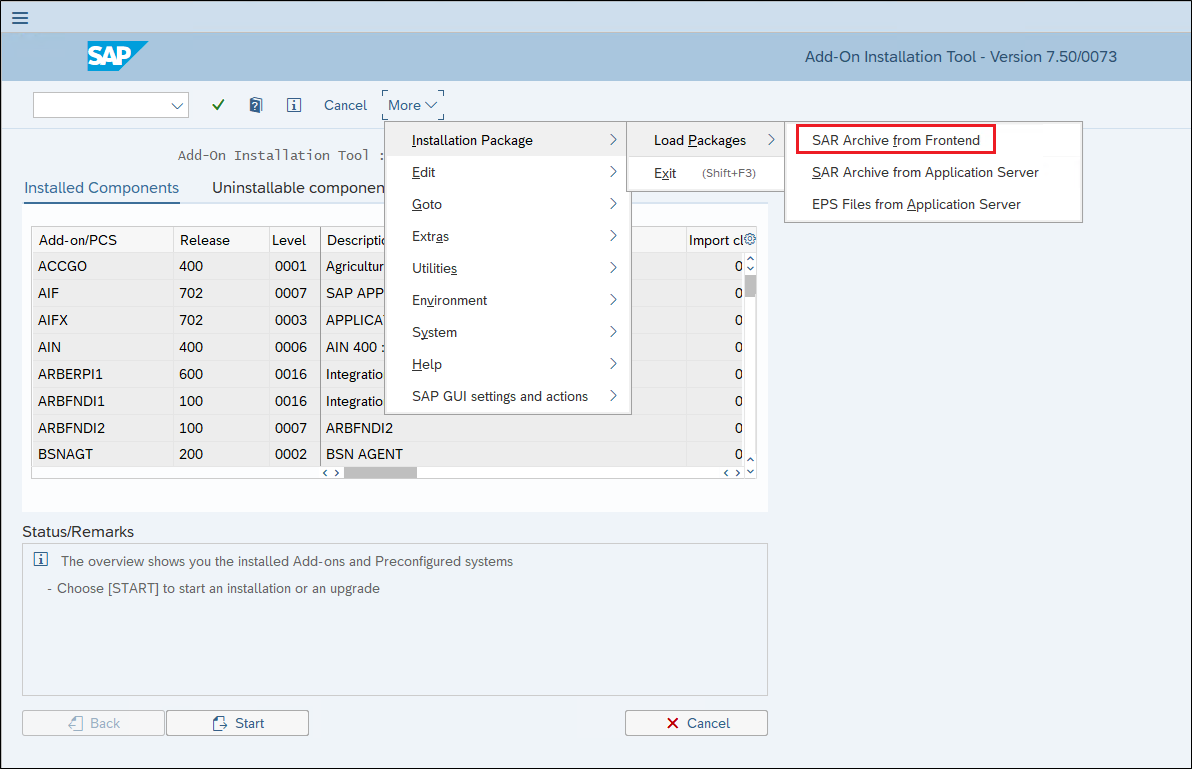
Select the menu More > Installation Package > Load Packages > Sar Archive from Frontend.
-
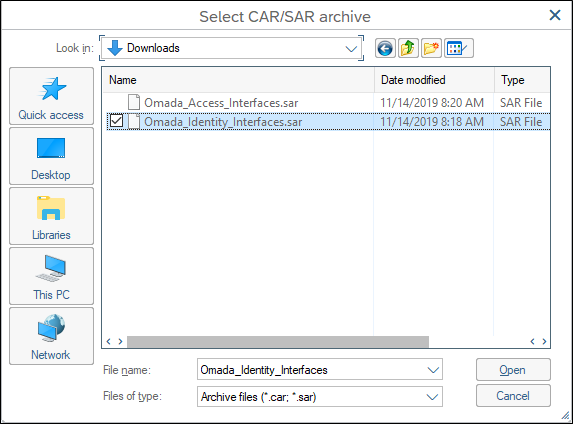
Navigate to the folder where the downloaded .sar file is located and click Open.
-
If the below pop-up appears, select Allow.

-
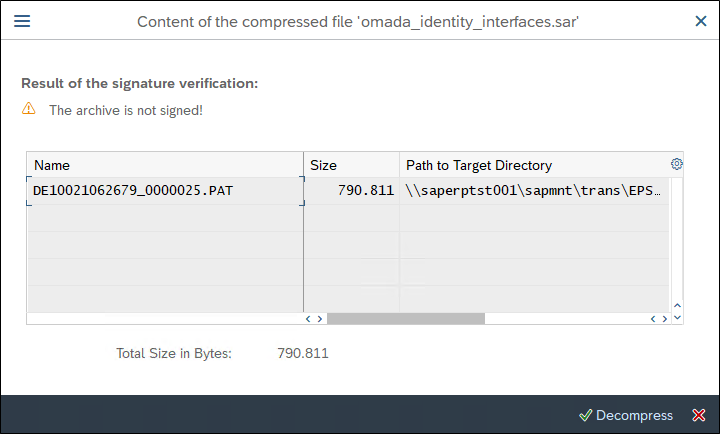
You can ignore the warning about the archive not being signed. Select Decompress to unpack and copy the file to target directory on the SAP server.
-
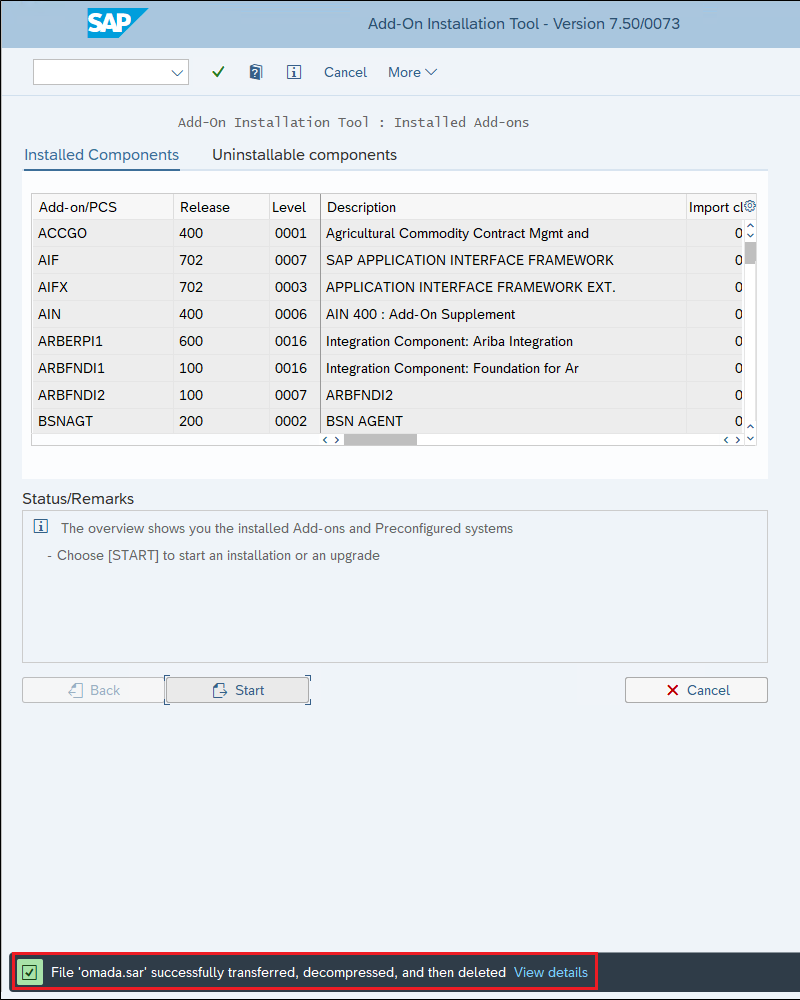
You will be returned to the below screen again where you select Start.
-
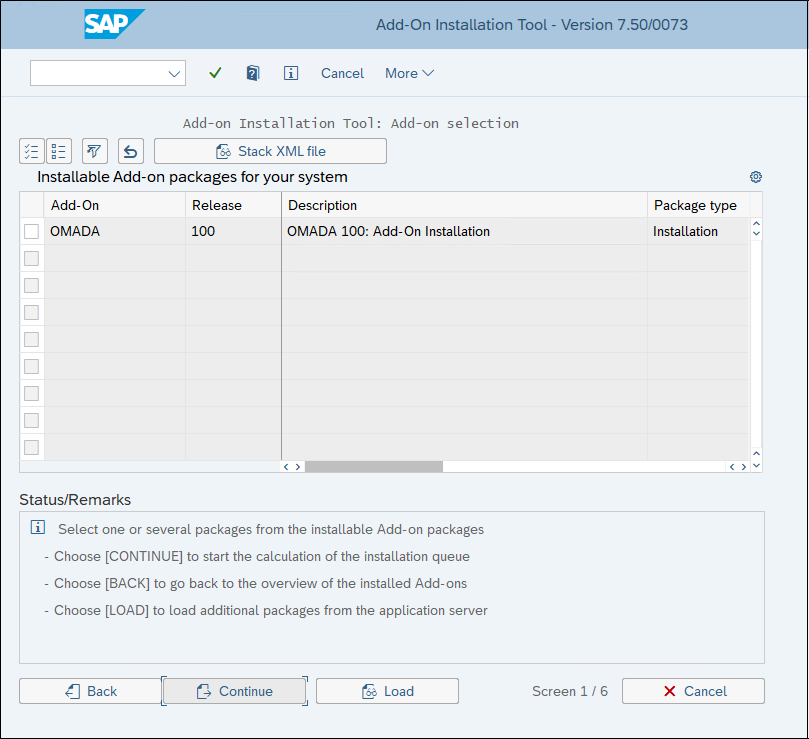
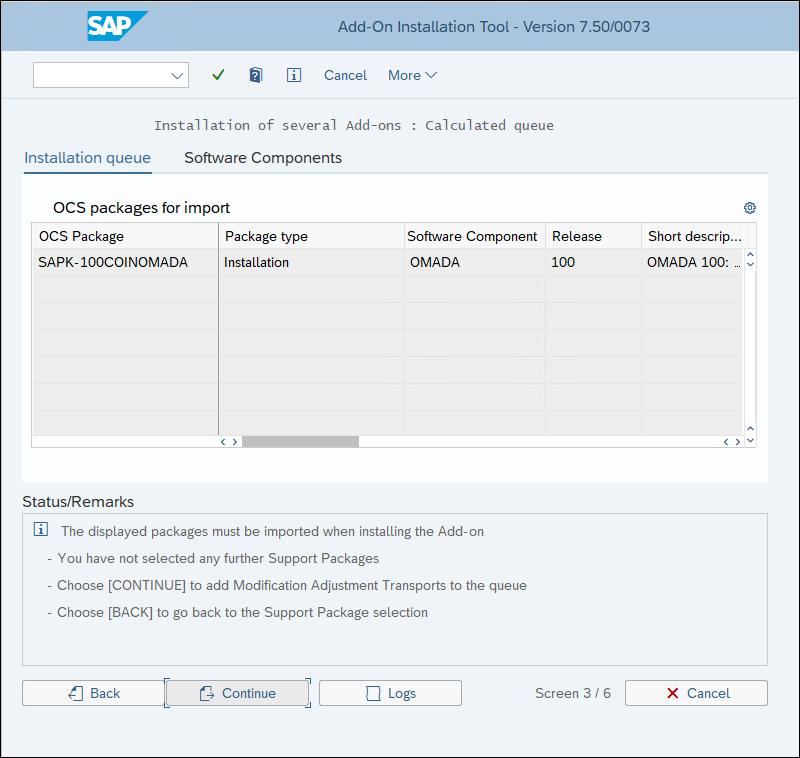
The Omada Add-On is now listed as an installable Add-on package, select the package by ticking the box to the left of the row and click Continue.
-
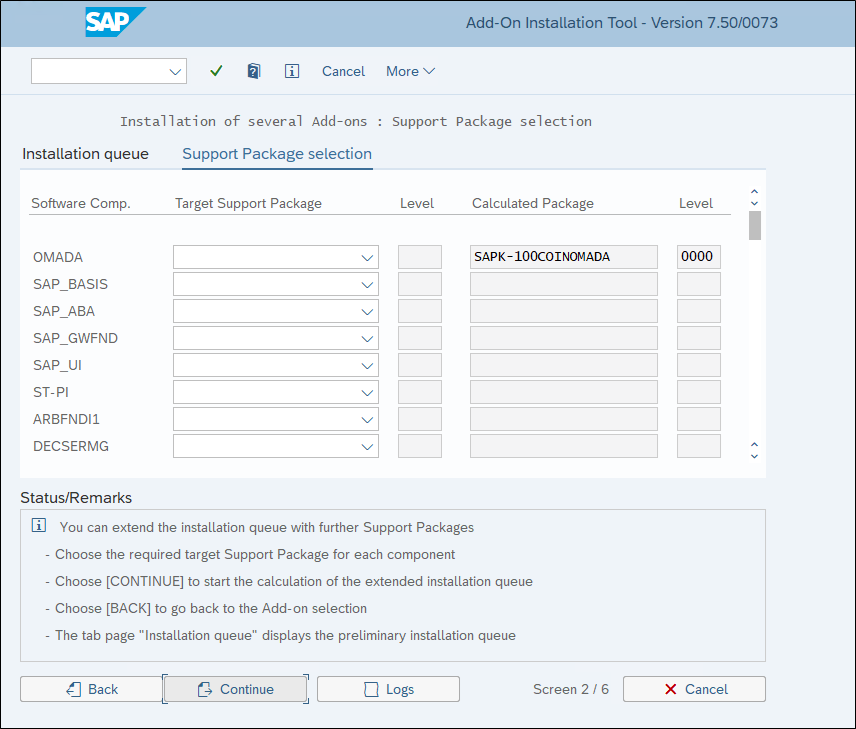
There are no Support Packages to apply, select Continue.
-
The Omada Add-on is added to the installation queue, select Continue.
-
When you are asked if you want to add Modification Adjustment Transports, select No.

-
The Add-On is now ready to be installed. By default, it runs in a dialog mode, but optionally you can also change the Start Options to run the installation in the background. This guide will demonstrate running in dialog mode. Click the
 icon to continue.
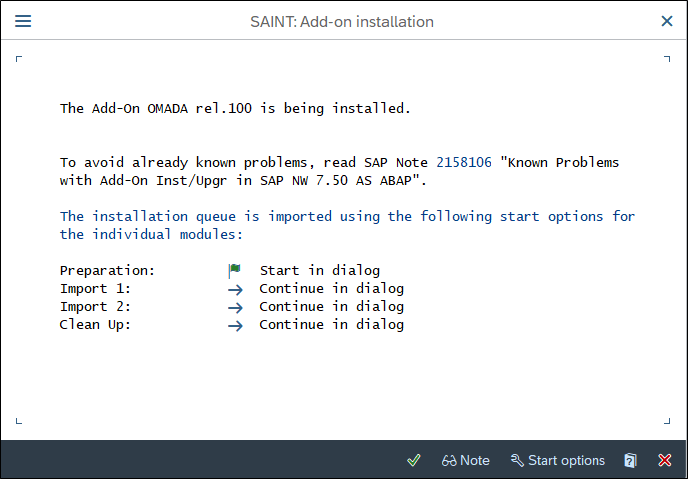
-
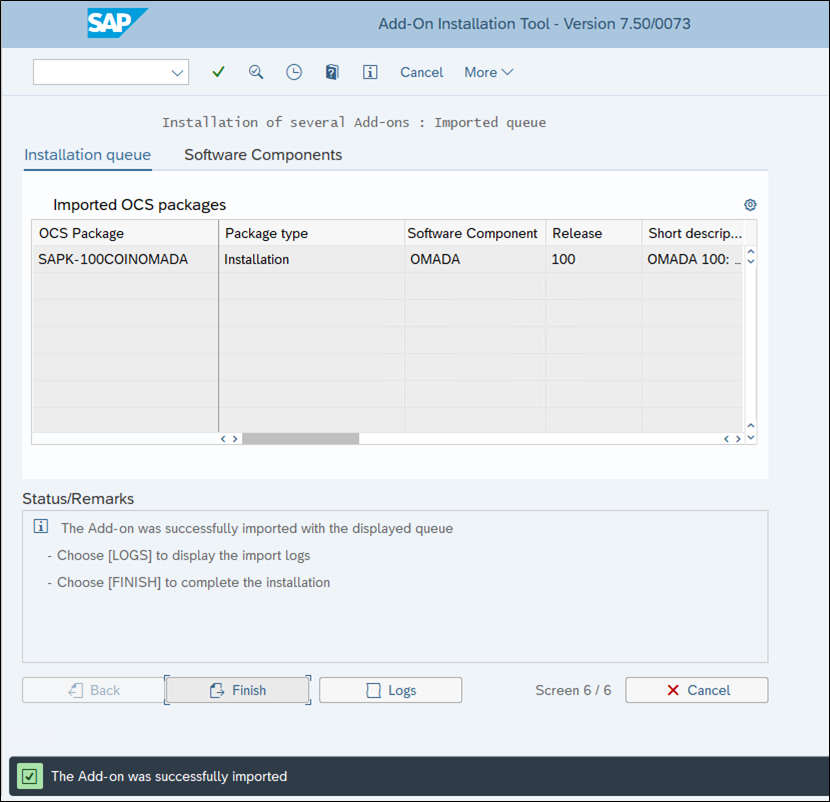
After some time, you should receive the below confirmation that the Add-On was successfully imported, click Finish.
-
You are prompted if you want to send runtime analysis, select Do not send.

-
Add-On import is now completed, and you can continue to the configuration part.

Note that Omada provides newer versions of the Add-On when required, so the Release and Level numbers shown in the above screenshot can be higher. The latest version is always available on the Omada Help Desk.
If you are only trying out the Omada SAP Connectivity Framework, you have the possibility to uninstalling it by following the below steps
-
Log into client 000 in SAP via SAP GUI and execute transaction SAINT.
-
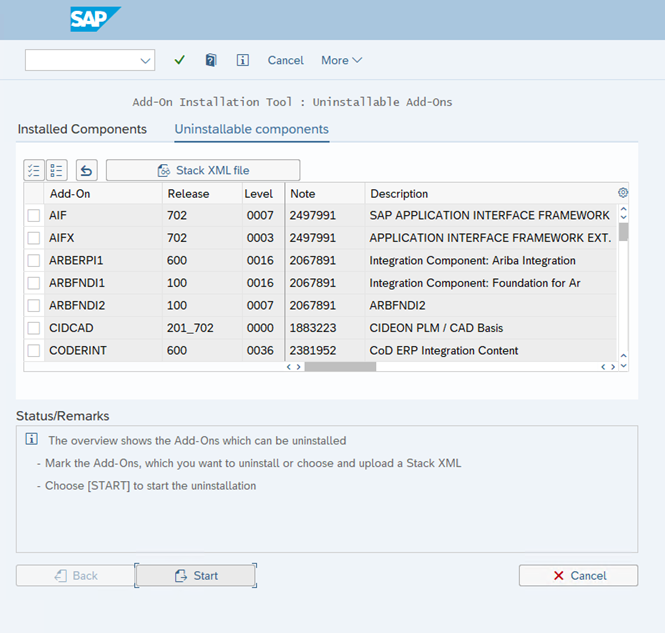
Click Uninstallable components.
-
Scroll down and find Omada and select it.
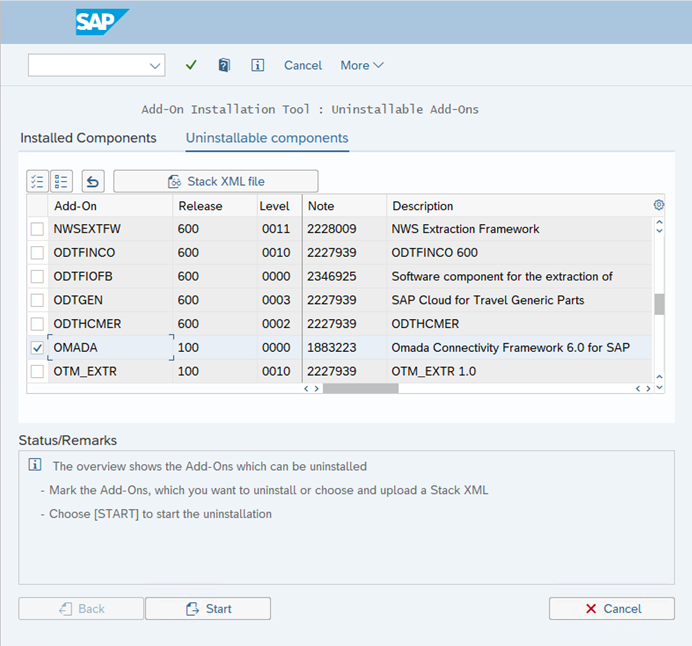
-
Click Start. The Add-On is now ready to be uninstalled, by default it will run in the dialog mode. Optionally, you can also change the Start Options to run the installation in the background. This guide demonstrates running in the dialog mode. Click the
icon to continue.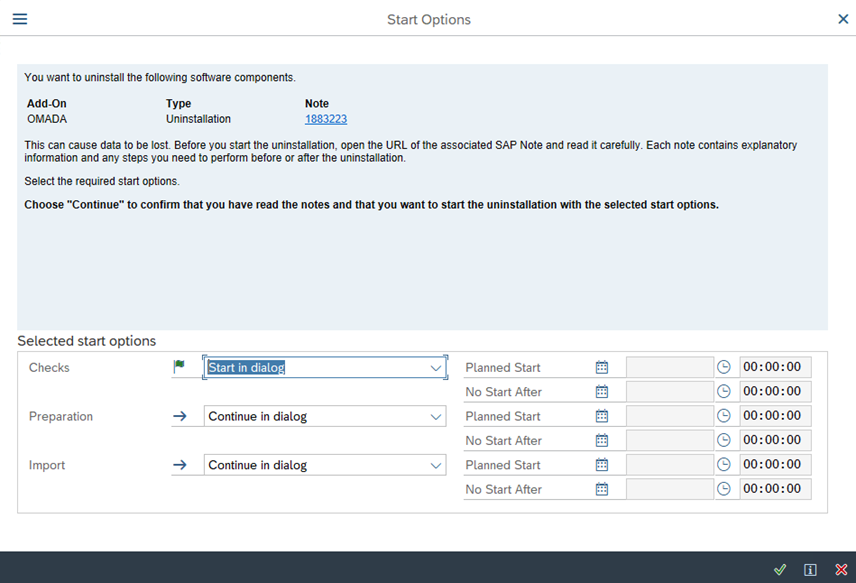
-
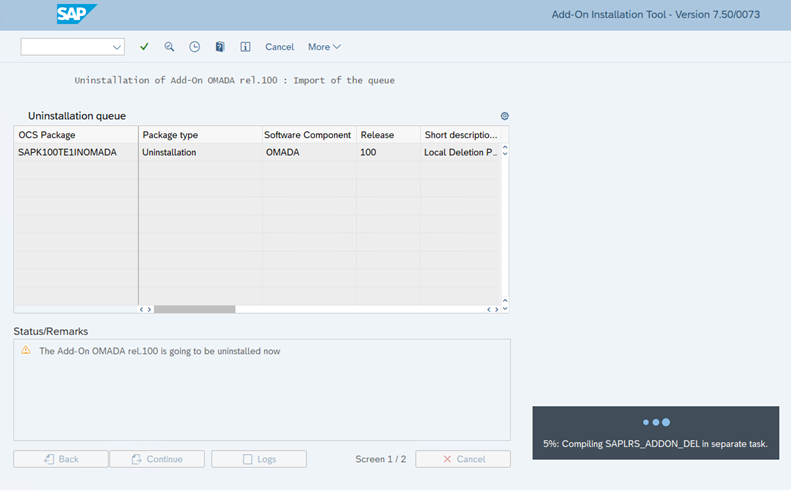
Wait for the uninstallation process to finish.
-
When uninstallation is completed, the below confirmation is displayed. Click Finish.
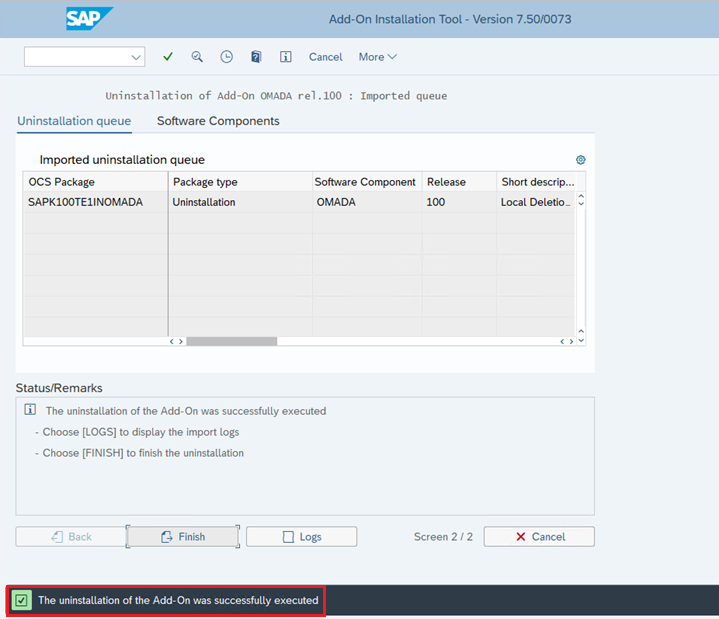
-
You are prompted if you want to send runtime analysis. Select Do not send.

Target system configuration
Dynamic extract program
The SAP HCM interface extracts the identity management relevant information that is related to the identities stored in SAP. The frequently used parameters that drives access and provisioning in an identity management solution are provided out of the box.
The interface enables you to carry out a full extract of the identities found in SAP.
The identities are extracted to the internal table called SAPHREMPLOYEEDATA. The table fields are defined in a structure which is only used by this function module. The structure is called ZHRIDENTITYDATA and the predefined fields are listed in the General config section.
The logic utilizes the BAPI_EMPLOYEE_GETDATA method, a function module, which is included in
the SAP standard installation. The method allows to retrieve data from several crucial info
types:
- info type 0001 - Org. Assignment
- info type 0002 - Personal Data,
- info type 0032 - Internal Data,
- info type 0105 - Communications.
These four info types do not normally cover all the relevant data needed. Therefore, logic has been added to retrieve the following:
- Data from additional info types using the SAP standard function module
HR_READ_INFOTYPE - Organizational structure data using the SAP standard function module
RH_SETUP_TREE_TABLE - Text of the job and position using the SAP standard function module
HR_READ_FOREIGN_OBJECT_TEXT - Company code data using the SAP standard function module
BAPI_COMPANYCODE_GETDETAIL
The extract program, running in the background (specifically during night hours), populates the /OMADA/HRCACHE and /OMADA/HRCACHE2 cache tables
The extract program uses the configuration tables to fetch employee records and populate the cache tables. The cache tables are exposed via an ABAP proxy for which a SOAP web service is generated as described in the Generate Web Services using SOAMANAGER.
Initial configuration
The initial extract configuration rules defined by Omada for the employee extraction are delivered as a Business Configuration Set (BC Set).
It is recommended to only import the BC Set during the initial implementation of the Omada SAP HCM Connectivity Interface.
The activation of BC set overwrites existing configuration with the initial configuration rules provided by Omada for employee extraction. This is especially relevant if you have defined:
- Extraction rules including fields, conditions, and exceptions to extract
- Rules for dates utilized in selection parameters and general configuration, relevant for conditions or exceptions, that uses the Transaction code /N/OMADA/CONFXHR.
The BC Set is delivered as part of the Add-On installation but must be activated in the SAP client from where employees are exported to Omada Identity.
Activation of the BC set
-
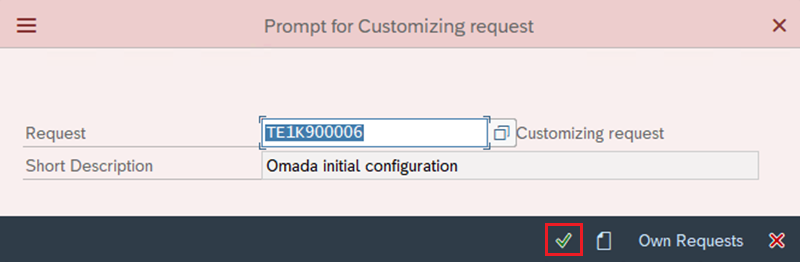
Log in to the SAP client where the employees exist, enter transaction SCPR20.

-
Hit F4 to search for /OMADA and click Start Search.
-
The below entry will be displayed -- select it and click the check mark icon.
-
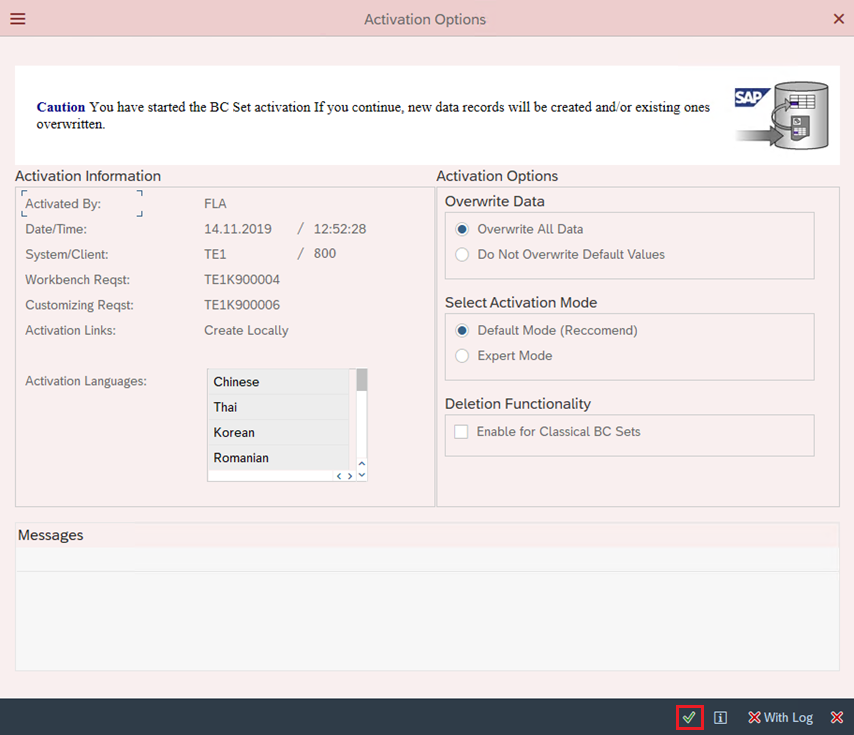
Click the icon (F7) to activate the BC Set.
-
You are prompted for a transport request -- choose an existing or create a new one. You will use this transport request to import the initial configuration into the other SAP HCM systems in your SAP landscape. Click the check mark icon to continue.
-
You are presented with the below dialogue, keep default settings and click the check mark icon to continue.
-
When activation completes the below screen is presented.
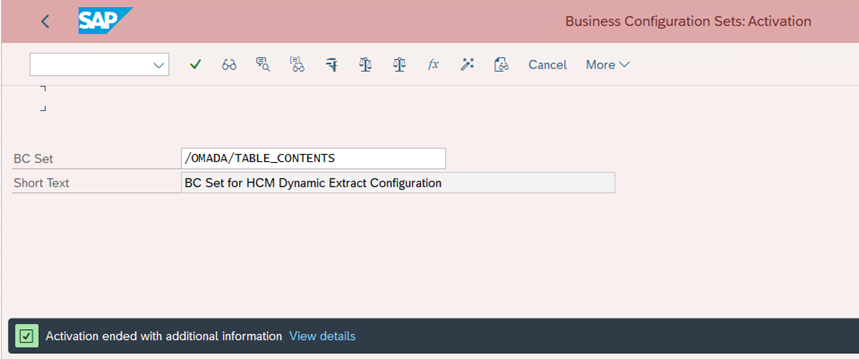
You can now continue with the next step.
Configuration of dynamic extract program
The configuration of the dynamic extract program is stored in a number of custom tables provided by Omada. For easy access to these tables maintenance screens, the transaction code /N/OMADA/CONFXHR is provided. For more information, go to Additional information.
Basic selection - /OMADA/BASICSEL
The configuration is stored in the /OMADA/BASICSEL table. Basic selection is only used when filling or reading from the cache table. If you use incremental data retrieval (delta), basic selection has no effect.
The single quote mark is a placeholder for the value specified in the Dynamic condition column.
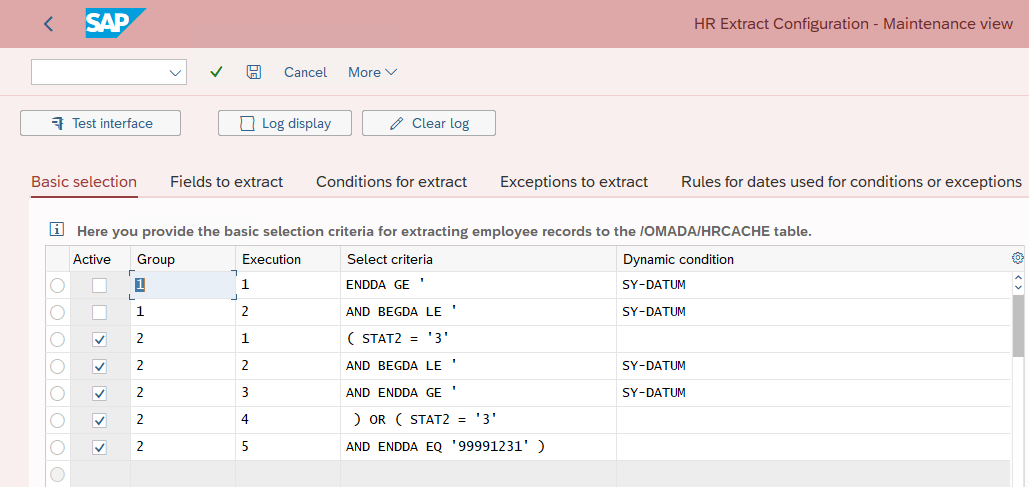
You can have more groups but only one as active.
The rules are as follows:
- If you delete one entry from a group -- the entire group will be deleted.
- If you change "Active" for one entry in a group -- the complete group will be active.
- If you want to activate another group, you must deactivate the active one.
Functionality regarding "Execution", "Select criteria", and "Dynamic condition" is the same as in the Conditions for extract section.
The second group can be an example of how you can use the "(" symbol. The result for group 2 will be:
( STAT2 = '3'
AND BEGDA LE SY-DATUM
AND ENDDA GE SY-DATUM )
OR
( STAT2 = '3'
AND ENDDA EQ '99991231')
Fields to extract
Here you can define data from which fields is extracted to the /OMADA/HRCACHE and /OMADA/HRCACHE2 output tables, and how it is mapped. Based on the import parameter, the identities are extracted one by one.You can find some entries that are not active. These entries are provided as examples for your convenience.
The configuration is stored in table /OMADA/MAPPARAM.
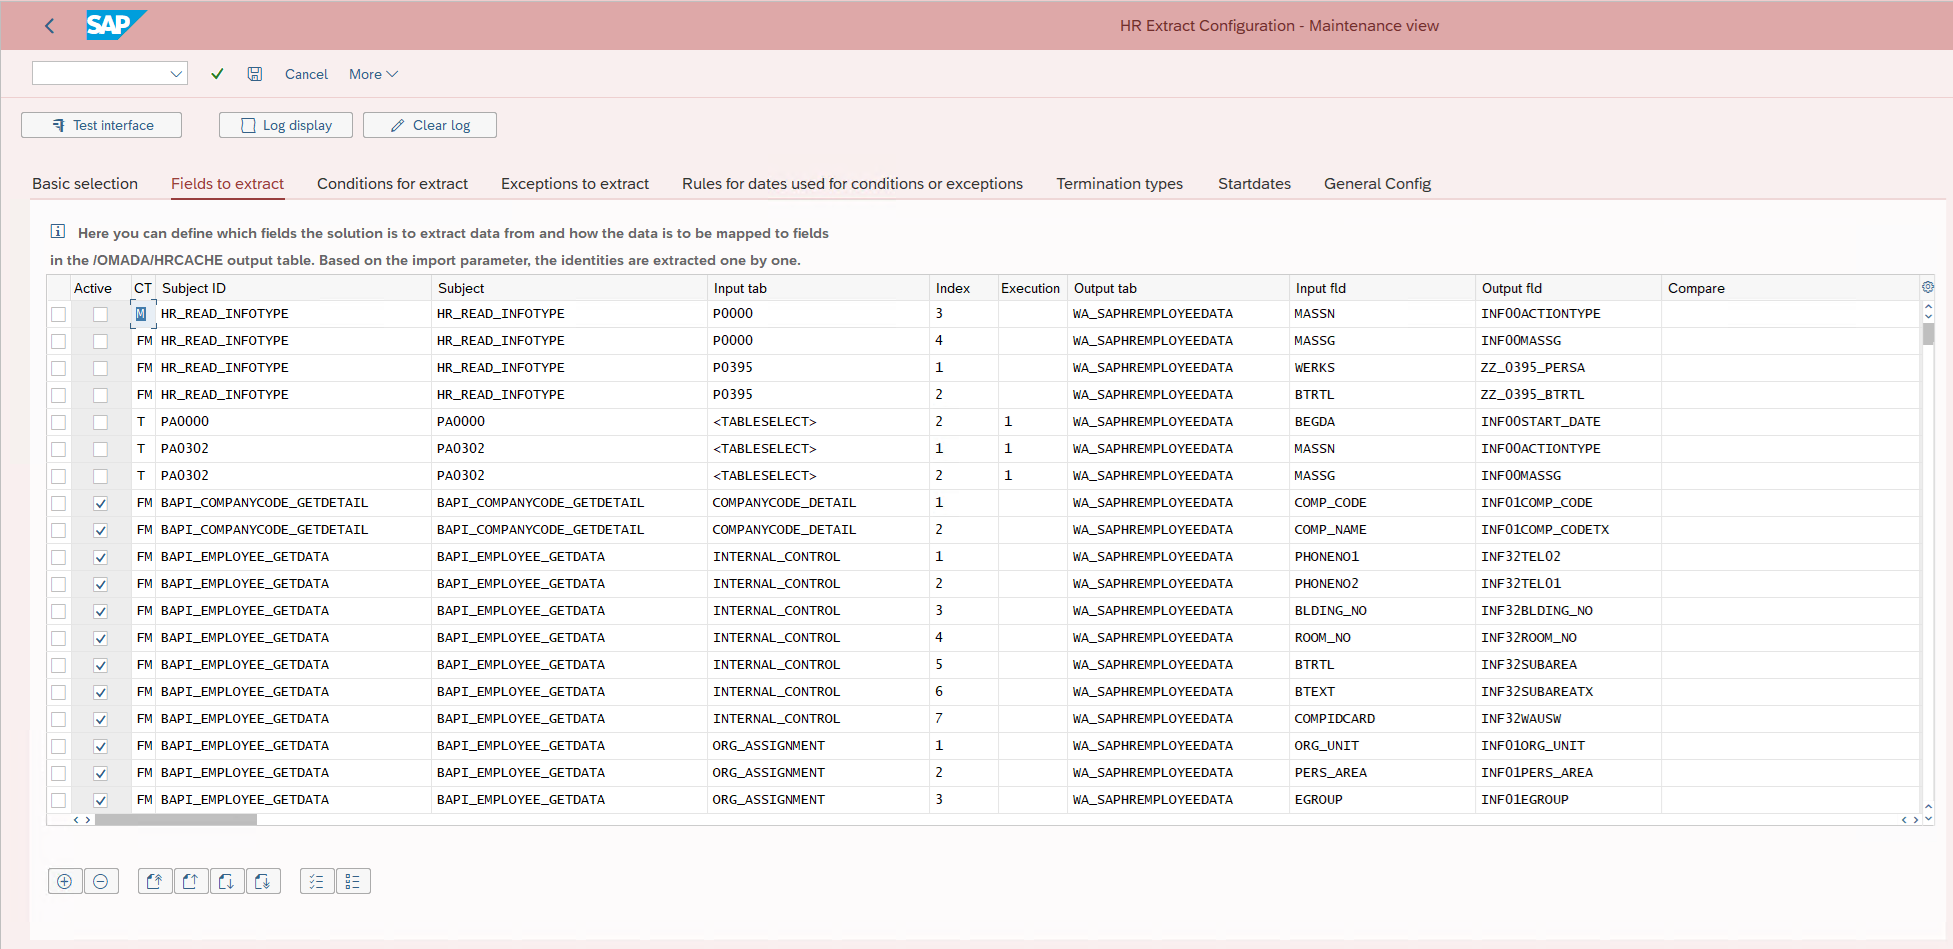
The CT column has two values
- FM: Function Module
- T: Tableselect
These values decide on how the extract program extracts data.
In addition to the call of the standard function modules, you can also directly retrieve data from tables defined in SAP Dictionary entries where Input tab has <TABLESELECT> value. The mapping of data from these tables must also be defined in the /OMADA/MAPPARAM customized table. However, you must specify the actual call with the specific extract conditions in the /OMADA/XTRACTCND customized table, which means entries in /OMADA/XTRACTCND must be defined in
/OMADA/MAPPARAM.
Conditions for extract
Here you can specify the conditions of the extract from SAPHREMPLOYEEDATA. Entries in this table are related to entries in the /OMADA/MAPPARAM table that has <TABLESELECT> value in the Input tab.
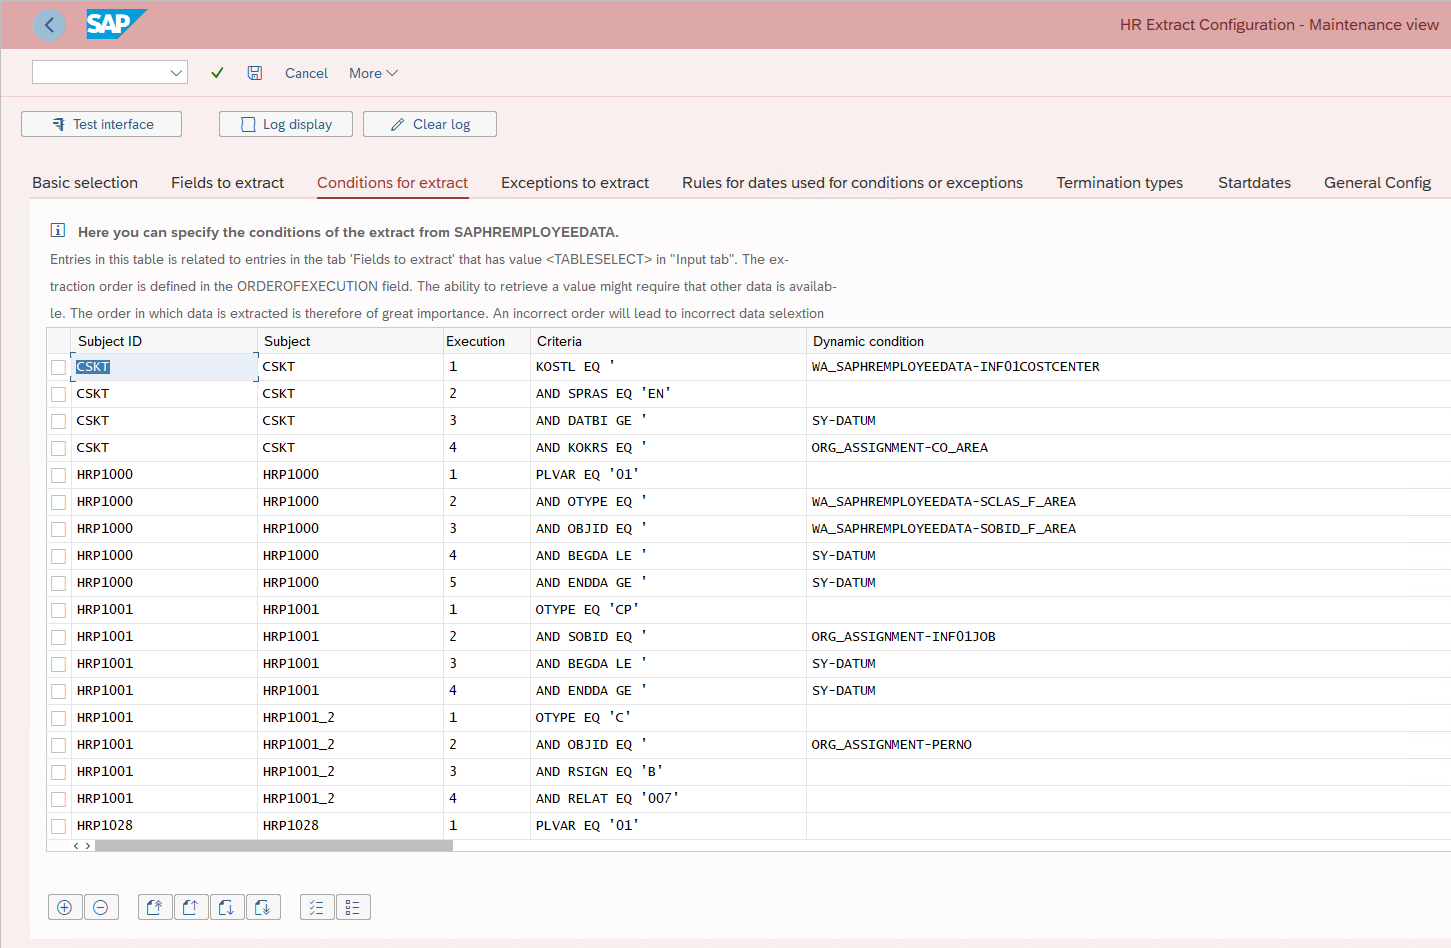
For example, CSKT is a <TABLESELECT> , and thus, you can find entries in /OMADA/XTRACTCND for the same Subject ID. The extract is based on the content in the /OMADA/MAPPARAM table. This table comes with some predefined records. If you do not need one or more of the predefined records, you can delete them from the table. The extraction order is defined in the Execution field. The ability to retrieve a value may require other data to be available.
The order in which data is extracted impacts the retrieval of data. An incorrect order will lead to inaccurate data selection.
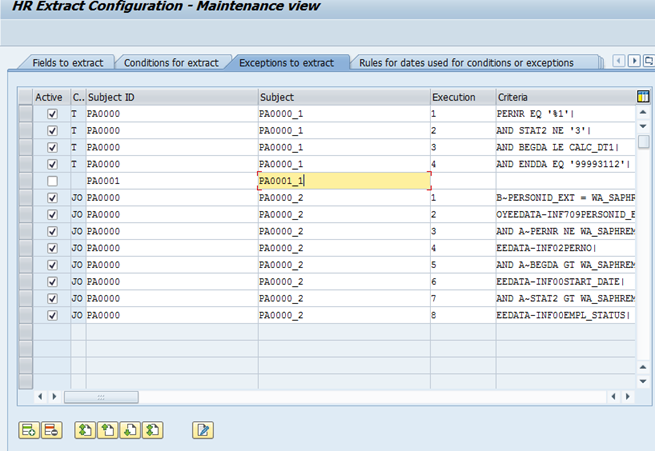
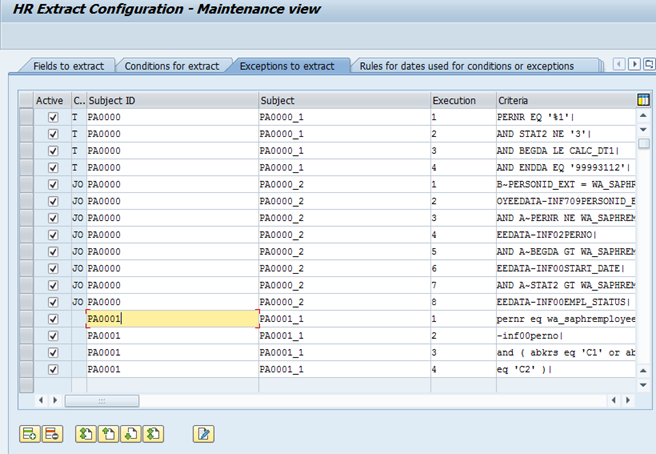
Exceptions to extract
In this tab, you can configure if you want to exclude some entries from the extract. The configuration is stored in the /OMADA/XTRCT_XCE table. You can use this table by creating entries so the program can make the table select from the backend.
This table is always Tableselect.
This table also comes with predefined exceptions that you can activate by setting a checkmark for the fields in the Active column. You enter conditions to check whether the identity in question complies with the rules. If the identity complies with the rules, it is not extracted.
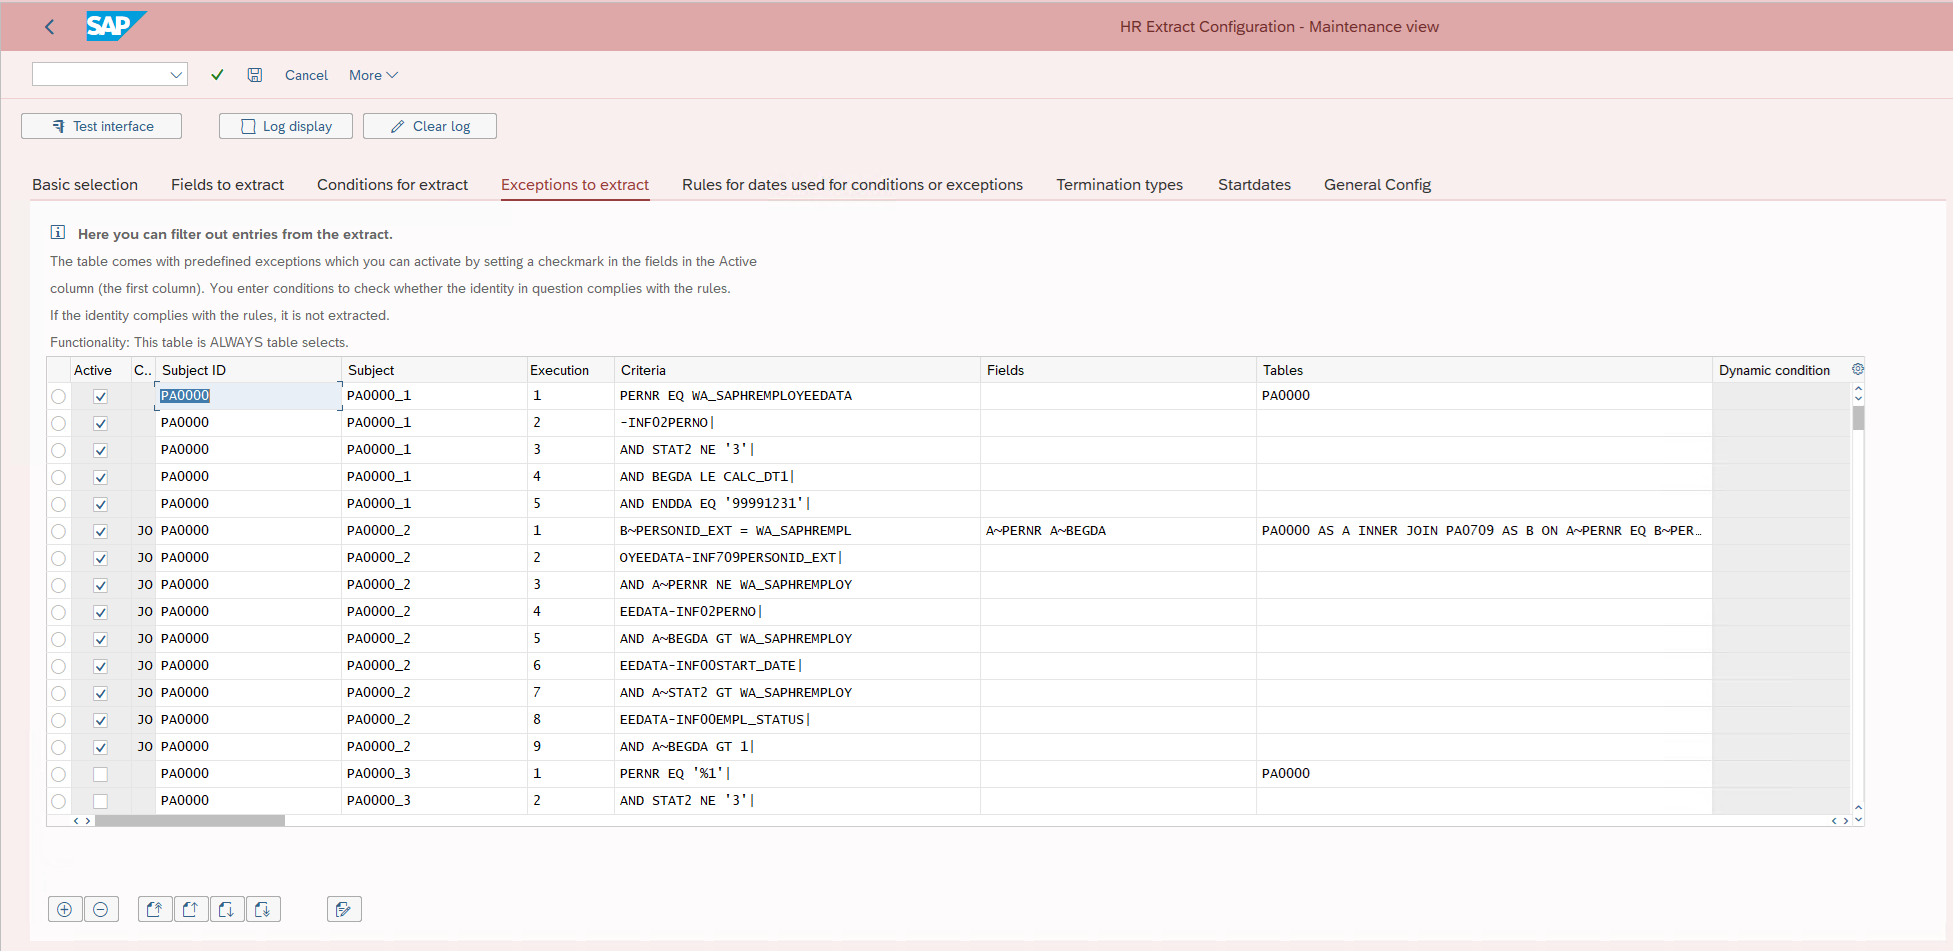
The predefined exceptions require the synchronized Employees to be Active and have the PERNO attribute populated. This may require a change to match the customer's requirements.
Maintain Exception Conditions
To specify a dynamic SQL call in ABAP, different parts of the statement can be built dynamically by code to allow more flexibility. This is not offering good performance and is mostly discouraged for normal use. It can be used in a batch program being executed in the background to reduce the impact on the performance.
The general form of a dynamic SQL statement is:
SELECT [field] INTO TABLE <itab>
FROM [table]
WHERE [where-clause]
The dynamic parts of the statement are enclosed in brackets [ ]. The <itab> is a pointer to an internal table for the resulting data.
- The [field] is a string with a list of fields as they would be written in OpenSQL.
- The [table] is the table specification. This can be a single table name or a join of tables including the join condition.
- The [where-clause] is a string with the where clause using the same syntax as OpenSQL.
- The first table in the join must be the same as Subject ID
- Only fields from the table specified by Subject ID can be returned. This is because the internal table
<itab>is created dynamically from the structure of that table.
Placeholders are named %1 - %9 and can be used to insert the value of a program variable. This is often not necessary as the where-clause should be written as a normal ABAP statement would be written. For example, it is necessary when the value needs to be enclosed between quotation marks.
There is no mechanism to verify if a program variable is valid or if the syntax of the SQL statement is correct.
To deactivate a statement, all lines of that statement have to be disabled. If a single line of the statement is marked as active, the whole statement is active. When a line of a statement is checked/unchecked the result is that all lines get checked/unchecked.
The Delete Row functionality removes the whole statement.
The CALL_TYPE and DYN_CONDITION are legacy columns that are not used but remain to avoid deleting data of existing implementations.
Creating a new exception
-
Insert a new entry.
-
Enter the table in Subject ID and a Subject. The subject must be unique within the Subject ID.
-
Select the new entry and click the edit SQL icon.
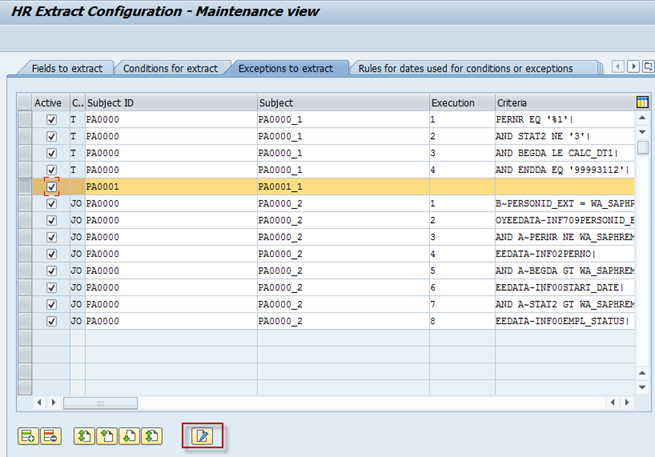
This opens the Edit SQL statement window.
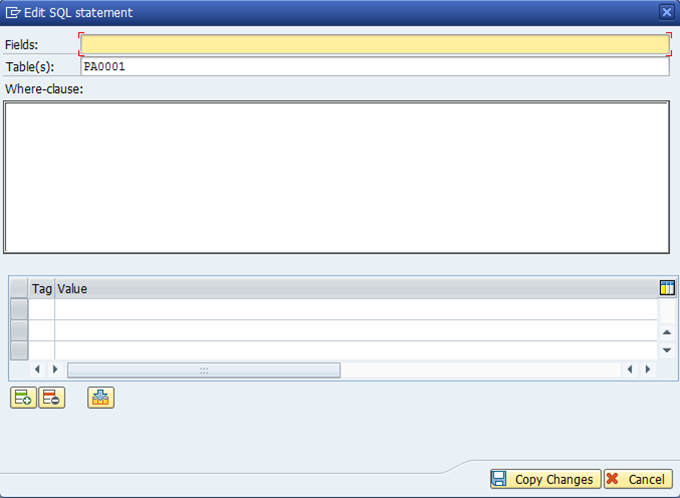
The Table field has already been filled with the table (from the Subject ID).
-
Enter the conditions and click Copy Changes.
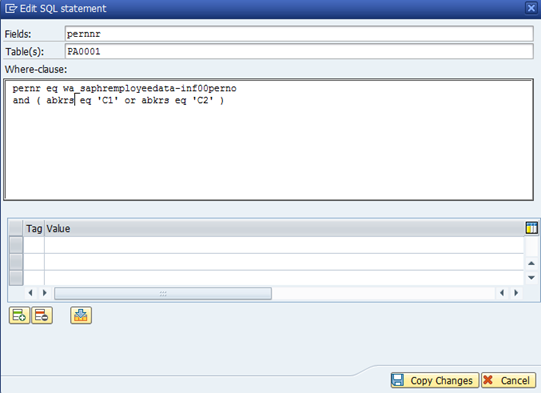
The changes are saved.
Additional details for setup of HCM extract control tables
/OMADA/MAPPARAM
Use sequence number to generate unique link if more information is to be extracted from the same table using different selection criteria.
/OMADA/XTRACTCND

This table is only used for table selects.
/OMADA/XTRCT_XCE

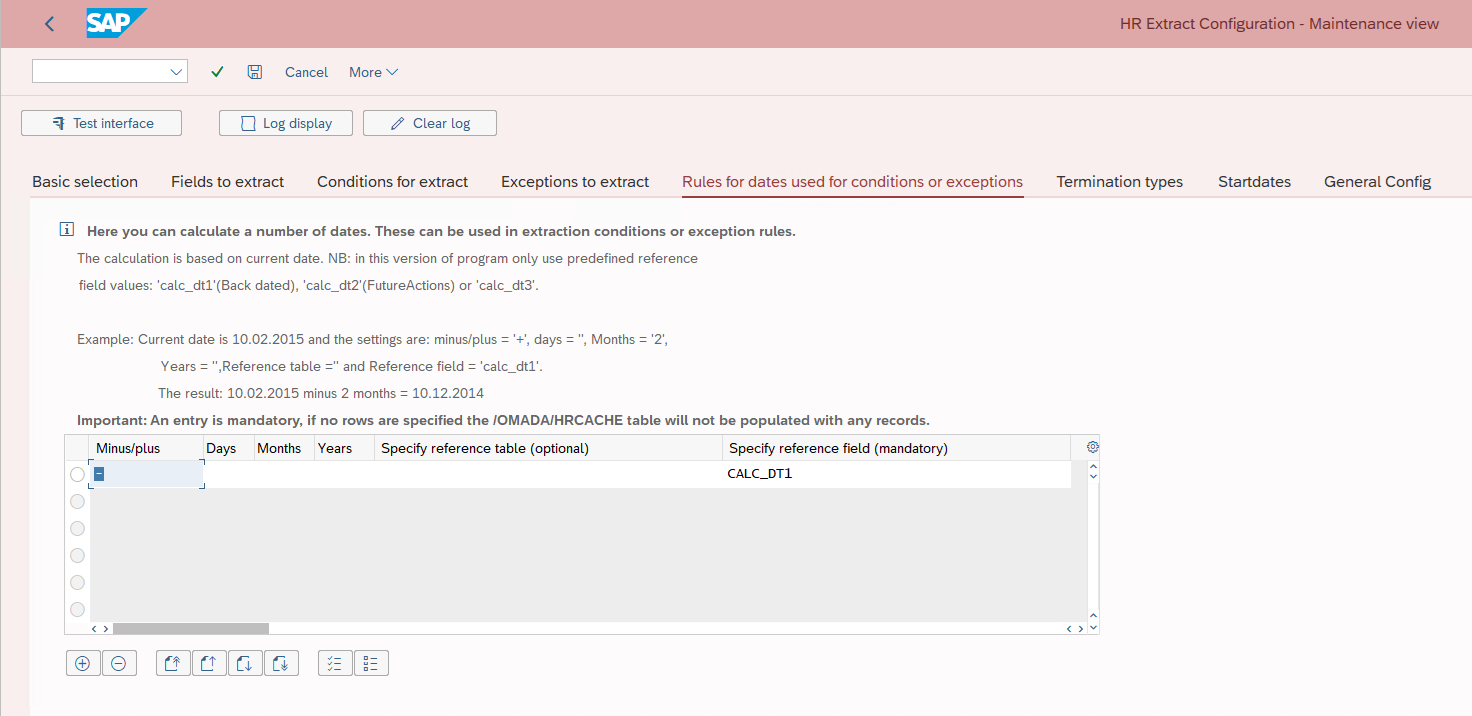
Rules for dates used for conditions or exceptions - /OMADA/DYN_DATE table
This setting allows you to extract records with a valid to date, set in the past. This is relevant and required if an employee's valid to date is updated after the expiration date has passed.
If you do not require to extract terminated records, don't remove the row in the figure, instead set the days, months, and years value to blank.
Termination types
This tab allows you to find the actual termination date for a specific employee. The date is entered into the TERMDATE field in the /OMADA/HRCACHE and /OMADA/HRCACHE2 tables. The SAP Collector in Omada uses an expression for the Identity object to read ValidTo from TERMDATE if the field is populated.

The entries from the /OMADA/HRCACHE table are used to find the correct termination date if the employee status value is set to terminated. Termination types (Action Type) used to find the correct termination date must be entered into this table. In the extract program, entries are selected and, if status from actual/future employee period is one of the entries in /OMADA/TERM_TYPE, the termination date for the employee in the extract will be set as the beginning date from the actual termination period.
/* Define the parameters to determine the starting date of the employee */
SELECT * INTO wa_actiontypes
    FROM /omada/id_strtdt.

    SELECT * INTO wa_t529t
    FROM t529t WHERE mntxt = wa_actiontypes-mntxt AND
                     sprsl = sy-langu.
        APPEND wa_t529t TO itab_t529t.
    ENDSELECT.
ENDSELECT.
Start dates
This setting allows you to change the start date, if the future entry has the rehire action type value, equal to one of the table entries.
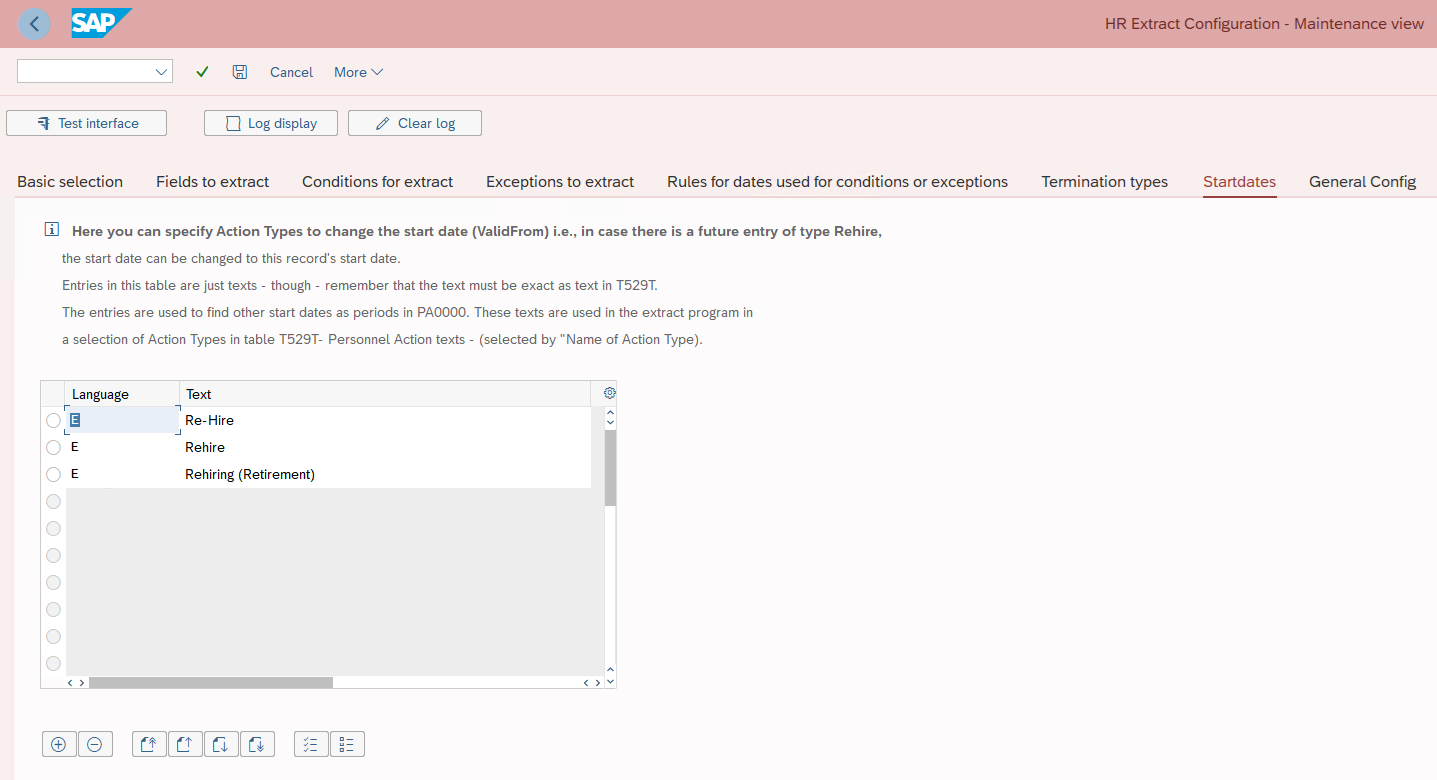
Entries are stored in the /OMADA/ID_STRTDT table and are plain text. However, the text has to be corresponding with the T529T. The entries are used to find other start dates as periods in PA0000. These texts are used in the extract program to select Action Types in the T529T - Personnel Action texts table, which are chosen by Name of action type.
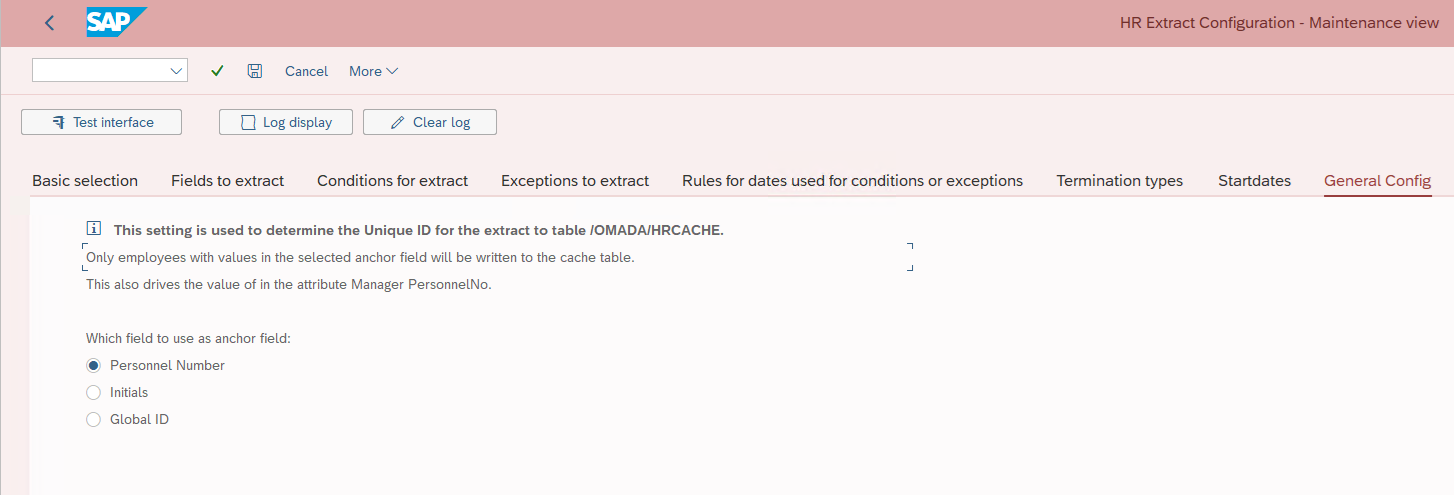
General Config
This setting is used to determine the Unique ID for the extract to /OMADA/HRCACHE or /OMADA/HRCACHE2 tables, and thereby the anchor for the SAP MA. Only employees with values in the selected anchor field will be written to the cache table. This also drives the value of in the attribute Manager PersonnelNo.
The configuration is stored in the /OMADA/EXTRACT_C table.
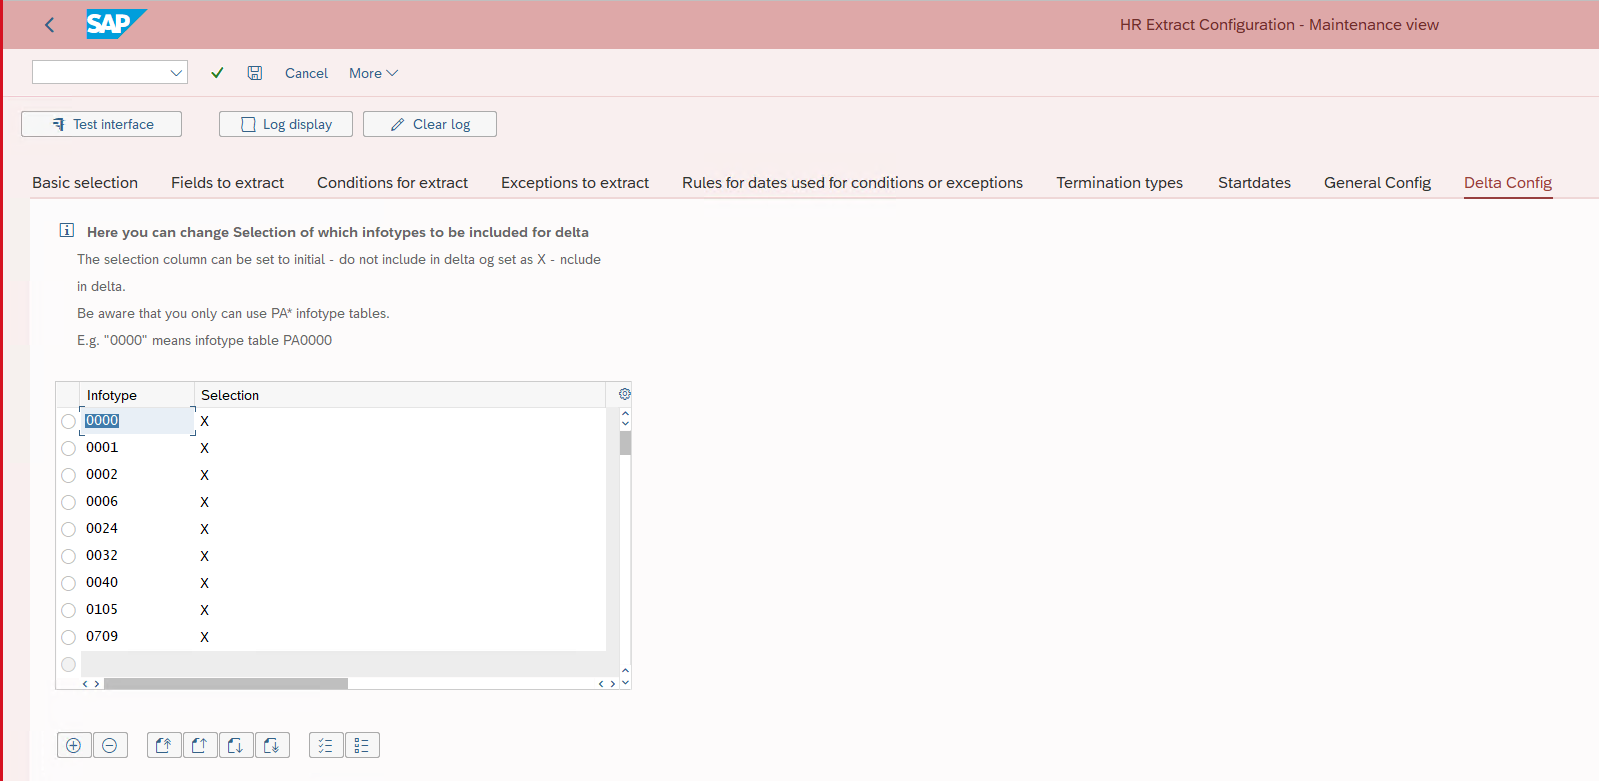
Delta Config
This setting allows you to change the selection of which infotypes to include for delta.
The selection column can be set in a following way:
-
initial - do not include in delta
-
Set as X - include in delta
You can only use PA infotype tables.
The value 0000 in the Infotype column means infotype table PA0000.
Function - Test Interface
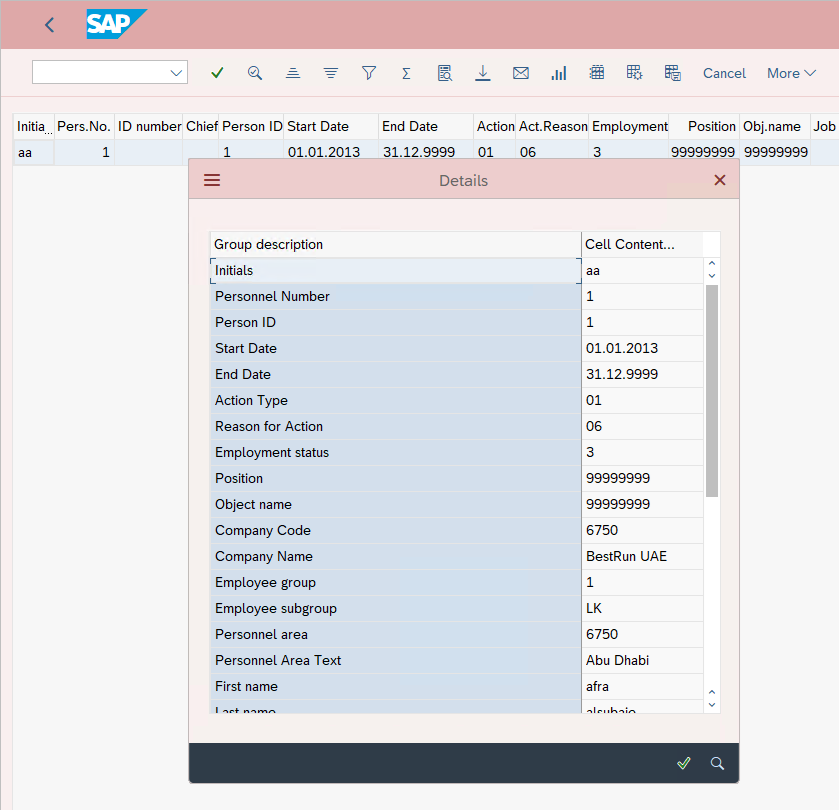
When you have made changes to the configuration of the dynamic extract program, you can test the configuration by using the below button.

You can test and verify with a single employee if the record is included in the /OMADA/HRACHE table or not -- dependent on the configuration.

You can only test one employee at the same time.
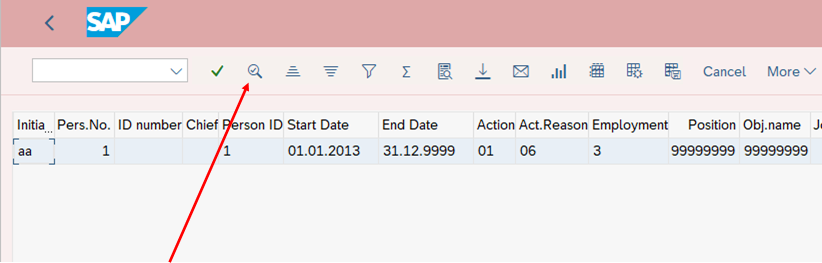
To show details, click details (the example shows SAP GUI 750).
Function - Log Display
You can display the logs of every execution of the extract program. Both manual tests and the executions performed via a background job.

You can select a specific date or an interval.
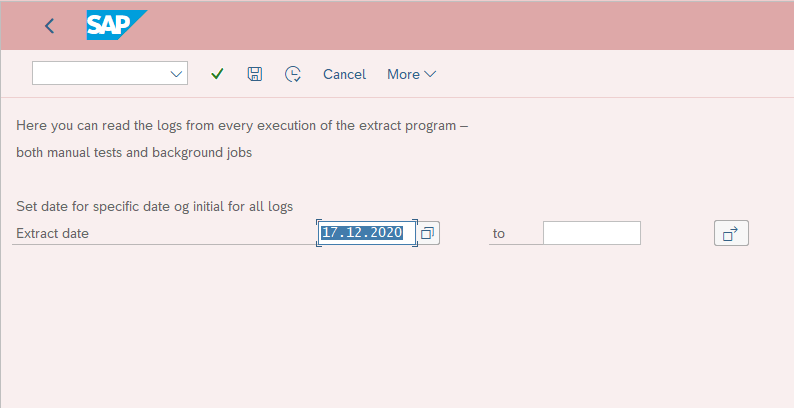
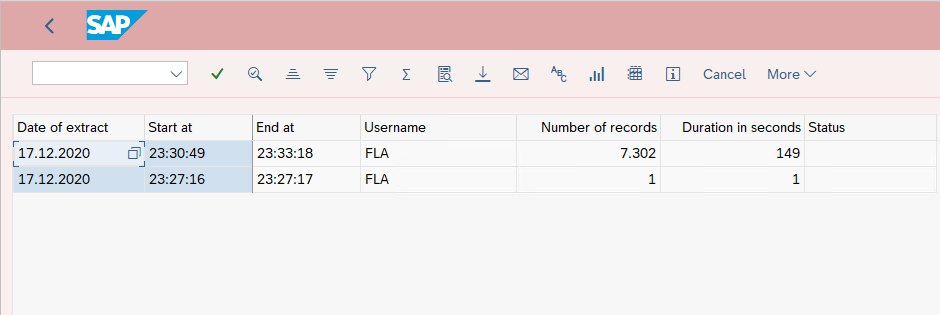
Log summary shows the date and time of extract, including duration, no. of records, and who initiated the extract.
Function - Clear Log
You can delete the logs of every execution of the extract program. Both manual tests and the executions performed via a background job.

You can select a specific date or an interval.
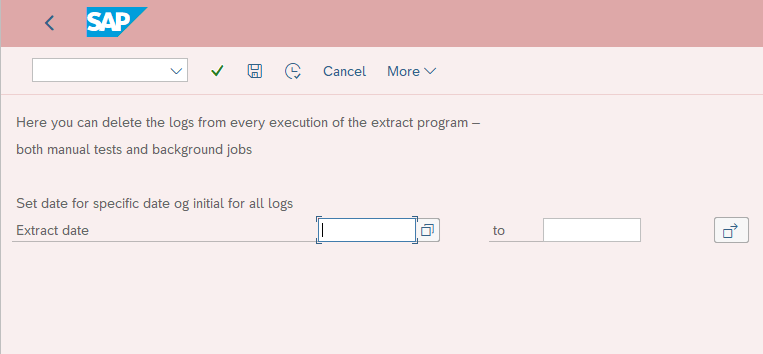
All logs relevant for selection range Extract date will be deleted.
Transport configuration changes
When you introduce changes to the dynamic extract program in the development instance of the SAP HCM system, it requires reentering the changes into Test/QA/Production SAP HCM systems. To automate reentering the changes use a SAP Transport Request to add the table contents of the involved /OMADA tables.
If you don't have access to the transaction code SE10 (Transport Organizer) in your SAP system ask your SAP Basis Team for assistance,
SAP supports automatic recording of changes only via transaction code SM30, hence recording changes performed in transaction code /OMADA/CONFXHR is not possible.
SAP HCM background job scheduling
The Read all Employees service either returns information on all employees or only those that had their information updated after a provided date (the delta date). Returning information on all employees takes a considerable amount of time to execute in environments with large numbers of employees. This can cause timeout errors from multiple places in the SAP stack.
For this reason, instead of computing the result for every call, the service returns results retrieved from a cache tables. Specifically, the /OMADA/HRCACHE and /OMADA/HRCACHE2 tables. The content of those cache tables needs to be refreshed periodically by a background job. The suggested update interval is once per day.
Scheduling the background job requires user with appropriate permissions in the SAP.
The background job must be scheduled by a SAP administrator in transaction SM36. The report in question is /OMADA/UPDATEHRCACHE. Ad hoc cache updates can be performed by scheduling the report for immediate execution in transaction SM36. Should errors occur during the cache refresh, the job will be flagged red with status Cancelled in the background job list (transaction SM37). In this case, the job log will contain more information about why the job has failed.
Note that if a delta date is provided in the web service call, the information will always be computed and returned synchronously. Cached data will only be returned if no delta date is provided.
Generate Web Services using SOAMANAGER
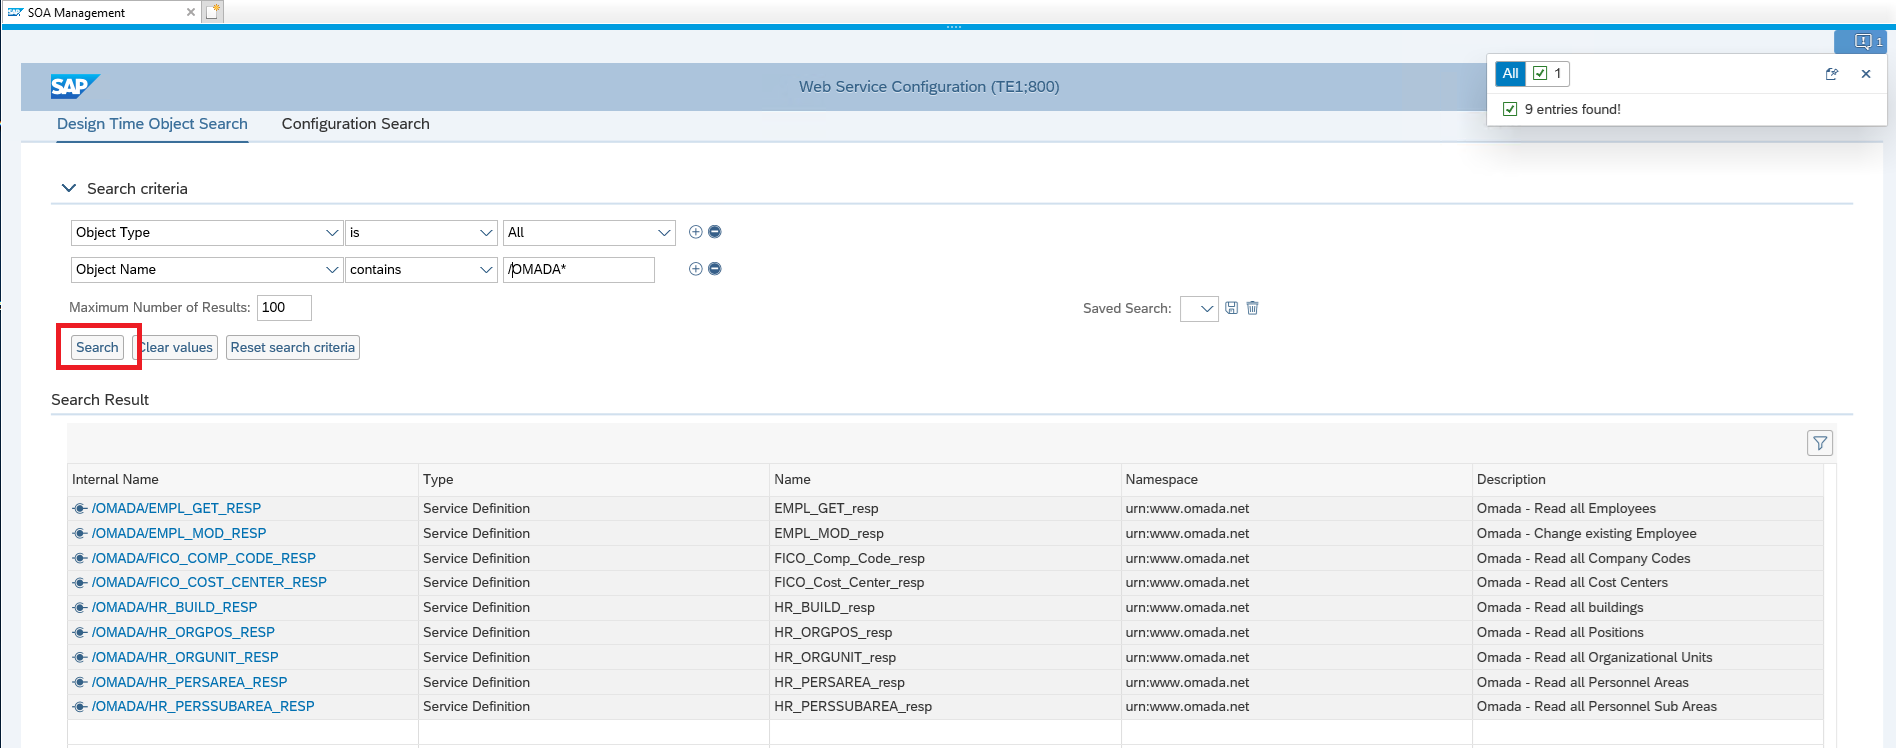
Objects supported by Omada Connectivity Framework for SAP Solutions:
| SAP Object | Internal Name (SOAMANAGER) | Description |
|---|---|---|
| Employees | /OMADA/EMPL_GET_RESP | Read all Employees |
| Employees | /OMADA/EMPL_MOD_RESP | Change existing Employee |
| Company Code | /OMADA/FICO_COMP_CODE_RESP | Read all Company Codes |
| Cost Centers | /OMADA/FICO_COST_CENTER_RESP | Read all Cost Centers |
| Building | /OMADA/HR_BUILD_RESP | Read all buildings |
| Jobs | /OMADA/HR_JOBS_RESP | Read all jobs |
| Positions | /OMADA/HR_ORGPOS_RESP | Read all Positions |
| Org. Units | /OMADA/HR_ORGUNIT_RESP | Read all Organizational Units |
| Personnel Area | /OMADA/HR_PERSAREA_RESP | Read all Personnel Areas |
| Personnel Subarea | /OMADA/HR_PERSSUBAREA_RESP | Read all Personnel Sub Areas |
-
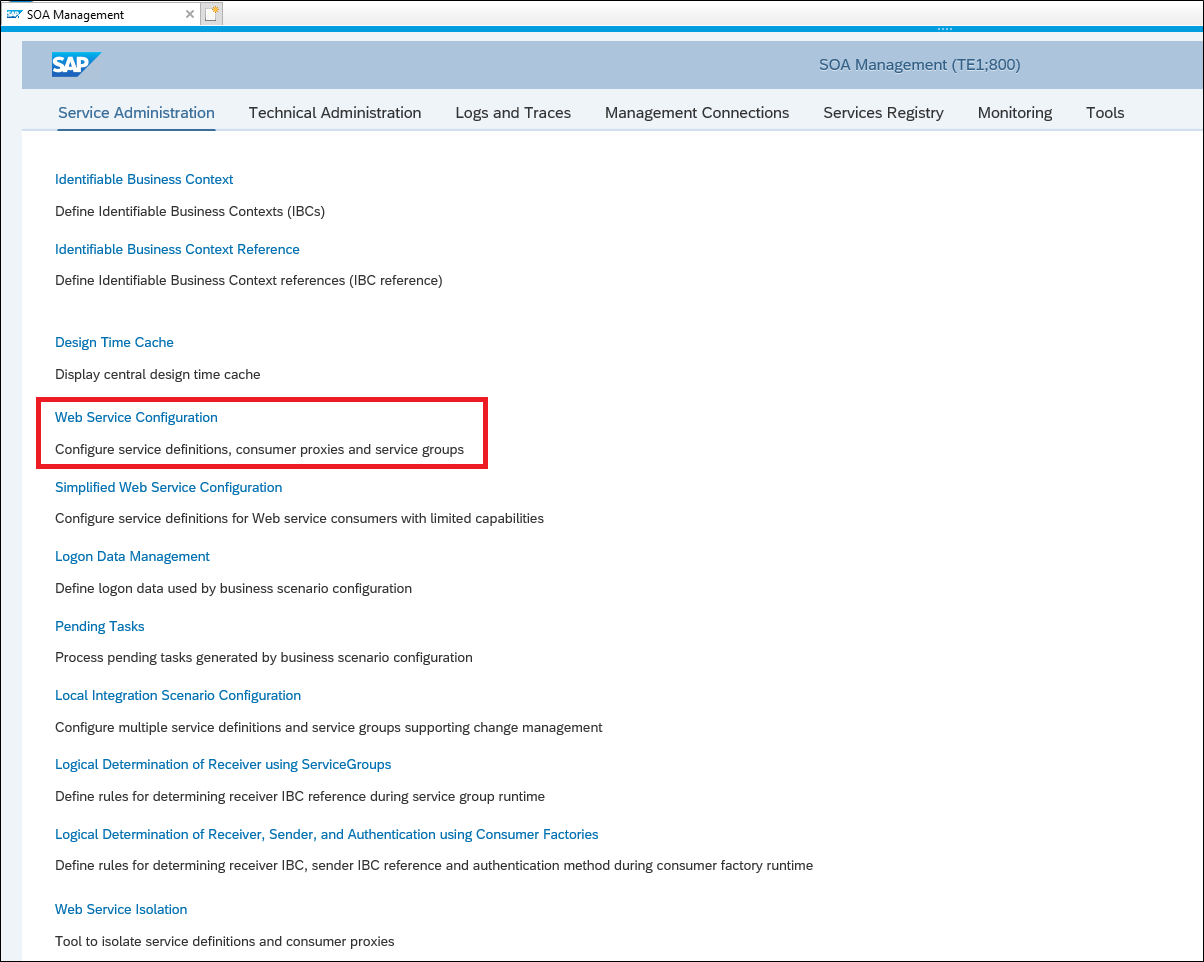
Start transaction SOAMANAGER in the SAP backend where you want to generate the Web service.
Your standard browser will open (Internet Explorer 11 is shown below):
-
Select the Service Administration tab.
-
Click the Web Service Configuration link.
-
Set up the following search criteria:
Search by: Object Name; Search Criteria: contains; Search Pattern: /OMADA*
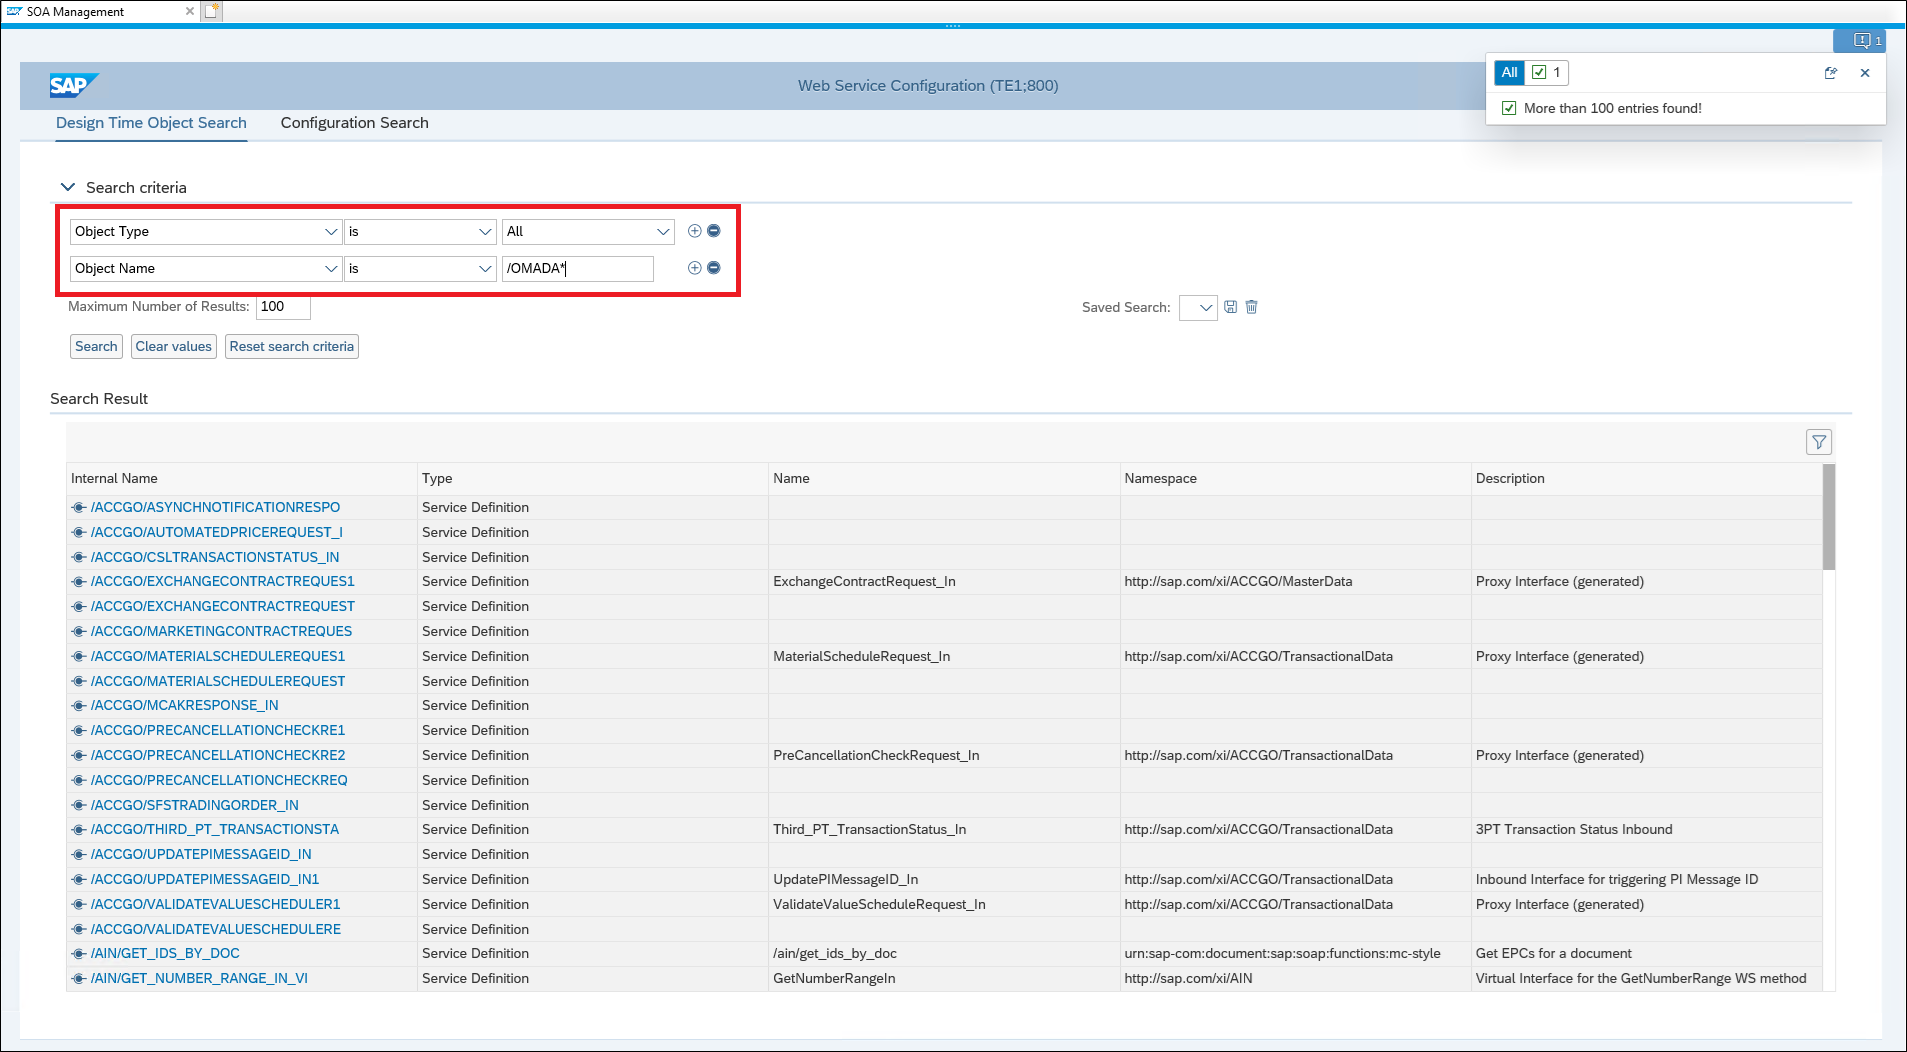
-
Click Search. The search results will now be shown.
-
Choose the relevant interface (see the information in table above) by clicking it, the below screen appears.

-
Click Create Service.

-
Enter a Service Name, Description, and Binding Name. Make sure that the names and description reflect the interface that you have chosen. When you have done so, click Next.
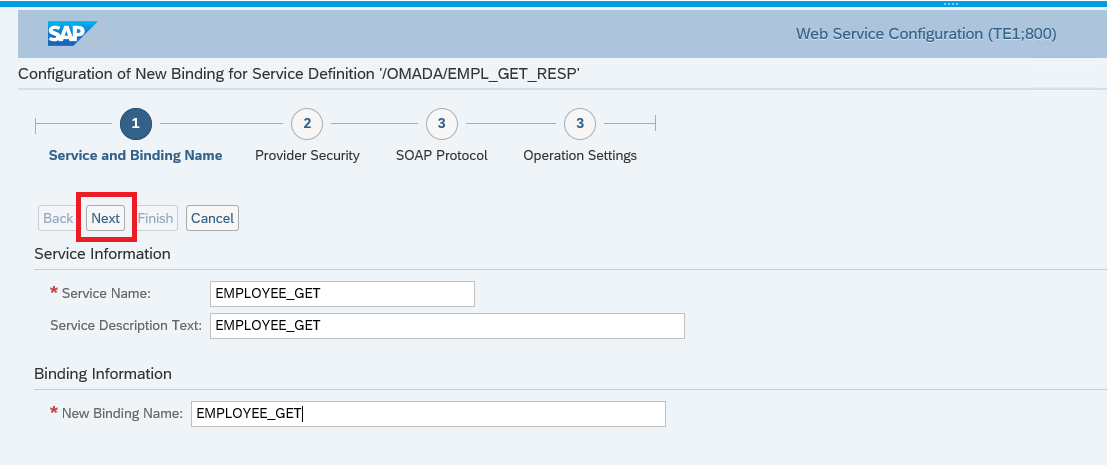 important
The values entered in Service Name and New Binding Name will be part of the generated web service url, so in order to use as much of the predefined query and mapping configuration in the System Onboarding wizard in Omada Identity, it is recommended to name the services according to below table.
An overview of service names and binding names:
| Object | Service Name / New Binding Name |
|---|---|
| Employees | employee_get employee_modify |
| Company Code | companycode_get |
| Cost Centers | costcenter_get |
| Building | building_get |
| Jobs | Jobs_get |
| Positions | position_get |
| Org. Units | orgunit_get |
| Personnel Area | personnelarea_get |
| Personnel Subarea | personnelsubarea_get |
-
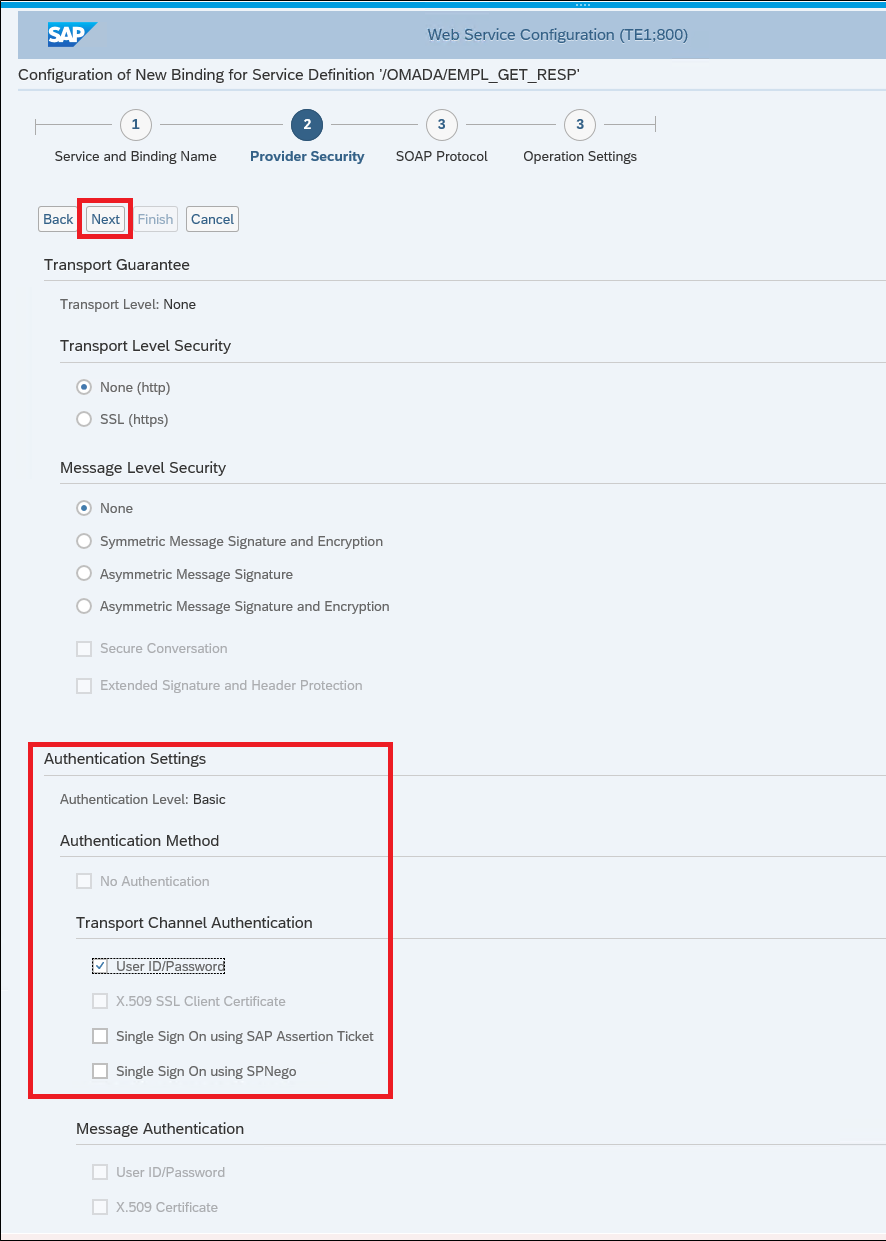
Under Authentication Settings, Transport Channel Authentication, select User ID/Password, and then click Next.)
-
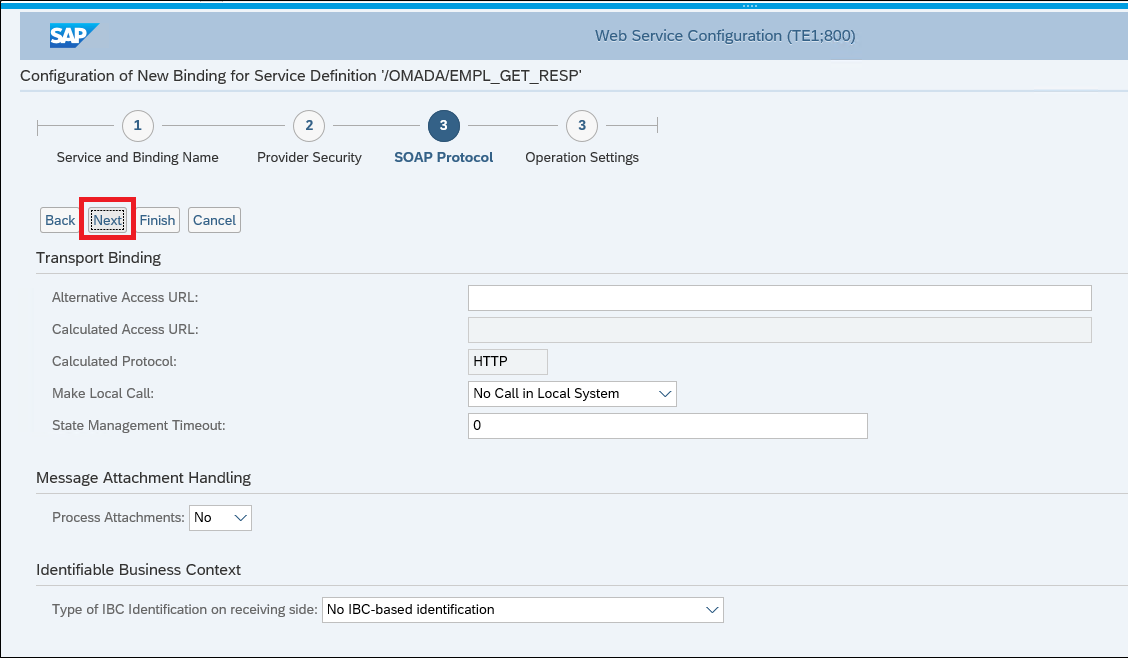
There is nothing to configure in the step SOAP Protocol, click Next.
-
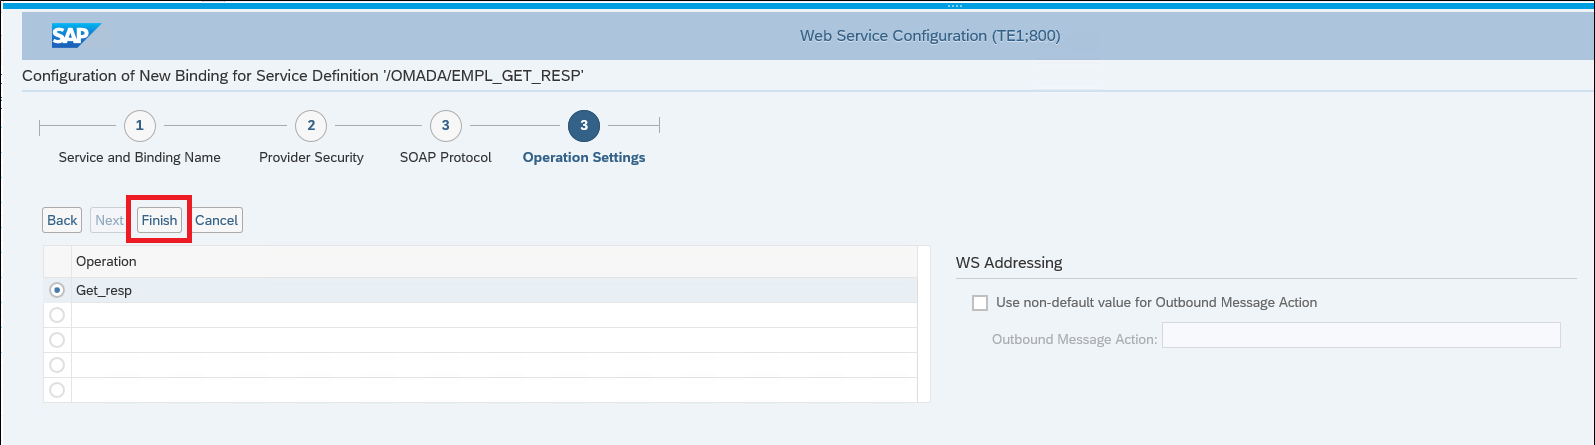
There is nothing to configure in the step Operation Settings, click Finish.
-
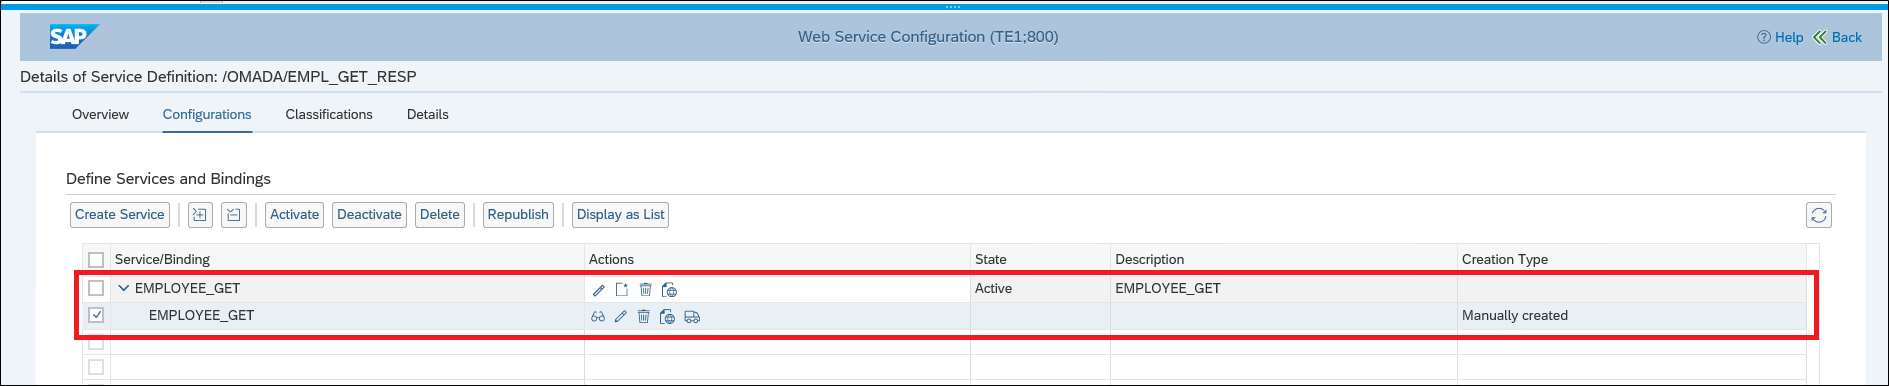
You can now see the new service and the binding that you have generated.
-
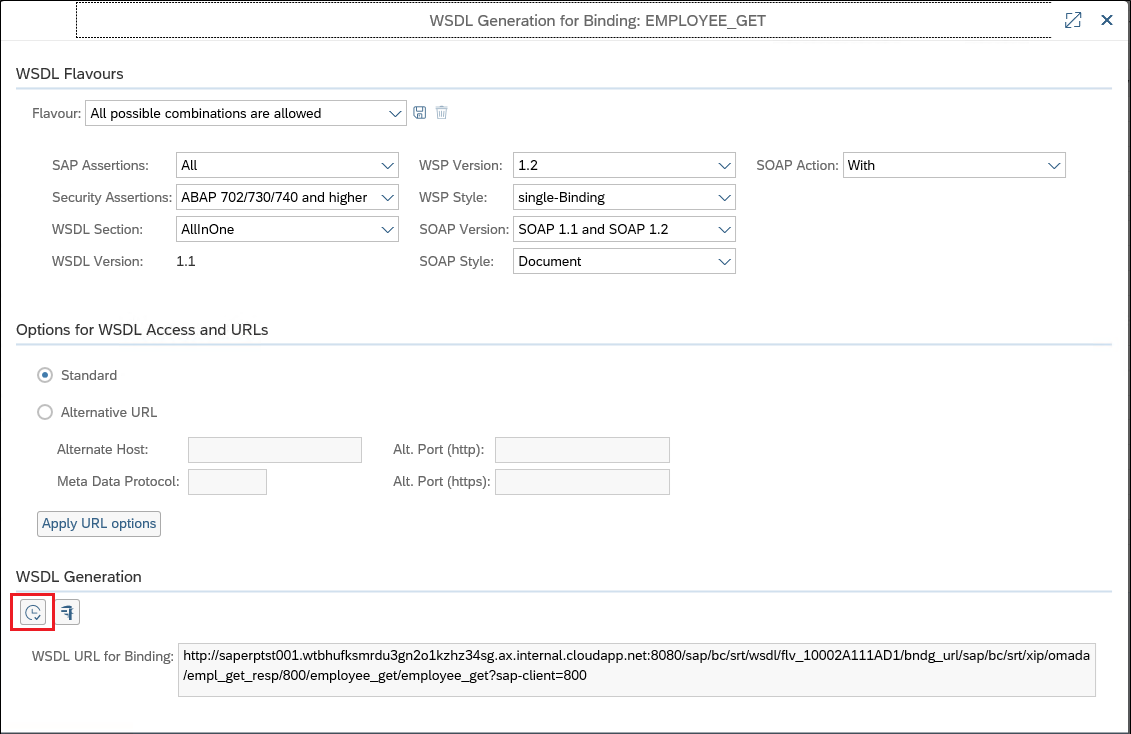
Now you have to find the corresponding Web service and link to it. In the same screen, click the Open Binding WSDL Generation icon.

-
Click the icon Open WSDL document for selected binding.
-
You will be prompted for username and password
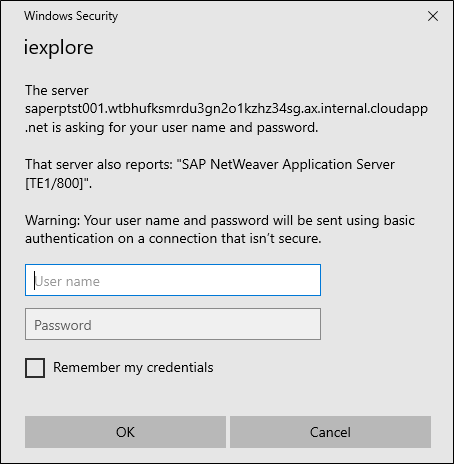
-
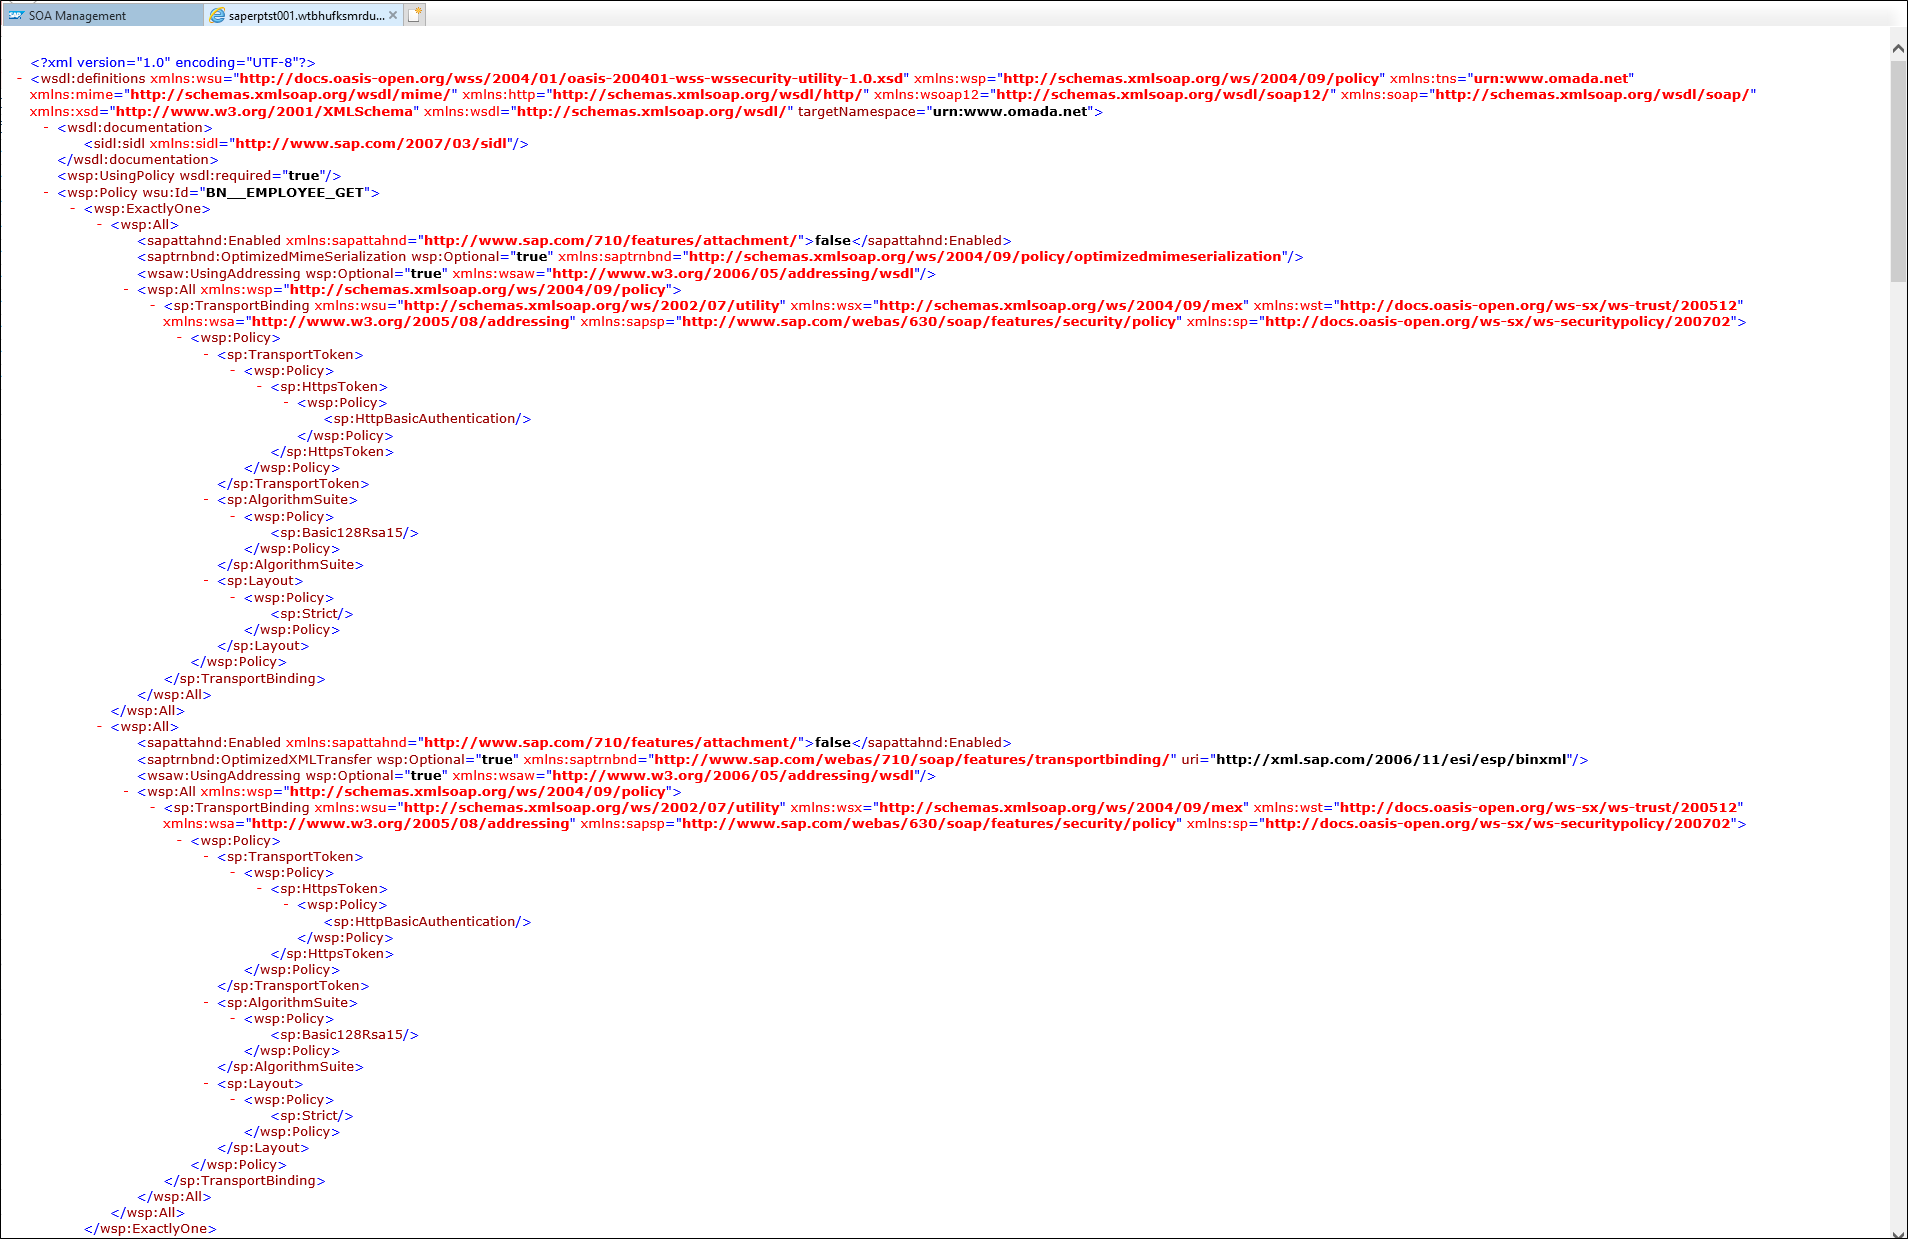
After you enter correct username and password, the WSDL is shown in your standard browser (Internet Explorer 11 is shown below):
You can now continue to create services for the remaining interfaces.
OPTIONAL - Implement BADI in SAP ABAP backend system
For customers who have requirements which cannot be met via configuration of the dynamic extract program, a BADI is provided as an enhancement option in the service interface. Customers must implement BADI to suit the custom requirements. The interface's outbound processing should be implemented to enhance the output structure.
All skilled developers can prepare coding in below BADI's by double click required BADI.
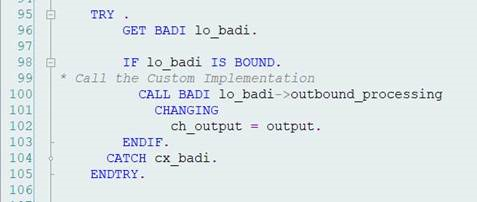
BAdi - /OMADA/EMPL_GET_SEND:
- Interface - OUTBOUND_PROCESSING
The screenshot below presents BADI Code Snippet from the service interface method.
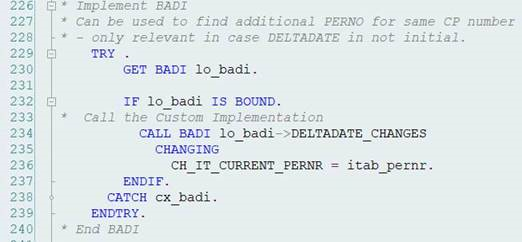
- Interface -- DELTADATE_CHANGE
The screenshot below presents BADI Code Snippet from the extract program (FM: OMADA/GET_HR_IDENTITIES).
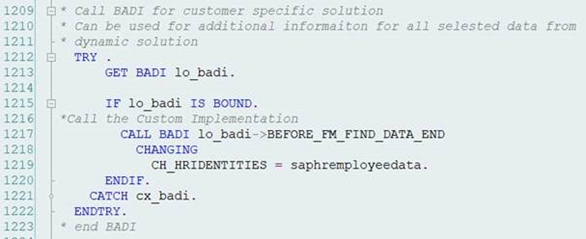
- Interface -- BEFORE_FM_FIND_DATA_END
The screenshot below presents BADI Code Snippet from the extract program (FM: OMADA/GET_HR_IDENTITIES).
Further functionalities not handled by configuration program
The functionalities described below are not utilized by the configuration program.
Subtype for Infotype PA0006 - /OMADA/INFTP6UPD
You can use transaction code /N/OMADA/UPD_INFTP6UPD to access the maintenance screens for this table.

This table is only used for updating employee infotype 6 - subtype. The extract searches only for entries in this table -- infotype 6 subtypes - in case an employee has data from infotype 6. In this case, the extract program updates required infotype by running SAP standard methods (actual Function Module) HR_MAINTAIN_MASTERDATA.
Cust_extx fields for extract
Ten fields are inserted to cache table /OMADA/HRCACHE2 -- "CUST_EXT1", "CUST_EXT2"...."CUST_EXT10"). These fields are not used as standard solution, but can be used in the configuration.
You can save data in CUST_EXT1 as follows:
-
From configuration functionality go to "Fields to extract". See the Maintain Exception Conditions section on how to insert new entry.

-
STAT2 is moved to fields INF00EMPL_STATUS and, as a test, CUST_EXT1. Remember this is NOT part of standard entries.
Additional information
- List of supported attributes - export to SAP HCM
- List of supported attributes - import from SAP HCM
| Component | Component Type | Data Type | Length | Short Description |
|---|---|---|---|---|
| INF02FIRST_NAME | PAD_VORNA | CHAR | 40 | First Name |
| INF02LAST_NAME | PAD_NACHN | CHAR | 40 | Last Name |
| INF02MIDDLE_NAME | PAD_MIDNM | CHAR | 40 | Middle Name |
| INF02NICK_NAME | PAD_RUFNM | CHAR | 40 | Nickname |
| INF06COM01 | COMKY | CHAR | 4 | Communication Type |
| INF06NUM01 | COMNR | CHAR | 20 | Communication Number |
| INF06COM02 | COMKY | CHAR | 4 | Communication Type |
| INF06NUM02 | COMNR | CHAR | 20 | Communication Number |
| INF06COM03 | COMKY | CHAR | 4 | Communication Type |
| INF06NUM03 | COMNR | CHAR | 20 | Communication Number |
| INF06COM04 | COMKY | CHAR | 4 | Communication Type |
| INF06NUM04 | COMNR | CHAR | 20 | Communication Number |
| INF06COM05 | COMKY | CHAR | 4 | Communication Type |
| INF06NUM05 | COMNR | CHAR | 20 | Communication Number |
| INF06COM06 | COMKY | CHAR | 4 | Communication Type |
| INF06NUM06 | COMNR | CHAR | 20 | Communication Number |
| INF105SMTPADR | AD_SMTPADR | CHAR | 241 | E-Mail Address |
| INF105SUBTYPMAIL | AD_SMTPADR | CHAR | 241 | E-Mail Address |
| INF105TLNMBR1 | AD_SMTPADR | CHAR | 241 | E-Mail Address |
| INF105USERID | AD_SMTPADR | CHAR | 241 | UserID |
Below table lists all the properties which are available in tables:
-
/OMADA/HRCACHE
-
/OMADA/HRCACHE2
/OMADA/HRCACHE table
| Component | Component Type | Data Type | Length | Short Description |
|---|---|---|---|---|
| INF02INITIALS | INITS | CHAR | 10 | Initials |
| INF02PERID | PRDNI | CHAR | 20 | Personnel ID Number |
| HEADOFORG_UNIT | HROMLEADER | CHAR | 1 | Head of Organizational Unit |
| INF709PERSONIDEXT | PERSONID_EXT | CHAR | 20 | External Person ID |
| INF00START_DATE | BEGDA | DATS | 8 | Start Date |
| INF00END_DATE | ENDDA | DATS | 8 | End Date |
| INF00ACTIONTYPE | MASSN | CHAR | 2 | Action Type |
| INF00MASSG | MASSG | CHAR | 2 | Reason for Action |
| INF00EMPL_STATUS | STAT2 | CHAR | 1 | Employment Status |
| INF01POSITION | PLANS | NUMC | 8 | Position |
| INF01POSITIONTX | STEXT | CHAR | 40 | Object Name |
| INF01JOB | STELL | NUMC | 8 | Job |
| INF01JOBTX | STLTX | CHAR | 25 | Job Title |
| INF01COMP_CODE | BUKRS | CHAR | 4 | Company Code |
| INF01COMP_CODETX | BUTXT | CHAR | 25 | Name of Company Code or Company |
| INF01EGROUP | PERSG | CHAR | 1 | Employee Group |
| INF01ESUBGROUP | PERSK | CHAR | 2 | Employee Subgroup |
| INF01ORG_UNIT | ORGEH | NUMC | 8 | Organizational Unit |
| INF01ORGTXSHORT | ORGTX | CHAR | 25 | Short Text of Organizational Unit |
| INF01ORGTXLONG | STEXT | CHAR | 40 | Object Name |
| INF01PERS_AREA | PERSA | CHAR | 4 | Personnel Area |
| INF01PERS_AREATX | PBTXT | CHAR | 30 | Personnel Area Text |
| INF01COSTCENTER | KOSTL | CHAR | 10 | Cost Center |
| INF01ANSVH | ANSVH | CHAR | 2 | Work Contract |
| INF01BGDATNXREC | BEGDA | DATS | 8 | Start Date |
| INF01POSITIONNXT | PLANS | NUMC | 8 | Position |
| INF01POSITTX_NXT | STEXT | CHAR | 40 | Object Name |
| INF01JOB_NEXT | STELL | NUMC | 8 | Job |
| INF01JOBTX_NEXT | STLTX | CHAR | 25 | Job Title |
| INF01ORGUNITNEXT | ORGEH | NUMC | 8 | Organizational Unit |
| INF01ORGTXSHRTNX | ORGTX | CHAR | 25 | Short Text of Organizational Unit |
| INF01ORGTXLNGNEX | STEXT | CHAR | 40 | Object Name |
| INF01SUPERVISAREA | MSTBR | CHAR | 8 | Supervisor Area |
| INF02FIRST_NAME | PAD_VORNA | CHAR | 40 | First Name |
| INF02LAST_NAME | PAD_NACHN | CHAR | 40 | Last Name |
| INF02FULL_NAME | PAD_CNAME | CHAR | 80 | Complete Name |
| INF02TITLE | TITEL | CHAR | 15 | Title |
| INF02NAMEAFFIX | VORSW | CHAR | 15 | Name Prefix |
| INF02NAME_PREFIX | VORS2 | CHAR | 15 | Second Name Prefix |
| INF02NICK_NAME | PAD_RUFNM | CHAR | 40 | Nickname |
| INF02MIDDLE_NAME | PAD_MIDNM | CHAR | 40 | Middle Name |
| INF02GENDER | GESCH | CHAR | 1 | Gender Key |
| INF02ANRED | ANRDE | CHAR | 1 | Form-of-Address Key |
| INF03FIRST_NAME | PAD_VORNA | CHAR | 40 | First Name |
| INF03LAST_NAME | PAD_NACHN | CHAR | 40 | Last Name |
| INF06STREET | PAD_STRAS | CHAR | 60 | Street and House Number |
| INF06CITY | PAD_ORT01 | CHAR | 40 | City |
| INF06POSTAL_CODE | PSTLZ_HR | CHAR | 10 | Postal Code |
| INF06TELNR | TELNR | CHAR | 14 | Telephone Number |
| INF06COUNTRY | LAND1 | CHAR | 6 | Country Key |
| INF06COM01 | COMKY | CHAR | 4 | Communication Type |
| INF06NUM01 | COMNR | CHAR | 20 | Communication Number |
| INF06COM02 | COMKY | CHAR | 4 | Communication Type |
| INF06NUM02 | COMNR | CHAR | 20 | Communication Number |
| INF06COM03 | COMKY | CHAR | 4 | Communication Type |
| INF06NUM03 | COMNR | CHAR | 20 | Communication Number |
| INF06COM04 | COMKY | CHAR | 4 | Communication Type |
| INF06NUM04 | COMNR | CHAR | 20 | Communication Number |
| INF06COM05 | COMKY | CHAR | 4 | Communication Type |
| INF06NUM05 | COMNR | CHAR | 20 | Communication Number |
| INF06COM06 | COMKY | CHAR | 4 | Communication Type |
| INF06NUM06 | COMNR | CHAR | 20 | Communication Number |
| INF32BLDING_NO | GEBNR | CHAR | 6 | Building Number |
| INF32ROOM_NO | DZIMNR | CHAR | 6 | Room Number |
| INF32TEL01 | TELIN | CHAR | 5 | In-House Telephone Number |
| INF32TEL02 | TELIN | CHAR | 5 | In-House Telephone Number |
| INF32SUBAREA | BTRTL | CHAR | 4 | Personnel Subarea |
| INF32SUBAREATX | BTEXT | CHAR | 20 | Text for stock type |
| INF32WAUSW | WAUSW | CHAR | 12 | Company ID |
| ORGBUILD | BUILD | CHAR | 8 | Building |
| ORGSTEXT | STEXT | CHAR | 40 | Object Name |
| ORGCNAME | CNAME | CHAR | 25 | Address Supplement (c/o) |
| ORGSTRAS | PD_STRAS | CHAR | 30 | House Number and Street |
| ORGORT01 | KORT | CHAR | 40 | City |
| ORGPSTLZ | PD_PSTLZ | CHAR | 10 | Postal Code |
| ORGLAND | KLAND | CHAR | 3 | Country |
| ORGSTRS2 | STRAS_GP | CHAR | 35 | House number and street |
| ORGTELNR | TELENR | CHAR | 25 | Telephone Number |
| CSKTKTEXT | KTEXT | CHAR | 20 | General Name |
| CSKTLTEXT | KLTXT | CHAR | 40 | Description |
| HRR_INITS | INITS | CHAR | 10 | Initials |
| MGR_INITS | INITS | CHAR | 10 | Initials |
| MGR_INITS_NEXT | INITS | CHAR | 10 | Initials of future manager |
| MGR_PERNO | PERNR_D | NUMC | 8 | Personnel Number |
| MGR_PERNO_NEXT | PERNR_D | NUMC | 8 | Personnel number of future manager |
| PERSAREACOMPNAME | NAME2 | CHAR | 30 | Name 2 |
| PERSAREA_STREET | STRAS | CHAR | 30 | House number and street |
| PERSAREA_PO_BOX | PFACH | CHAR | 10 | PO Box |
| PERSAREAPOSTCODE | PSTLZ | CHAR | 10 | Postal Code |
| PERSAREA_CITY | ORT01 | CHAR | 25 | City |
| PERSAREACONTRKEY | LAND1 | CHAR | 3 | Country Key |
| PERSAREA_REGION | REGIO | CHAR | 3 | Region (State, Province, County) |
| INFO40LOAN_OBJ | LEIHG | CHAR | 4 | Object on loan |
| INFO40LOANOBJNAM | LOBNR | CHAR | 20 | Name of object on loan |
| INFO40LOAN_OBJNO | ANZNR | DEC | 4 | Number of objects on loan |
| INFO40UNIT | PT_ZEINH | CHAR | 3 | Time/Measurement Unit |
| ORGOTYPE, (Central Person) | OTYPE | CHAR | 2 | Object Type |
| ORGOBJID, (Central Person) | HROBJID | NUMC | 8 | Object ID |
| ORGSOBID, (Central Person) | SOBID | CHAR | 45 | ID of Related Object |
| ORGBEGDA, (Central Person) | BEGDA | DATS | 8 | Start Date |
| ORGENDDA, (Central Person) | ENDDA | DATS | 8 | End Date |
| INF105BADGE | RCOMP_D | CHAR | 6 | Company |
| SCLAS_F_AREA, (Functional Area) | SYSID | CHAR | 30 | Communication ID/Number |
| SOBID_F_AREA, (Functional Area) | SHORT_D | CHAR | 12 | Object Abbreviation |
| ORGSHORT_F_AREA, (Functional Area) | STEXT | CHAR | 40 | Object Name |
| ORGSTEXT_F_AREA, (Functional Area) | SCLAS | CHAR | 2 | Type of Related Object |
| ORGRCOMP_INT | SOBID | CHAR | 45 | ID of Related Object |
| PERS_SUB_AREA | BTRTL | CHAR | 4 | Personnel Subarea |
| INF105SUBTYPCELL | SYSID | CHAR | 30 | Communication Identification/Number |
| EMPLSTATUSTEXT | TEXT40 | CHAR | 40 | Text, 40 Characters Long |
| EMPLGROUPTEXT | PGTXT | CHAR | 20 | Name of Employee Group |
| PERSUBAREATEXT | BTRTX | CHAR | 15 | Personnel Subarea Text |
| ACTIONTYPETEXT | MNTXT | CHAR | 30 | Name of Action Type |
| EMPLSUBGRPTEXT | PKTXT | CHAR | 20 | Name of Employee Subgroup |
| SITEID | SYSID | CHAR | 30 | Communication Identification/Number |
| MYACCESSID | SYSID | CHAR | 30 | Communication Identification/Number |
| BUILD_ID | BUILD | CHAR | 8 | Building |
| TERMDATE | DATUM | DATS | 8 | Date |
/OMADA/HRCACHE2 table
| Component | Component Type | Data Type | Length | Short Description |
|---|---|---|---|---|
| CUST_EXT1 | CHAR | 200 | Customer extension field 1 | |
| CUST_EXT2 | CHAR | 200 | Customer extension field 2 | |
| CUST_EXT3 | CHAR | 200 | Customer extension field 3 | |
| CUST_EXT4 | CHAR | 200 | Customer extension field 4 | |
| CUST_EXT5 | CHAR | 200 | Customer extension field 5 | |
| CUST_EXT6 | CHAR | 200 | Customer extension field 6 | |
| CUST_EXT7 | CHAR | 200 | Customer extension field 7 | |
| CUST_EXT8 | CHAR | 200 | Customer extension field 8 | |
| CUST_EXT9 | CHAR | 200 | Customer extension field 9 | |
| CUST_EXT10 | CHAR | 200 | Customer extension field 10 | |
| CUST_EXT11 | CHAR | 50 | Customer extension field 11 | |
| CUST_EXT12 | CHAR | 50 | Customer extension field 12 | |
| CUST_EXT13 | CHAR | 50 | Customer extension field 13 | |
| CUST_EXT14 | CHAR | 50 | Customer extension field 14 | |
| CUST_EXT15 | CHAR | 50 | Customer extension field 15 | |
| CUST_EXT16 | CHAR | 50 | Customer extension field 16 | |
| CUST_EXT17 | CHAR | 50 | Customer extension field 17 | |
| CUST_EXT18 | CHAR | 50 | Customer extension field 18 | |
| CUST_EXT19 | CHAR | 50 | Customer extension field 19 | |
| CUST_EXT20 | CHAR | 50 | Customer extension field 20 | |
| INF02PERNO | PERNR_D | NUMC | 8 | Personnel Number |
| MGR_EMAIL | AD_SMTPADR | CHAR | 241 | E-Mail Address |
| INF105SMTPADR | AD_SMTPADR | CHAR | 241 | E-Mail Address |
| INF105USERID | AD_SMTPADR | CHAR | 241 | E-Mail Address |
| INF105TLNMBR1 | AD_SMTPADR | CHAR | 241 | E-Mail Address |
| INF105SUBTYPMAIL | AD_SMTPADR | CHAR | 241 | E-Mail Address |