Data import
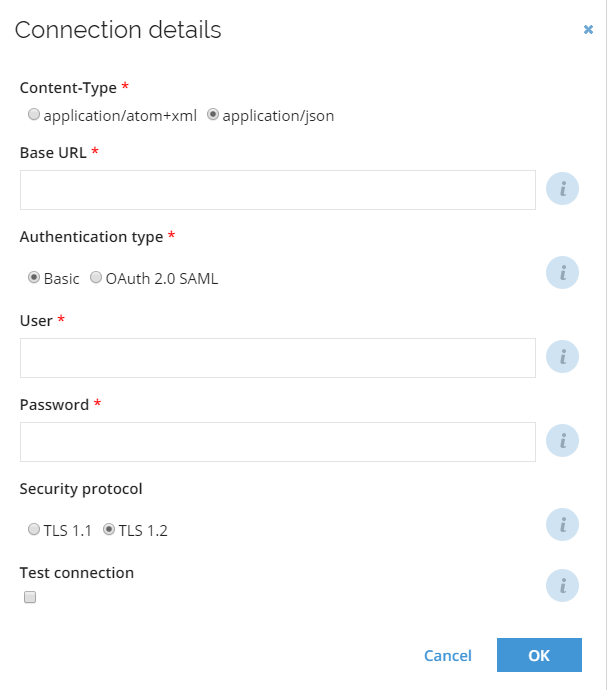
Connection details
-
In the Content-type option, choose if the content that is returned from the system should be in atom+xml or JSON format.
Omada recommends that you choose JSON because this type of content takes up less space and generally should give you a better system performance compared to atom+xml. Your organization should test/verify if this content is the best solution for your organization's purposes.
-
In the Base URL field, type or paste the URL for the API URL.
noteTo find the API URL, see the following knowledge base article from SAP.Note that you must have an account for the SAP Support portal to access this knowledge base article.
For example, the login URL for an end user is as follows:
https://company.successfactors.eu/login?company=Megamart. To specify the Base URL, copy this URL, and remove the part of the URL that starts with login?. In the example, this means you should removelogin?company=Megamart. -
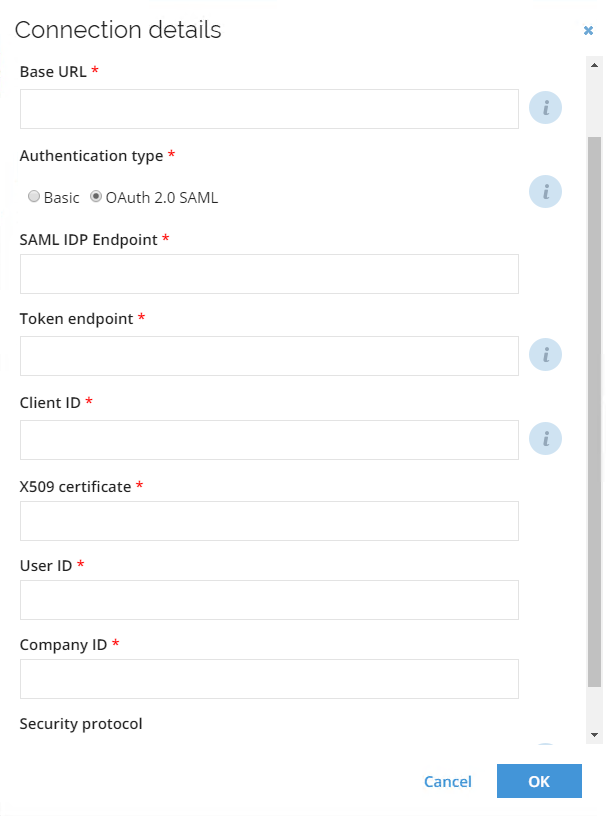
The Authentication type allows you to choose if you want to use Basic authentication or OAuth 2.0 SAML. Depending on the authentication type, the required fields for authentication data are different.
-
In the User field, type the user name to use with the login. You must add the @ sign to the company ID from the login URL, for example, admin@
megamart.- If you do not write the user login this way, Omada Identity cannot validate the user. This field is required for the Basic authentication type.
-
In the Password field, type the password for the user that you specify for login. This field is required for the Basic authentication type.
-
In the SAML IDP Endpoint field provide the URL of the IDP Endpoint used for SAML authentication. This field is required for the OAuth 2.0 SAML authentication type.
-
In the Token endpoint provide the URL of the token endpoint used to exchange an authorization grant for an access token. This field is required for the OAuth 2.0 SAML authentication type.
-
Provide the Client ID that is a client identifier issued during client registration process. This field is required for the OAuth 2.0 SAML authentication type.
-
In the X509 certificate field provide the proper certificate. In order to find more details on setting up X509 certificate for OAuth in SAP SF, refer to SAP documentation.
- This field is required for the OAuth 2.0 SAML authentication type.
-
In the User ID enter the user identifier for the OAuth. This field is required for the OAuth 2.0 SAML authentication type.
-
In the Company ID enter the company identifier for the OAuth. This field is required for the OAuth 2.0 SAML authentication type.
-
In Security protocol specify the security protocol that will be used in the connection (select TLS 1.2).
Queries and mappings
The Omada SAP SuccessFactors connectivity is based on the OData collector and has several predefined queries and mappings for the following object types:
- Contexts
- Context assignments
- Context owner
- Identity
- Identity owner
Make sure that the properties used in the Queries and Mappings have the Enabled field set to Yes in SAP SuccessFactors.
This collector supports any number of queries and has the following query parameters which should be specified when creating or editing a query:
-
In the URL is a DynamicExpresso expression field, you can specify whether the URL is generated from a DynamicExpresso expression (if Yes is selected) or interpreted directly (if No is selected).
-
In the URL field, enter the URL for the resource. If No is selected in URL is a DynamicExpresso expression, you can specify a full URL or the part of the URL which should be appended to the Base URL. If Yes is selected in URL as a DynamicExpresso expression, the URL enables the user to specify a DynamicExpresso expression, which is used to generate the URL dynamically.
importantIt is recommended to use the SuccessFactors paging mechanisms when querying PerPerson entity to avoid missing or duplicate records. This behavior occurs when the same Entity is updated by another process in parallel while being read from SAP. To enable the paging mechanism to add the paging=snapshot query parameter at the beginning of the URL:
PerPerson?paging=snapshot&$filter... -
Optionally, in the Nested URL field, you can provide any attribute returned from the URL and use it as a nested query. The attribute must be enclosed in brackets, for example,
/groups/{PARENT_id}/members?roles=MEMBER.infoIf the URL returns a collection (multi-value), the Nested URL will only be called using the first element of each collection. Moreover, as the **Nested URL **is called for the number of rows returned from the URL, employing this feature causes a performance penalty.
The Nested URL field doesn't allow special characters.
-
Optionally, in the Nested URL is a root radio button, you can specify whether the return should be the first found collection, by selecting No (which is the default value) or a root element treated as a single element, by selecting Yes.
-
Optionally, when the Nested URL is root parameter is set to Yes, then the Nested URL Collection must be specified as well, to point to the collection inside the root element from which you want to collect data.
-
Optionally, disable paging for the Nested URL.
-
Optionally, in the Append field, enter some query parameters which should be appended.
-
Optionally, in the Distinct field, specify if the collector should remove possible duplicate rows.
-
Optionally, in the Collection field, you can specify the name of the collection element in the response from where the result should be read. By default, the result is read from the first found collection.
-
Optionally, in the Filter field under the Parameters heading, you can provide a Dynamic Expresso expression that is used for filtering the data imported into Omada Identity. It returns a TRUE/FALSE result for each imported data row. If the expression returns FALSE for the given row that row is skipped during import.
- The filter can be supplied with special functions
#MinRow()or#MaxRow(). The#MinRow()/#MaxRow()are custom functions that can be combined with regular DynamicExpresso expressions thanks to the # prefix. For example, in line:#MinRow(col1, col2)#col=="active":- the custom function is encapsulated with # at the start and optionally at the end (if a regular filter is to be appended like in the example (
col=="active")). - The
MinRow()/MaxRow()functions take two parameters. The intention is similar to a "Group by function" in SQL server that allows you to eliminate duplicates and to take the lowest orhighest[order by column]for each[unique column]row, i.e.,MinRow([unique column],[order by column].
- the custom function is encapsulated with # at the start and optionally at the end (if a regular filter is to be appended like in the example (
- The filter can be supplied with special functions
-
Optionally, in the Description field, enter a description for what this query is doing.
Mapping of resource owners
If you create a query to import resource owners, it is possible to specify the resource's owner in two ways. You can do it either by directly importing the UID of the identity or by specifying the account from which the resolved owner is imported as a resource owner.
When mapping directly to the UID of identity, ensure that identities are already imported to Omada Identity. When mapping to an owned account, it is possible to either specify the business key of the account or the composed business key. The former should be used if the account is in the same system as the resource; the latter should be used if the account is imported into any of the trusted systems.
When the account stems from another system, you should use a Lookup mapping.
Advanced configuration
You can select the Perform unfolding option to enable the system to unfold the parent-child hierarchy of the resource. The Timeout in seconds field allows you to specify how long the collector should wait for a response of the REST service. The default value is set to 3600 seconds (1 hour). In the optional Row count per batch field, you can set the number of objects that will be collected and staged as a batch when paging is implemented in the collector. The default value is 100000.
Bear in mind that applying a low value (e.g., 50 or 500) to this setting may result in extended import time.
Configure data import
Store data for reporting - enable this setting to only import data to the staging database. This allows you to inspect the data and adjust the system onboarding configuration without storing any history.
- Note that:
- The setting is enabled by default and applies to the full system category.
- If you disable the setting, the data for the system category is only imported to the staging database no matter what import profile is running it.
Prepare data for processing - enable this setting to represent imported data as objects in Omada Identity. The setting is enabled by default.
Configure thresholds
The Configure thresholds function allows you to set the amount of changes that cannot be exceeded, relevant to the last import.
In the Configure import thresholds view, type a number (integer) in percentage for New objects, Modified objects, and Deleted objects to enable thresholds for the import of objects from this system.
The value for each operation is by default set to 0, which means that no threshold calculations take place for the operations until you change the integer.
For more information, refer to the Threshold section in the Import and Onboarding documentation.
For all .NET-based collectors, thresholds are calculated in the following relation:
- If the system category is set to Identity data, the thresholds are calculated.
- If the system category is set to Access data, the thresholds are calculated.
- If the system category set to Both, the thresholds only apply to Access data, that is, Accounts, Resources, and ResourceAssignments.