Target system
Omada provides several Enterprise Services for reading, updating, creating, and deleting data in SAP.
Prerequisites
Before you start to generate the Web services for the interfaces or object types, following prerequisites
-
Activate the required services in transaction SICF:
- sap/bc/webdynpro/sap/APPL_SOAP_MANAGEMENT
- sap/bc/srt (including sub-nodes)
-
Omada SAP Connectivity Add-On package must be imported with the ABAP Proxies.
Minimum required permissions
SAP Connectivity for Access Data in Omada Identity requires the access to run transaction code SOAMANAGER in the backend system.
Required Authorizations in SAP
For configuration and execution of the Omada SAP Connectivity package, you can use the SAP Connectivity Interface template role.
For the SAP Access Data system, those are Y_OMADA_SAPMA_DEVELOPER_ECC and Y_OMADA_SAPMA_CONSUMER_ECC.
The SAP Connectivity Interface composite role for developers enables you to administer and configure service providers and consumer proxies for your local backend. The roles provide only normal SAP developer system access for the SAP backend.
The consumer role is to be assigned to the user used by OPS, and ODW, and who connects to SAP and reads/changes/create objects in SAP. The roles are delivered as part of the Add-on package provided by Omada.
Role Details
- Y_OMADA_SAPMA_DEVELOPER_ECC
- Y_OMADA_SAPMA_CONSUMER_ECC
The SAP ECC composite role, Y_OMADA_SAPMA_DEVELOPER_ECC, contains the following single roles:
| Role name | Description |
|---|---|
| Y_OMADA_SAPMA_CONSUMER_ECC | Master role for Omada SAP MA, OPS, and ODW |
| Y_OMADA_SAPMA_WEBS_ADMIN | Web Service Administrator |
| Y_OMADA_SAPMA_WEBS_ADMIN_BIZ | User Role for Business Administrator |
| Y_OMADA_SAPMA_WEBS_ADMIN_TEC | Standard Role for Technical Administration of Web Services |
| Y_OMADA_SAPMA_WEBS_CONSUMER | Web Service Consumer |
| Y_OMADA_SAPMA_WEBS_DEBUGGER | Template Role for Web Service Debugger |
| Y_OMADA_SAPMA_WEBS_OBSERVER | User Role for Viewing All Web Service Information |
| Y_OMADA_SAPMA_WEB_SERVICE_USER | Pattern Role for Web Service Runtime Background User |
The SAP ECC role, Y_OMADA_SAPMA_CONSUMER_ECC is a single role which contains all required authorizations for the SAP MA user.
Network requirements
The TCP/IP ports used by the SAP system are customer specific, typically the SAP Basic administrator can provide this information. The port numbers are maintained in the SAP NetWeaver Application Server profile.
![]()
SAP add-on installation
SAP add-on installation
As the first step in preparing the SAP backend, you must import the enterprise services and extract the program provided by Omada.
To upgrade your SAP Interfaces follow the provided instructions. After upgrading all web services are already configured and no additional configuration is required.
Omada's SAP Access Data Connectivity utilizes the SAP Add-On installation Tool (SAINT) to install the Omada components into the SAP system(s).
-
Download the .sar file, that is relevant for your SAP solution, from the Omada Help Desk and copy it to the folder on your local PC.
-
Log into client 000 in SAP via SAP GUI and execute transaction SAINT.
-
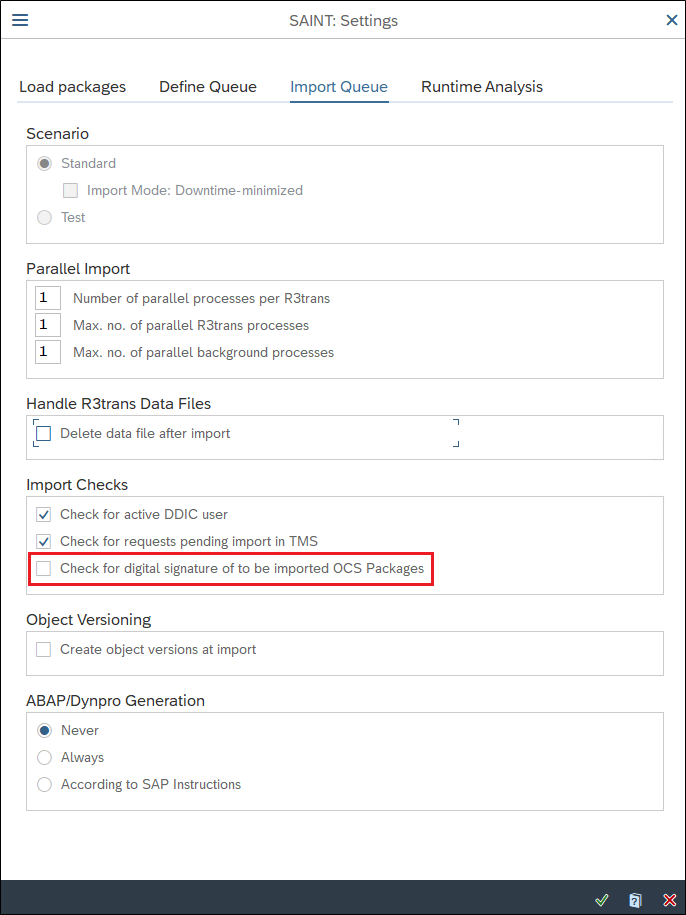
Select the menu More > Extras > Settings and deselect the Check for digital signature of to be imported OCS Packages option marked below.
-
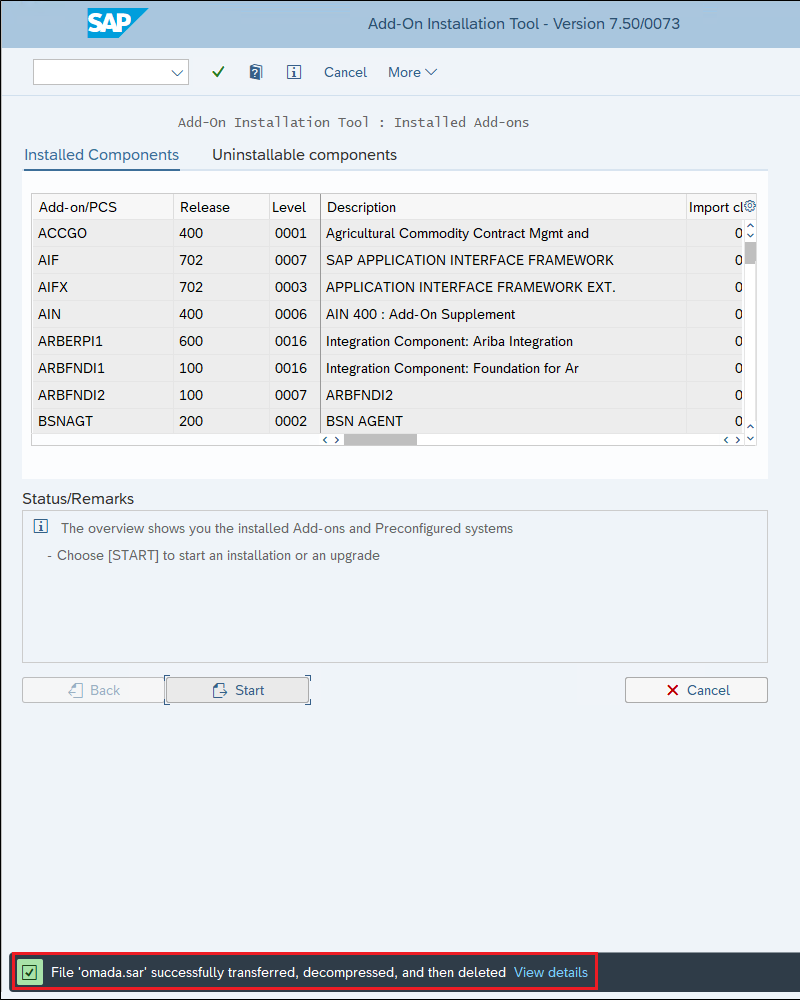
The list of installed components is displayed.

-
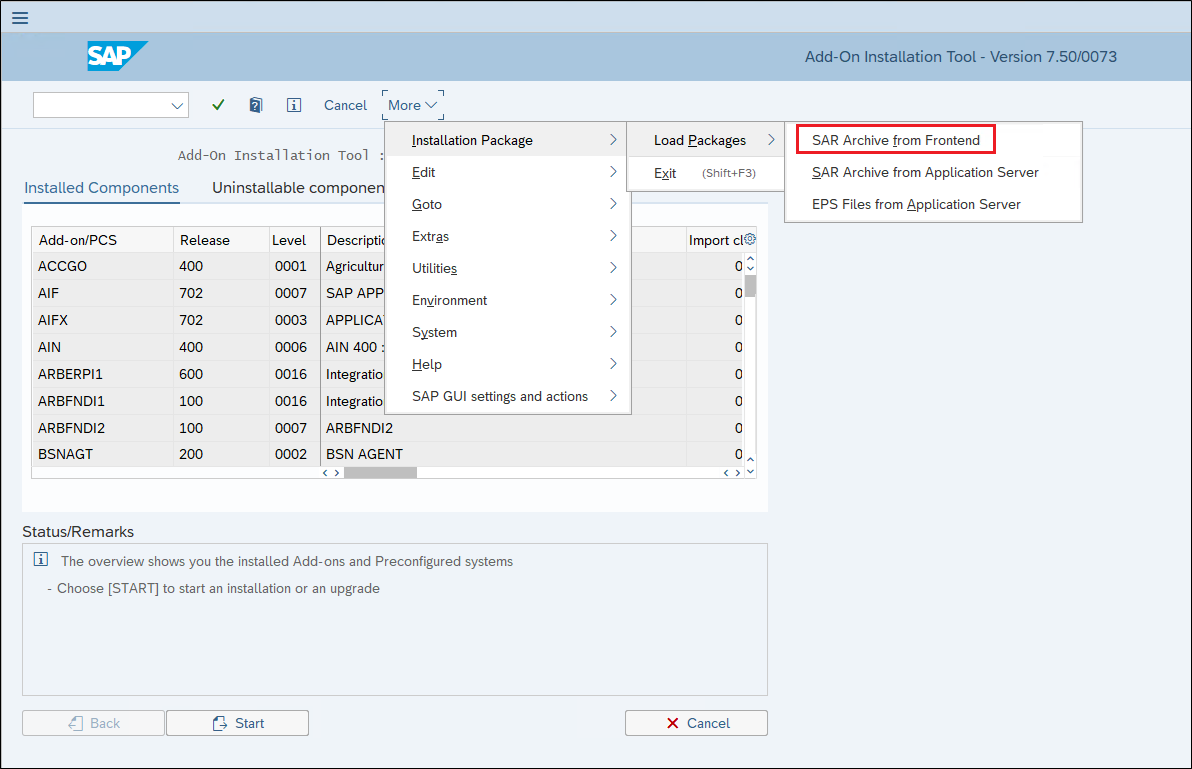
Select the menu More > Installation Package > Load Packages > Sar Archive from Frontend.
-
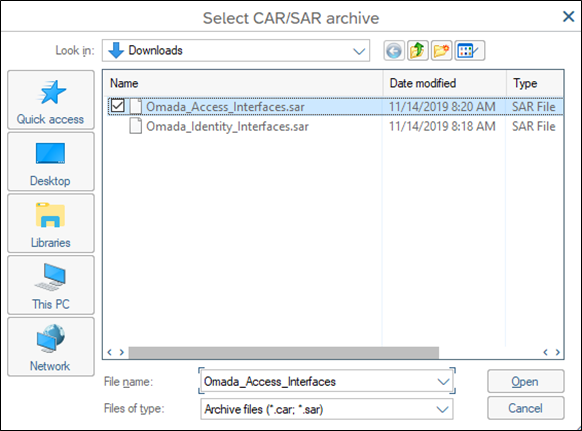
Navigate to the folder where the downloaded .sar file is located and click Open.
-
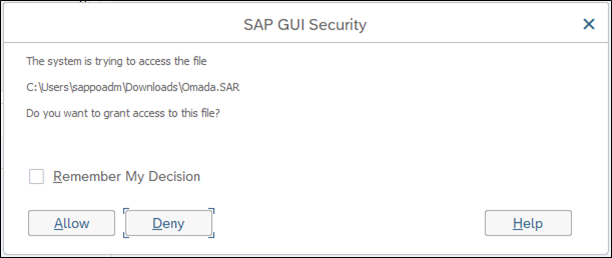
If the below pop-up appears, select Allow.
-
You can ignore the warning about the archive not being signed. Select Decompress to unpack and copy the file to target directory on the SAP server.

-
You will be returned to the below screen again where you select Start.
-
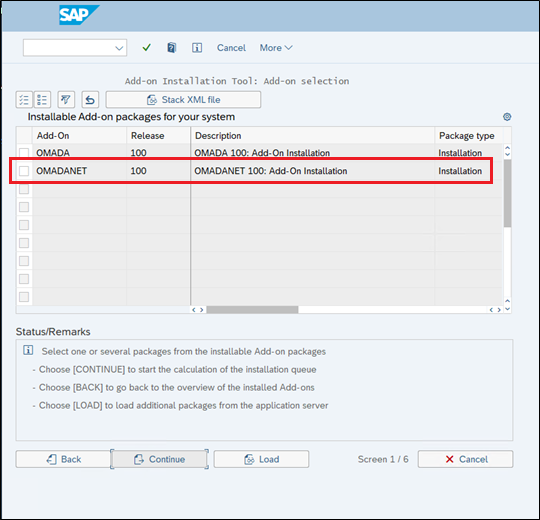
The OMADANET Add-On is now listed as an installable Add-on package, select the package by ticking the box to the left of the row and click Continue. (The other package listed here is OMADA, which is only used for SAP HCM systems, refer to the Omada Identity - SAP HCM Connectivity Guide for details.)
-
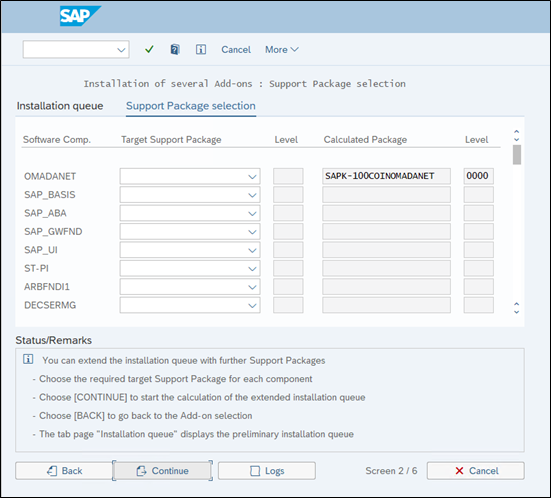
There are no Support Packages to apply, select Continue.
-
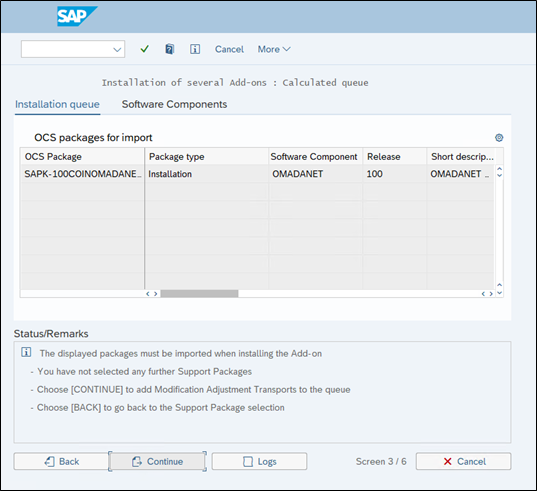
The Omada Add-on is added to the installation queue, select Continue.
-
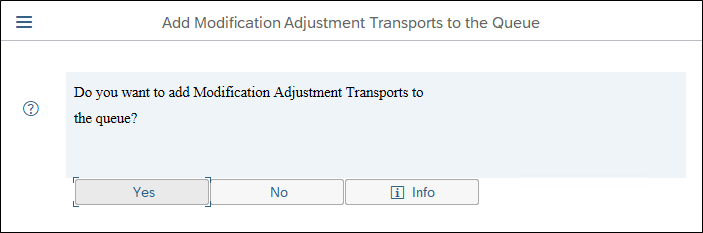
When you are asked if you want to add Modification Adjustment Transports, select No.
-
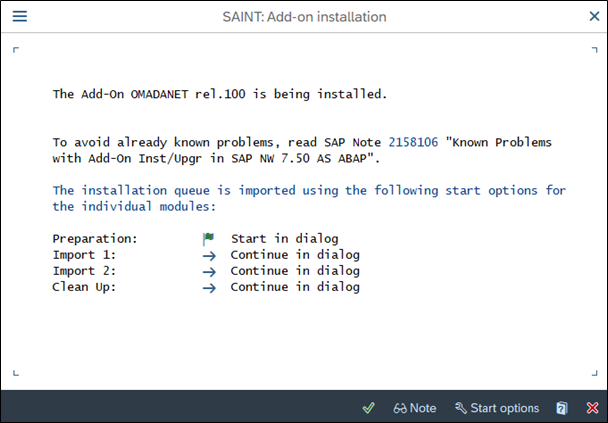
The Add-On is now ready to be installed. By default, it runs in a dialog mode, but optionally you can also change the Start Options to run the installation in the background. This guide will demonstrate running in dialog mode. Click the icon to continue.
-
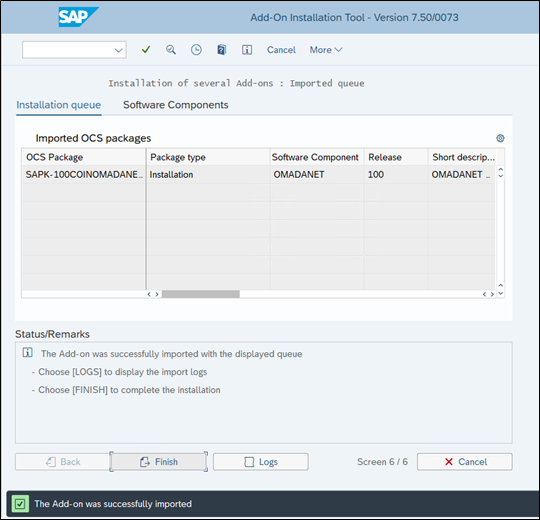
After some time, you should receive the below confirmation that the Add-On was successfully imported, click Finish.
-
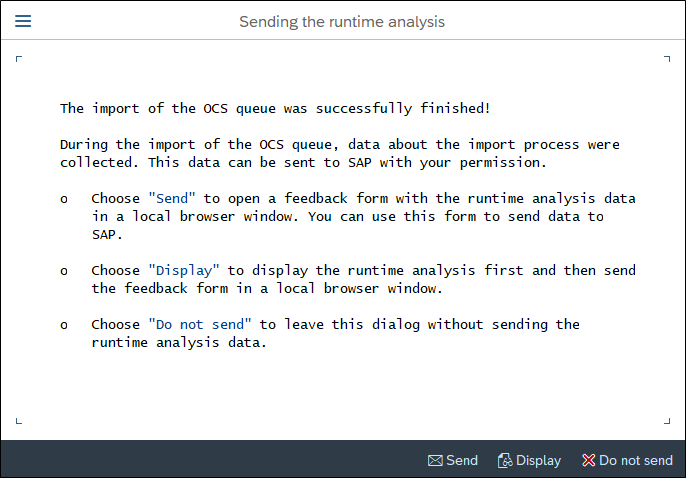
You are prompted if you want to send runtime analysis, select Do not send.
-
Add-On import is now completed, and you can continue to the configuration part.
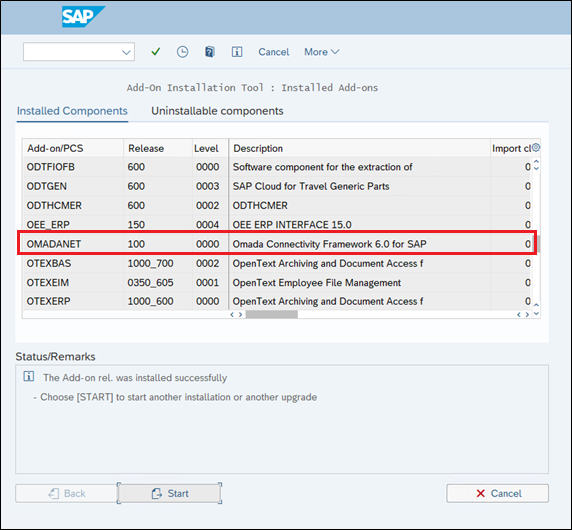
Note that Omada provides newer versions of the Add-On when required, so the Release and Level numbers are shown in the above screen-shot can be higher. The latest version is always available on the Omada Help Desk.
Target system configuration
Initial configuration
The default behavior of the Omada Connectivity Framework for SAP Solutions is to extract all user records from SAP. However, we also support excluding SAP user records from the import to Omada Identity, thereby reducing the number of user records being read from SAP to Omada.
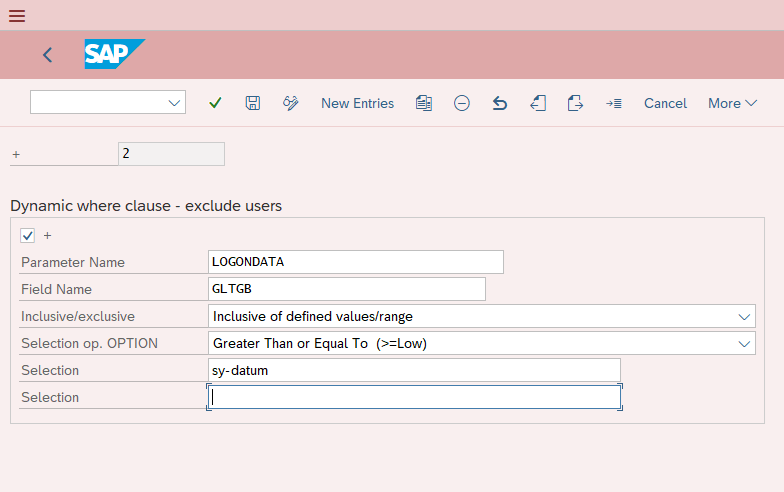
Use Transaction code /N/OMADANET/USERCONF to insert dynamic where clauses to exclude users.
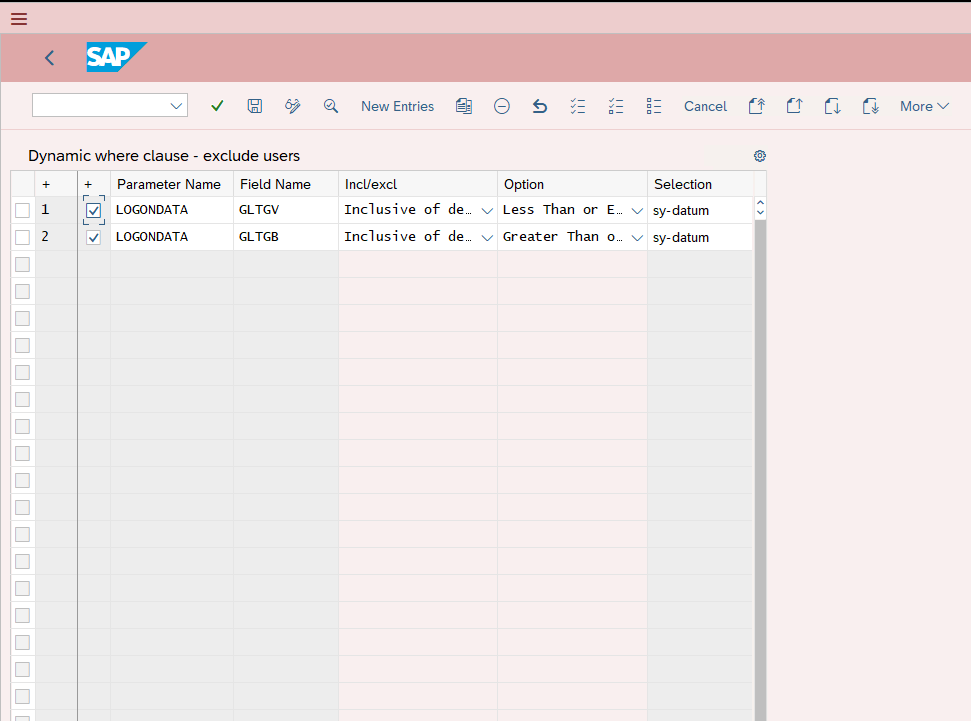
See the below table for the description of the input properties.
| Columns | Description |
|---|---|
| First column (+) | Specify the order |
| Second column (+) | Enable/disable the "where" clause |
| Parameter Name | This maps to the tabs in t-code SU01. Refer to the below list of available parameters and fields. |
| Field Name | This maps to the tabs in t-code SU01. Refer to the below list of available parameters and fields. |
| Incl/excl | Include/Exclude defined value |
| Option | Values allowed are standard – Equal-to, Not Equal-to, etc. |
| Selection | Input value you need to compare to. It can be used as a single value, or in case you need range, this will be the low value. If you use the date, it must be YYYMMDD or use sy-datum as the only available substitution field. Remember – no quotes. |
| Selection | Input value you need to compare to. Only used in case you have a range. If you use the date, it must be YYYMMDD or use sy-datum as the only available substitution field. Remember – no quotes. |
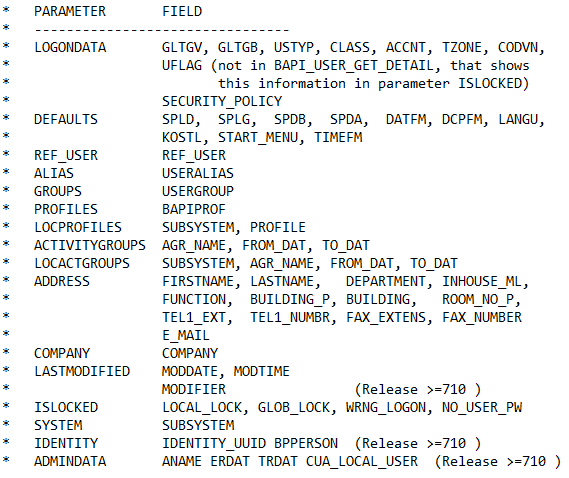
List of valid parameters and fields.
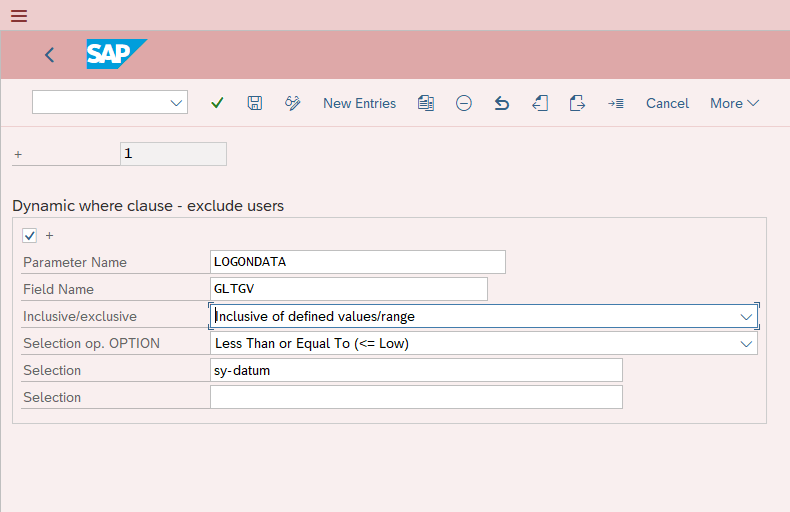
Find below an example of how to import users only within the active validity period. Remember to Save your entries before exiting the transaction.
Roles and Profiles
The default behavior of the Omada Connectivity Framework for SAP Solutions is to extract all roles and profiles from SAP. However, we also support excluding SAP roles and profiles from the import to Omada Identity, thereby reducing the number of records being read from SAP to Omada.
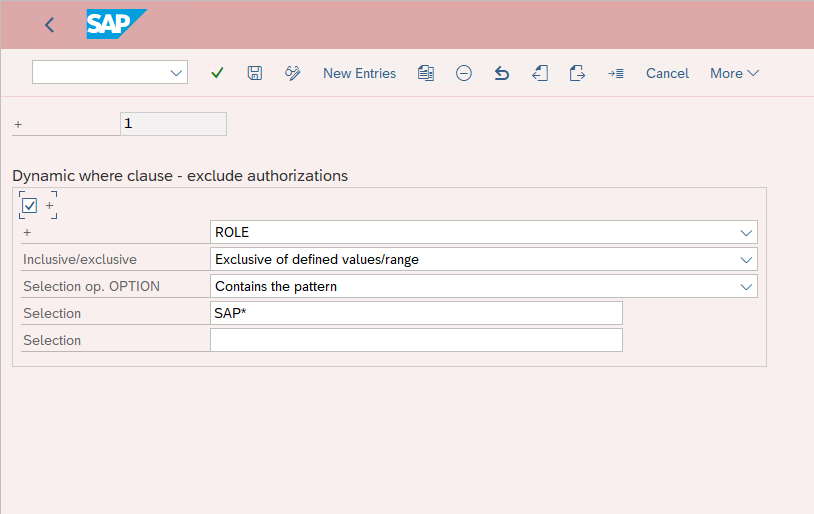
Use Transaction code /OMADANET/AUTHCONF to insert dynamic where clauses to exclude roles and profiles.
Use this option with caution. If you exclude roles and/or profiles assigned to users, you will experience issues when importing resource assignments for users as they will refer to non-existing resources.
Below you can find the example of how to exclude the SAP standard roles that start with SAP in the role name.
Remember to Save your entries before exiting the transaction.
Generate Web Services using SOAMANAGER
The below table provides an overview of all objects supported by the Omada Connectivity Framework for SAP Solutions including the internal names of the services as they appear in transaction SOAMANAGER.
| SAP Object | Internal Name (SOAMANAGER) | Description |
|---|---|---|
| Profiles | /OMADANET/AUTH_PROF_RESP | Read all Profiles |
| Roles | /OMADANET/AUTH_ROLES_RESP | Read all Roles |
| Tcodes | /OMADANET/AUTH_TCODES_RESP | Read all Tcodes |
| Profiles | /OMADANET/OPS_PROF_ASSIGN_RESP | OPS - Assign Profiles |
| Roles | /OMADANET/OPS_ROLE_ASSIGN_RESP | OPS – Assign Roles |
| Users | /OMADANET/USER_CRE_RESP | Create User |
| Users | /OMADANET/USER_GET_ALL_RESP | Read all Users |
| Users | /OMADANET/USER_GET_SINGL_RESP | Read single User |
| Users | /OMADANET/USER_MOD_RESP | Modify User |
| Users | /OMADANET/USER_PW_CH_RESP | Change Password |
| Users | /OMADANET/USER_REM_RESP | Remove User |
Generating web services
-
Start transaction SOAMANAGER in the SAP backend where you want to generate the Web service. Your standard browser will open (Internet Explorer 11 is shown below):
-
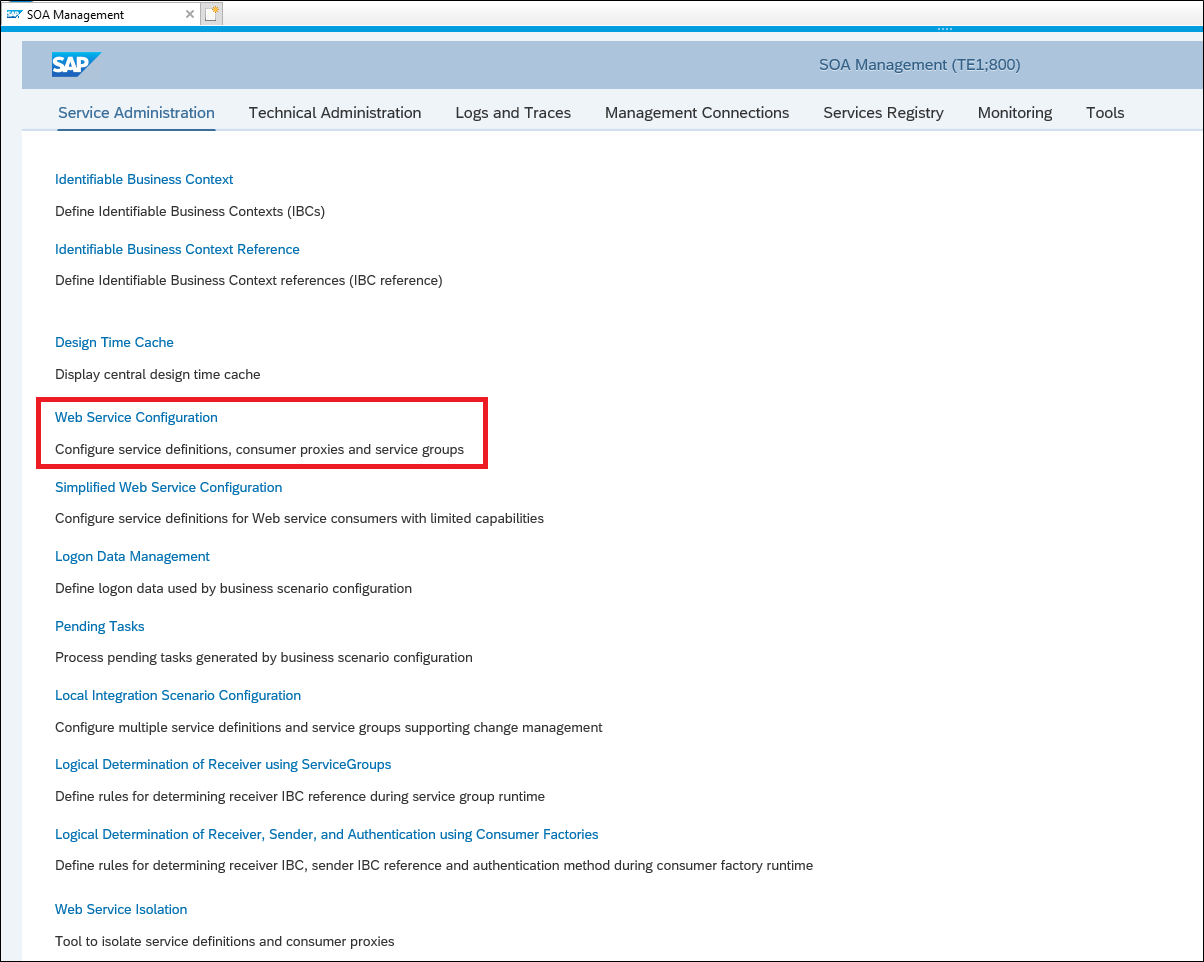
Select the Service Administration tab and click the Web Service Configuration link.
-
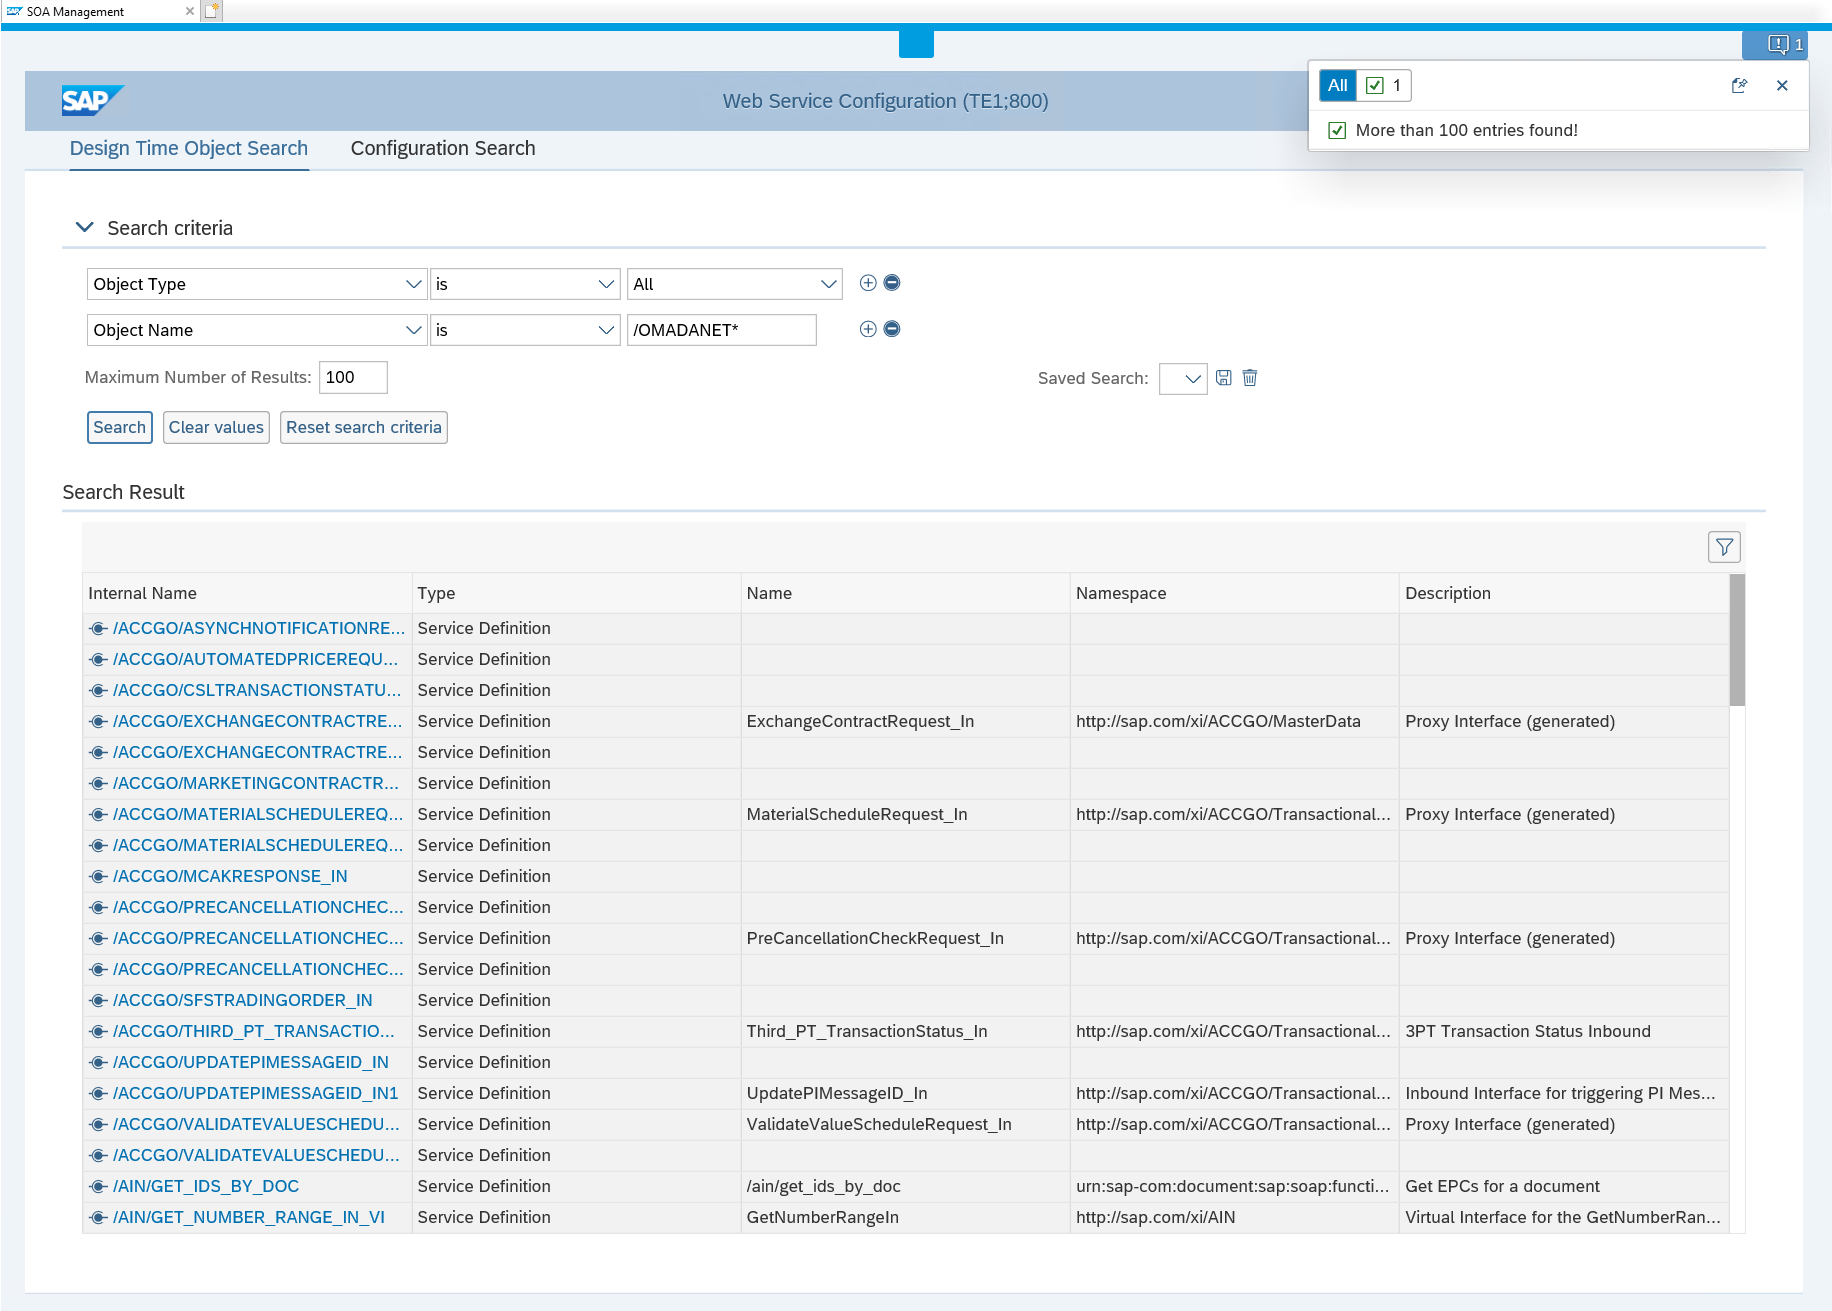
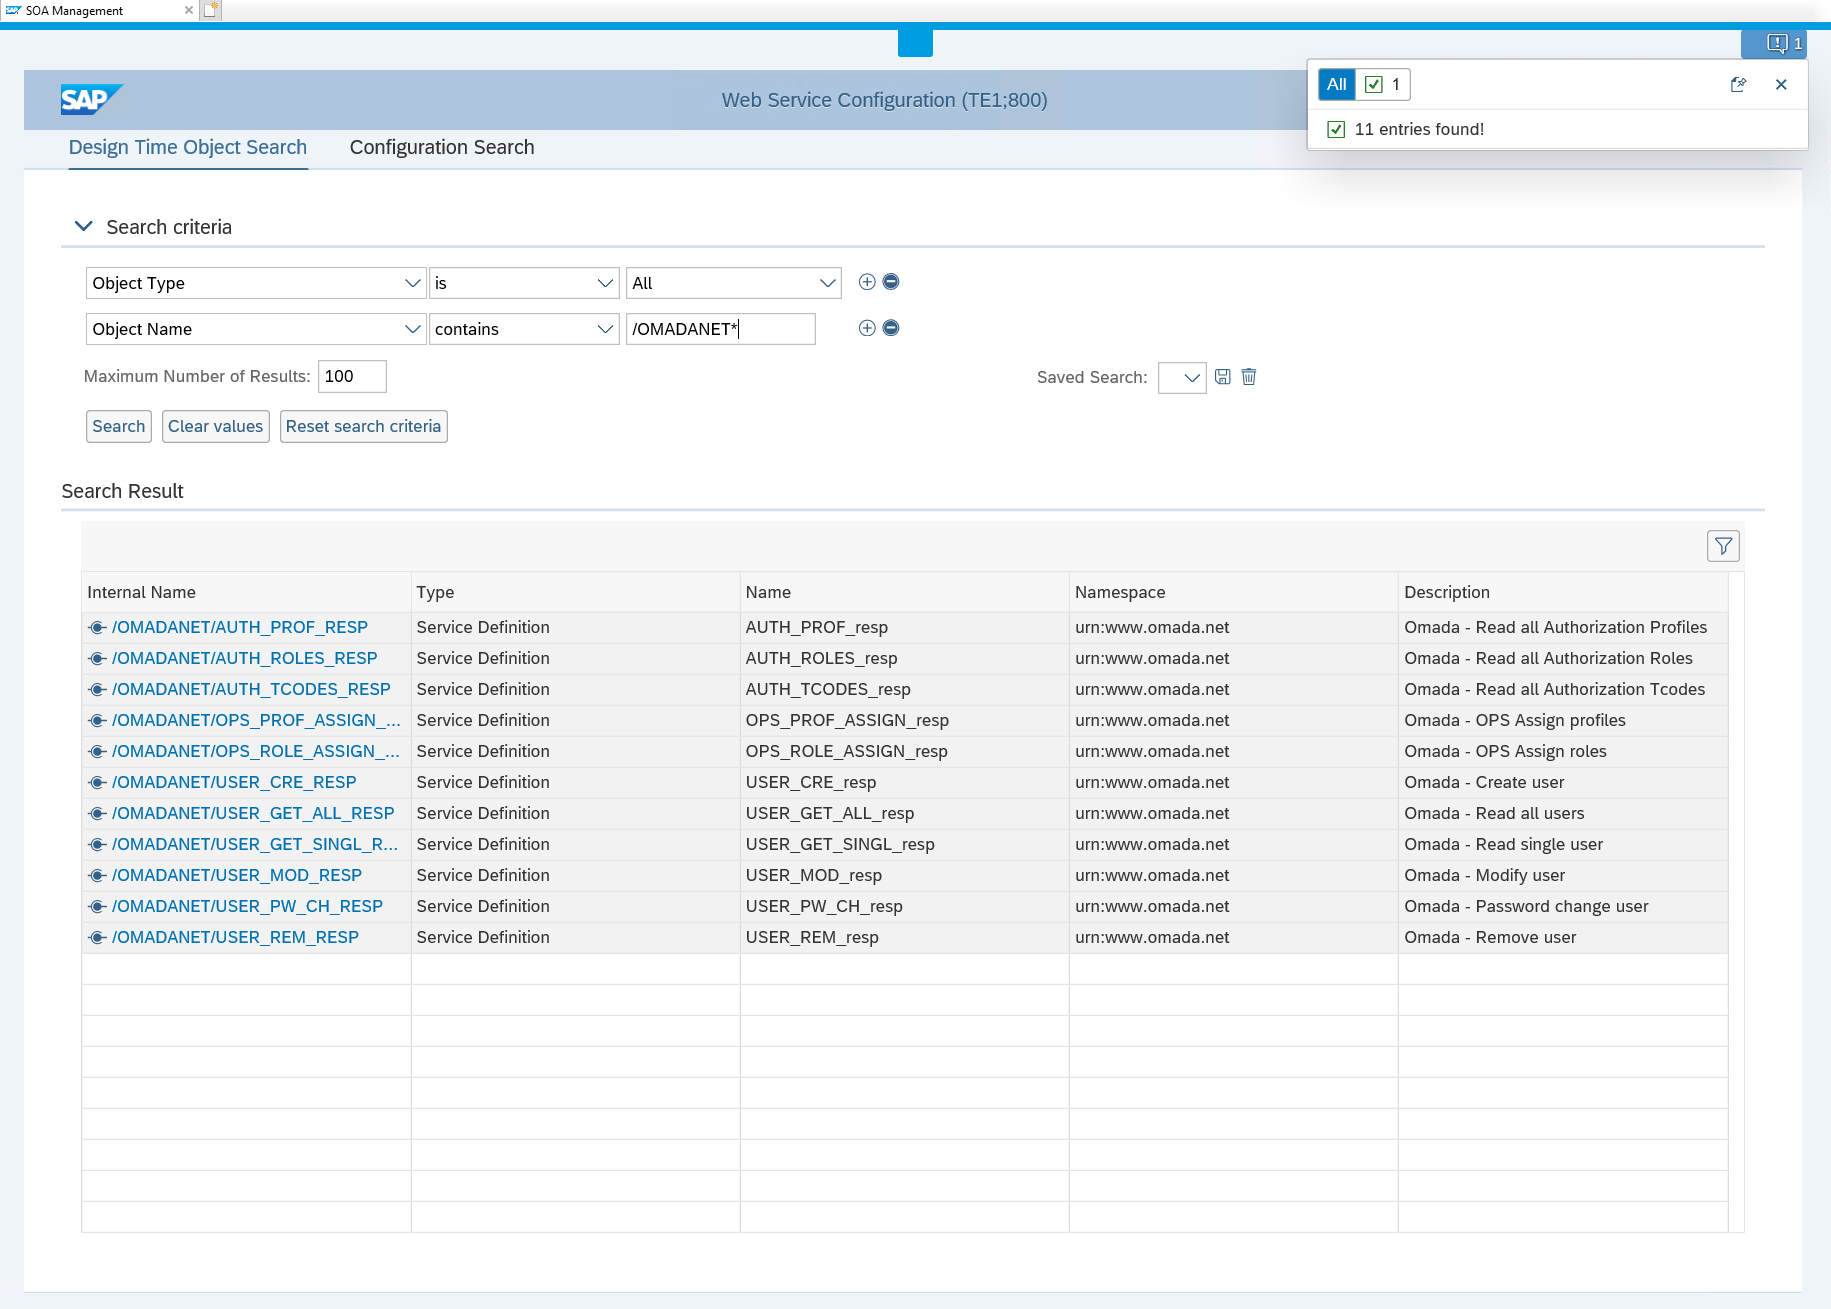
Set up the following search criteria:
- Search by: Object Name
- Search Criteria: contains
- Search Pattern: /OMADANET
-
Click Search. The search results will now be shown.
-
Choose the relevant interface (see the information in the table above) by clicking it, the below screen appears.
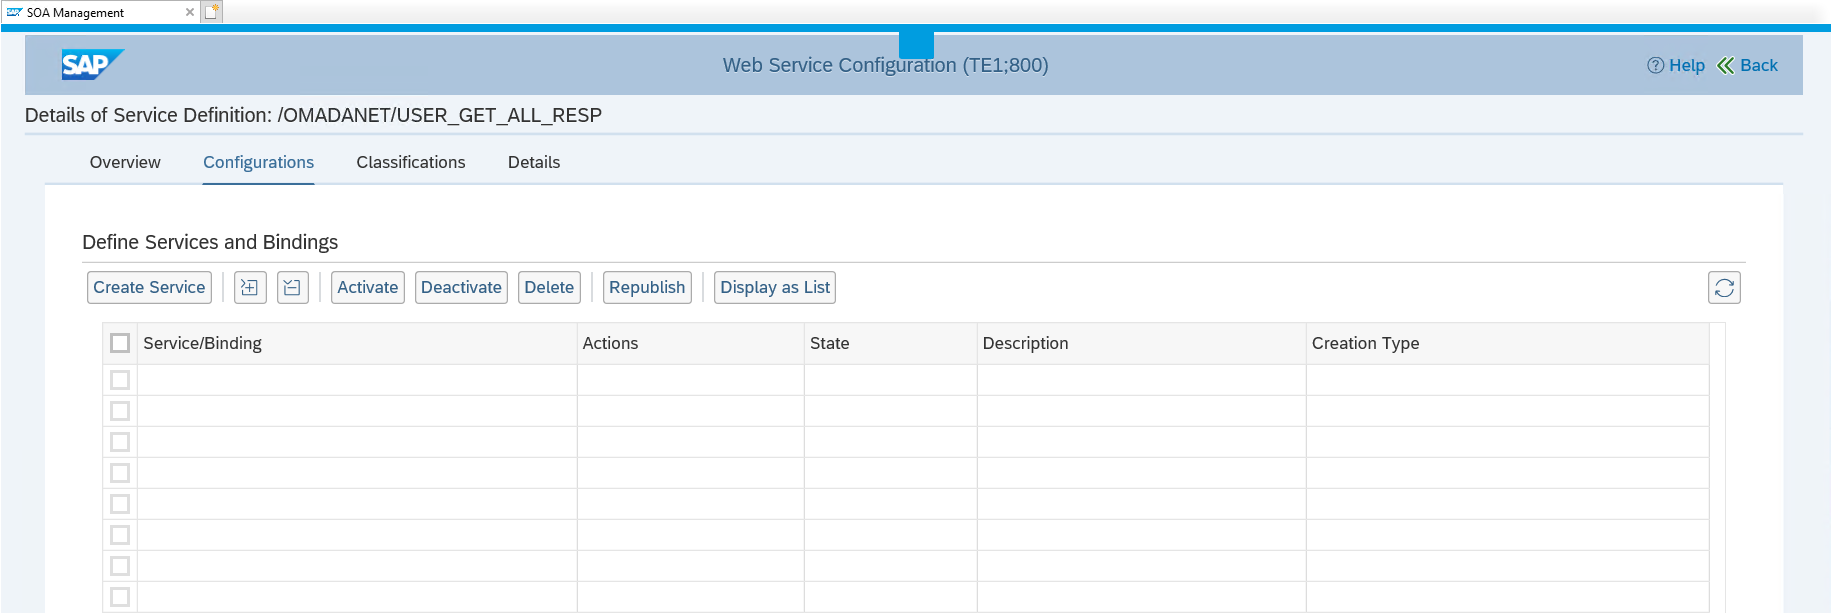
-
Click Create Service.
-
Enter a Service Name, Description, and Binding Name. Make sure that the names and descriptions reflect the interface that you have chosen. When you have done so, click Next.
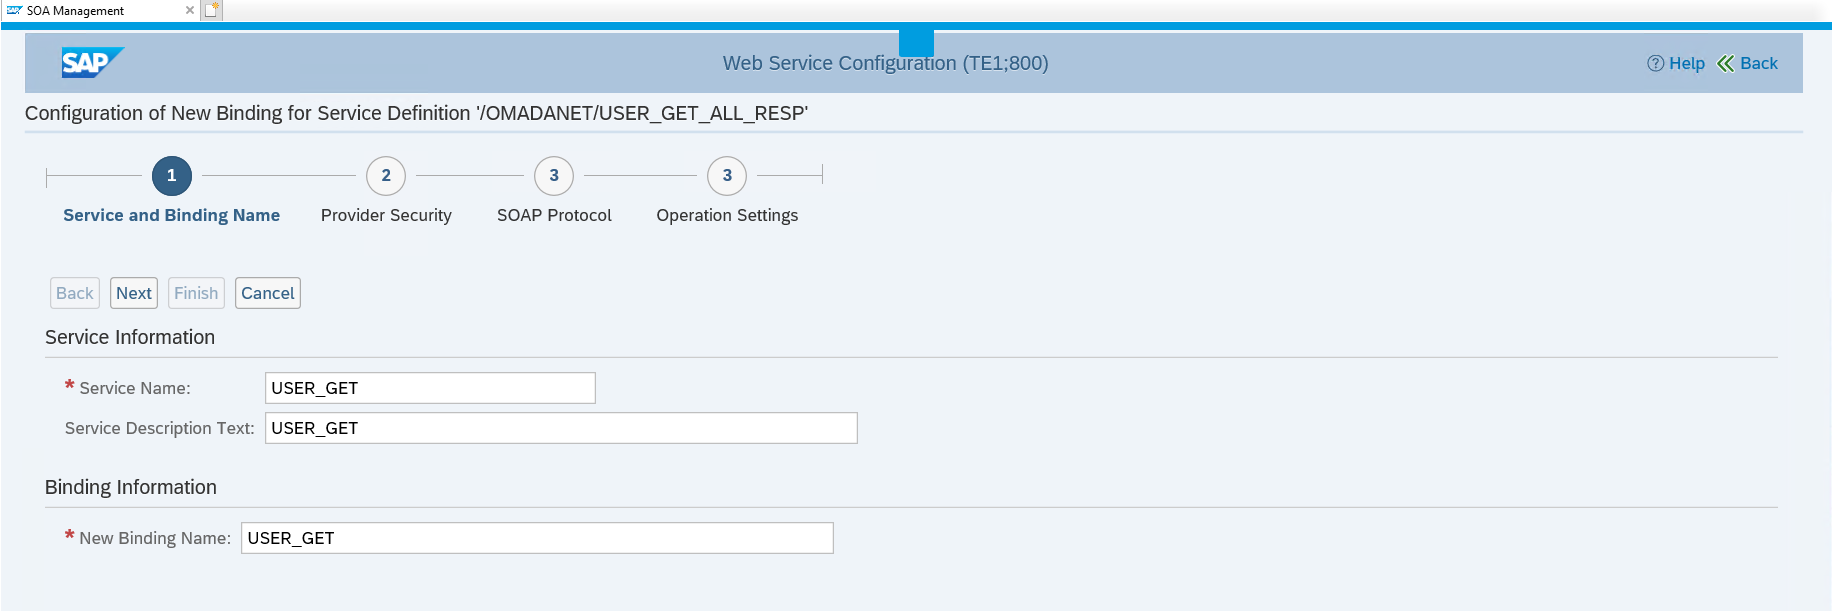
The values entered in Service Name and New Binding Name will be part of the generated web service url, so in order to use as much of the predefined query and mapping configuration in the System Onboarding wizard in Omada Identity, it is recommended to name the services according to below table.
Overview of service names and binding names
| Object | Permissions | Service Name / New Binding Name |
|---|---|---|
| Profiles | Read all Profiles | profile_get |
| Roles | Read all Roles | role_get |
| Tcodes | Read all Tcodes | tcode_get |
| Profiles | Profile assignment | profile_assignments |
| Roles | Role Assignment | role_assignments |
| Users | Create User | user_create |
| Users | Read all Users | user_get |
| Users | Read single User | user_single_get |
| Users | Modify User | user_modify |
| Users | Change Password | user_change_password |
| Users | Remove User | user_remove |
-
Under Authentication Settings, Transport Channel Authentication, select User ID/Password, and then click Next.

-
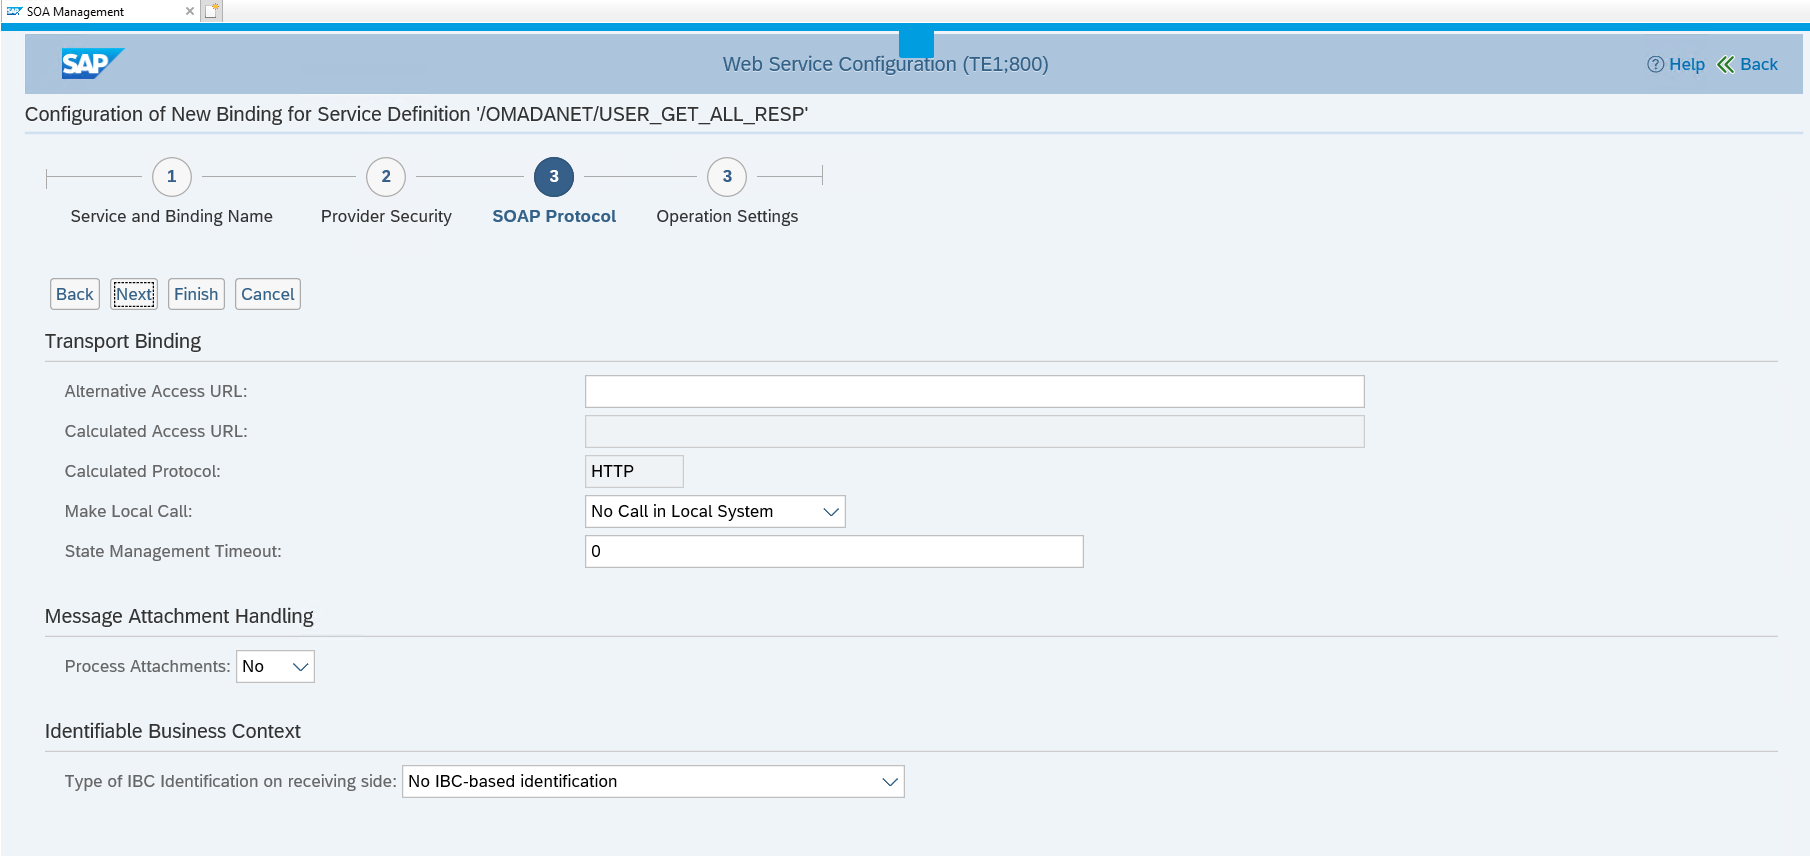
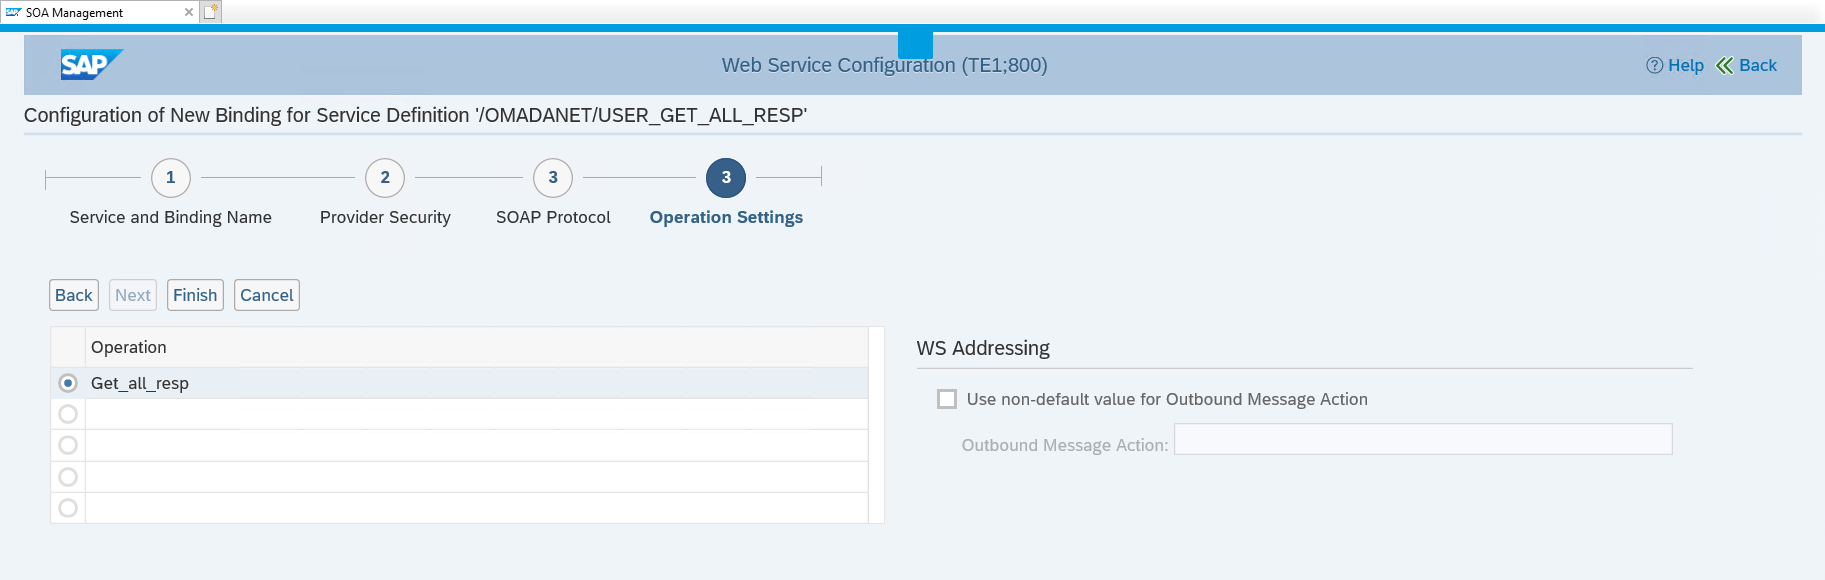
There is nothing to configure in the step SOAP Protocol, click Next.
-
There is nothing to configure in the step Operation Settings, click Finish.
-
You can now see a new service and the binding that you have generated.

-
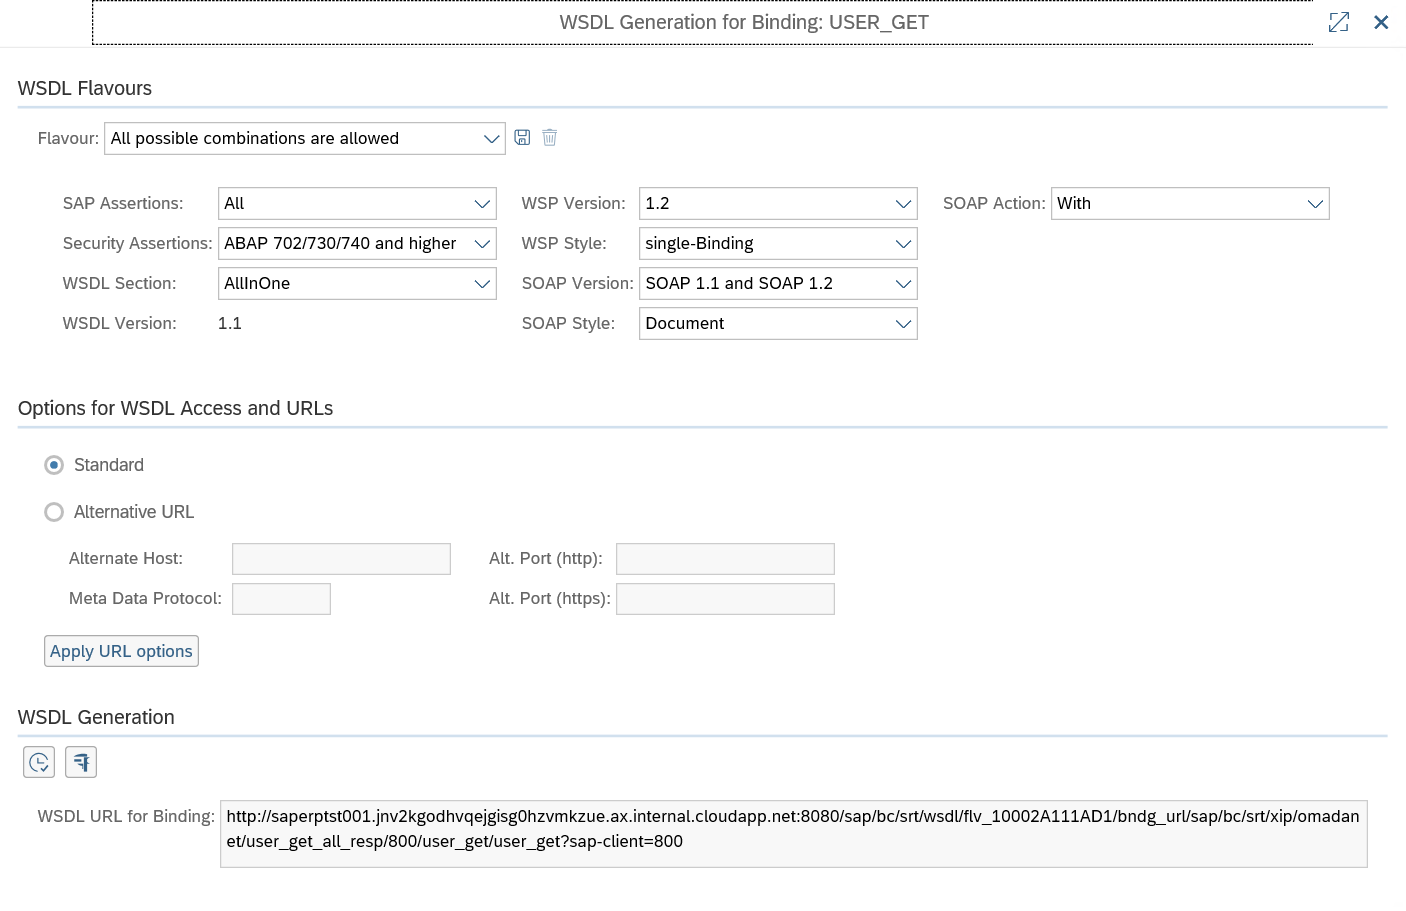
Now you have to find the corresponding Web service and link to it. On the same screen, click the Open Binding WSDL Generation icon.

-
Click the icon Open WSDL document for selected binding.
-
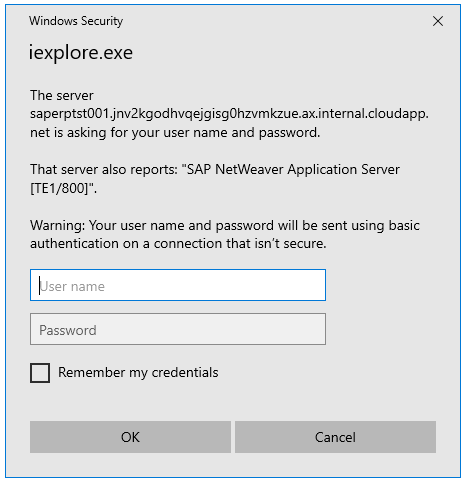
You will be prompted for username and password
-
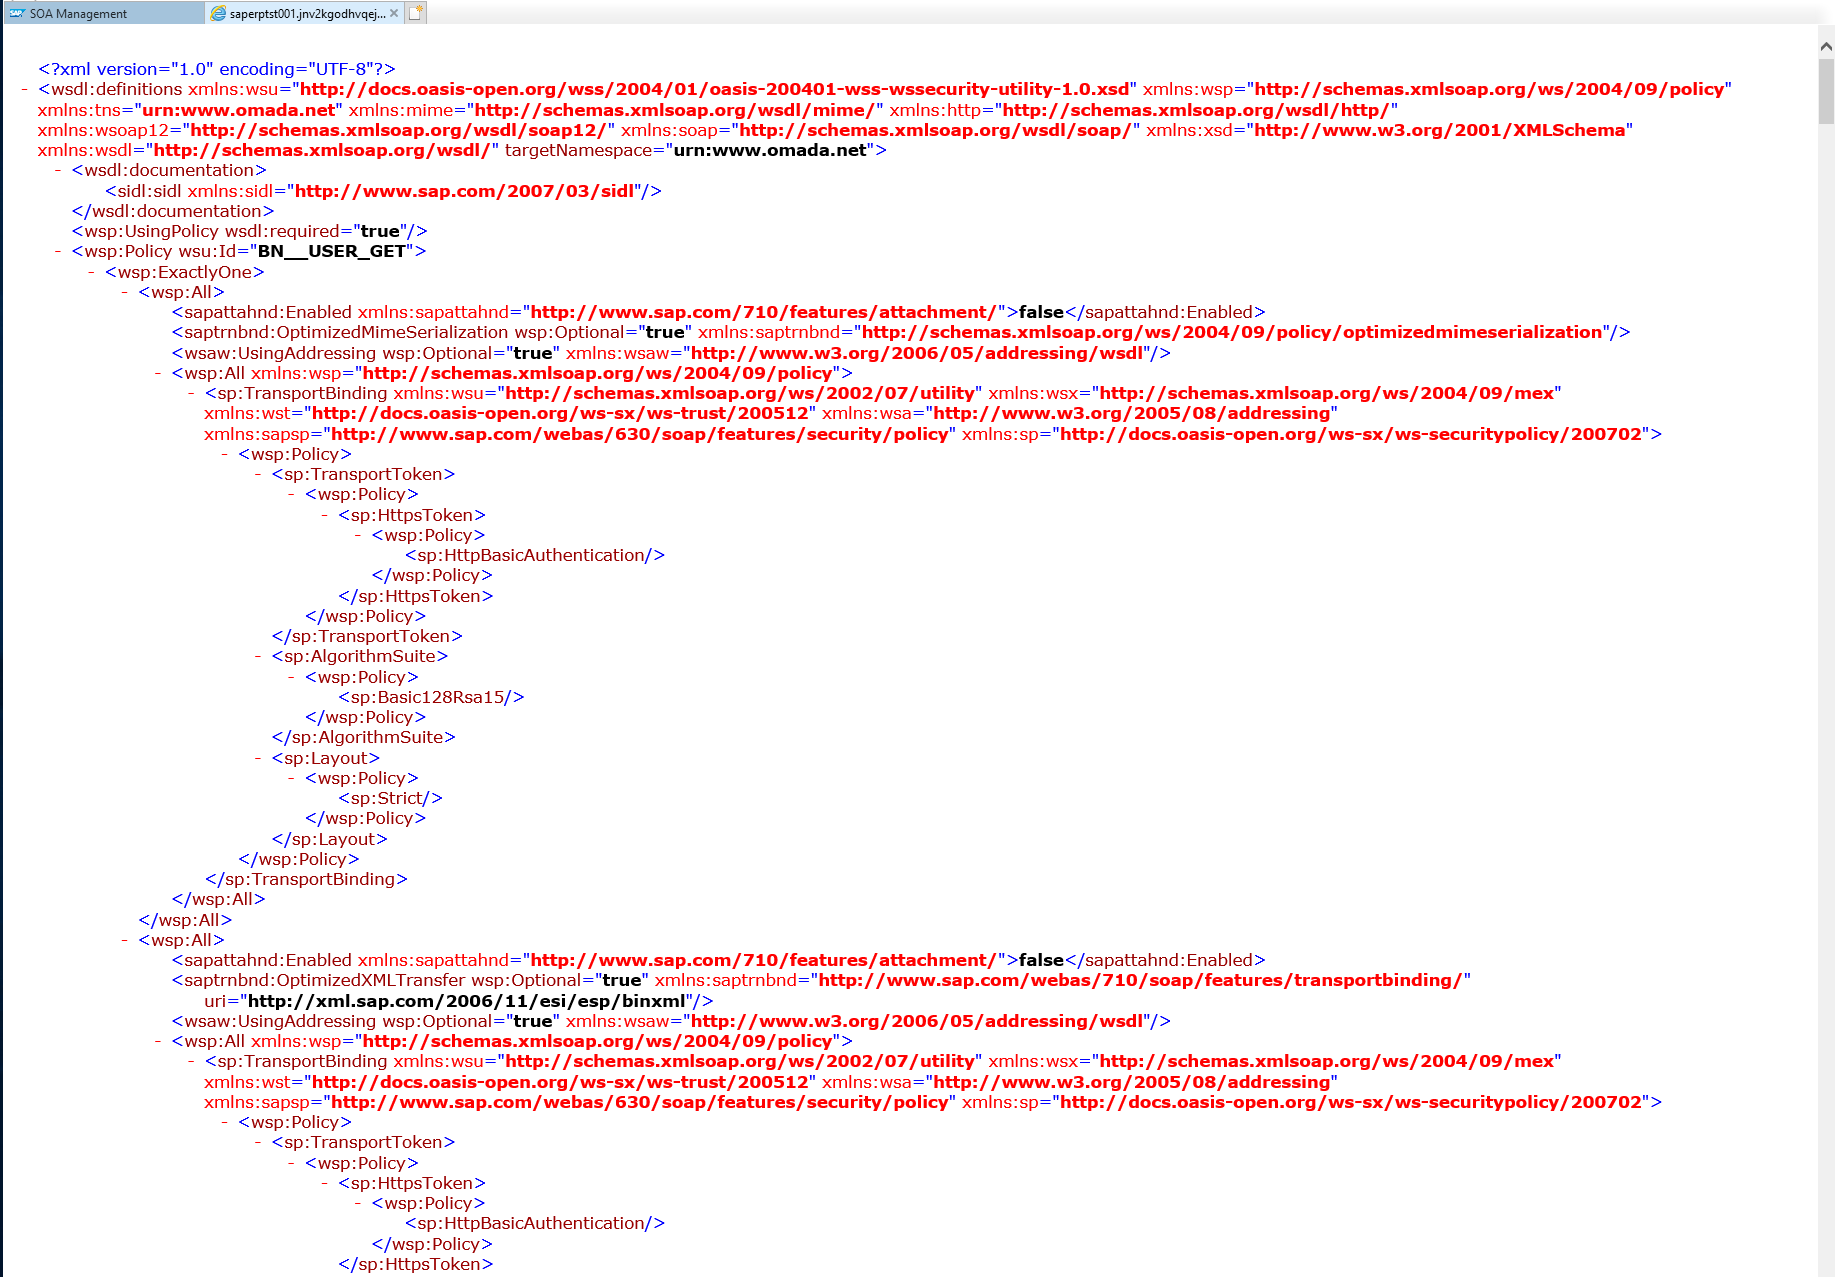
After typing in the correct username and password, the WSDL is now shown in your standard browser (Internet Explorer 11 is shown below):
You can now continue to create services for the remaining interfaces.