Configure Enterprise Server
Initial configuration
The Enterprise Server installation installs two services:
- Omada Identity Timer Service
- Omada Role and Policy Engine (RoPE) Service
The default startup type of these services is Manual. For this reason, you may want to change this property for the Timer Service and the RoPE Service. See the image below:
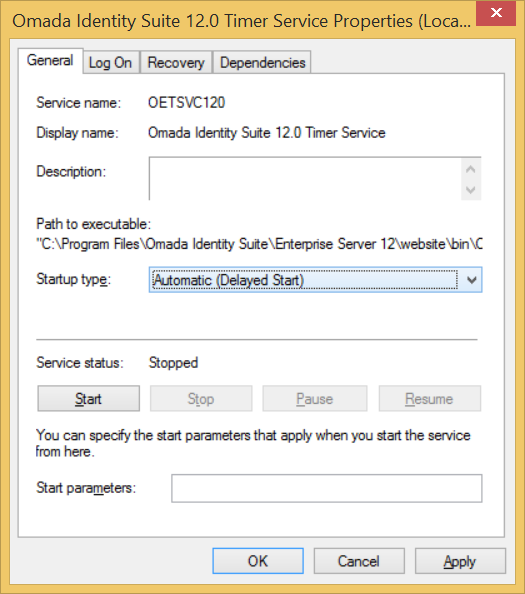
The services are set to manual startup by default. After an installation, upgrade, or patch has been applied, you must start the Timer Service and any other services that you require.
If you are using Microsoft Security Support Provider Interface (SSPI), you must assign a specific user to two of these services.
The service account(s) used for the Omada Services must be given the right to Log on as a service in Local Policies and the db_owner role in the Enterprise Server database.
These services require you to configure the following settings to ensure that the software reflects local preferences.
- Customer settings
- Master settings
- Host Header configuration
- Language settings
To configure the customer settings, go to Setup -> Administration -> More... -> Customer Settings.
The most relevant customer settings to configure are listed in the table below.
| Setting | Description |
|---|---|
| Mail sender | The email address that you provide here is used as the From address for any emails that are sent from the system. |
| Support email | Type the email address used for reporting errors. |
| Support email (auto) | Type the email address to which automatic, system-generated error reports should be sent. |
| Website URL | Type the full URL to the site. Example: http://OIS.somecompany.com/ |
| Disable full text index searching | If you set this setting to False, you enable the full-text search. |
When enabling OpenID or Security Assertion Markup Language (SAML), you must perform additional mandatory changes to tblCustomer and tblCustomerAuth. These tables must be edited using SQL Server Management Studio.
Any changes to authentication settings take immediate effect, and hasty changes may lock the user who is changing the Master Settings out of the Omada Identity system.
There are particular Enterprise Server parameters that can be modified in the Enterprise Server (ES) via the Master Settings table.
You can find the Master Settings in Setup > Administration > More… > Master Settings.
These settings can be seen and configured only by Platform administrators. Modifying these settings may have system-wide effects, so extreme caution is advised.
Authentication
| Interface Name | Key | Description |
|---|---|---|
| Identity username property system names | IdentUserNameProps | The master setting can be populated with system names of Identity properties which can be used as usernames when logging on to the ES. The list is comma-separated. |
| Customer name | CustomerLogon | The customer’s name. If specified, this customer name is always used during login. On non-integrated authentication schemes in the application, the user should provide this as the Domain name, for example, Omada\Administrator. |
| Domain logon name | DomainNameLogon | The domain name login. Use the domain as the customer during login. This property must only be set to True when you use Windows Authentication to identify the instance of Enterprise Server. For all other scenarios, it must be set to False. |
| Host header logon | HostHeaderLogon | Host header logon. Use the host header of the request as the customer. You must only set this setting to True when you are using HostHeader to identify the instance of Enterprise Server. For all other scenarios, it must be set to False. If you are logging in anonymously, it should be set to False as a default. You must also configure the HostHeader on the Internet Information Services (IIS) and Domain Name System (DNS) servers. |
| OpenID nonce cookie name | OpenIDNonceCookieName | The name of the OpenID nonce cookie. |
| OpenID Claim Types | OpenIDClaimTypes | Comma-separated list of claim types to search for in a JSON Web Token (JWT) to derive the username. The first one with a value will be returned. For Microsoft Entra ID v1 it should be upn for users from the directory and email for Live ID users. For Google it should be email. For general-purpose authorization system it can be sub. It can also be given_name. For Microsoft Entra ID v2.0 tokens it should be azp. It can also be preferred_username. |
| Qualified username | QualifiedUserName | When set to False (default), the username used in authentication is the account without the domain prefix (DOM\cso) or email domain postfix (cso@dom.com). When set to True, the username is the username as presented by the authentication system, for example, DOM\cso or cso@dom.com. |
| Qualified username legacy | QualifiedUsernameLegacy | When enabled, usernames presented as an email address (for example, cso@dom.com) during the authentication are transformed to the legacy format, for example, dom\cso. This setting only takes effect when the QualifiedUsername setting is set to False. |
| SAML name ID policy format | SAMLNameIDPolicyFormat | The NameID format in the SAML request. For Microsoft Entra ID it should be "urn:oasis:names:tc:SAML:1.1:nameid-format:emailAddress" For ForgeRock it should be "urn:oasis:names:tc:SAML:1.1:nameid-format:unspecified" For PingFederate and Okta, it can be one or the other. |
| SAML request ID cookie name | SAMLRequestIdCookieName | The name of the SAML request ID cookie. |
| Session cookie name | SessionCookieName | The name of the session cookie. |
| Use secure session cookies | SecureSessionCookie | Disabling secure session cookies compromises security and can only be done on non-production environments. This setting is by default set to True. Together with the correct setting of IIS to use HTTPS, it allows Omada Identity cookies to have the Secure flag. |
Environment
| Interface Name | Key | Description |
|---|---|---|
| Enable SignalR Sql Scaleout option | EnableSignalRSqlScaleOut | The SignalR component uses the Enterprise Server SQL database for scaling out. |
| Enable SignalR ServiceBus Scaleout option | EnableSignalRServiceBusScaleOut | The SignalR component uses the Azure Service Bus for scaling out. |
| Event Hub Connection String | EventHubConnectionString | Connection string to Azure Event Hub, including the name of the Event Hub. |
| Is the environment an OIS SaaS environment | IsOISaaS | True if the environment is a software as a service (SaaS) environment. |
| SignalR Azure ServiceBus Connection String | SignalRServiceBusConnectionString | Connection string to the Azure Service Bus used by the SignalR scale-out option. |
If you want to use the SignalR ServiceBus ScaleOut option with Azure Managed Identity Authentication, you must set the SignalRServiceBusConnectionString master setting to the following value:
Endpoint=sb://<servicebusname>.servicebus.windows.net/;Authentication=Managed Identity;Audience=https://servicebus.azure.net
For more information on authentication and authorization of an application with Microsoft Entra ID, refer to the Microsoft Azure documentation.
Mail settings
| Interface name | Key | Description |
|---|---|---|
| SMTP server | SMTPServer | The Simple Mail Transfer Protocol (SMTP) server used for relaying email messages to users. The default value is localhost. Be careful when you set this setting on test environments with real email addresses. From version 14.0.14 onwards, this setting is deprecated, and its functionality is covered by the notificationSettings configuration object. |
Misc
| Interface Name | Key | Description |
|---|---|---|
| Default portal page | RedirectURL | Can optionally be configured with a URL to an index page which will replace the main.aspx page. |
| Enable anonymous approval of mobile access requests | AnonMobileReqApprv | Allow users to access the portal anonymously with a token sent by email when approving requests for access. |
Monitoring
| Interface Name | Key | Description |
|---|---|---|
| Enable Application Insights | AppInsightsEnabled | Controls whether Application Insights is enabled. |
| Start performance counters | StartPerfCounters | When set to False, the Omada Identity Suite (OIS) performance counters are not initialized. This can improve the startup time of the OIS Windows services. |
Password reset
| Interface Name | Key | Description |
|---|---|---|
| AD client | PWRADCLIENT | Enables user password verification via an Active Directory (AD) client identified by the PWRADSYSTEMID customer setting. Exactly one password verification and one password reset client is required. |
| Azure AD client | PWRAZUREADCLIENT | Enables user password verification via a Microsoft Entra ID client identified by the PWRAZURESYSTEMID customer setting. Exactly one password verification and one password reset client is required. |
| Basic client | PWRBASICCLIENT | Enables user password reset and verification via Basic Client (local ES database). Exactly one password verification and one password reset client is required. |
| LDAP client | PWRLDAPCLIENT | Enables user password verification via a Lightweight Directory Access Protocol (LDAP) client identified by the PWRLDAPSYSTEMID customer setting. Exactly one password verification and one password reset client is required. |
| OPS client | PWROPSCLIENT | Enables user password reset via the Omada Provisioning Service. Exactly one password verification and one password reset client is required. |
Passwords
| Interface Name | Key | Description |
|---|---|---|
| Max logon attempts | MaxLogonAttempts | Maximum number of failed logon attempts using the ES password before the user is inactivated. |
| Max password age | MaxPasswordAge | Maximum number of days between password changes for ES authentication. |
| Password age warning | PasswordAgeWarning | Number of days before the password expires when a warning is shown on the logon page. |
Security
| Interface Name | Key | Description |
|---|---|---|
| Enables verification of the request source origin | VerifyRequestOrigin | Enables or disables the verification of the request source origin to prevent Cross-Site Request Forgery. |
System
| Interface Name | Key | Description |
|---|---|---|
| Application version | AppVer | The major/minor version of the application. You should never modify this setting. The exact build version, for example, 14.0.0.42 is not shown here, but you can find the build version on the About page in Omada Identity. |
| Database patch version | DbVer | The database patch version. You should never modify this setting. The version is updated for every SQL script change. |
| DB locking scheme | LockMode | When the value is set to 1, access to the main object tables is serialized using a table lock. Under normal circumstances, Omada does not recommend enabling this lock mode. Possible values are: 0=Normal, 1=Serialized. |
Code methods
| Interface name | Key | Description |
|---|---|---|
| Temporary Directory | TempDir | Add a temporary directory required by the UtilityCodeAssembly.Main.SaveDataObjCSV() and SaveDataObjCSVExtended() Code Methods (see below). |
The TempDir master setting is not installed by default, and can be added with the following SQL statement:
INSERT INTO [tblMasterSetting] ([Key],[Name],[Description],[ValueStr],[ValueInt],[ValueDateTime],[ValueBool],[Type]) VALUES('TempDir','Temporary Directory','','C:\OmadaEnt_Temp',NULL,NULL,NULL,0)
It is important that you check the SMTPServer setting.
When enabling OpenID or SAML, you must perform additional mandatory changes to tblCustomer and tblCustomerAuth. These tables must be edited using SQL Server Management Studio.
Any changes to authentication settings take immediate effect, and hasty changes may lock the user who is changing the Master Settings out of the Omada Identity system.
Working with the authentication settings
The following Master Settings directly affect the way the authentication to the application is performed.
| Setting | Interface Name |
|---|---|
| IdentUserNameProps | Identity username property system names |
| OpenIDClaimTypes | OpenID claim types |
| QualifiedUserName | Qualified username |
| SAMLNameIDPolicyFormat | SAML name ID policy format |
| SecureSessionCookie | Use secure session cookies |
Be careful when you edit these settings, because incorrect changes can prevent proper authentication in Omada Identity.
There are three settings: HostHeaderLogon, DomainNameLogon, and CustomerLogon that are used to map a request to a customer in tblCustomer or tblCustomerAuth. When you change these settings, take the following precautions:
- When using the CustomerLogon setting, the master setting value must map to the customer name in tblCustomer or tblCustomerAuth.
- When using HostHeaderLogon, the entire hostname in the URL must map to an entry in tblCustomerAuth.
- When using DomainNameLogon, the domain name of the user logging in with Single Sign-On must map to an entry in tblCustomerAlias.
If the AuthenticationType column in the tblCustomer is set to Forms or Basic authentication, the authentication implicitly relies on the password in the Enterprise Server database.
Omada does not recommend using Basic authentication in production environments. Basic authentication does not provide the same level of security as the integrated authentication options. As a result, if Basic authentication is used, your Omada Identity installation will not be protected against, for example, password reuse.
When using Forms-based authentication, SAML-based authentication, or OpenID-based authentication on a website without Secure Sockets Layer (SSL) enabled, the master setting SecureSessionCookie must be set to False. Omada does not recommend this, because it lowers website security: sessions can be hijacked by intercepting network packets.
With the master setting IdentUserNameProps it is possible to configure a property on the Identity object to be used when matching with the username provided by the authentication mechanism.
With the OpenIDClaimTypes and SAMLNameIDPolicyFormat it is possible to configure which attributes from the identity provider (IdP) or token are used during the authentication.
When you want to provide different addresses to access different environments running on the same machine, use the Host Header Logon (HostHeaderLogon) configuration.
For example, this configuration applies when the following addresses are running on the same server: http://development/OIS, http://test/OIS, and http://quality/OIS.
To make this configuration, you need to:
-
Create DNS records that point to the server's IP address.
You can either do this on the DNS server or in the hosts file for every client machine. By default, the hosts file is located at C:\WINDOWS\SYSTEM32\DRIVERS\ETC\hosts. For example, create the following three records:
- 192.168.0.1 development
- 192.168.0.1 quality
- 192.168.0.1 test
-
Configure IIS
-
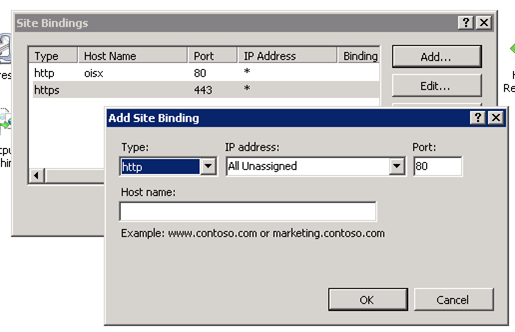
Open the IIS Manager, go to <Server name> -> Web Sites, and find the appropriate site name. Right-click the site name and select Edit Bindings....
-
In the Site Bindings dialog box, click Add....
-
Add the hosts manually as illustrated in the following image:
-
Each environment must have an alias configured in the table dbo.tblCustomerAuth, which associates the name used on the host header to the database connection in the table dbo.tblCustomer.
-
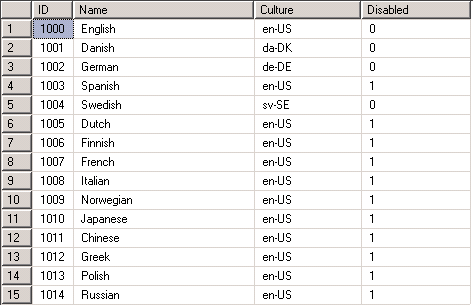
Set the available languages in Enterprise Server by activating the language in the tblLanguage table.
-
Set the Disabled flag to False for languages that you want to be available in the system. Culture specifies the language shown in Omada Identity.
-
Note that not all languages are available in a default installation. The following language options are currently available:
- en-US (US English)
- da-DK (Danish)
- de-DE (German)
- sv-SE (Swedish)
- nl-NL (Dutch)
- fr-FR (French)
- nb-NO (Norwegian)
- pl-PL (Polish)
- es-MX (Spanish)
- pt-PT (Portuguese)
Maintain the Omada platform
To ensure that Omada Identity runs well, it is important to maintain the SQL Server continuously. Because schedules vary from customer to customer, the requirements listed here are only basic requirements.
A more advanced setup of maintenance plans should be discussed between the customer's IT department and Omada Consultants.
Set up SQL server maintenance plans
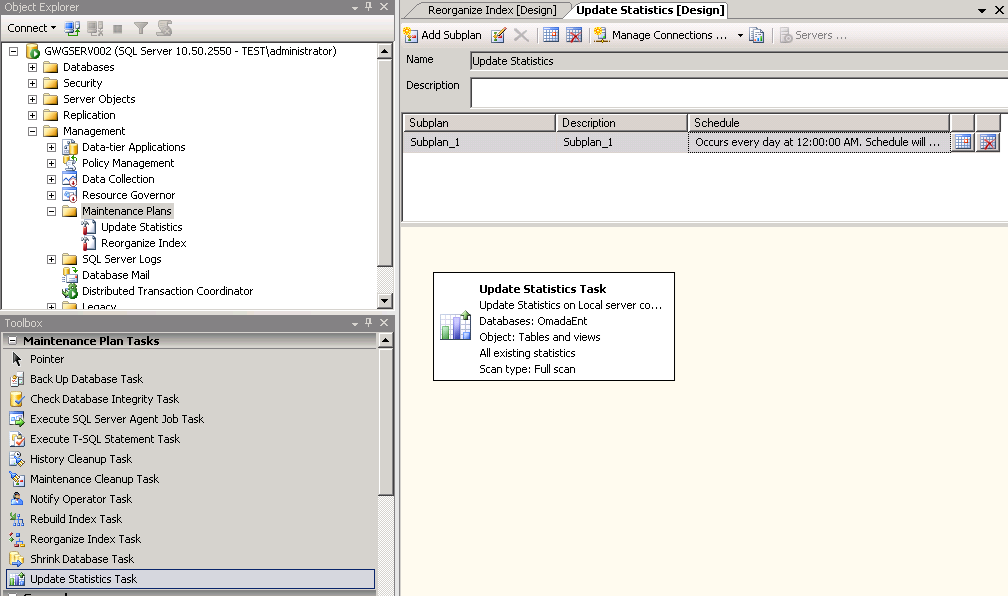
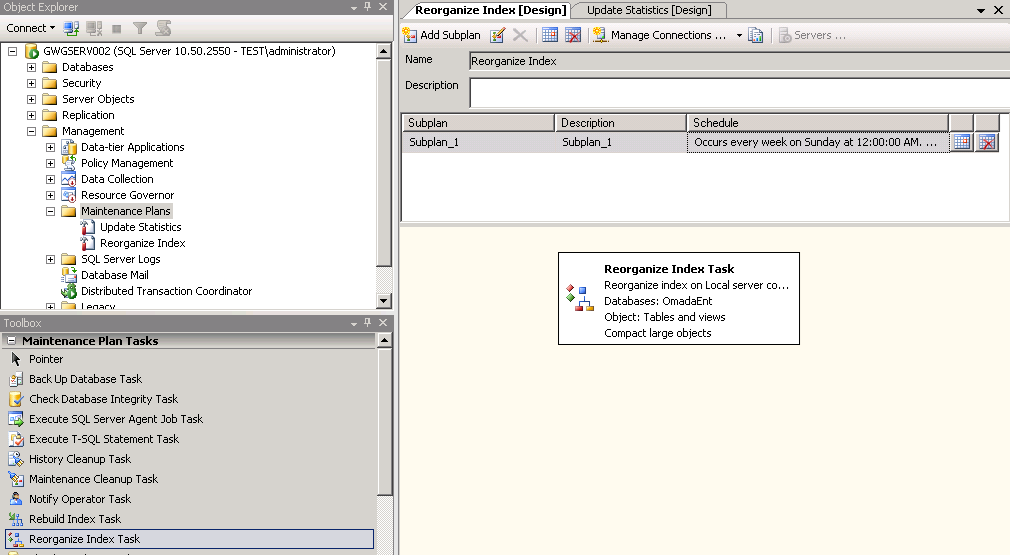
From SQL Server Management Studio, you can set the database maintenance plans to match the local requirements and service windows. You can do this in Management -> Maintenance Plans.
-
Set up a plan to update the statistics on a regular basis, preferably every night.
-
Set up another plan to reorganize data and index pages at least once a week.
Using SSPI
Using the Security Support Provider Interface (SSPI) requires you to configure the following settings.
Configure Active Directory settings
-
Create an Active Directory (AD) service account to be used for the integrated authentication between the web or application server and the SQL Server.
-
Log on to the Domain Controller with Domain Admin rights and execute the following command, where
<webserver fqdn>is the fully qualified domain name (FQDN) of the web server:setspn -s HTTP/<webserver fqdn> <DOMAIN>\<service account>
Configure Web/Application server settings
-
Add the newly created AD account to the local user group IIS_IUSRS on the web server.
-
Set up an application pool in the IIS to use the newly created AD service account. Setting up an application pool in IIS is described at the end of this section.
-
Change the Enterprise Server web application to use the newly created application pool.
-
Change the connection string to:
Initial Catalog=<db name>;Data Source=<db server name>\<DB INSTANCE>;Integrated Security=SSPI;ExampleInitial Catalog=OISTST;Data Source=DBSRV01\TST;Integrated Security=SSPI; -
Run the following command in the folder C:\inetpub\AdminScripts:
cscript adsutil.vbs set w3svc/NTAuthenticationProviders "Negotiate"
Authentication with Kerberos on Windows 2016 or newer
When you use Windows Integrated Authentication with Kerberos on Windows Server 2016 or newer, you may need to change the ASP.NET authentication function to use the application pool credentials.
-
Open a command prompt and enter:
cd %windir%\system32\inetsrvappcmd.exe set config -section:system.webServer/security/authentication/windowsAuthentication -useAppPoolCredentials:true
Alternatively, you can disable kernel-mode authentication in IIS:
- In Internet Information Services (IIS) Manager, expand the local computer's node, expand Sites, and click the website.
- In the center pane, under IIS, double-click Authentication.
- Click Windows Authentication.
- In the right-side pane, under Actions, click Advanced Settings.
- Clear the check box Enable Kernel-mode authentication. Click OK.
SQL Server Settings
- On the SQL Server instance, you must create a new login equal to the newly created AD service account.
- Go to the Enterprise Server database and create a new user with the newly created login.
- Assign the database role membership db_owner to the newly created user.
Omada Identity Windows Services
After configuring all the settings listed here, you must change the Timer Service to use the newly created Active Directory service account.
Remember to set the Windows services as described here each time you apply a patch to Enterprise Server.
Configuring SSL
-
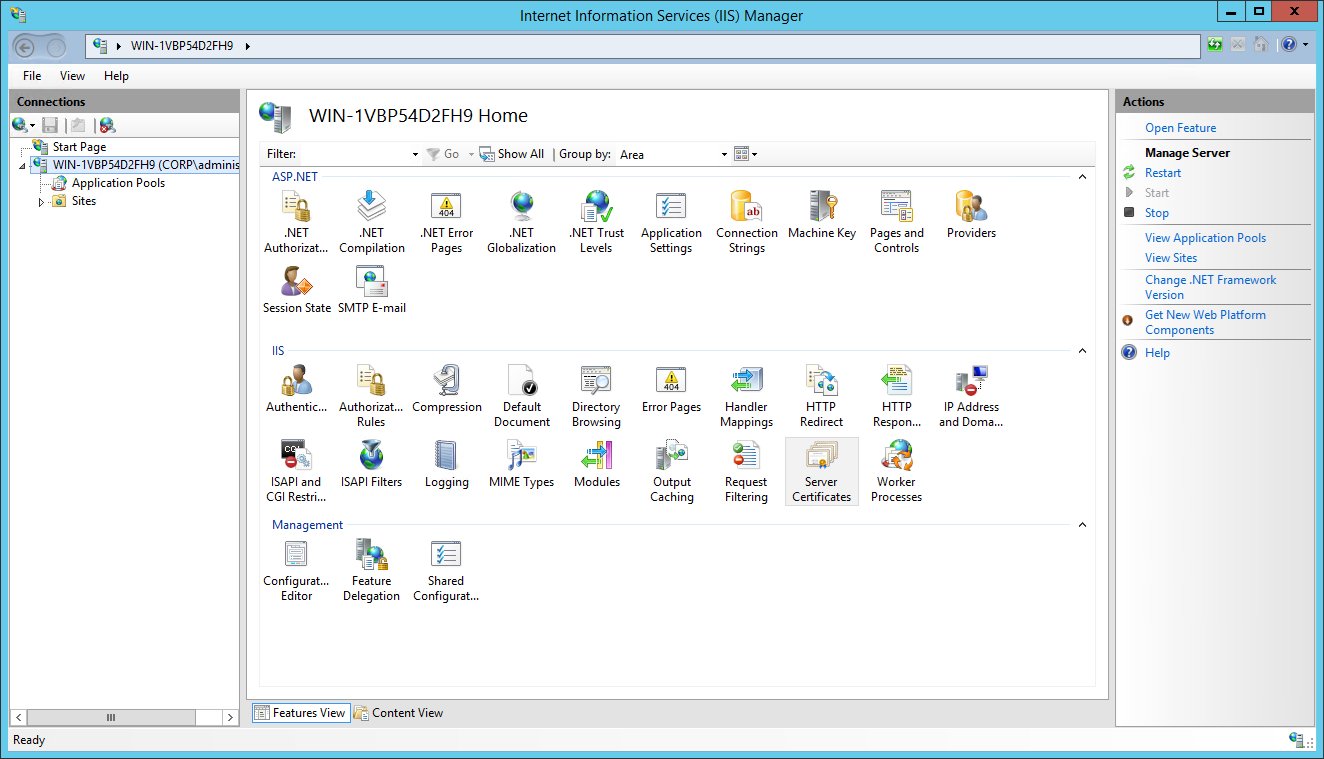
Start Internet Information Services Manager, then select the relevant server and double-click Server Certificates in the main pane.
-
In the right-side menu, click one of the available options to launch a wizard that helps you create a request for a server certificate. The request is delivered to a certificate authority that can grant a certificate. The response is brought back to the wizard, and the certificate is then installed.
noteThe certificate's common name must match the DNS common name on the web server. Certificates are typically issued by public certificate authorities, such as VeriSign or Thawte. However, internal solutions often choose an internal certificate authority, which requires that all internal PCs must have the appropriate root certificate installed. This is Omada's best practice advice.
It is critical that you select the correct setup to match your security and usability needs. Therefore, contact your own IT support to ensure that the best solution is chosen for your enterprise.
-
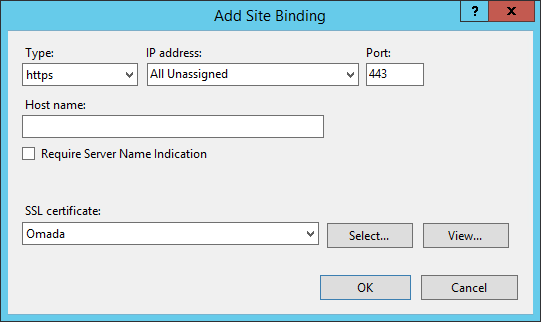
After the certificate is installed, select the website, and open the Site Bindings dialog box. Click Add and create an https site binding using the installed certificate.
-
Select SSL Settings in the main pane and select Require secure channel (SSL). If you enable this setting, all network traffic is encrypted with the server certificate.
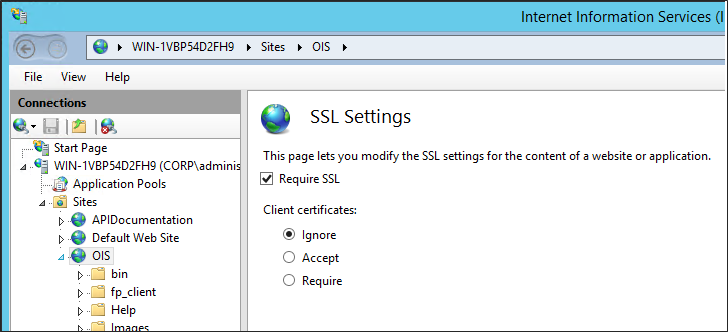
The described solution does not cover client certificates.
Check the system security
When your Enterprise Server installation is complete, you can apply security to the installation.
-
Change any blank passwords that were used during installation into secure passwords. Your company should already have a password policy in place. Omada recommends following password best practices such as:
- Periodic password changes and no recycling of passwords
- No dictionary words or names
- Minimum 6 characters
- No passwords that contain user names, real names, or company names
- The inclusion of English uppercase and lowercase characters (A-Z and a-z), Base 10 digits (0-9), and symbols found on the keyboard, such as !, $, #, or %.
-
Contact your auditors to include your Enterprise Server installation in future routine audits that include security checks.
Right after Omada Identity is installed, the PswEncryptionKey has the default value DefaultEncryptionKey. You need to change this value as soon as possible after the installation, preferably before performing any other actions within Omada Identity.
The PswEncryptionKey change must be performed manually in all the places where it is used.
For more information about PswEncryptionKey, refer to the Password encryption key section.
The following table shows a sample checklist for ensuring the security of your implementation:
| Action | Notes | Result |
|---|---|---|
| Change the PswEncryptionKey from the default one. | Refer to the Password encryption key section. | |
| Change administrator password from <blank>. | See the password best practices described in step 1 above. | |
| Use SSPI connection instead of username/password. | To avoid having the username and password stored in clear text in the registry. | |
| Activate SSL. | Optimize security. |
This is security for your environment and is therefore unrelated to the security settings within the installation. For information about security in Omada Identity, go to Security settings.