Application packages and changesets
This page explains application packages and changesets.
Feature packages
Enterprise Server (ES) includes application packages that add features and other functionality to Omada Identity. Some packages are mandatory, while others are optional and can be installed according to your organization's needs.
The content of packages is protected against accidental deletion in the portal. Some content is also protected against modification. The customer setting Allow feature package content modification controls whether built-in objects and objects from feature packages can be modified or deleted. Platform administrators can configure this setting.
When you install a new version of Omada Identity, Omada also provides updates to the application packages. For future package updates to work correctly, install all current updates successfully.
Customers can customize packages, but customizations may cause issues when importing package updates. Omada recommends undoing the custom changes and importing the package changes. If you do not want to undo the custom changes, you can select Exclude from the context menu for the relevant package change. Excluded changes do not appear again unless they are added back from the list of excluded changes.
Platform administrators can also whitelist built-in objects and objects from feature packages. You can whitelist some object types through the user interface (UI) by selecting Add to whitelist in the ... menu. Other objects, such as Code Assemblies, Processes, and Activities, can be whitelisted only by manually adding an appropriate entry to the whitelist Structured Query Language (SQL) table.
You can use an SQL script to add entries to the tblFeaturePackageWhitelist table in the ES database, which is named Omada Identity Suite (OIS) by default.
List of standard feature packages
The packages available in your system may differ from this list, depending on your Omada Identity version.
| Package | Description |
|---|---|
| Access request approval ed2 | Includes an approval survey, the mobile access request approval template, and properties related to the approval survey. |
| Access request ed2 | Contains the Access request process. Requires the Access request approval ed2 package. |
| Analytics | Contains the Advanced Analytics package. |
| Application onboarding | Contains the Application onboarding process. |
| Basic configuration | You must always install this package. Existing customers may be unable to install it or may choose not to, because it affects the existing configuration. |
| Business contexts | Contains the Join a business context process. |
| Delegation concept | Contains the Delegate my access process. |
| Escalation concept | Contains event definitions and properties for the escalation concept. |
| Exchange integration | Contains configuration objects that allow Omada Identity and Omada Provisioning Service (OPS) to provision mailboxes to Microsoft Exchange. |
| Emergency lockout | Contains views and process templates for the Emergency lockout feature. |
| Foundation | You must always install this package. Contains fundamental data required by the other packages. You can safely install it on all systems because it does not interfere with the existing configuration. |
| Identity lifecycle | Contains the identity lifecycle processes: Onboard employee, Onboard contractor, and Transfer identity. Requires the Access request ed2 and Access request approval ed2 packages. |
| Maintain own data | Contains the Maintain my data process. |
| Manual provisioning ed2 | Contains the Manual provisioning process used for manual provisioning in Role and Policy Engine (RoPE). |
| Omada Data Warehouse (ODW) integration | Contains Omada Identity Data Warehouse (ODW) integration content: the Data Warehouse Export preview pages, Data Warehouse Report links and menu items, and additional context type properties. |
| Omada Identity Management | Contains the Omada Identity Self-management concept. |
| Password reset | Contains data object types, views, and other items for the Password reset service, including the Enroll to password reset and Reset Password processes. |
| Provisioning service integration | Contains data object types, views, and other items for OPS, including the Provisioning Monitor. This is a licensed module. |
| RoPE integration | Contains data objects and properties needed for the Compliance Workbench. |
| Segregation of Duties (SoD) concept ed2 | Contains the Separation of Duties (SoD) concept, including the Evaluate Violation process. This is a licensed module. |
| Survey feature | Contains data object types, views, and other items for the Survey feature, including the New survey template process and the configuration UI. This is a licensed module. |
| Views and screens | Contains standard views and screens, including the Assigned Resources grid. |
Package dependencies
Some packages depend on other packages. The table below shows these dependencies.
Six packages are required for ES to work. All other Omada Identity ES packages depend on these six packages. You must always install them:
- Foundation
- Basic configuration
- Views and screens
- RoPE integration
- ODW integration
- Omada Identity Management
There are also the following dependencies:
| Package | Depends on |
|---|---|
| Access request approval ed2 | Survey feature |
| Identity lifecycle | Access request ed2 |
| Survey feature | Escalation concept |
Install feature packages
Install standard feature packages from the ES UI. You can install them from the Installed Packages view.
Go to Setup > Administration > System settings > Installed packages to open this view. It lists all packages installed on your system.
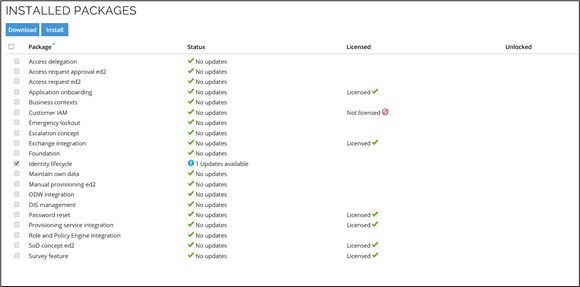
The view displays various information about each package:
| Column | Description |
|---|---|
| Package | Shows the package name. |
| Status | Shows whether the package is up to date. - No updates: The package is up to date. - Updates available: Shows the number of available package updates. |
| Licensed | Shows the package's license status. - Licensed: The package requires a license, and the installed license includes its license key. - Not licensed: The package requires a license, but the installed licenses do not include its license key. - Not required: The package does not require a license. |
Click Install at the top of the screen to go to the import page. You can also click Download to download the selected packages as a changeset file.
If you have installed a software patch, an information message at the top of the screen indicates whether updates are available for any installed packages.

Changesets
Omada Identity ES supports changesets, which let you modify the system configuration to meet your organization's needs.
For example, you can import custom changesets created as part of an implementation project through the Import Changeset page or by using the Changeset Import Utility. For information about using the Changeset Import Utility, see Operations.
You can access the Import Changeset view through Setup > Administration > Changeset management > Import changeset.
Import configuration changesets
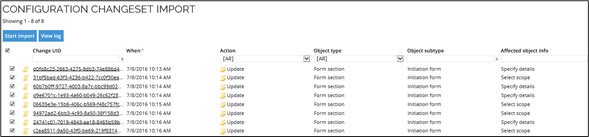
The Configuration Changeset Import view lists the changes available to import. Click Start import in the upper-left corner to begin.
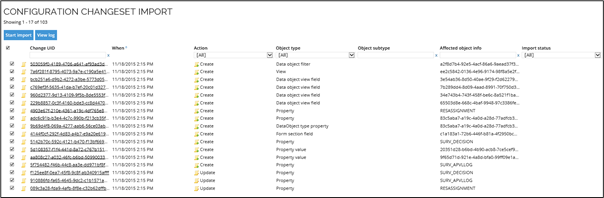
You are prompted to choose whether to run the import in test mode. Test mode can help identify import conflicts. ES does not save any data when you import changes in test mode.
Import conflicts can occur for several reasons. For example, a conflict occurs if a change updates a field in a form that you have deleted.
For changes with Update or Delete actions, you can click the link in the Affected object info column to open the edit dialog for the affected object. This lets you inspect the object before importing the change. However, not all object types support this.
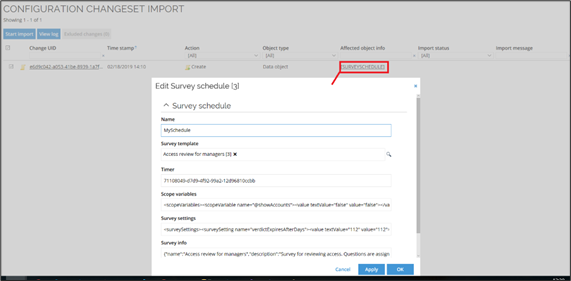
If this feature is not supported, or if the object does not exist in the system, the affected object's unique identifier (UID) is shown.
If you encounter import conflicts, Omada recommends analyzing and resolving them. Do not disable changes from the standard application without guidance, as this can prevent Omada Identity from working correctly.
The import progress is displayed while the import runs.
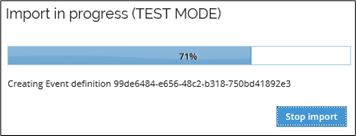
To run the import in import mode, clear the test mode check box in the Confirmation dialog box. If errors occur, an error message appears, and all error messages are shown in the import dialog box.
Import changesets
-
If you recorded changesets before updating Omada Identity to a newer version, you cannot import those changesets into the updated version. Import the changeset before upgrading.
For example, you cannot import a changeset recorded in Omada Identity version 16.0.0 into version 16.0.1. Import the changeset in version 16.0.0 before upgrading to version 16.0.1.
-
When installing feature packages as part of a new Omada Identity installation, a small number of configuration changes may not be imported. This is expected: those changes are imported only when upgrading from an earlier version of Omada Identity.
-
If you upgrade from Omada Identity 11.1, it may be useful to use the Changeset Import Utility instead of the workflow in ES.
For information about using the Changeset Import Utility, see Operations.
-
In the left-side menu, click Setup > Administration > Changeset management > Import changeset.
-
In the File Upload window, click Browse to locate the required changeset file.
-
To add another changeset, click Click here to upload changeset file in the blue notification bar on the Configuration Changeset Import page. Then use the File Upload window and follow step 2.
-
By default, all changes in the changeset file are selected. Clear the check box for each change you do not want to include.
-
When you are ready, click Start import in the upper-left corner to begin the import.
-
In the confirmation dialog box, select Run in test mode to check for conflicts. The import progress is displayed. The duration depends on the number of changes in the changeset.
-
To skip test mode, clear Run in test mode in the Confirmation dialog box. When the import is complete, a summary appears.
User interface
We welcome feedback about any unintended effects the new UI elements may have on your installation. Contact our support desk so we can improve or document them in a future release.
on-prem To customize the logo in the new UI for the on-premises solution, follow these steps:
-
Go to this directory on your system: C:\Program Files\Omada Identity Suite\Enterprise Server\website\build\Logo\.
-
Upload your logo to this directory.
-
Rename the uploaded file to menulogo.png. This replaces the default logo with your custom logo.
