Enterprise Server database setup and troubleshooting
Omada Identity audit database
The Omada Identity audit database is designed specifically for reporting purposes. This section explains how to configure the database.
Configure the audit database
-
Create an empty SQL Server database and name it, for example, OmadaEnt_Archive.
-
Enable snapshot isolation in the archive database:
ALTER DATABASE OmadaEnt_Archive SET ALLOW_SNAPSHOT_ISOLATION ONALTER DATABASE OmadaEnt_Archive SET READ_COMMITTED_SNAPSHOT ON -
Grant the db_owner role permissions to access the archive database for the Enterprise Server service account user (when you use integrated security) or for a SQL user.
-
Go to Setup -> Connectivity -> Data Connections.
-
Open the connection ESARC and edit the ActiveX Data Objects (ADO) connection string accordingly.
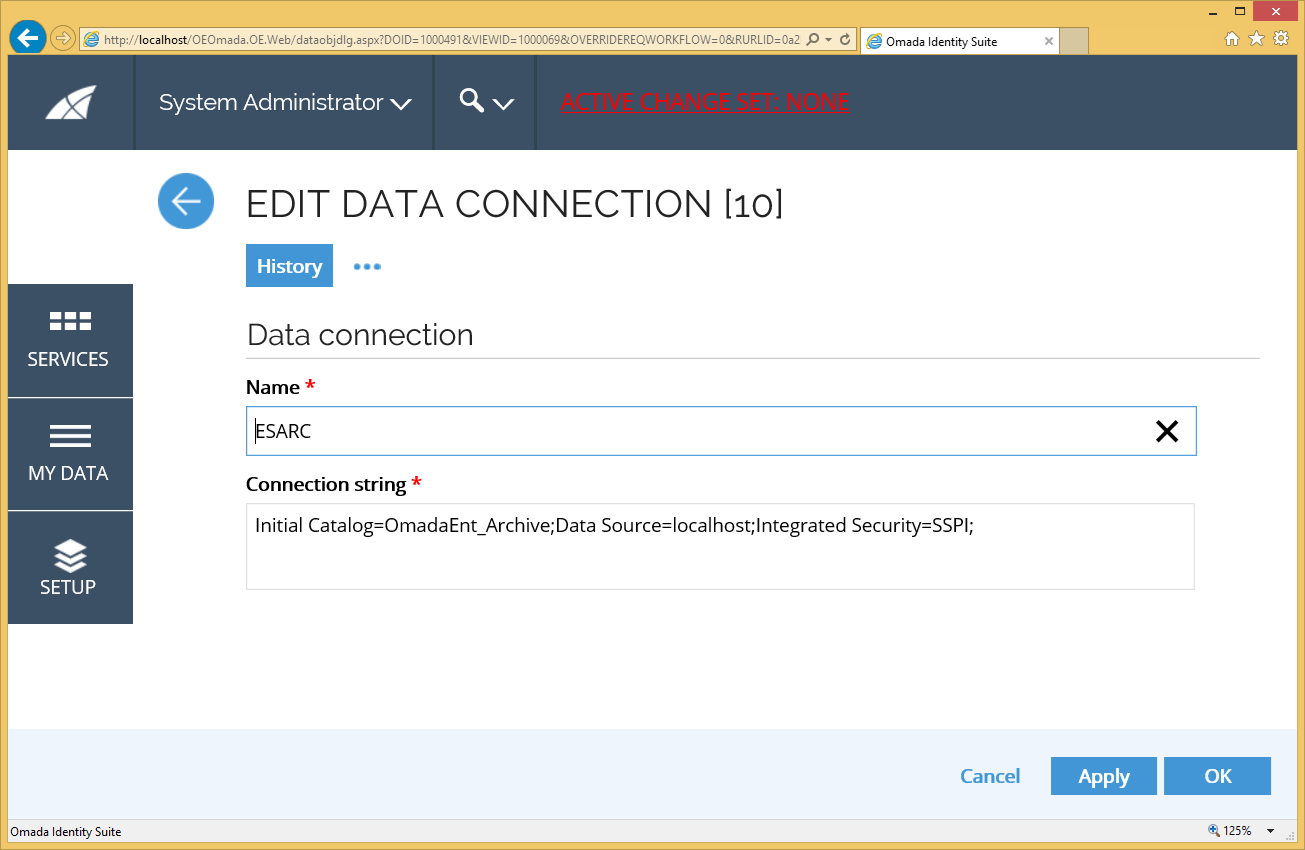
Configure object types for auditing
- In the Data Object Type dialog box, configure the object types that should be replicated to the audit database by selecting the Enable archiving check box.
- When an object type is configured to be replicated to the audit database, a table named "tbl[system name of object type]", for example, "tblIdentity", is created in the audit database.
Database schema
The database schema in the Omada Identity audit database goes through maintenance automatically. If you make any changes to the Enterprise Server's object model, for example, when you add a property binding to a data object type, you must restart the Omada Identity Timer Service to refresh the target schema.
-
DataObjects
DataObject versions are stored in a table that is named according to the configuration, for example, tblIdentity for identity objects. Columns in these tables are named according to their System Name property.
There is a _DELETETIME column in each table. In this column, NULL indicates the current value.
-
Multivalued properties
Multivalue reference properties and multivalue set properties have their own reference table in the audit database. For example, the Manager property in tblIdentity is stored in a tblIdentity_MANAGER table.
-
Set and multilingual property values
Set property values and multilingual text property values get a column for each configured language. For the type Identity, there is an Identity Status property that is transported into the columns IDENTITYSTATUS_ENGLISH and IDENTITYSTATUS_DANISH when the English and Danish languages are requested.
-
Data object types with built-in properties
When special built-in data object types, namely Users, Processes, and Activities, are included in the configuration, their properties are handled as indicated in the following table.
Data Object Type Properties Archived Users _USERNAME Processes _State, _Target, _AbsDuration, and _Duration Activities _State, _Process, _FirstActiveTime, _ActiveTime, _AbsDuration, _AbsDuration2, and _Duration2 -
UserGroup memberships
Enterprise Server internal UserGroup memberships are stored in the table tblUser_MemberOf, where the _DELETETIME column indicates whether the row has a current value.
Limitations
File attachments are not stored in the Omada Identity audit database.
Reference property attribute values are not covered by the archive feature. Most notably, resource assignment attribute values are not represented in the archive database.
Install IIS and create a database
Omada Identity Enterprise Server requires an empty database, so you must create one in SQL Server.
While creating the Enterprise Server (ES) database, make sure that you have both read_committed_snapshot and allow_snapshot_isolation settings enabled in the ES database before you use the Omada Identity software. These settings are required for proper operation of the ES.
-
Click Start -> All Programs -> Microsoft SQL Server -> SQL Server Management Studio.
-
Click Connect. The server type must be Database Engine, Server name must be (local), and Authentication must be set to Windows Authentication.
-
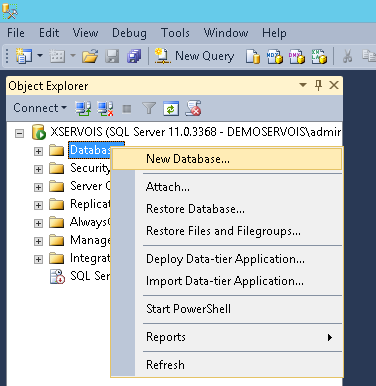
Right-click Databases and then click New Database.
-
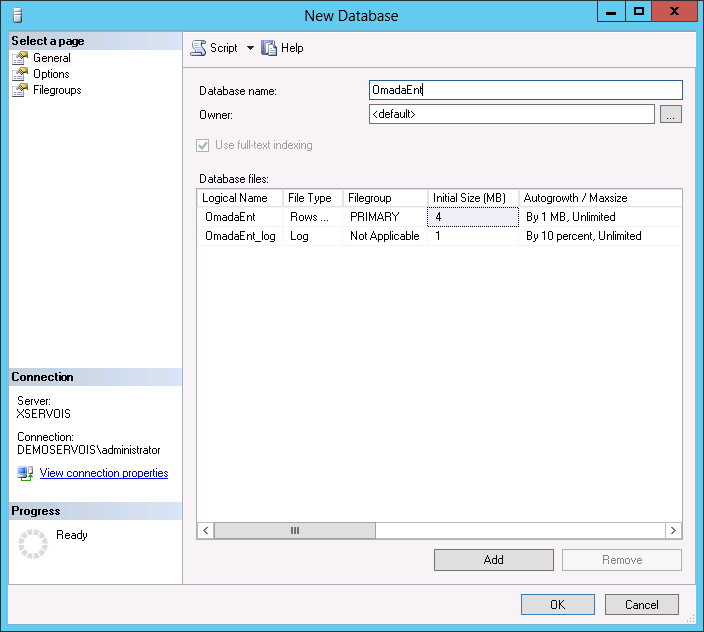
Enter OmadaEnt as the database name and, if necessary, change the default location of the database files. Click OK to create the database.
-
Make sure that the service account running Enterprise Server is assigned the db_owner role for the database.
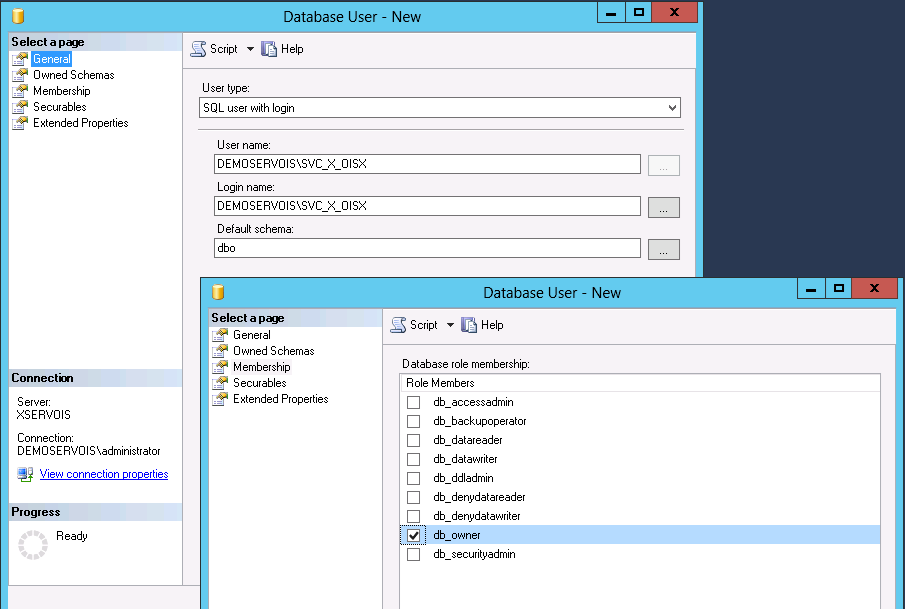
If the user who is accessing the Enterprise Server database is not allowed to have the db_owner role because of company or SQL Server policy, do the following:
- Install the db_omada role on the SQL Server using the script db_omada.sql.
- Grant the user who is accessing the Enterprise Server database the following roles: db_omada, db_datareader, and db_datawriter.
Install IIS on Windows Server
This section describes how to install Internet Information Services (IIS) on Windows Server and how to configure IIS on installations with remote users.
For information about configuring application pools in IIS, see Set-up the Web Application in IIS.
For security reasons, you may need to add the installation URL to your web browser's local intranet zone.
Install IIS on Windows Server 2016 and later
- Click Start -> Administrative Tools -> Server Manager to start the Server Manager.
- Click Manage -> Add Roles and Features to open the Add Roles and Features Wizard.
- On the Installation type page, select either Role-based or Feature-based installation.
- Select the correct server on the Select destination server page.
- On the Server Roles page, select Application Server and Web Server (IIS). The pop-up window Add features required for Web Server (IIS) may appear when you select Web Server (IIS). In this case, click Add Features in the pop-up window, and then click Next on the Select Server Roles page.
- On the Select features page, make sure that .NET Framework 4.8 (including ASP.NET 4.8) is installed. If it is not, you must install it. Click Next.
- Read the informational message for Application Server and click Next.
- Select Web Server (IIS) Support on the Select role services page. Click Next.
- Read the informational message for Web Server Role (IIS) and click Next.
- On the Select role page, review the Role services that you have selected to be installed. Click Next.
- On the Confirm installation selections page, select Restart the destination server automatically if required, and click Install.
- When the installation is complete, the Installation Results page opens. Check that the Web Server role services were installed successfully and click Close.
Install IIS on Windows Server 2008
- Start the Server Manager by clicking Start -> Administrative Tools -> Server Manager.
- In the tree view, select Roles.
- In the Roles Summary pane, click Add Roles to start the Add Roles Wizard.
- On the Before You Begin page, click Next.
- On the Select Server Roles page, select Application Server and click Next.
- On the Application Server page, click Next.
- On the Select Role Services page, select Web Server (IIS) Support and then click Next.
- On the Web Server (IIS) page, click Next.
- On the Select Role Services page, leave the default configuration as it is, and click Next.
- On the Confirm Installation Selections page, read the informational messages and click Install to start the installation.
- The Installation Progress page now shows you the features that are being installed and the progress of the installation.
- When the installation is complete, the Installation Results page opens. Check that the Web Server role services were installed successfully and click Close.
Configure IIS on Installations with Remote Users
Omada recommends that you enable content expiration on the IIS instance for installations with remote users because this improves performance.
-
Double-click HTTP Response Headers in the main pane for the website in question, and then click Set Common Headers....
-
Select Expire Web content, select After, and set the time (in days or hours) that can elapse before expiry.
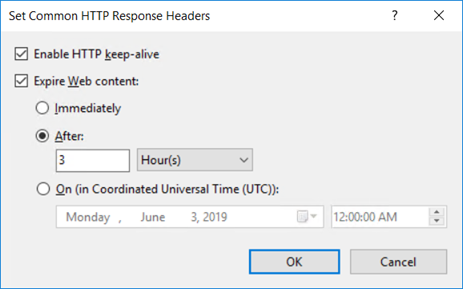
For slow networks, Omada recommends setting the web content expiration time to 7 days. In such cases, 7 days before a planned upgrade, set the expiration time to 3 hours, and increase it again right after the upgrade is finished.
Tips and troubleshooting
If you experience frequent restarts, add the following element to the Aspnet.config file and set enabled to true:
<legacyUnhandledExceptionPolicy enabled="true" />
If you have problems uninstalling an Omada service, use the following:
.netv2.0\installUtil -u OmadaOeservice.exe
If the user who is accessing the Enterprise Server database is not allowed to have the db_owner role because of company or SQL Server policy, do the following:
- Install the db_omada role on the SQL Server using the script db_omada.sql.
- Grant the user who is accessing the Enterprise Server database the following roles: db_omada, db_datareader, and db_datawriter.
Security software blocking network traffic between web browser and web server
Under some circumstances, if Omada Identity was not deployed using HTTPS (as recommended), antivirus software or other security components can block the HTTP network traffic. Consequently, such a block causes issues between the end user's web browser and the ES web server. For example, it may cause problems during the import of changesets, which stops without further progress.
This issue has been identified, for instance, when using F-Secure's browser plugin in combination with its Advanced Network Protection feature. In such a situation, the issue can be resolved by adding the HTTP site to the exclude list of the F-Secure client or turning off the Advanced Network Protection completely.
However, the solution that Omada recommends is to deploy Omada Identity using HTTPS.
Installing updates
The following tip simplifies your update installation procedure.
- Store a backup of the connection string under a key called ConnStr_ in the registry editor: HKEY_LOCAL_MACHINE -> SOFTWARE -> Omada -> Omada Enterprise.
If a backup connection string exists, it is recovered during the installation and the Omada Timer Service also starts.
Remember to update your backup copy when changing the real connection string. Be careful when you manually change anything in the registry.
Later uninstalls of Enterprise Server do not clear the registry of Enterprise Server content. The program works with the Omada Windows Server Component certification.
Web farms
When you deploy to an installation where Enterprise Server is load-balanced between several web servers with, for example, Windows Network Load Balancing (WNLB), you must add a machineKey to the Web.config file.
The machineKey section should be added to the bottom of the system.web section:
    <system.web>

    ....

    <machineKey ....>

    </system.web>
The change to the Web.config file must be made after each Enterprise Server patch release because when you apply a new patch, manual edits are overwritten.
For more information about configuring machineKey, see Web Farm Deployment Considerations at How To: Configure MachineKey in ASP.NET 2.0.
Batch jobs
With batch jobs, consider the Web.config setting <httpRuntime executionTimeout="90">. The value is in seconds.
You should set the value to the time it takes for batch jobs to run. Otherwise, the jobs may not finish. A value of 300 seconds is a good starting point.