Account matching
Here are information relevant for managing the Shared, Room, and Equipment mailbox resource types. If You are interested only in managing User Mailboxes, disable the Queries & Mappings for Shared, Room, and Equipment Mailbox resource types.
When a Mailbox is created in Exchange (no matter if it is a Shared, Room, Equipment Mailbox, etc.), a corresponding account is created in Active Directory (or Microsoft Entra ID). For these mailbox types a disabled account is automatically created. As part of the import from Exchange we lookup the account of the mailbox in either Active Directory (or Microsoft Entra ID) and assign the mailbox to the account as a resource assignment. The accounts are imported to ODW as part of the Active Directory (or Microsoft Entra ID) import. This means that importing from these systems must have run before or together with Exchange import.
The Accounts for all the non-personal mailboxes must be matched to an Identity in Omada Identity, to avoid creating a Personal Identity per mailbox, we suggest creating a Technical Identity for each type of mailbox (you can also choose to create additional Technical Identities if you want to separate the ownership even further).
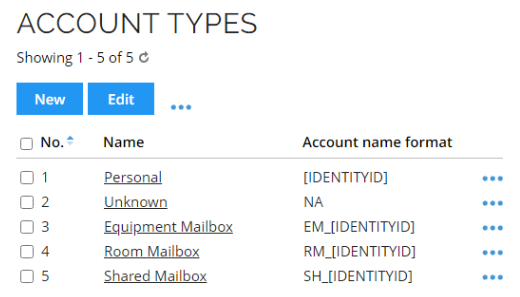
Since RoPE only allows to assign one account of the Personal account type per system to an non-technical Identity, it is required to create new account types to handle Room, Equipment, or Shared Mailboxes.
The following section explain how these accounts can be matched to Technical Identities. Additionally, information required to properly configure Request Access process are provided ensuring requesting access for shared, room, and equipment mailboxes works properly.
Technical Identities
Create three Technical Identities using the Request technical identity process and assign them to the Exchange system in Omada Identity.
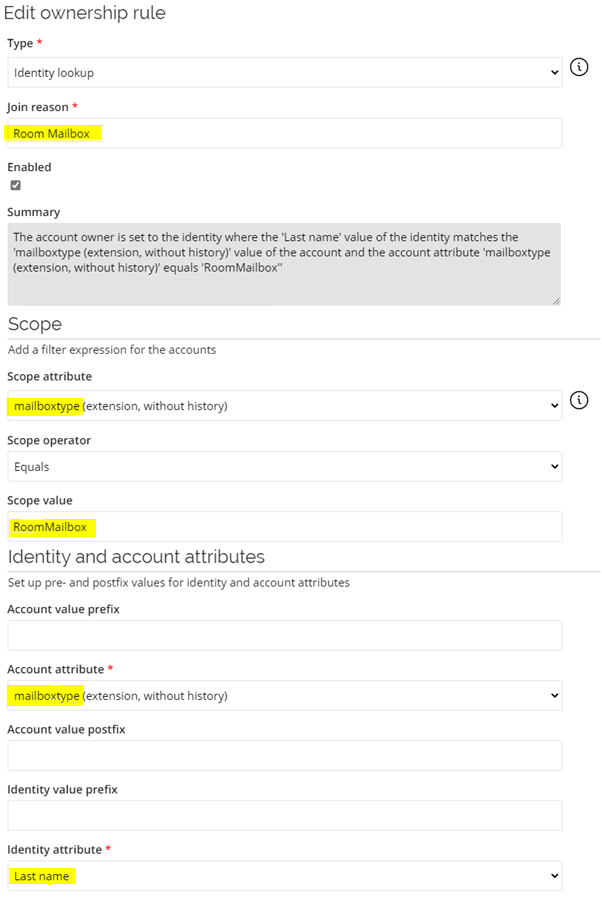
For the three Technical Identities the Last name property is used to specify the value of the mailbox type (RoomMailbox, SharedMailbox, EquipmentMailbox) as that will be imported from Active Directory (or Microsoft Entra ID or Exchange) as an extension attribute.
New Account Types
It is required to create new Account Types to support matching multiple accounts to same Technical Identity.
Assign Account types to Exchange resources
Prior to assigning Account types to Shared, Room, and Equipment Mailbox resources, an import from Exchange must be performed.
The Shared, Room, and Equipment Mailbox resources must have corresponding Account types configured.
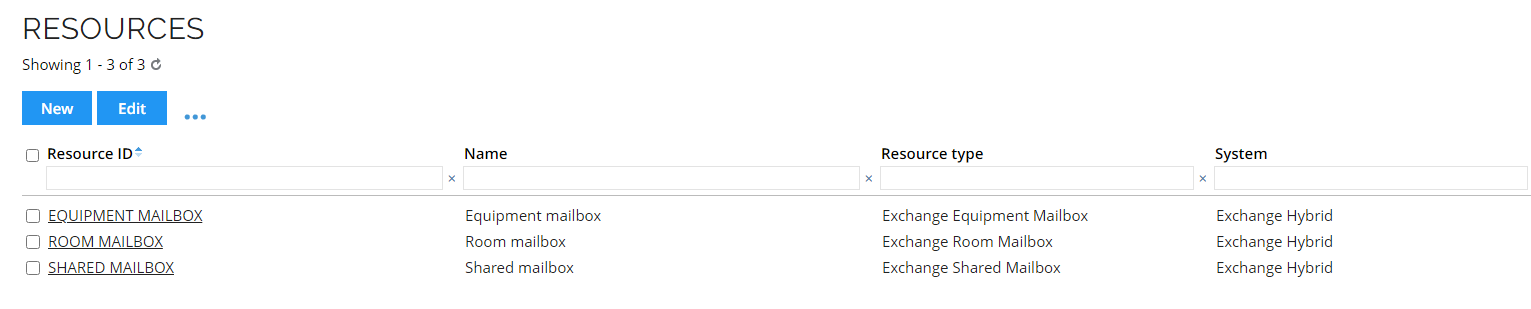
When a resource is opened. the Account types field can be found in the Advanced section of settings.
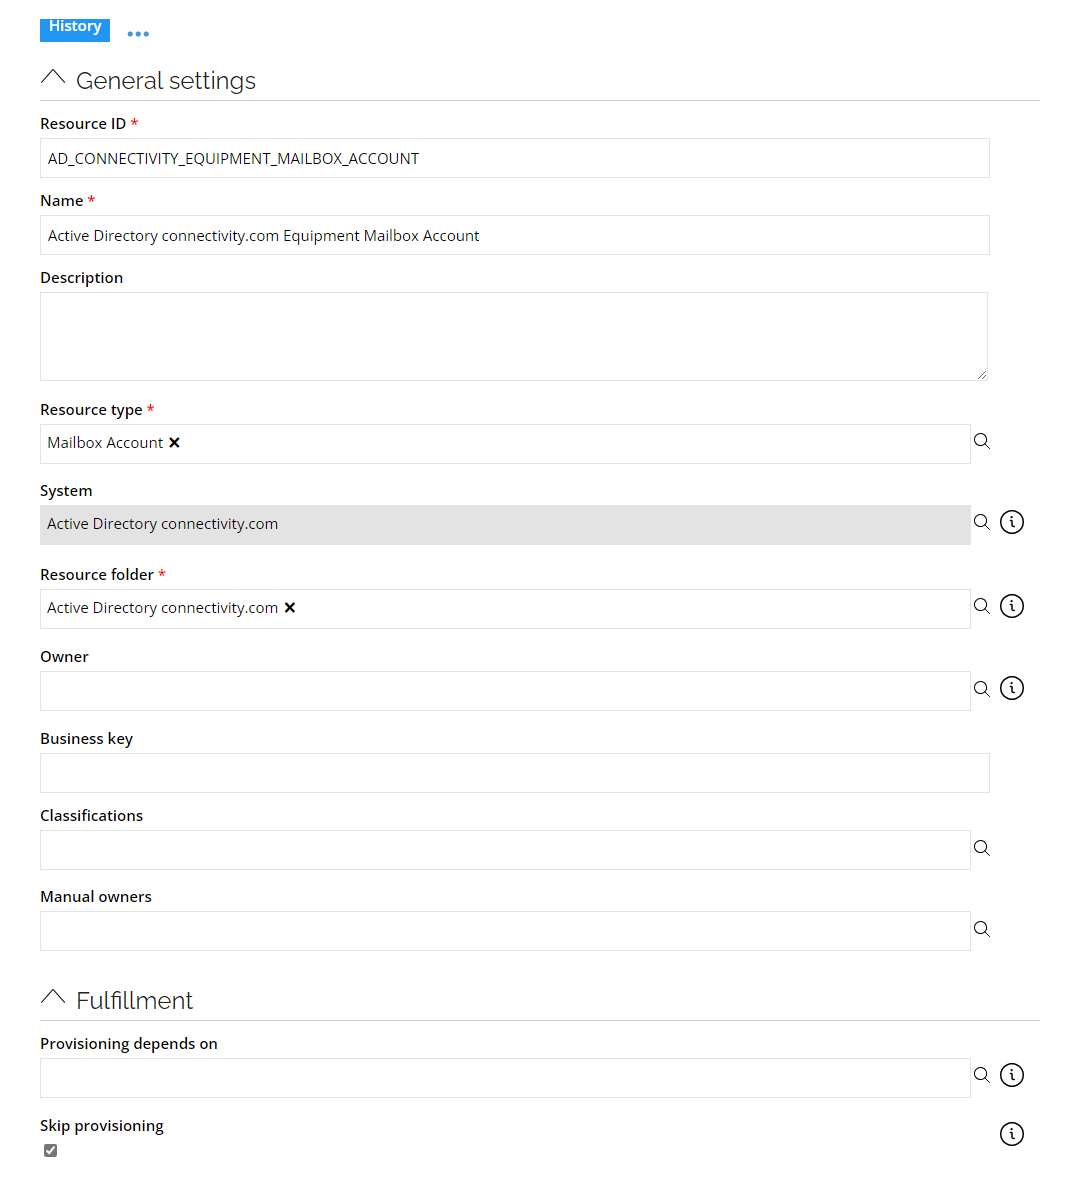
New Account Resources
It is required to create new AccountResources, one for each Account Type for each Active Directory (or Microsoft Entra ID) system.

Additionally, go to Setup > Master Data> Account Resources and for each of the created Account Resources set the Skip provisioning setting to true.
Skipping provisioning
To enable skip provisioning setting for an account resource, do the following:
-
Go to Account Resources and open the resource you would like to configure.
-
Go to Fulfillment section of settings and enable the Skip provisioning option.
Extension Attribute
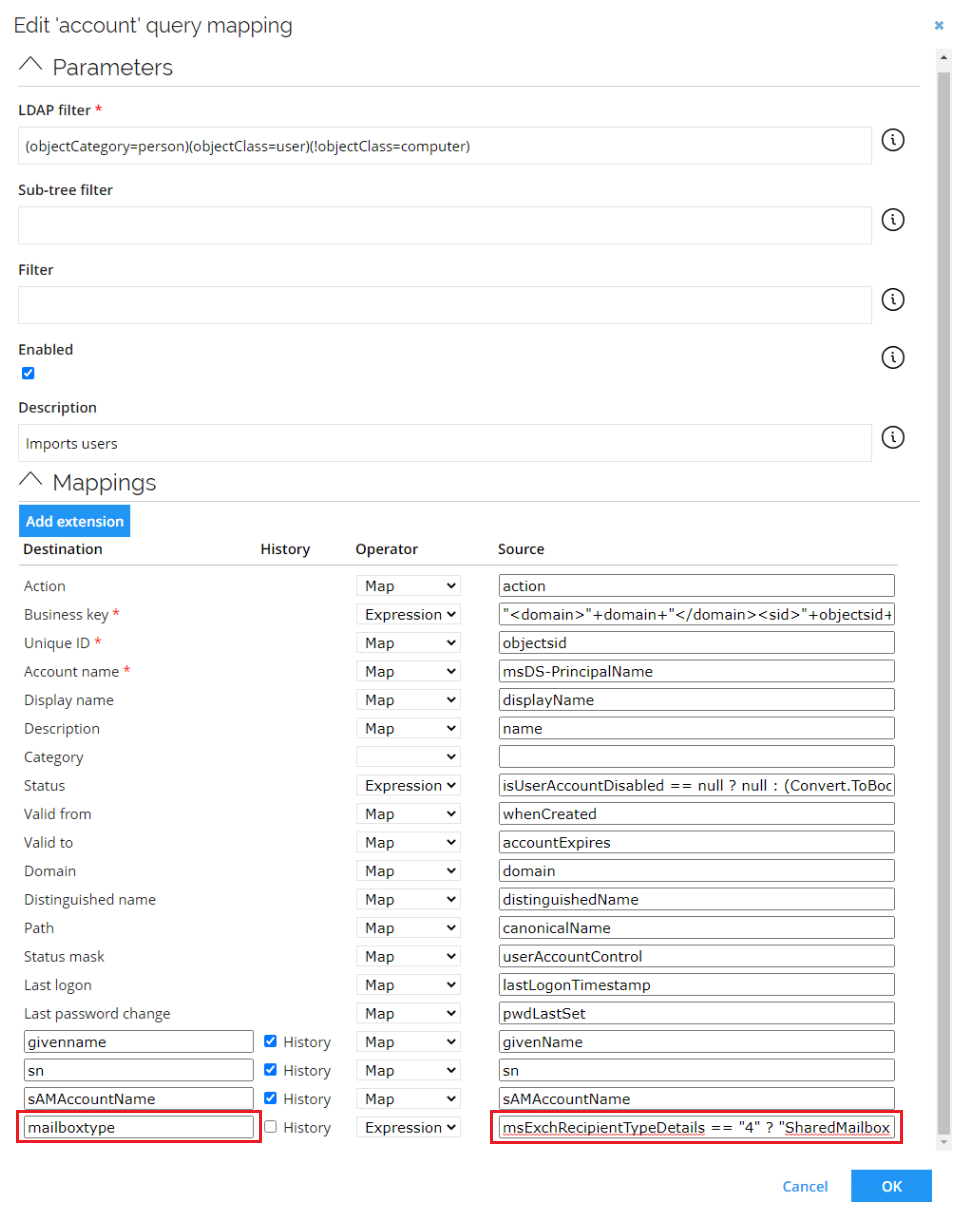
To support assigning different account types to the mailboxes based on the mailbox types, it is required to import the mailbox type (msExchRecipientTypeDetails) from the accounts in Active Directory (or Microsoft Entra ID) to an extension attribute in ODW.
msExchRecipientTypeDetails == "4" ? "SharedMailbox" :
(msExchRecipientTypeDetails == "16" ? "RoomMailbox" :
(msExchRecipientTypeDetails == "RemoteSharedMailbox" ? "RemoteSharedMailbox" :
(msExchRecipientTypeDetails == "2147483648" ? "RemoteUserMailbox" :
(msExchRecipientTypeDetails == "17179869184" ? "RemoteEquipmentMailbox" :
(msExchRecipientTypeDetails == "8589934592" ? "RemoteRoomMailbox" :
(msExchRecipientTypeDetails == "2" ? "LinkedMailbox" :
(msExchRecipientTypeDetails == "32" ? "EquipmentMailbox" :
(msExchRecipientTypeDetails == "1" ? "UserMailbox" :
"Unknown"))))))))
Importing mailboxes type directly from Microsoft Entra ID is impossible. To obtain it use following naming convention and mapping:
userPrincipalName.ToLower().Contains("room") ? "RoomMailbox" :
userPrincipalName.ToLower().Contains("shared") ? "SharedMailbox" :
userPrincipalName.ToLower().Contains("equipment") ? "EquipmentMailbox" : "Unknown"
Account Rules
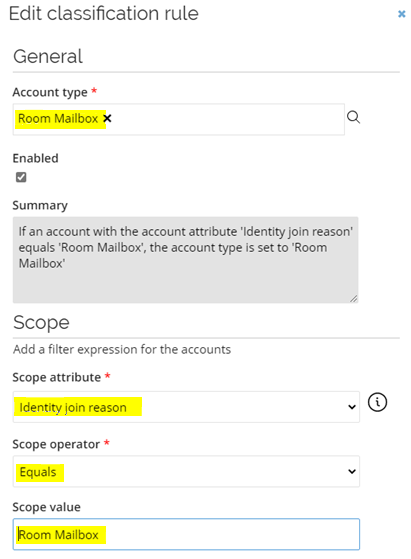
New Account Rules must be created to match the accounts with the Technical Identities. You must create Ownership and Classification rules for each mailbox type.
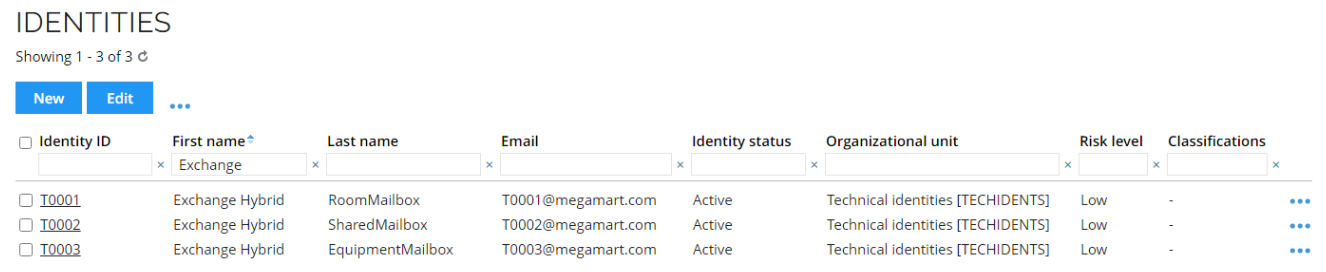
Verification
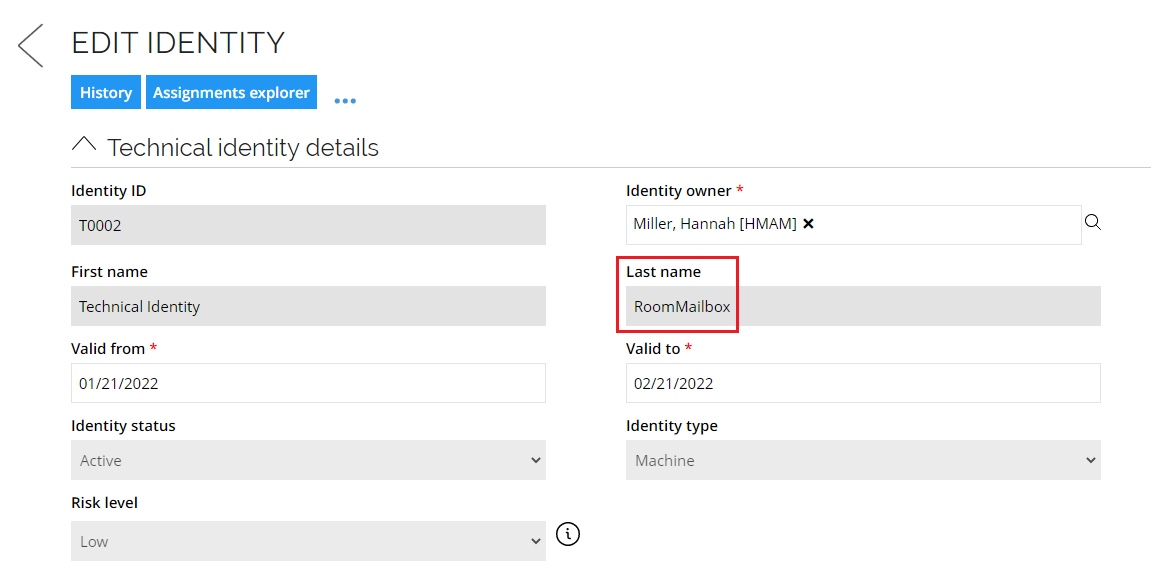
As an example, the accounts and resource assignments for Room Mailboxes are matched to the T0003 Technical Identity with Last name set to RoomMailbox, as shown below:
Upgrading to newer version
If the system has been onboarded prior to the upgrade, then performing following steps can be required for the shared, room, and equipment mailboxes to work properly.
-
Go to Setup > Master Data > Resource Management > Attributes and configure following attributes:
Attribute Name Definition Hide attribute Requires value Mailbox location (set) Mailbox location (set) MAILBOXLOCATIONSET false true Mailbox name Mailbox name EXCHANGE_NAME false true Mailbox display name Mailbox display name EXCHANGE_DISPLAYNAME false true Mailbox alias Mailbox alias EXCHANGE_ALIAS false true Mailbox Organizational Unit Mailbox Organizational Unit EXCHANGE_ORGANIZATIONALUNIT false false Room Office Room Office EXCHANGE_OFFICE false false Room Phone Room Phone EXCHANGE_PHONE false false Room Capacity Room Capacity EXCHANGE_CAPACITY false false Primary SMTP Address Primary SMTP Address EXCHANGE_PRIMATYSMTPADDRESS false false 
-
Go to Setup > Master Data > Resource Management > Attribute Sets and create following attribute sets:
Attribute set name Attributes Exchange Shared Mailbox Attribute - Mailbox name
- Mailbox display name
- Mailbox alias
- Mailbox location
- Mailbox Organizational Unit
- Primary SMTP Address
- Mailbox location (set)Exchange Room Mailbox Attributes - Mailbox name
- Mailbox display name
- Mailbox alias
- Mailbox location
- Mailbox Organizational Unit
- Room Office
- Room Phone
- Room Capacity
- Primary SMTP Address
- Mailbox location (set)Exchange Equipment Mailbox Attributes - Mailbox name
- Mailbox display name
- Mailbox alias
- Mailbox location
- Mailbox Organizational Unit
- Primary SMTP Address
- Mailbox location (set)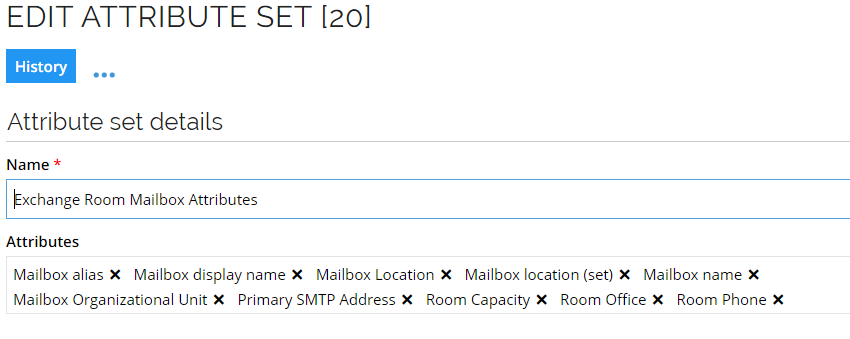
-
Go to Setup > Master Data > Resource Management > Resource Types and assign appropriate attribute sets to resource types.
Resource type Attribute set Exchange Shared Mailbox Exchange Shared Mailbox Attributes Exchange Room Mailbox Exchange Room Mailbox Attributes Exchange Equipment Mailbox Exchange Equipment Mailbox Attribute 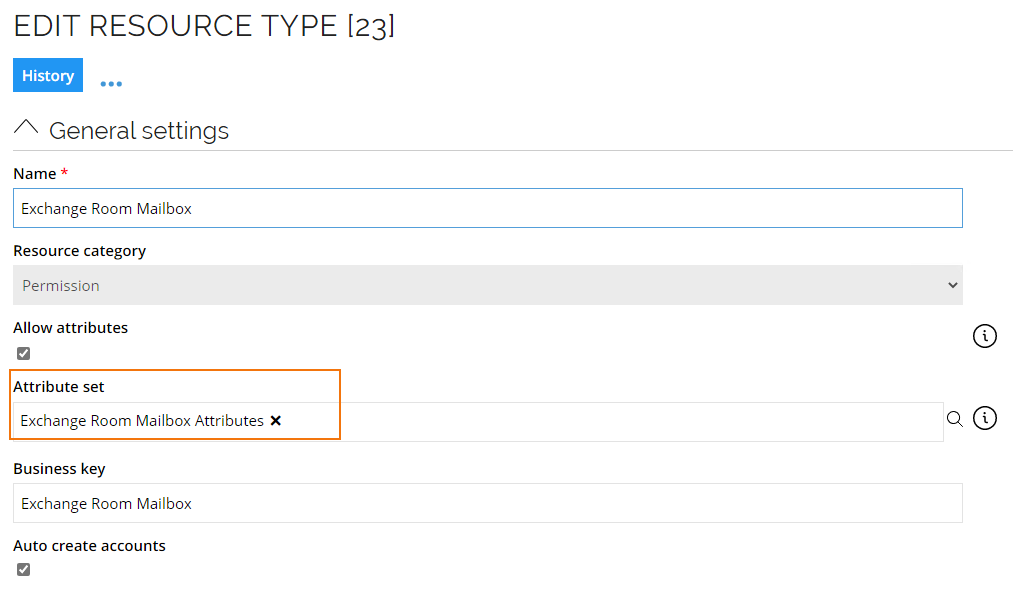
-
Go to Setup > Administration > Connectivity > Connectors and open Microsoft Exchange Hybrid template connector. There copy the data model.
-
Go to Setup > Master Data > Systems > Exchange Hybrid > Data Model and paste the data model copied in previous step.
noteIf the data model was modified after the provisioning was enabled the data models require to be merged.
-
Go to Setup > Master Data > Systems > Exchange Hybrid > Task Mappings and ensure that the following task mappings are assigned to appropriate resource types.
Resource type Task mapping Exchange Shared Mailbox Microsoft Exchange Shared Mailbox Assignment Exchange Room Mailbox Microsoft Exchange Room Mailbox Assignment Exchange Equipment Mailbox Microsoft Exchange Equipment Mailbox Assignment