Data import
This section lists prerequisites and configuration instructions required to enable the Microsoft Entra ID collector in Omada Identity.
Connection details
Choose one of the following options to configure the connection with Microsoft Entra ID: OAuth2 client credentials or OAuth2 JWT.
OAuth2 client credentials
- In the Tenant ID field, enter or paste the Tenant ID (using the Directory ID of the directory for which you configured the application). You can find the Directory ID in the Microsoft Azure Portal, under the Properties section for the relevant directory.
- In the Application ID, enter the ID of the Omada Identity Azure application that you created in the Microsoft Azure Portal. You can find the Application ID under Settings in the Azure Portal.
- In the Client Secret, enter or paste the key that you created during the Omada Identity application setup in the Azure Portal. See Prerequisites for details.
- In the API Version field, enter the version of the Microsoft Graph API that you want to employ for this connectivity.
- Optionally, configure the Headers field. You can provide a JSON document specifying custom headers. Example:
{"Request": {"Accept": " text/html",
"contenttype": "application/json",
"SomeCustomHeaderWithValue": "custom value",
"SomeCustomHeaderWithoutValue": null}}
- Optionally, enable the Test connection setting to make sure that the details that you entered are correct.
OAuth2 JWT
- In the Tenant ID field, enter or paste the Tenant ID (using the Directory ID of the directory for which you configured the application). You can find the Directory ID in the Microsoft Azure Portal, under the Properties section for the relevant directory.
- In the Application ID, enter the ID of the Omada Identity Azure application that you created in the Microsoft Azure Portal. You can find the Application ID under Settings in the Azure Portal.
- In the JWT X.509 Certificate Thumbprint, enter or paste the Thumbprint that you created during the Omada application setup in the Azure Portal.
- In the JWT Private Key, enter or paste the certificate key that you created during the Omada application setup in the Azure Portal.
- In the JWT Passphrase for private key, enter or paste the passphrase for private key.
- Optionally, configure the Headers field. You can provide a JSON document specifying custom headers. Example:
{"Request": {"Accept": " text/html",
"contenttype": "application/json",
"SomeCustomHeaderWithValue": "custom value",
"SomeCustomHeaderWithoutValue": null}}
- Optionally, enable the Test connection setting to make sure that the details that you entered are correct.
Queries and mappings
When you onboard an Microsoft Entra ID directory, a number of default queries are already set up. To specify queries and mappings:
- Verify that the default Microsoft Entra ID mappings are set up.
- Consider if you need to set up special account rules. No identity data is imported from Azure. If you want to make any changes to the queries, click New, then select the object type to create a query for.
- In the New query and mapping dialog box, in the General tab, specify a valid URL.
- Optionally, use the Filter field in the General tab. You can use a Dynamic Expresso expression to filter the data imported into Omada Identity. It returns a
TRUE/FALSEresult for each imported data row. If the expression returnsFALSEfor the given row, that row is skipped during import.- Modify the filter for the Resources Assignments - Members resource assignment (requires
GroupMember.Read.Allapplication permission). Change the current filter (membersdelta_odatatype=="#microsoft.graph.user" && removed_reason != "deleted") tomembersdelta_odatatype=="#microsoft.graph.user" && membersdelta_removed_reason != "deleted".
- Modify the filter for the Resources Assignments - Members resource assignment (requires
- Optionally, enter a Description. If you leave the Base DN field empty, the system uses the Base DN that you specified under Connections details.
- Optionally, in the Advanced tab, configure the Headers field. You can provide a JSON document specifying this query mapping. Example:
{"Request":{"ConsistencyLevel":"eventual"}}
- In the Mappings tab, map the relevant Destination properties in the left column to a value in the Source on the right side. You can specify whether the Operator is a Map, a Constant, an Expression, or a Lookup. You must always specify the required properties. The number of these properties depends on the selected mappings.
- Optionally, you can also add other extension attributes if you click the Add extension button. In such a case, you must type both a name for the extension attribute under the Destination column and a value in the Source column.
- For extension attributes you entered manually, select the History checkbox if you want to enable the history recording of the relevant extension attribute.
- When you return to the Queries and mappings dialog box, you can copy one or more object types in the overview by selecting the individual object type. Click … --> Copy.
- Once you have added the required queries and mappings, click OK. The system validates the details. If there are no errors, the status in the Status column changes to OK.
Default attribute mappings for objects
The table below presents the default fields selected for the object mappings.
| Object type | Microsoft Entra ID object | Default selected fields |
|---|---|---|
| Account | users | id, userPrincipalName, displayName, accountEnabled, lastPasswordChangeDateTime, mail, givenName, surname, businessPhones, manager_mailNickname |
| Resource | teams | id, displayName, description |
| Resource assignment | teams/{PARENT_id}/members | PARENT_id, userId, id, roles |
| Resource owner* | groups/{PARENT_id}/owners | PARENT_id, userPrincipalName |
| Resource | teams/{PARENT_id}/channels | id, displayName, description, PARENT_id |
| Resource parent/child | teams/{PARENT_id}/channels | PARENT_id, id |
| Resource | groups/{PARENT_id}/sites/root | PARENT_id, id, displayName, description |
| Resource assignment* | groups/{PARENT_id}/members | PARENT_id, id, member |
| Resource assignment* | groups/{PARENT_id}/owners | PARENT_id, id, owner |
| Resource owner* | groups/{PARENT_id}/owners | PARENT_id, userPrincipalName |
| Resource | groups?$filter=mailEnabled eq false and securityEnabled eq true and NOT(groupTypes/any(s:s eq 'Unified')) | id, displayName, description |
| Resource assignment* | groups/{PARENT_id}/members | PARENT_id, id, member |
| Resource assignment* | groups/{PARENT_id}/owners | PARENT_id, id, owner |
| Resource owner* | groups/{PARENT_id}/owners | PARENT_id, userPrincipalName |
| Resource | groups?$filter=mailEnabled eq true and securityEnabled eq false and NOT(groupTypes/any(s:s eq 'Unified')) | id, displayName, description |
| Resource assignment* | groups/{PARENT_id}/members | PARENT_id, id, member |
| Resource assignment* | groups/{PARENT_id}/owners | PARENT_id, id, owner |
| Resource owner* | groups/{PARENT_id}/owners | PARENT_id, userPrincipalName |
| Resource | groups?$filter=mailEnabled eq true and securityEnabled eq true and NOT(groupTypes/any(s:s eq 'Unified')) | id, displayName, description |
| Resource assignment* | groups/{PARENT_id}/members | PARENT_id, id, member |
| Resource assignment* | groups/{PARENT_id}/owners | PARENT_id, id, owner |
| Resource owner* | groups/{PARENT_id}/owners | PARENT_id, userPrincipalName |
| Resource assignment | groups/delta?$select=displayName,description,members | id, membersdelta_id |
| Resource assignment | groups?$expand=owners($select=id)&$select=id | id, owners_id |
| Resource owner | groups?$expand=owners($select=id,userPrincipalName)&$select=id | id, owners_userPrincipalName |
| Resource | directoryRoles | id, displayName, description |
| Resource assignment | directoryRoles/delta | id, members |
| Resource | subscribedSkus | skuId, skuPartNumber |
| Resource assignment | users | assignedLicenses, id |
| Resource | subscribedSkus | servicePlans, id |
| Resource parent/child | groups/delta | id, members |
Queries marked with * are currently disabled because members are retrieved from the Microsoft Graph API using the delta query. This approach allows fetching all group members without distinguishing between individual groups or group types in Microsoft Entra ID.
Since Microsoft only allows retrieving members through delta and not owners, a separate query was created to fetch all group owners without differentiating by group type. The same applies to resource owners - the queries that previously retrieved resource owners separately by group type were disabled. A single query was added to fetch all resource owners at once.
To retrieve members separately by group type, enable these queries manually as needed.
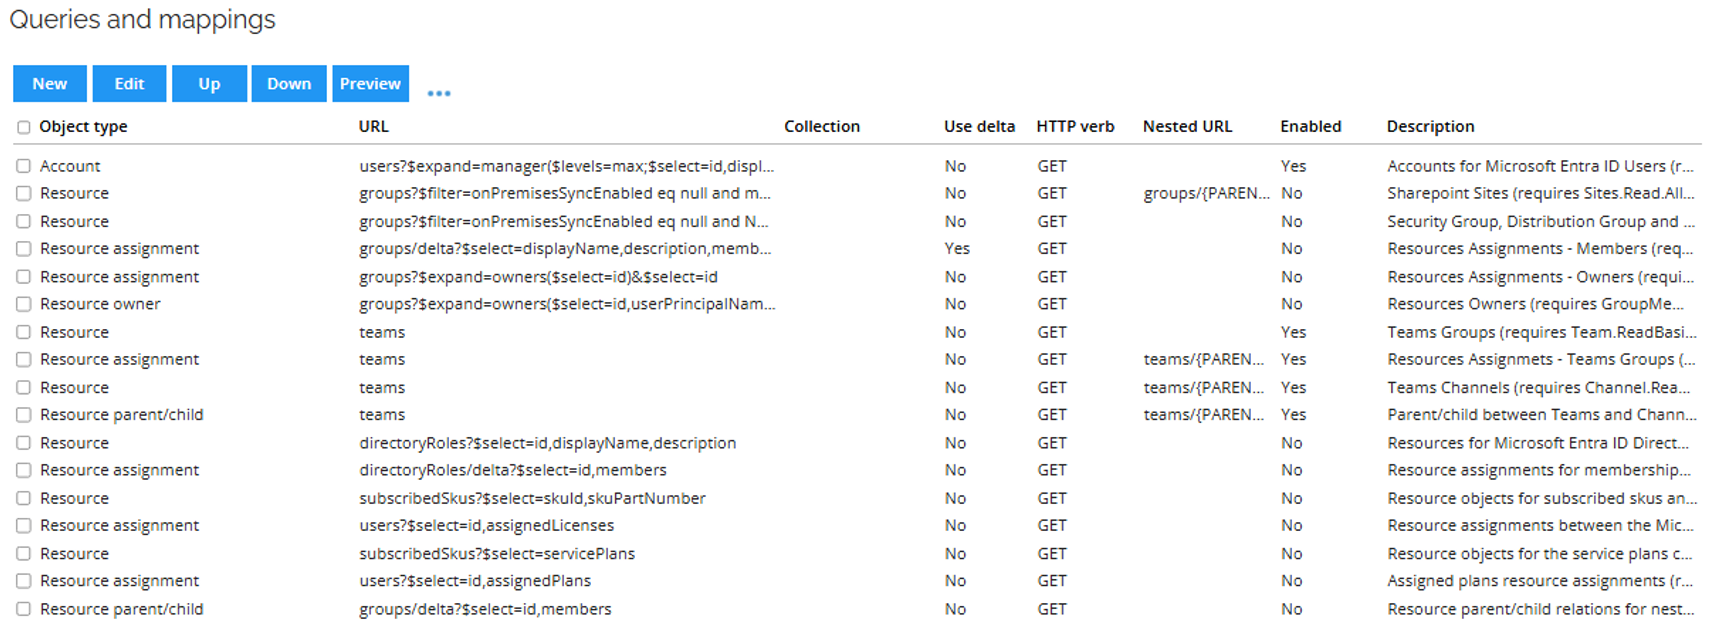
Ensure that the teams mappings are not the first ones in the Queries and mappings list:
Adding new fields to the mappings
To add new fields to the object mappings, in the Queries and mappings window, in the URL field, add the fields to the comma separated list.

Mapping of resource owners
If you create a query to import resource owners, it is possible to specify the resource's owner in two ways. You can do it either by directly importing the UID of the identity or by specifying the account from which the resolved owner is imported as a resource owner. When mapping directly to the UID of identity, ensure that identities are already imported to Omada Identity.
When mapping to an owned account, it is possible to either specify the business key of the account or the composed business key. The former should be used if the account is in the same system as the resource; the latter should be used if the account is imported into any of the trusted systems.
When the account stems from another system, use a Lookup mapping.
Advanced settings
- Enable Perform unfolding to unfold access from resources which use groups to assign membership to users (and where the user is a member of one of these groups). For example, if a user is a member of Active Directory 1, there are certain rights assigned to this user. If Active Directory 1 is a member of Active Directory 2, the user can get the rights for both Active Directory 1 in addition to Active Directory 2. This inheritance of rights is not enabled by default, but if you enable the resource parent-child hierarchy, you can allow it.
You can also provide Microsoft Office 365 licenses and access to applications in MyApps through groups. Omada recommends enabling this setting to ensure that license and application access is unfolded.
- The Timeout in seconds field allows you to specify how long the collector should wait for a response from the REST service. The default value is set to 3600 seconds (1 hour).
- In the optional Row count per batch field, you can set the number of objects that are collected and staged as a batch when paging is implemented in the collector. The default value is
100000. Applying a low value (for example: 50 or 500) to this setting may result in extended import time.
Default collected data
When you register the first Microsoft Entra ID system, ten new resource types are created:
| Resource type | Description |
|---|---|
_[system name]_ Account | This is the default Account resource type. Two standard account resources are also created. One resource is for personal accounts and the other resource is for orphan accounts with no primary owner. The name of this resource depends on the name of the system. |
| Microsoft Entra ID Teams | This is a Permission resource type. When you import Teams groups, this type is used. |
| Microsoft Entra ID Teams channel | This is a Permission resource type. When you import channels from Teams, this type is used. |
| Microsoft Entra ID SharePoint | This is a Permission resource type. When you import SharePoint sites, this type is used. |
| Microsoft Entra ID security group | This is a Permission resource type. When you import Security groups, this type is used. |
| Microsoft Entra ID distribution group | This is a Permission resource type. When you import Distribution groups, this type is used. |
| Microsoft Entra ID Mail-enabled security group | This is a Permission resource type. When you import Mail-enable Security groups, this type is used. |
| Microsoft Entra ID Sku | This is a Permission resource type. When you import purchased O365 SKUs, this type is used. |
| Microsoft Entra ID service | This is a Permission resource type. When you import services that are a part of a purchased SKU, this type is used. |
| Microsoft Entra ID directory role | This is a Permission resource type that contains the role definitions in the Entra ID |
Default data imports from queries and mappings
When you run an import, the system imports the data defined by queries and mappings. The default data is listed in the Default attributes mappings for objects in the Queries and mappings section.
Users
To import Users, the application must be given the User.Read.All application permission. The collector imports Microsoft Entra ID Users as Accounts; by default, the displayName, givenName, surname, userPrincipalName, mail, businessPhones, manager, sign-in activity and the lastPasswordChangeDateTime are imported. The state of the account is determined by the accountEnabled property.
givenName, surname, and manager are imported as extension attributes and are added to the set of attributes specified for the Account Resource Type. These three attributes are used for reconciliation.
Accessing SignInActivity data requires an Azure Active Directory Premium P1 or P2 license. If no premium license is available, you can remove the out-of-the-box query containing SignInActivity from queries and mappings.
Groups
To import Groups, the application must be given the Group.Read.All application permission. The collector imports Groups as Resources with the Microsoft Entra ID Security Group, Microsoft Entra ID Distribution Group, and Microsoft Entra ID Mail-enabled Security Group resource types. All groups are imported as different types.
The collector imports Groups as Resources with the Microsoft Entra ID Security Group, Distribution Group, Mail-enabled Security Group resources types. All groups (Security, Security (mail enabled) and Distribution) are imported as different types.
The Microsoft Graph API does not support distinct endpoints to separate the groups. Omada utilizes filters for separation. Some groups can only be imported and not managed (you cannot manage memberships and other details).
Do not use the Description field for standard purposes in Microsoft Entra ID Groups. Due to the limitations of the Graph API, Omada uses this field to store logical keys. This prevents resource duplication within the Omada environment.
Teams Groups
To import Teams Groups, the application must be given Team.ReadBasic.All application permission. The collector imports Teams Groups as Resources with the Microsoft Entra ID Teams resource type. The ID of the Teams Group is imported as ShortName. The ID of the group is imported as ShortName. In a default configuration, it means the Omada Identity Configurtion ID is also the resource ID. See the Team resource type in the Microsoft documentation to learn more.
Teams Channels
To import Teams Channels, the application must be given the Team.ReadBasic.all Channel.ReadBasic.All application permission. The collector imports Teams Channels as Resources with the Microsoft Entra ID Teams Channel resource type.
In Microsoft Teams, when you create a new team, a default channel called General is automatically created. To prevent the duplication of channels, Omada Identity includes a filtering mechanism that excludes channels named General in the import process.
SharePoint Groups
To import Sharepoint Groups, the application must be given the Group.Read.All and Sites.Read.All application permission. The collector imports Sharepoint groups as Resources with the Microsoft Entra ID SharePoint resource type. The ID of the group is imported as ShortName. In a default configuration, it means the ID is also the resource ID.
Accessing data from SharePoint sites requires a Microsoft E5 license.
Do not use the Description field for standard purposes in Microsoft Entra ID SharePoint Groups. Due to the limitations of the Graph API, Omada uses this field to store logical keys. This prevents resource duplication within the Omada environment.
Omada also implements filtering methods to acquire relevant SharePoint sites without duplicating resources (Omada uses nested URLs to access site details). The Microsoft Graph API does not provide endpoints for provisioning SharePoint sites or memberships. Omada uses Entra ID Groups for provisioning SharePoint groups and managing memberships.
Directory roles
To import Directory roles the application must be given the RoleManagement.Read.Directory application permission. The collector imports Directory roles as Resource with the Microsoft Entra ID Directory Role resource type. The ID of the directory role is imported as ShortName. In a default configuration, it means the ID is also the resource ID. Only the activated directory roles are imported.
See the directoryRole resource type in Microsoft documentation to learn more.
Resources Assignments
To import Assignments, the application must be given the Group.Read.All application application permission. To import Teams memberships, the application must be granted the TeamMember.Read.All application permission. The following standard resource assignments are available in Omada:
- Assignments between Security Groups, members and owners
- Assignments between Mail-enabled Security Groups, members and owners
- Assignments between Distribution Groups, members and owners
- Assignments between Sharepoint Groups, members and owners
- Assignments between Teams Groups, members and owners
In all listed resource assignments, an extension attribute called C_MSENTRAIDGROUPROLE was integrated. This attribute allows specifying the membership type (member or owner). Omada Identity uses this attribute to provision rights during the membership deletion processes.
For resource assignments involving Teams groups and users, a new extension attribute called C_MSTEAMSMEMBERSHIPID was integrated. This attribute stores the membership ID from Teams, providing information necessary for deleting assignments as required.
The Microsoft Graph API does not provide an endpoint to fetch the members of the site. Omada uses groups/members and groups/owner to retrieve the SharePoint assignments.
Assignments between Users and Directory roles
To import Assignments, the application must be given the RoleManagement.Read.Directory application permission. Resource assignments between Users and Directory roles are imported using the delta functionality of the MS Graph API. However, the collector performs an initial query on each import and, in that sense, not utilizes the full delta functionality.
Parent/child relationships between Teams and Channels
To import the relationships, the application must be given the Team.ReadBasic.all Channel.ReadBasic.All application permission.
Parent/child relationships between Groups
To import relationships the application must be given Group.Read.All application permission. In Microsoft Entra ID, if a group is a member of another group, these memberships are imported as Parent/child relationships in Omada Identity. This means that if a User A is member of a group Child, and the group Child is member of a group Parent, then the User A has an implicit direct membership of the group Parent.
Role and Policy Engine (RoPE) does not calculate implicit direct memberships out of the box. To calculate such memberships, set the Ignore indirect ODW assignments customer setting to False. You can also instruct the Omada Data Warehouse to not unfold these assignments in the Advanced settings of the system onboarding.
Resource owners
To import relationships, the application must be given the Team.ReadBasic.All and Group.Read.All application permissions. The following standard resource owners are available in Omada:
- Resource owner Security Groups
- Resource owner Mail-enabled Security Groups
- Resource owner Distribution Groups
- Resource owner Sharepoint Groups
- Resource owner Teams Groups
Office 365 information
The collector also imports data related to Office 365 licenses.
Stock Keeping Units
To import SKUs the application must be given the Organization.Read.All application permission. Stock Keeping Units or licenses are imported as resources with the Microsoft Entra ID SKU resource type. The resources are categorized as Resource in the ODW.
Service Plans
To import service plans the application must be given the Organization.Read.All application permission. The Service plans contained in an SKU are imported as separate resources with the Microsoft Entra ID Service resource type. The resources are categorized as Resource in the ODW.
Assigned licenses
To import service plans, the application must be given the User.Read.All application permission. Assigned licenses or assignments between a User and an SKU are imported as Resource assignments.
Assigned service plans
To import service plans the application must be given the User.Read.All application permission. Service plans assigned to a User through an Assigned service license are imported as Resource assignments.
Configure thresholds
The Configure thresholds function allows you to set the amount of changes that cannot be exceeded, relevant to the last import. In the Configure import thresholds view, type a number (integer) in percentage for New objects, Modified objects, and Deleted objects to enable thresholds for the import of objects from this system. The value for each operation is by default set to 0, which means that no threshold calculations take place for the operations until you change the integer.
For more information, see the Import and Onboarding section.
For all .NET-based collectors, thresholds are calculated in the following relation:
- If the system category is set to Identity data, the thresholds are calculated.
- If the system category is set to Access data, the thresholds are calculated.
- If the system category set to Both, the thresholds only apply to Access data, that is, Accounts, Resources, and ResourceAssignments.
Before running an import, ensure the RoPE configuration is completed.