Additional configuration
Switching custom REST-based collectors to .NET
All collectors based on the generic REST collector have their Collector ID migrated from REST to Omada ODW NET Query. For the existing custom REST-based collectors (the customer created collectors with REST as a Collector ID) some additional actions need to be taken to migrate the REST-based collector to a .NET Query collector.
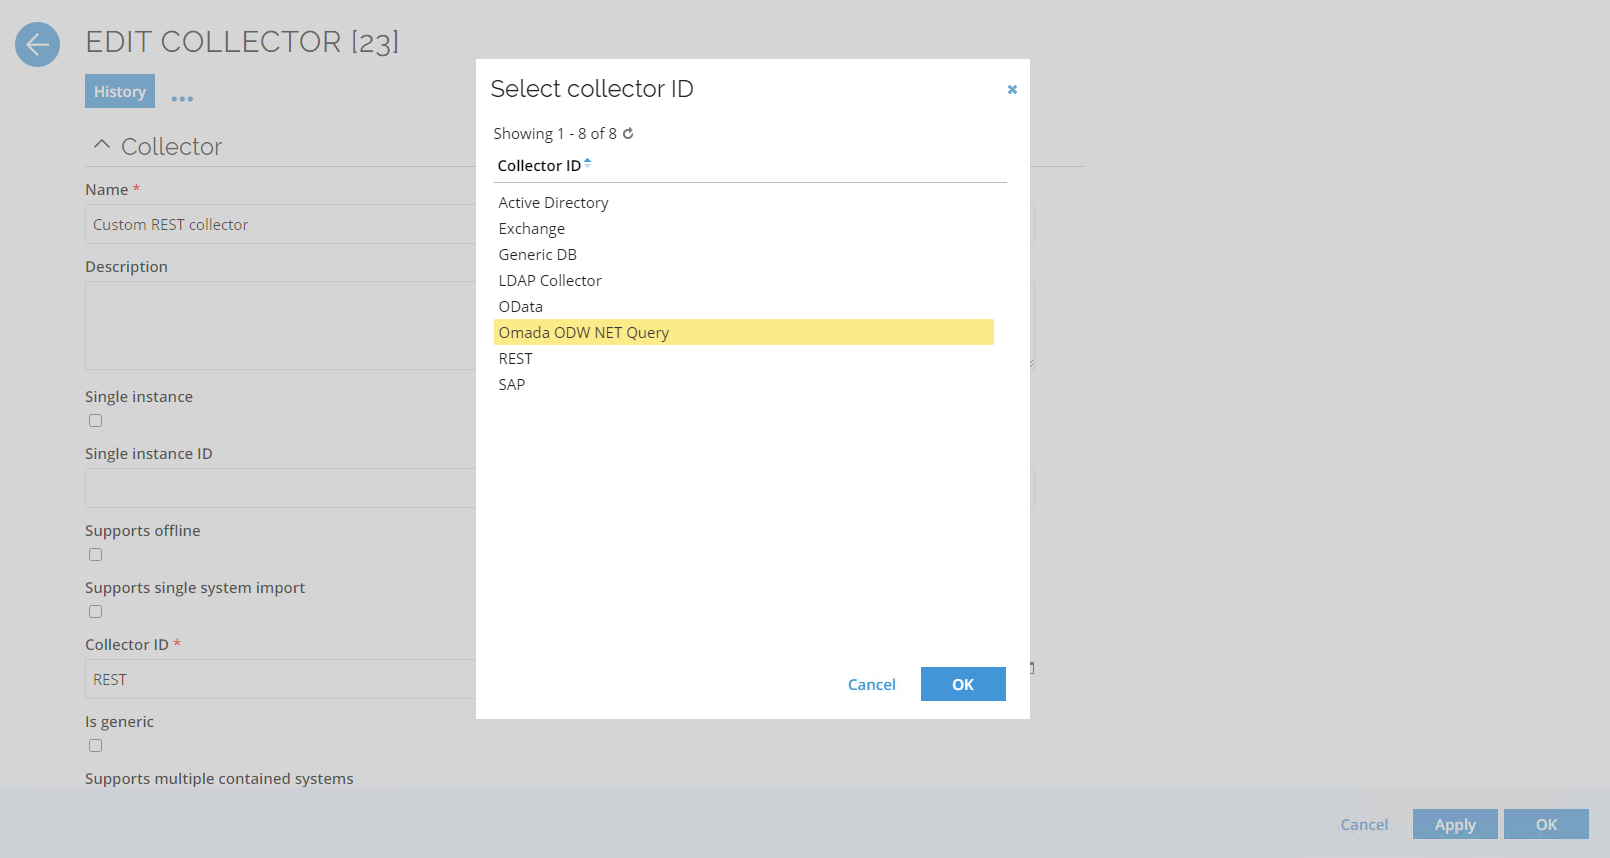
To switch your custom REST-based collector to .NET:
- Go to Setup -> Administration -> Connectivity -> Collectors.
- Select your custom REST-based collector and click Edit.
- Change the Collector ID to Omada ODW NET Query and click Apply.
In addition to the Collector ID, configuration changes must be added to the collector configuration file for the following configuration parameters:
assemblyLocationassemblyNameassemblyNameGACassemblyFolder

These configuration details can be found in the generic REST collector configuration details.
Bear in mind the following relations of the configuration parameters:
- If
assemblyLocation==FILEthenassemblyFolder+assemblyNameneeds to be filled; else, it can be left unset. - If
assemblyLocation==GACthenassemblyNameGACneeds to be filled; else, it can be left unset.
Storing custom data in extension properties
Objects in Microsoft Azure Active Directory have a limited number of properties. If you want to store an Omada Identity property that does not fit in any existing property in Microsoft Azure Active Directory, you can create an extension property for a given object and adjust the Microsoft Azure Active Directory Connector configuration to properly save the data.
To create an identityId extension property on the AD User Object to store the Omada Identity Identity ID:
Prerequisites: A configured Microsoft Azure Active Directory instance.
-
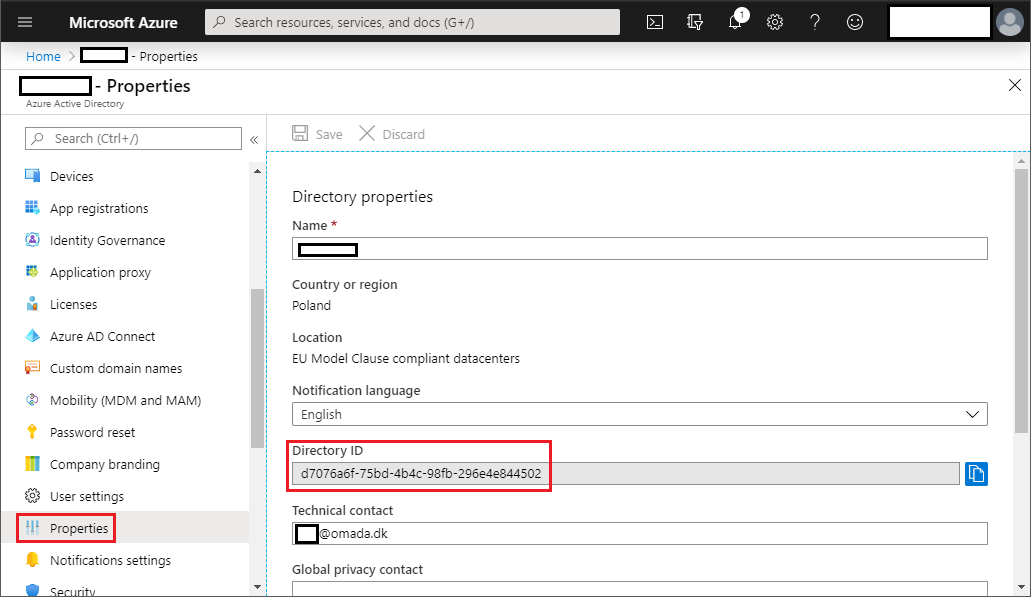
In the Azure Portal, go to Microsoft Entra ID blade and select Properties > Directory ID. Note down the Directory ID.
-
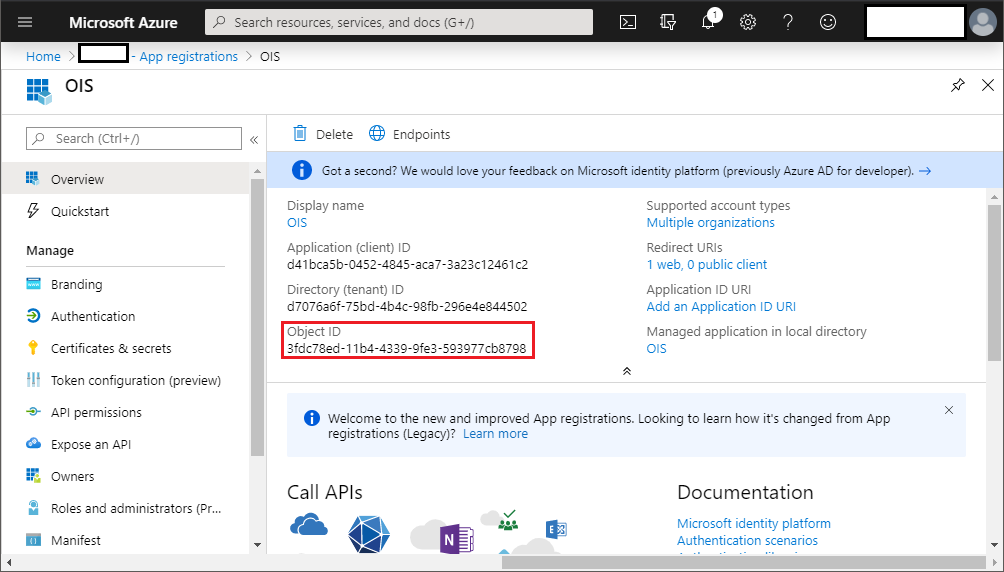
Also, in the Azure Portal, navigate to Microsoft Entra ID blade and select App registrations > Select application > Object ID. Note down the Object ID.
-
Create an extension property using Microsoft Graph API. You can use any tool to create a POST request or go to https://graphexplorer.azurewebsites.net/.
POST https://graph.windows.net/{Directory ID}/applications/{Application Object
ID}/extensionProperties?api-version=1.6
Content-Type: application/json
Body:
{
"name": "identityId",
"dataType": "String",
"targetObjects": [
    "User"
]
}
If the operation is successful, you should see in the response the name of created property in format:
extension_{Application Id}_identityId, for example:"extension_bad987cf52e44fe4b5afab7e62c53a97_identityId" -
Go to Omada Identity and update the Microsoft Azure Active Directory Connector data model. Under the Properties element, add a new property:
<property name="extension_bad987cf52e44fe4b5afab7e62c53a97_identityId" dataType="stringType"/>Under the AzureAdUser > objectProperties element, add a new property:
<objectProperty>extension_bad987cf52e44fe4b5afab7e62c53a97_identityId</objectProperty> -
In Omada Identity, edit the Microsoft Azure Active Directory Connector task mapping. Find Microsoft Entra ID – User Assignment and add:
<fieldMapping name="extension_bad987cf52e44fe4b5afab7e62c53a97_identityId"
dataType="stringType" action="modify" mappingType="Expression">Operation=="Create"
? ROPE_ATTR_IDENTITYID : null</fieldMapping> -
Commit the connector settings.
-
Now, if you create a new Identity in Omada Identity, you can make the following GET request to the Users endpoint to see if the property is populated in Microsoft Azure Active Directory:
GET https://graph.windows.net/{Directory ID}/users?api-version=1.6
Managing Office 365 licenses with Microsoft Azure Active Directory
In Omada Identity, you can use the Microsoft Azure Active Directory integration to assign Office 365 (O365) licenses to users in Omada Identity through groups in Microsoft Azure Active Directory.
An O365 license can have a number of different services, for example, Lync or Yammer. When you assign an O365 license to a group in the Azure Portal, you can decide which specific services to include. This way, you can either assign access to individual services or to clusters of services according to your organization’s needs.An O365 license can have a number of different services, for example Lync or Yammer. When you assign an O365 license to a group in the Azure Portal, you can decide which specific services to include. This way, you can either assign access to individual services or to clusters of services according to your organization’s needs.
When you manage licenses via the Omada Identity, the focus is on these individual services instead of the overall licenses.
You can see reports for the Office 365 services in the Omada Data Warehouse reports.
Configuring Microsoft Azure Active Directory and Omada Identity for Office 365 licenses
In order to manage Office 365 licenses via Omada Identity, you have to configure both Microsoft Azure Active Directory and Omada Identity. For each service or cluster of services that you want to manage via Omada Identity, for example, Yammer, you will have to create a group in Microsoft Azure Active Directory and a resource in Omada Identity.
When the user group and the resource are mapped to each other, the Omada Identity resource is what users will request access to in Omada Identity, which will then grant them access to the corresponding user group in Microsoft Azure Active Directory.
To begin with, create a group via the Microsoft Azure Active Directory:
- Log in to the Azure portal and navigate to Microsoft Azure Active Directory > Users and Groups > All groups. Create a new group, named after the relevant services or service cluster, for example, Yammer users. The Membership type must be Assigned.1. Log in to the Azure portal and navigate to Microsoft Azure Active Directory > Users and Groups > All groups. Create a new group, named after the relevant services or service cluster, for example Yammer users. The Membership type must be Assigned.
- Select the newly created user group, and click Licenses, then click Assign. Under Products, select a product that contains the services you want, for example, the Office 365 business Essentials product that contains Yammer.
- Under Assignment options, select On for all services that you want to include in the group, and select Off for any services that you want to exclude.
Next, you have to map the selected services to Omada Identity. In Omada Identity, create a new application for the Office 365 features:
- As a System administrator or IT administrator, go to Setup > Master data > Resource management > Applications, and click New.
- Create a new application. Make sure that Is logical system is checked. Under the Onboarding section, assign an Owner (IT) to the application. Click OK.
Once you have created the Office 365 application, follow these steps in Omada Identity to onboard the O365 application that you created:
-
As the assigned application owner, go to Services > Onboard application, and start the onboarding of the O365 application.
infoYou need to initiate the onboarding process as the Owner (IT) selected above.
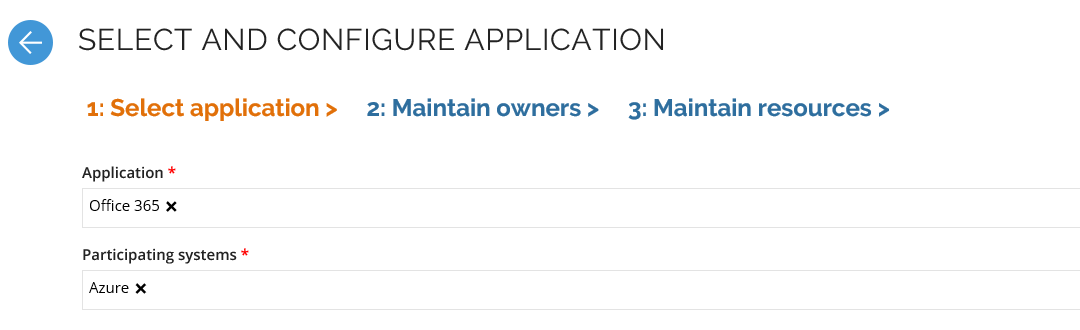
Under Participating systems, add your Microsoft Azure Active Directory. Under Maintain owners, add an owner of the system, and under Maintain resources, add the resources that relate to the relevant service:
- The Microsoft Azure Active Directory group that you have created for the service
- The Microsoft Azure Active Directory Sku resource for the chosen license, for example, O365_BUSINESS_ESSENTIALS. Note that the name of the resource does not match the display name in the Azure portal. - The Microsoft Azure Active Directory Sku resource for the chosen license, for example O365_BUSINESS_ESSENTIALS. Note that the name of the resource does not match the display name in the Azure portal.
- The Microsoft Azure Active Directory Service resource for the relevant service. Note that the name of the resource does not match the display name that you see in the Azure Portal.
-
Select Submit to business owner.
You have now created resources in Enterprise Server, that are mapped to Microsoft Azure Active Directory. Now, you must create an application resource that users can request access to.
-
Log in as the Business owner of the application and continue the onboarding process. Under Maintain resources, add a new application resource with names that are relevant to the chosen services. For example, Resource ID:
O365YAMMERand Name: Yammer enterprise. The created application resources need to be approved by an Application Onboarding administrator. -
Under Child resources, select the access resources that you created above: The Azure AD group, the Microsoft Azure Active Directory Sku, and the Microsoft Azure Active Directory Service. Click OK.
-
Click Submit for approval.
Finally, log in as the IT owner again and finish the process. The chosen Office 365 license, and its chosen services, are now mapped to the parent resource in Enterprise Server. Your users can now request access to the services during the normal Request access flow.
Requesting services covered by an Office 365 license
Users can request access to an O365 service via the normal Request access flow, where they have to enter Office 365 under System to request from.
- Start a Request access flow.
- Under Systems to request access from, select the application that you have made for the Office 365 licenses.
- Select and add the resources you want access to and submit your request.
Managing O365 resource assignments
As a manager, you can inspect the resource assignments of your identities. Resource assignments for Azure and for Office 365 are displayed in their own sections, respectively.
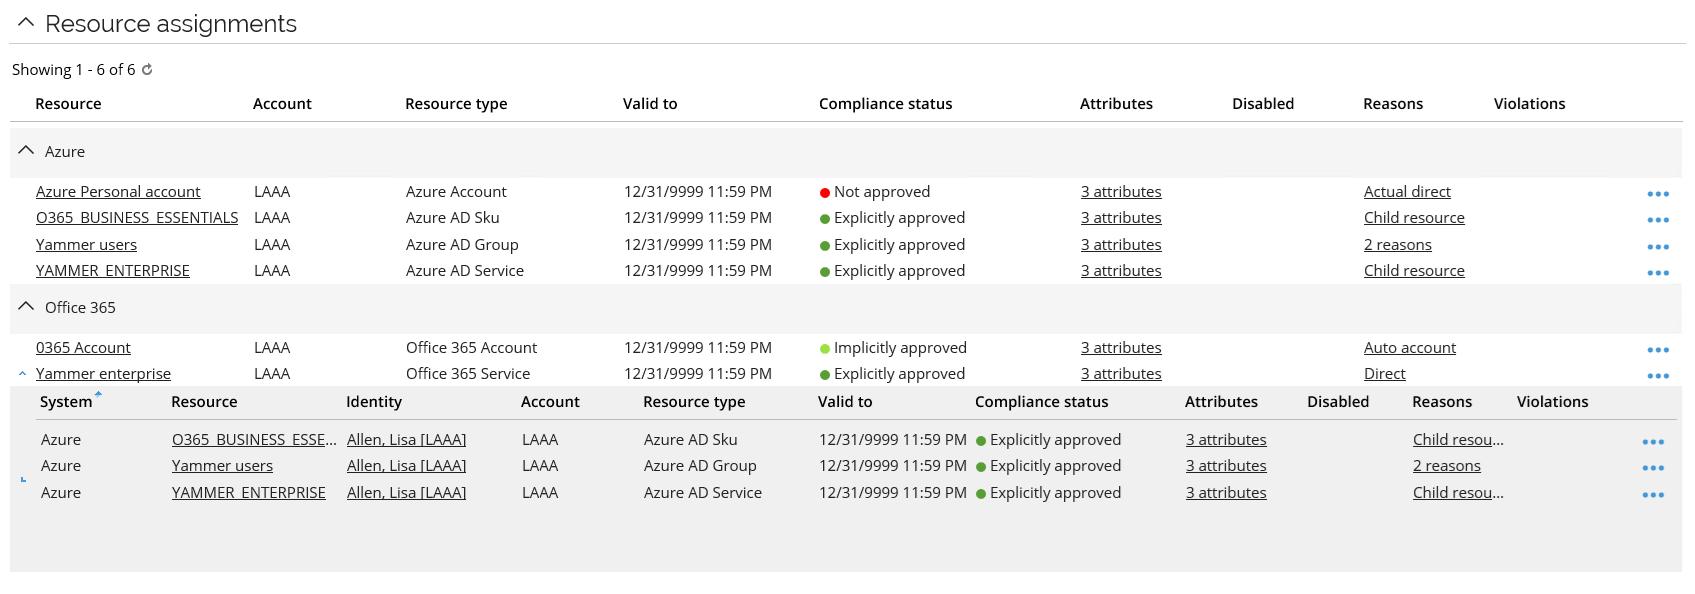
Under Office 365, the resources assignments for the role created in the second step of the application onboarding process have Direct reasons, because they were specifically requested.
Under Microsoft Azure Active Directory, the resources are listed as Child resources, since each resource is part of the O365 license.
The Microsoft Azure Active Directory Group resource will initially have two reasons, Child resource and Unconfirmed actual. The reason Unconfirmed actual is because the user will be added to the relevant user groups for any requested and approved resource. When you import the Azure system into Omada Identity again, this reason changes to Actual.
Using on-premise AD with Microsoft Azure Active Directory connect
You can synchronize groups, users, and memberships between your on-premise Active Directory and the Microsoft Azure Active Directory.
- Enable provisioning for your on-premise AD instead of the Microsoft Azure Active Directory.
- Go to Setup > Master data > Systems and add your on-premise AD to the list of participating systems.
- Go to Setup > Master data > Resource management > Resources and add the on-premise AD as an application resource.
Filtering on-premises synched objects
The groups and group memberships, originating from on-premises Active Directory (AD), can't be maintained with the Microsoft Azure Active Directory (neither Microsoft Azure Portal nor Microsoft Graph API supports it). Therefore, they can be excluded from the Microsoft Azure Active Directory imports, since they are already imported and governed by the AD system. This is relevant for a setup with the on-premises AD, synchronized via Microsoft Azure Active Directory Connect, deployed alongside the Microsoft Azure Active Directory.
Omada recommends to also import on-premises synced users, providing the full overview of the group memberships. It is possible to exclude user objects, originating from on-premises AD, from Microsoft Azure Active Directory imports, but since the users can have assigned memberships in cloud-only groups, hence the recommendation.
Queries and mappings excluding the on-premises synced objects
The following Queries and Mappings are adapted to exclude the on-premises synched objects:
| Object type | Microsoft Azure Active Directory object | Filtering | Example |
|---|---|---|---|
| Account | Users | doesn't recommend to modify the query and mapping for users. | N/A |
| Resource | Groups | An example of how to use a filter in the URL for groups, excluding the groups in Microsoft Azure Active Directory synchronized from on-premises AD. The onPremisesSyncEnabled attribute is used. | groups?$select=id, displayName, description, mailNickname, onPremisesSamAccountName, onPremisesSyncEnabled, securityIdentifier**&$filter=onPremisesSyncEnabled eq null&$count=true** |
| Resource Assignment | Group membership | For group memberships, the URL is also modified to filter out onPremisesSyncEnabled. Additionally, it is required to use a nested URL to only import memberships from the cloud-only groups. | URL: groups?$select=id, displayName, description, mailNickname, onPremisesSamAccountName, onPremisesSyncEnabled, securityIdentifier**&$filter=onPremisesSyncEnabled eq null&$count=true** Nested URL: groups/delta?$select=id, members&$filter= id eq '{PARENT_id}' |
Headers
To support advanced queries in the Microsoft Graph API, it is required to add the following header to the Connection details for the Microsoft Azure Active Directory system:
{"Request":{"ConsistencyLevel":"eventual"}}