Enable Omada Identity MCP
This page describes how to request Omada Identity MCP (Technical Preview feature) for your Omada Identity Cloud environment, and how to prepare your environment and your identity provider for it.
Your agreement with Omada must include the Omada Identity Graph API. Omada Identity MCP works through the Graph API, so without it, Omada Identity MCP cannot access the data that it needs. If you are not sure whether your agreement includes the Graph API, ask your Omada contact before you send the enablement ticket.
Enabling Omada Identity MCP follows this sequence:
- You send the enablement ticket. See Send the enablement ticket.
- Your agreement with Omada is updated to include Omada Identity MCP.
- Omada enables Omada Identity MCP in your environment and confirms when it is done. See What Omada does after you send the ticket.
- You configure Omada Identity and your AI assistant. You (or a partner, or an Omada consultant on your behalf) perform the following steps:
Send the enablement ticket
Send the enablement ticket to Omada Support. Include the following information:
- The environment name and delivery zone.
- Your Microsoft Entra tenant ID. Omada registers your environment against your tenant, and this registration lets the assistant reach your indexed resources. You can find the tenant ID in the Azure portal under Microsoft Entra ID > Overview.
- The system name of the property that links Omada users to the signed-in user. See Establish the link between Omada and the signed-in user.
- The Application (client) ID of the app registration that your environment uses for Omada sign-in. See Find the app registration.
Omada Identity MCP is not enabled by default. Omada enables it per environment, on request, as part of your agreement with Omada. If you are not sure whether your organization is covered, ask your Omada contact before you send the ticket.
Establish the link between Omada and the signed-in user
The user who signs in from the AI assistant must match a user in Omada Identity. To set up this link, identify the property that holds the value issued by your identity provider, and send its system name to Omada. This is the same step as for the Javi integration with Microsoft Teams, and the value is the same.
-
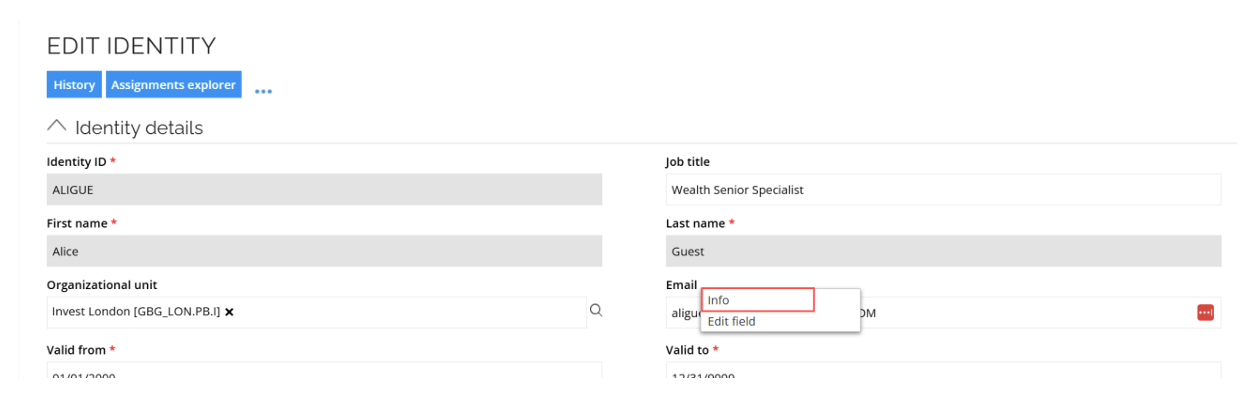
As an Omada administrator, go to Setup > Identities and select an identity.
-
In the field mapped to the User Principal Name (UPN), right-click the property name and select Info.
-
Note the systemname of the property, usually
EMAIL.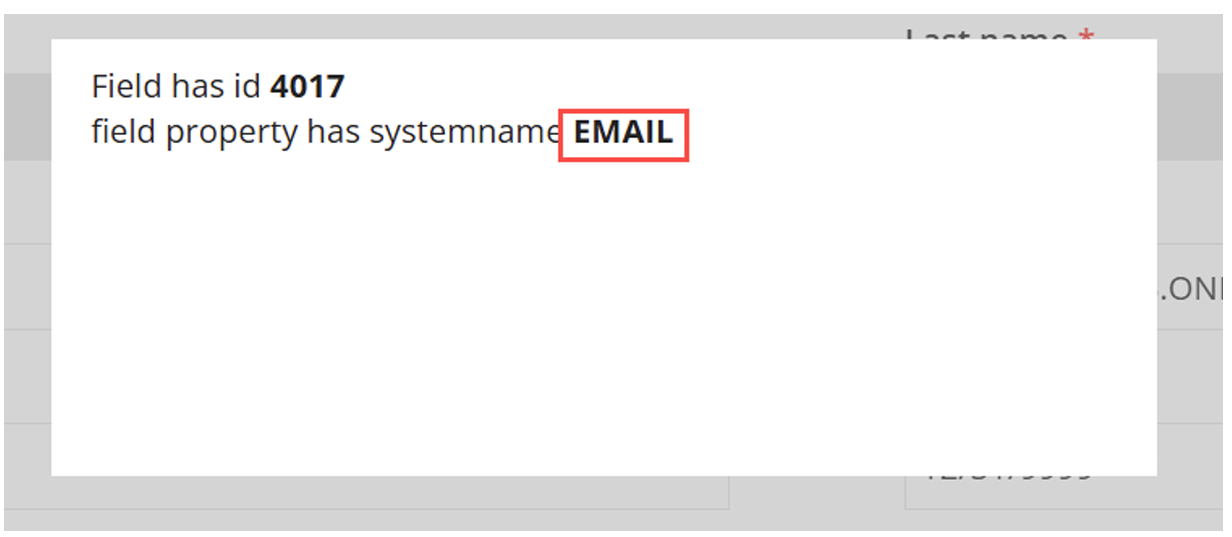
-
Include the system name in the enablement ticket.
-
The values do not match
If the value does not match the value issued by your identity provider, users can still sign in and connect, but they see only the tools that every user has. Manage access approvals, Revoke access, and Review the Compliance Workbench are missing, even for users who should have them. This looks like a permissions problem, but it is a matching problem, and it is the most common cause of an assistant that connects but cannot do anything. -
A user without an identity
A user who exists in Omada Identity but has no linked identity gets the correct tool list, because tool visibility depends only on the user and the user's groups. However, most tools return no results, because business contexts, access requests, approvals, and revocations all depend on the identity. Only documentation search works without an identity.If the tools are listed but return no results, check for a missing identity rather than a mismatched email address.
What Omada does after you send the ticket
When processing your ticket, Omada performs the following actions. None of them is a customer step, and none of them can be done from the Omada Identity user interface.
- Updates your agreement to include Omada Identity MCP.
- Enables Omada Identity MCP in the environment. This also creates the tool authorization roles described in Review the tool authorization roles. The roles do not exist before this step.
- Applies the entitlement for your environment. Until the entitlement is in place, the tool list is empty for every user, regardless of their roles.
- Registers your environment against your Microsoft Entra tenant. The assistant reaches the resource index through this registration.
- Indexes your resources using OData access.
The entitlement status is cached for 24 hours. Your environment may show no change until the cache expires. This is expected behavior and does not mean that the enablement failed.
Omada confirms when all these actions are complete. You can then configure Omada Identity and your AI assistant, starting with Enable OData for the Resource data object type. The authorization roles are created and assigned to the standard user groups automatically, so reviewing them is optional.
Enable OData for the Resource data object type
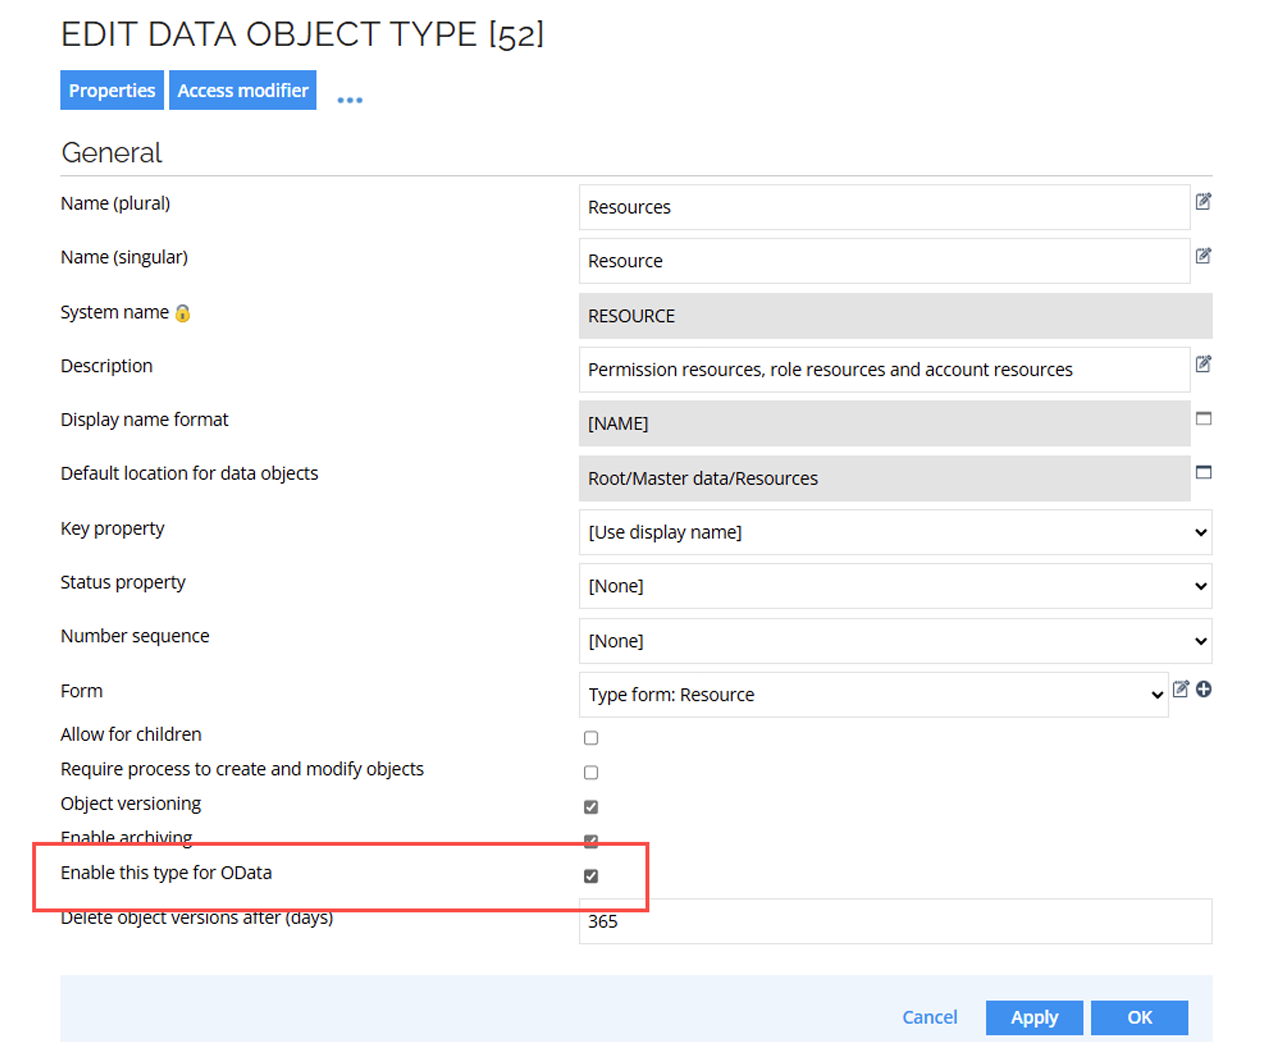
Omada builds a searchable index of your requestable resources, so that the assistant can find them and answer questions about them. Omada reads the resources over OData to build this index, so the Resource data object type must be enabled for OData.
- In Omada Identity, go to Setup > Data Object Types, and then select Resources.
- Select the Enable this type for OData checkbox.
- Select Apply or OK to save.
Check that User and User group are enabled for OData
The User and User group data object types are enabled for OData by default. The assistant reads them to determine which tools to offer each person, so make sure that they have not been disabled:
- In Setup > Data Object Types, open User and make sure that Enable this type for OData is selected.
- Repeat the check for User group.
If either type is disabled, users can sign in and connect, but everyone sees only the tools that are available to everyone. Manage access approvals, Revoke access, and Review the Compliance Workbench are missing, even for users whose roles allow them. This may look like a permissions problem, but it is caused by the OData configuration, so check these two data object types before you change any role assignments.
Resource, User, and User group are the only data object types that Omada Identity MCP uses.
Prepare the app registration in Microsoft Entra ID
Omada Identity MCP signs each user in through the app registration that your environment already uses for Omada sign-in. You add a few settings to that app registration. You do not create a new one, and nothing existing is changed or removed.
If your security team needs to review these changes before you make them, see Omada Identity MCP security.
Find the app registration
-
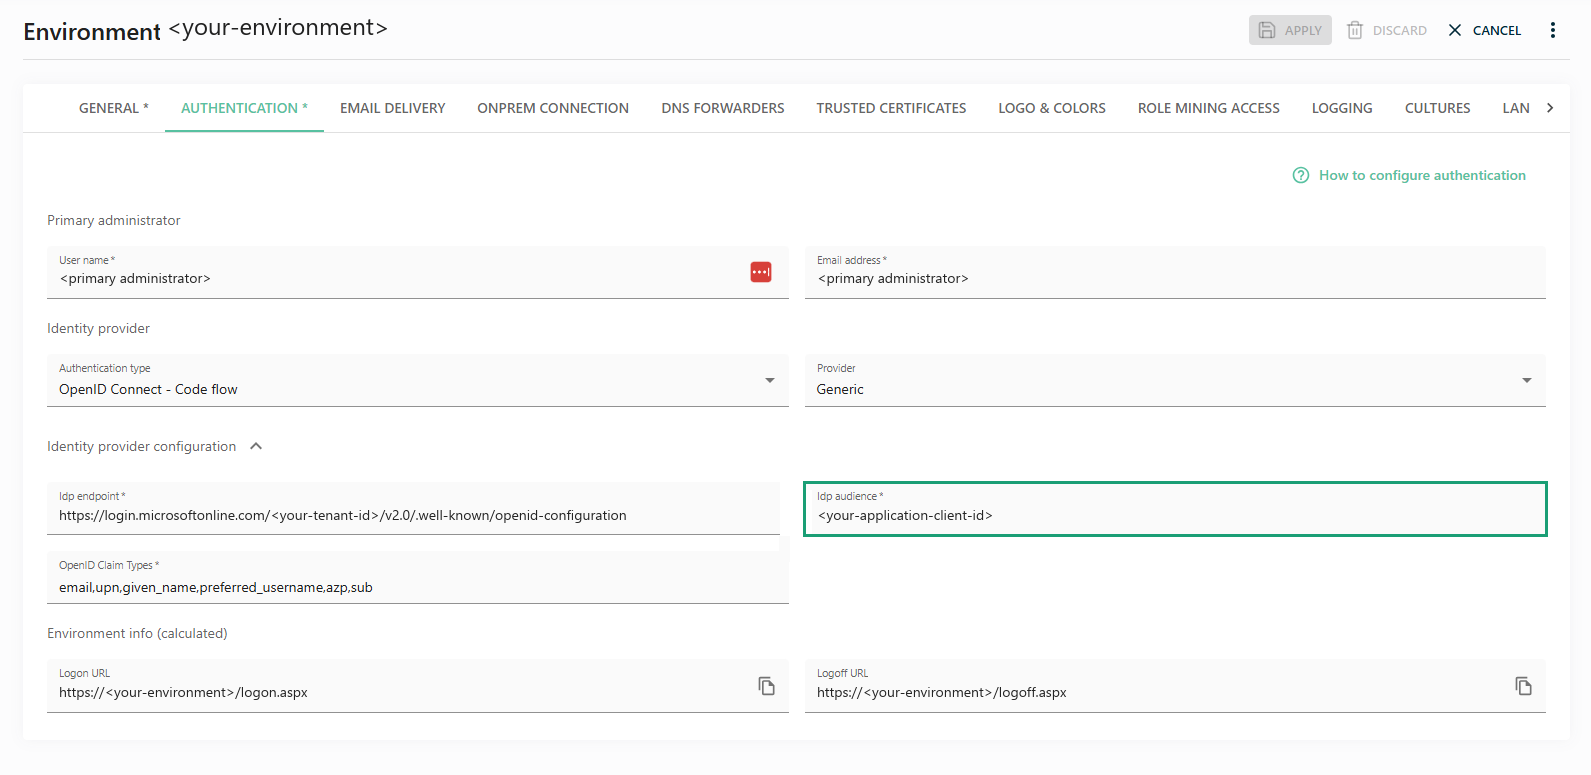
In the Cloud Management Portal, open your environment and select the Authentication tab. The Idp audience is the Application (client) ID of the app registration to use.
-
In Microsoft Entra ID, open App registrations and select the app registration with that Application (client) ID. Note the ID. You need it for the enablement ticket and to set up the AI assistants.
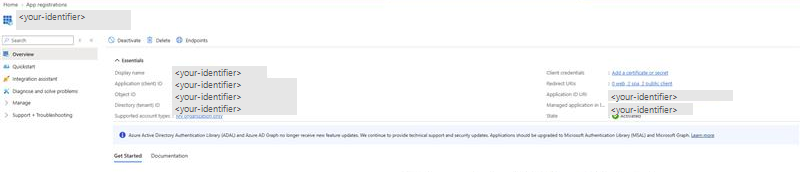
Omada Identity accepts a sign-in only if Microsoft Entra ID issued it for this app registration. A sign-in for any other app registration is refused, even in the same tenant.
Add the redirect URIs
After sign-in, Microsoft Entra ID returns the user to an address, called a redirect Uniform Resource Identifier (URI), that is registered on the app registration. Go to Authentication and add the address for each AI assistant that you use:
| Platform | Redirect URI | AI assistant |
|---|---|---|
| Mobile and desktop applications | https://claude.ai/api/mcp/auth_callback | Claude Team and Claude Enterprise |
| Web | https://chatgpt.com/connector/oauth/<callback-id> | ChatGPT Enterprise. ChatGPT shows this address when the administrator creates the plugin. Each plugin has its own address. |
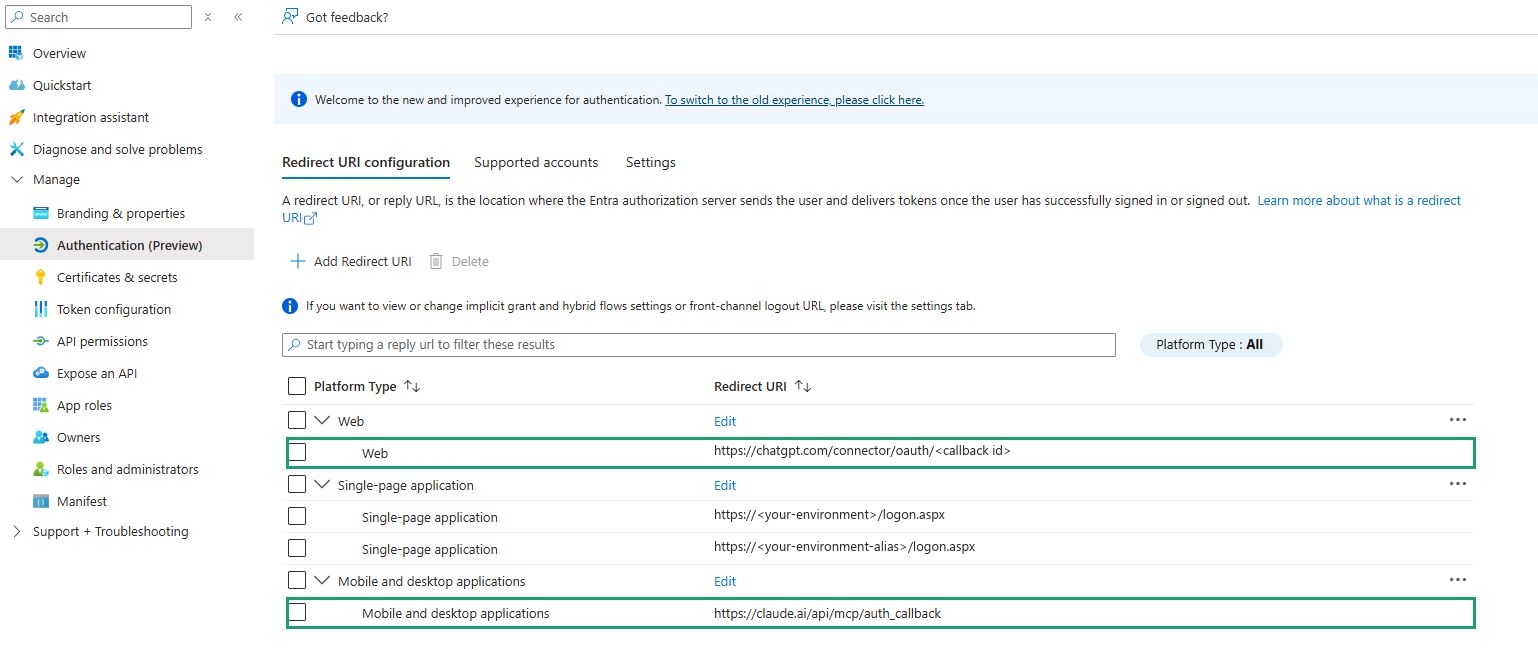
- Leave the existing entries as they are. The Single-page application entries are the sign-in pages of Omada Identity.
- Claude Desktop with a configuration file needs two more redirect URIs. See Individual setup: Claude Desktop with a configuration file.
Create a client secret for ChatGPT
Only ChatGPT Enterprise needs a client secret. Claude signs in without one. Skip this step if you do not use ChatGPT.
- Go to Certificates & secrets > New client secret.
- Enter a description, for example,
Omada Identity MCP - ChatGPT, and an expiry date that your policy allows. - Copy the Value immediately. It is shown only once.
- Give the value to the ChatGPT administrator over a secure channel.
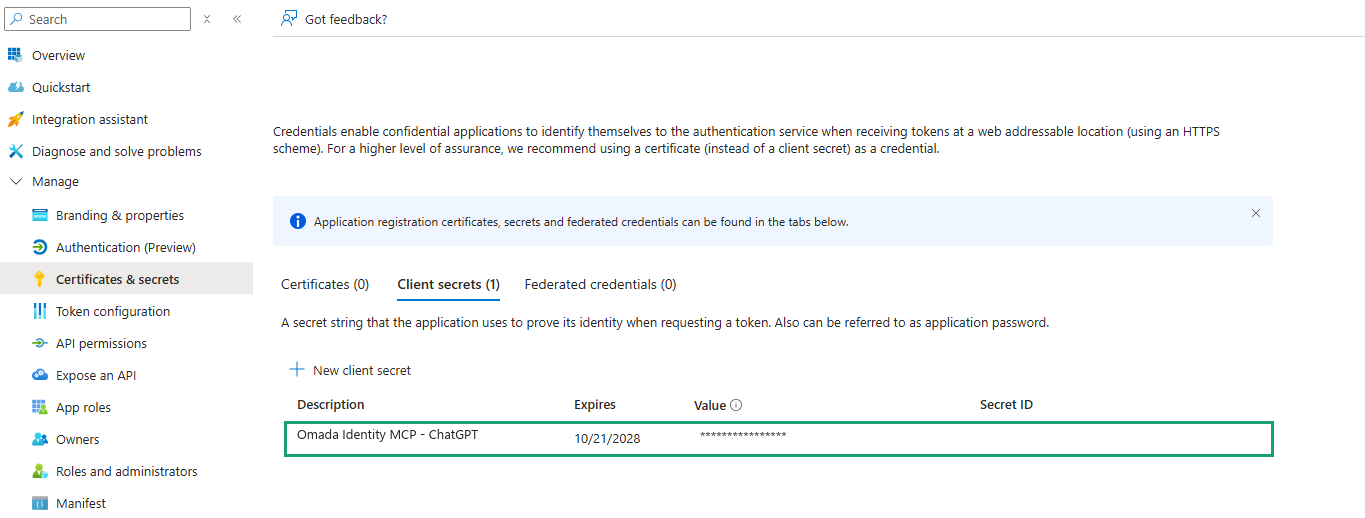
When the client secret expires, ChatGPT stops connecting for every user. Create a new secret before the expiry date and update it in the ChatGPT plugin.
Expose the assistant's permission
-
Go to Expose an API. If Application ID URI is empty, select Add and accept
api://<your-application-client-id>. If it already has a value, keep it. You add theapi://value in the manifest in the next section. -
Go to Add a scope and create the scope with the following values:
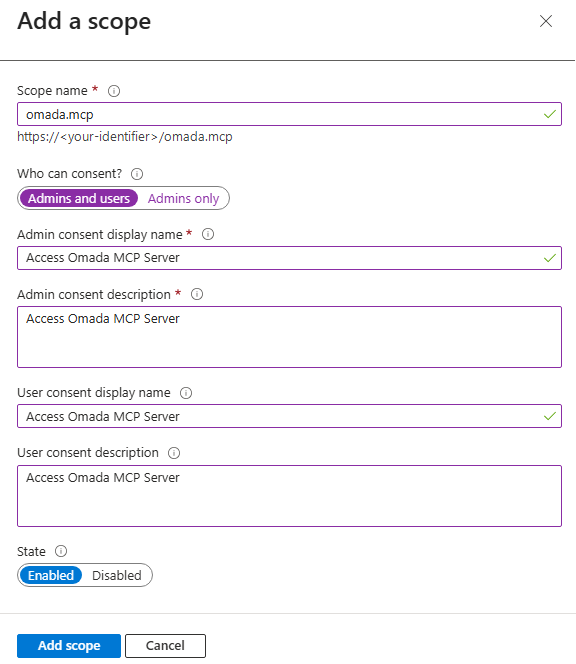
Field Value Scope name omada.mcpWho can consent Admins and users, or Admins only if your policy requires it.
Note: If you select Admins only, an administrator must grant consent once under API permissions > Grant admin consent. Both options work. The only difference is whether each user is prompted for consent the first time they sign in.Display name Access Omada MCP Server Description Allows the signed-in user to access Omada MCP Server tools on their behalf. State Enabled -
Save the scope by clicking Add scope.
After you save, the
omada.mcpscope is listed under Scopes defined by this API, next to any existing scopes: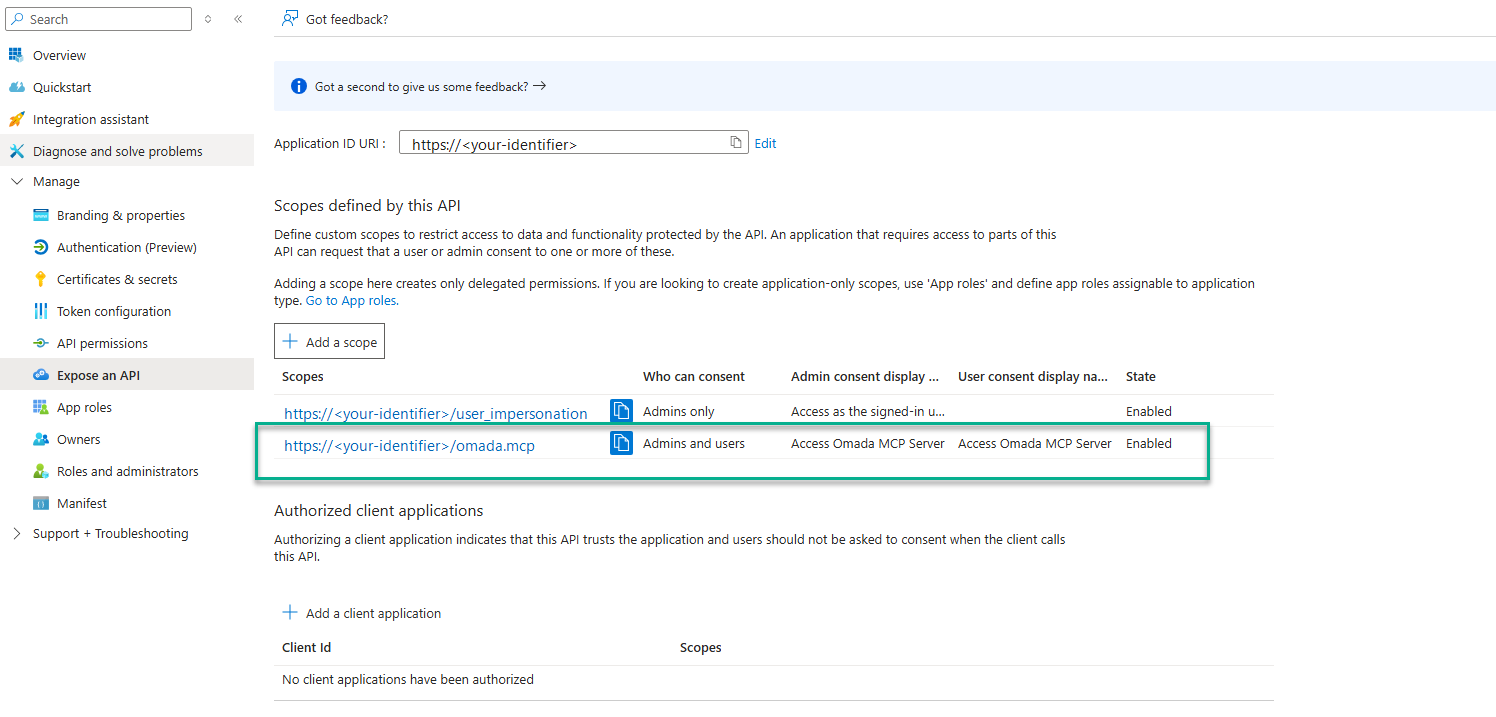 note
After you save the scope, the portal can show the permission as
https://…/omada.mcpinstead ofapi://…/omada.mcp. The portal always shows permissions against the first Application ID URI. It is the same permission, reachable by either name, so you do not need to add it twice.
Update the manifest
Go to Manifest and select the Microsoft Graph App Manifest tab.
-
Make sure that
api.requestedAccessTokenVersionis set to2.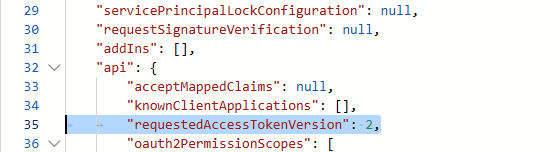 warning
If this value is not set, sign-in still succeeds, but Microsoft Entra ID puts the Application ID URI (
api://…) in the token audience instead of the client ID, and the assistant rejects the token as unauthorized. There is no warning, so check the value directly. -
In
identifierUris, add the following two values. Keep every value that is already in the list."identifierUris": ["api://<your-application-client-id>","https://<zone-address>/<your-environment>/mcp"]The second value is the address of your environment in Omada Identity MCP, exactly as you enter it in the AI assistant: the address for your delivery zone, your environment name, and
/mcp, with no trailing slash. For the zone addresses, see Before you start.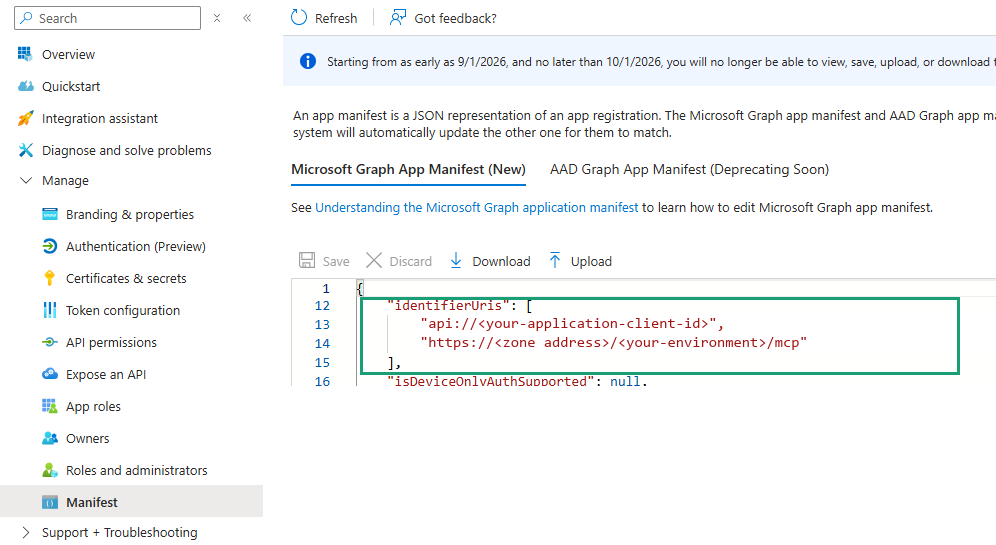
-
Save the manifest.
An app registration can have several Application ID URIs, and an existing one is still in use. Use the manifest to add these values: the Expose an API page shows and edits only one Application ID URI.
- Changes in Microsoft Entra ID can take a few minutes to apply. If a connection fails right after a change, wait five minutes and try again.
- Microsoft's default app-management policy accepts the
https://address for app registrations that issue version 2 access tokens. A tenant with a stricter custom policy may refuse it. If Microsoft Entra ID refuses to save the manifest, check with the person who manages that policy.
Why these settings are needed
| Setting | Reason |
|---|---|
| The same app registration as Omada sign-in | Omada Identity accepts only sign-ins issued for its own app registration. The assistant then works with exactly the permissions that the user already has in Omada Identity. |
| Redirect URIs | Microsoft Entra ID returns a user only to addresses that are registered on the app registration. |
| Client secret (ChatGPT) | ChatGPT proves to Microsoft Entra ID that it is the registered client when it completes the sign-in. Claude uses a one-time key instead (Proof Key for Code Exchange, PKCE), so it does not need a secret. |
The omada.mcp scope | Claude and ChatGPT request this permission by name. Without it, Microsoft Entra ID refuses the sign-in. |
| The two Application ID URIs | The AI assistant tells Microsoft Entra ID which service the sign-in is for by sending the address of Omada Identity MCP. Microsoft Entra ID accepts the address only if it is an Application ID URI of the app registration. |
| Access token version 2 | Version 2 tokens identify the app registration by its client ID, which is what Omada Identity checks. |
For background, see the Microsoft documentation: Redirect URI best practices and limitations and Understand the app manifest.
Security notes
These settings add a way for Claude and ChatGPT to sign users in. They add no new permissions.
- Sign-in stays with Microsoft Entra ID. Every sign-in happens on the sign-in page of your Microsoft Entra ID, with your multifactor authentication and Conditional Access policies. Omada never sees a password.
- No new permissions.
omada.mcpis a delegated permission. The assistant acts as the signed-in user and can do only what that user can do in Omada Identity. It grants no access to Microsoft Graph or to other services. - Application ID URIs are names, not permissions. Tokens are still issued for the same app registration.
- Only exact addresses. Microsoft Entra ID returns a sign-in only to a redirect URI that matches exactly. The sign-in result is useless without the one-time key of the client that started it, and for ChatGPT, also without the client secret.
- Omada stores no credentials. Omada Identity MCP never receives sign-in codes, refresh tokens, or the client secret. On each request, it checks that the token was issued by your tenant for this app registration and has not expired.
- You can switch it off at any time. Remove a redirect URI to stop new sign-ins from that assistant, or delete the client secret for ChatGPT. Sign-ins that already exist expire within about 60 to 90 minutes. Sign-ins through the assistants appear in your Microsoft Entra ID sign-in logs.
For a detailed explanation for IT and security teams, see Omada Identity MCP security.
Review the tool authorization roles
This step is optional. When Omada enables Omada Identity MCP, the authorization roles are created and assigned to the standard user groups. Review the roles only if you want to change who can approve, revoke, or review compliance.
Most Omada Identity MCP tools are gated by an authorization role, and a user is offered only the tools whose roles they hold. Get business context and Get form outcomes need no role, so every user has them. Use the roles to control what the assistant can do for whom.
| Authorization role | Capability | Assigned by default to |
|---|---|---|
| MCP - Access Request Tool | Request access | Everyone |
| MCP - Documentation Tool | Search the Omada documentation | Everyone |
| MCP - Resource Finder Tool | Find resources | Everyone |
| MCP - Approvals Tool | View and act on pending approvals | Managers, Resource Owners, System Owners, Security Officers |
| MCP - Compliance Reporting Tool | Review the Compliance Workbench | Data Administrators, Security Officers, Auditors |
| MCP - Revoke Access Tool | Revoke access | Administrators, Managers, Operation Administrators, Security Officers |
After Omada enables Omada Identity MCP, the six roles appear under Setup > Authorization roles.
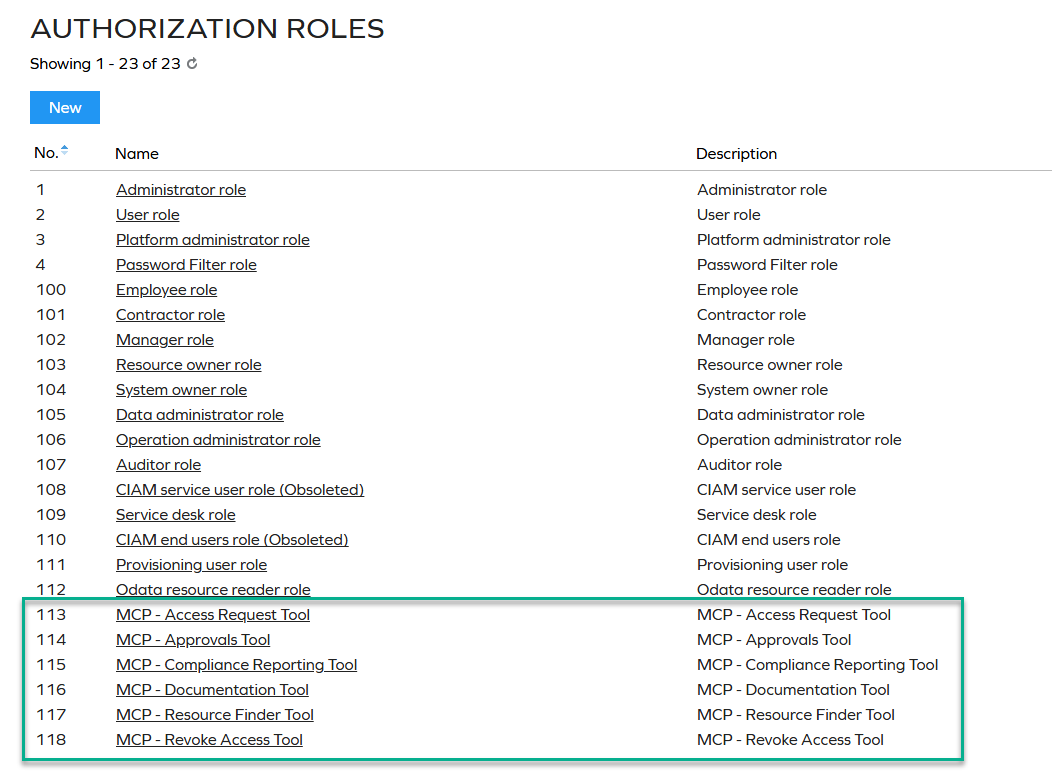
The default assignments let anyone request access, find resources, and search the documentation, while approving, revoking, and compliance review stay with the groups that have those responsibilities in Omada Identity. In most environments, you do not need to change anything.
The authorization roles only control which tools Omada Identity MCP shows. Every action still runs with the user's own permissions in Omada Identity, for example, which resources they can request. Every user always has MCP - Access Request Tool, MCP - Documentation Tool, and MCP - Resource Finder Tool. To change who can approve, revoke, or review compliance, edit the assignments of the other three roles as you would any other authorization role.
-
Your changes are kept: The default assignments are applied only when a role is first created. Upgrades and restarts check whether the roles exist, but do not apply the defaults again, so a user group that you remove from a role stays removed.
-
Roles with fewer user groups than listed: Some of the user groups in the table are included in feature packages rather than in the base product. If a user group does not exist in your environment, the role is still created, but without that assignment. You can assign the role to other user groups manually.