Authenticate API clients with OAuth

This page contains third-party references. We strive to keep our content up to date, but information about external vendors may change independently of Omada. If you spot any inconsistencies, report them through the support channel.
Applications, scripts, and integrations can call Omada Identity APIs, such as the OData REST API, the Omada Identity Graph API, and Omada Identity web services, using an OAuth 2.0 access token obtained with the client credentials flow. This flow does not require an interactive user sign-in. Omada Identity maps the token to a service user, and the request uses that user’s permissions. In Microsoft Entra ID, the client is represented by an app registration and its service principal.
This page describes the shared OAuth setup for API clients. Integration-specific pages, such as ServiceNow and the Omada Password Filter for on-premises customers, link here and describe any additional configuration they require.
How it works
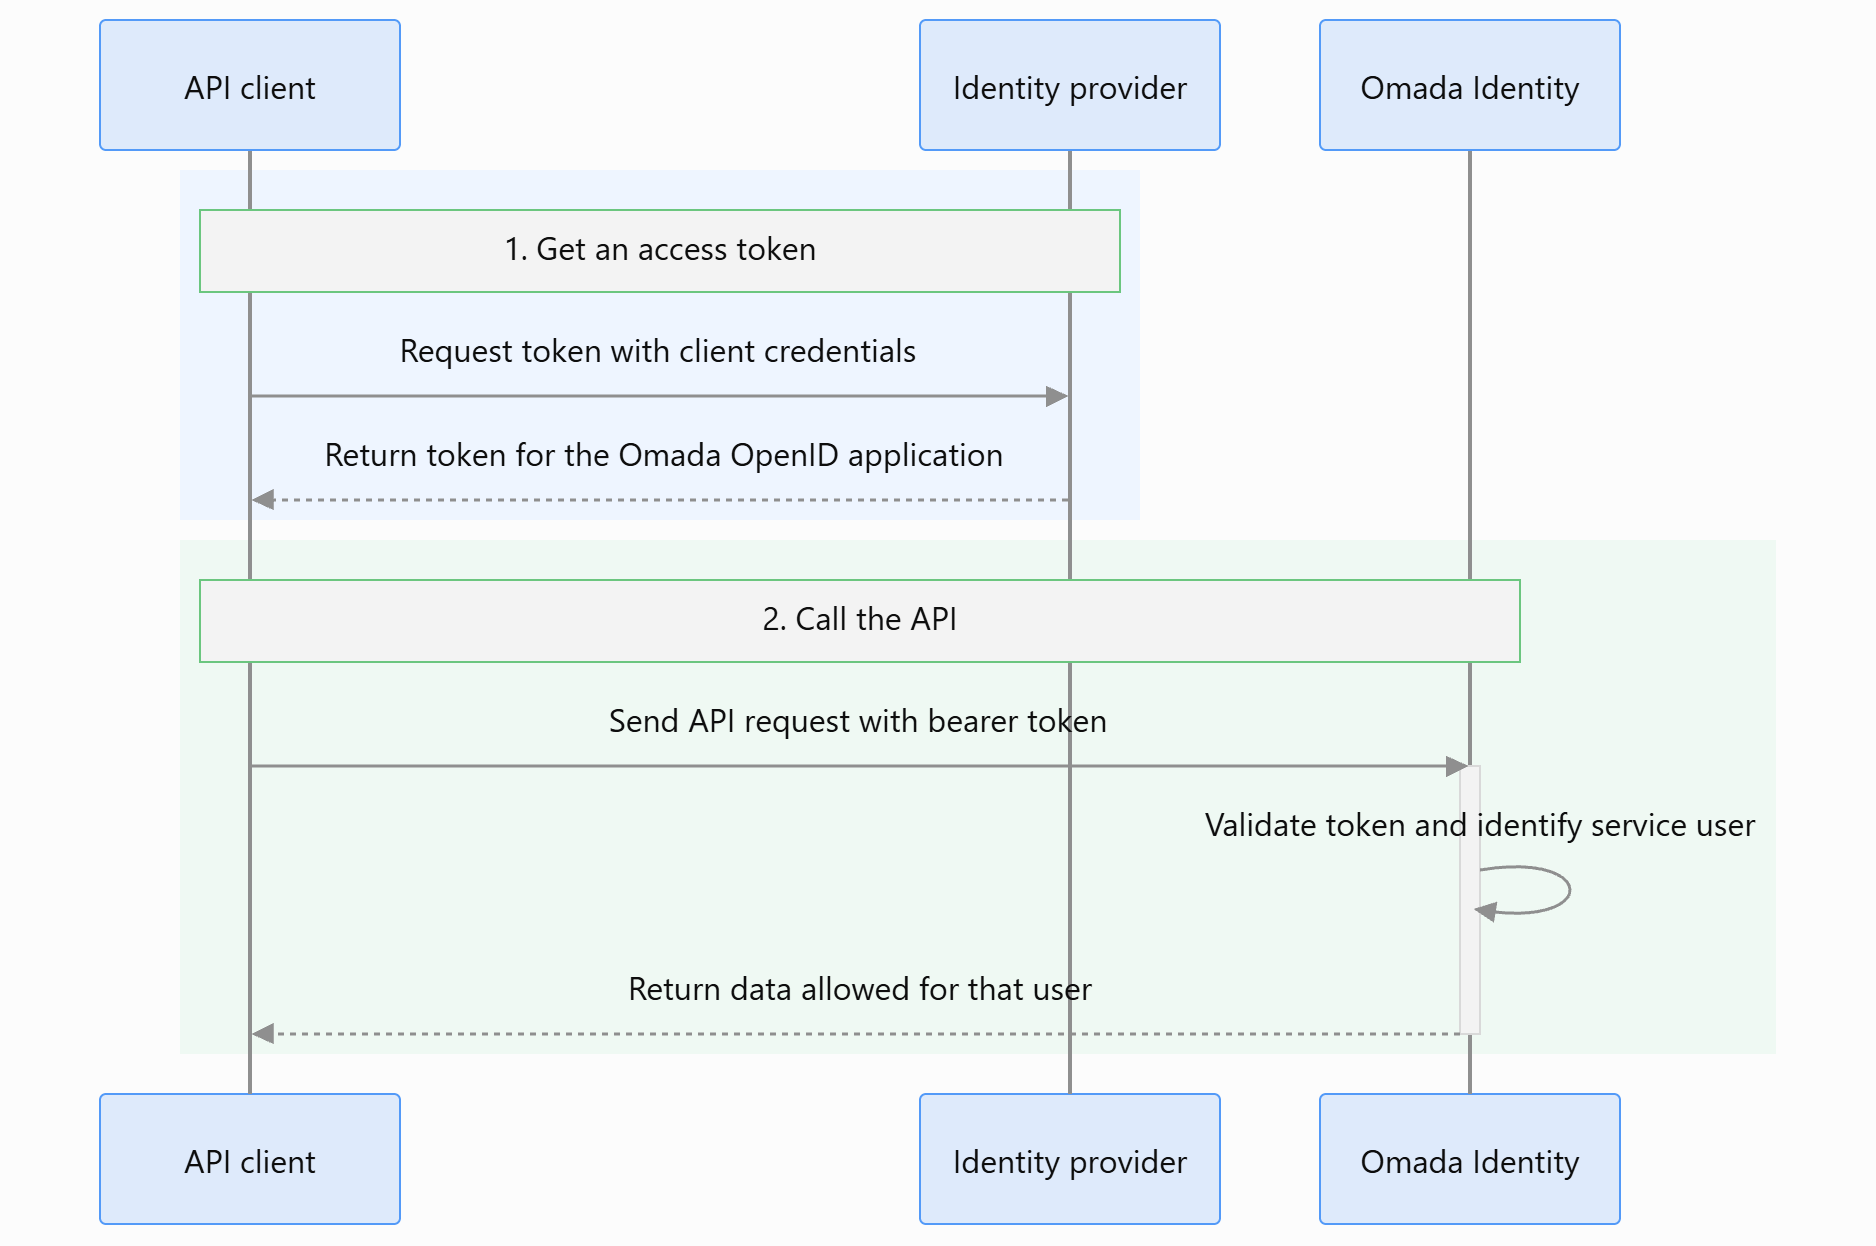
- The client requests an access token from your identity provider. The token is issued for the OpenID application, which is the application your users sign in to Omada Identity with.
- The client sends the token in the
Authorization: Bearer <token>header of each API request. - Omada Identity validates the token against the OpenID Connect configuration of the environment:
- The signature, using the signing keys from the OpenID metadata document.
- The lifetime of the token.
- The issuer (
iss), which must match the issuer in the OpenID metadata document. - The audience (
aud), which must match the Client ID configured for OpenID Connect authentication in Omada Identity.
- Omada Identity checks the following claims in order to find a matching user:
email,upn,given_name,preferred_username,azp, andsub. If a claim’s value matches the Client ID of the OpenID application, Omada Identity skips that claim and checks the next one. - The request runs with the permissions assigned to that user.
For client credentials tokens, this means that the username of the Omada Identity user is the client ID of the calling application:
| Identity provider | Claim used | Value to use as username in Omada Identity |
|---|---|---|
| Microsoft Entra ID | azp | Application (client) ID of the client application |
| Okta | sub | Client ID of the API Services application |
Because the Client ID of the OpenID application is never accepted as a username, each client needs its own application registration in the identity provider. Do not use the OpenID application itself as a client. We recommend one registration per client, so that each client has its own credentials and its own permissions in Omada Identity.
On-prem The order of the claims is defined by the OpenIDClaimTypes master setting.
Prerequisites
-
Omada Identity uses OpenID Connect for authentication on the URL that the client calls. See Configure Microsoft Entra ID with OpenID Connect or Configure Okta with OpenID Connect.
On-prem If the website uses another authentication type for end users, for example Windows authentication, create an additional Omada Identity website URL that uses OpenID Connect for API clients.
-
You can create and configure applications in your identity provider.
-
You are a system administrator in Omada Identity.
-
You have a tool to send HTTP requests, for example curl or Postman.
Configure Microsoft Entra ID
This section uses two application registrations:
- OpenID application: the existing registration that your users sign in to Omada Identity with. Its Application (client) ID is the Client ID configured for OpenID Connect authentication in Omada Identity.
- Client application: a new registration for the application or script that calls the API.
Step 1: Set the access token version of the OpenID application
Omada Identity requires version 2.0 access tokens. The token version is defined by the application the token is issued for, so set it on the OpenID application.
-
In Microsoft Entra ID, go to App registrations and open the OpenID application.
-
Select Manifest > Microsoft Graph App Manifest (New).
-
Set
requestedAccessTokenVersionto 2 and save.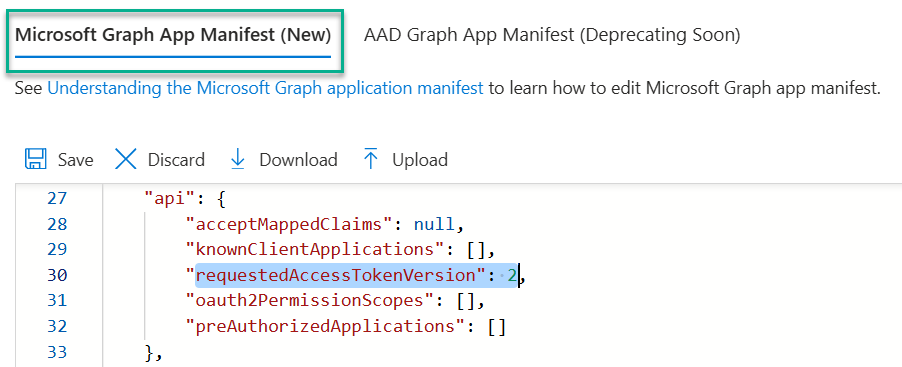
If you configured the OpenID application as described in Configure the Microsoft Graph App Manifest, this setting is already in place. The client application does not need a manifest change.
Step 2: Set an Application ID URI on the OpenID application
The client uses the Application ID URI of the OpenID application to request a token.
-
In the OpenID application, select Expose an API.
-
Next to Application ID URI, select Add.
-
Accept the default value
api://<Application (client) ID of the OpenID application>and select Save.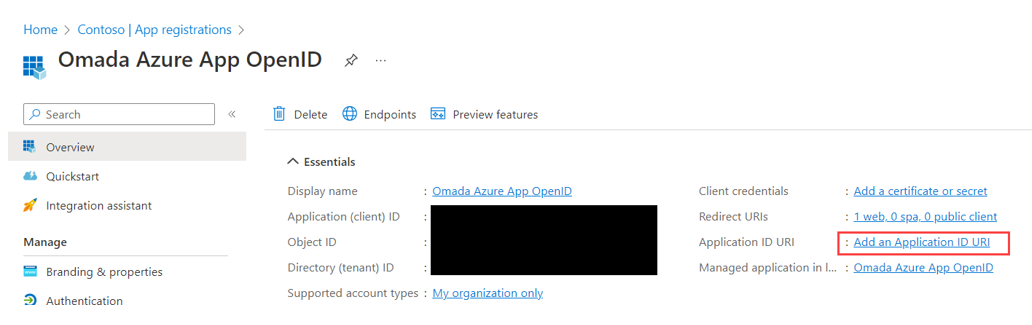
If the OpenID application already has an Application ID URI, keep it and use it in the following steps.
Step 3: Register the client application
-
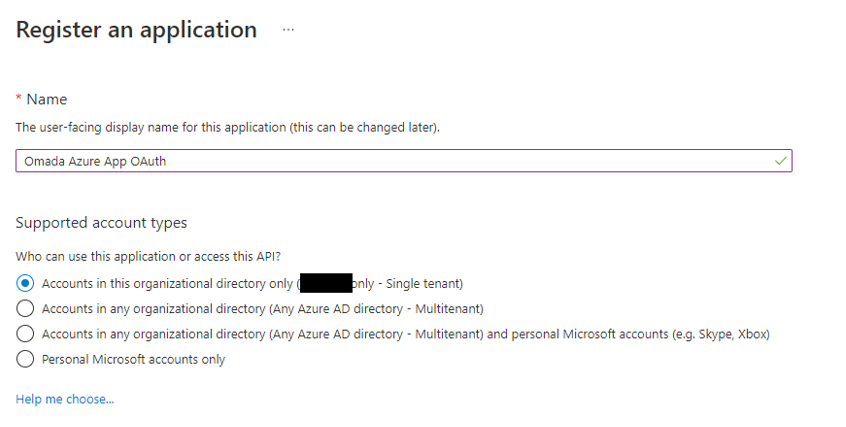
In Microsoft Entra ID, go to App registrations and select New registration.
-
Enter a name that identifies the client, for example
Omada API - Reporting. -
Under Supported account types, select Single tenant only.
-
Leave Redirect URI empty and select Register.
-
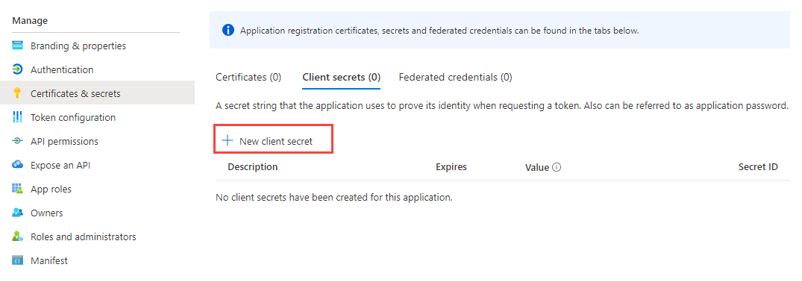
Go to Certificates & secrets and create a new client secret, or upload a certificate if your client supports certificate credentials.
-
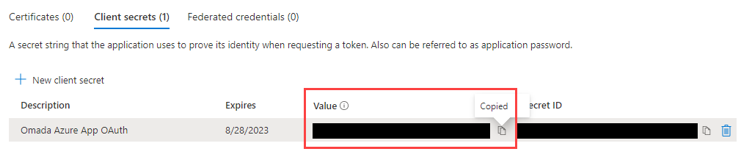
Copy the Value of the client secret. It is only shown once.
-
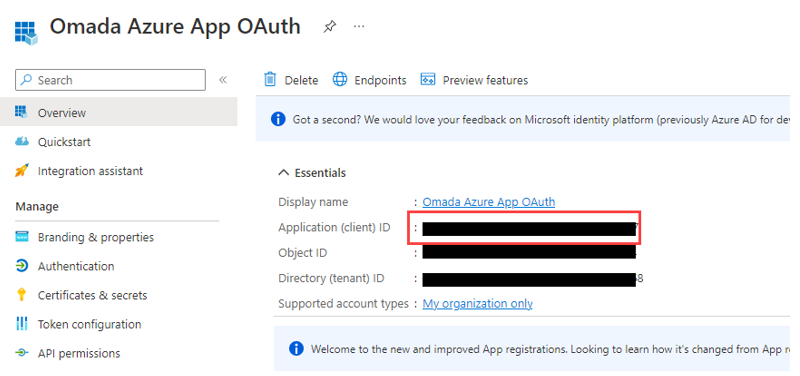
Go to Overview and note the Application (client) ID and the Directory (tenant) ID.
-
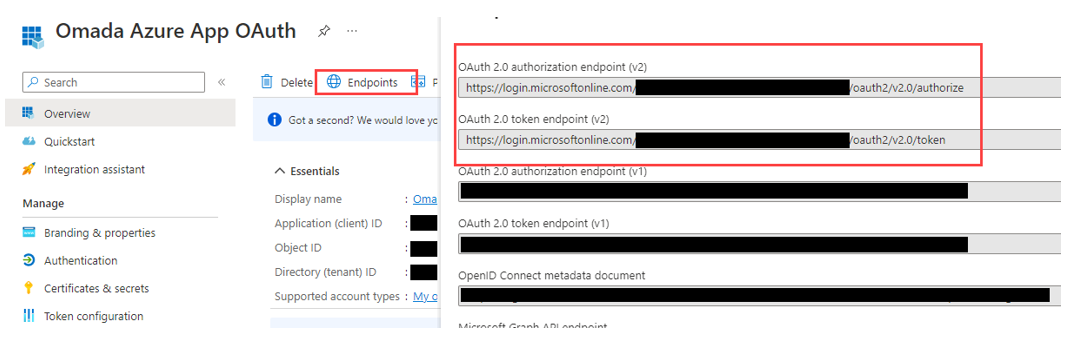
Select Endpoints and note the OAuth 2.0 token endpoint (v2). Some clients, for example ServiceNow, also ask for the OAuth 2.0 authorization endpoint (v2).
Step 4 (optional): Allow only assigned client applications
By default, Microsoft Entra ID issues a token for the OpenID application to any client application in your tenant. Access to Omada Identity is still limited to clients that have a user in Omada Identity. To also restrict which client applications can obtain a token, use an application role:
- In the OpenID application, go to App roles and create an app role:
- Allowed member types: Applications
- Value: for example
Omada.Api.Access
- In the client application, go to API permissions > Add a permission > APIs my organization uses, and select the OpenID application.
- Select Application permissions, select the app role, and select Add permissions.
- Select Grant admin consent.
- Go to Enterprise applications, open the OpenID application, select Properties, and set Assignment required? to Yes.
Assignment required also applies to users who sign in to Omada Identity interactively. Before you enable it, make sure that all users or groups who sign in to Omada Identity are assigned to the enterprise application of the OpenID application.
Omada Identity does not evaluate the roles claim of the token. The app role only controls which clients Microsoft Entra ID issues tokens to.
Request a token
Request a token from the token endpoint. Use the Application ID URI of the OpenID application followed by /.default as the scope.
curl -X POST "https://login.microsoftonline.com/<tenant ID>/oauth2/v2.0/token" \
  -H "Content-Type: application/x-www-form-urlencoded" \
  -d "grant_type=client_credentials" \
  -d "client_id=<Application (client) ID of the client application>" \
  -d "client_secret=<client secret>" \
  -d "scope=<Application ID URI of the OpenID application>/.default"
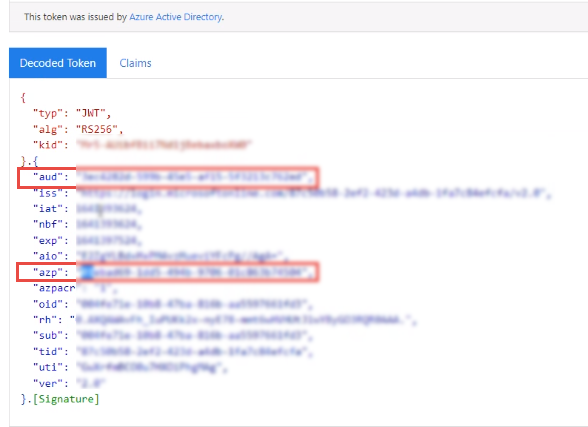
Copy the access_token from the response and decode it, for example with jwt.ms. Verify the following claims:
| Claim | Expected value |
|---|---|
aud | Application (client) ID of the OpenID application |
azp | Application (client) ID of the client application. This is the username of the Omada Identity user. |
iss | https://login.microsoftonline.com/<tenant ID>/v2.0 |
ver | 2.0 |
Continue with Create the service user in Omada Identity.
Configure Okta
This configuration requires a custom authorization server, which is part of Okta API Access Management. See API Access Management and Authorization servers in the Okta documentation.
This section uses two applications:
- OpenID application: the existing OpenID Connect application that your users sign in to Omada Identity with. See Configure Okta with OpenID Connect.
- Client application: a new API Services application for the application or script that calls the API.
Step 1: Create an authorization server
-
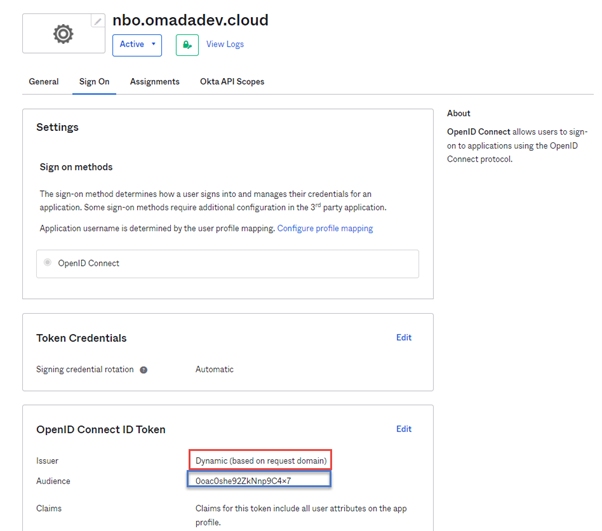
In the OpenID application, open the Sign On tab. Set the issuer to Dynamic (based on request domain) and note the Audience.
-
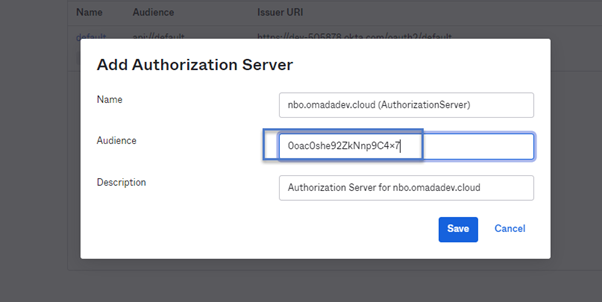
Go to Security > API > Add Authorization Server.
-
Enter a name and description. As Audience, enter the audience of the OpenID application from step 1.
-
Add a scope, for example
omada.api. You use the scope name when you request a token.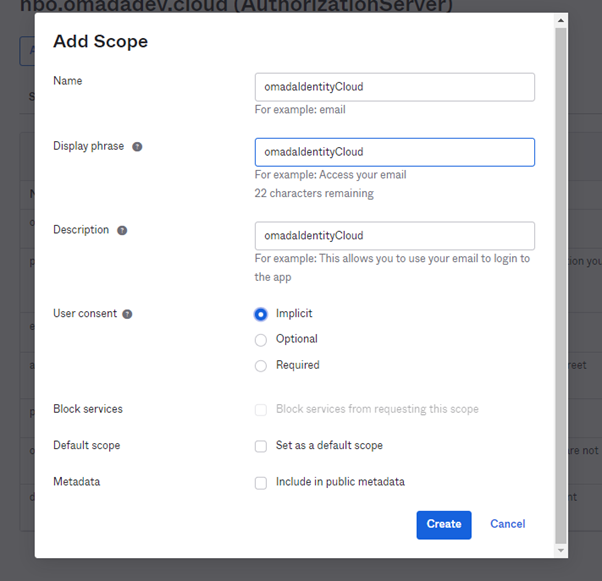
-
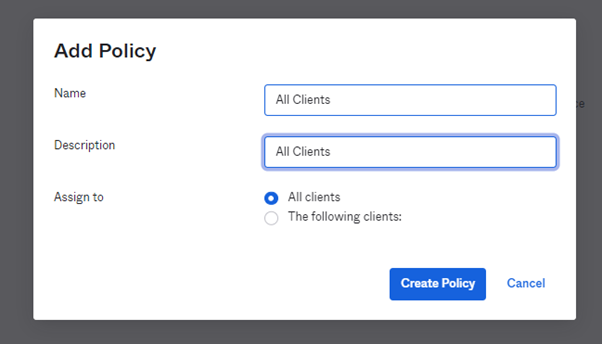
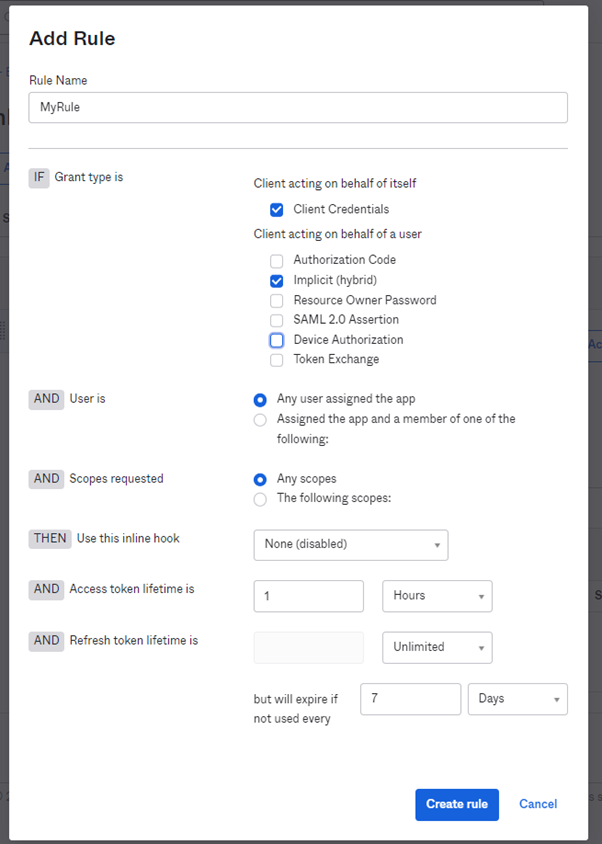
Add an access policy and a rule that allows the Client Credentials grant type.
Step 2: Point Omada Identity to the authorization server
Omada Identity validates tokens against the issuer of its OpenID Connect configuration. Configure OpenID Connect in Omada Identity with the authorization server you created:
-
Client ID: the Client ID of the OpenID application.
-
Okta base URL: the Issuer URI of the authorization server, without the
https://prefix.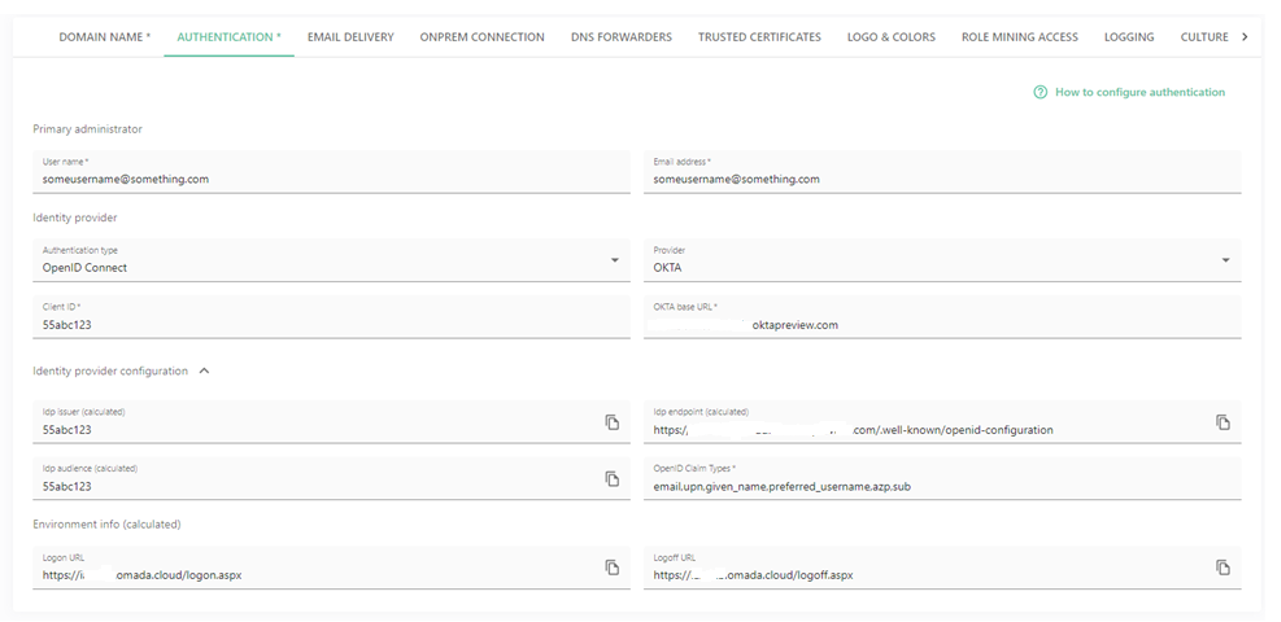
Step 3: Create the client application
-
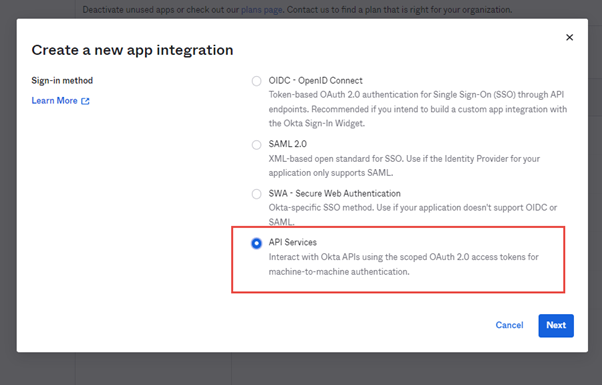
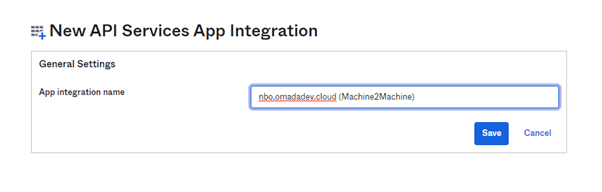
Go to Applications > Create App Integration.
-
Select API Services.
-
Enter a name that identifies the client.
-
Note the Client ID and the Client secret.
-
After creating the client application, return to the authorization server’s access policy from Step 1. - Edit the rule to allow the Client Credentials grant for this client application only.
Request a token
Take the token URL from the Metadata URI of the authorization server.
curl -X POST "https://<your Okta domain>/oauth2/<authorization server ID>/v1/token" \
  -H "Accept: application/json" \
  -H "Content-Type: application/x-www-form-urlencoded" \
  -d "grant_type=client_credentials" \
  -d "scope=<scope name>" \
  -d "client_id=<Client ID of the client application>" \
  -d "client_secret=<client secret>"
In the decoded token, sub contains the Client ID of the client application. This is the username of the Omada Identity user.
Create the service user in Omada Identity
-
Log in to Omada Identity as a system administrator.
-
Go to Setup > Administration > Users & Security > Users and select New.
-
In Username, enter the client ID of the client application:
- Microsoft Entra ID: the Application (client) ID of the client application.
- Okta: the Client ID of the API Services application.
-
In Name, enter a name that identifies the client.
-
Add the user to a user group that grants only the permissions the client needs. Do not add the user to the System administrators group.
-
Select OK to save the user.
The service user is subject to the same access control as an interactive user:
- An authorization role grants access to the API. For the OData API, the authorization role must have the OData element enabled for the required operations (Create, Read, Update, Delete).
- The data object security model and access modifiers control which data objects the user can read or change.
- For the OData API, the data object types must be enabled for OData.
For details, see OData REST API: Security and Users and user groups.
Example: a client that reads identity data through the OData API needs a user group with an authorization role that has the OData element enabled for Read, and read access to the Identity data object type.
Act on behalf of users (impersonation)
Some clients send requests on behalf of an end user, for example the ServiceNow application. They identify the end user in the IMPERSONATE_USER request header. A client that only reads or writes data as itself does not need impersonation.
To allow impersonation:
-
Add the service user to one of these user groups:
- Impersonation Service Users: the request runs at authentication level Low.
- Privileged Impersonation Service Users: the request keeps the full authentication level.
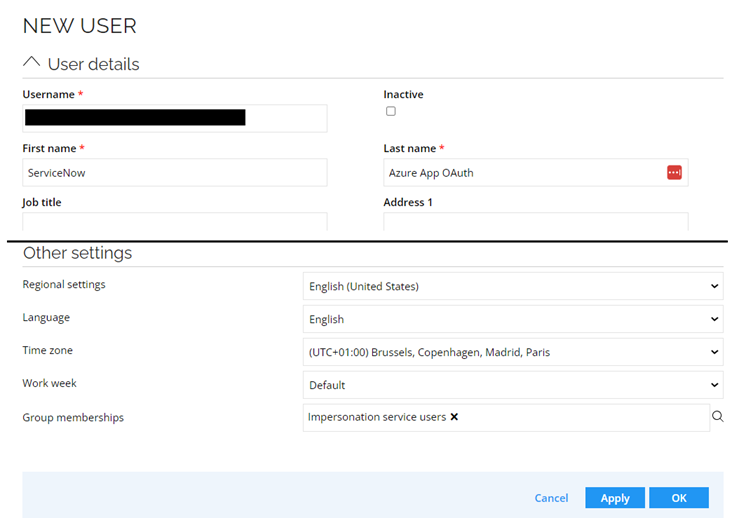
The screenshot shows Impersonation Service Users selected as an example.
-
Restrict the IP addresses that impersonation requests are accepted from with the customer setting
AllowedImpersonationIPMask. Enter the IP addresses separated by commas. A value ending with*matches all addresses that start with the preceding characters, for example10.20.30.*. If the setting is empty, impersonation requests are accepted from any IP address.In Omada Identity Cloud Private, also make sure that the network security group rules allow inbound traffic from the client. See Networking prerequisites.
Users who are members of the System administrators group cannot be impersonated. For details on authentication levels, see Impersonation and authentication levels.
Test OData access
The following example tests access to the OData API. Send a request with the access token:
curl "https://<your Omada Identity URL>/OData/DataObjects/Identity?\$top=1" \
  -H "Accept: application/json" \
  -H "Authorization: Bearer <access token>"
A successful request returns status code 200 and the data the service user is allowed to read.
To test the Graph API or a web service, send a request to the relevant endpoint using that API’s request format and include the access token in the Authorization header.
Troubleshooting
If a request fails, check the Event Log in Omada Identity for authentication errors.
| Symptom | Cause | Solution |
|---|---|---|
The token request fails with AADSTS500011. | The scope does not match the Application ID URI of the OpenID application. | Use the Application ID URI from Step 2 followed by /.default. |
The token request fails with AADSTS501051. | Assignment required is enabled on the OpenID application, and the client application has no app role. | Assign the app role and grant admin consent as described in Step 4. |
The API returns 401, and the token contains "ver": "1.0" or an issuer starting with https://sts.windows.net/. | The OpenID application issues version 1.0 access tokens. | Set requestedAccessTokenVersion to 2 on the OpenID application as described in Step 1. Request a new token afterwards. |
The API returns 401, and aud is not the Client ID of the OpenID application. | The token was issued for another application. | Request the token with the scope of the OpenID application. |
| The API returns 401, and the token is valid. | No Omada Identity user has a username that matches the claim selected from the token. | Check which claim Omada Identity selects, following the order in How it works, and make sure a service user has that value as its username. |
| On-prem The API returns 401 for all tokens. | The website URL does not use OpenID Connect authentication. | Use a website URL that is configured for OpenID Connect. |
| The request succeeds, but data is missing, or the API returns an access error. | The service user lacks permissions. | Check the authorization role, the data object security, and whether the data object type is enabled for OData. |
| Impersonated requests fail. | The impersonation requirements are not met. | Check the user group membership of the service user, the AllowedImpersonationIPMask setting, and the authentication level of the impersonated user's groups. See Act on behalf of users. |