Connect your AI assistant to Omada Identity MCP
Follow this page after Omada confirms that Omada Identity MCP (Technical Preview feature) is enabled on your environment, and after you complete the configuration steps in Enable Omada Identity MCP.
This page refers to third-party products, such as Claude, ChatGPT, Node.js, and Microsoft Entra ID. Omada strives to keep this information up to date, but these products are developed independently of Omada, and their behavior, settings, and error messages may change without notice. If you spot any inconsistency, report it to our Helpdesk.
All product names, logos, and trademarks shown on this page belong to their respective owners.
Supported AI assistants
Omada Identity MCP currently supports the following AI assistants:
| AI assistant | Plan | Who gets access | Setup |
|---|---|---|---|
| ChatGPT | ChatGPT Enterprise | The whole workspace | Organization setup |
| Claude (web and Claude Desktop) | Claude Team or Claude Enterprise | The whole organization | Organization setup |
| Claude Desktop | Any plan | A single user | Individual setup |
There are two ways to connect:
- Organization setup (recommended). An administrator adds Omada Identity MCP once to Claude Team, Claude Enterprise, or ChatGPT Enterprise. Each user then connects and signs in with their own account. Nothing is installed on the users' machines.
- Individual setup. A single user connects Claude Desktop through a configuration file on their own machine, with any Claude plan. Use this if you do not want to add Omada Identity MCP for the whole organization.
Each user signs in as themselves and is offered only the tools that their authorization roles allow.
Before you start
Make sure that you have the following:
-
The app registration is prepared. See Prepare the app registration in Microsoft Entra ID.
-
The address of your environment. The address depends on your delivery zone:
Delivery zone Address CEU (Europe) https://dr-0xxx-ceu-wa-mcp.omada.cloudCUS (US) https://dr-0xxx-cus-wa-mcp.omada.cloudPSI Contact Omada. The full address is the address for your delivery zone, followed by your environment name and
/mcp, for example,https://dr-0xxx-ceu-wa-mcp.omada.cloud/ab1234/mcp. Omada confirms the address when the enablement is complete. It must be the same address that was added to the app registration. -
The Application (client) ID of the app registration. See Find the app registration.
Organization setup
Claude Team or Claude Enterprise
An owner of the Claude organization does this once.
-
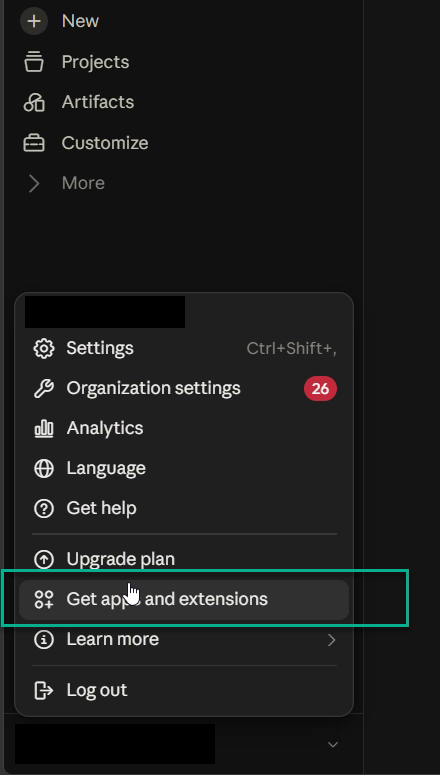
In Claude, open the account menu at the bottom left and select Get apps and extensions.
-
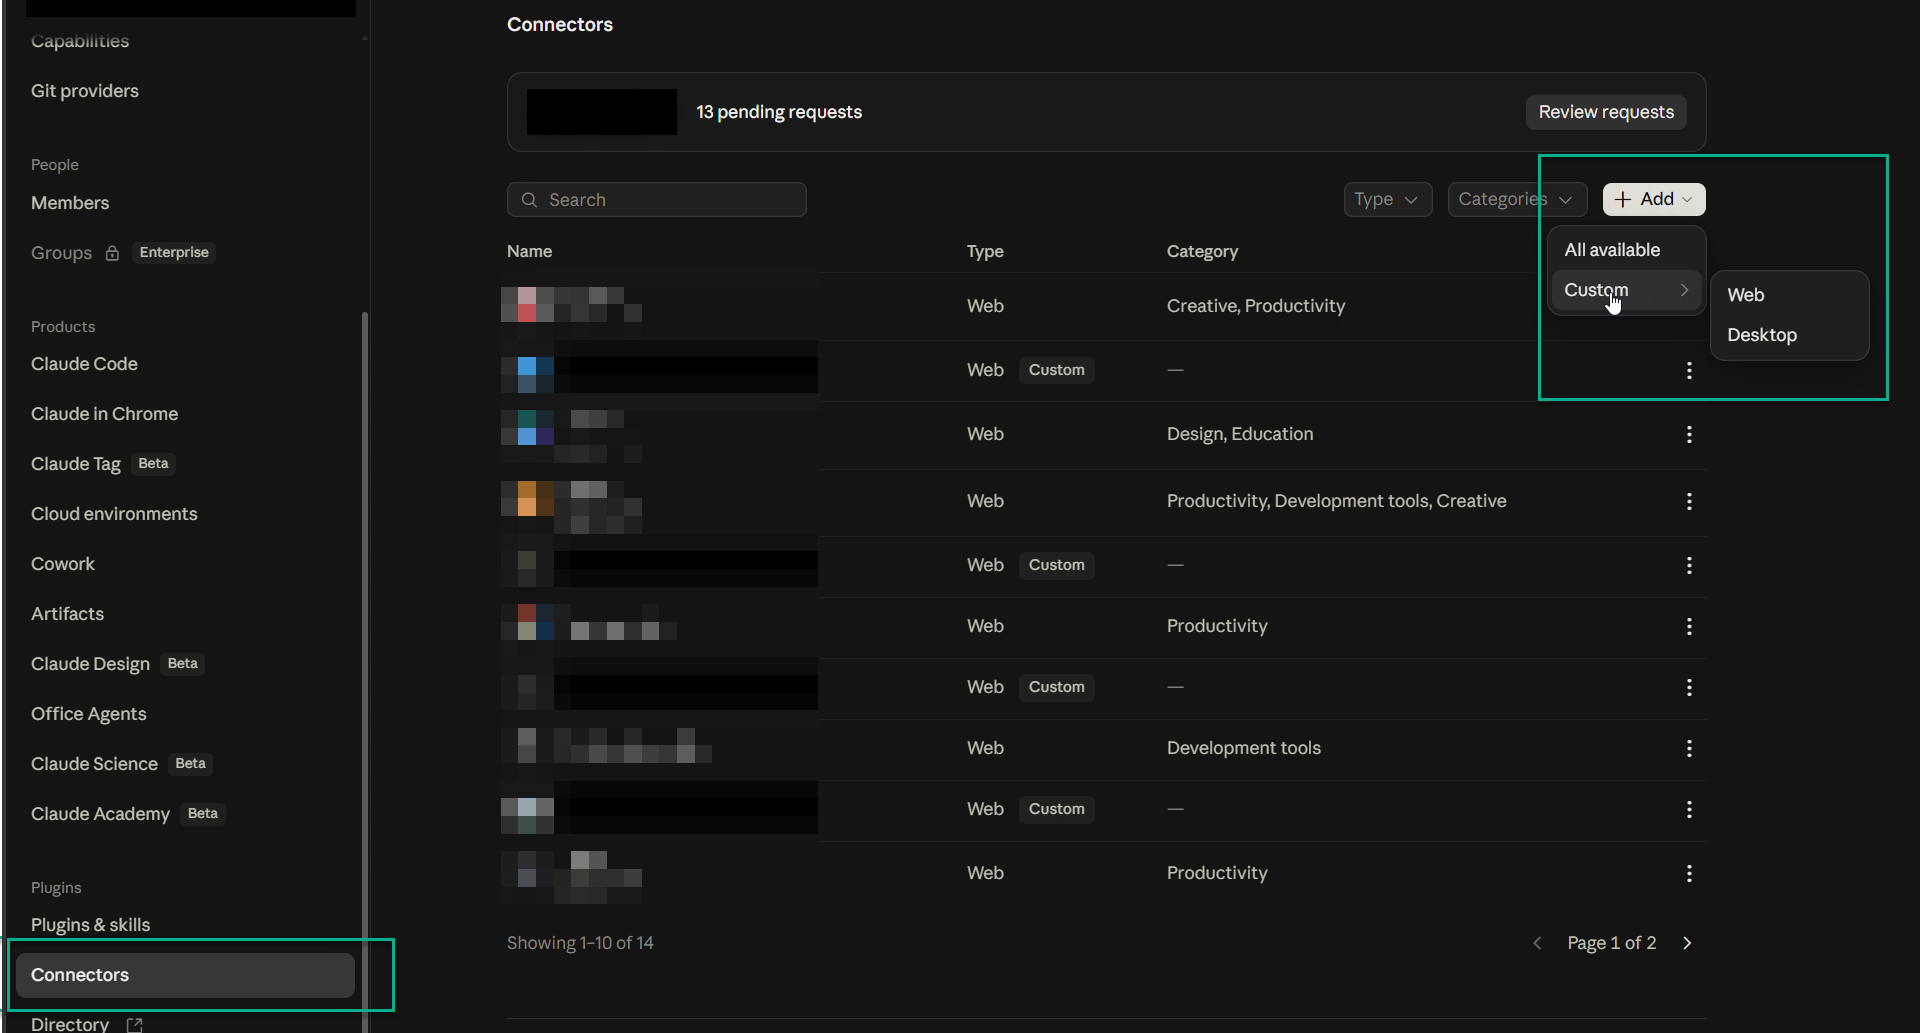
Go to Connectors and select Add > Custom > Web.
-
In Add custom connector, enter a name, for example,
Omada Identity MCP, and the address of your environment in MCP server URL. Select Continue.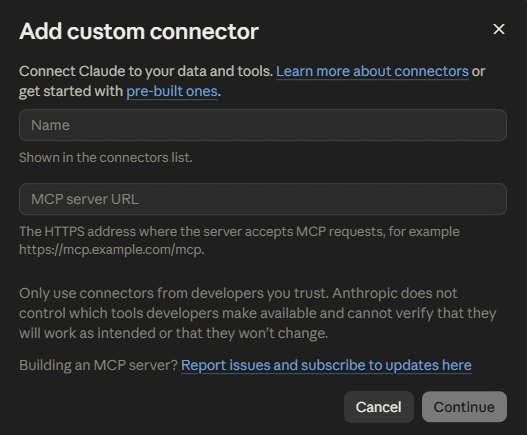
-
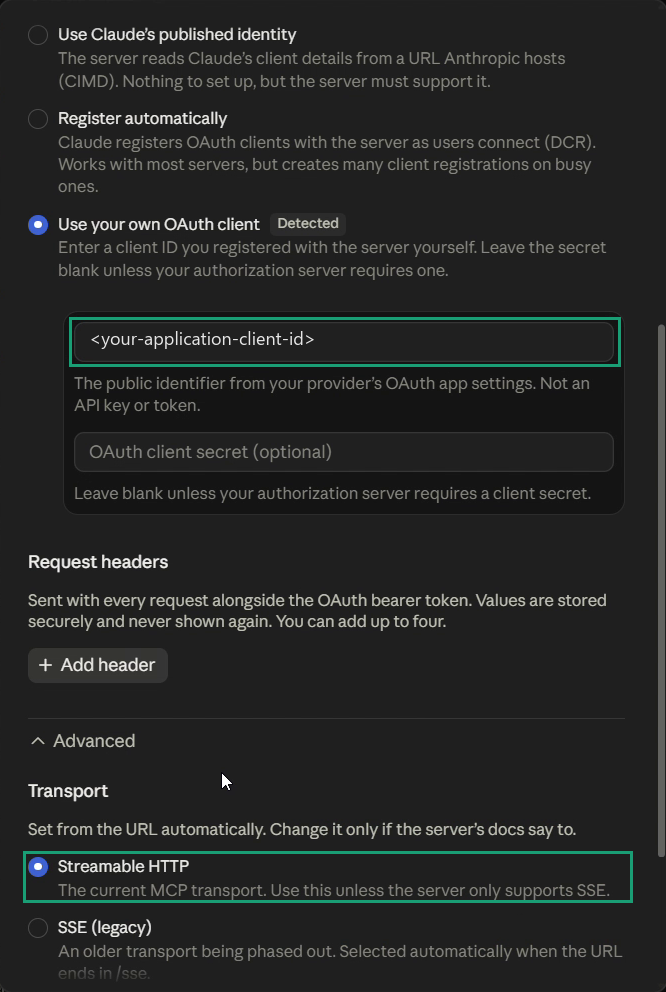
Claude reads the sign-in settings from Omada Identity MCP and selects Sign in now and Use your own OAuth client, both marked Detected. Keep both.
-
Enter the Application (client) ID as the OAuth client ID. Leave the client secret empty.
-
Open Advanced, set Transport to Streamable HTTP, and select Add.
The top of the dialog shows the sign-in settings that Claude detected. Both Sign in now and Use your own OAuth client are selected and marked Detected:
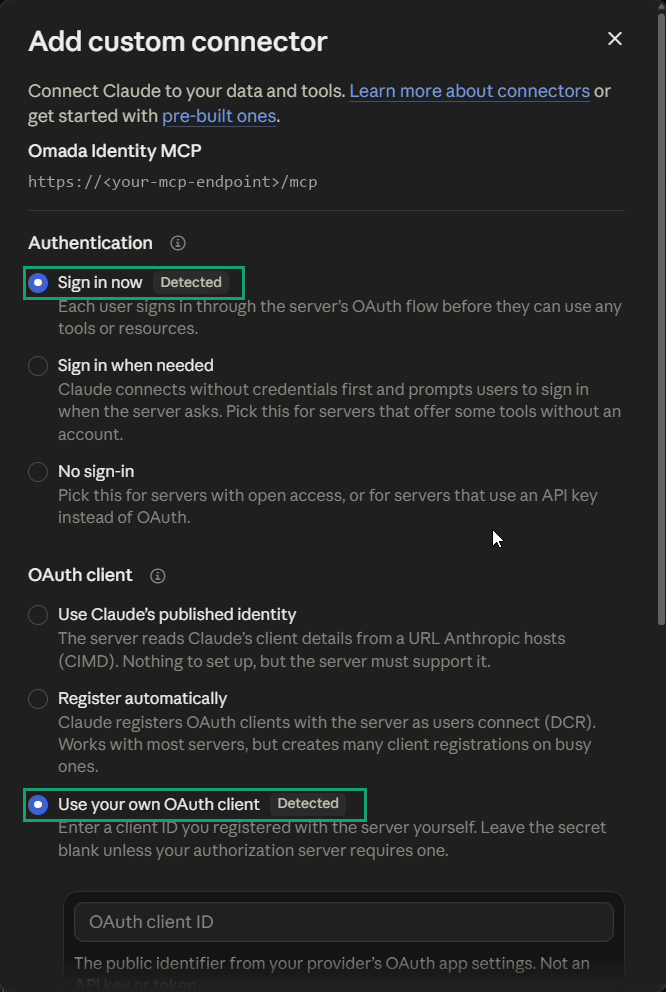
Further down, the OAuth client ID field contains the Application (client) ID, the client secret field is empty, and Transport under Advanced is set to Streamable HTTP:
Claude confirms with Custom connector added.
-
Open the connector. Under Configuration, use Roles with access > Edit to choose who can find and connect it. Keep Browser sign-in turned on, so that each user signs in through their browser.
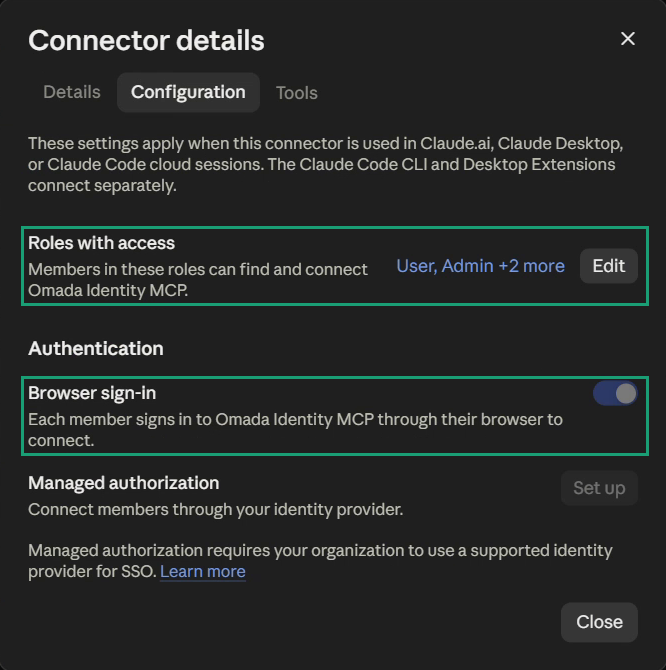
You cannot change the sign-in settings of a Claude connector after you add it. To use a different client ID, remove the connector and add it again. The users then connect again.
ChatGPT Enterprise
A ChatGPT workspace administrator does this once.
-
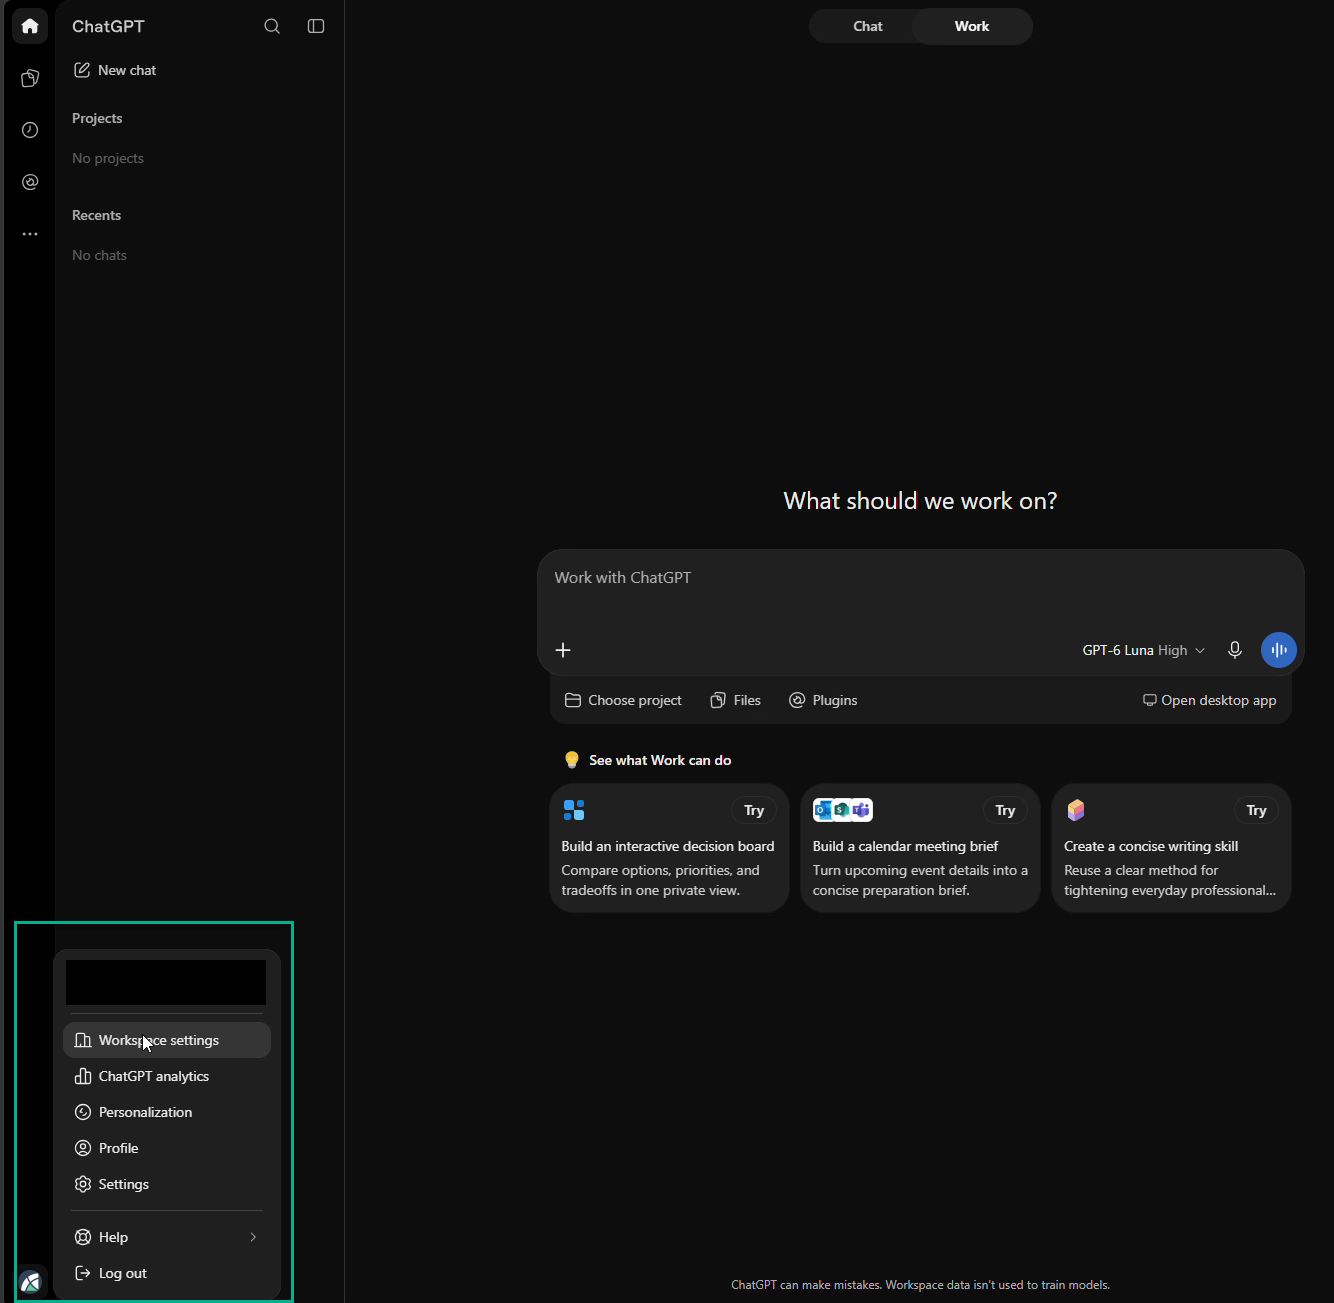
In ChatGPT, open the account menu at the bottom left and select Workspace settings. The Admin Console opens.
-
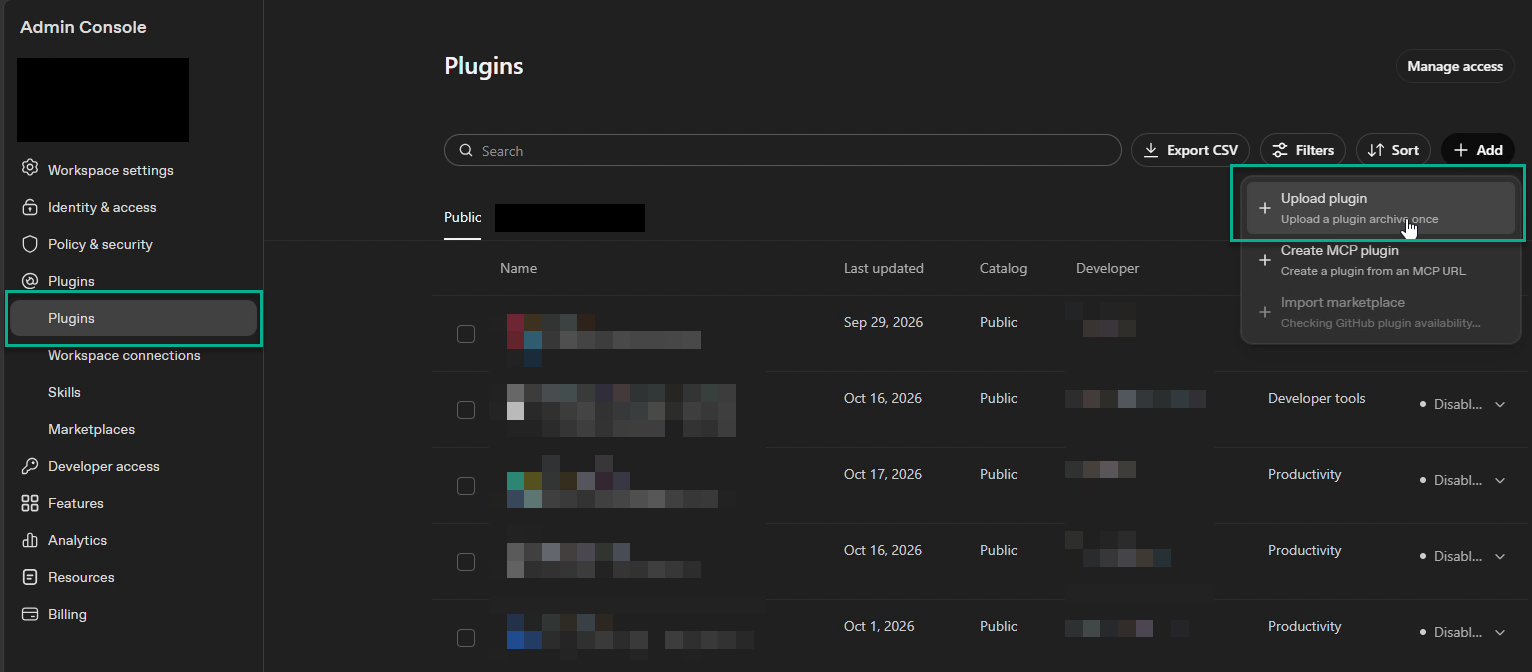
Go to Plugins and select Add > Create MCP plugin.
-
Enter a Custom name, for example,
Omada Identity MCP. Under Connection, keep Server URL and enter the address of your environment. Under Authentication, select OAuth.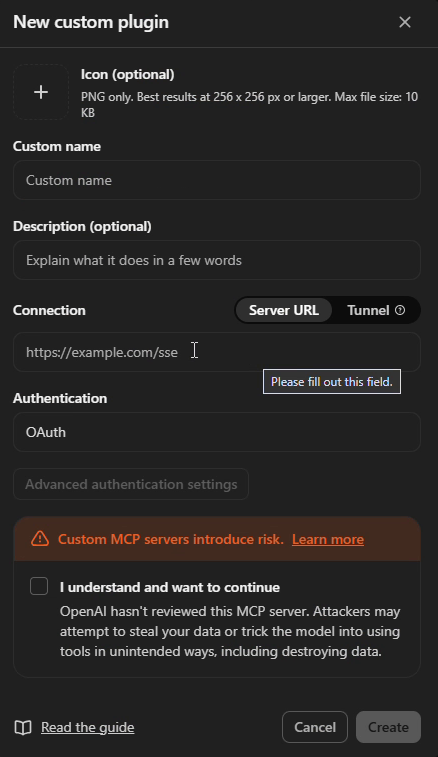
-
Open Advanced authentication settings. ChatGPT reads the sign-in settings from Omada Identity MCP. Leave the discovered addresses as they are.
-
Select User-Defined OAuth Client. Enter the Application (client) ID and the client secret, and set the token authentication method to
client_secret_post. ChatGPT shows that Dynamic Client Registration (DCR) and Client ID Metadata Document (CIMD) are unavailable. This is expected: Omada Identity MCP uses the app registration that you prepared. -
Copy the Callback URL and send it to the administrator of the app registration. They add it as a Web redirect Uniform Resource Identifier (URI). See Add the redirect URIs.
-
Under scopes, keep the default scope
api://<your-application-client-id>/omada.mcpselected, and enteroffline_accessas the base scope.The top of Advanced authentication settings shows the Callback URL to copy, the client ID and client secret that you entered, and
client_secret_postas the token authentication method: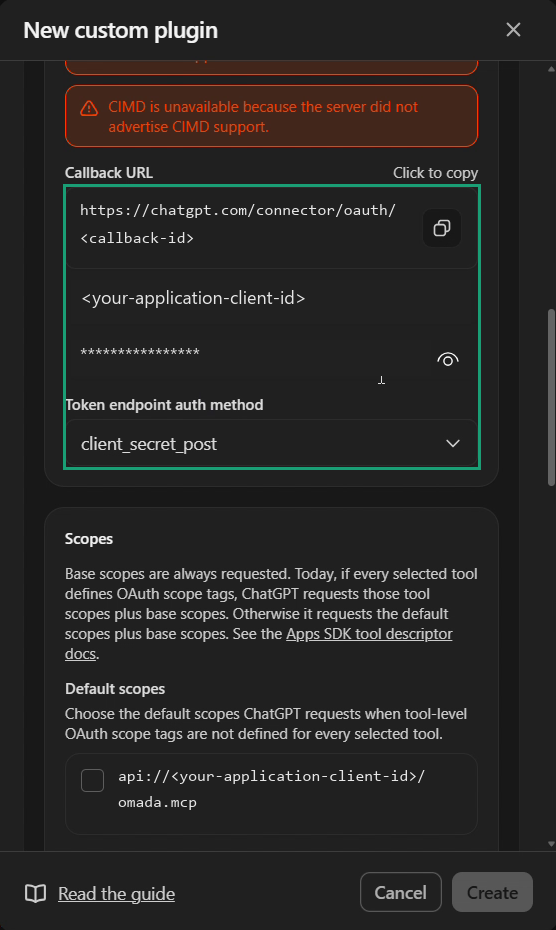
Further down, the default scope is selected,
offline_accessis entered as the base scope, and the OAuth endpoints that ChatGPT discovered are filled in: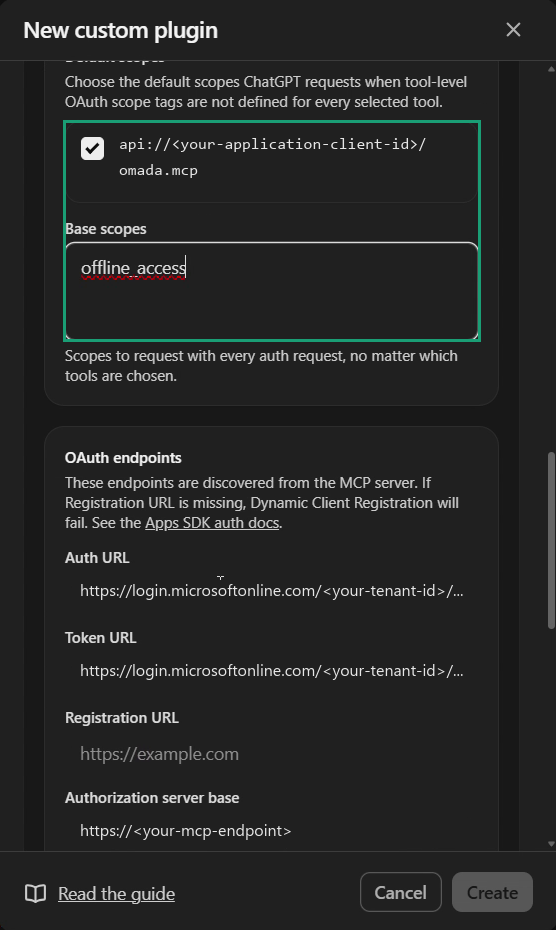
-
Select I understand and want to continue, and then Create. An authorization window opens. Signing in now is optional:
- If you sign in, the plugin loads the tools that your account has access to. You can then allow or block each tool before users connect, and your choice applies to every user of the plugin.
- If you close the window, the tools load when the first users connect. You can then allow or block each tool on the plugin page.
-
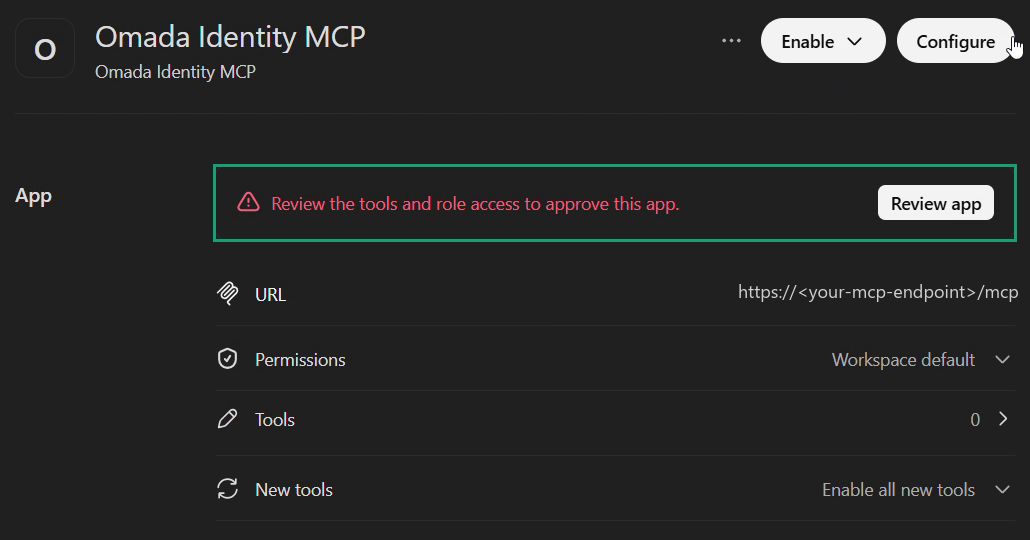
Open the plugin and select Review app.
-
Review both potential risks, and then select Publish.
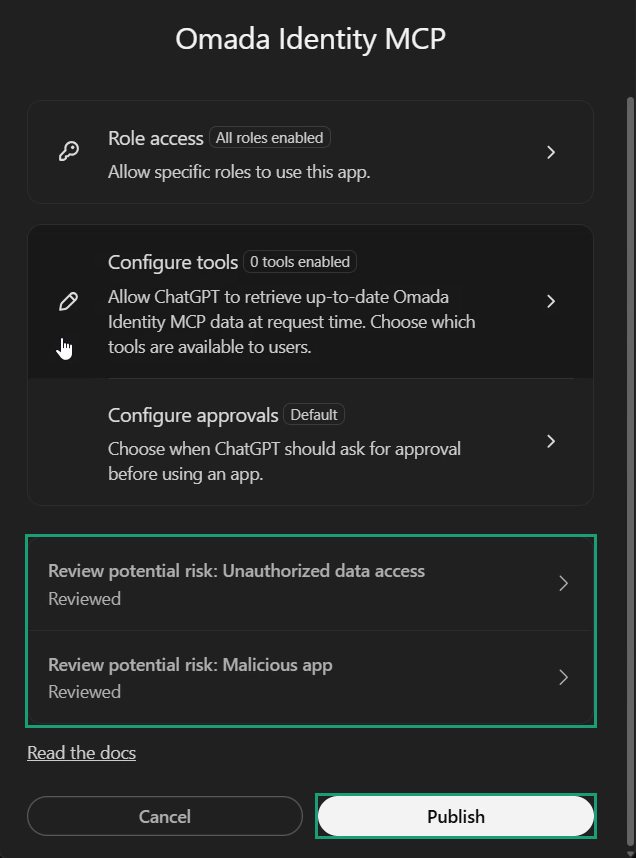 warning
If you skip Review app, users see Disabled by admin, even after you set the availability. The plugin and the app inside it are approved separately.
-
On the plugin page, open the Enable menu and select an option:
Option Result Available for workspace Each user installs the plugin. Installed for workspace The plugin is installed for everyone and only an administrator can remove it. Each user still signs in. Customize by role You set the availability per role. 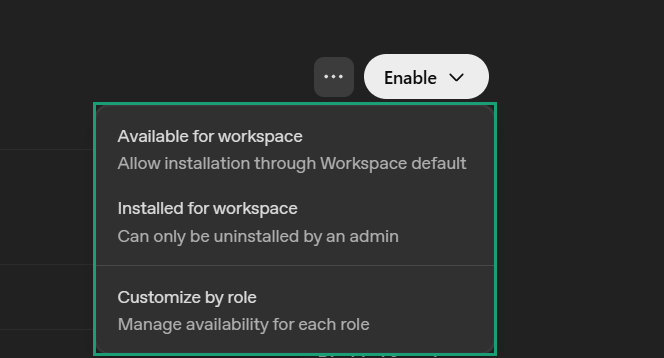
The plugin is now Enabled, and its availability shows, for example, Available to install.
To change which tools users can use later, open Tools on the plugin page and allow or block each tool.
Connect and sign in
Each user does this once.
- Claude: Go to Settings > Connectors, select the Omada Identity MCP connector, and then select Connect.
- ChatGPT: Open the Omada Identity MCP plugin and select Install plugin. The first time you use it in a chat, for example with @Omada Identity MCP, ChatGPT asks for access. Select Continue.
A Microsoft sign-in page opens. Sign in with your work account. Your organization's multifactor authentication and Conditional Access policies apply. If you are asked to approve a permission for Omada, accept it.
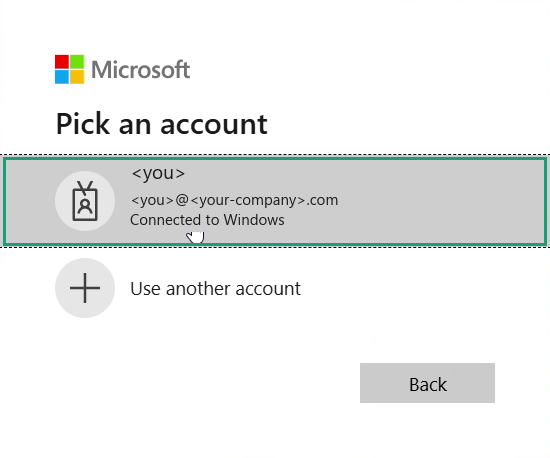
The connector is now connected and lists the Omada Identity MCP tools that you have access to. Claude also lists some tools under App-only tools. The interactive forms use these tools, and Claude does not call them itself.
Both assistants ask for your approval before they run a tool, unless the tool is set to be always allowed.
Claude
The connector lists the tools that you have access to, grouped by type. For each tool, you can choose whether Claude can use it without asking, needs your approval, or cannot use it:
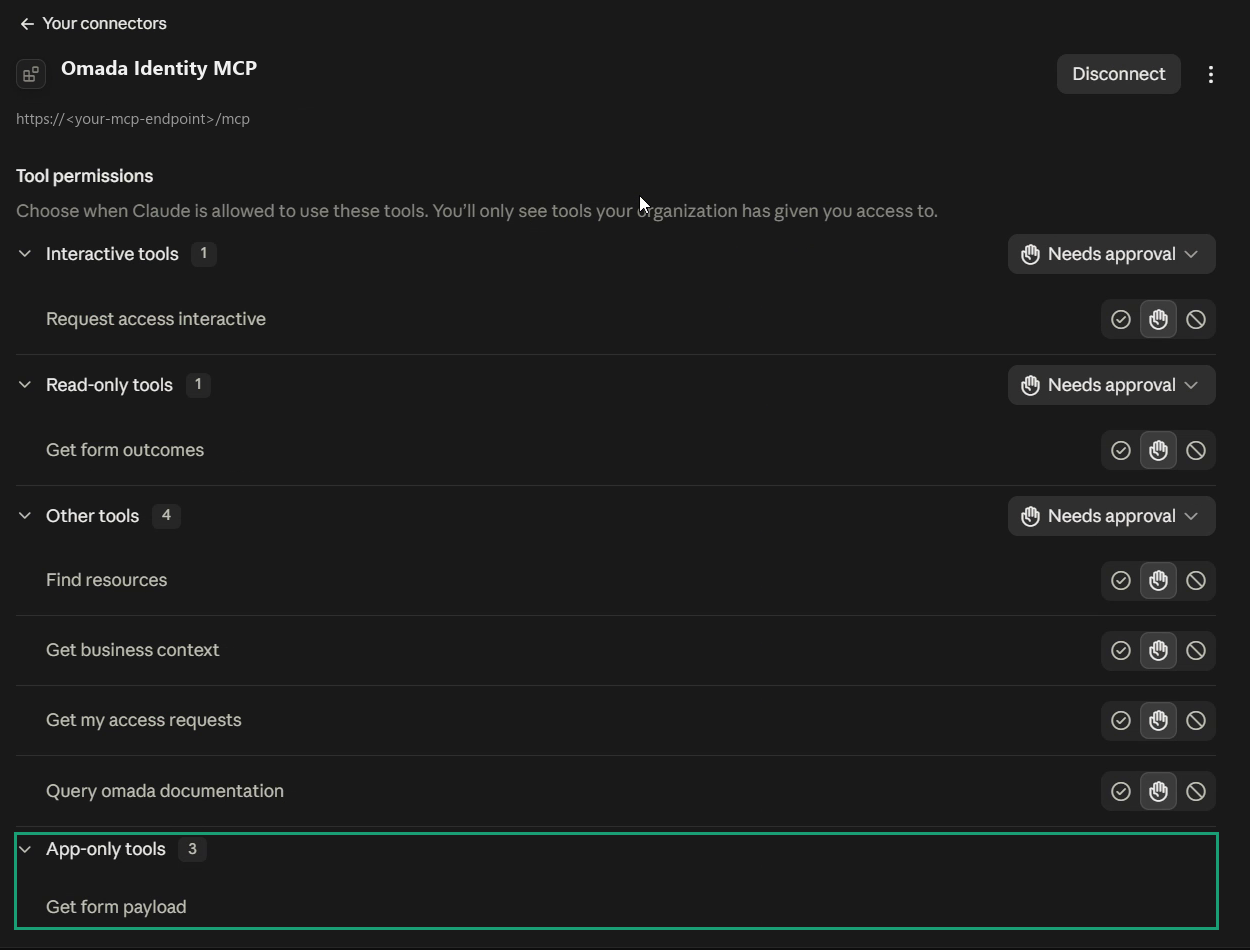
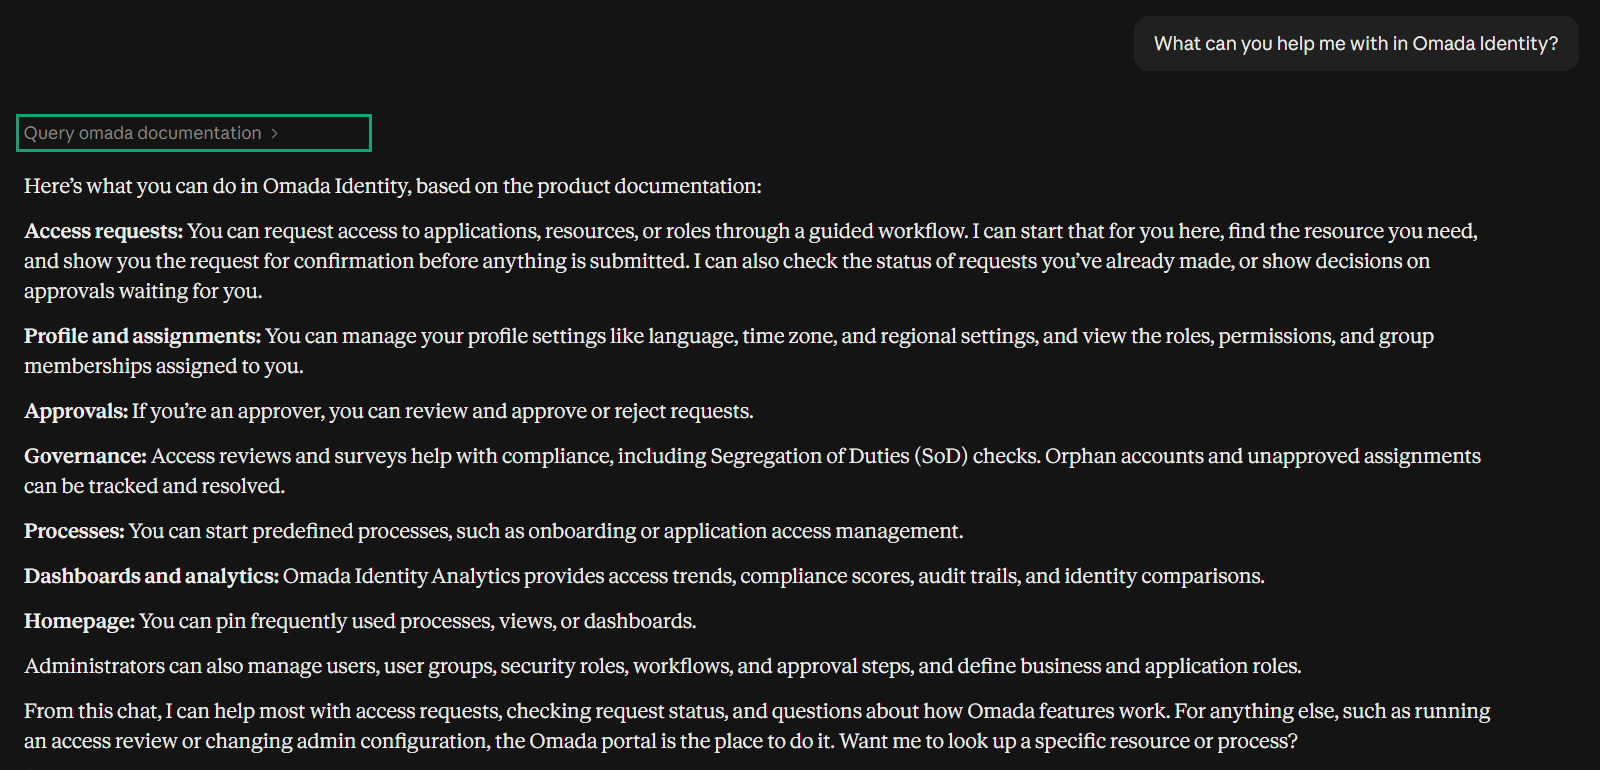
To check the connection, ask a first question, for example: What can you help me with in Omada Identity?. Claude calls the matching tool, in this case Query omada documentation, and answers:
ChatGPT
To check the connection, mention the plugin in the first question, for example:
@Omada Identity MCP
What can you help me with in Omada Identity?
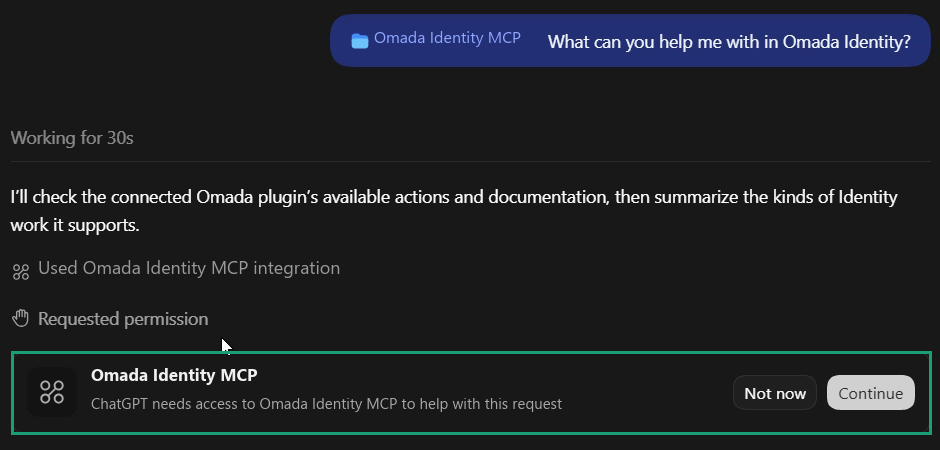
The first time you use the plugin, ChatGPT asks for access to Omada Identity MCP. Select Continue:
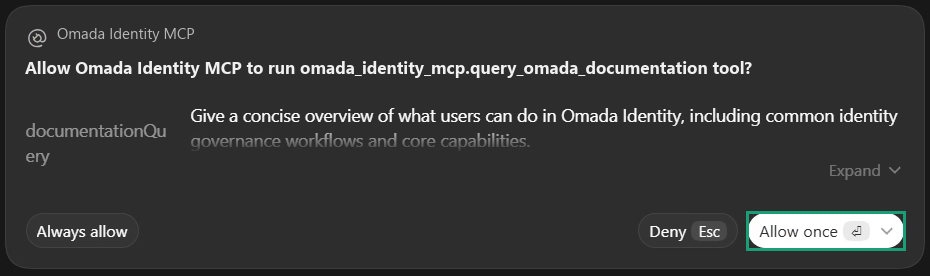
ChatGPT then asks whether it can run the tool. Select Allow once, or select Always allow if you do not want to be asked again for this tool:
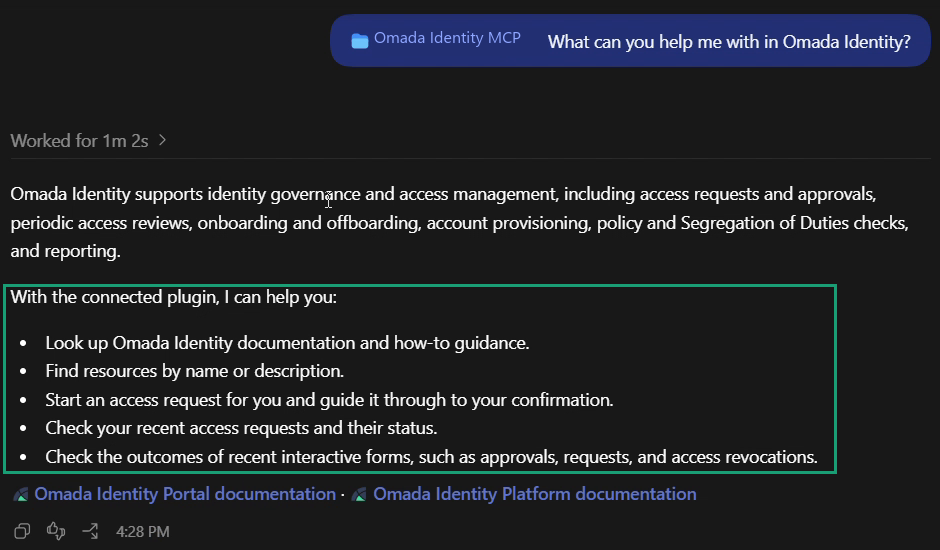
ChatGPT answers and lists what it can do for you through the plugin:
The assistant performs every action as you. It sees what you can see and can request only what you could request, and Omada Identity records every action against your name.
Individual setup: Claude Desktop with a configuration file
Use this setup if a single user wants to use Omada Identity MCP in Claude Desktop, and you do not want to add it for the whole organization. It works with any Claude plan. To give the whole organization access, use the organization setup instead.
In addition to the Before you start list, the user needs Claude Desktop installed and signed in, and Node.js installed.
Add the redirect URIs for Claude Desktop
This setup signs in through a local address on the user's machine, so the app registration needs two more redirect URIs.
-
In Microsoft Entra ID, open the app registration and go to Authentication.
-
Under Mobile and desktop applications, add both of the following redirect URIs:
-
http://127.0.0.1:17777/oauth/callback -
http://localhost:17777/oauth/callback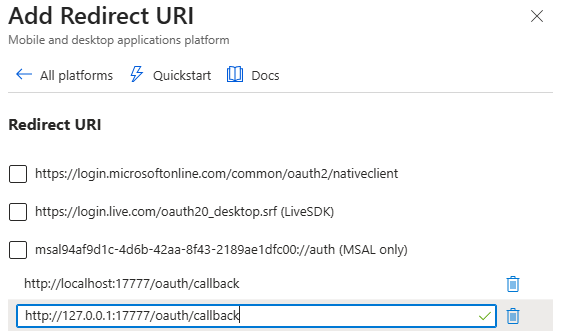
-
-
Save the changes.
- Microsoft Entra ID treats
127.0.0.1andlocalhostas different values, and the one that Claude Desktop uses depends on the operating system: Windows uses127.0.0.1, and macOS and Linux uselocalhost. If you register only one, sign-in works on some machines and fails on others with a redirect URI error. 17777is a port number. The same port appears in both redirect URIs and in the Claude Desktop configuration, and all values must match.- No client secret is needed. The sign-in is protected by Proof Key for Code Exchange (PKCE).
Configure Claude Desktop
-
Open the Claude Desktop configuration file, or create it if it does not exist:
Operating system File Windows %APPDATA%\Claude\claude_desktop_config.jsonWindows, installed from the Microsoft Store %LOCALAPPDATA%\Packages\Claude_<publisher-hash>\LocalCache\Roaming\Claude\claude_desktop_config.jsonmacOS ~/Library/Application Support/Claude/claude_desktop_config.jsonnoteIf you installed Claude Desktop from the Microsoft Store, the first path does not exist because the application keeps its settings inside its package folder. If you edit the wrong file, Claude Desktop appears to ignore the configuration.
-
Paste the configuration for your operating system, as described in the following sections.
-
Replace the two placeholder values, as described in Values to replace.
-
Save the file.
Configuration depending on your operating system
Windows
{
  "mcpServers": {
    "omada-mcp-server": {
      "command": "cmd",
      "args": [
        "/c",
        "npx",
        "-y",
        "mcp-remote",
        "https://<your-mcp-endpoint>/mcp",
        "17777",
        "--static-oauth-client-info",
        "{\"client_id\":\"<your-application-client-id>\"}"
      ]
    }
  }
}
macOS
{
  "mcpServers": {
    "omada-mcp-server": {
      "command": "npx",
      "args": [
        "-y",
        "mcp-remote",
        "https://<your-mcp-endpoint>/mcp",
        "17777",
        "--static-oauth-client-info",
        "{\"client_id\":\"<your-application-client-id>\"}"
      ]
    }
  }
}
Values to replace
| Placeholder | Value |
|---|---|
<your-mcp-endpoint> | The address for your delivery zone, followed by your environment name, for example, dr-0xxx-ceu-wa-mcp.omada.cloud/ab1234. Together with /mcp, it must match the address that was added to the app registration. |
<your-application-client-id> | The Application (client) ID of the app registration. |
Leave everything else exactly as it is, including the quotation marks and backslashes in the last line. 17777 is the port number. It must match the port in the redirect URIs.
Store the client ID in a file
If the escaped quotation marks in the last line cause problems, you can store the client ID in a file instead:
-
Create a file, for example,
omada-oauth-client.json, with the following content:{ "client_id": "<your-application-client-id>" } -
In the configuration, replace the last argument with the absolute path of the file, preceded by
@, for example:"@C:\\Users\\<you>\\omada-oauth-client.json"
The rest of the configuration stays the same.
If your organization inspects TLS traffic
Many corporate networks inspect Transport Layer Security (TLS) traffic by re-signing HTTPS traffic through a proxy. Claude Desktop connects to Omada Identity MCP through Node.js, which uses its own list of trusted certificate authorities and ignores the ones installed in Windows. As a result, the connection can fail even though your browser works. In that case, you see a certificate error before any connection is attempted.
To solve this, add the root certificate of your organization to the omada-mcp-server entry, next to "args":
      "env": {
        "NODE_EXTRA_CA_CERTS": "C:/certs/corporate-root-ca.pem"
      }
Setting NODE_EXTRA_CA_CERTS as a Windows environment variable is not enough.
Sign in to Claude Desktop
- Quit Claude Desktop completely and open it again. (Closing the window is not enough.)
- A browser window opens. Sign in with your work account.
- Approve the request.
Claude Desktop now lists the Omada Identity MCP tools that you have access to. To see the tools and choose when Claude can use each of them, open the connector in the Claude Desktop settings.
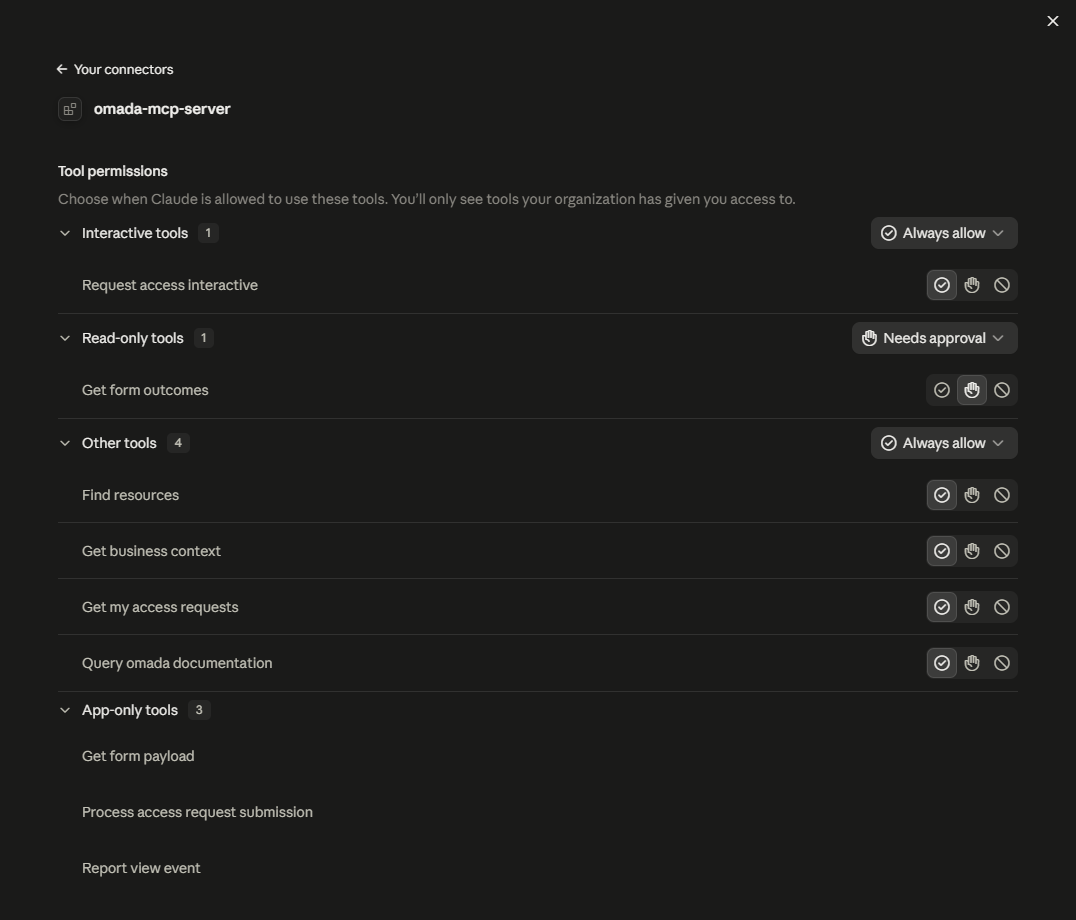
Claude Desktop shows the connector under the name of its entry in the configuration file, omada-mcp-server in the examples on this page. If you use a different name, Claude Desktop shows that name, and that is the name to use when you ask Claude to use the connector.
Troubleshooting
| Problem | Cause and solution |
|---|---|
An error says that the resource parameter does not match the requested scopes (AADSTS9010010). | The address of your environment is not an Application ID URI of the app registration, or it does not match exactly (environment name, /mcp, no trailing slash). See Update the manifest. |
Sign-in fails with a redirect URI error (AADSTS50011). | The redirect URI of the assistant is not registered. For ChatGPT, register the callback URL of that plugin. For Claude Desktop with a configuration file, register both localhost redirect URIs, with the same port as in the configuration. See Add the redirect URIs. |
An error says that the requested permission or scope does not exist (AADSTS650053). | The omada.mcp scope was not added to the app registration, or admin consent was not granted if your policy requires it. See Expose the assistant's permission. |
An error says that the application was not found in the directory (AADSTS700016). | The client ID belongs to a different tenant or environment. In Claude or ChatGPT, add the connector again with the correct client ID. In Claude Desktop, correct the configuration and clear the cache as described below. |
An error says Authentication failed while resolving user identity (401). | Omada Identity rejected the user's sign-in token, because the token expired, is invalid, or was issued by a different tenant. Sign in again. If the error persists, check the configuration of the app registration in your identity provider. See Prepare the app registration in Microsoft Entra ID. |
| ChatGPT shows Disabled by admin. | The app inside the plugin was not approved, or the user's role has no access. See ChatGPT Enterprise, steps 9 and 10. |
| ChatGPT stopped connecting after it worked before. | The client secret expired. Create a new secret and update it in the plugin. |
| Sign-in succeeds, but Manage access approvals, Revoke access, and Review the Compliance Workbench are missing, even for users who should have them. | The user's authorization roles are not assigned, or the EMAIL attribute on the Omada user does not match the email address issued by your identity provider. See Establish the link between Omada and the signed-in user and Review the tool authorization roles. |
| The tools are listed, but they return no results. | Your Omada user has no linked identity. See Establish the link between Omada and the signed-in user. |
| Claude Desktop shows no Omada Identity MCP tools, and no sign-in window opens. | Claude Desktop cannot read the configuration file. Make sure that you edited the correct file (Microsoft Store installations use a different path) and that every quotation mark inside the last line is preceded by a backslash. |
| An error mentions a self-signed certificate before any sign-in window opens. | Your network inspects TLS traffic. See If your organization inspects TLS traffic. |
| An error says that no free callback port can be found. | Another program uses the port. Choose a different port, and update it in the configuration and in both redirect URIs. Docker and Windows Subsystem for Linux (WSL) reserve port ranges that do not show up in the usual tools, so choose a port well away from them. |
| The tools worked and then stopped. | Your sign-in expired. Connect again, or restart Claude Desktop to sign in again. |
| You corrected the Claude Desktop configuration, but nothing changed. | Claude Desktop keeps what it learned the first time it connected. Delete the .mcp-auth\mcp-remote-v1 folder in your user profile, and then quit and reopen Claude Desktop. |