AWS
The AWS connectivity package supports governing and managing AWS IAM API environments. It allows you to:
- create, read, update (deactivate), and delete accounts.
- reset password.
- read and deprovision groups and policies.
Supported objects and operations
Only full import is available, AWS does not support delta import.
| AWS object | Omada data model | Operations |
|---|---|---|
| List Users | Account | Create, read, update, delete |
| List Groups | Resource | Read |
| List Policies | Resource | Read |
| Account: Group assignment (GetAccountAuthorizationDetails) | Resource Assignment | Read and delete |
| Account: Policy assignment (GetAccountAuthorizationDetails) | Resource Assignment | Read and delete |
| Group: Policy assignment (GetAccountAuthorizationDetails) | Resource Assignment | Read |
Minimum required permissions
Only administrators can get the authorization credentials required to connect to AWS. To set up the AWS integration with Omada Identity, you need to have an existing AWS account with an Administrator IAM User. Create this IAM user and configure the appropriate security credentials (Access Key ID and Secret Access Key) directly in the AWS Management Console. To ensure proper provisioning and deprovisioning of AWS IAM users through Omada Identity, the IAM user used by the connector must be granted access to the following API actions:
- iam:ListUsers
- iam:ListGroups
- iam:ListPolicies
- iam:GetAccountAuthorizationDetails
- iam:GetLoginProfile
- iam:CreateUser
- iam:DeleteUser
- iam:CreateLoginProfile
- iam:UpdateLoginProfile
- iam:DeleteLoginProfile
- iam:AddUserToGroup
- iam:RemoveUserFromGroup
- iam:AttachUserPolicy
- iam:DetachUserPolicy
These permissions are required for Omada to perform essential operations such as creating and deleting users, assigning or removing policies and groups, and managing login profiles. Alternatively, a custom IAM policy with these actions can be created and attached to the IAM user dedicated to the Omada integration. This ensures the connector has sufficient access to perform user lifecycle operations.
See Setting up your AWS account in AWS documentation to learn how to create an AWS IAM Admin. See Actions for more information on API methods.
Implementation notes
In Omada Identity, a single account object represents two separate AWS IAM entities: an AWS User (the user account, which is defined by a path and a name) and a Login Profile (the access data, which consists of the password at the minimum). When onboarding an AWS system, a task mapping is used to specify the created Import Profile with an automatically generated password, and the AWS User account is created through an additional custom action.
When an AWS user account is being removed, the Login Profile is removed first as a custom action, and a task mapping is used to point to the removal of the AWS User.
Limitations
Deleting users
You cannot delete users who still have policies and groups (resources in AWS) assigned (this is stemming from a system limitation in AWS). Before removing the AWS account resource assignment in Omada Identity (for example, by revoking it), make sure that all the other AWS resource assignments for the given identity are revoked. Otherwise the provisioning job will fail for the account deletion with the following error:


To avoid this error, Omada Identity allows adjusting the execution order of provisioning tasks through the Prioritize delete tasks setting. Go to the Advanced Settings of the provisioning configuration and enable this option.
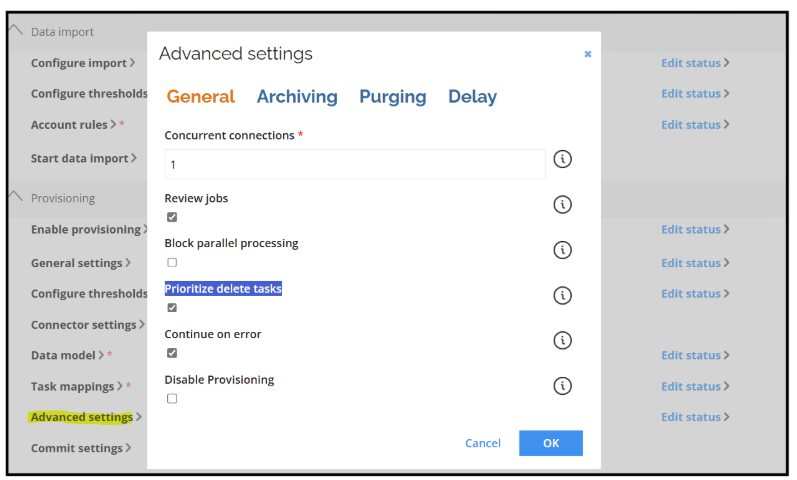
When this option is enabled, resource assignments (such as policies and groups) will be deleted before the user account itself, ensuring that the delete operation for the AWS account does not fail due to dependencies. This configuration is particularly relevant in environments like AWS IAM, where user accounts cannot be deleted until all associated resources have been removed.
Password change after first login
The AWS connector is configured to require users to change their password upon first login. To ensure this functionality works as expected, the user must have the IAMUserChangePassword permission assigned. Without this permission, the password reset at first login will fail.
Prerequisites
To allow Omada Identity to manage AWS IAM resources, perform the following steps to create a dedicated IAM user with the necessary permissions and generate the access keys.
Create a custom IAM policy
- Sign in to the AWS Management Console.
- Go to IAM > Policies > Create policy.
- Select the JSON tab and paste the following policy:
    {

    "Version": "2012-10-17",
    "Statement": [
        {
            "Sid": "IAMReadAccess",
            "Effect": "Allow",
            "Action": [
                "iam:ListUsers",
                "iam:ListGroups",
                "iam:ListPolicies",
                "iam:GetAccountAuthorizationDetails",
                "iam:GetLoginProfile"
            ],
            "Resource": "*"
        },
        {
            "Sid": "IAMUserManagement",
            "Effect": "Allow",
            "Action": [
                "iam:CreateUser",
                "iam:DeleteUser",
                "iam:CreateLoginProfile",
                "iam:UpdateLoginProfile",
                "iam:DeleteLoginProfile"
            ],
            "Resource": "arn:aws:iam::*:user/*"
        },
        {
            "Sid": "IAMUserGroupPolicyManagement",
            "Effect": "Allow",
            "Action": [
                "iam:AddUserToGroup",
                "iam:RemoveUserFromGroup",
                "iam:AttachUserPolicy",
                "iam:DetachUserPolicy"
            ],
            "Resource": [
                "arn:aws:iam::*:user/*",
                "arn:aws:iam::*:group/*",
                "arn:aws:iam::*:policy/*"
            ]
        }
    ]
}
-
Click Next. Enter a name for the policy (example:
OmadaIAMUserManagement). Add a description if needed. -
Go to IAM > Users > Add users.
-
Enter a username (example:
OMADAAPI). Click Next. -
Attach the policy to the user:
- In the Set permissions step, choose Attach policies directly.
- Search for and select the custom policy you created (OmadaIAMUserManagement).
-
Click Next and then Create user.
-
Search for the user and go to Create access key. Choose Third-party service. Click Next.
-
Click Create access key. Save the access key and secret.
Make sure to save these credentials in a secure location. They will be used in the Omada connector configuration to authenticate API calls to AWS.
Important: For security reasons, AWS will only show the secret access key once. If you lose it, you will need to generate a new one.
Register a new system in Omada Identity
- From the main page in Omada Identity, go to Setup > Systems > All systems.
- In the left upper corner, click New. In the dialog box, enter the Name and System ID. Both values must be unique. Select New as your Category and AWS in the Collector technology.
- In the Content section, choose Access Rights. Click OK to register the new system and close the dialog box.