Omada Identity Installation Tool
The Omada Identity Installation Tool creates a reusable configuration file for installing some or all Omada Identity components. You can use the tool to create a configuration file and run the installation, or use its scripts to run the installation manually.
You can use the tool in one-, two-, or three-server environments. The PowerShell scripts use the configuration file, which you can also reuse for future troubleshooting.
By default, the tool installs only core feature packages. A system administrator must install additional packages manually from the Enterprise Server (ES) web portal.
To install optional packages, go to Setup > Administration > System settings > Installed packages.
The Omada Identity Installation Tool uses the PowerShell SqlServer module to perform database tasks. If the module is not installed on the server, the Installation Tool uses NuGet to download and install it.
If the server is not connected to the internet, install the SqlServer module before running the Omada Identity Installation Tool.
Components
The Omada Identity Installation Tool has two components:
- A user interface (UI) for configuring the installation settings.
- A PowerShell script that runs the installation process.
You can also run the PowerShell script without using the Installation Tool.
Requirements
The following rights and software are required for installation:
- Administrative access on the servers where the software will be installed.
- Microsoft SQL Server 2017 or 2019. Installing with the Installation Tool on SQL Server 2022 is currently not supported.
- PowerShell 5.1 or newer.
- Internet Information Services (IIS) 7.5 or newer.
- SQL Server Integration Services (SSIS) and PowerShell Remoting (PSRemoting).
- PowerShell SqlServer module.
If you install Omada Identity components on a machine that already has components installed but does not have Microsoft SQL Server, install SSIS as a prerequisite.
You must also enable PSRemoting on all involved machines. The Installation Tool uses it to communicate between servers.
If the servers where Omada Identity is installed are not connected to the internet, install the PowerShell SqlServer module on them. To check whether the module is installed, run this PowerShell command:
Get-Module SqlServer -ListAvailable
To use the SqlServer module on an offline machine, install it on an online server first, then copy it to C:\Program Files\WindowsPowerShell\Modules on the offline machine.
You can install the SqlServer module with this PowerShell command:
Install-Module SQLServer -Force -AllowClobber
If the SqlServer module is not installed, the Installation Tool tries to download and install it. Without an internet connection, the installation fails.
For a multi-server environment, configure Windows Firewall to allow Distributed Transaction Coordinator communication on all involved machines.
Using SSL
You can configure the Omada Identity Portal to use Secure Sockets Layer (SSL). Provide a certificate thumbprint in the Omada Identity Installation Tool configuration. Omada Provisioning Service (OPS) can also use SSL. For more information, see Configure SSL.
SQL Server instances
You can use SQL Server instances that do not have the default name. However, you cannot use SSIS instances that do not have the default name.
PowerShell scripts
The Omada Identity Installation Tool uses PowerShell scripts to perform the installation. You may need to change the execution policy on your server or servers to allow the tool to run the required scripts:
-
Open PowerShell.
-
To view the current execution policy settings, run:
Get-ExecutionPolicy -List -
To set the execution policy, run:
Set-ExecutionPolicy Bypass -
Restart the server.
-
Repeat steps 1–4 on every server used in your setup.
After installing Omada Identity, you can restore the execution policy to its original state.
For more information about PowerShell execution policies, see the Microsoft documentation.
Make changes to security settings
During installation, the Omada Identity Installation Tool changes some security settings. For example, these changes allow you to use Kerberos for authentication.
In a three-host deployment, configure delegation for the SSIS host before using the Omada Identity Installation Tool.
If the user running the installation is not a member of Domain Administrators, make the following changes manually.
- Before configuring Delegation, make sure the following service accounts and service principal names (SPNs) are registered:
-
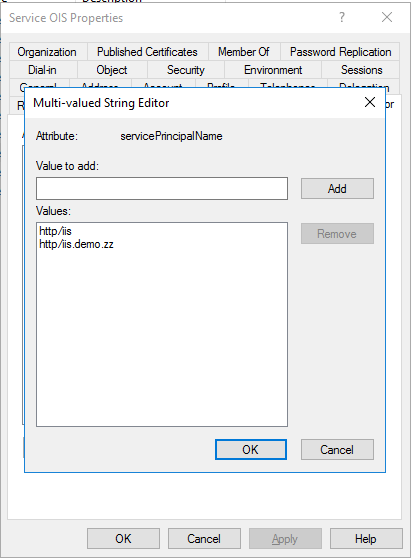
For the ES portal, check the Attribute Editor tab of the Omada Identity service to verify that the IIS service account is set as an SPN.
-
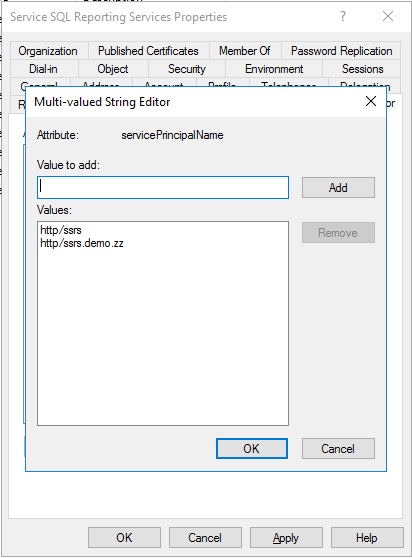
For the Reporting Service, go to the Attribute Editor tab of the SQL Server Reporting Services (SSRS) service and verify that the SSRS service account is set as an SPN.
-
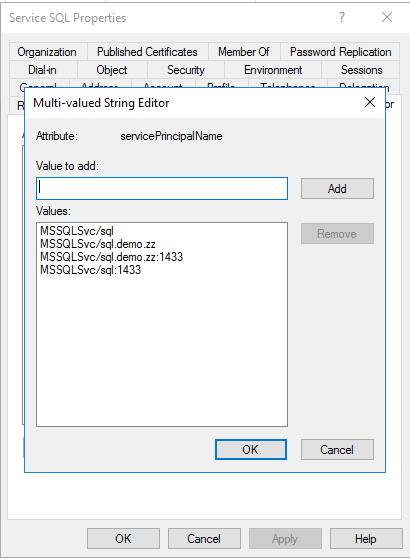
For the Structured Query Language (SQL) Service, check the Attribute Editor tab of the SQL Server to verify that the SQL service account is set as an SPN.
-
If SSRS and IIS run on the same host, configure their SPNs carefully. Either use the same SPN and service account for both services, or give each service its own SPN. In the latter case, they need separate Domain Name System (DNS) records because both services use the http prefix for their SPNs.
If the required SPNs are not configured, you can use the Setspn command on the domain controller.
-
Enable Delegation for each service:
-
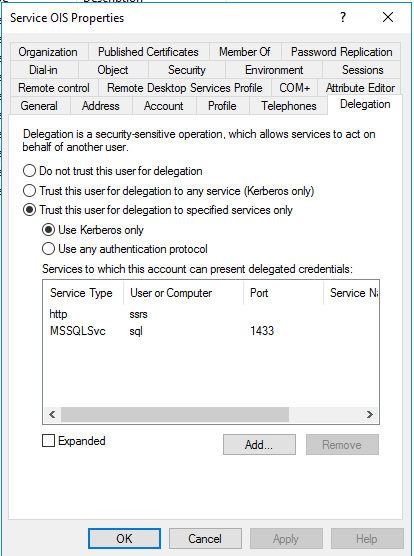
For the ES portal, go to the Delegation tab of the Omada Identity service (svc_ois). Use constrained delegation by selecting Trust this user for delegation to specified services only, then Use Kerberos only. Add delegation to the SSRS service (svc_ssrs) and the SQL Service.
-
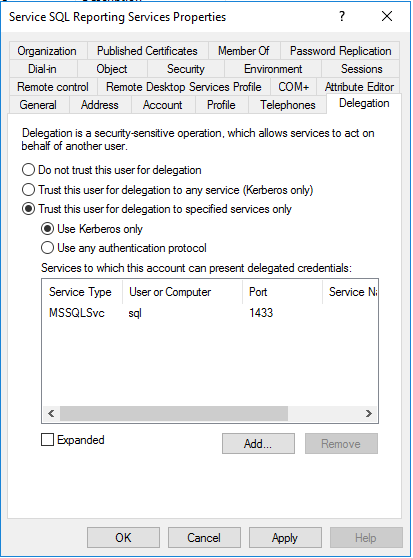
For the Reporting Service, go to the Delegation tab of the SSRS service (svc_ssrs). Use constrained delegation by selecting Trust this user for delegation to specified services only, then Use Kerberos only. Add delegation to the SQL Server (svc_sql).
-
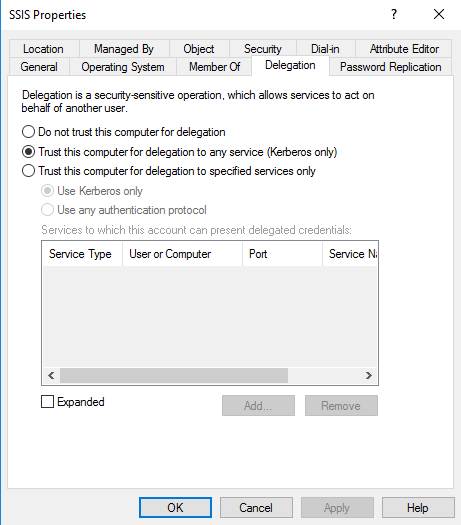
For SQL Server Integration Services, go to the Delegation tab of the SSIS server computer account. Use general unconstrained delegation by selecting Trust this computer for delegation to any service (Kerberos only).
noteThis is a Microsoft restriction related to the requirements of remote Windows Management Instrumentation (WMI) execution. If your organization's security policy does not allow this setting, you can avoid enabling it by not using WMI for Omada Identity Data Warehouse (ODW) imports.
 Important
Restart the SSIS host after configuring delegation.
For security reasons, this type of unconstrained delegation is not recommended in configurations other than the SSIS configuration.
-
-
Add access rights for the Windows Registry by modifying the local security policy on the SSIS server:
- Open the Local Group Policy Editor by running gpedit.msc.
- Browse to Computer Configuration > Windows Settings > Security Settings > Local Policies > User Rights Assignment.
- Find and open Back up files and directories, add the service user, and click OK.
- Find and open Restore files and directories, add the service user, and click OK.
-
When using Windows Integrated Authentication with Kerberos on Windows Server 2016 or newer, you may need to configure ASP.NET authentication to use the application pool credentials. For details, see Authentication with Kerberos on Windows 2016 or newer.
If Kerberos does not work correctly, you may need to check for duplicate SPNs. Another common error is HTTP 400 – Bad Request, which can be caused by Kerberos tickets that exceed the request-header size limit.
Checklist before installation
Before starting an installation with the Omada Identity Installation Tool, check that the following items are set up. The tool does not check prerequisites before running.
-
Ensure that the SQL Server components are installed.
-
Enable PSRemoting on all servers and verify the connection with PowerShell:
Enter-PSSession -Credential (Get-Credential) -ComputerName <remote server name> -
Grant the user administrative access on the servers where the software will be installed.
-
Ensure that PowerShell version 5.1 or newer is installed. Verify the version in PowerShell:
$PSVersionTable.PSVersion -
Verify that IIS version 7.5 or newer is installed.
-
Ensure that .NET version 4.8 or newer is installed. Verify the version in PowerShell:
gci 'HKLM:\SOFTWARE\Microsoft\NET Framework Setup\NDP' -recurse | gp -name Version,Release -EA 0 | where { $_.PSChildName -match '^(?!S)\p{L}'} | select PSChildName, Version, ReleaseAlternatively, use Programs and Features in Windows to check the installed .NET Framework version.
-
Gather all information required by the Omada Identity Installation Tool.
-
Verify that the ES Portal website binding is correctly created in DNS (Host (A) record). Use
pingat the command line to check that the name resolves. -
Ensure that the Active Directory (AD) module for Windows PowerShell is installed on the installation server. Verify this in PowerShell:
Import-Module ActiveDirectory -
If Active Directory (AD) groups and other AD users have not been created before installation, make sure the user performing the installation has domain administrator permissions. If they have already been created, the Installation Tool user does not need to be an AD administrator.
-
Verify that all SPNs for servers and services are correctly created.
-
Ensure that passwords do not contain
>or<characters. -
For a multi-server installation, make sure the drive used on the installation server is also present on the other servers. For example, if the installation package is on the
D:\Omadadrive on the application server, make sure the other servers, such as the database server, also have aD:\drive. -
Configure SSRS, including a connection to an SSRS database and a Web service URL.
-
Ensure that the web browser you are using is not running on the installation server.
-
Install the Microsoft OLE DB Driver 19 for SQL Server (
MSOLEDBSQL19) on the application server. -
Inform the customer that the user running the installation becomes the first administrator of the Omada Identity Portal. This user replaces the default administrator account.
Continue with the Installation Tool
| Task | Guide |
|---|---|
| Configure and run the wizard | 👉 Run the Installation Tool |
| Configure the reusable configuration file | 👉 Configuration file reference |
| Review available PowerShell scripts | 👉 PowerShell scripts |
| Install, update, back up, or restore with scripts | 👉 Script-based operations |