Upgrade steps from 12.2 or 12.3 to 14
The following procedure describes the basic steps to upgrade Omada Identity from v12.2 or 12.3 to v14. It is required that you follow the steps in chronological order.
The following section describes how to upgrade the individual components. If a component is installed in multiple places, the steps must be followed for all installations.
You can upgrade from any version of Omada Identity v12.2 or v12.3 to v14. However, it is recommended that you update your existing installation to the latest patch release.
It is necessary to perform all the procedures listed below, and to follow all the steps exactly in the given order.
Upgrade Omada Provisioning Service
The following steps must be performed to upgrade OPS:
-
Uninstall the old version of OPS and install the new version. After the installation is completed, select the Show the Windows Installer log option and save the log file, if needed.
-
Compare the C:\Program Files\Omada Identity Suite\Provisioning Service\ Omada.OPS.Service.exe.config file with the previous version to ensure that no customizations are lost. Pay special attention to:
-
Any changed
<appSettings> -
The use of HTTPS instead of HTTP
-
The
<endpoint>pointing to the ES portal. -
Make sure that the assembly bindings for
Newtonsoft.JSONis updated to version 13.0.0.0:<assemblyBinding xmlns="urn:schemas-microsoft-com:asm.v1">
<dependentAssembly>
<assemblyIdentity
name
="Newtonsoft.Json" publicKeyToken="30ad4fe6b2a6aeed" culture="neutral"/>
<bindingRedirect oldVersion="0.0.0.0-
13.0.0.0" newVersion="13.0.0.0" />
</dependentAssembly>
<dependentAssembly>
-
Upgrade RoPE
The following steps must be performed to upgrade RoPE.
-
Uninstall the old version of RoPE and install the new version. After the installation is completed, select the Show the Windows Installer log option and save the log file, if needed.
-
If upgrading from v12.2, apply the upgrade script
UpdateDB_12_3.sql. You can find the script in the following location: C:\Program Files\Omada Identity Suite\Role and Policy Engine\Support Files. -
Run the upgrade script
Update DB_14_0.sqllocated in C:\Program Files\Omada Identity Suite\Role and Policy Engine\Support Files. -
Launch
CMDas ADMIN, go to C:\Program Files\Omada Identity Suite\Role and Policy Engine\Service and executeOmada.RoPE.EngineExecutor -U. This will update the database-schema to the latest required by RoPE. -
After performing the upgrade and before starting the RoPE service, you need to navigate to the
ConnectionStrings.configfile and open it for editing. There, change the name of the initial catalog as follows:<add name="OISXConnection" connectionString="Initial
Catalog=OmadaEnt;Integrated Security=SSPI;"></add>to:
<add name="OISXConnection" connectionString="Initial Catalog=OIS;Integrated
Security=SSPI;"></add>
You must examine the contents of the file. Comparing time stamps is not considered enough. If you are using OPS, the extension <add type="Omada.OPS.Integration.PolicyEngine.ProvisioningServiceExtension,Omada.OPS.Integration.PolicyEngine"></add> should no longer be added.
Install Enterprise Server v12.3 to v14
When upgrading from 12.2 to any version 14, it is necessary to install ES 12.3 and launch the ES portal before upgrading to 14:
-
Uninstall the old version of Omada Identity Enterprise Server first, and then install Omada Identity Enterprise Server version 12.3. After installation is completed, select the Show the Windows Installer log option and if necessary, save the log file.
-
Run the Omada Enterprise Configuration Utility.
-
When you are prompted, enter the connection string that you saved from the previous procedure. Then, click OK.
-
Click OK again to upgrade the database to version 12.3, then when the Setup complete message appears, click OK, and close the configuration utility.
infoAt this point, in the Windows registry, go to the** \HKLM\Software\Omada\Omada Enterprise\12.3** registry path and ensure that you that you enter the
PswEncryptionKeythat you copied in the Prerequisites procedure.
-
-
Launch the ES portal. If there are any updates to the standard application, apply the updates.
Upgrade Omada Identity Enterprise Server
-
Uninstall the old version ES and install the new version. After the installation is completed, select the Show the Windows Installer log option and save the log file, if needed.
-
Run Omada Enterprise Configuration Utility. The utility can be found in the Windows start menu.
-
When you are prompted, enter the connection string that you saved in step 7 of the Prerequisites procedure. Then, click OK.
-
Click OK again to upgrade the database to version 14.0, then click OK when the Setup complete message appears and close Omada Enterprise Configuration Utility.
infoAt this point, in the Windows registry, go to the \HKLM\Software\Omada\Omada Enterprise Suite\14.0 registry path and ensure that you enter the
PswEncryptionKeythat you copied in the Prerequisites procedure.
-
-
Update the website settings:
By default, ES v14.0 is installed in a different standard folder compared to v12.3. Start Internet Information Services Manager and ensure that the Physical path for the ES portal is configured correctly.

If you had any customizations in the
web.config file, make sure that you copy them to the file present in the new location.Remember to copy the custom language files and other custom files from your backup to the new location.
Upgrade Omada Data Warehouse
If you are upgrading from v12.2 and the build of ODW is 12.2.104 or newer, you must follow the manual steps below for a correct update:
- The stored procedure
UpgradeDB_12.02.05->12.03.00on the Data Warehouse DB must be renamed toUpgradeDB_12.02.06->12.03.00. - The stored procedure
UpgradeDB_12.02.06->12.03.00must be altered in the way described in the next step. - At the beginning of the stored procedure, the line
IF @dbVer <> '5'must be changed toIF @dbVer <> '6'.
Before upgrading from 12.2 to v14, ODW must be upgraded to the latest patch release of 12.3.
To do so, the running 12.2 version of ODW must be uninstalled and the new 12.3 version installed.
After the upgrade, the configuration package must be executed – this can be achieved by using the ImportConfiguration.ps1 PowerShell script placed in the Support Files folder.
- Create a backup of the files Omada ODW
WebService.dtsConfigand Omada ODWConnectionString.dtsConfig. - Uninstall the current version and install new ODW. After the installation is completed, select the Show the Windows Installer log option and save the log file for later inspection, if needed.
- Reapply the previously backed-up files Omada ODW
WebService.dtsConfigand Omada ODWConnectionString.dtsConfig.
Upgrade Generic Databases
The Generic Database schema has changed from version 12.3 to 14.0.
For each database, apply the following change to the table or the view:
-
In the Context table or view, add the column named
Parent_ComposedBusinessKey. The column must be of the typenvarchar(440)and must allow null values, for example:alter table [Context] add [Parent_ComposedBusinessKey] nvarchar(440) null -
In the Resource table or view, add the column named
LogicKey. The column must be of the typenvarchar(440)and must allow null values, for example:alter table [Resource] add [LogicKey] nvarchar(440) null
Upgrade custom extensions
If your installation contains custom extensions, follow the following steps to upgrade these extensions. The extensions must be upgraded before both the services and the website can be started.
Upgrade Code Extensions with the following steps:
-
Uninstall the previous version.
-
Verify that any custom extensions or
.dllare removed. For example, C:\Program Files\Omada Identity Suite\Enterprise Server \bin\Omada.OE.Custom.(Customer name).(type).dll.
Install the new Code Extension.
Start the application
Start the Enterprise Server
-
Start the ES and application pool.
noteUpgrading to Omada Identity v14.0.4 (Update 4) resets the Enterprise Server authentication to “Forms”. If another type of authentication is to be used a manual change in the tblCustomerAuth table of the Omada Identity database is required before proceeding.
-
Open the ES portal. Note that this can take considerable time when done for the first time, due to internal upgrade actions.
-
Upgrade all the standard application packages that you have already installed on your system to the latest version. This is necessary for the application logic to work as expected. To begin, click the link on the yellow notification bar.
Note that the total number of changes in the upgrade and the number of successfully imported packages may differ, since some of the changes are discarded during the upgrade.
-
Start the Omada Identity Suite Timer Service Windows service and check the event log for errors. Note that service has changed its display name and service name.
Execute UpdateSearchData tool for version 14.0.3 and higher
Due to the changes in the Search mechanism after upgrading and launching the ES portal, you must execute the UpdateSearchData tool. The utility will recalculate the search data for all the data objects in the system.
In a system with a large database, the tool may run for an extended period of time.
-
Locate the UpdateSearchData tool in the bin folder of the Enterprise Server installation folder.
-
Execute the tool from the Command Prompt, providing the customer name as a parameter, for example,
UpdateSearchData.exe -c Omada.Only the data objects with a null value in the searchdata column in tbldataobject will be updated.
Start ODW
- In the ES Audit database, reapply the script
CreateObjects.OISAudit.sqllocated in C:\Program Files\Omada Identity Suite\Datawarehouse\Support files. - Start the Import configuration import profile, either from the ES portal or by using the PowerShell script C:\Program Files\Omada Identity Suite\Datawarehouse\Support Files\ImportConfiguration.ps1.
Wait until the configuration import finalizes.
Upgrade ODW Custom views and packages
Consider the following list of customizations which must be manually migrated after updating from 12.2 or 12.3:
-
If the ODW database contains a function named CustomGetActiveIdentity, this function must be changed to return IdentityOISID's instead of IdentityUID's.
-
If you have an OISX_DataObjectExchange_IdentityUpdate_Custom view make sure that:
-
You use
OISIDas the key property and allow theOISIDproperty to be updated. The value must be picked fromOISID, for example:(SELECT 'OISID' AS "@name", 'true' AS "@isKey",
'modify' AS "propertyValues/propertyValue/@action", [OISID]
AS "propertyValues/propertyValue/@valueInteger" FOR XML PATH('property'),
type) -
You use
ODWBUSIKEYas a secondary key. The value should be picked from ComposedBusinessKey, for example:SELECT 'ODWBUSIKEY' AS "@name", 'true' AS "@isKey2",
'modify' AS "propertyValues/propertyValue/@action", [ComposedBusinessKey]
AS "propertyValues/propertyValue/@valueText" FOR XML PATH('property'), type)
-
-
If the ODW database contains custom export views, these views must be changed to use IdentityOISID as the key, instead of IdentityUID.
-
If the Audit DB contains custom ODW views, these views must be updated to return
OISID. -
The existing custom join packages must be migrated to the new template.
Synchronize data
-
In the ES Portal, ensure that you have manually updated the value of the
OISIDof the UNRESOLVED identity to -1. -
In the ES portal, navigate to Setup > Systems and select the built-in Omada Identity system.
-
Validate the Warehouse to portal mappings. Ensure that the custom export views are updated according to the procedure above, and that they are represented in the expected place and in the expected order. Then, select ok.
-
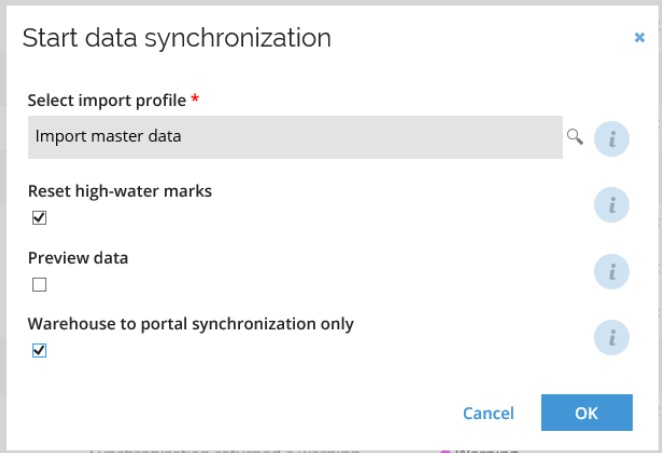
Click Start synchronization and make sure to select the Reset high-water marks and the Warehouse to portal synchronization only check boxes. Wait until data synchronization finalizes.
-
After the first Import profile has run with Reset Watermarks, an administrator must manually make OISID mandatory, unique, and immutable in Omada Identity Enterprise Server.
-
Go to Setup > Administration > More… > Customer Settings and make sure RoPE is configured to use
RoPE_AccountandRoPE_ResourceAssignment.
-
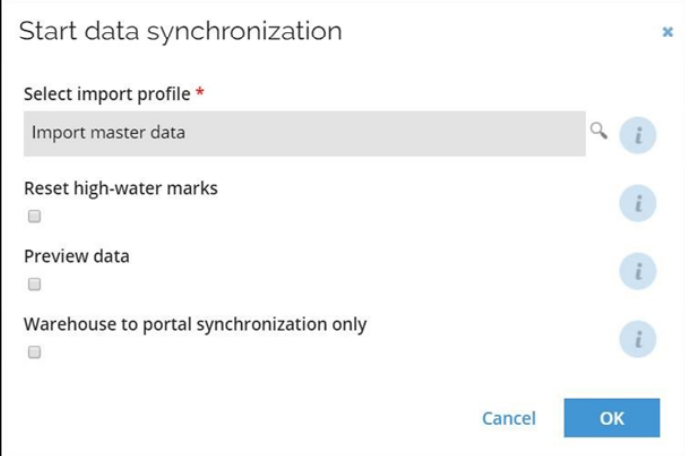
Stop the RoPE service. Click Start data synchronization again (this time with no checkboxes selected). Wait until data synchronization finalizes.
-
Start the RoPE service.
infoData synchronization may take a long time. Note that all identities will be updated with a new anchor value.
-
-
Check the event log for errors.
Upgrade RoPE data schema for version 14.0.2 and higher
Due to the changes in the RoPE database schema the migration must be completed before the Omada Identity services are started.
In order to migrate data:
-
Open a windows command prompt.
-
Navigate to the RoPE installation folder. The default folder is C:\Program Files\Omada Identity Suite\Role and Policy Engine\Service.
-
Drop one of the index:
DROP INDEX [IX_tblCalculatedAssignment_AssignmentType] ON RoPE.[tblCalculatedAssignment]. -
Run the following command in order to upgrade the RoPE database schema:
Omada.RoPE.EngineExecutor -X -K 1000 1000Note that the upgrade can run for several hours depending on the amount of historical calculations.
The migration will produce output as shown below:
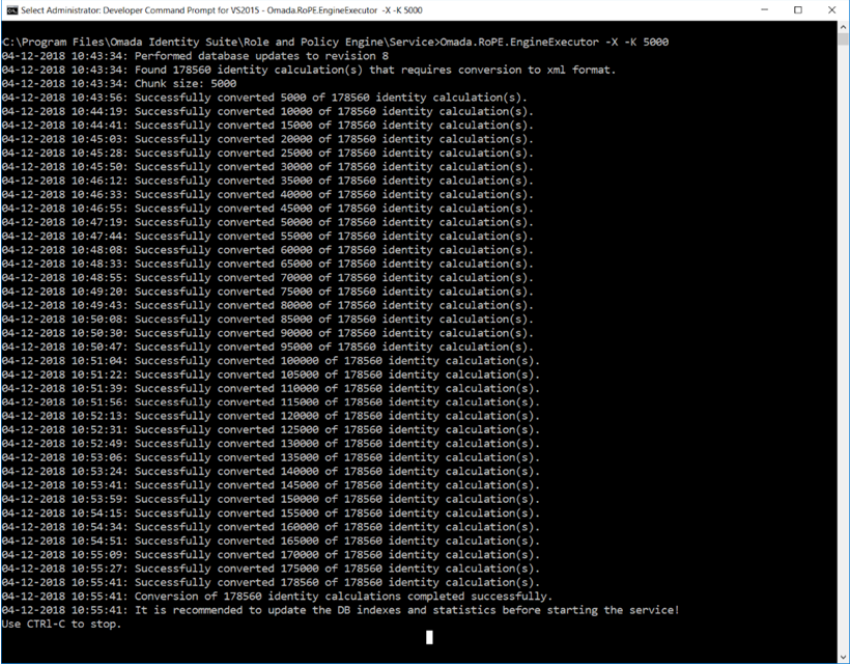
The duration of the migration depends on the amount of data in the RoPE database, especially the number of identities, historic calculations, and attribute values.
-
Run this command to re-add the dropped index:
CREATE NONCLUSTERED INDEX [IX_tblCalculatedAssignment_AssignmentType]
ON [RoPE].[tblCalculatedAssignment]([AssignmentType])
        INCLUDE ([ResourceId], [AccountName], [AccountTypeId],
[LastChangedTime], [ReasonTypes], [IdentityId])
WHERE [AssignmentType] = 1
Start OPS and RoPE
- Start the Omada Provisioning Service Windows service and check the event log for errors.
- From the Enterprise Server Portal, go to any system where provisioning through Omada Provisioning Service is enabled and select Commit Settings.
- Start the Omada Role and Policy Engine Service Windows service and check the event log for errors.
If you want to achieve the newest version of the product, please refer to the lastest upgrade guide and follow the steps.