Authorization roles
An authorization role is a role that defines the user or user groups permission to access and/or work with authorization elements or objects defined in the application.
You can assign users or user groups to an authorization role that specifies permissions for any number of authorization elements. The most common permissions are Create, Read, Update, and Delete.
The permissions can vary, depending on the nature of the authorization role element. The authorization elements relate to the master data of the system.
You can set authorization roles for each type of master data to control individual users or user groups to work with that particular type of master data represented through authorization elements.
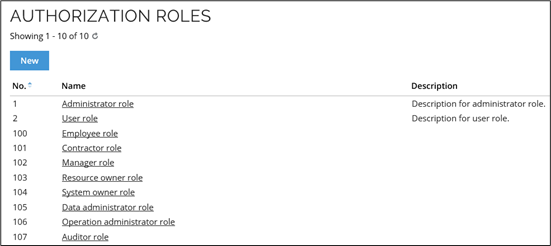
Go to Setup > Administration > Users & Security > Authorization Roles. Click New in the upper-left corner to create an authorization role.
Edit an authorization role�
-
Go to Setup > Administration > Users & Security > Authorization Roles
-
Click the authorization role, or open the context menu and then select Edit.
-
Type a name for the new authorization role and choose a user or a user group to whom the authorization role should belong.
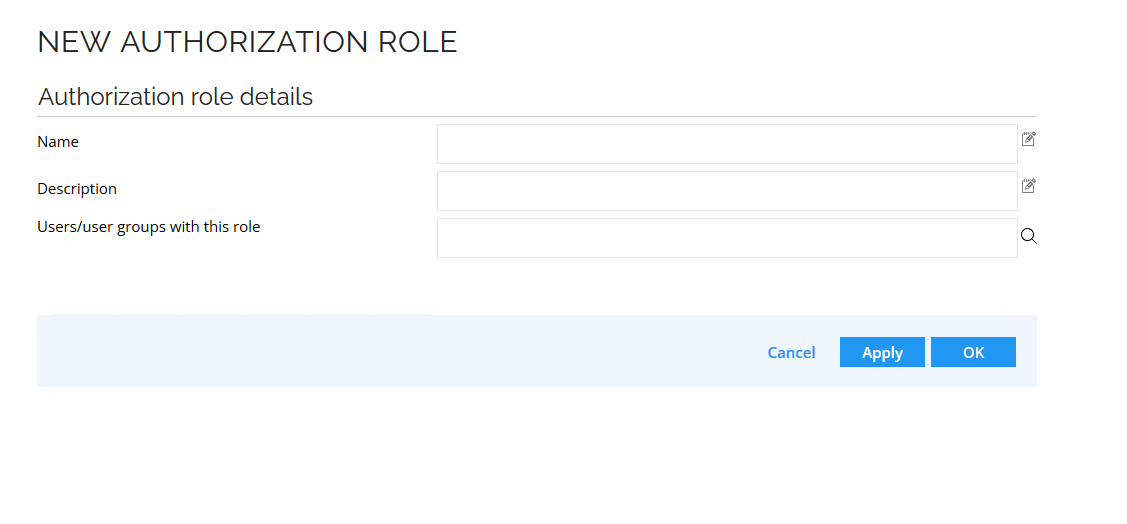
Create an authorization role
The authorization role dialog box is the same for creating and editing authorization roles.
-
Click New in the toolbar.
-
Fill in the Name, Description , Users and User groups fields.
-
Click Apply: this enables the button Authorizations in the toolbar.
-
Select the relevant permissions for the role.
-
Click OK to save your changes.
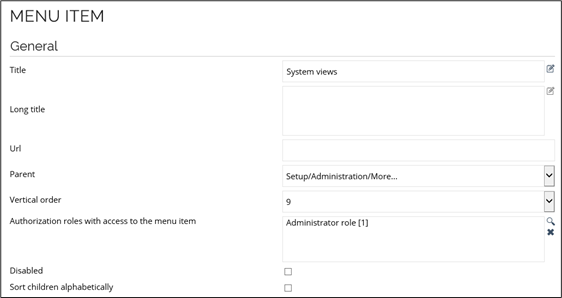
Set authorization on the menu
You can see or set specific authorizations for views in the Menu structure page in Omada Identity. You can add one or more authorization roles for a view. To do so, go to Setup > Administration > User Interface > Menu Structure.
Even in cases in which you do not have access to a menu item, you can still open the web page manually if you have the URL. This is not the case with views. See the following example for more information.
Security summary
The Security Summary shows the rights of a user or a user group and the roles to which the user or user groups belongs. You can access the security summary via the Users or User Groups. Click the relevant user or user groups, then click the Security Summary button.
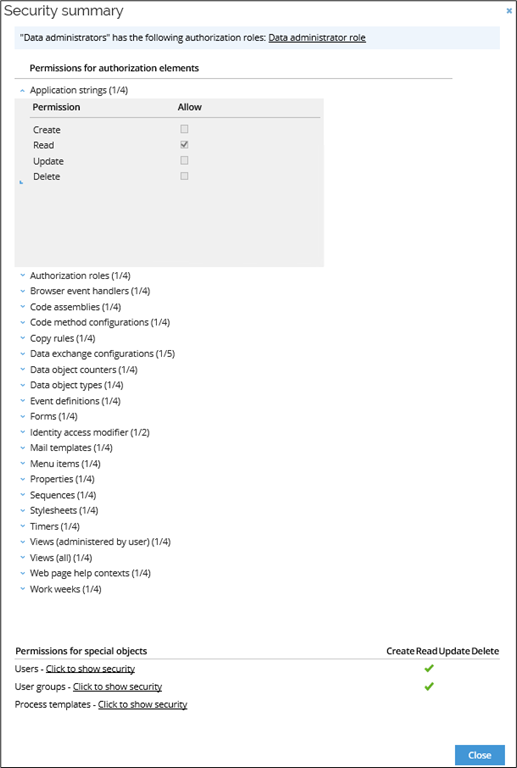
The Security Summary may look similar to the Authorization dialog box when you see it at first glance, but you cannot edit anything here. The page serves as an overview of the rights and roles to which the role belongs. The sum of all the user/user group's authorization roles is listed at the bottom of the dialog box under Permissions for Special Objects. This summary is based on the authorization roles to which the role belongs. Permissions for special objects lists this role's right to create/read/update/delete users, user groups, and process templates according to Data Object Security Model (DOSM).
Security in views
You should restrict access to views as well as to property lookup views, based on a user's group membership. It may be a good idea to restrict a common user's access to only have access to those sections that relate to their resource assignments or jobs.
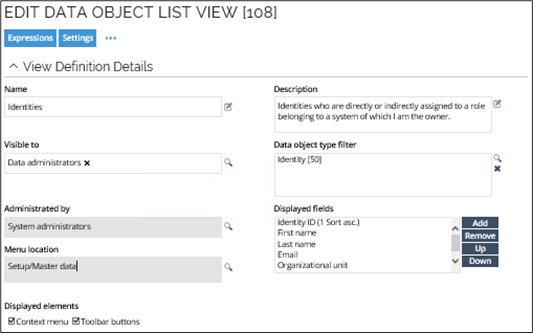
Here you will find an example of a security view.
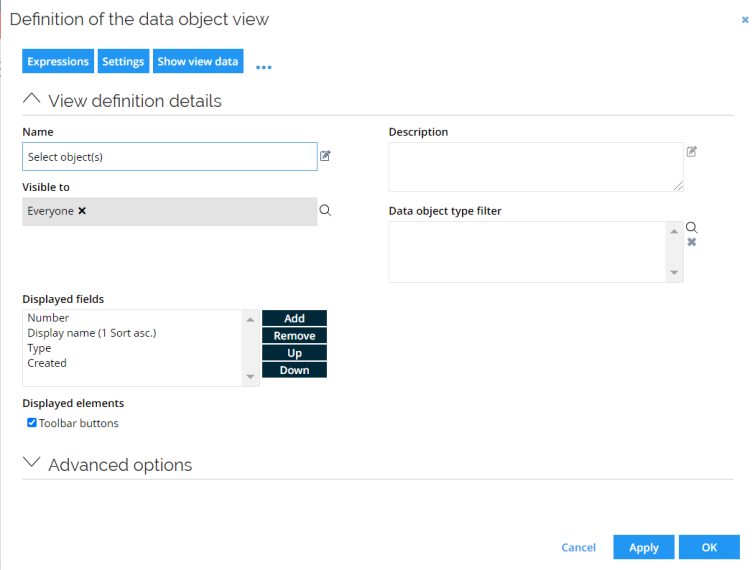
Here you will find an example of a** property lookup view**.
Each type of user can see different views in the left-side menu, depending on the permissions they have been granted. The number of views and functionality available in the left-side menu varies between the basic user, the business manager, and the system administrator. For examples for each type of user, see the following images.
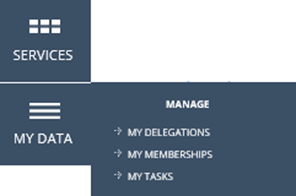
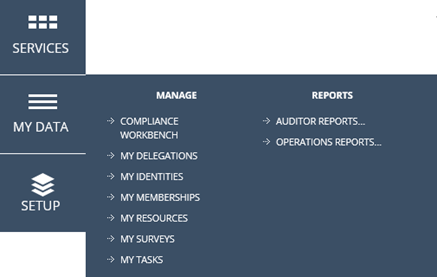
Basic user access
Under the My Data area, the basic user only has access to the basic fundamentals. The basic user does not have access to any administrative views, only tasks related to the basic user themselves.
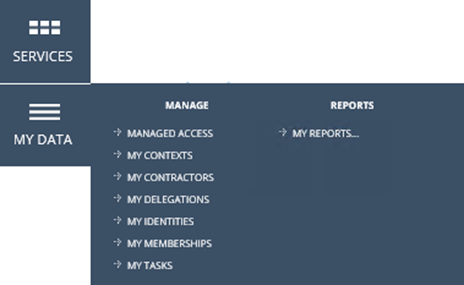
Access for managers
The manager has access to more views and functionality than the basic user. In addition to the basic user's access, the manager can, for example, manage identities and contractors and view reports.
Access for system administrators
The system administrator has access to all system-related views and functionality in Omada Identity.
The system administrator also has the third area available that is not available to basic users nor managers which is the Setup tab.
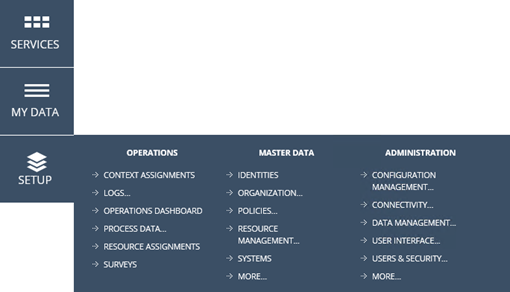
Under the Setup tab, the the system administrator can set up all functionalities related to the system setup, for example, system onboarding or changing or adding resources.
All of this functionalities are not available to a basic user or manager in a typical setup, because a change in the configuration can have impact on the system performance. Only advanced system users should do make any changes to configuration.
-
Even in cases in which you do not have access to a menu item, you can still open the web page manually if you have the URL. With reference property views it is possible to retrieve the list of possible values using web service calls.
-
The access limitation to views is customized per user or user groups with the attribute Visible to.
-
You cannot open a view that you do not have access permissions for.
Predefined authorization roles
Omada Identity comes with a predefined set of authorization roles and each role has default authorizations. This section covers each role and the authorizations that it has by default. However, you can modify these authorizations. If you want to know how to modify them, go to the Edit an authorization role section.
Resource owner
Resource owner is linked to Resource owners user group.
| Authorization element | Create | Read | Update | Delete |
|---|---|---|---|---|
| OData | X | X | X | X |
Administrator role
Administrator role is linked to System administrators user group.
| Authorization element | Create | Read | Update | Delete | Execute |
|---|---|---|---|---|---|
| Application strings | X | X | X | X | |
| Authorization roles | X | X | X | X | |
| Browser event handlers | X | X | X | X | |
| Code assemblies | X | X | X | X | |
| Code method configurations | X | X | X | X | |
| Code method log | X | ||||
| Copy rules | X | X | X | X | |
| Data objects counters | X | X | X | X | |
| Data exchange configurations | X | X | X | X | |
| Data object types | X | X | X | X | |
| Email log | X | ||||
| Event definitions | X | X | X | X | |
| Forms | X | X | X | X | |
| Mail templates | X | X | X | X | |
| Menu items | X | X | X | X | |
| OData | X | X | X | X | |
| Properties | X | X | X | X | |
| Password filter webservice | X | X | X | X | X |
| Password reset access modifier | X | X | X | X | X |
| Sequences | X | X | X | X | |
| Stylesheet | X | X | X | X | |
| Timers | X | X | X | X | |
| Views | X | X | X | X | |
| Web page help context | X | X | X | X | |
| Work weeks | X | X | X | X | |
| Queue identity for recalculation | X |
Service desk role
Service desk role is linked to Service desk agent user group.
| Authorization element | Create | Read | Update | Delete | Execute |
|---|---|---|---|---|---|
| OData | X | X | X | X | |
| Queue identity for recalculation | X |
| Authorization element | Request access | Request access status | Revoke assignments | Reassign Activities |
|---|---|---|---|---|
| Service desk | X | X | X |
| Authorization element | Read | Read and Update |
|---|---|---|
| Activity access modifier | X | |
| Process access modifier | X | |
| Resource assignments access modifier | X |
| Authorization element | Reset all passwords | Reset managed identities passwords |
|---|---|---|
| Password reset access modifier | X |
Auditor role
Auditor role is linked to Auditors user group.
| Authorization element | Create | Read | Update | Delete |
|---|---|---|---|---|
| Application strings | X | |||
| Authorization roles | X | |||
| Browser event handlers | X | |||
| Code assemblies | X | |||
| Code method configurations | X | |||
| Copy rules | X | |||
| Data object counters | X | |||
| Data object types | X | |||
| Data exchange configurations | X | |||
| Event definitions | X | |||
| Forms | X | |||
| Identity access modifier | X | |||
| Mail templates | X | |||
| Menu items | X | |||
| OData | X | X | X | X |
| Properties | X | |||
| Process target access modifier | X | |||
| Sequences | X | |||
| Stylesheets | X | |||
| Timers | X | |||
| Views (all) | X | |||
| Web page help contexts | X | |||
| Work weeks | X |
CIAM service user role
CIAM service user role is linked to CIAM service user user group.
| Authorization element | Create | Read | Update | Delete |
|---|---|---|---|---|
| Data object types | X | |||
| Forms | X | |||
| Mail templates | X | |||
| Menu items | X | |||
| OData | X | X | X | X |
| Properties | X | |||
| Views (all) | X |
| Authorization element | Read | Read and Update |
|---|---|---|
| Identity access modifier | X |
CIAM end user role
| Authorization element | Create | Read | Update | Delete |
|---|---|---|---|---|
| OData | X | X | X | X |
Data administrator role
Data administrator role is linked to Data administrators user group.
| Authorization element | Create | Read | Update | Delete | Execute |
|---|---|---|---|---|---|
| Application strings | X | ||||
| Authorization roles | X | ||||
| Browser event handlers | X | ||||
| Code assemblies | X | ||||
| Code method configurations | X | ||||
| Copy rules | X | ||||
| Data exchange configurations | X | ||||
| Data objects counters | X | ||||
| Data object types | X | ||||
| Event definitions | X | ||||
| Forms | X | ||||
| Identity access modifier | X | X | |||
| Mail templates | X | ||||
| Menu items | X | ||||
| OData | X | X | X | X | |
| Properties | X | ||||
| Sequences | X | ||||
| Stylesheet | X | ||||
| Timers | X | ||||
| Views | X | ||||
| Web page help context | X | ||||
| Work weeks | X | ||||
| Queue identity for recalculation | X |
Employee role
Employee role is linked to Employees user group.
| Authorization element | Create | Read | Update | Delete |
|---|---|---|---|---|
| OData | X | X | X | X |
Manager role
Manager role is linked to Managers user group.
| Authorization element | Create | Read | Update | Delete | Allow |
|---|---|---|---|---|---|
| OData | X | X | X | X |
| Authorization element | Reset all passwords | Reset managed identities passwords |
|---|---|---|
| Password reset access modifier | X |
Operation administration role
Operation administration role is linked to Operation administrators user group.
| Authorization element | Create | Read | Update | Delete | Allow | Execute |
|---|---|---|---|---|---|---|
| Application strings | X | |||||
| Authorization roles | X | |||||
| Browser event handlers | X | |||||
| Code assemblies | X | |||||
| Code method configurations | X | |||||
| Copy rules | X | |||||
| Data exchange configurations | X | |||||
| Data object counters | X | |||||
| Data objects type | X | |||||
| Event definitions | X | |||||
| Forms | X | |||||
| Mail templates | X | |||||
| Menu items | X | |||||
| Identity access modifier | X | |||||
| OData | X | X | X | X | ||
| Properties | X | |||||
| Provisioning errors | X | X | ||||
| Sequences | X | |||||
| Stylesheet | X | |||||
| Timers | X | |||||
| Views | X | |||||
| Web page help contexts | X | |||||
| Work weeks | X | |||||
| Queue identity for recalculation | X |
| Authorization element | Reset all passwords | Reset managed identities passwords |
|---|---|---|
| Password reset access modifier | X |
Password filter role
| Authorization element | Create | Read | Update | Delete | Allow |
|---|---|---|---|---|---|
| Identity access modifier | X |
| Authorization element | Execute PasswordFilter method | Execute PasswordChangeNotify method |
|---|---|---|
| Password filter webservice | X | X |
Platform administrator role
| Authorization element | Create | Read | Update | Delete |
|---|---|---|---|---|
| OData | X | X | X | X |
System owner role
System owner role is linked to System owners user group.
| Authorization element | Create | Read | Update | Delete |
|---|---|---|---|---|
| OData | X | X | X | X |
Contractor role
| Authorization element | Create | Read | Update | Delete |
|---|---|---|---|---|
| OData | X | X | X | X |
User role
The user role is linked to Everyone and System administrators user group.
User role does not have any permissions regarding authorization elements by default. If you want to modify permissions assigned to User role, go to section Edit an authorization role.
Provisioning User role
| Authorization element | Create | Read | Update | Delete |
|---|---|---|---|---|
| OData | X | X | X | X |
| Identity access modifier | X |