Additional security aspects
Some of the security aspects within Omada Identity are relevant for several of the solution's component. Elements such as Shared secret or password encryption key are not associated with ES or OPS only, but span across entire Omada Identity. This article is dedicated to discuss these aspects.
Password encryption key
Omada Identity uses common encryption key, PswEncryptionKey, for all of its main components. This key is used to encrypt sensitive data such as passwords or connection strings.
PswEncryptionKey can be stored in several places in Omada Identity. Omada recommends to store the key in the Windows registry under the key \HKEY_LOCAL_MACHINE\SOFTWARE\Omada\Omada Identity Suite, but alternatively, it can be stored in config files for each of the components, that is Web.config file (ES), Omada.OPS.Service.exe.config file (OPS), AppSettings.config file (RoPE), and Omada.OE.Service.config file (timer service).
Immediately after the Omada Identity installation, the PswEncryptionKey has the default value DefaultEncryptionKey. This value should be changed as soon as possible after the installation, preferably before performing any actions within Omada Identity.
The PswEncryptionKey change must be performed manually in all the places where it is used.
However, PswEncryptionKey can be changed at any later stage, even if you have encrypted data with the DefaultEncryptionKey or your updated PswEncryptionKey.
Add a password encryption key for ES, ODW and RoPE
Omada recommends that you set a secret password encryption key, so that you do not use the default one. This needs to be done before you enter any credentials that are to be encrypted with this key.
To set up the new password encryption key, add a string value named PswEncryptionKey into the following path of the Windows Registry: HKEY_LOCAL_MACHINE > SOFTWARE > Omada > Omada Identity Suite.
As an alternative, the key can also be stored in the Web.config file, Omada.OPS.Service.exe.config file, AppSettings.config file, and Omada.OE.Service.config file.
The password encryption key must be set on all servers running ES, ODW and RoPE. For the corresponding configuration of OPS, see section Adding a password encryption key in the Omada Provisioning Service.
For Data Preview Service and Vault Service, the password encryption key must be set in their respective configuration files, not in Windows registry.
Add a password encryption key in the Omada Provisioning Service
Omada recommends that you set a secret password encryption key, so that you do not use the default one. This needs to be done before you enter any credentials that are to be encrypted with this key.
To do this, enter the new password in Omada.OPS.Service.exe.config.
As an alternative, the key can also be set in the registry database as described in the Add a password encryption key for ES, ODW, and RoPE section.
<appSettings>
<add key="PswEncryptionKey" value="DefaultEncryptionKey"/>
Please, bear in mind that PswEncryptionKey must be the same in all the places where it is set.
Change PswEncryptionKey after data encryption
Changing PswEncryptionKey after it has been used to encrypt data should be performed with caution as incorrect update may render data lost or Omada Identity unresponsive. In order to change the PswEncryptionKey follow the steps below:
- Ensure that all mail queues are emptied (initial password encrypted).
- Ensure that all account provisioning jobs with initial passwords in OPS are finalized.
- Ensure that the account creation has been confirmed by an ODW import, and the account creation email with the initial password has been sent out.
- Stop all Omada Identity services on all servers.
- Change PswEncryptionKey on all servers – both in Registry and config files.
- Re-encrypt previously encrypted Database Connection strings in registry and configuration files.
- Re-encrypt API keys in configuration files.
- Re-encrypt Azure Service Bus connection string.
- Re-encrypt any encrypted property values on Data Objects. For example, the INITIALPASSWORD property on Identity data objects, if used.
- Restart application pool for Omada Identity on all servers.
- For each onboarded system, visit all tasks where passwords or keys are entered, and re-enter the password.
- Re-encrypt previously encrypted Data Connection connection strings. Start the Omada Identity services again.
Shared secret authentication
The shared secret is an authentication method for the internal process communication between the Omada Identity components. It covers the following types of communication between components:
- Role & Policy Engine to Omada Provisioning Service
- Enterprise Server to Omada Provisioning Service
- Enterprise Server to Role & Policy Engine
This authentication method utilizes a shared secret concept. In Omada Identity, the shared secret is the APISharedSecret API key, shared between ES, RoPE, and OPS.
The shared secret is stored in either encrypted or unencrypted form in the configuration files for ES, RoPE, and OPS.
Omada strongly recommends using the StringEncrypter utility to encrypt the shared secret before storing it in the configuration files.
Set-up shared secret authentication in ES
In order to correctly utilize shared secret authentication, it must be properly configured for ES, RoPE, and OPS.
You can configure the authentication by adding the following line with a value of the shared secret to the Web.config.
<appsettings>

<add key="ApiSharedSecret" value=""></add>
The ApiSharedSecret key accepts values encrypted with PswEncryptionKey as well as unencrypted values. In the former case, it is strongly advised that you encrypt the ApiSharedSecret with the PswEncryptionKey using the StringEncrypter. In the latter case, in the unencrypted ApiSharedSecret key, you cannot use special characters that are illegal in XML config files (& < > " '). The value must be the same in ES, RoPE, and ODW.
For information on setting up the PswEncryptionKey, see the Add a password encryption key for ES, ODW, and RoPE section.
For more information on setting up the shared secret in RoPE, see the Set-up shared secret authentication in RoPE section.
Set-up shared secret authentication in OPS
In order to correctly utilize shared secret authentication, it must be properly configured for ES, RoPE, and OPS.
For the Role & Policy Engine, you can configure the authentication by adding the following line with a value of the shared secret to the Omada.OPS.Service.exe.config.
<appsettings>
<add key="ApiSharedSecret" value=""></add>
In addition, the behavior of the Omada.OPS.Service.WCF.Impl.AllWcfServices service in the Omada.OPS.Service.exe.config needs to be changed to support API shared secret.
In the behaviorConfiguration set one of the below service behaviors. When using the shared key, you can use either ProvisioningServiceServiceBehaviorApiSharedSecret or ProvisioningServiceServiceBehaviorApiSharedSecretHttps.
<system.serviceModel>

<services>

<service name="Omada.OPS.Service.WCF.Impl.AllWcfServices" behaviorConfiguration="ProvisioningServiceServiceBehaviorApiSharedSecret">
The ApiSharedSecret key accepts values encrypted with PswEncryptionKey as well as unencrypted values. In the former case, it is strongly advised that you encrypt the ApiSharedSecret with the PswEncryptionKey using the StringEncrypter. In the latter case, in the unencrypted ApiSharedSecret key, you cannot use special characters that are illegal in XML config files (& < > " '). The value must be the same in ES, RoPE, and ODW.
Set-up shared secret authentication in RoPE
In order to correctly utilize shared secret authentication, it must be properly configured for ES, RoPE, and OPS.
For the Role & Policy Engine, you can configure the authentication by adding the following line with a value of the shared secret to the AppSettings.config.
<appsettings>

<add key="ApiSharedSecret" value=""></add>
The ApiSharedSecret key accepts values encrypted with PswEncryptionKey as well as unencrypted values. In the former case, it is strongly advised that you encrypt the ApiSharedSecret with the PswEncryptionKey using the StringEncrypter. In the latter case, in the unencrypted ApiSharedSecret key, you cannot use special characters that are illegal in XML config files (& < > " '). The value must be the same in ES, RoPE, and ODW.
StringEncrypter
Omada Identity includes an encryption tool named StringEncrypter which is installed along with the software. You can use this tool to encrypt any string or part of the string, for example, a password used in a connection string.
You can encrypt a string by running the StringEncrypter in command prompt. The first parameter, PswEncryptionKey, specifies the encryption key. The second parameter specifies the string to encrypt. You can select and copy the result.
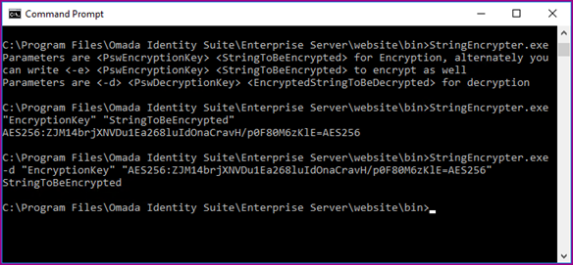
To make sure that the password string is read as a single string, insert quotation marks before and after the password, for example:
StringEncrypter.exe "abc|def" "abc|def".
Do this regardless of whether you have used special characters (for example &, |, !).
If you want to encrypt only a part of the string, use the StringEncrypter on the desired part of the string, and then paste the encrypted part manually into the target string. The encrypted part must include special tags at the start and the end of it. For example, the starting tag is AES256:, and the ending tag is =AES256:
Server=localhost; User Id=AES256:bGUt1APx1lRsvcdwdf9BXQ===AES256;Password=AES256:bGUt1APx1lRsvcdwdf9BXQ===AES256;Database=OIS
The StringEncrypter adds these tags automatically.
Encryption
Omada Identity uses a PBES2-based encryption method as defined by the JSON Web Encryption (JWE) standard to protect sensitive data. This approach follows industry best practices by combining a strong key derivation function with authenticated encryption.
The encryption mechanism applies the following components:
-
PBKDF2 with SHA-512 (Password-Based Key Derivation Function 2) as the key derivation function.
explanationAn algorithm strengthens passwords by repeatedly hashing them. This process makes it much harder for attackers to guess or brute-force the original password because it slows down every attempt with thousands of hash iterations.
-
AES-256-GCM (A256GCM) as the encryption mode.
explanationIt is a modern encryption standard that both protects the confidentiality of data and verifies that it has not been tampered with. It uses a 256-bit key for strong security and includes built-in integrity checks, so if the encrypted data is changed in any way, the decryption process will detect it.
-
A random salt generated for every encryption operation.
explanationEven if the same password is used multiple times, the derived encryption key will always be different.
-
A random initialization vector (IV) generated for every encryption operation.
explanationEven if the same plaintext is encrypted multiple times with the same key, the ciphertext will always differ.
-
A configurable iteration count to balance performance and security requirements.
explanationThe PBKDF2 iteration count master setting allows system administrators to specify the number of iterations for the PBKDF2 key derivation function. The default value is set to 210,000, which aligns with modern security recommendations for PBKDF2 with SHA-512. For more technical details, look up this seetting in Master settings – Security.
Performance ConsiderationsWhile higher values for the PBKDF2 iteration count can improve security by making brute-force attacks more computationally expensive, they can also impact system performance. To strike the right balance between performance and security, evaluate your security needs and system capabilities when configuring this setting.
Library support
The CommonLib Crypto library provides the method EncryptWithPassword, which applies the PBES2 encryption approach with a random salt, random IV, and configurable iteration count.
Caching
Omada Identity applies data caching in selected places to improve the end-user experience. This means that you must reset the IIS when certain configuration data are modified or wait until the caching period expires and the data are automatically reloaded.
Make an IISReset after you have made changes to certain parts of the system’s configuration.
The default caching period is two (2) minutes. If you need to, you can change the customer setting Configuration Mode to True in your configuration and development environments. If you do this, you prevent the system from applying caching in the selected places.
| Type of data | Are cached for | Skips caching in configuration mode |
|---|---|---|
| Views | 2 minutes | Yes |
| Filters (for example on a view) | 2 minutes | No |
| Context types | 2 minutes | Yes |
| Configuration Objects | 2 minutes | Yes |
| Data Sources | 2 minutes | Yes |
| Data Connections | 2 minutes | Yes |
| Xml Schema | 2 minutes | Yes |
| System name of a Data Object Type | 2 minutes | No |
| System name of a Property | 2 minutes | No |
| Data sets used in dashboard charts and KPIs.Run a query specified on a data source | Period specified on the data source definition. | Yes |
| Members of a user group | 2 minutes | No |
| The identity specified on a user object | 2 minutes | No |
| Menu items | 1 minute | Yes |
Configuration Mode also has an impact in other areas. You should avoid setting Configuration Mode to True in production environments as it has an impact on system performance.