Omada Data Warehouse
This advanced configuration section provides information that enables you to set up Omada Identity Data Warehouse (ODW) to suit your company’s business needs.
Omada Identity Data Warehouse is a dedicated identity management data warehouse. It is designed for use as a data source for compliance applications such as Enterprise Server.
The design
By default, identities with identical UID are assumed to represent the same person and are therefore joined together. However, Omada Identity also allows for multiple joining scenarios with the use of other identity attributes such as Name, Email, or EmployeeID. The full list of allowed attributes can be found in the Join rules configuration section.
Due to the fact that Technical Identities or CIAM users undergo uniqueness checks, the joining mechanism is not designed to be used with these identity types.
The number of possible scenarios for joining identities is virtually infinite, therefore, only the most common scenarios are described below.
The survey sent to the primary identities after each scenario serves the sole purpose of reviewing. The survey replies do not result in any actual joining.
Scenario 1: Joining identities from multiple HR systems
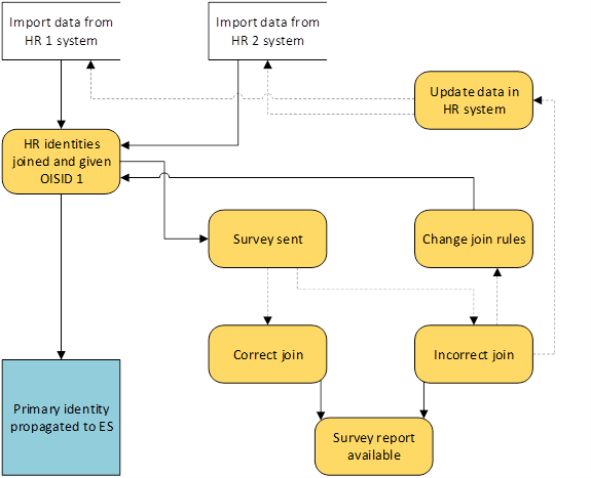
If data are imported from more than one HR system, the preferred solution is to define join rules before the profile import. This way, the data are joined in the ODW and only one, the Primary, identity is propagated to ES. The primary identity is selected in ODW according to Identity Picker rules set in the Customer Settings.
The Survey is then sent to the primary identities to review if the join was correct.
In order to prevent Omada Identity from creating multiple identities with distinct OISIDs and propagating them to ES before employing Identity join rules, you must remember to correctly configure the data import for the HR system.
While preparing the import from multiple HR systems, remember to configure the data import in such a way that the identities were not propagated to ES. You can do it by deselecting the Prepare data for processing checkbox in the Configure import dialog box.
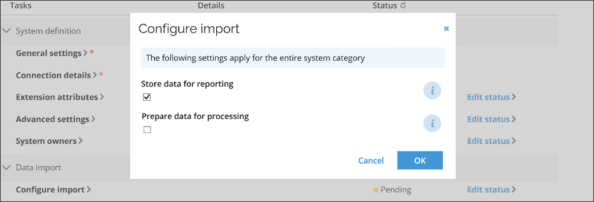
Ideally, by deselecting the Store data for reporting checkbox, you can also import data to the staging database only which in turn will guarantee that the identities will not be imported into ODW before proper Identity join rules are in place.
Scenario 1B: Joining identities already exiting in ODW
In the case of the identities already been propagated to ODW and separate OISIDs have been assigned to them, the process is similar to the one above. The Identity Picker Rules select the primary identity to which other identities are joined with the help of the identity join rules.
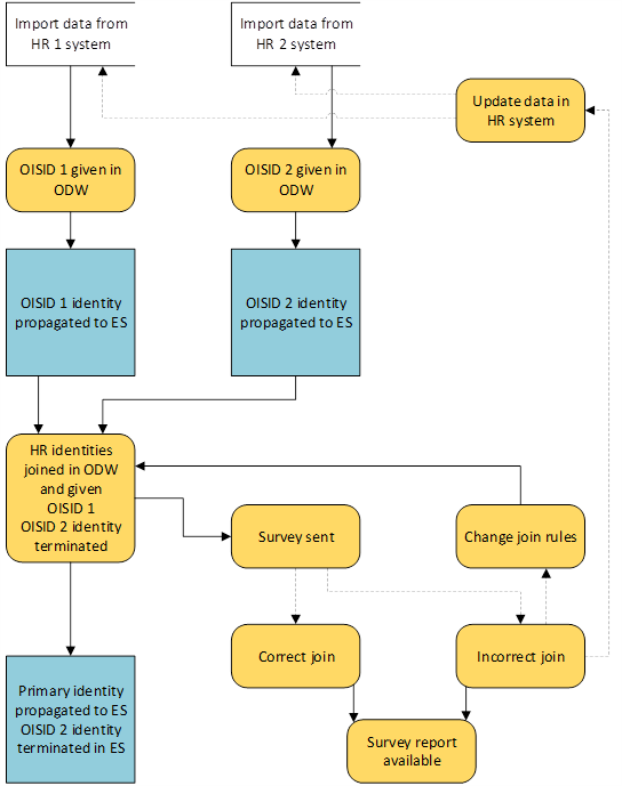
The data are joined in the ODW and only one, the Primary, identity is propagated to ES, with the privileges of all identities combined. The identities that are not set as the primary in the ODW are terminated.
After the join, the Survey is sent to the primary identities to review if the join was correct.
Scenario 2: Joining identities from the new HR system to existing identities

If data from a new HR system are imported to Omada Identity with already existing HR data, the solution is similar to the previous scenario. The join rules should be defined before profile import in order not to create additional identities. This way, identities imported from the new HR system are automatically joined with the ones existing in the ODW and the OISID of the existing identities is preserved. The primary identity is selected according to the identity picker rules.
As before, the survey is sent to primary identities to review if the join was correct.
In ODW, the following prioritized rules are used for assigning OISID to a primary identity:
- The OISID for the previous version of the identity, if the previous version is marked as the primary identity.
- The OISID for the previous version of a joined identity, if the previous version of the joined identity is marked as the primary identity.
- The OISID for the previous version of the identity, if the identity is re-created and the previous version is marked as the primary identity.
- The OISID generated by ES.
- A new OISID.
Scenario 3: Converting a contractor into an employee

If a contractor is to be converted into an employee, again, the new OISID and joining rules allow you to preserve all the information and privileges, automatically providing the identity the employee only privileges, after importing a new employee from an HR system. The join rules and authoritative source policies allow the new employee identity to take over the OISID of the contractor identity with all its privileges. The employee identity becomes the primary identity.
In this case, the survey is also sent to the primary identity to confirm the correct join.
Scenario 4: Converting an employee into a contractor
This type of conversion is not supported out of the box. If an employee is to be converted into a contractor, a custom manual process needs to be created in order to ensure that the employee identity with the given OISID is converted into a contractor by changing the attributes on that OISID.
The above change would allow the authoritative source policies to take effect and, in consequence, allow the new contractor identity to take over the OISID of the employee identity. The contractor identity would then become the primary identity.
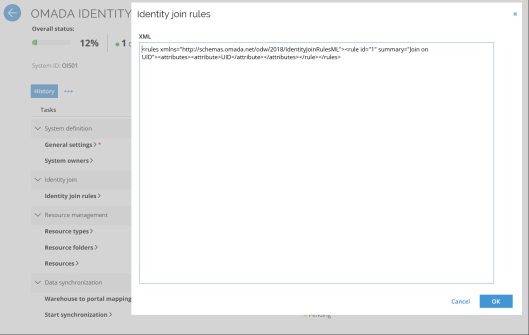
Join rules configuration
Join rules can be changed in Setup > Systems. Click the Omada Identity system and edit the Identity Join Rules.
Inside the rules element, you can enter any number of rule elements with a unique id attribute.
<rule id="1" ></rule>
Each rule element must contain a single attributes element which may contain any number of attribute elements.
<rule id="1">

<attributes>

<attribute>Name</attribute>

</attributes>

</rule>
The value of an attribute element can be a standard identity attribute (case insensitive):
- UID
- Status
- Name
- FirstName
- LastName
- JobTitle
- Country
- Company
- EmployeeID
- Category
- Type
In addition, value of the attribute can also contain any of the extension attributes.
If you want to use extension attributes for your join rules, please remember that you should use the column name in the INTERNAL_Identity table. This means that the used attributes should be postfixed with WH or WoH(case sensitive). For example, <attribute>Ext_SSNWH</attribute> or <attribute>Ext_SSNWoH</attribute>.
A rule summary attribute is assigned automatically when the rules are saved.
<rule id="1" summary="Join on Name">
<attributes>
<attribute>Name</attribute>
</attributes>
</rule>
The XML must respect the IdentityJoinRulesML schema.

The rules are applied by Synchronization and Import import profiles, and only the primary identities are visible in the Portal.
The UID of the primary identity is mapped to IDENTITYID in the Enterprise Server portal. In case multiple primary identities share the same UID, a unique UID2 value is generated and mapped to IDENTITYID. The format of this UID2 is <UID> <OISID>.
The Review joined identities survey can be used to verify that identities are joined correctly.

The survey contains one question for each joined identity. Each question is assigned to the primary identity.
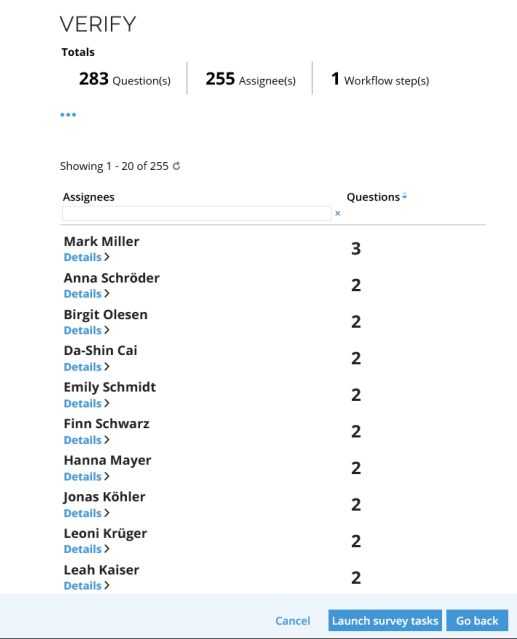
The primary identity chooses Keep or Remove joined identities in order to indicate whether each identity has been joined correctly or not.
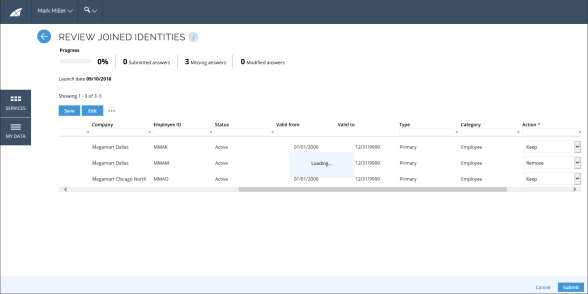
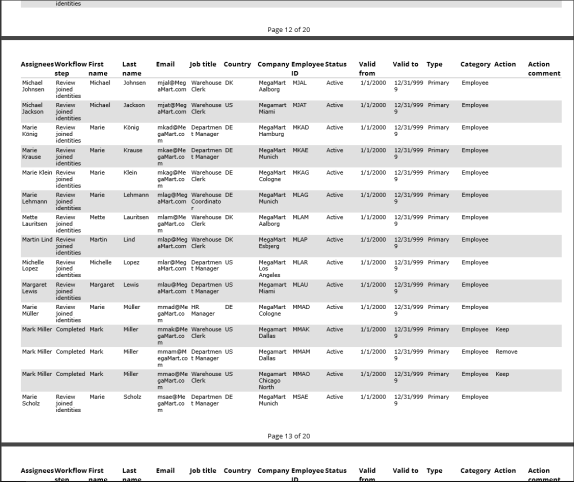
The survey administrator can download a report containing all the survey answers.
Incorrectly joined identities can be fixed in two ways:
- Change the Identity join rules.
- Have the HR responsible update the identity in the HR system.
Changes to Identity join rules should be done with caution and ideally set only when configuring a system, or in a controlled test environment.
If the Identity join rules are changed at a later stage, it's important to verify that they work as expected immediately after running an Import master data or Import. This is due to the fact that reverting to the previous "correct" rule should be done immediately after the import since the logic for joining – and separating – Identities only looks at the previous version of the data (for performance reasons). Consequently, if an Identity has changed between the "wrong" rule being set and the revert to the "correct" rule, then it will not be matched to the previous Identity (OISID). This may cause errors that have to be handled manually, as a new OISID will be assigned to the changed identity.
ODW Import on-prem
There are general settings that are relevant for all source systems. Connection strings and import source systems are common settings, while master data settings are specific to source systems.
ODW Connection strings
The connection strings to the ODW databases are maintained in a common configuration file named Omada ODW ConnectionString.dtsConfig, which is located at C:\Program Files\Omada Identity Suite\Datawarehouse\Common. This file is used by all the Omada ODW SSIS packages.
The file Omada ODW ConnectionString.dtsConfig contains four connection string settings that you can configure. These settings are described in the table below.
You should normally enter these strings in the installation wizard, but you can edit them if the connections change.
| Setting | Description |
|---|---|
| OLE_CON ODW | The OLE DB connection string to the Omada Identity Data Warehouse database. |
| OLE_CON ODWMD | The OLE DB connection string to the Omada Identity Data Warehouse Master database. |
| OLE_CON ODWS | The OLE DB connection string to the Omada Identity Data Warehouse Staging database. |
| OLE_CON SSIS | The OLE DB connection string to the SQL Server instance on the SSIS Server. The name of the SQL Server instance was entered during the installation of the Omada ODW SSIS packages. |
Due to hardened security, customers who use SQL user/password authentication are required to manually encrypt password in the connection strings present in the ConnectionString.dtsConfig file with the StringEncrypter. If the password is not encrypted, data import will not be possible.
With the help of the StringEncrypter tool it is possible to encrypt the entire ConnectionString, for example,
Initial Catalog=Omada Data Warehouse;Data Source=localhost;Uid=test;Pwd=sa1dd1f;Provider=MSOLEDBSQL19;
as
AES256:LZ7qTetSlqe8G4+pr0jkaDiojSkH5ryzb/ZxhjTEFGw6RX5SrzHwprIuxZrg/bYqzCf+tUDrKSf4/iffprX9SOE4UrY3VRGOMDCee+ylqfnX+zQq0ITALhG0kyl2vG24pk0ks/txclFHb+6swqtT6w===AES256
or create a partially encrypted ConnectionString with the full password section encrypted, for example,
Initial Catalog=Omada Data Warehouse;Data Source=localhost;Uid=test;AES256:kqieFRqaXqoJaiG3zmo9qA===AES256;Provider=MSOLEDBSQL19;
This solution does NOT work only in the case of encrypting the password itself, as the Pdw= section is stripped during import.
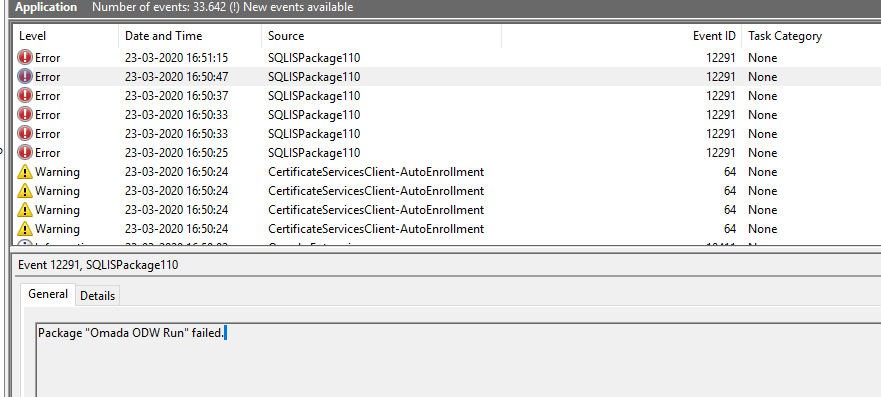
Troubleshooting
In case if the encryption key is set incorrectly and connection strings in the Omada ODW ConnectionString.dtsConfig are encrypted with this invalid key, the imports will not be started correctly, and no logs will be recorded due to inability to access log table sysssislog. However, this situation causes listing an error in the Windows Event log.
ODW Web Service configuration settings on-prem
You can edit the following settings in the Omada ODW Webservice.dtsConfig file. In a default installation, it is located at C:\Program Files\Omada Identity Suite\Datawarehouse\Common.
| Setting | Description |
|---|---|
| WebServiceURL | The URL for the Enterprise Server data object exchange web service. |
| UseDefaultCredentials | This setting must be True or False. If you set this setting to True, the web service is called using integrated security, with the user that runs the ODW Import package. If you set this setting to False, the web service is called using basic authentication, with the configured credentials. The user calling the Enterprise Server web service must be a member of the Data Admin group in Enterprise Server. |
| Domain | The domain of the user that calls the web service. If your organization uses basic authentication in Enterprise Server, the value should be the Customer name as specified in the tblCustomer table in the Enterprise Server database. |
| User | The user that calls the web service, when basic authentication is in use. |
| Password | The encrypted password of the user that calls the web service when basic authentication is in use. |
| SecurityProtocol | The SecurityProtocol value. If the value is not set, configured packages will use the default security protocols of TLS 1.2. For the possible values of the SecurityProtocol enumeration, see the following link and use the numeric value (for example, 3072 for TLS 1.2): SecurityProtocolType Enum. |
Enterprise Server import
This section provides detailed information on the configuration of Omada Identity Enterprise Server imports from Audit Database and ODW.
Enterprise Server import loads data from an Omada Identity Audit Database into Omada Identity Data Warehouse. Resource assignments are imported directly from a view in the Role and Policy Engine (RoPE) database.
In the standard configuration, Enterprise Server import works out of the box. If any of the data object types and properties used by OIS-X Import have been changed, you can still import the data into ODW by creating custom database views.
All common attributes are imported by the Omada ODW OISX package. Any custom attributes created in Enterprise Server can be loaded into extension columns.
Assignment reasons and compliance status for resource assignments are imported from the RoPE database.
Configuring the Omada Identity Audit database
Enterprise Server Import includes a set of database views that you must install in the Omada Identity Audit Database.
To do this, run the SQL script CreateObjects.OISAudit.sql. In a default installation, this is located at C:\Program Files\Omada Identity Suite\Datawarehouse\Support Files.
Creating custom sources
If you change any of the data object types and properties in the Enterprise Server which the Enterprise Server Import uses, you must create custom database views in the Omada Identity Audit Database.
Custom database views must follow the naming convention dbo.standard view_Custom, for example dbo.Resource_Custom.
Importing extension attributes from ES to ODW
In order to import extension attributes from ES to ODW, take the following steps using the identity DOT and the attribute "EXT_SSN" as the extension attribute:
-
Create a new property on the identity DOT with the system name "EXT_SSN".
-
Set an ODW attribute name in the property bindings. It is the name needed in the SQL statement, in this case: "EXT_SSN".
-
Before creating the view, identify whether if the extensionAttribute is:
- multivalued; if so, use: ,CONVERT(bit,'1') AS [MultiValued]
- not multivalued; if so, use: ,CONVERT(bit,'0') AS [MultiValued]
By default, the OIS_Classification extension attribute is multivalued. On opposite, the account name or email extension attributes are usually not multivalued.
- Create a custom view Identity_ExtensionMasterData_Custom using the setup below (considering whether the extension is multivalued):
CREATE VIEW [dbo].[Identity_ExtensionMasterData_Custom]

AS

SELECT

        i.[_ID]

        ,i.[_DELETETIME]

    ,i.[_DISPLAYNAME]

        ,CONVERT(NVARCHAR(100),'OIS_Classification') AS [Attribute]

        ,CONVERT(bit,'1') AS [WithHistory]

        ,CONVERT(bit,'0') AS [MultiValued]

FROM [dbo].[tblIdentity_CLT_TAGS] i

Where  i.[_DELETETIME] IS NULL

union all

SELECT

        i.[_ID]

        ,i.[_DELETETIME]

    ,i.EXT_SSN AS [_DISPLAYNAME]

        ,CONVERT(NVARCHAR(100),'EXT_SSN') AS [Attribute]

        ,CONVERT(bit,'1') AS [WithHistory]

        ,CONVERT(bit,'0') AS [MultiValued]

FROM [dbo].[tblIdentity] i

Where i.EXT_SSN IS NOT NULL AND i.[_DELETETIME] IS NULL
- Set up a binding rule for the attribute in the Authoritative Source Policy (for identities in both the employee and non-employee policies).
- Run synchronization.
Extension Columns in Data Warehouse
The calculation and updating of Extension Columns in the Data Warehouse reporting views (AUDIT_, OWNER_, PUB_*) are generated using metadata rather than parsing the data columns (ExtensionAttributesWithHistory and ExtensionAttributesWithoutHistory).
For extension attributes from ES, the views ([Context_ExtensionMasterData], [Identity_ExtensionMasterData], [Resource_ExtensionMasterData], and [System]) in the ES Audit database are used to determine which Extension Columns are available.
For extension attributes from all other sources, the data is provided by the ES web service when an import is executed.
Each time an import is executed, newly configured extension attributes are added to the ODWExtensionAttribute table in the Data Warehouse.
Rows are never deleted automatically from this table. This ensures that historical extension columns are preserved if extension attributes from the source system are no longer configured for import. However, if extension attributes are added by accident (e.g., a non-existing attribute added from OData due to a spelling mistake) they must be removed manually from ODWExtensionAttribute.
It is also possible to manually add rows to ODWExtensionAttribute table to make columns available in the reporting views before they are setup for import. However, the casing must be the same as what you enter in ES.
The default value for the DataType column in the ODWExtensionAttribute table is nvarchar(400). You can change it manually in the ODWExtensionAttribute table. It requires manually changing the data type of the corresponding column in the extension table, for example, IdentityExtensionAttribute.
When a row is automatically added to ODWExtensionAttribute, the column MultiValued is set, based on the Multivalued checkbox in query mapping - "true" (1) if it is checked, "false" (0) if it is unchecked.
If multiple systems are configured to import the extension attribute on purpose (e.g. extension attribute “Test Status” from both an OData source and a Generic DB source) the casing must be the same.
Delete or adding rows to ODWExtensionAttribute does not affect the actual data that is stored in ExtensionAttributesWithHistory and ExtensionAttributesWithoutHistory. However, these are affected if data from the two columns are exposed as Extension Columns in the data warehouse reporting views.
ODW to ES Portal Synchronization
Information like identities, organization data, and resources imported from target systems to the ODW must be represented as data objects in the Enterprise Server.
When running an import, the last step of the import is to propagate new data and changes to the Enterprise Server.
You can configure the way how data is synchronized using the Warehouse to portal mapping feature on the System onboarding page for the built-in Omada Identity system.
When a new system is being onboarded, there can be a delay before the portal (ES) and the warehouse (ODW) have synchronized their data. At this time, the policy engine (RoPE) may already start computing identities that have entitlements in the system, and as a result these entitlements may not be correctly reflected in the computation result. To remedy this, the identities should be manually queued for re-computation after the data synchronization has been completed.
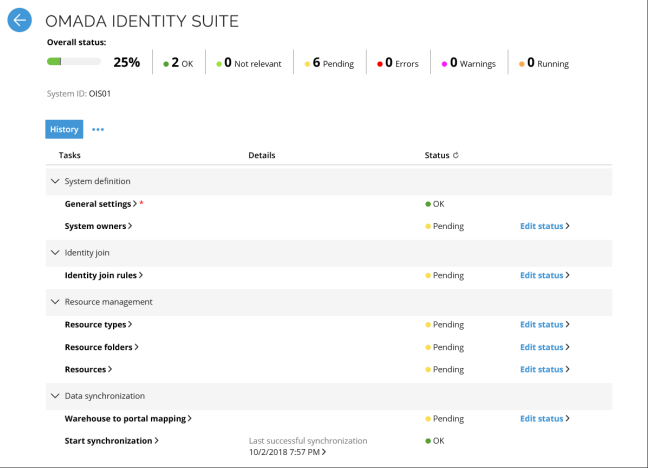
The system comes with a set of default mappings which ensures that all necessary standard data are synchronized.
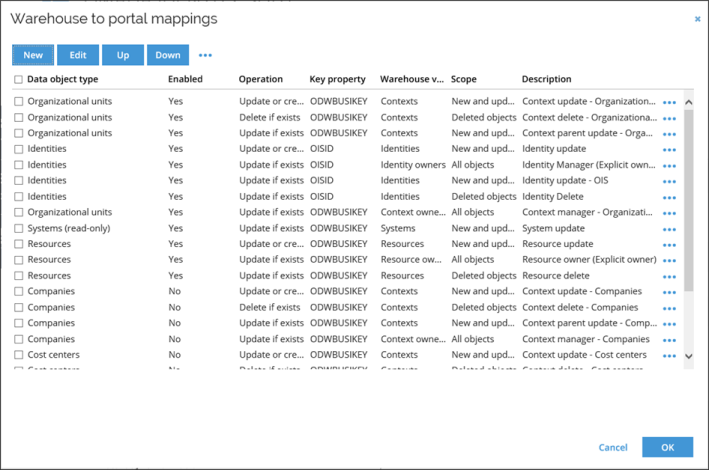
Note that some of the mappings are initially disabled as these will require you to install additional feature packages. You can enable and disable mappings from the ‘…’ menu in the toolbar.
Also, note that the mappings can be ordered top-down. The mappings are performed in the order shown on the list from top to bottom. Consider dependencies between the different object when ordering the mappings.
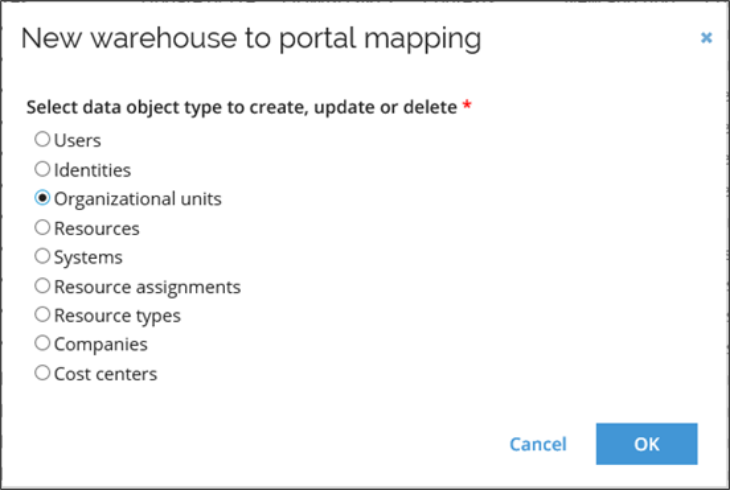
Adding a new mapping allows you to select a data object type in the ES. The data object types are limited to those which has a binding to the ODWBUSIKEY property.
The query and mappings screen is divided into three sections displayed as tabs:
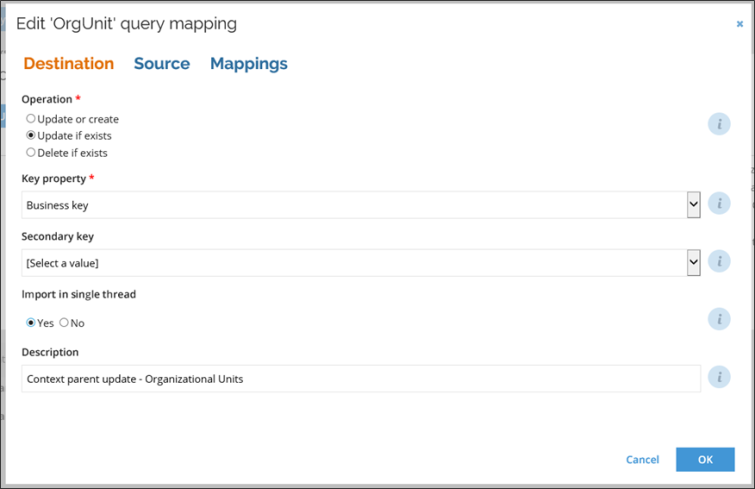
- Destination: here you can define all the settings that apply to the ES data object.
- Operation: this setting defines how the flow should handle the object.
- Key property: this setting is used to determine if the object already exists.
- Secondary key: this setting is used to match an object if the Key property does not return a match.
- Import in single thread: this setting is used to set a given query to be exported in a single thread only.
- Description: this setting is used to specify a description of the particular mapping.
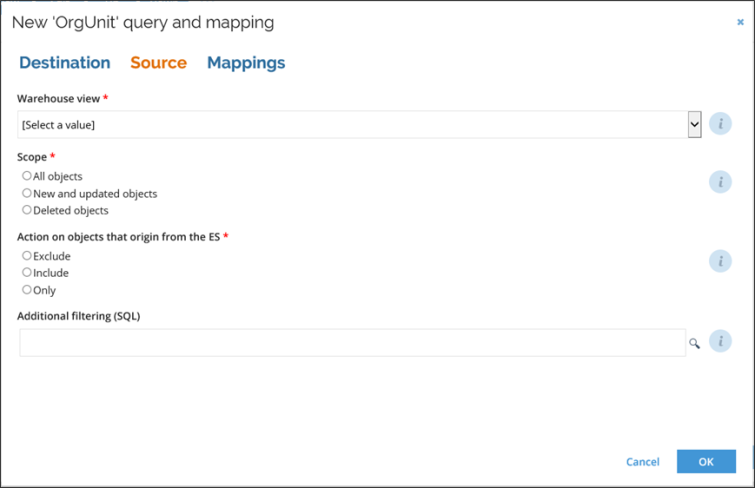
- Source: here you can define all settings that apply to the source data in the warehouse.
- Warehouse view: this setting selects one of the ODW reporting views, for example, AUDIT_Identity. The views can be configured in a configuration object from the Enterprise Server.
- Scope: this setting specifies which objects (all object, new, or deleted) in the view are applied for the export.
- Action on objects that origin from ES: this setting defines if objects originating from Omada Identity itself (ES) should be excluded, included, or the export should comprise of only these objects.
- Mappings: in this section you can specify how the fields from the source object should be mapped to properties of the selected data object.

The mappings appear as an editable grid with the following columns.
- Destination: this column presents the property of the data object.
- Operator: this column specifies how to map the source. The available options are:
- Map: this will map the property to a column in the selected source view.
- Constant: this will map the property to a constant value.
- Lookup: this will perform a lookup against another warehouse view and then map the property to a column in that view. Read more on lookup further down.
- Source: Here you can specify the constant value or the source column to map. The magnifier glass icon allows you to display a list of available columns in the selected warehouse view.
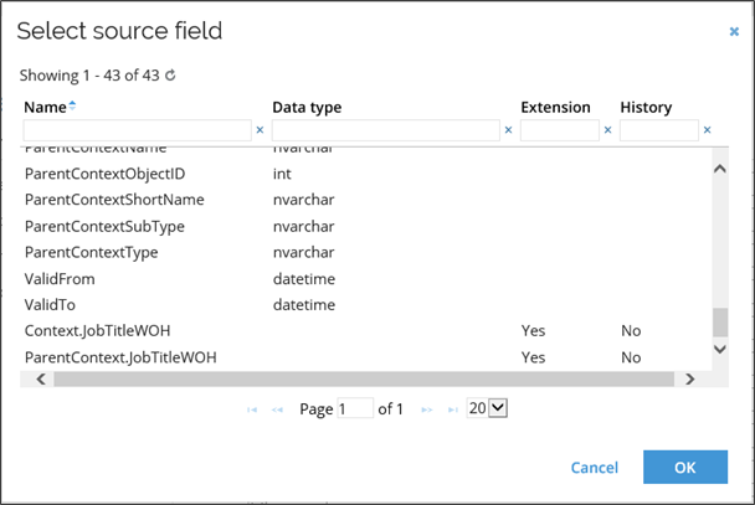
This view has 4 columns:
- Name: represents the name of the field in the view.
- Data type: explains the type of data this field contains. Consider this when mapping it to the data object property.
- Extension: indicates if this is an extension field. If the warehouse view contains a reference to several entities, the name of the extension field will be prefixed with the entity it is related to.
- History: if the field is an extension field, this column will show whether the field has a history.
- Advanced: select Edit in the Advanced column to specify advanced settings for an individual field mapping. The following advanced options are available.
Available options depend on the type of destination property for which the mapping is set.
- Default value: this can be used to specify a fallback value in a case the source column is null.
- Only assign on create: this decides if the defined value should only be set when creating the object and not when updating the object.
- Allow null values: this decides how the import should behave if it encounters a null value in the Warehouse source field. You can either choose to flow null values to clear the target value in ES or fail the import on null values. If you choose the latter option, you must set the default option if you want the import to succeed.
- Clear existing values: this is used for the set or reference properties to indicate if any reference already existing on the property should be cleared first.
- Detect multi-value: this is used for multi-value reference properties when you want to add or remove references as a part of the same view.
The scope must be set to Latest for the Detect multi value to function properly. If the latest row in the warehouse isn’t expired the reference will be added. If the latest row is expired the reference will be removed.
- Target key property: it controls which property of the referenced objects should be used to resolve the object. If no value is specified, the key property of the data object type is use
The Lookup operator only applies to reference properties. When using this operator, an additional set of Advanced settings is displayed.
- Lookup view: sets of warehouse views. This specifies against which view the lookup will be performed.
- Lookup join field: this defines the field from the lookup view which you wish to use as join key against the export mappings.
- Lookup value field: this field contains the value you wish to send to ES web service.
Owners
The property called EXPLICITOWNER, seen in the Mappings section, is used for the synchronization of ownership between the Enterprise Server and ODW. EXPLICITOWNER is used to hold actual ownership which has been exported from ODW.
Enterprise Server merges actual ownership into the MANAGER/OWNERREF properties, dependent on the data object type. Moreover, ODW imports ownership from the MANAGER/OWNERREF properties but excludes ownership that exists in the EXPLICITOWNER property as this information is already in Omada Identity Data Warehouse.
For more details, see the Omada Identity Data Model Reference document, available from the Omada Help Desk.
Standard views
All existing standard export views are replaced with one or more declarative views. Some of the old standard views contained unions reading data from different sources, or targeted multiple ES data objects. These are split into separate declarative views.
Reverting to the standard views can be done by pressing CTRL key down when selecting the Export mappings task and deleting all the shown XML.
Preview data
When starting an import, you can Preview the data. This means that data are not immediately created or updated in ES but are instead added to a set of tables in the warehouse database.
When starting the export make sure to check the Preview data option. You can sort and filter the data by a source system or composed business key.
Preview data for a system
Data preview can also be viewed from the system onboarding page of a given system.
In this case, the data are accessible from the View preview data action.
This action is only available if proper preview data exist for the system’s category. Data are listed for ALL the systems belonging to that system category.
The view summarizes the tables and the number of objects in each table. You can also export the preview data to a .csv file. To do so:
- In ES, in the Omada Identity Portal, click Setup > Master Data > Systems.
- In the Systems view, click to select the relevant system.
- In the Data import section, click View preview data.
- In the Preview data for dialog box, in the Number of exports column, click the value, for example 8.
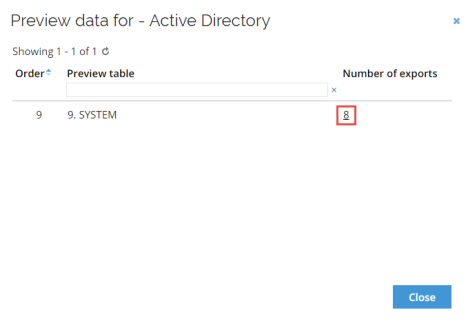
- In the Export preview dialog box, click the context menu (…) and then click Export to CSV file.
Custom warehouse views on-prem
To add custom warehouse views, you will have to create a configuration object in the Enterprise Server. Configuration objects can be found under Setup -> Administration -> More -> Configuration objects.
The Name of the object must be ExportMappingsReportingViews and the configuration data that need to be entered as XML must apply to the schema.
Below you can find an example of how to make a view named CustomAccount available:
<?xml version="1.0" encoding="utf-8" ?><reportingViews xmlns="http://schemas.omada.net/odw/2018/ExportMappingsReportingViewsML">
  <views>
    <view
      name="CustomAccount"
      title="Accounts (custom)"
      composedBusinessKeyColumn="ComposedBusinessKey"
      effectiveTimeColumn="EffectiveTime"
      expirationTimeColumn="ExpirationTime">
      <objectTypes>
        <objectType objectType="identity" extensionPrefix="Identity" />
      </objectTypes>
    </view>
  </views>
</reportingViews>
For each custom view, a <view> element must be added. The <view> element has the following attributes:
name– This is the physical name of the view.title – This is the title displayed in the ES for the warehouse view selection.composedBusinessKeyColumn– This is used to specify the name of the field in the view that contains the composed business key.effectiveTimeColumn– This is used to specify the name of the field in the view that contains the effective time on the object.expirationTimeColumn– This is used the specify the name of the field in the view that contains the expiration time on the object.
Support for legacy custom views on-prem
With the introduction of Omada Identity V14, custom export views will be deprecated and later support for this feature will be removed.
However, to ensure smoother migration for existing installations, existing custom views will still be supported.
The system will automatically detect if there are any custom views in the ODW database and list these views in the list of export mappings.

The custom views are listed by their name. You cannot edit or delete the query from the UI.
If a custom view is available, you can set its Enabled flag to Yes and the flag of the standard view it replaces to No.
If custom views are detected it will NOT be possible to start ANY import until the status of the Export mappings task has been manually set to OK.