Omada Identity system settings
Identity Merge rules
The Horizons solution is capable of merging data from different identity data sources. You can define which source system is authoritative for specific properties on the identity data object. Configuration for the merge of data is provided in a .xml format Identity merge rules file.
As a guiding principle, the identity merge acknowledges only identities that provide a value for an attribute. A perfect example is an email address: if only one of the identities provides a value for the email address, then it becomes its primary source disregarding any other configured rules.
Each merged property requires corresponding identityMergeRule element. For each identityMergeRule element, between one or more following rules can be defined:
- validFromToRule - When using this rule, the identity is selected based on validity.
For more details on how the rule works, go to The validFromToRule section. - activeStatusValuesRule - This rule requires defining the order of states. The system with the highest status rank is prioritized.
Example:MobilePhoneof an Identity with status Active, takes priority over Identity with status Pending. - systemCategoriesRule - This rule is used to explicitly define the order of the system categories.
Example:Telephoneof an Identity from a SAPHCM system is prioritized.
For the LastName property all three rule types apply are evaluated according to the order in which they were configured. The property for which the rule applies is defined in the propertyName attribute of the identityMergeRule element. The property name can be any identity attribute (including extension attribute).
A catch-all merge rule is configured by setting the propertyName to “*” (asterisk). This rule is then applied to all properties without an explicit rule. The validFromToRule applies.
When you onboard an HR system and it initiates the import of identities from the HR system to the Omada Identity, the following actions take place:
- An identity is created in the
IDS.Identitytable within the IDS (Identity Data Store). - A new record is added to the
IDS.PublicIdentityMergedtable, since there is no existing identity to join. - The identity is automatically created in the ES (Enterprise Server).
In case of import from or synchronization with the Omada Identity system, this is what happens:
- A new identity is created in the the
IDS.Identitytable within the IDS and is joined with the corresponding identity from the HR system. - If you use the default configuration with the catch-all merge rule, it isn't effective if both identities are simultaneously considered valid. In this case, a built-in fallback policy is introduced. This policy determines priority based on the order in which the identities were originally imported. It references the
OriginId, which is stored in theIdentityJoin.IdentityJointable. ThisOriginIdcorresponds to the identity'sIdfound in theIDS.Identitytable. - Identity record in the
PublicIdentityMergedtable includes properties originating from the identity in the HR system.
A merged identity is also created for identities that are not joined to any other identities. All of the properties for a single identity are stored in the IDS.
Don't delete the rule with the * property name and ensure it is placed as the last entry in the Identity Merge configuration.
EXAMPLE
<?xml version="1.0" encoding="utf-8"?>

<identityMergeRules xmlns="http://schemas.omada.net/ingestion/2023/IdentityMergeRulesML" xmlns:xsi="http://www.w3.org/2001/XMLSchema-instance">
    <identityMergeRule propertyName="Email">
        <rules>
            <validFromToRule />
        </rules>
    </identityMergeRule>
    <identityMergeRule propertyName="MobilePhone">
        <rules>
            <activeStatusValuesRule>
                <statusValue>Active</statusValue>
                <statusValue>Pending</statusValue>
            </activeStatusValuesRule>
        </rules>
    </identityMergeRule>
    <identityMergeRule propertyName="TelePhone">
        <rules>
            <systemCategoriesRule>
                <categoryIdentifier>SAPHCM</categoryIdentifier>
                <categoryIdentifier>SAP_SuccessFactors</categoryIdentifier>
            </systemCategoriesRule>
        </rules>
    </identityMergeRule>
    <identityMergeRule propertyName="LastName">
        <rules>
            <validFromToRule/>
            <activeStatusValuesRule>
                <statusValue>Active</statusValue>
                <statusValue>Pending</statusValue>
            </activeStatusValuesRule>
            <systemCategoriesRule>
                <categoryIdentifier>SAPHCM</categoryIdentifier>
                <categoryIdentifier>SAP_SuccessFactors</categoryIdentifier>
            </systemCategoriesRule>
        </rules>
    </identityMergeRule>
    <identityMergeRule propertyName="*">
        <rules>
            <validFromToRule/>
        </rules>
    </identityMergeRule>
</identityMergeRules>
Using the SQL Troubleshooting tool you can check the list of the fields that you can include in the Identity Merge rules. They are stored in the Omada Data Warehouse (ODW) IDS.PublicIdentityMerged table.
With the Horizons architecture enabled, the customer settings in the Warehouse Identity Picker section are no longer available. Their functions of picking the primary identity are provided by the Identity merge feature.

Identity picker rules are automatically migrated to the Identity Merge feature. The settings are migrated if Rules Active Status Values or Source System Names are defined. The rules are migrated according to the order specified in the Identity picker rules setting. Single <identityMergeRule> is created using a catch-all property name, meaning it applies to all properties.
The validFromToRule
With the validFromToRule applied, the validity of the identity merge behavior is based on a priority hierarchy establishing which identity is the source of the attribute value.
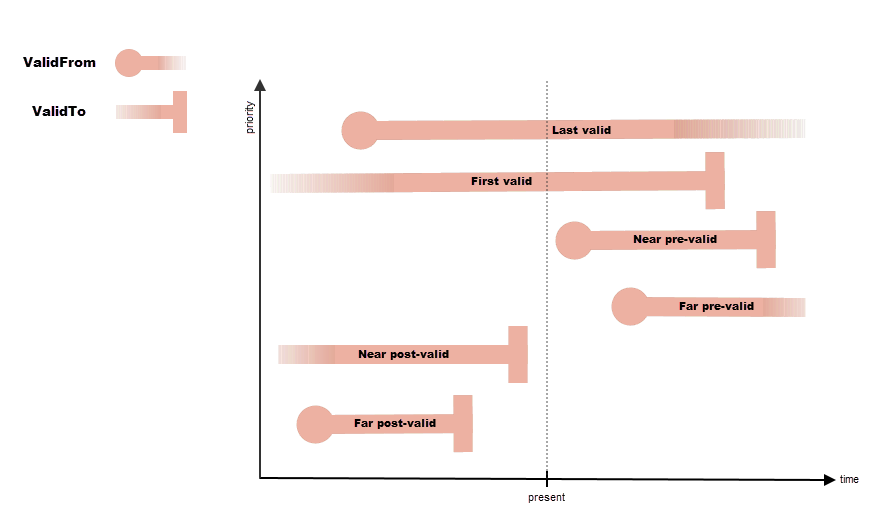
First, all valid identities are considered, and the priority is granted in the following way:
- The identity with the
ValidFromvalue closest to the present point in time is prioritized (The Last valid bar in the diagram). - If there are multiple identities sharing the
ValidFromvalue, the one with theValidTovalue extending furthest from the present point in time is selected. - If there are multiple identities sharing the
ValidTovalue, other rules, such as activeStatusValuesRule or systemCategoriesRule, are applied if they are configured.
In case there are only identities pending validity, the following logic applies:
- The identity with the
ValidFromvalue closest to the present point in time is prioritized (The Near pre-valid bar in the diagram). - If there are multiple identities sharing the same
ValidFromvalue, the one with theValidTovalue extending furthest from the present point in time is selected. - If there are multiple identities sharing the
ValidTovalue, other rules, such as activeStatusValuesRule or systemCategoriesRule, are applied if they are configured.
In a scenario where there are only identities with an expired validity, the following logic applies:
- The identity with the
ValidTovalue closest to the present point in time is prioritized (see the Near post-valid bar in the diagram). - If there are multiple identities sharing the same
ValidTovalue, the one with theValidFromvalue extending furthest from the present point in time is selected. - If there are multiple identities sharing the
ValidFromvalue, other rules, such as activeStatusValuesRule or systemCategoriesRule, are applied if they are configured.
Queries and mappings
In the legacy solution, identity data that originated from the Enterprise Server (ES) is synchronized with the Omada Data Warehouse (ODW) via the ES Archive Database, where configuration or customization of master data synchronization is performed in the ES Archive Database views. The data synchronized can be for example added or updated properties of existing employee identities or contractor identities created directly in the Omada Identity cloud management portal.
The join and merge processes for identities and matching of the accounts to identities requires data from both ES and HR sources. In the Horizons solution required data is extracted directly from the ES, making ODW and ES Archive databases obsolete for this purpose. This is achieved by employing a dedicated ES collector, utilizing the Omada Identity Cloud OData API.
To avoid issues with data matching during import, ensure the date-time values exclude offset and time zone information. To do so, format date fields in the following way:
DateTime.Parse(
    Convert.ToDateTime(exampleDateTime)
    .ToString("yyyy-MM-ddTHH:mm:ss")
)
The collector comes with one out-of-the-box query for identities. Only queries for the Identity Data Object Type are supported, and selecting source fields marked as a destination field under Warehouse to portal mappings is forbidden.
Verify if any custom view are defined for the Identity object in the ES Archive database. For existing ones you have to create corresponding queries and mapping, to allow the usage of the attributes from custom view in the data ingestion process. The data being:
- Identity join
- Identity merge
- Account join
ManagedByOIS extension attribute
You can find the ManagedByOIS extension attribute in the Queries and mappings section of Omada Identity system. This attribute is an expression set by default to IDENTITYCATEGORY_Value == "Contractor" || IDENTITYTYPE_Value == "Machine", meaning that the ManagedByOIS attribute value equals true when the identity is either a contractor or a machine.
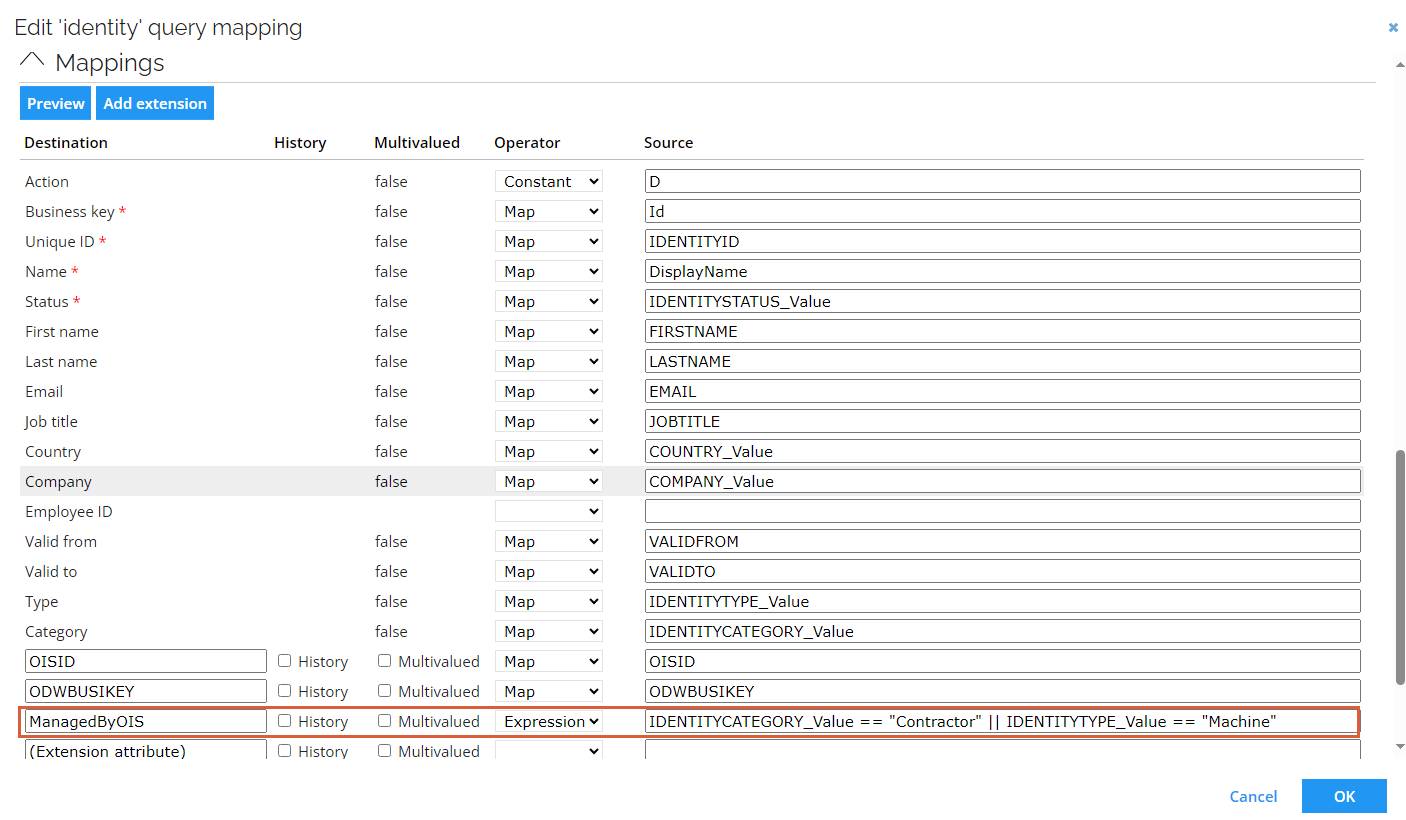
By default, the ManagedByOIS extension attribute expression checks for the built-in Contractor identity category. If you use custom identity categories or do not use the Contractor category, update the expression to include your specific categories. This ensures that identity join and merge rules are correctly applied to identities in those categories.
EXAMPLE
If you use a custom internal identity category, the expression used for the ManagedByOIS should be adjusted in the following way:
IDENTITYCATEGORY_Value == "Internal" || IDENTITYTYPE_Value == "Machine"
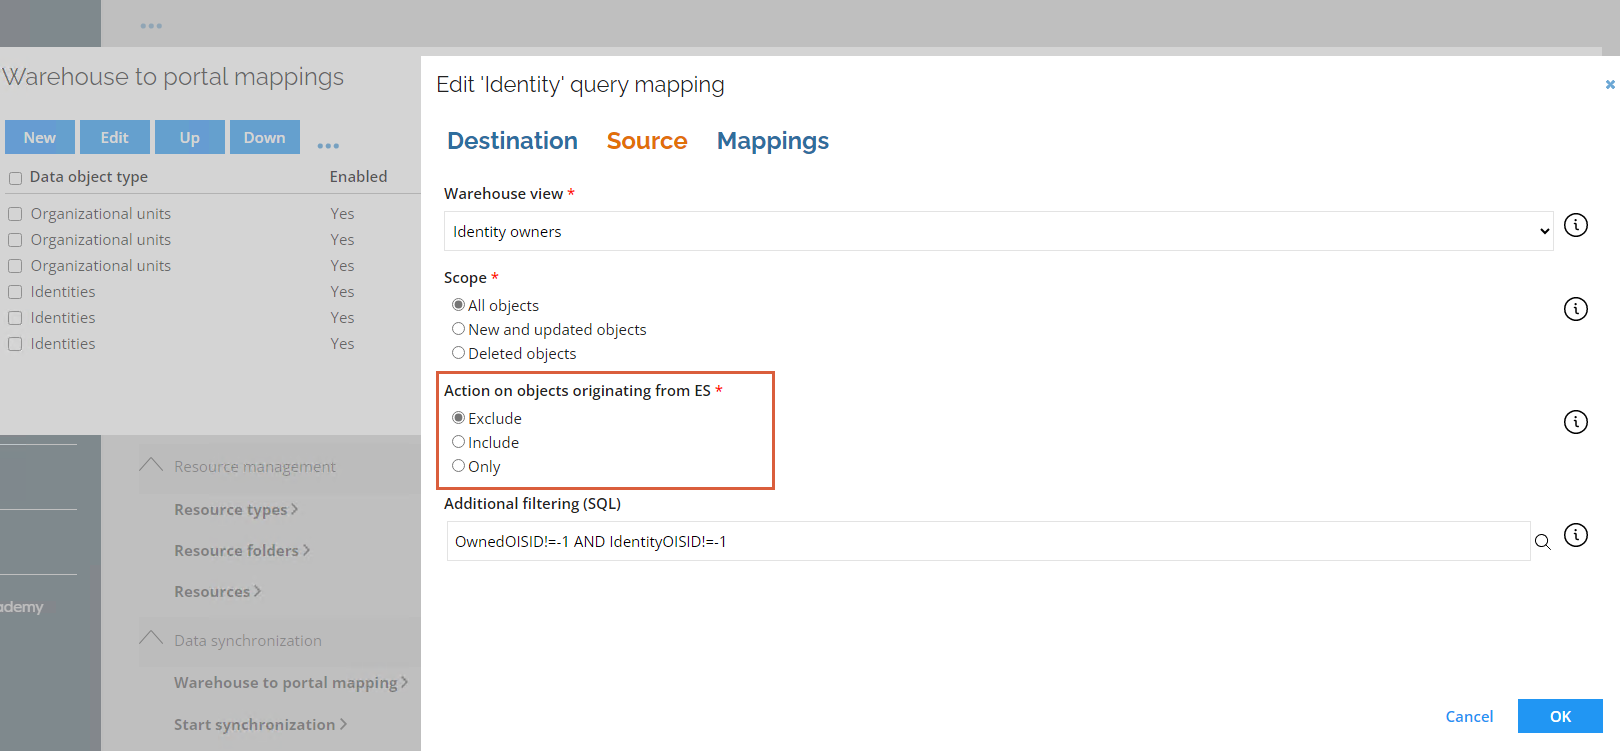
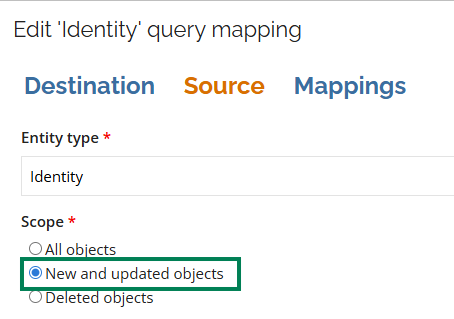
To configure how the identities with the ManagedByOIS attribute set to true are processed, go to Export mappings > Identity > Source and set the Action on objects originating from ES parameter value. By default, the value is set to Exclude, meaning the identities with the ManagedByOIS attribute value equal to true are not imported.
A property utilized by the identity join must be included in both the HR system and the Omada Identity Queries and mappings, since the Omada Identity system also acts as a source for identities.
To include contractors in the import, change the default expression of the ManagedByOIS extension attribute, in the Queries and mappings section, to IDENTITYTYPE_Value == "Machine".
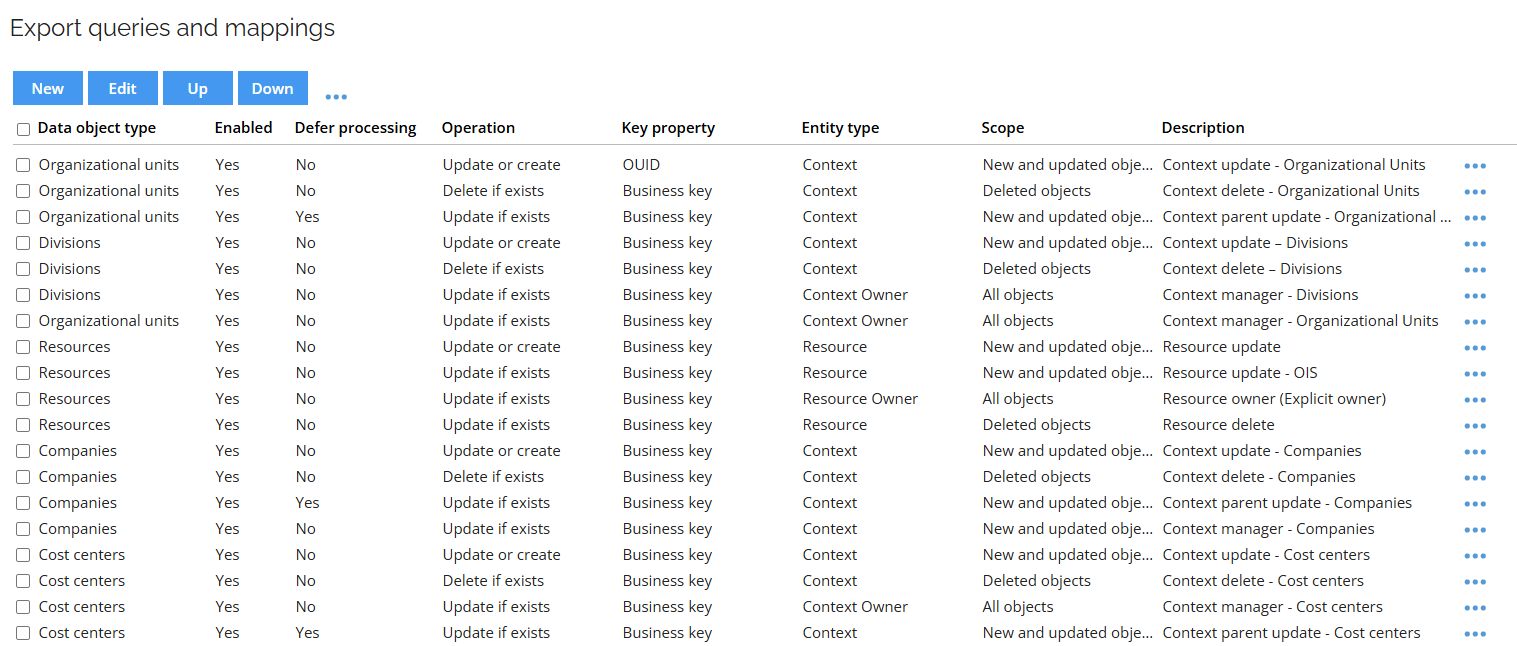
Export Queries and mappings
In the Horizons solution, the ODW is no longer used as a source for the data import to the portal, instead this function is provided by the Internal Data Store (IDS), which exposes the data through the Graph API from data origin to the portal. Configuring mappings from IDS to the portal is performed in the Export Queries and Mappings (previously called Warehouse to portal mappings) menu. By using the existing configuration option, you can apply automatic migration for almost all of the mappings and retain a familiar UI.
The use of SQL statements and custom views is no longer supported.
An automatic migration of the existing Warehouse to portal mappings is provided. Depending on the complexity of the SQL statements, manual effort might be required from you to migrate those statements. If you have included custom views, you are required to manually migrate those mappings. All mappings should be verified for using the SQL statements and custom views. If it's confirmed, the configuration must be changed.
To estimate manual migration effort you can use the web service and perform test migration of the existing Warehouse to portal mappings.
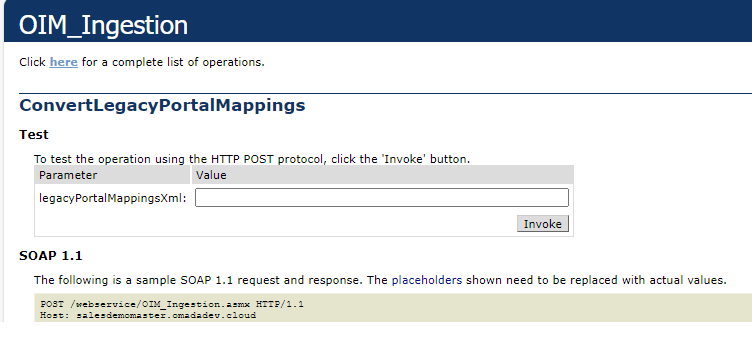
To perform test migration perform the following steps:
- Open the
https://<environment URL>/webservice/OIM_Ingestion.asmx?op=ConvertLegacyPortalMappingsaddress to access the web service. - In Omada Identity go to Setup>All Systems>Omada Identity and holding the CTRL button click on the Warehouse to portal mappings.
- Copy the xml content of the dialog window.
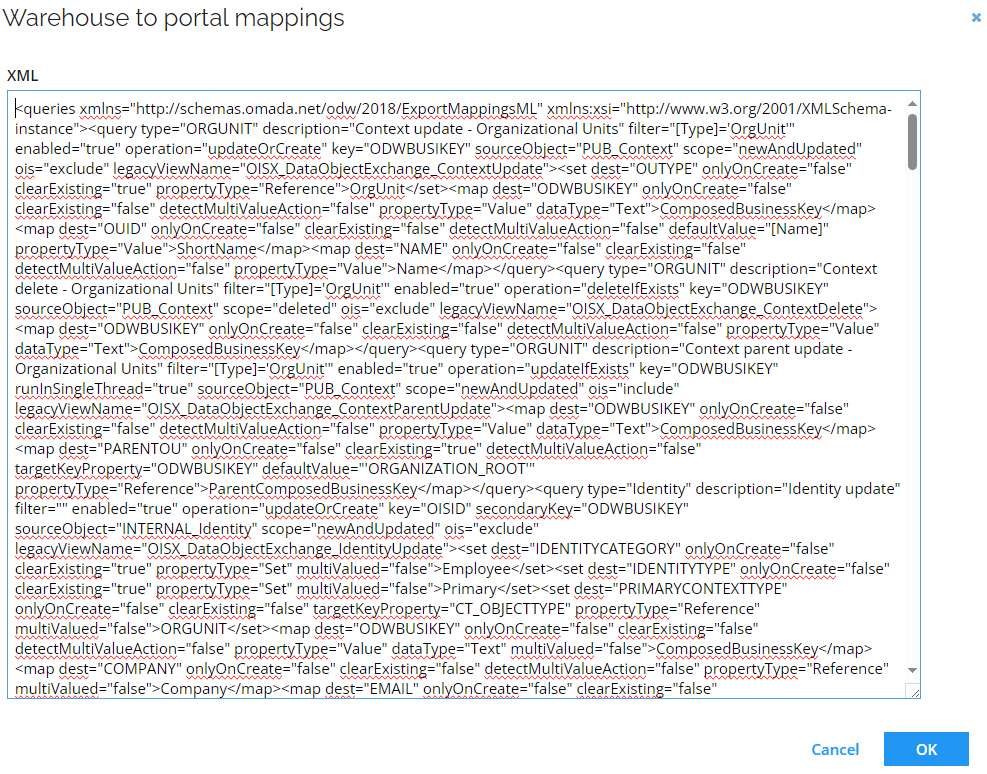
- Go to the web service and paste the xml content into the legacyPortalMappingsXml field and select Invoke.
- Copy the returned result into a xml editor and search for the AUTOCONVERSION NOT SUPPORTED phrase.
- If the AUTOCONVERSION NOT SUPPORTED phrase is not found you can perform the migration, otherwise investigate and prepare to solve found issues once the migration to the Horizons is completed.
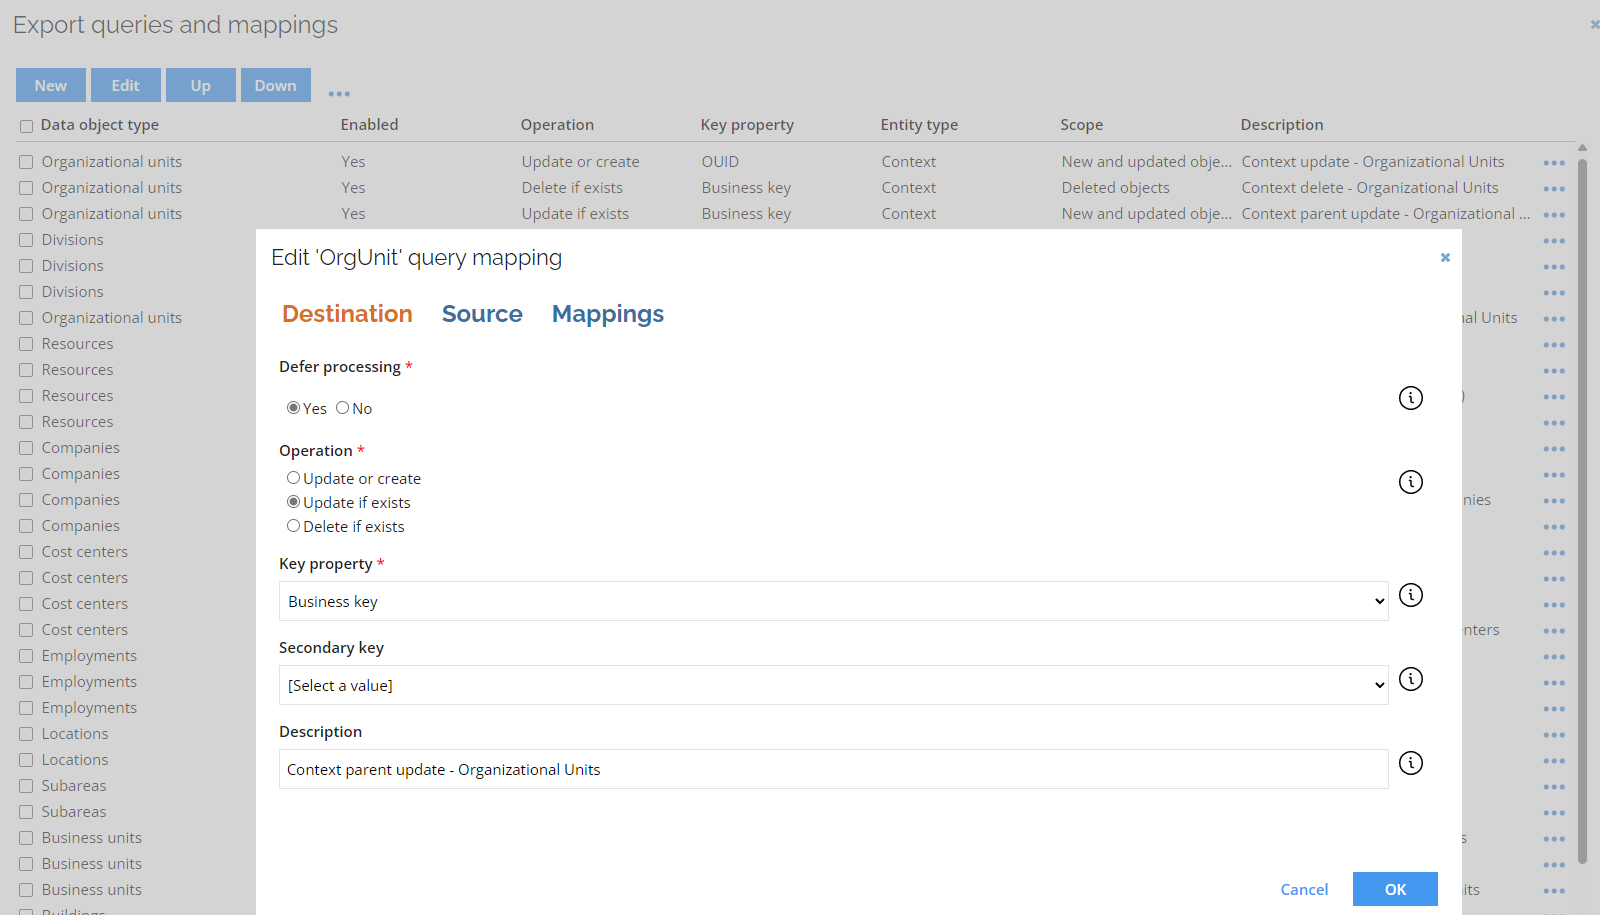
Additional filtering
To access the Additional filtering setting, go to the Export queries and mappings and Source tab.
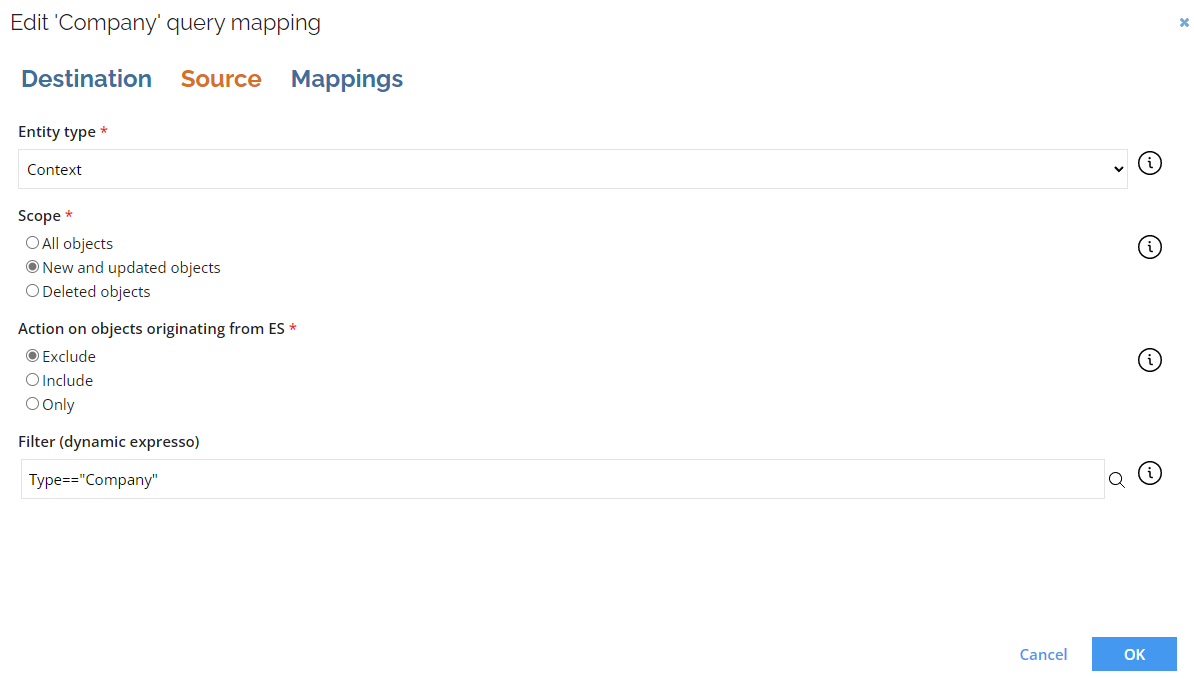
The Filter (dynamic expresso) setting utilizes dynamic expresso syntax. For tips on how to create expressions using dynamic expresso, go to:
Context_Type=="OrgUnit"&&Owner_OisId!=-1
ExpirationTime>=ValidFrom&&ExpirationTime<ValidTo
Lookup filter
Lookup filters enable you to limit which lookup records are considered during processing.
- Lookup only active records
- Lookup only records from a specific system
- Filter based on attribute values such as region, type, or status
As a result both performance and accuracy of lookups are improved, since only relevant records are evaluated during processing.
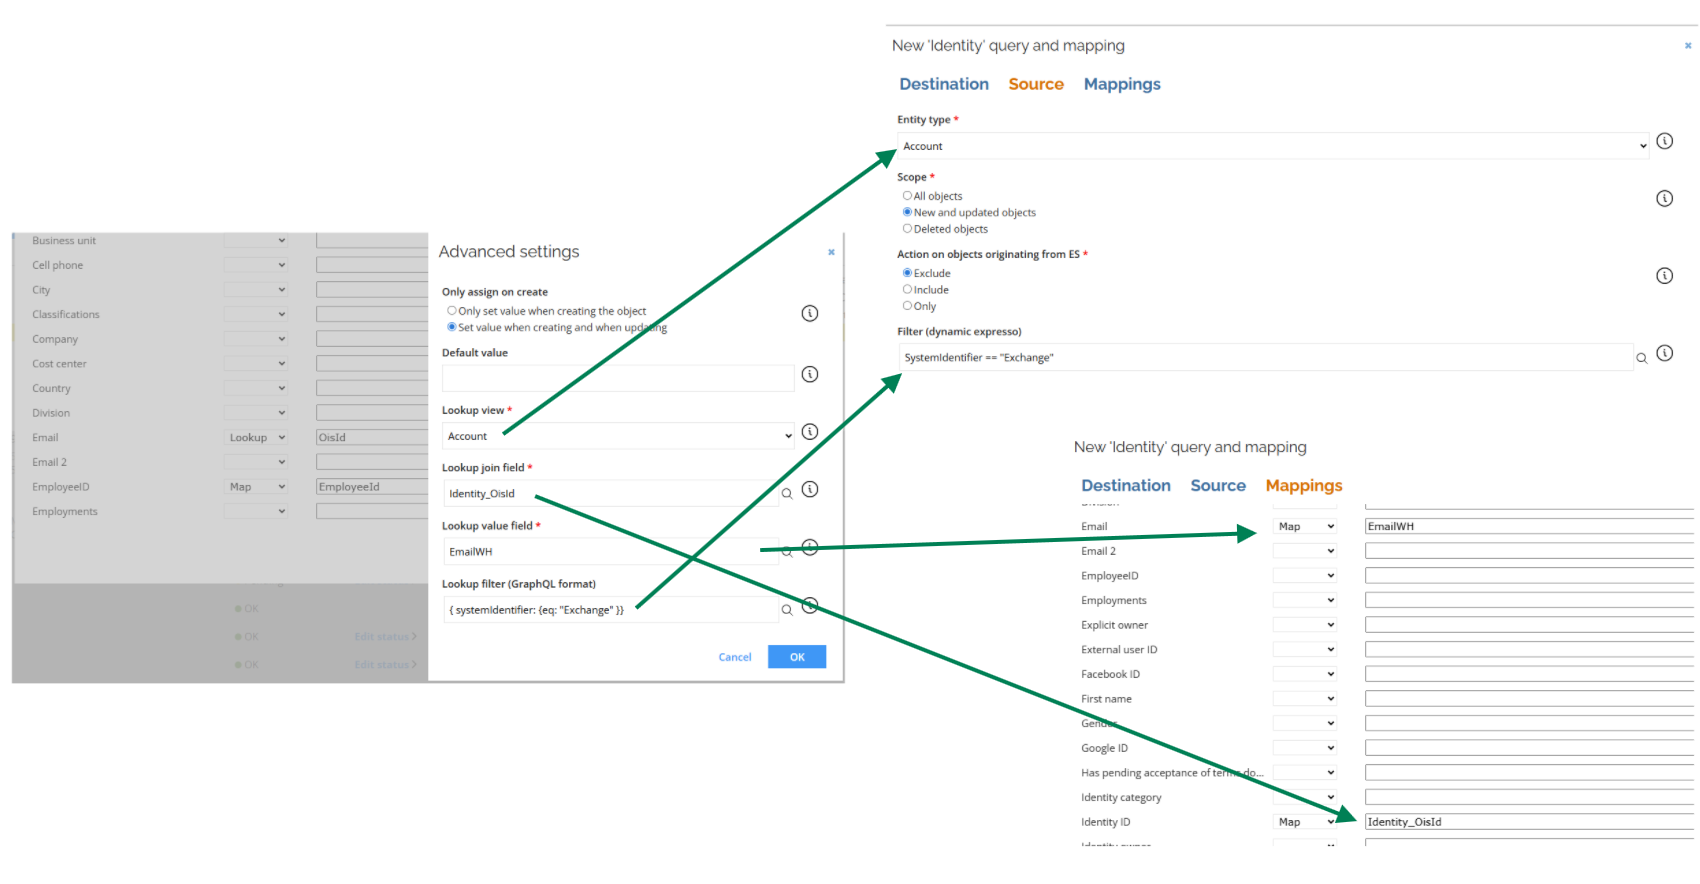
To utilize the Lookup option, to lookup values from other objects, go to Export queries and mappings>Mappings and select the Lookup operator for a object in mappings. Select Edit to access the Advanced setting pop-up where you can configure the Lookup filter setting in the GraphQL format.
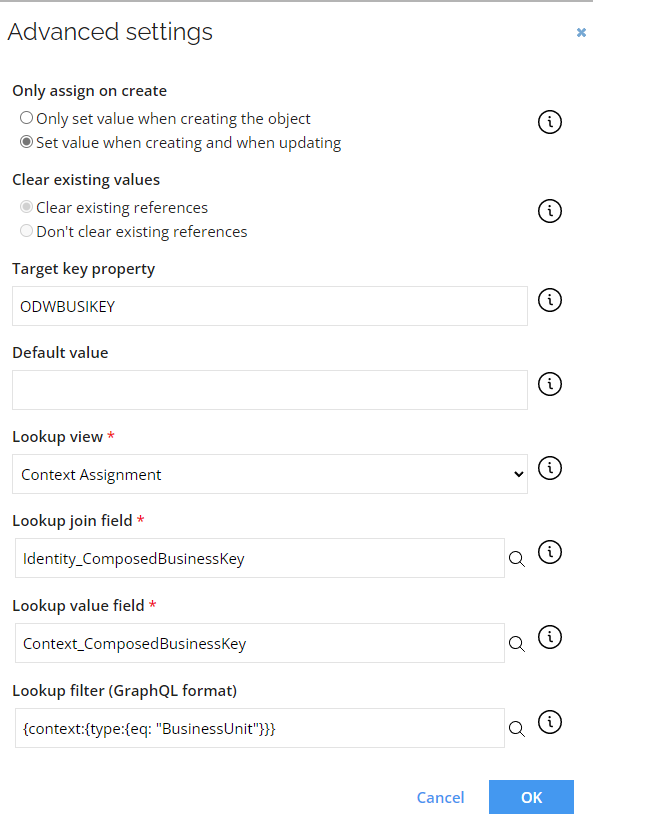
For more information, go to GraphQl website.
Example of using the GraphQL
Using the SQL Troubleshooting Tool select the ODW as database and select the DB explorer
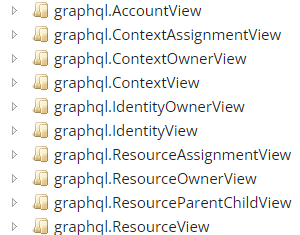
Expanding the graphql.ContextView folder you can see all database fields related to the Context object. Fields containing an underscore _ represent linked objects fields.
- Lookup_Id represents ID of a Lookup the ContextView entry is linked to.
- Parnet_Name references the Name of a Parent context.
note
Mappings updating a parent object require the Defer processing setting to be enabled.
GraphQL filter example
Example of a GraphQL filter
{
    OBJECT_TYPE:
    {
        PROPERTY
        {
            OPERATOR:VALUE
        }
    }
}
OBJECT_TYPE - entity object type, for example, a context or an identity
PROPERTY - any property of a specific entity, verifiable in the database
OPERATOR - operator used in the filter (for more information, go to HotChocolate GraphQL)
VALUE - value applied to filter
Multiple operators can be included for the same property.
To create a filter for the DateTime fields, use the following constants after the OPERATOR:
DateTime.Now - provides current date, including time
DateTime.Today - provides current date, with time set to 00:00:00
EXAMPLE
{
    validTo:
    {
        lte:"DateTime.Today"
    }
}
The diference between views and filters in GraphQL is that the filter for nested entity looks in the following way:
{
    context:
    {
        parent:
        {
            name:
            {
                eq: "Expected value"
                neq: “Unexpected value”
            }
        }
    }
}
With the Horizons the SystemsID in lookups is replaced with the use of the Data Object ID in the Enterprise Server for the systems. To address this change you need to adjust your lookups.
You can find your systems IDs in following ways
- Debug information
- SQL Troubleshooting
Go to Systems list and select specific system. Holding Ctrl right click and select Debug information. In the pop-up you can find SystemID as a value for DataObjectId.
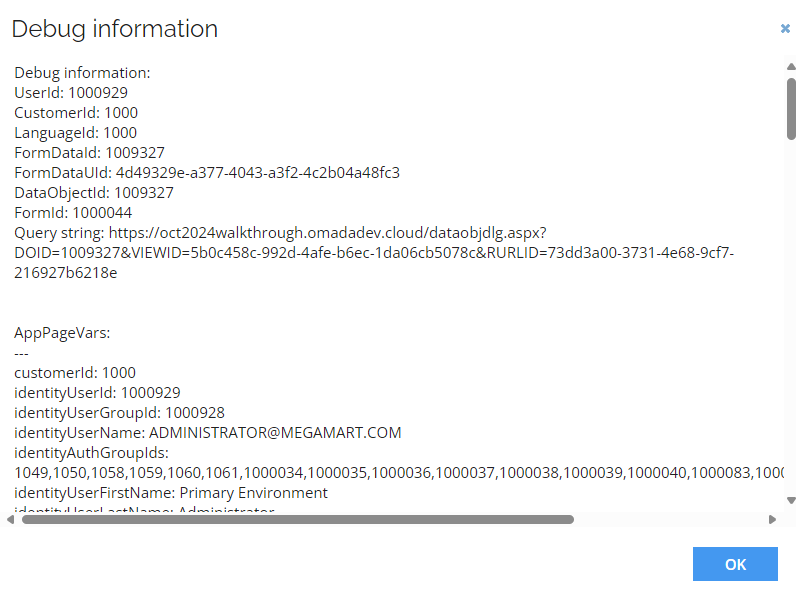
In this example SystemID has the 1009327 value.
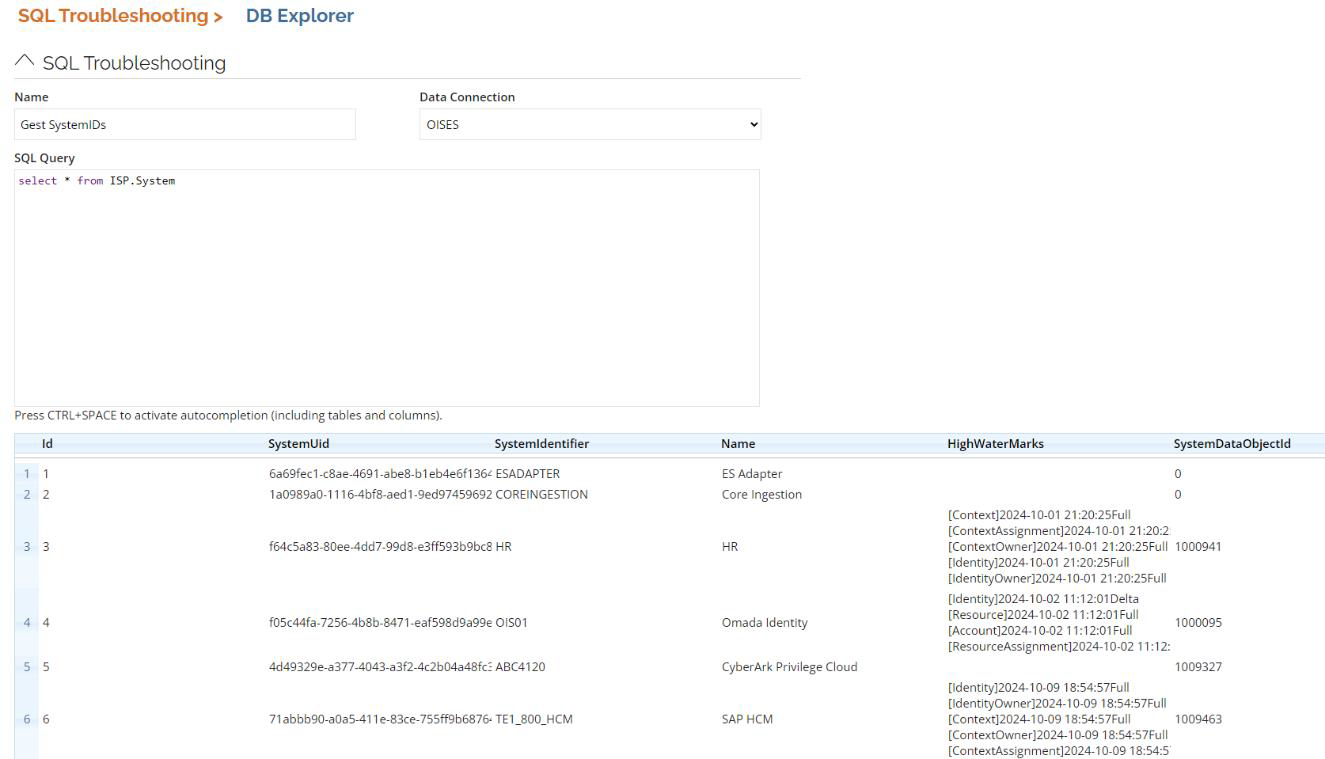
To find the SystemID value, in the SQL Troubleshooting, go to DB Explorer select the OISES database and use the following statement:
select*from ISP.System
Systems are visible only after an import was performed with the Horizons enabled.
Performance considerations for Lookup
Lookup functionality is an effective way to enrich and validate data during the Processing phase. However, you should utilize the lookup cautiously, since it is evaluated for each object during import processing and can have a significant impact on performance.
To ensure optimal performance and predictable behavior, consider following:
Use Lookup Filters
Always use filters for the lookup functionality to limit the number of evaluated lookup records. Otherwise, the import performance can noticeably deteriorate, due to lookup engine scanning entire datasets for every processed object.
Filter lookup data by status, for example Active, type or category, and scope (for example, region or system). Only include lookup records that are relevant for the specific use case.
Account for scenarios impacting performance or behavior
Some lookup use cases may reduce efficiency and lead to unintended bahvior, even with the filters configured. Below are examples of such scenarios:
- Low lookup performance
A lookup can become a performance bottleneck during processing if it:
- Evaluates a large dataset
- Is executed for many imported objects
- Performs complex matching logic
- Lookup adds or removes values based on expiration
A lookup can introduce additional complexity and repeated reprocessing when it:
- Dynamically adds values as lookup entries become valid
- Removes values as lookup entries expire
It is sepecially relevant for large environments.
- Object creation does not require lookup values
Performing a lookup during processing may be unnecessary overhead when the lookup:
- Is not required when an object is first created
- Only affects how data is written to a target system later
Use Export Mappings Instead
In a scenario where a object creation does not require lookup values, or where lookup performance is a concern, consider using regular export mappings instead.
Defer Processing
The Defer Processing setting is available for the Export Mappings. It controls when entities of a given type are processed during an import.
When it is enabled, the entities affected by the export mapping are processed after the Processing phase is completed for all objects.
Effects of defer processing
When the setting is enabled, processing of the affected entity type is deferred until the end of the Processing phase, meaning that
- The entity is not processed immediately as it is encountered.
- It is handled after all other processing logic has completed.
This behavior can be useful in specific dependency scenarios but comes with important trade-offs.
Performance impact
Using defer processing prolongs the import due to:
- Processing is no longer incremental.
- The system must wait until the entire
Processing phaseis completed before handling deferred entities. - Additional internal buffering and ordering is required.
- Use defer processing only when it is strictly required
- Limit usage to as few export mappings as possible
- Avoid enabling it on multiple interdependent entity types
- Test performance impact in a non-production environments
- Monitor imports closely after enabling
Defer processing applications
Consider using the defer processing for the following scenarios:
- An entity depends on other entities that must be fully processed first
- Immediate processing would result in missing references
- No alternative modeling or mapping approach is possible
Always carefully evaluate and test lookup usage before implementation.
In the Export queries and mappings overview you can see which mappings are eligible for defer processing.
The intended use for defer processing is for queries using context parent in mapping.
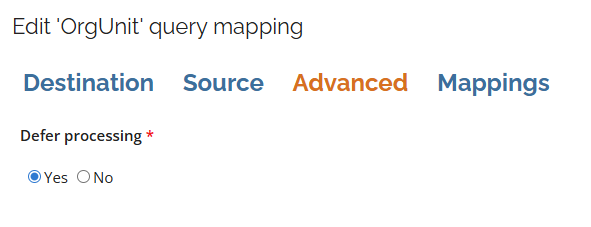
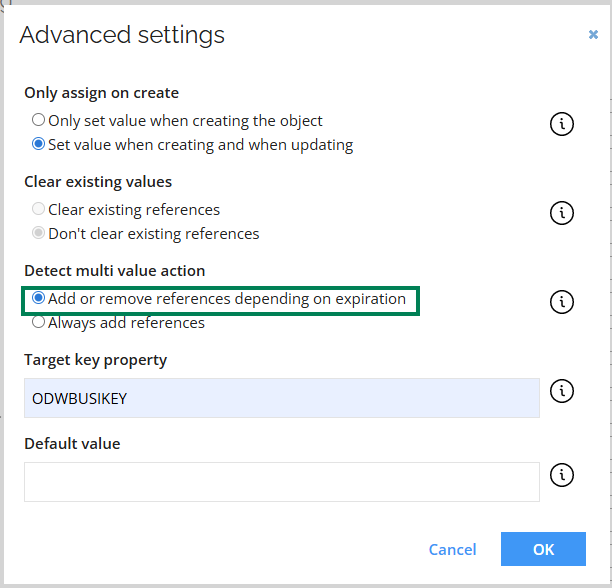
In the Advanced tab you can configure the defer processing.
Multivalue properties
When working with multivalue properties, for example Manager or ExpliciteOwner, in export mappings, incorrect configuration can lead to unexpected behavior in target systems.
The most common issues are related to how values are added, updated, or removed over time.
-
Value is alternating between previous and new value
The target system alternates between the previous value and the new value across provisioning runs.
It usually happens when:
- A multivalue attribute is treated like a single-value attribute
- The mapping does not explicitly control replacement behavior
-
Previous value is not removed
The previous value remains in the target system and the new value is added, resulting in accumulation of values when only one is expected.
It usually happens when:
- The mapping only adds values
- No cleanup or replace behavior is defined
Handling multivalue properties
The correct configuration of multivalue properties depends on how many values are allowed for the relationship between objects (the "cardinality"). For example, some relationships require only one value (one-to-one), while others may allow multiple values (one-to-many).
- One-to-One relationship
When only one value is expected for the relationship, the mapping must ensure that any previous value is removed before adding the new value.
- An Identity always has exactly one manager
- The value is always present
- Only one value should exist in the target system
The mapping can be configured as follows:
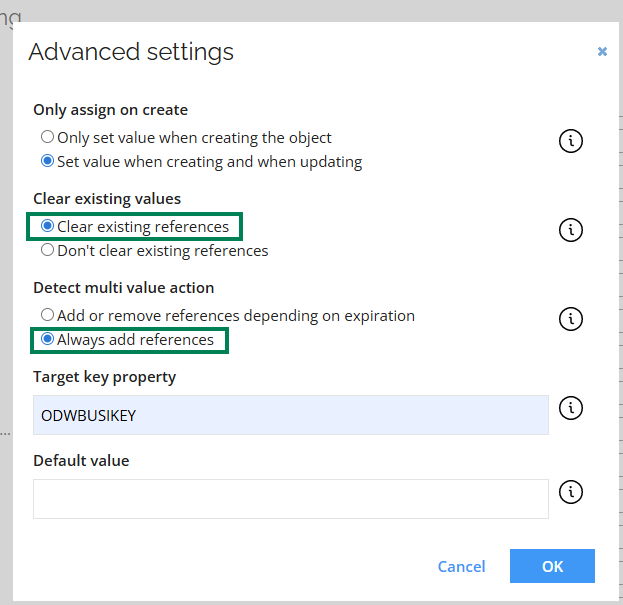
- One-to-Many relationship
One Identity has:
- Multiple employments
- Multiple email domains
The mapping can be configured as follows:
Export Audit
The Export Audit feature provides assistance in troubleshooting cases where some data objects were not imported into the Enterprise Server.
Enabling Export Audit
To enable this feature, configure the Enable export audit setting to True. By default, the value is set to False. When enabled, all Data Object XMLs sent by the ESAdapter to the Enterprise Server are stored in the esadapter.ExportAudit table in the OIS database. You can access the table using the SQL troubleshooting tool.
Data Stored in Export Audit
The esadapter.ExportAudit table contains the following information for each data object:
| Attributes | Provided information |
|---|---|
| ImportUId | Unique identifier of the import. |
| IngestionImportId | ID of the import in IDS tables. |
| Timestamp | Datetime of the import. |
| ExportQueryName | Name of the query in the format {ordinal number of the export mapping}.{target object} - {operation}. |
| EntityCBK | Composed Business Key of the entity. |
| EntityId | ID of the entity in the corresponding IDS table. |
| DataObjectXML | XML containing changes made to the data object. |
| Status | Status of the operation: - Created: New object created.- Updated: Existing object updated.- Unchanged: No changes detected against the existing object.- Deleted: Existing object deleted.- Ignored: Object to update/delete was not found.- Error: Exception was thrown during the import. |
| ErrorMessage | Error message if the import ended with an error. |
The number of days after which data is removed is controlled by the Auto delete warehouse logs setting.
Since the Export Audit feature can occupy significant database space when there is a large volume of data, we recommended to keep this feature disabled and enable it only when investigating potential data issues.
Resynchronization
The Start synchronization option in the Data synchronization section allows to repeat the import of the latest data to the ES. You can choose to either resynchronize the latest entities, failed during prior import, or import all latest entities.
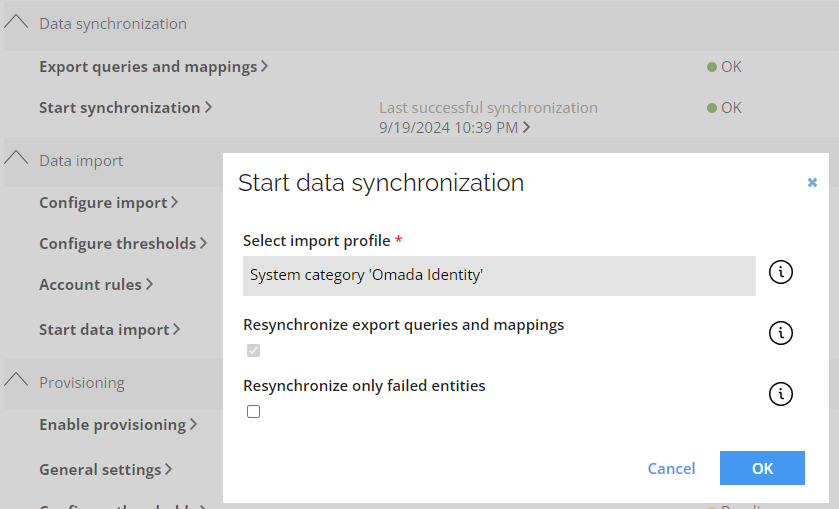
Initialize resynchronization after faild import during adaptation stage, to ensure the consistency of data.