Creating environment
The Cloud Management Portal lifecycle allows you to configure and manage environments in Omada Identity Cloud. The options displayed in the environment creation view are adjusted based on your customer contract.
Only one operation (creation, configuration, deletion) can be performed for an environment at a time. The configuration page is not accessible while a new configuration is being applied.
Follow these steps to create the new environment:
-
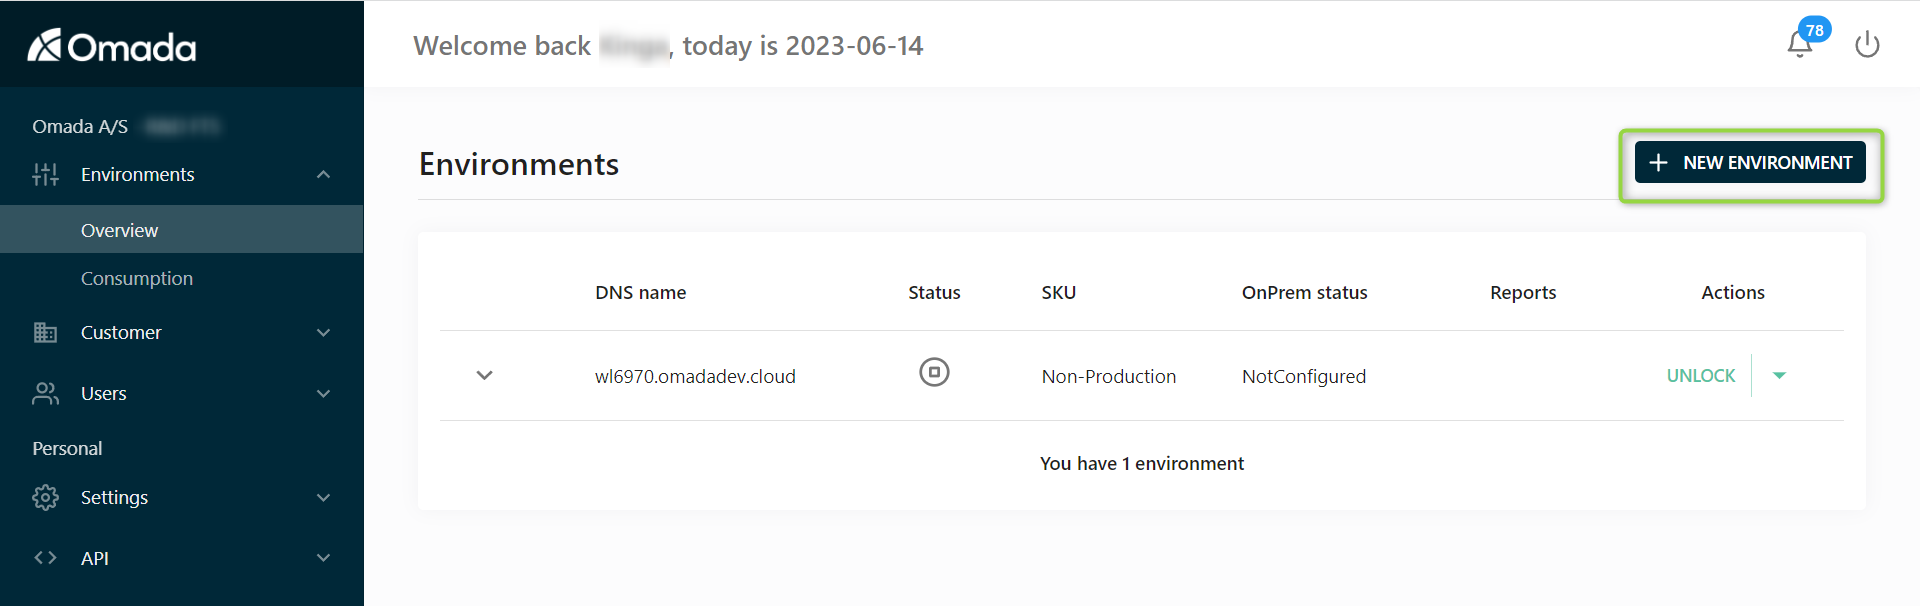
Click the NEW ENVIRONMENT button in the upper-right corner in the Environment overview tab.
-
The Environment details dialog is displayed.
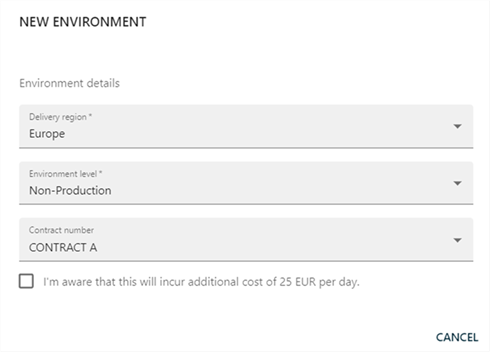
Select the following:
-
Delivery region (Europe or US). The delivery region determines where (geographically) your environment is going to be located. This choice is important for two reasons.
- Location of your data – data never leaves the region that you are selecting when creating the environment.
- Latency for your end users – pick the delivery region which is closest to most of your users.
-
Environment level The environment level (SKU) determines multiple characteristics of an environment. There are four different environment levels:
- Production
- Production non-georedundant
- Non-production
- Non-production configuration
Depending on the environment level, the following specifications are adjusted (see Environments for details):
- High availability
- Georedundancy of data
- Disaster recovery
- Backup retention
- Scalability/elasticity
- SLA
- Deletion prevention
The delivery region and the environment level cannot be changed after the creation of an environment.
- Contract number.
Please be aware, that the creation of environments will create additional costs if they are not covered by your subscription agreement.
It can take up to 5 minutes for the environment provisioning to be complete.
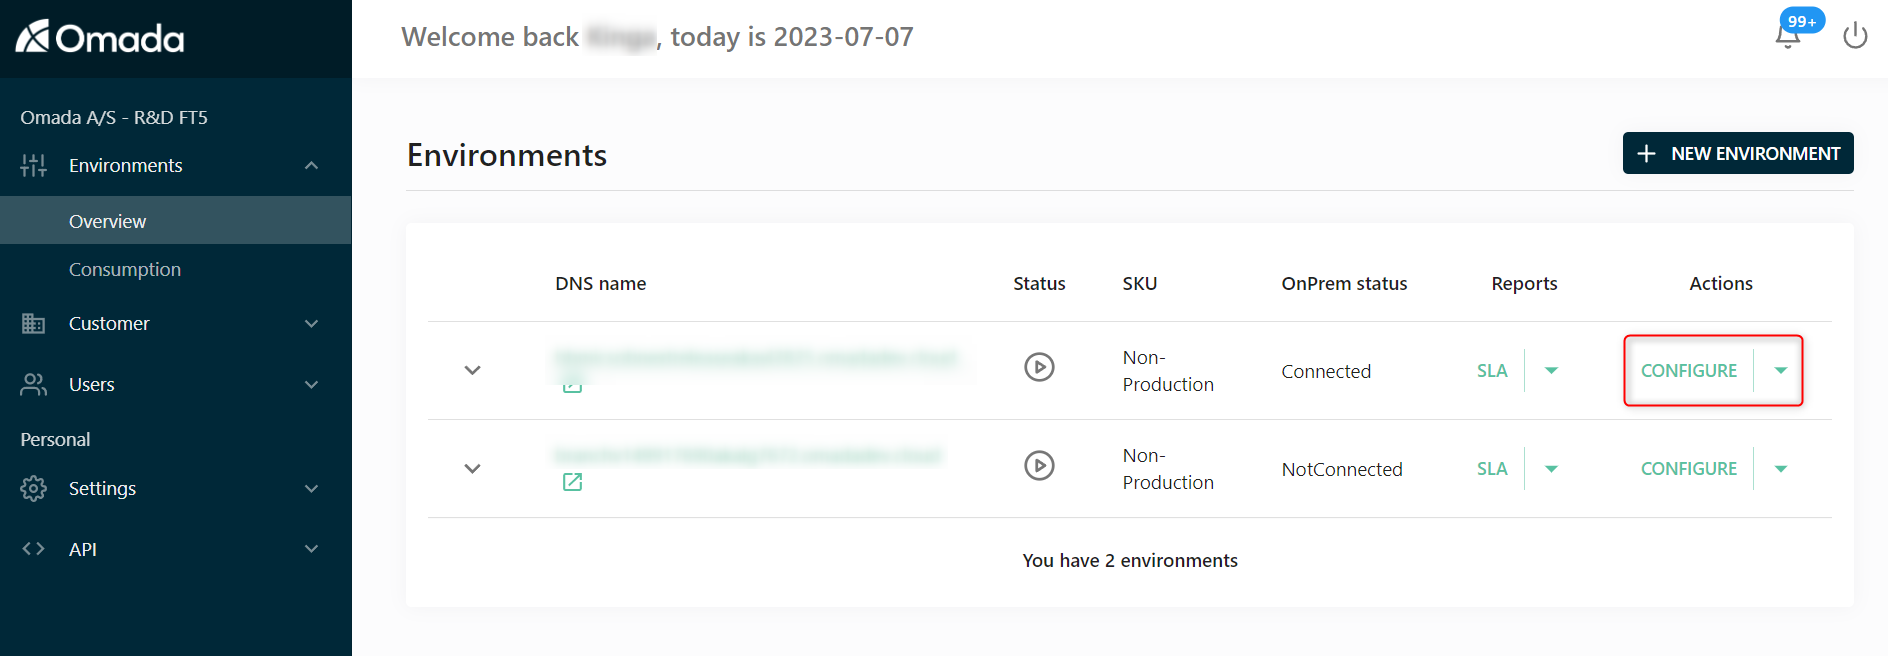
Configuring environment
To configure the created environment, fill in the following environment information:
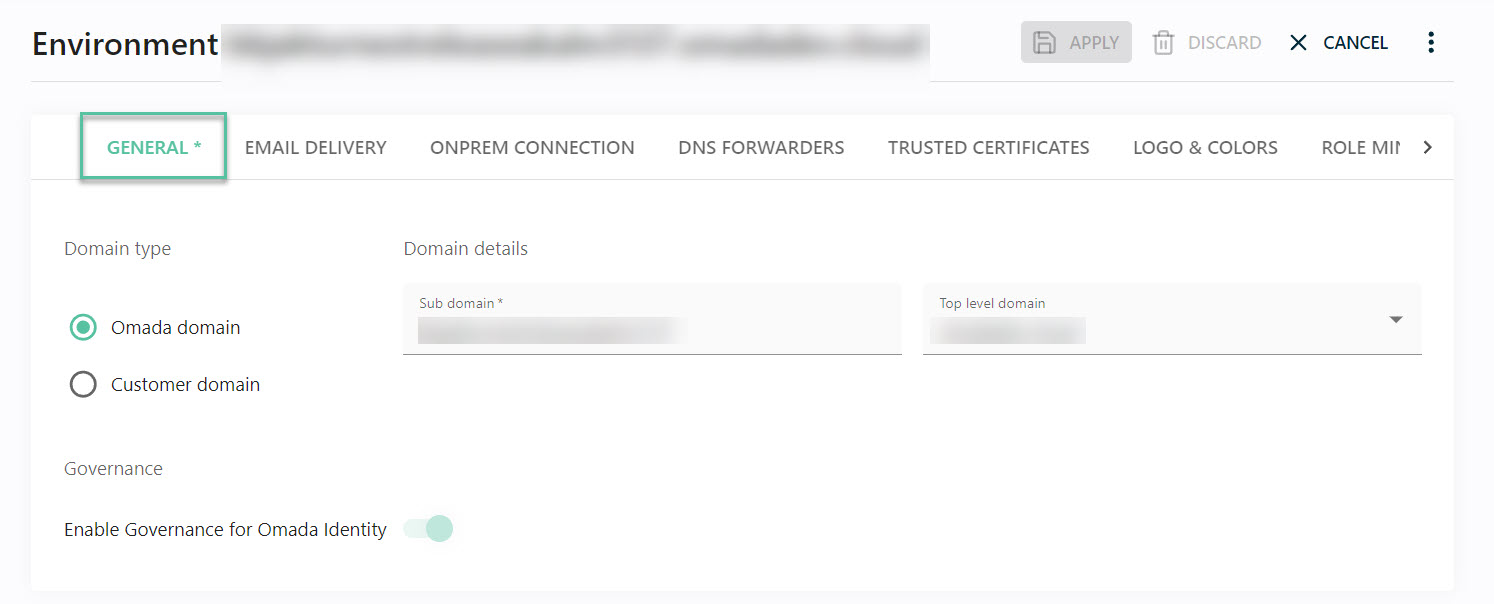
General
In the General tab, you can set the following:
-
Domain type: decide if your Cloud product will be available with the default domain name from the Omada domain, or setup up your own by clicking the Customer domain radio button.
-
If you want to use your own top-level domain for the URL to, select Customer domain as the Domain type. Create a CNAME record in your DNS pointing to the DNS name shown in the CNAME field. You must also provide a Public and Private Key (in a PFX file) that is issued for the "fully qualified domain name" (fqdn) of your choice. The wizard validates that the certificate is issued to the selected fqdn as well as the existence of a CNAME record in your DNS that is pointing to the correct environment CNAME.
-
Governance: decide whether you want to activate the Governance for Omada Identity feature.
-
The Enable Governance for Omada Identity setting is disabled by default for existing environments; however, it is enabled by default for new environments of new customers.
infoOnce the Enable Governance for Omada Identity setting is enabled, it cannot be reversed at the environmental level.
-
Authentication
In the Authentication tab, select and configure the authentication type and the authentication provider necessary to sign in Cloud.
For more information on authentication, refer to the Authentication and Single Sign-on Configuration section.
Email delivery
By default, emails sent to the users of Cloud are using the default Omada SMTP server. This is the option recommended by Omada. Follow these steps if you want to send emails via your own company SMTP:
-
Select the radio button Own SMTP server.
-
Fill in the necessary details:
- Email address (sender)
- Display name
- DNS name
- Port number
-
Choose the authentication type:
-
Basic
-
Azure AD Password Grant with the following fields
- instance - read-only, with the default value
https://login.onmicrosoftonline.com - clientId - the Application (client) ID that the Azure portal - App registrations page assigned to your app
- tenantId - the directory tenant that you want to log the user into
- userName - the user name associated with the credentials
- password - password for the user name associated with the credentials
- scopes - default value is
https://outlook.office365.com/.default
- instance - read-only, with the default value
-
Google Service Account with the following fields
- Application ID - ID of the service account, available in the JSON file or in the Google console
- Key ID - the private_key_id from the JSON file created and downloaded from the Google console
- Private key - the service account private_key created and downloaded in the JSON format from the Google console, encrypted through StringEncrypter
- Scopes - by default, the required scope is
https://mail.google.com - User name - the service desk email address that the service will use to send the mails
Make sure that the SMTP server that you’re configuring supports receiving email via TLS protocol.
Some situations (Sandbox environments, merger/acquisitions, User Acceptance Testing, etc.) require the email delivery to be temporarily paused. You can therefore select Disabled and the environment will not send out any emails. Emails which are in the queue will remain there for 10 days (and will also be sent once you re-enable the delivery of email again in that timeframe). Should you want to remove emails from the email queue, please raise a service request with the Omada Cloud Operations team.
-
OnPrem connection
The OnPrem tab allows you to setup conditional forwards for our integration components enabling you to use your OnPrem DNS names just as if you were in your local network. We recommend putting at least two DNS server IP addresses per domain for better fault tolerance.
When you select the connection from the left-side menu in the On-Prem tab, you can also use the buttons to:
- View the security associations
- Start and stop the packet capture and download logs
- Reset the VPN connection
DNS forwarders
The DNS forwarders tab allows you to set up conditional forwards for our integration components enabling you to use your OnPrem DNS names just as if you were in your local network. We recommend putting at least two DNS server IP addresses per domain for better fault tolerance.
Trusted certificates
The Trusted certificates tab allows you to configure trusted certificates for our integration components enabling you to use SSL/TLS communication with your on-prem/cloud systems that have certificates which have been signed by private certificate authorities. A common use case is importing Active Directory information through LDAPSLightweight Directory Access Protocol. where the certificates which are securing the communication between the and the domain controller are typically issued by a private active directory integrated certificate authority.
Logo & Colors
The Logo & Colors tab allows you to configure a logo as well as a primary and secondary colors for your environment. First, upload the desired logo, as the color pickers will then suggest colors from the uploaded logo. Should none of these colors meet your expectation you can also put in HEX codes from your company corporate design style guide.
You can also enable the new user interface from this tab. Bear in mind that once enabled, you cannot move back to the legacy user interface.
Role mining access
The Role mining access tab allows you to login to and read SQL databases, more precisely the Omada Data Warehouse and RoPE databases, which can help you to extract and consolidate roles in your instance. To use it, switch on the Enabled slider, set up a password and, if needed, add firewall rules to restrict access from specific IP addresses.
Logging
The Logging tab you can set up the place where the logs from Cloud will be saved.
Cultures
The Cultures tab you have a list of all the Cloud translations available, with their XML files. If needed, you can download and customize that XML file and upload it in the Custom file column, to override the default translations.
Languages
The Languages tab, you register and enable the languages applied in the previous tab Cultures. This will impact the options available in the settings of the user profiles in Cloud.
Password synchronization
Click Generate new key to create a new encryption key for the Password Synchronization Feature (Password Filter).
RoPE configuration
In the RoPE configuration tab, you can find and explore the extensions and keys of the Role and Policy Engine, which calculates roles and identities.
There are two views available: Extensions view and XML view. You can add comments, switch order, disable extensions and make changes in both.
The views are not synchronized so any change done in one view will disable the other one.
The XML "executor", owned by the Cloud Management team, is only shown for completeness, and can't be changed by customers.