Feature adjustments
Frequently occurring use cases are described below in order to adapt the standard configuration to the respective requirements.
Managing users
Managing admin users
-
If it doesn't already exist, create an administrator account type.
-
If it doesn't already exist, create an account resource for the Omada Identity system for the Administrator account type. Provide a meaningful account name format, for example
ADM_[IDENTITYID]. -
Update the allowed account types for administrative resources.
-
Configure the approval workflow for the administrative resources.
Users of non-personal account types are not directly linked to the identity through the IDENTITYREF property.
Managing built-in attributes on the User object
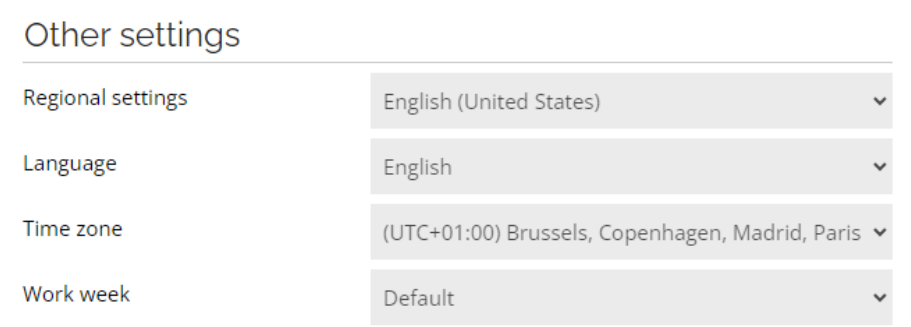
By default, the built-in Language, Regional settings, Time zone and Work week properties are set with the system defaults when the account is created and are no longer automatically managed.
If required, automatic management can be enabled by following the configuration steps below.
Establish a desired state
In the solution, there are 4 properties suitable for the Identity data object type to establish a desired state:
- Regional settings (
REGIONALSETTINGS) - Language (
LANGUAGE) - Time zone (
TIMEZONE) - Work week (
WORKWEEK)
The properties can be maintained manually in the ES portal or in the HR system by configuring the identity import.
The Time zone property is added to the Identity data object type out of the box. The remaining three can be added to the Identity type and the Identity form(s) according to business requirements.
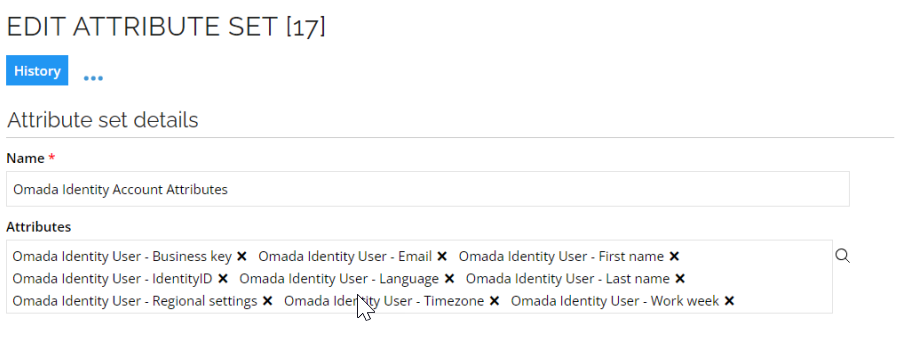
Extend the attribute set
Along with the properties, there are 4 Attribute objects, one for each property. The relevant attributes must be added to the attribute set Omada Identity Account Attributes:
- Omada Identity User – Regional settings (
REGIONALSETTINGSCODE) - Omada Identity User – Language (
LANGUAGECODE) - Omada Identity User – Timezone (
TIMEZONECODE) - Omada Identity User – Work week (
WORKWEEKCODE)
RoPE configuration
Configure the RoPE AttributeValueResolver extension to resolve the 4 new attributes. If the extension is not in use, add the entire section to the EngineConfiguration.config. If it is, just add the 4 settings:
<add type="Omada.RoPE.Controller.OISX.Extensions.AttributeValueResolver, Omada.RoPE.Controller.OISX">

 <settings>

 <add key="setting4" name="Omada Identity Account:TIMEZONECODE" extraInfo="Type:Expression" value="Expression.GetTimeZoneCode(ROPE_IdentityTimeZone)" />

 <add key="setting5" name="Omada Identity Account:LANGUAGECODE" extraInfo="Type:Expression" value="Expression.GetLanguageCode(ROPE_IdentityLanguage)" />

 <add key="setting6" name="Omada Identity Account:REGIONALSETTINGSCODE" extraInfo="Type:Expression" value="Expression.GetRegionalSettingsCode(ROPE_IdentityRegionalSettings)" />

 <add key="setting7" name="Omada Identity Account:WORKWEEKCODE" extraInfo="Type:Expression" value="Expression.GetWorkWeekCode(ROPE_IdentityWorkWeek)" />

 </settings>

 </add>
Enable reconciliation
The reconciliation map on the resource type must be extended to cause provisioning updates. For instance, you can add:
TIMEZONECODE=TIMEZONEID;LANGUAGECODE=LANGID;REGIONALSETTINGSCODE=CULTURE;WORKWEEKCODE=WORKWEEKID

Queries and mappings
In the Queries and mapping for the Omada Identity system, extend the query for the Account objects to include the attributes: LangId, Culture, TimeZoneId, and WorkWeekId:
`User?$select=Id,UId,UserName,DisplayName,Email,IdentityRef,Inactive,FirstName,LastName,LangId,Culture,TimeZoneId,WorkWeekId`

Add extension attributes as needed with History enabled and map to the right query field:
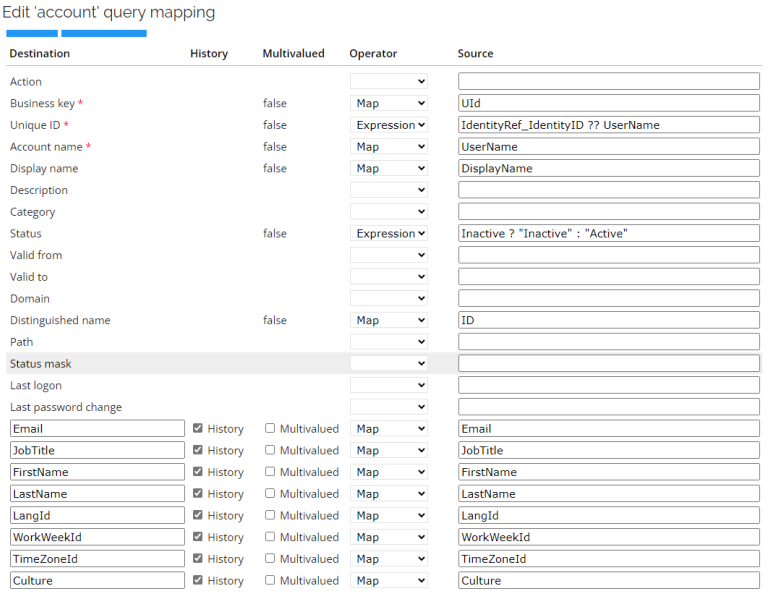
Previewing the query gives the current users/accounts with their built-in attributes:

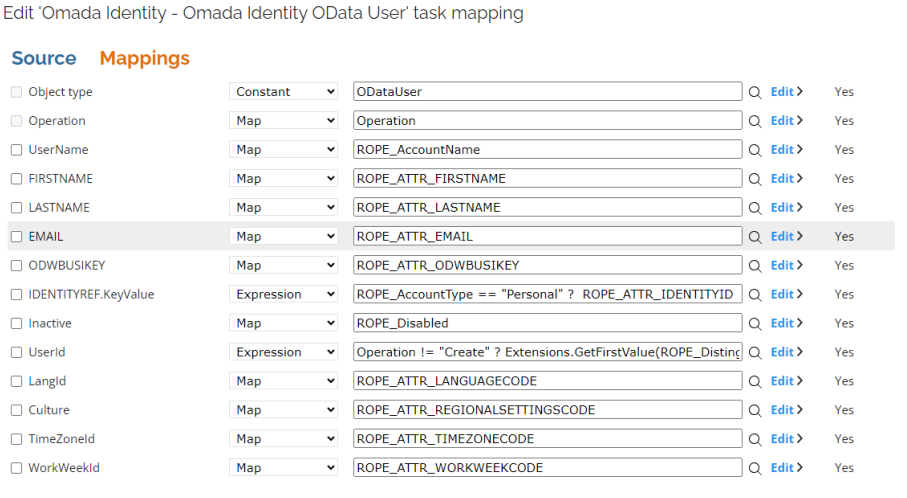
Task mappings
The new attributes must be mapped in the task for Omada Identity OData User. The attributes are already defined in the Data Model and on the ODataUser object as Culture, LangId, TimeZoneId and WorkWeekId. Map to the related RoPE attribute:
TimeZoneIdtoROPE_ATTR_TIMEZONECODELangIdtoROPE_ATTR_LANGUAGECODECulturetoROPE_ATTR_REGIONALSETTINGSCODEWorkWeekIdtoROPE_ATTR_WORKWEEKCODE
Maintain the valid attribute values
The values available in the three new (reference) properties are maintained through three new views in the Setup menu:
- Languages
- Regional options
- Work weeks.
The options in the Time zone property are maintained under the Values of the Property with the name Time zone.
Languages
The Language objects have a Name and a Disabled flag:
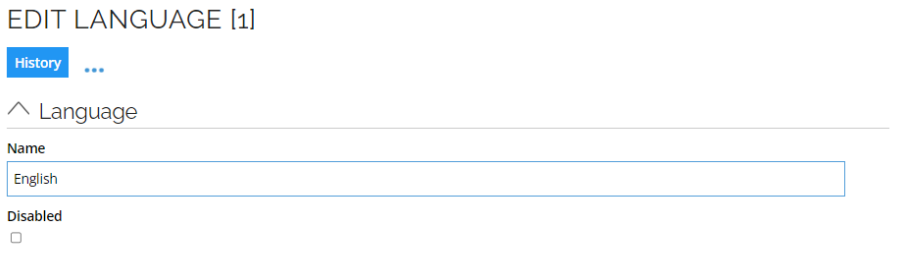
The objects in this view must manually be synchronized with the values in the tblLanguage table. The value of Name must match the name of the row in tblLanguage.
If the Disabled flag is set, it is not possible to select the language in the portal. It is recommend to also synchronize the Disabled flag with the value in tblLanguage.
Regional options
The Regional options object has a Name and Culture field:
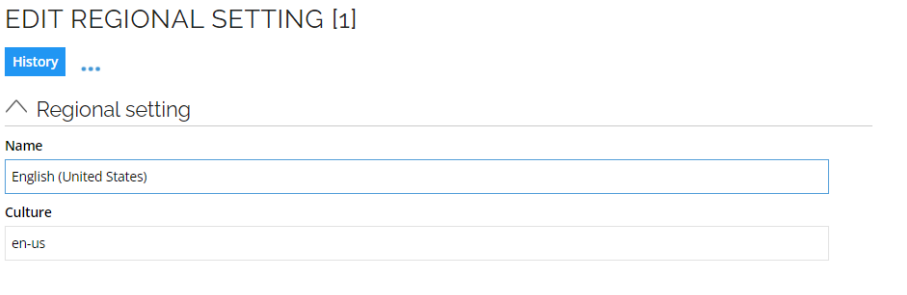
The Culture string should contain the standard culture name according to RFC 4646, where the format is languagecode2-country/regioncode2, where languagecode2 is the two-letter language code and country/regioncode2 is the two-letter subculture code.
Only culture codes where a language code exists (and is enabled) in tblLanguage are allowed.
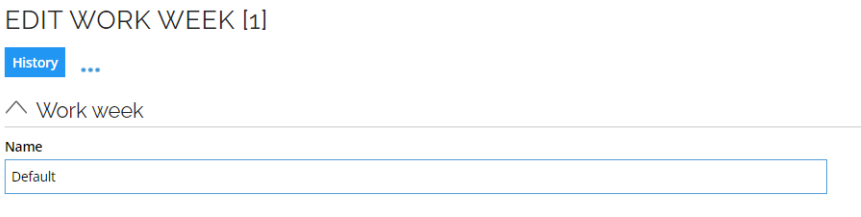
Work weeks
The Work week data object has a Name property which must match the name of the Work week in the list of the actual work week objects.
Time zones
Time zones are maintained under the values of the Time zone property. Each time zone has a Name and a Description. The Description must match the name in the IANA Time Zones list, and the time zone must also be present in the Windows Registry.
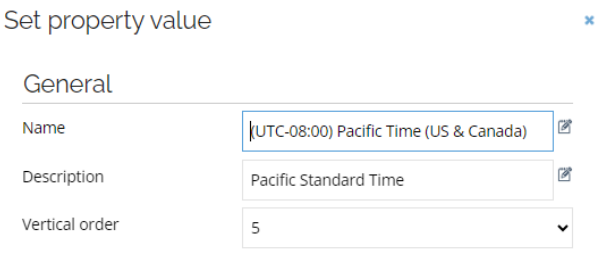
You should never modify the Time zone set property description value.
Configuring the My settings page
If one or more of the built-in user attributes are maintained by the Governance feature, the field(s) should be disabled on the My settings page to avoid confusion for a user trying to change the attribute there.
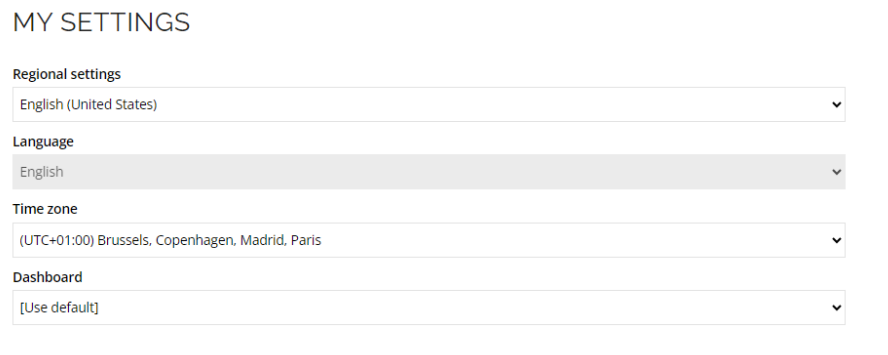
The field state is maintained in the customer settings under User interface.

Maintain custom user properties
You can configure the import and export of custom properties. This functionality allows you to manage additional attributes specific to your organization's needs that may not be covered by default settings. To do so, follow these steps:
-
Create a new attribute based on the custom property.
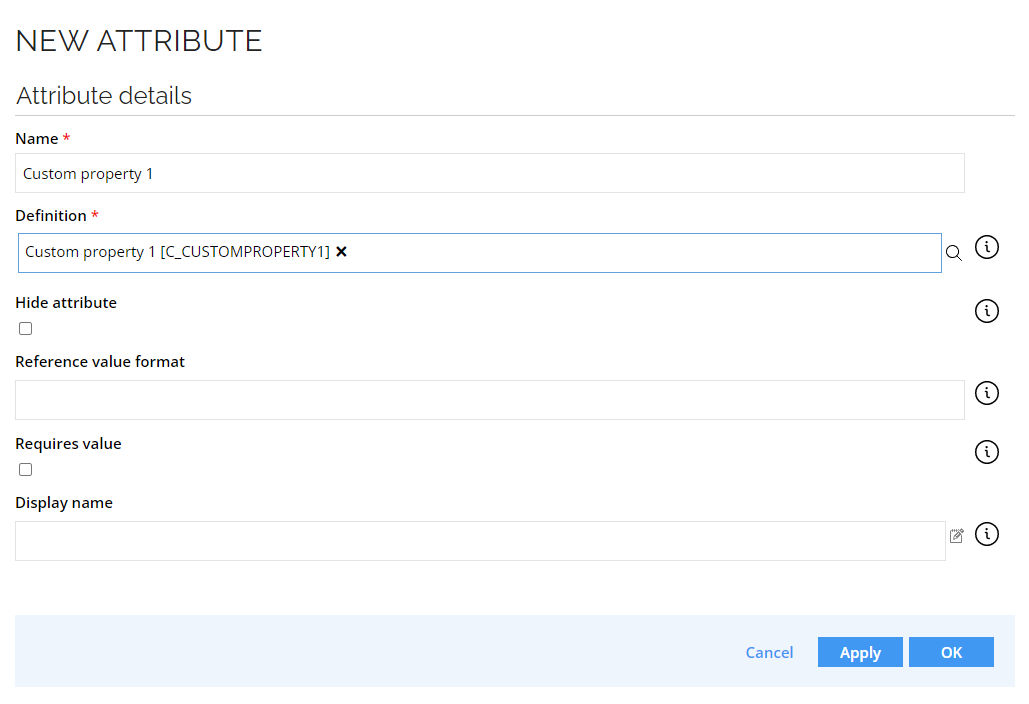
-
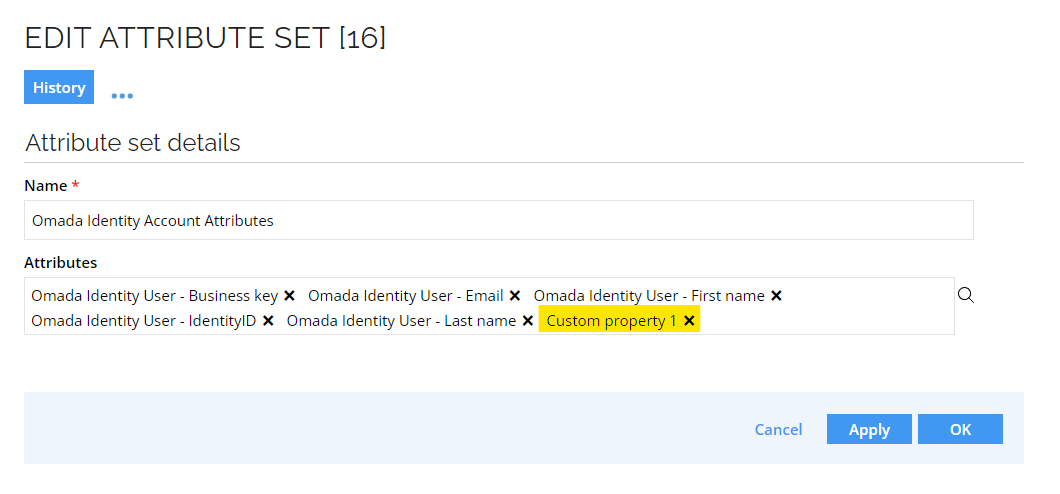
Add the newly created attribute to the attribute set Omada Identity Account Attributes.
-
Establish a desired state for the new attribute.
- To do so, you can add the relevant property to the identity object type. This allows the value to be automatically mapped to the account attributes. Alternatively, you can set the desired state using an
AttributeValueResolverexpression.
- To do so, you can add the relevant property to the identity object type. This allows the value to be automatically mapped to the account attributes. Alternatively, you can set the desired state using an
-
Recalculate an identity with an account and validate that the attribute values are populated appropriately.
Import custom property
To configure an import for custom property, follow the steps below:
-
Go to the Omada Identity system configuration.
-
In the System definition section, add the custom property to the Queries and mappings section.
- Select the appropriate queries and mappings based on the object type that contains the custom property.
-
In the Parameters section, in the OData URL field, add the new custom property to the URL. Include it in the select parameter list by adding the new property, separated by a comma, for example:

-
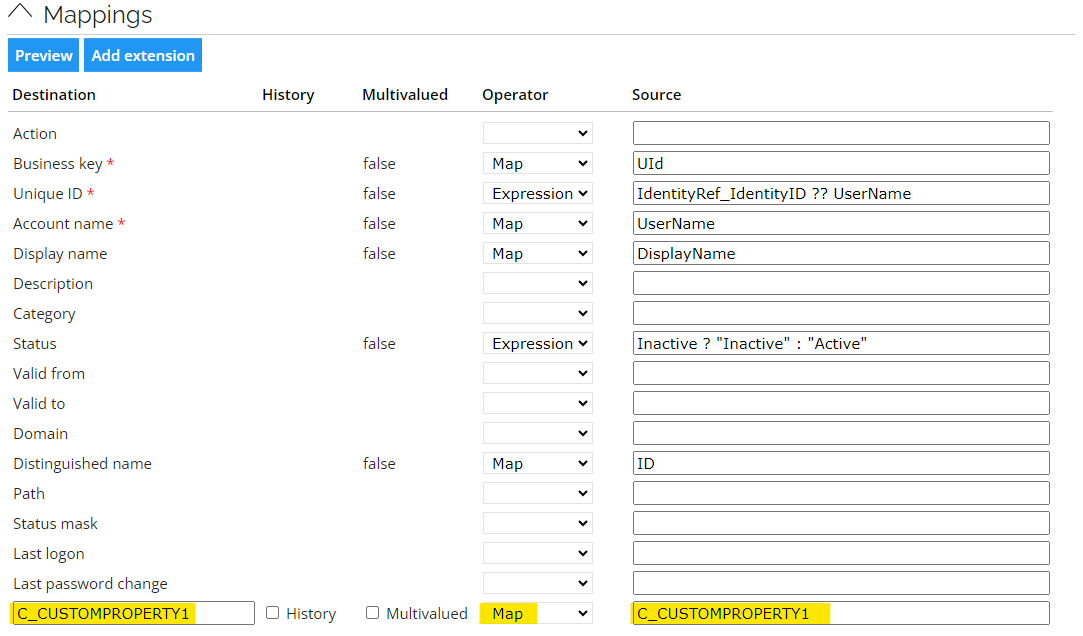
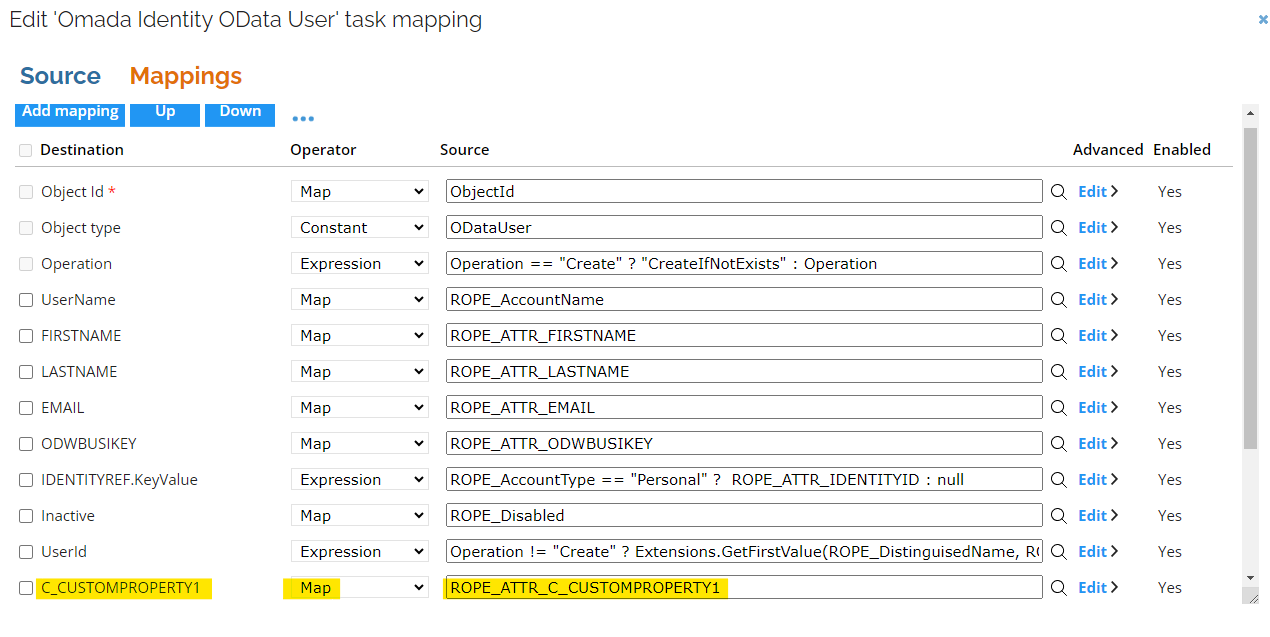
In the Mappings section, add a new mapping for the custom property in the Extension attribute row. Enter the system name of the custom property in both the destination and source columns, and select the Map operator, for example:
Export custom property
To configure an export for custom property, follow the steps below:
-
Go to the Omada Identity system configuration.
-
In the Data Model section:
-
Add the new custom property to the Properties section in the XML, for example:
<properties>
    ...
    <property name="C_CUSTOMPROPERTY1" dataType="stringType" />
</properties> -
Add the custom property to the data model where you want to provision it, for example:
<object name="ODataUser">
    ...
    <objectProperties>
        ...
        <objectProperty>C_CUSTOMPROPERTY1</objectProperty>
    </objectProperties>
</object>
-
-
Click OK to save the changes.
-
In the Task mappings section:
-
Select the data model object type where you want to add the new custom property and edit it accordingly.
-
In the Mappings tab, add a new mapping:
-
In the Destination column, select the new custom property.
-
In the Source column, click the magnifying icon and search for the new property (for example,
ROPE_ATTR_C_CUSTOMPROPERTY1). -
As an Operator, select Map.
-
-
-
Click OK to save the changes.
-
Click Commit settings to save the changes for the Provisioning section. Until you commit the changes, they will not be applied to the system.
-
To allow the property to be reconciled, ensure that the Reconcile on attribute level checkbox is still selected and add it to the Reconciliation attributes map on the corresponding resource type, for example:

Managing user groups
Create a new user group
To create a user group, follow these steps:
- Go to User Groups in Setup and click New.
- Provide the details of the new user group. The corresponding resource will be created with the same name and the Logical Key configured for import to match the actual user group with the resource.
- The resource is immediately created automatically and does not require an import.
Managing user group lifecycle
To ensure smooth management of user groups and associated resources, it's essential to understand the lifecycle process, which involves creating, renaming, and deleting user groups while maintaining consistency and preventing potential issues:
-
When a new user group is created, a corresponding resource is automatically created for it, and the user group's reference property is assigned to the new user group.
-
If you rename a user group, the management resource isn't renamed immediately. The functionality depends on the reference between the user group and the resource, ensuring the link between them functions properly. For naming consistency, you can run an import. It is part of the Warehouse to portal mapping feature in import. For more information, refer to the ODW to ES Portal Synchronization section in the Import and onboarding guide.
-
When you delete a user group, the corresponding resources and resource assignments aren't updated automatically. Ensure to terminate the resource assignments before deleting the user group to avoid deprovisioning issues. For status consistency, you can run an import. It is part of the Warehouse to portal mapping feature in import. For more information, refer to the ODW to ES Portal Synchronization section in the Import and onboarding guide.
Request and approval of user group membership
Similar to other resources, you can configure the visibility of access to the resources for requests by using the Prevent self-service and Prevent self-service in third party applications properties on the Resource, Resource Type, or System.
On a resource type in the Other settings:
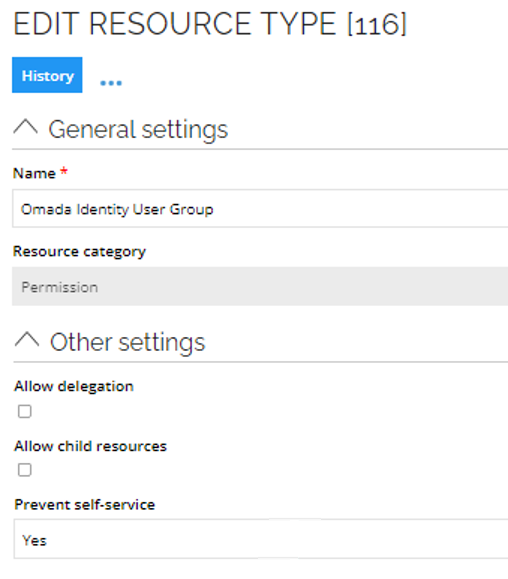
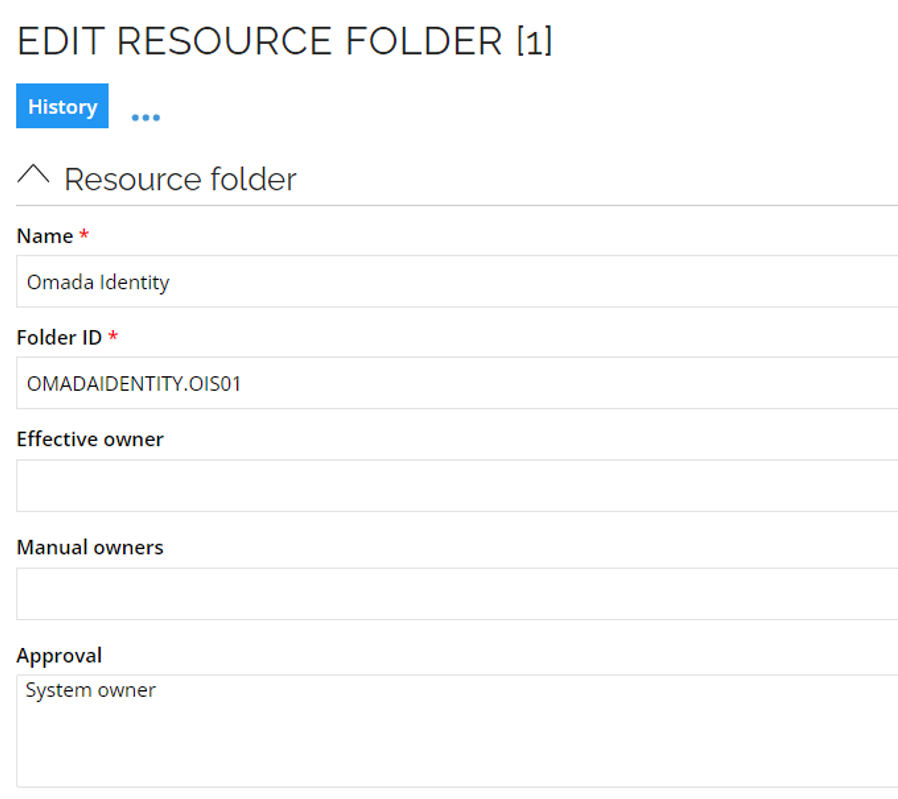
To configure the approval of access requests for resources, go to Omada Identity resource folder. For security reasons it is crucial to have the approval level configured.
Compliance Status
-
To monitor compliance status of Omada Identity, go to the Compliance workbench.
-
Click the Settings filter and include account assignments.
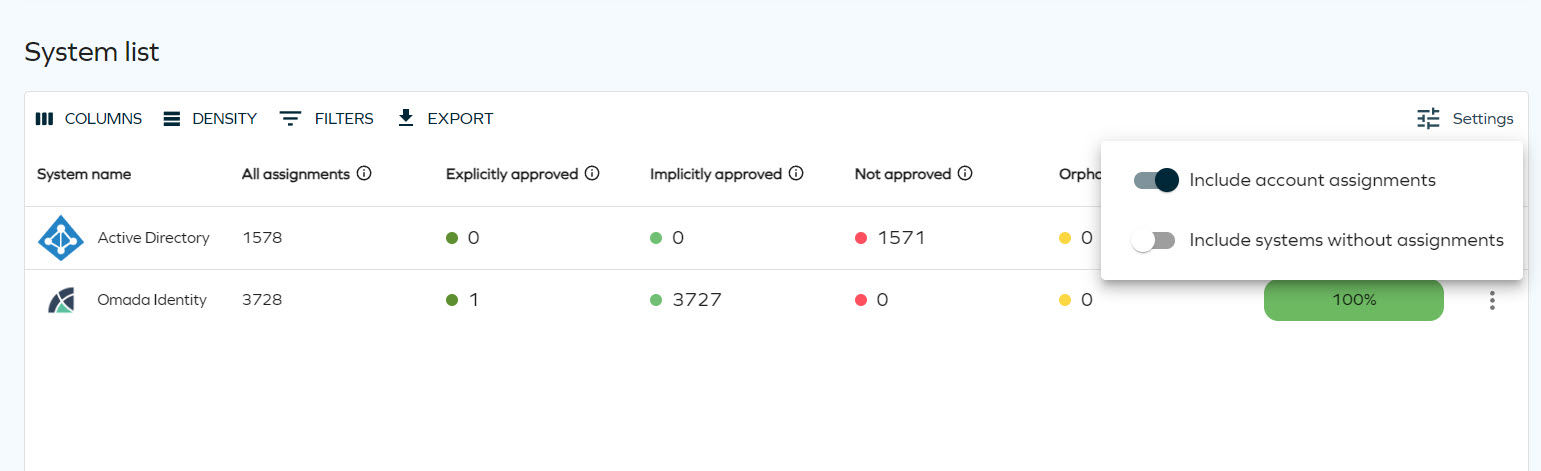
-
For any orphaned or not approved assignments, implement one of the corrective actions:
- Request access to the account or permission resource.
- Manually remove the account or the user group membership.
- Enable the Exclusively managed setting on the resource type for automated deprovisioning.
Initiate import and validate in the Compliance workbench corrective actions and compliance level.