Activation
To enable an automated deployment of the Governance for Omada Identity, ensure that your environment is upgraded to the latest release.
This feature will be enabled by default in environments for new customers after the July 2024 release.
Activation prerequisites
Before activation, you should have the following information at hand:
-
Naming conventions
- Determine the account name format for accounts (default:
[EMAIL]). - Determine the name of the personal account type (default: Personal).
- Determine the account name format for accounts (default:
-
Account rules
-
Determine the Ownership rule (default: The account owner is set to the identity where the 'Identity's unique ID' value of the identity matches the 'Account UID' value of the account).
infoWhile by default, the account name format is set to
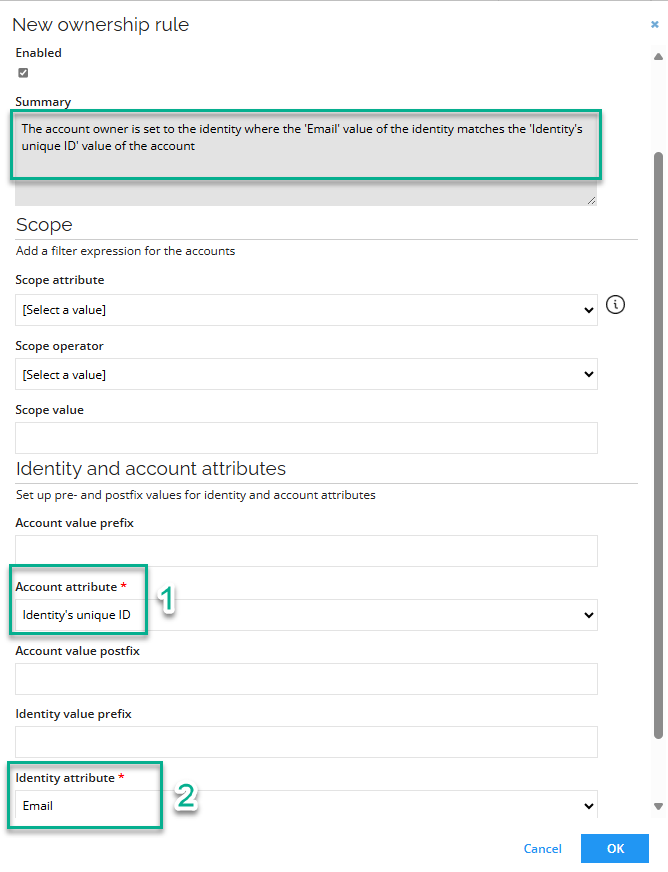
[EMAIL], also by default, the Omada Identity system matches the account's UID to the IdentityID.If you do not use the email address as the IdentityID (but, for example, employee numbers from the HR system), you can change the ownership rule:
-
Go to Systems > Omada Identity > Account rules > New.
-
Set the Account attribute to Identity's unique ID.
-
Set the Identity attribute to Email. After that, the Summary will be updated automatically.
-
-
Determine the Classification rule (default: If an account with the account attribute 'Identity join reason' equals 'IdentityID Match', the account type is set to 'Personal').
-
-
Approval workflow
- Know the required level of approval for access to the Omada Identity user groups (default: System owner)
-
Check that there are no extensions or configuration changes to the handling of users and user groups.
- If this is the case, some additional prior checking and follow-up may be required (not covered here).
-
Evaluate whether there are other context types than OrgUnit wit a service desk definition.
- For information on migrating the Service Desk Agent configuration to use self-management concept, refer to the Migrating Service Desk Agent configuration section.
-
Make sure that the Resources category field in the Resources view is disabled.
warningActivating Governance for Omada Identity results in enabling the Resources category field in the Resources view. Therefore, if this field is not disabled before the activation of Governance, you will receive the following error message:
View field "Resource category" already exists in View "Resources".
Activation
Enable this feature while the RoPE queue is empty to avoid incorrect provisioning jobs before the actual state is imported.
-
Go to the Cloud Management Portal and select the configuration option for your environment. In the General tab, enable the Enable Governance for Omada Identity setting to install it.
-
During the deployment of the feature, the Current Status of your environment is Configuration (Running). Wait until the Current Status of your environment is changed to Configuration (Completed).
infoThis action cannot be reversed.
-
-
If the account name format for accounts in the system Omada Identity is not
[EMAIL], then update the account name format of the corresponding account resource to the desired format. -
If the name of the personal account type is not Personal, then update the mapping of ODataUser under Task Mappings for the
IDENTITYREF.KeyValuemapping. -
Perform the first import:
- Go to Setup > All systems.
- Select the Omada Identity system.
- In the Data import section, click Start data import and run the import.
- Wait until the import has been completed.
-
Wait for all pending RoPE calculations to complete.
-
Review all provisioning tasks:
- Go to Setup > Operations Dashboard.
- In the Provisioning Jobs column, open the jobs For Review.
- Review each deployment job one at a time:
- If the tasks are as expected, click Mark as Reviewed to initiate the provisioning.
- If something is not as expected, review the tasks to identify and correct the issue (for example, removing incorrect access to a resource for that identity). After making the necessary corrections, click Archive for that job and allow the associated claim to expire. This will trigger new calculations and provisioning jobs.
-
Disable provisioning review mode for Omada Identity system:
- During the feature installation, provisioning review mode is enabled; if you want to remove this configuration, follow these steps:
- Go to Setup > All Systems.
- Select the Omada Identity system.
- In the Provisioning section, click the Advanced settings.
- Disable the Review jobs setting and click OK.
- In the Provisioning section, Commit settings.
- During the feature installation, provisioning review mode is enabled; if you want to remove this configuration, follow these steps:
-
Configure approvals:
- Go to the Resource Folders view and select the Omada Identity resource folder.
- Configure the appropriate approval level of the access to the Omada Identity user groups, for example, using system owner approval (default).
- Validate if the approval is set up properly (for example, system owner is defined for system owner approval).
-
The built-in update action will automatically migrate service desk agents configured in the SERVICEDESKAGENTS field of the OrgUnit data object. If other context types besides OrgUnit have a service desk definition and there is no existing Self-management configuration for that object type in the context type, then you must configure it according to the procedure documented in the Self-management configuration documentation.
Activation postrequisites
The following steps are recommended to properly finalize the Governance for Omada Identity activation:
-
Set the Account name format for the Omada Identity Accounts to follow logon requirements for the Enterprise Server. Create an Account Resource for the administrator accounts. If it wasn't already created, do the following:
-
Create an Administrator Account type.
-
Create account resource for the Omada Identity system for the administrator account type.
-
Update the allowed account types for administrative resources.
-
Configure the approval workflow for the administrative resources.
Omada recommendsUse the administrative Omada Identity resources for primary identities with an administrative account only.
-
-
Create technical identities for the System administrator, service accounts in the Enterprise Server (excluding the ones managed by Omada; for details see the description of users entity type in the Data object types section of OData), and other required non-personal and service accounts. This action prevents the accounts from being identified as orphan accounts. Create one technical identity for each service account (one-to-one relationship).
To create technical identities for a user:
-
Go to the Services section and select the Request technical identity service.
-
In the Systems textbox, select Omada Identity. The technical identity you create will be associated to this system.
-
Select the owner of the technical identity as the responsible personal identity.
-
Fill in the remaining required fields. Keep the default Valid to date (
12/31/9999), as the related accounts will be used for various internal tasks such as managing system settings, running scheduled tasks, and communicating with external systems. -
Click Submit.
tipSee the IdentityProcess+ framework for more information on technical identities.
-
-
Optionally, link the technical identity with an account:
- Link the technical identity with account using OData (recommended)
- Link technical identities with account manually
Link the technical identity with the service account:
-
Perform a PUT operation to OData API using a browser extension, curl, Postman or any other tool. See OData REST API for details. Example (replace the
URL, INTEGER_USERID, INTEGER_IDENTITYIDwith correct values):-
Method: PUT
-
URL:
URL/OData/DataObjects/User/INTEGER_USERID -
Body:
{ "IDENTITYREF": { "Id": INTEGER_IDENTITYID }}tipYou can obtain the integer ID of the technical identity and the user using the Debug menu. Use the edit identity/user view to get the integer from the
DataObjectIdfield.
-
-
Repeat this operation for every service account and technical identity.
warningLinking the technical identity with the service account can be performed manually, however, it may lead to future errors because of the manual link between accounts and identities.
Enable the identity property on the user form (perform this step if the Identity property is set to read-only on the user form):
- Go to Setup > Forms. Select the Type form: Users.
- Click Design form.
- For the Identity (Read only) property, click the 3 dots and then Edit.
- Uncheck the Read only property. Click OK.
Link the Service account to the technical identity:
- Go to Setup > Users.
- Select the user that will be linked to the technical identity.
- In the Edit user form, select the created technical identity in the Identity property. Click OK.
When all technical identities have been created and linked to the service accounts, the Identity property can be disabled again on the user form.
-
Configure custom mappings:
- If you have custom mappings, you must map the attributes from the identity to the user. To map an attribute from the identity to the user, follow these steps:
- The attribute set for the Omada Identity account must be extended. Calculate the attribute values if they are not mapped directly from the identity.
- The data model for the account in the system onboarding screen must be extended to accommodate the new attributes.
- Map the attributes in the task mapping process to ensure they are correctly associated with the user.
- The attributes must be read in as extension attributes using appropriate queries and mappings.
- Update the reconciliation map accordingly for the Omada Identity Account resource type to ensure the mappings are correctly reconciled.
- If you have custom mappings, you must map the attributes from the identity to the user. To map an attribute from the identity to the user, follow these steps:
Orphan accounts and unapproved user group memberships handling
-
Calculate the Unresolved Identity.
cautionMany orphan assignments may result in a prolonged time of the Unresolved Identity calculations.
-
Initiate the Account Ownership review survey, scoped for the Omada Identity system, to validate the system compliance.
noteAssign the orphan accounts to an identity.
- Service accounts are usually assigned to a technical identity.
- Administrator accounts are usually assigned to an identity through administrator account type.
-
Repeat system import.
-
In the Compliance dashboard validate that there are no orphan accounts and unapproved assignments.
cautionIf the system remains uncompliant, create appropriate assignment policies and access requests to achieve desired state.
-
For the Omada Identity Account and Omada Identity User Group resource types enable the Exclusively managed field. This enables that not approved user group assignments are deprovisioned by the system when manually assigned.
Governance for Omada Identity interdependencies
As users are imported into the warehouse as accounts, and user group memberships are imported as permission assignments upon installation of the feature package, the event-driven logic becomes disabled. Consequently, the provisioning of users (accounts) and user group membership (permissions) are entirely managed by OPS. This shift has several implications when enabling the Governance for Omada Identity features, such as:
Code methods impacted by the feature
CreateContractorIdentity2- no longer adds user to the contractor user groupCreateEmployeeUser2- no longer adds user to the employee user group
Code methods made obsolete
All automated operations performed by these code methods will be managed by the new Governance for Omada Identity feature through provisioning tasks. Consequently, these code methods will no longer be accessible for use in any new functionality, even if Governance for Omada Identity is not yet enabled. Furthermore, they will be phased out in future versions of the product. However, despite their unavailability for new functionalities, they will continue to function as expected for existing ones. Following the activation of Governance for Omada Identity, they will become redundant, prompting their classification as obsolete.
Identity.CreateIdentityUserIdentity.UpdateIdentityUserMain.CreateIdentityUserMain.CreateIdentityUserExMain.UpdateIdentityUser
If you enabled Governance for Omada Identity, go through your custom event definitions and code method calls from processes that could use the obsolete code methods, and disable or replace them. When they are not disabled or replaced, and Governance is being used, errors appear in the Event Log.
Application events made obsolete
IdentityUserSynchronizer- Sync from Identity to user of FirstName, LastName, JobTitle, Email, IdentityStatus(interpreted into Inactive flag), ODWBusinessKeyGroupMembershipHandler- Adding and removing users to user groups when they're being added or removed as owner of identities, orgunits, resources, systems, resource folders, constraints and contexts. Similarly, adding or removing users to the service desk group.
The RoPE extension SelfManagementExtension no longer adds or removes users from user groups.