Omada Identity Governance capabilities
The Omada Identity Governance feature comes with the following capabilities.
Create a new personal user
By default, Omada Identity manages users and accounts for all employees and contractors. If there is a need for an identity with a different "identity category", the account can be requested in an access request for the "Omada Identity Account" resource or any of the Omada Identity User Group resources, as the system is configured to "auto create accounts".
Create a new admin user
- If it doesn't already exist, create an administrator account type
- If it doesn't already exist, create an account resource for the Omada Identity system for the Administrator account type. Provide a meaningful account name format, for example
ADM_[IDENTITYID]. - Request access to the new account resource and await the completion of the provisioning.
Users of non-personal account types are not directly linked to the identity through the IDENTITYREF property.
Maintain user properties
You can provision additional property values to the user object. To do so, follow these steps:
-
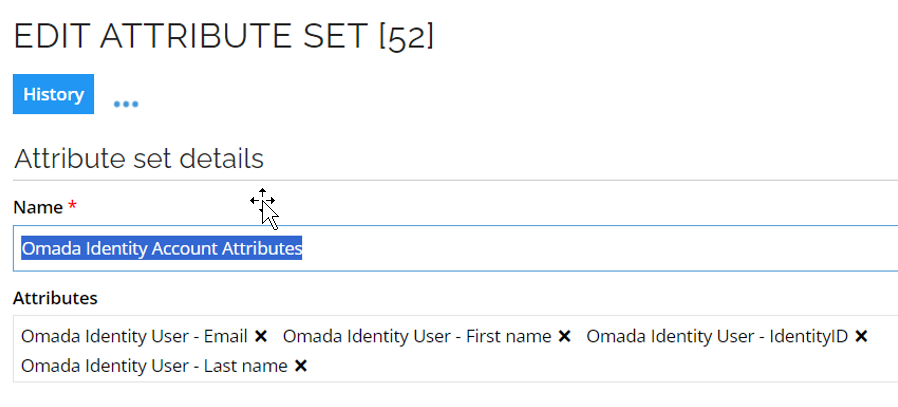
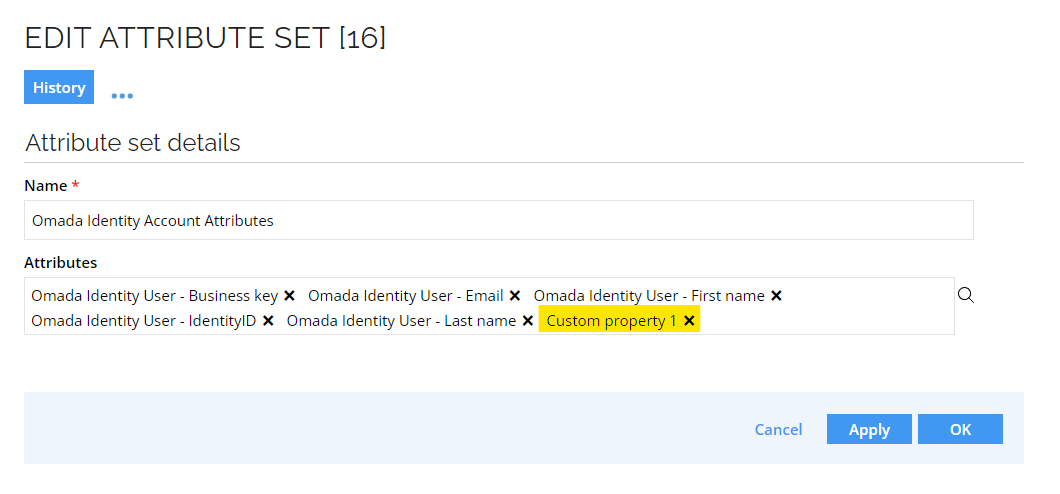
Add new attributes to the attribute set Omada Identity Account Attributes.
-
Recalculate an identity with an account and validate that the attribute values are populated appropriately.
-
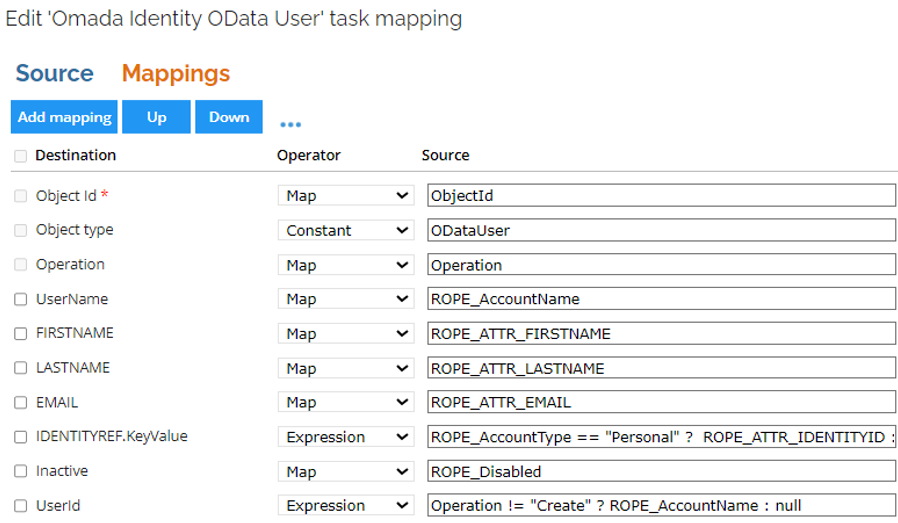
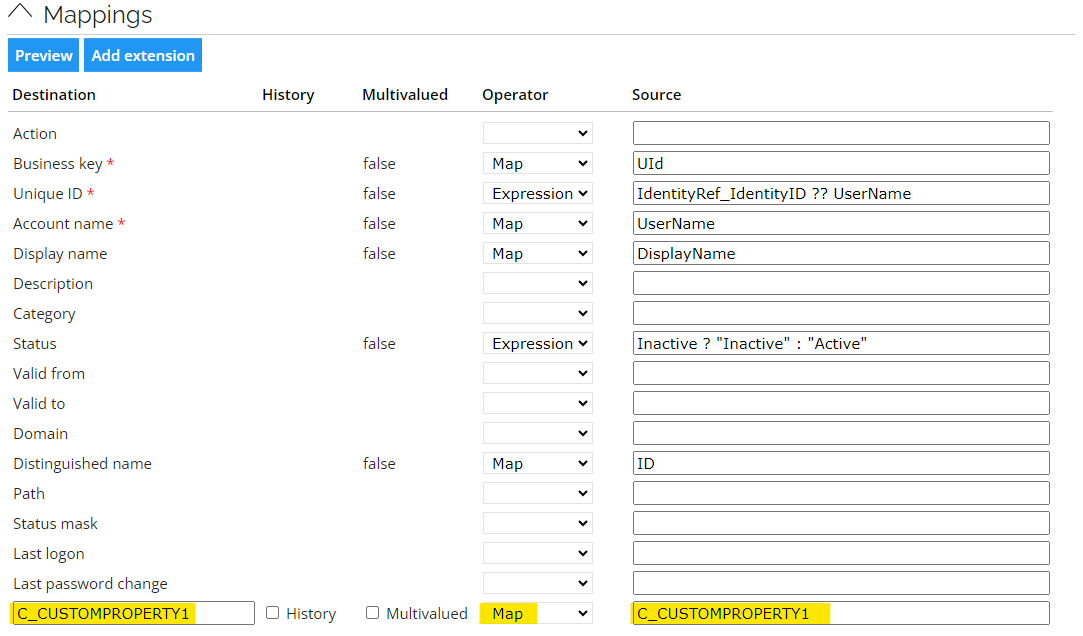
Extend the task mapping to include the additional properties.
exampleMapping User property to the new RoPE attribute value.
Create a new user group and related user group resource for self-service
To create an user group go to the user groups, in Setup, and click New. Then, enter new user group details. The user group resource is created with the name corresponding to the user group and the Logical key configured for the import to match the actual user group with the user group resource.
Managing user group lifecycle
To ensure smooth management of user groups and associated resources, it's essential to understand the lifecycle process, which involves creating, renaming, and deleting user groups while maintaining consistency and preventing potential issues:
-
When a new user group is created, a corresponding resource is automatically created for it, and the user group's reference property is assigned to the new user group.
-
If you rename a user group, the management resource isn't renamed automatically. The functionality depends on the reference between the user group and the resource, ensuring the link between them functions properly. For naming consistency, you can rename the resource accordingly. Similarly, if you rename a management resource, consider renaming the user group for consistency.
noteThe renaming of management resource is updated when you run an import. It is part of the Warehouse to portal mapping feature in import. For more information, refer to the ODW to ES Portal Synchronization section in the Import and onboarding guide.
-
When you delete a user group, the corresponding resources and resource assignments aren't deleted automatically. Remember to delete the related management resources and resource assignments as well. Ensure you delete the resource and resource assignments before deleting the user group to avoid deprovisioning issues.
Request and approval of user group membership
Similarly to other resources, you can configure the visibility of the user group resources using the Prevent self-service property on Resource, Resource type, or System.
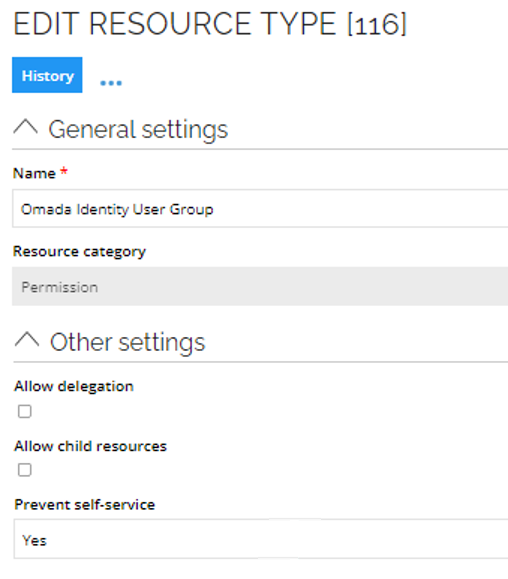
On a resource type in the Other settings
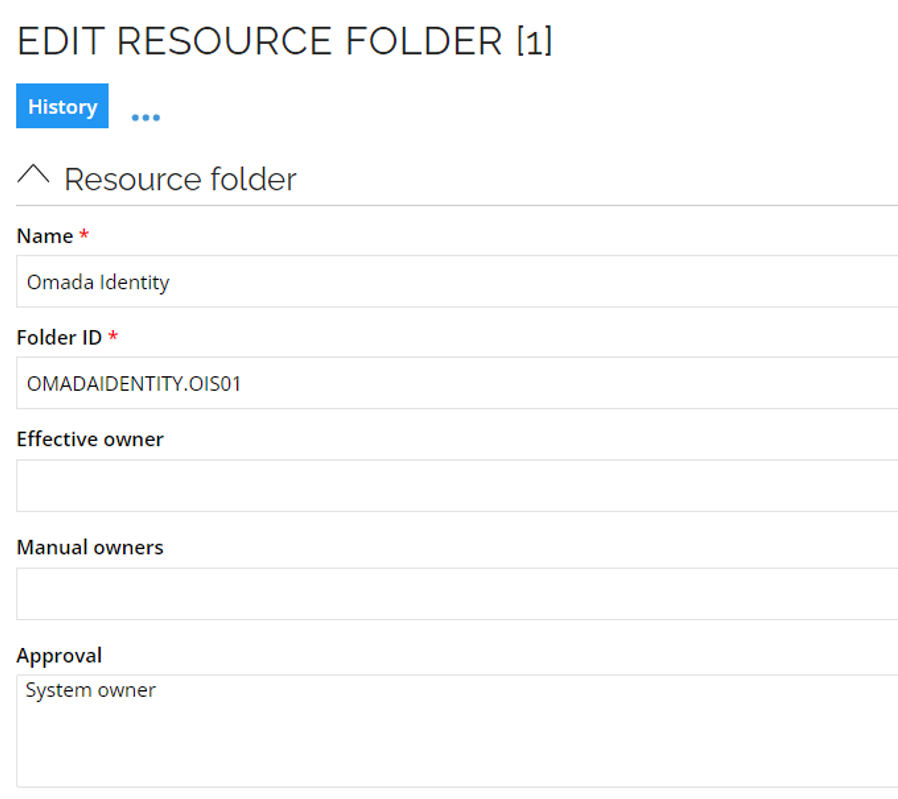
To configure the approval of the user group resource assignment, go to Omada Identity resource folder. For system security reasons it is crucial to have the approval level configured.
Monitor compliance status of Omada Identity and implement corrective actions
-
To monitor compliance, go to the Compliance workbench.
-
Click the Filter button for the Omada Identity system and include account assignments.

-
For any orphaned or not approved assignments, implement one of the corrective actions:
- Request access to the account or permission resource.
- Manually remove the account or the user group membership.
- Enable the Exclusively managed setting on the resource type for automated deprovisioning.
Initiate import and validate in the Compliance workbench corrective actions and compliance level.
Configure custom properties
In Omada Identity Governance, you can configure the import and export of custom properties. This functionality allows you to manage additional attributes specific to your organization's needs that may not be covered by default settings. To do so, follow these steps:
-
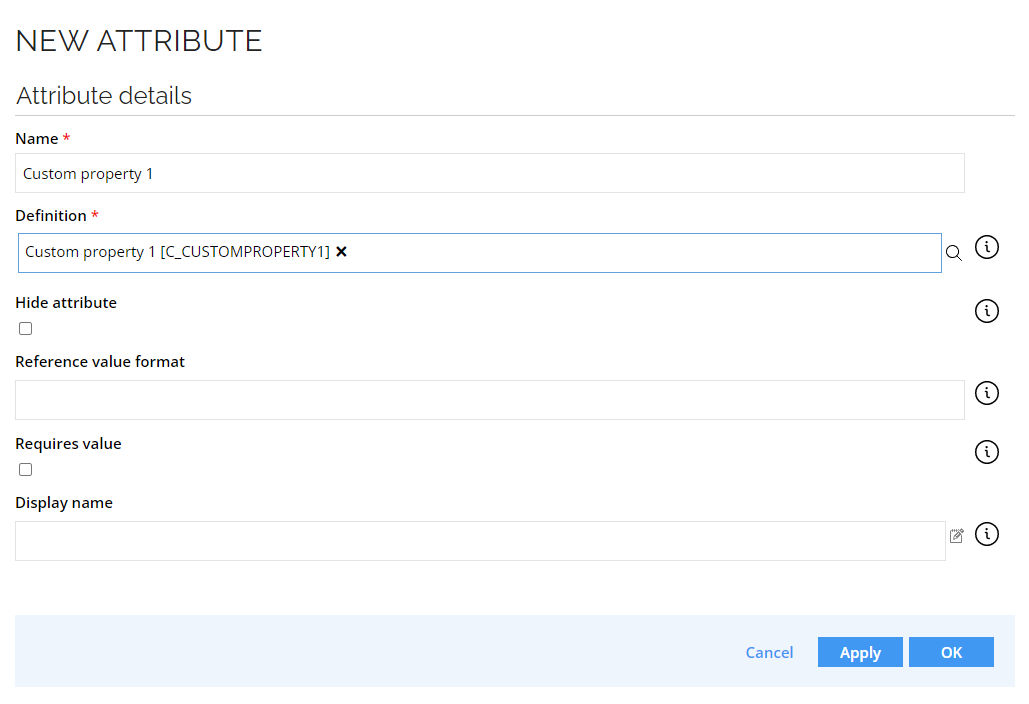
Create a new attribute based on the custom property.
-
Add the newly created attribute to the corresponding attribute set.
-
Establish a desired state for the new attribute.
- To do so, you can add the relevant property to the identity object type. This allows the value to be automatically mapped to the account attributes. Alternatively, you can set the desired state using an
AttributeValueResolverexpression.
- To do so, you can add the relevant property to the identity object type. This allows the value to be automatically mapped to the account attributes. Alternatively, you can set the desired state using an
Import custom property
To configure an import for custom property, follow the steps below:
-
Go to the Omada Identity system configuration.
-
In the System definition section, add the custom property to the Queries and mappings section.
- Select the appropriate queries and mappings based on the object type that contains the custom property.
-
In the Parameters section, in the OData URL field, add the new custom property to the URL. Include it in the select parameter list by adding the new property, separated by a comma, for example:

-
In the Mappings section, add a new mapping for the custom property in the Extension attribute row. Enter the system name of the custom property in both the destination and source columns, and select the Map operator, for example:
Export custom property
To configure an export for custom property, follow the steps below:
-
Go to the Omada Identity system configuration.
-
In the Data Model section:
-
Add the new custom property to the Properties section in the XML, for example:
<properties>
        ...
<property name="C_CUSTOMPROPERTY1" dataType="stringType" />
</properties> -
Add the custom property to the data model where you want to provision it, for example:
<object name="ODataUser">

<objectDetails>

        ...

        </objectDetails>

        <objectProperties>

        ...

        <objectProperty>C_CUSTOMPROPERTY1</objectProperty>

</objectProperties>

</object>
-
-
Click OK to save the changes.
-
In the Task mappings section:
-
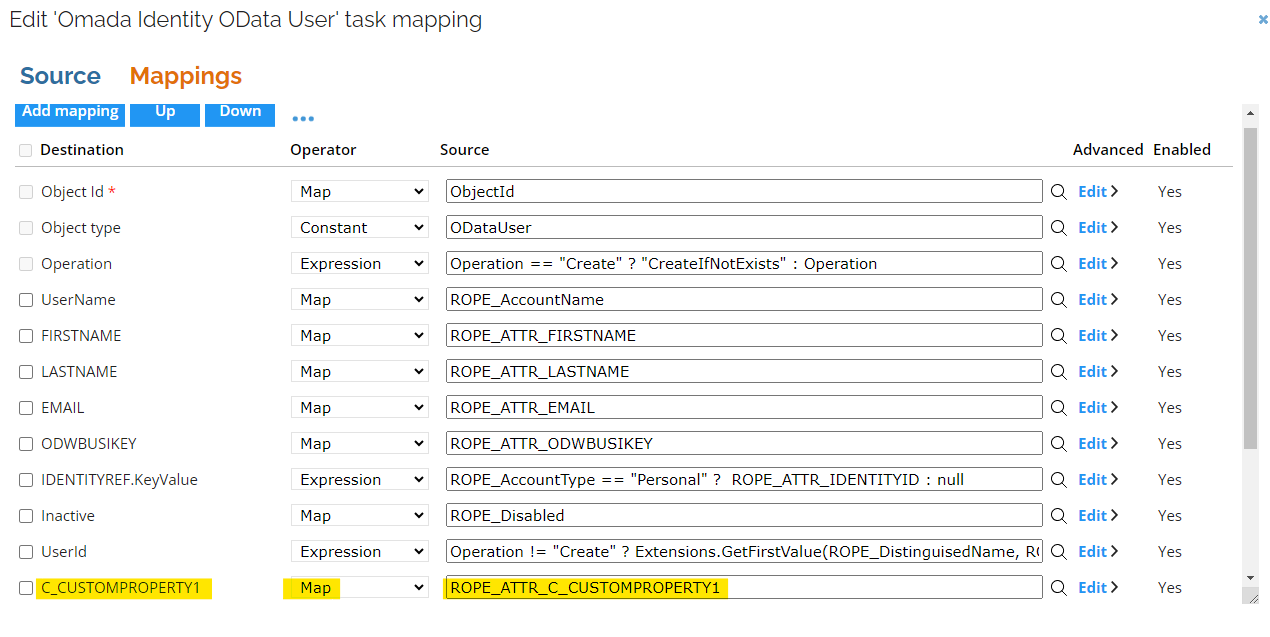
Select the data model object type where you want to add the new custom property and edit it accordingly.
-
In the Mappings tab, add a new mapping:
-
In the Destination column, select the new custom property.
-
In the Source column, click the magnifying icon and search for the new property (for example,
ROPE_ATTR_C_CUSTOMPROPERTY1). -
As an Operator, select Map.
-
-
-
Click OK to save the changes.
-
Click Commit settings to save the changes for the Provisioning section. Until you commit the changes, they will not be applied to the system.
-
To enable the reconciliation of the property, check the Reconcile on attribute level checkbox and add it to the Reconciliation attributes map on the corresponding resource type, for example:
