Menus and settings
My settings
The account settings are displayed when you click your username, in the top-left corner. It contains the following options:
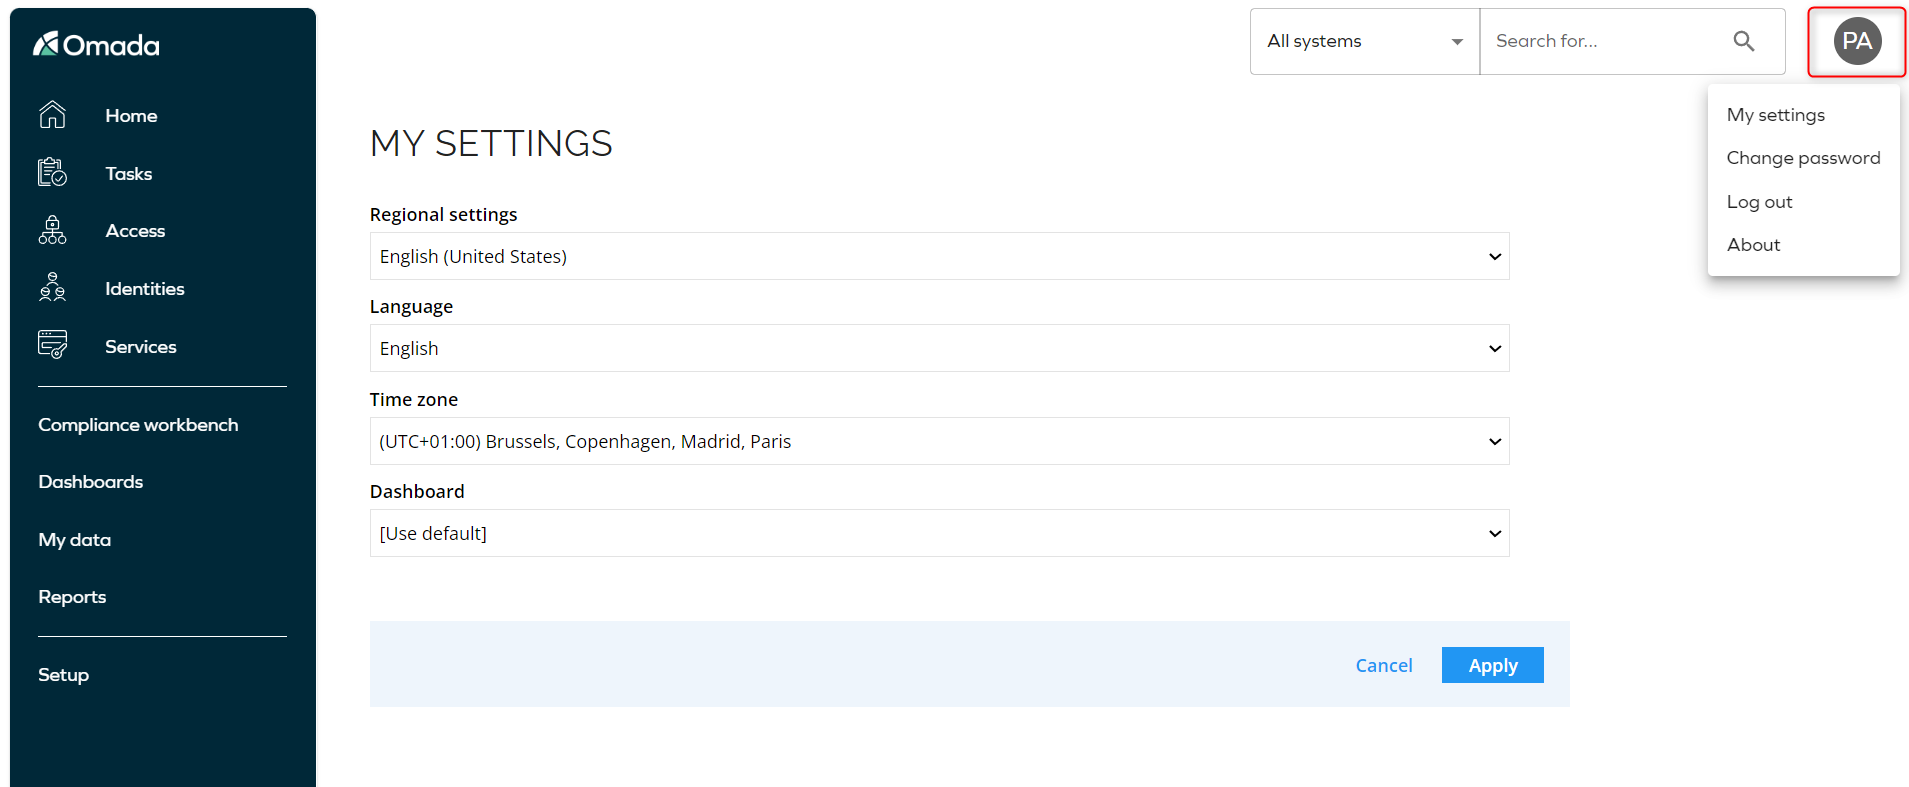
The My settings section contains basic settings relevant for the user currently logged in to Omada Identity. My settings include such settings as:
-
Regional settings – specifies calendar and date format.
-
The cultures used for this setting are the ones specified by Windows language culture names. This field must have the following format:
languagecode-country/regioncode, where:languagecodeis a lowercase, two-letter code, for example,encountry/regioncodeconsists of two uppercase letters or a language tag, for example,US
-
The following are examples of languages and their corresponding cultures:
- English:
en-US - Danish:
da-DK - German:
de-DE - Spanish:
es-MX - Swedish:
sv-SE - Dutch:
nl-NL - French:
fr-FR - Norwegian:
nb-NO - Polish:
pl-PL
noteCurrently, Regional settings are directly tied to the supported interface languages. Regional settings for cultures other than the ones using one of the interface languages are not supported.
In addition, Regional settings for the cultures that use Right to Left text are also not supported.
- English:
-
-
Language – specifies the language of the Omada Identity interface. NB: For strings that do not have a translation for the selected language, the default language (English) is used.
- Omada Identity supports multiple display languages that control what language menu items, properties, views, and other text strings are displayed as, dependent on the language set in the User profile for a user. For example, if you have Danish set as your user language, menu items and text strings will be displayed in Danish. This is controlled by defining application strings for multiple languages.
- These are the languages available with an out-of-the box installation:
- en-US (US English)
- da-DK (Danish)
- de-DE (German)
- sv-SE (Swedish)
- nl-NL (Dutch)
- fr-FR (French)
- nb-NO (Norwegian)
- pl-PL (Polish)
- es-MX (Spanish)
- pt-PT (Portuguese)
-
Time zone – specifies the time zone currently logged in user resides. The default time zone is UTC+01:00.
-
Dashboard – specifies the dashboard that will be presented to a given user after logging into the Omada Identity.
Menu structure
By default, the Menu Structure visible on the portal's left-side is composed of the following folders:
-
Services - where you can see your tasks and initiate your own requests, surveys, etc.
-
My Data - where you can find all information about your settings and your role.
-
Setup - where you find the tools to define the menu items displayed in each folder, their position in the folders, as well as in the views.
-
System operation:
- Logs
- Control policies
-
Master:
- Identities
- Organization
- Resources
- Context Managements
- Policies
- Classification
- Systems
-
Administration
- Changeset management
- Connectivity configuration
- Process configuration
- User interface
- Users & Security
- System settings
- Developer configuration
- UI actions
- Form and list actions
-
CIAM:
- Signup request
- Email ownership challenges
- Email change requests
- Terms documents
-
Advanced configuration:
- Folders
- Data object counters
- Work weeks
- Code assemblies
- OU Types
- Question in challenge
- Sequences
- Reason for request
- System view
-
-
Dashboards - where you can see your different dashboards.
-
Reports - where you can see your reports.
Here you will find how the left-menu side is depending on your role:
| System administrator | Manager | Employee |
|---|---|---|
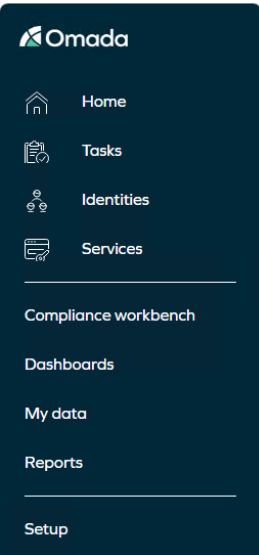 | 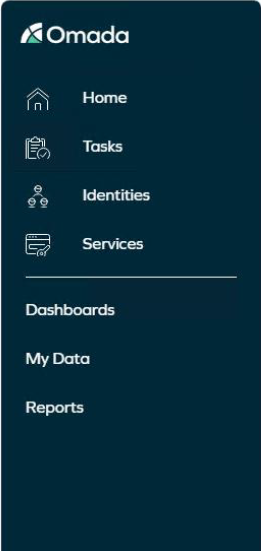 | 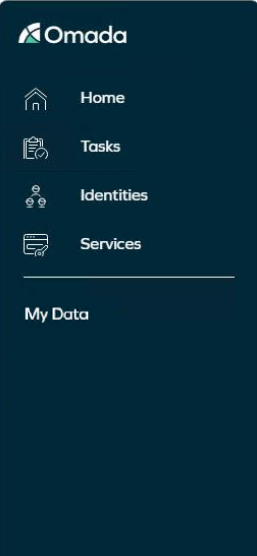 |
The content of those folders can vary according to your role and your permissions. The folder Setup is the one containing administration interfaces, which may be available only to administrators.
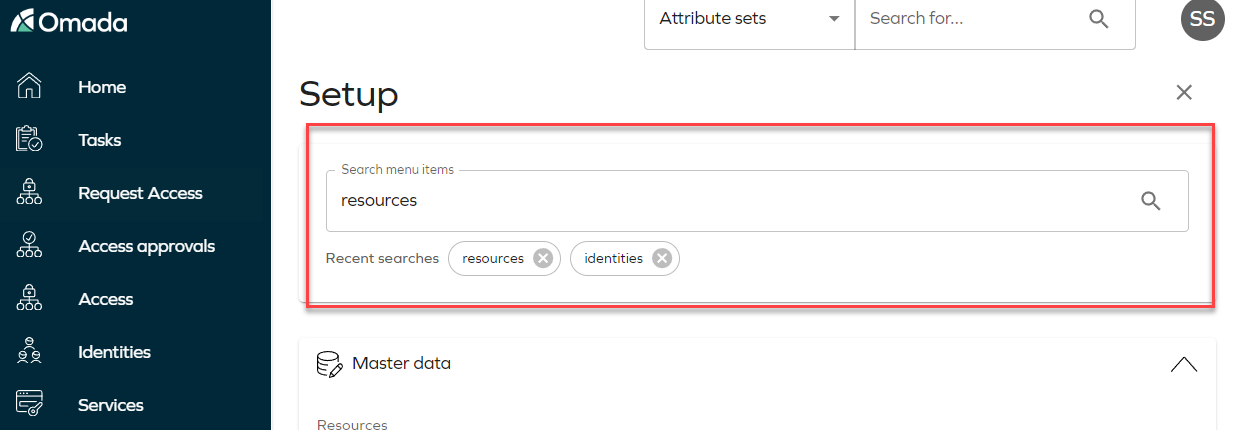
Menu search
Menu search box in the setup will save your most recent searches.
Menu items available only for administrators
Some menu items holding information or enabling valuable actions, are available only for users with Platform or System administrative permissions.
A Platform administrator must be both a System administrator and a Platform administrator to be able to configure the system.
Click on each list to learn which settings a user with particular role can change:
Platform administrators
Belonging to the Platform administrators user group gives elevated rights as compared to the System administrator.
While System administrators are able to configure the customer specific solution, only the Platform administrator can change the settings that affect the platform, such as:
- View and edit data objects of the DataConnection and OPSInstance types.
- Edit data objects of the XmlSchema type.
- View and edit certain customer settings.
- View and edit any master settings.
- Change the Omada Identity license key.
- Configure Data Exchange to use an SQL query as a data source.
- Whitelist configuration objects.
- Change the members of the Platform administrators user group.
- Reset the passwords of the Platform administrators users.
System administrators
The following menu items are designed specifically for System administrators:
-
Code method log
- This view lists all executed code methods. It is accessible in Setup > Operations > Logs.
-
Changesets and Configuration changes
- Both views are available under Setup > Administration > Configuration management.
- When moving data from one system to another, for example, from a development system to a production system, the system can log these changes and collects them into changesets that can be exported to another instance of the system.
-
Customer settings
- This view is available under Setup > Administration > More... Here, you can manage various customer settings.
-
Objects with defined security
- This view is available under Setup > Administration > Users & Security. This view displays data objects that have security defined: the name, type, path, and creation date.
-
Deleted objects
- Any data objects marked for deletion from the system are stored here. This view acts like a recycle bin where you can restore the object if the deletion was an error or purge the objects from the system entirely.
-
Email log
- This view is available under Setup > Operations > Logs. It displays a log of the mails that were generated by the system (for example, when resetting passwords) with the following details: receiver, subject, sent date, and status.
-
Generate MIM Management Agent
- This view is available under Setup > Administration > More.... In this view, you generate and download a MIM (formerly FIM) Management Agent configuration file for one or more data object types.
-
Installed packages
- This view is available under Setup > Administration > Configuration management. Installed packages, available when the Omada Identity Standard Application has been implemented, is a list of installed packages and shows details (such as the version) of the packages.
-
License
- This view is available under Setup > Administration > More.... This page displays the current software license status.
-
System statistics
- This view is available under Setup > Administration > More.... In this view, you can generate various statistics reports about the system performance. This is a part of the logging capabilities in Omada Identity.
-
ListViews
- This view is available under Setup > Administration > More.... In this view, you can access to critical list views, such as Identities, Resources, Technical Identities, Applications and Surveys, each featuring an updated user interface.
How to create a new menu item?
-
Go to Setup > Administration > User interface and click Menu structure.
-
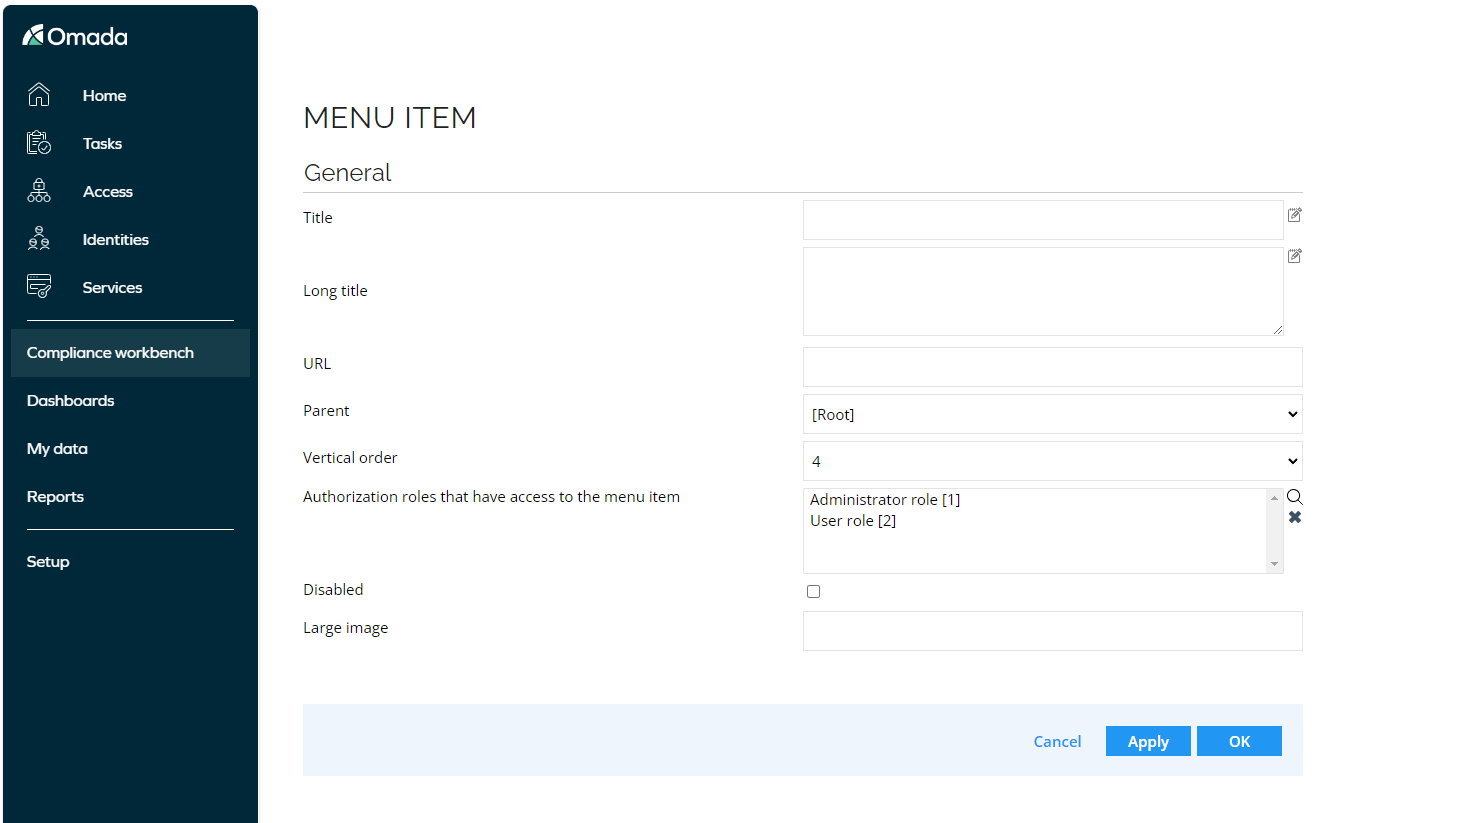
Click New and enter the following details to create a new menu item:
-
Enter a Title and Long title for the menu item.
-
In the URL field, type the name of an .aspx page or an external URL which you may want the menu item to open.
-
From the Parent dropdown list, select the position of the menu item in the menu structure. If Root is selected, the items will be displayed in the top position.
-
From the Vertical order dropdown list, select the position of the menu item among other menu items below the same parent menu item.
-
In the Authorization roles with access to the menu item field, click the Add icon to select the roles which should have access to the menu item.
-
Select the Disabled checkbox if you do not want the menu item to be displayed, but do not want to delete it.
-
Large image: select the icon you want to use in the menu item. We suggest using a SVGs icons. You can find a long list of icons available here:
-
Click here to see the icons
| Icon | Path |
|---|---|
| icons/process_access_approve.svg | |
| icons/process_access_delegate.svg | |
| icons/process_access_request.svg | |
| icons/process_access_revoke.svg | |
| icons/process_access_with_risk_approve_requested.svg | |
| icons/process_emergency_lockout.svg | |
| icons/process_evaluate_identity_violations.svg | |
| icons/process_join_project.svg | |
| icons/process_maintain_data.svg | |
| icons/process_manage_control_policy_exceptions.svg | |
| icons/process_manage_medium_risk_policy_exceptions.svg | |
| icons/process_offboard_application.svg | |
| icons/process_offboard_contractor.svg | |
| icons/process_offboard_employee.svg | |
| icons/process_onboard_application.svg | |
| icons/process_onboard_contractor.svg | |
| icons/process_onboard_employee.svg | |
| icons/process_password_change.svg | |
| icons/process_password_enroll_reset.svg | |
| icons/process_password_reset.svg | |
| icons/process_perform_provisioning.svg | |
| icons/process_request_technical_identity.svg | |
| icons/process_review_account_ownership.svg | |
| icons/process_review_joined_identities.svg | |
| icons/process_review_managers_access.svg | |
| icons/process_review_resource_owners_access.svg | |
| icons/process_review_user_mailbox_access.svg | |
| icons/process_revoke_emergency_lockout.svg | |
| icons/process_survey_classification.svg | |
| icons/process_survey_deleted_context.svg | |
| icons/process_survey_new_template.svg | |
| icons/process_survey_resource_classification.svg | |
| icons/process_survey_role_certification.svg | |
| icons/process_survey_system_classification.svg | |
| icons/process_survey_transfer_ownership.svg | |
| icons/process_transfer_identity_assignments.svg | |
| icons/process_user_icon_1.svg | |
| icons/process_user_icon_2.svg | |
| icons/process_user_icon_3.svg | |
| icons/process_user_icon_4.svg | |
| icons/process_user_icon_5.svg | |
| icons/streamline-icon-coding-apps-fix-wrench.svg | |
| icons/streamline-icon-cog-1svg | |
| icons/streamline-icon-database-edit.svg | |
| icons/streamline-icon-hand-give-lock.svg | |
| icons/streamline-icon-house.svg | |
| icons/streamline-icon-information-desk-custome.svg | |
| icons/streamline-icon-lock-hierarchy/dark.svg | |
| icons/streamline-icon-lock-hierarchy.svg | |
| icons/streamline-icon-multiple-users.svg | |
| icons/streamline-icon-password-key.svg | |
| icons/streamline-icon-task-checklist-check-bl.svg | |
| icons/streamline-icon-task-checklist-check.svg | |
| icons/streamline-icon-user-add.svg |
- Click Apply to save your changes and keep working, or OK to save your changes and close the view.
Please be aware that altering the top section menu may result in its loss if you make any modifications.
Page menu
The Page menu is located in the toolbar of each view. The content of the page menu is dependent on the displayed view in Omada Identity.
The Page menu options are:
- Download - allows you to download a copy of the view's information, as a .csv file or a PDF file.
- Setup View - allows you to inspect and update the definition of the object on which is based the view.
- Delete - click to delete rows selected in the list.
- Mass update - allows you to update several of the properties at the same time.
- History - returns the changes done to the data object view and their dates.
- Copy view - allows you to create a new view, based on the same data object and settings.
- User Group Matrix - downloads a .csv file containing the user groups and users with permissions to this view.
- Last logon – Download a .csv file of the last logged-on users.
Context menu
We call Context menu the options which, in any given view, allow you to consult the details of a data object and provide shortcuts to edit the data object.
You open the context menu by clicking the ellipsis (...) button on the right side of data objects.
The content of the context menu is dependent on the data object type, and can contain options such as Edit, Delete, History, and Security.
You can disable or enable the Context menu for any view in Setup > Administration > User interface > Views.
For an example of additional options, refer to the Users and groups view section.
Debug menu
Debug information can be accessed by pressing the CTRL key and right-clicking anywhere in a view.
The debug menu provides the following options:
- Debug information - provides the view ID as well as the object ID, user ID and language ID used by the view.
- Changesets - shows the latest changesets related to the object used by the view.
- Document mode - allows the developer to see the HTML document mode used by the browser to render the current view.
- Page variables - front-end details about the view (cookies, query string, session, form).
- Submit page - refreshes the view with a post back to the ASP.NET page.
- Print - allows you to print or download a copy of the view.
- Form data uid - allows you to obtain the object's form data UID on which the view is based.
- Query string - returns the URL of the Omada Identity view.
The most common use of the debug menu is to copy an object’s Form data UID. The Form data UID is used when defining code methods for Event Definitions and for the Data Object Exchange Web Service.