Raw IaC mode
This page describes the Raw IaC (Infrastructure as Code) deployment mode for Omada Identity Cloud Private – direct access to the Terraform and Ansible scripts for advanced users who need full control over state management and execution order. For an overview of deployment modes and shared prerequisites, see the Deployment guide.
This page is provided for reference, and is not required if you are using the Installation Script mode, which handles all of this automatically.
Characteristics
- Direct Terraform CLI execution (no wrapper scripts).
- Direct Ansible CLI execution for playbooks.
- Full control over state management and execution order.
- Ability to modify scripts and customize deployments.
- Requires manual orchestration of all steps.
- Suitable for complex environments or enterprise integrations.
Prerequisites for Raw IaC:
- Deep understanding of Terraform (state, workspaces, modules).
- Ansible playbook expertise.
- Experience with Azure resource dependencies.
- Knowledge of IaC troubleshooting and debugging.
For tooling versions, see Raw IaC prerequisites in the Deployment guide.
When to use:
- Significant customization or modifications required.
- Existing Terraform/Ansible infrastructure to integrate with.
- Internal tooling requires direct script access.
- Advanced users comfortable with IaC.
Manual deployment flow
You will receive a secure link to download the Omada Identity Cloud Private installation package from the Omada Community. This applies to both Raw IaC and Installation Script modes.
Before installing the product, you can confirm that the downloaded release packages actually came from Omada and have not been altered in transit. See Release package signing.
To execute the Raw IaC deployment, download and unpack the release package.
Quick execution summary
Tool: Bash shell
# Navigate to the unpacked release package
cd <unpacked_release_package_path>

# Prerequisites
az login
export GLOBAL_PREFIX="<your-global-prefix>"
export APP_PREFIX="<your-app-prefix>"
export WORKSPACE_PREFIX="<your-workspace-prefix>"

# Shared Infrastructure (run once)
cd iac/infrastructure/iac-shared
terraform init
terraform apply

# Upload Container Images and Artifacts
# (manual or scripted image push to container registry)
# (upload release artifacts to blob storage)

# Workspace-Specific Infrastructure (per environment)
cd ../iac
terraform init
terraform workspace select -or-create $WORKSPACE_PREFIX
terraform apply

# Save Terraform outputs for Ansible
terraform output -json > ../../ansible/vars/terraform_outputs.json

# Set up Ansible environment (one-time) — see Step 8 for full setup commands
cd ../../ansible
ansible-galaxy collection install "azure.azcollection:==3.10.1" kubernetes.core

# Tier 1: Pre-AKS DB setup
ansible-playbook playbooks/configure_db_preaks.yml \
  --extra-vars "global_prefix=${GLOBAL_PREFIX} app_prefix=${APP_PREFIX} workspace_prefix=${WORKSPACE_PREFIX}"

# Phase 1: Deploy AKS, ES pod, and Timer pod
ansible-playbook playbooks/deploy_aks.yml \
  --extra-vars "global_prefix=${GLOBAL_PREFIX} app_prefix=${APP_PREFIX} workspace_prefix=${WORKSPACE_PREFIX}"

# Tier 2+3: ES configuration
ansible-playbook playbooks/configure_es.yml \
  --extra-vars "global_prefix=${GLOBAL_PREFIX} app_prefix=${APP_PREFIX} workspace_prefix=${WORKSPACE_PREFIX}"

# Phase 2: Secondary pods (RoPE, CagOps)
ansible-playbook playbooks/deploy_aks.yml \
  --extra-vars "global_prefix=${GLOBAL_PREFIX} app_prefix=${APP_PREFIX} workspace_prefix=${WORKSPACE_PREFIX} run_phase2=true"
Before you start
Before starting, review the files containing the variables and locals for both Terraform and Ansible. Update them as needed based on your tenant and subscription. The relevant files are:
-
iac/infrastructure/iac/variables.auto.tfvars.json -
iac/infrastructure/iac-shared/locals.tf -
iac/ansible/vars/main.yml -
iac/infrastructure/iac/shared-config.tfnoteThe
shared-config.tffile contains some default configurations for resources, such as SKUs, vnet address space, and other infrastructure settings. Review the file and replace the settings as needed.There is also a mechanism of overriding config values based on environment (workspace name). The default values are in the shared_config block of
shared-config.tf. In that block, there is also anenvironment_overridesmap that contains some example overrides fordevandprodenvironments. You can modify those or add new ones for your custom workspace names.shared-config.tfis subject to change: in future versions, we might rely solely on variables.
Step 1: Configure sizing and SKUs (optional)
By default, Cloud Private deployments use pre-configured sizing profiles optimized for each environment type (dev, QA, prod). Sizing is defined in iac/infrastructure/iac/shared-config.tf and iac/infrastructure/iac-shared/locals.tf.
Default sizing profiles
For sizing profiles and SKU recommendations per environment, see Azure infrastructure sizing in the Omada Identity Cloud Private overview.
Customizing sizing
To modify sizing for your environment:
- Locate configuration file: Open
iac/infrastructure/iac/shared-config.tf. - Identify resource sizing: Look for SKU variables (for instance,
aks_vm_size,sql_database_sku,app_service_plan_sku). - Apply environment overrides: Add overrides in the
environment_overridesmap for your workspace:
Format: HCL (Terraform)
environment_overrides = {
  prod = {
    aks_vm_size       = "Standard_D8s_v5"    # Upgrade from D4s_v5
    sql_database_sku  = "S2"                 # Upgrade from S1
    app_service_sku   = "P1V2"               # Upgrade from B3
  }
}
- Apply changes: Run
terraform planandterraform applyto preview and deploy.
For SKU selection guidance per environment, see SKU selection guidance in the Omada Identity Cloud Private overview.
Step 2: Determine the workspace name
The workspace name controls which Terraform state and infrastructure set is used. Choose a workspace name (for example, dev, test) and export it:
Tool: Bash shell
export WORKSPACE="dev"
Step 3: Azure login
Tool: Bash shell
az login
az account set --subscription <your-subscription-id>
az account show
Verify you are on the correct subscription.
When running locally, make sure you have sufficient permissions to access the Terraform state storage account and manage resources in the target subscription/resource groups.
Step 4: Terraform – shared infrastructure
The shared infrastructure includes resources that are common across all environments, such as the main Key Vault, container registry, or artifact storage account. This is deployed once and used by all workspaces.
Tool: Bash shell
cd iac/infrastructure/iac-shared

terraform init

terraform apply -auto-approve
After the shared infrastructure is provisioned, populate the required certificates and secrets in the newly created Key Vault before proceeding. For the full list of required certificates, encoding instructions, and a pre-deployment checklist, see Key Vault and secret management.
Unlike Installation Script mode, Raw IaC does not include an automated secrets validation phase. Verify that all required certificates and secrets are correctly populated in Key Vault before running the Ansible playbooks.
Step 5: Terraform – workspace creation
Tool: Bash shell
cd iac/infrastructure/iac/

terraform init

terraform workspace select -or-create "$WORKSPACE"
Depending on your needs, you can change where the state is stored: create a separate storage account or use the one that was created for shared infrastructure.
After you select the workspace, run terraform apply to create the workspace-specific infrastructure (AKS cluster, VMs, databases, networking, and other resources). From the same iac/infrastructure/iac/ directory, run:
Tool: Bash shell
terraform apply -auto-approve
To do a dry run (plan only, no changes applied), execute:
Tool: Bash shell
terraform plan
Step 6: Upload container images to registry
This step assumes that container images are taken from the containers folder and uploads them to the Azure Container Registry created in step 5.
Prerequisites
- Containerd is installed and running on your machine.
- Container image files are available in the
containersfolder (TAR format).
Authenticate with Azure Container Registry
Set the registry name (from Terraform outputs or Azure portal) and authenticate using Azure CLI:
Tool: Bash shell
REGISTRY_NAME="<your-registry-name>"
REGISTRY_URL="${REGISTRY_NAME}.azurecr.io"

az acr login --name "$REGISTRY_NAME"
Upload images
Navigate to the package location and import/push each image. For a single image:
Tool: Bash shell
cd /path/to/package

ctr -n k8s.io image import containers/imagename.tar
ctr -n k8s.io image tag docker.io/library/imagename:tag ${REGISTRY_URL}/imagename:tag
ctr -n k8s.io image push ${REGISTRY_URL}/imagename:tag
Batch upload script
To upload all images from the containers folder:
Tool: Bash shell
#!/bin/bash
REGISTRY_NAME="<your-registry-name>"
REGISTRY_URL="${REGISTRY_NAME}.azurecr.io"
CONTAINER_IMG_PATH="/path/to/package/containers"

cd "$CONTAINER_IMG_PATH"

for image_file in *.tar *.tar.gz; do
  [ -f "$image_file" ] || continue

  image_basename=$(basename "$image_file" .tar.gz)
  image_basename=$(basename "$image_basename" .tar)

  echo "Uploading: $image_basename"
  ctr -n k8s.io image import "$image_file"
  ctr -n k8s.io image tag "docker.io/library/${image_basename}" "${REGISTRY_URL}/${image_basename}"
  ctr -n k8s.io image push "${REGISTRY_URL}/${image_basename}"
  echo "✓ Completed: $image_basename"
done
Verify images in registry
Tool: Bash shell
# List all repositories
az acr repository list --name "$REGISTRY_NAME"

# List tags for a specific image
az acr repository show-tags --name "$REGISTRY_NAME" --repository "image-name"
Step 7: Save Terraform outputs
The Ansible stages need the Terraform outputs. Save them to the expected location. From the iac/infrastructure/iac/ directory, run:
Tool: Bash shell
terraform output -json > ../../ansible/vars/terraform_outputs.json
Step 8: Set up Ansible environment
This is a one-time setup per machine (or virtual environment). The pipeline runs this before each Ansible stage.
This step can be completed at any point before step 9. It can be done once and the same Ansible environment can be reused for multiple deployments.
Tool: Bash shell
# Install Microsoft ODBC Driver 18 for SQL Server (Ubuntu)
curl https://packages.microsoft.com/keys/microsoft.asc | sudo apt-key add -
curl https://packages.microsoft.com/config/ubuntu/$(lsb_release -rs)/prod.list \
  | sudo tee /etc/apt/sources.list.d/mssql-release.list
sudo apt-get update
sudo ACCEPT_EULA=Y apt-get install -y msodbcsql18 unixodbc-dev

# Create and activate Python virtual environment
python3 -m venv ~/ansible-venv
source ~/ansible-venv/bin/activate

# Install Python packages
pip3 install --trusted-host pypi.org --trusted-host files.pythonhosted.org \
  requests ansible==13.0.0 kubernetes pyodbc==5.2.0 pywinrm pypsrp

# Install Ansible collections
ansible-galaxy collection install "azure.azcollection:==3.10.1" --force
ansible-galaxy collection install kubernetes.core --force

# Install Azure collection Python dependencies
pip3 install -r ~/.ansible/collections/ansible_collections/azure/azcollection/requirements.txt
Step 9: Tier 1 – Pre-AKS database setup
This step runs the database and schema setup before the AKS cluster exists. All tasks run locally via delegate_to: localhost – no AKS pod is required.
Tool: Bash shell
cd ../../ansible

ansible-playbook playbooks/configure_db_preaks.yml \
  --extra-vars "global_prefix=${GLOBAL_PREFIX} app_prefix=${APP_PREFIX} workspace_prefix=${WORKSPACE_PREFIX}"
Step 10: Phase 1 – Deploy AKS, Enterprise Server, and Timer
Deploys the AKS cluster, the Enterprise Server (ES) pod, and the Timer pod.
Tool: Bash shell
ansible-playbook playbooks/deploy_aks.yml \
  --extra-vars "global_prefix=${GLOBAL_PREFIX} app_prefix=${APP_PREFIX} workspace_prefix=${WORKSPACE_PREFIX}"
DNS records are updated automatically as part of the deploy_aks.yml playbook. The playbook creates public A records for <global_prefix>.<dns_zone_name> and <global_prefix>-forms.<dns_zone_name>, and optionally private DNS A records when update_private_dns_records is set to true (default).
Step 11: Tier 2+3 – ES configuration
Runs the full Enterprise Server configuration: changeset import, user provisioning, connectivity, and worker settings.
Tool: Bash shell
ansible-playbook playbooks/configure_es.yml \
  --extra-vars "global_prefix=${GLOBAL_PREFIX} app_prefix=${APP_PREFIX} workspace_prefix=${WORKSPACE_PREFIX}"
Step 12: Phase 2 – Secondary pods
Deploys RoPE and CAGOps pods. This phase is gated and runs after the ES configuration is complete.
Tool: Bash shell
ansible-playbook playbooks/deploy_aks.yml \
  --extra-vars "global_prefix=${GLOBAL_PREFIX} app_prefix=${APP_PREFIX} workspace_prefix=${WORKSPACE_PREFIX} run_phase2=true"
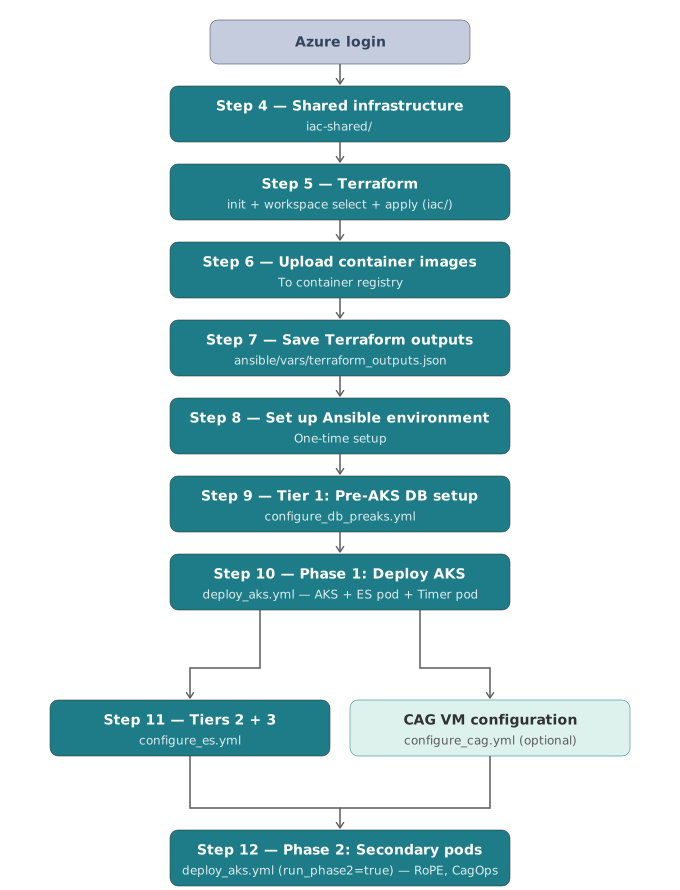
Stage dependency overview
The following diagram illustrates the dependencies between the Raw IaC deployment stages.
For the full deployment validation checklist, see Deployment validation checklist in the Deployment guide.