Install and maintain Omada Identity with scripts
Partial installation of Omada Identity
You can configure the scripts to install only selected Omada Identity components. Enable or disable each component node separately in the configuration file: Enterprise Server (ES), Omada Provisioning Service (OPS), Omada Identity Data Warehouse (ODW), and Role and Policy Engine (RoPE).
<ES Enabled="true">...</ES>
<OPS Enabled="true">...</OPS>
<ODW Enabled="true">...</ODW>
<RoPE Enabled="true">...</RoPE>
Every step not listed in the table below always runs, regardless of which components are enabled or disabled.
| Step | All components enabled | ES | ODW | OPS | RoPE |
|---|---|---|---|---|---|
| 1.3 Checking Enterprise Server prerequisites | X | X | |||
| 1.5 Configuration of separate database/SQL Server Integration Services (SSIS) server (for multi-server installations) | X | ||||
| 2 Enterprise Server installation | X | X | |||
| 3 Omada Data Warehouse installation | X | X | |||
| 4 Role and Policy Engine installation | X | X | |||
| 5 Omada Provisioning Service installation | X | X | |||
| 6.1 Changesets import | X | X | |||
| 6.2 AuditDB configuration | X | ||||
| 6.5 Additional changes in RoPE configuration files | X | X | |||
| 6.6 Additional changesets import | X | X | |||
| 6.8 Creation of task for daily import/export | X |
You cannot install RoPE without a working instance of Enterprise Server.
Use the scripts
This section explains how to use the Omada Identity Installation scripts.
Install a new version of Omada Identity
Before you start:
- Check that the installation files have been copied and verified.
- Verify that the connection string is ready.
- If required, verify that the relevant Windows features are installed.
- Remove old log files.
- If required, configure the separate database/SSIS server.
- Check that the local user exists, or create it.
-
Run the script with the following parameters:
Invoke-OmadaUpgrade -Action Upgrade -XMLPath "C:\powershell\DO-UpgradeTools\Private\install.config" -
The script performs the following actions:
- Stops all services for the Omada software components enabled in the configuration file.
- Backs up databases if this option is enabled.
- Uninstalls the Role and Policy Engine.
- Deletes the Role and Policy Engine database.
- Uninstalls the Omada Provisioning Service.
- Deletes the Omada Provisioning Service database.
- Uninstalls the Omada Identity Data Warehouse.
- Deletes the Omada Identity Data Warehouse database.
- Deletes the Omada Identity Data Warehouse Master database.
- Deletes the Omada Identity Data Warehouse Staging database.
- Removes the Enterprise Server web page.
- Removes the Enterprise Server application pool.
- Uninstalls Enterprise Server.
- Deletes the Enterprise Server database.
- Deletes the Enterprise Server Audit database.
- Deletes the Enterprise Server Source System database.
- Deletes the Enterprise Server database login.
noteIf the target of a step is missing—for example, because not all components are installed—the corresponding step is skipped, and the script continues.
-
The installation script runs.
-
For Omada Identity Enterprise Server, the script:
- Installs Enterprise Server.
- Configures Enterprise Server.
- Installs any relevant additional tools.
- Creates the website.
- Creates the proxy account in Microsoft SQL Server.
- Imports changesets.
-
For Omada Identity Data Warehouse, the script:
- Installs Omada Identity Data Warehouse.
- Creates additional database users.
- Changes the Data Transformation Services (DTS) configuration files.
- Configures Distributed Component Object Model (DCOM).
- Configures Omada Identity Data Warehouse.
- Loads the relevant reports.
-
For Omada Identity Role and Policy Engine (RoPE), the script:
- Installs RoPE.
- Creates database users.
-
The script installs Omada Provisioning Service (OPS).
-
The script performs the following additional system configuration:
- Imports changesets.
- Configures the Audit database.
- Changes the service startup type.
- Reconfigures the reporting server.
- Restores additional databases if this option is enabled.
- Creates a daily import and export job.
- Restarts the services.
- Backs up newly created databases.
This procedure may take up to 20 minutes to complete.
Update an existing Omada Identity installation
-
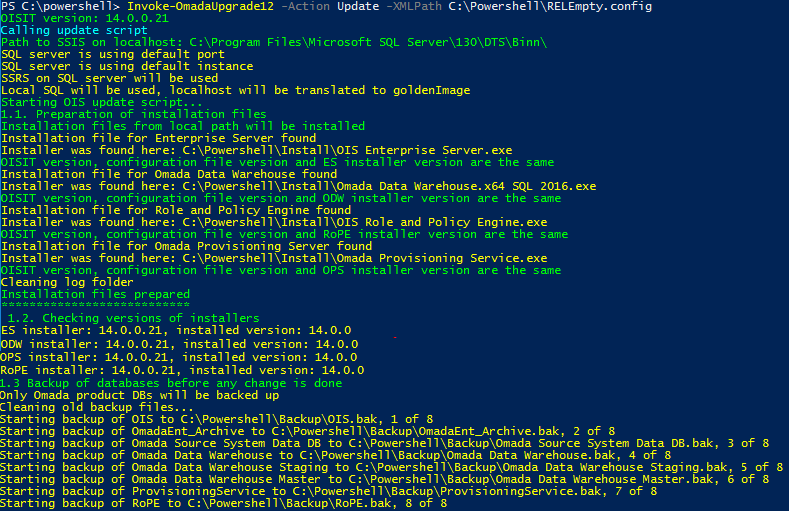
Run the script with the following parameters:
Invoke-OmadaUpdate -XMLPath "C:\PowerShell\DO-UpgradeTools\Private\install.config"All components enabled in the configuration file are upgraded.
-
The script creates database backups.
-
The script upgrades Enterprise Server.
-
The script upgrades Omada Identity Data Warehouse.
-
The script upgrades Omada Identity Role and Policy Engine:
- Backs up the configuration files.
- Uninstalls the Role and Policy Engine.
- Installs the Role and Policy Engine.
- Updates the Role and Policy Engine database.
- Updates the Role and Policy Engine configuration files.
-
The script upgrades Omada Provisioning Service.
-
The script performs additional configuration:
- Uploads reports.
- Uploads surveys.
This procedure may take up to 20 minutes to complete.
Uninstall an existing Omada Identity installation
-
Run the script with the following parameters:
Invoke-OmadaUpgrade -Action Uninstall -XMLPath "C:\powershell\DO-UpgradeTools\Private\install.config" -
The script performs the following actions:
- Stops all services for the Omada software components enabled in the configuration file.
- Backs up databases if this option is enabled.
- Uninstalls the Role and Policy Engine.
- Deletes the Role and Policy Engine database.
- Uninstalls the Omada Provisioning Service.
- Deletes the Omada Provisioning Service database.
- Uninstalls the Omada Identity Data Warehouse.
- Deletes the Omada Identity Data Warehouse database.
- Deletes the Omada Identity Data Warehouse Master database.
- Deletes the Omada Identity Data Warehouse Staging database.
- Removes the Enterprise Server web page.
- Removes the Enterprise Server application pool.
- Uninstalls Enterprise Server.
- Deletes the Enterprise Server database.
- Deletes the Enterprise Server Audit database.
- Deletes the Enterprise Server Source System database.
- Deletes the Enterprise Server database login.
noteIf the target of a step is missing—for example, because not all components are installed—the corresponding step is skipped, and the script continues.
Create a database backup
-
Run the script with the following parameters:
Backup-OmadaDatabases -XMLPath "C:\PowerShell\DO-UpgradeTools\Private\install.config"The script creates backups of all databases used by the Omada Identity components.
-
To back up all databases configured for backup in the configuration file, run the script with these parameters:
Backup-OmadaDatabases -backupAll true -XMLPath "C:\PowerShell\DO-UpgradeTools\Private\install.config"
Restore databases
-
Run the following command to restore all databases used by Omada Identity components that have the Restore parameter set to True:
Restore-OmadaDatabases -XMLPath "C:\PowerShell\DO-UpgradeTools\Private\install.config"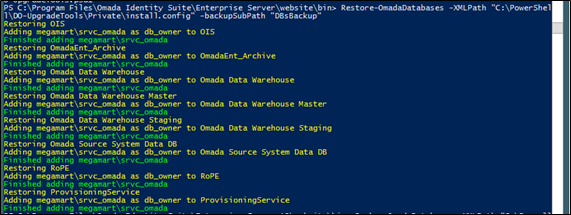
-
To restore all databases configured for restoration in the configuration file, run the command with these parameters:
Restore-OmadaDatabases -restoreAll true -XMLPath "C:\PowerShell\DO-UpgradeTools\Private\install.config"
Troubleshooting
Error handling
All steps and substeps should display user-friendly error messages. Error messages appear in red.
If an error occurs, fix it and then run the Invoke-OmadaUpgrade script with either the Uninstall or Upgrade action enabled.

Installation log storage
Logs from installers, changeset imports, data object imports, and package run files are stored in the folder specified in the configuration file.

Reuse a service username that was removed from AD
If Omada Identity uses Kerberos and you reinstall it on a server where a previous version was installed using the Omada Identity Installation Tool, the installation fails if you reuse the previous service username after that user has been removed from Active Directory (AD). Use a new username for the reinstallation.