ODW Reports
Omada Identity includes a standard application package called ODW Integration that you can import to Omada Identity via the Installed packages page. This creates the recommended menu structure in Omada Identity, including the URL to the standard reports on the Reporting Server.
You can install the package in the Omada Identity Portal through the Installed packages view. Go to Setup > Configuration Management > Installed packages to do this.
The menu items are configured to look for the reports in the following folders on the Reporting Server:
- Data Quality -- Data quality reports
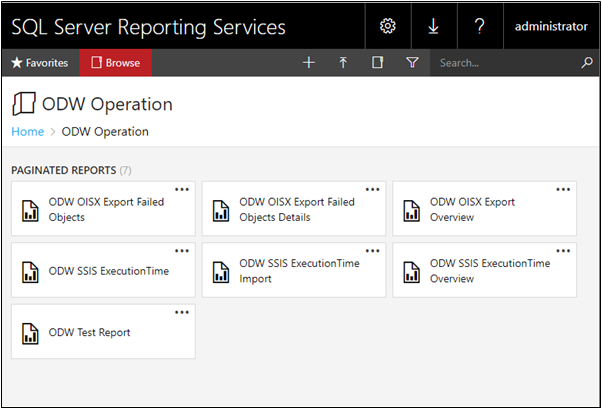
- ODW Operation -- Operation reports
- Reports -- System, Account, Resource, Identity, Context, and Resource assignment reports.
The user/user group that runs reports in Omada Identity must have the default language for its SQL server login set to English (US).
Links to the Dashboard reports are not created by the ODW Integration package.
Omada Identity Portal report viewer
Omada Identity can show reports embedded in Omada Identity, if you have installed the Microsoft Report Viewer.
Omada Identity can store the URL to the reporting server in a Customer Setting. This saves you from updating the URL field for each relevant menu item, should it change, for example when you move between environments.
The Customer setting key is SSRS URL.
If you use the report viewer, URLS for reports in menu items must follow the pattern:
ReportViewer.aspx?Path=/reports/ODW Systems&ActorRole=AUDIT
If you are not using the Report Viewer, add the full URL in the URL field in menu items.
Setting parameters in the URL
To be able to pass parameters to the report, you must use a URL to the report server, for example:
http://localhost/ReportServer/Pages/ReportViewer.aspx?%2fODW+Operation%2fODW+SSIS+ExecutionTime+Overview
You can then add report parameters or other commands. You can use the report parameters, for example, to hide the available parameters or to open a PDF version of the report. The following are exemplary actions and their corresponding commands:
- Render report -
&rs:Command=Render - Collapse parameters -
&rc:Parameters=Collapsed - Expand parameters -
&rc:Parameters=Expanded - Open a PDF version of the report -
&rs:Format=PDF - Set the max. items parameter to a specific value (in this case 1000 items) -
&MaxRows=1000
For more information about the available commands, see Microsoft documentation.
Actor role
The data security model for ODW reports rely on actor roles and data ownership to determine what data the user viewing the report is allowed to see. If you want to use the built-in security concept, you should always add the relevant actor role as a parameter to the report URL, for example &ActorRole=AUDIT for Auditor access. Available actor roles:
- Auditor -
AUDIT - Owner -
OWNER
Add report links
When you have set up the report URL with the relevant parameters, you must create a menu item for it.
To create a menu header:
- Go to Setup > Master Data > Menu Structure. Click New.
- Enter a Title, choose the Parent menu, and choose the Authorization roles that should have access to the menu item. If you leave the default User role, all users have access to the item. You can order the Menu Item by selecting its position in Vertical order. Click OK.
To create a report item:
- Go to Setup > Master Data > Menu Structure. Click New.
- In the Title field, type a relevant name, then choose the parent menu item in the Parent drop-down list.
- Enter the URL to the report in the URL field.
- Enter a Title, choose the Parent menu, and choose the Authorization roles that should have access to the menu item. If you leave the default User role, all users have access to the item. You can order the Menu Item by selecting its position in Vertical order. Click OK.
Report verification and troubleshooting on-prem
It can be difficult to verify report installation and configuration, and it can be hard to troubleshoot when individual users cannot run reports.
The Omada Identity Test Report gives you the insight into the security details which are essential to the report execution.
Follow these steps to deploy the Omada Identity Test Report:
-
Locate ODW Test Report.rdl in the Datawarehouse\Support Files\SSRS Reports\ODW Operation folder, and upload it to the ODW Operation folder in SQL Server Reporting Services. Ensure that the report uses the ODW data source in the Reports folder.
-
Go to Setup > Administration > Configuration objects, and edit the Report Viewer Configurations. Add the following inside the
reportConfigurationselement, to make the report available to everyone:<reportConfiguration name="WT001" reportPath="/ODW Operation/ODW Test Report" actorRole="OWNER">
<visibility>
<visibleTo userGroupUId="942e8812-bf35-45b2-8a19-2bd27ab801a3" />
</visibility>
</reportConfiguration> -
Call the report by browsing a report, then change the RD parameter to the name of the
reportConfigurationelement in the URL, e.g.http://enterpriseserver/ReportViewer.aspx?RD=WT001&PTITLEAPPSTRID=1000893
Using the Omada Identity Test Report
You can change between the Owner and Auditor role in the report parameters and click View report, in order to test each role.
If the parameters are not visible you must click the small arrow in the top of the report.
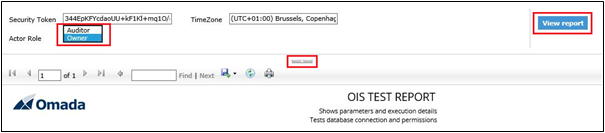
The Report section includes the URL that has been used to call the report server. This is configured in the SSRS URL customer setting.

The Report parameters section lists the parameter values that the test report has been called by.
The Security token is generated by the Portal and written to [dbo].[ReportSecurityToken] in the Data Warehouse database. The token is used to identify the identity that runs the report and whether the user has auditor access. The token is not used when Omada Identity has been configured for integrated authentication.

The Report execution section shows the user that runs the report. This depends on how the Portal web site has been configured, and how Omada Identity authentication has been configured. It is usually the logged in user for integrated authentication, and the application pool identity for other authentication methods.
