Access request
New UI processes cannot be added to All services dashboard.
The Access request process allows you to define the scope of your access requests. You can easily select who should have access to specific resources or systems using this process. With the Access request process you can:
- Request access for multiple identities simultaneously.
- Request access more simply and intuitively.
- Check your access requests on a new page.
- Request access for multiple identities with different context.
Experience the request access process with Omada Identity Cloud interactive walkthrough. Learn how to perform a manager approval of access requested by one of your subordinates.
Follow these steps to request access:
-
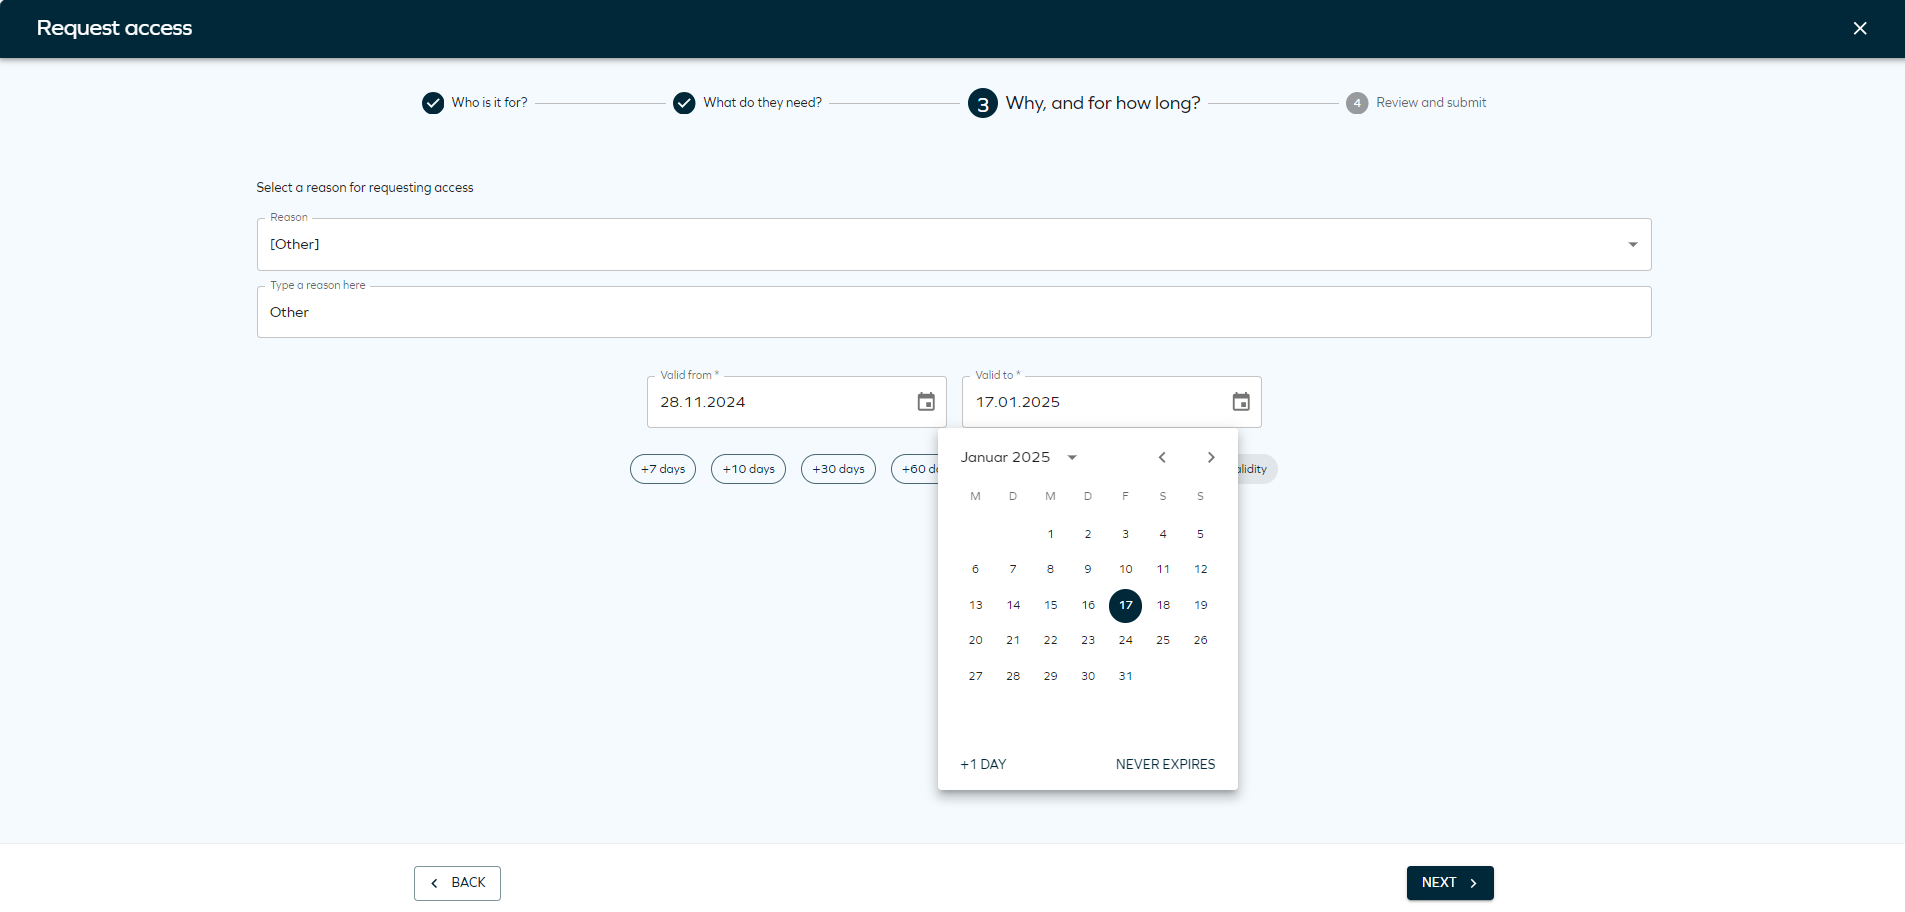
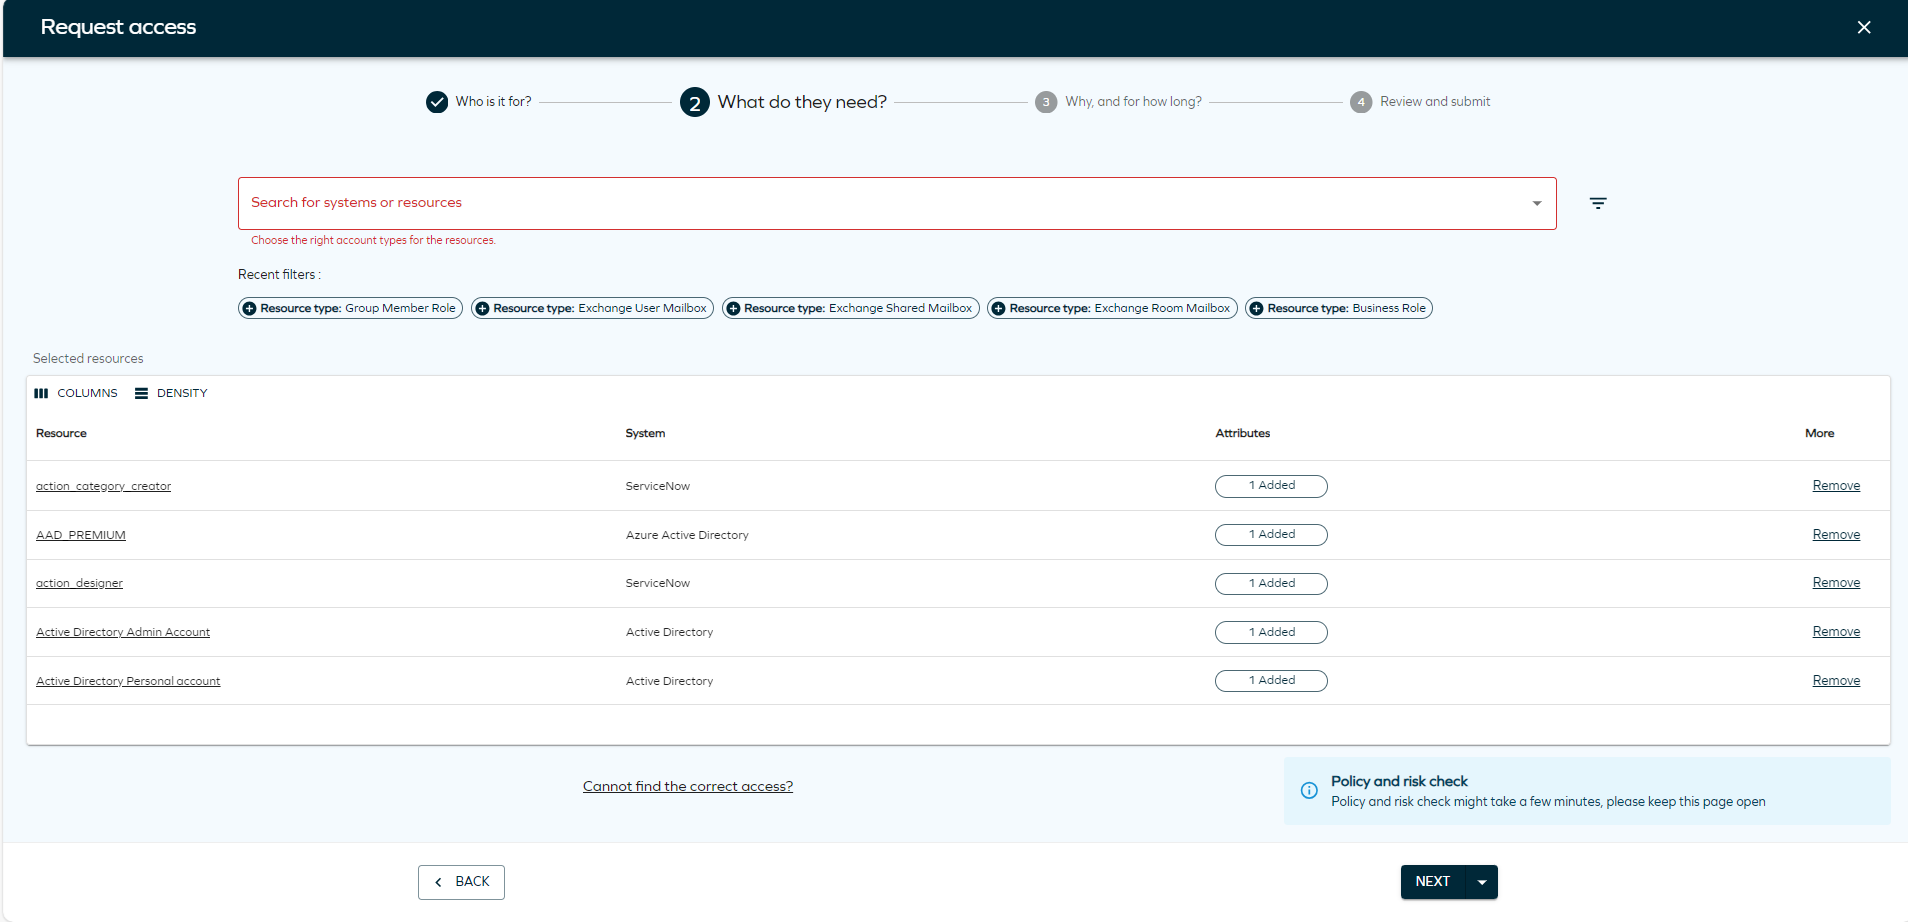
Click Request access tab in the Home page. The page will open, and you will see four steps.

-
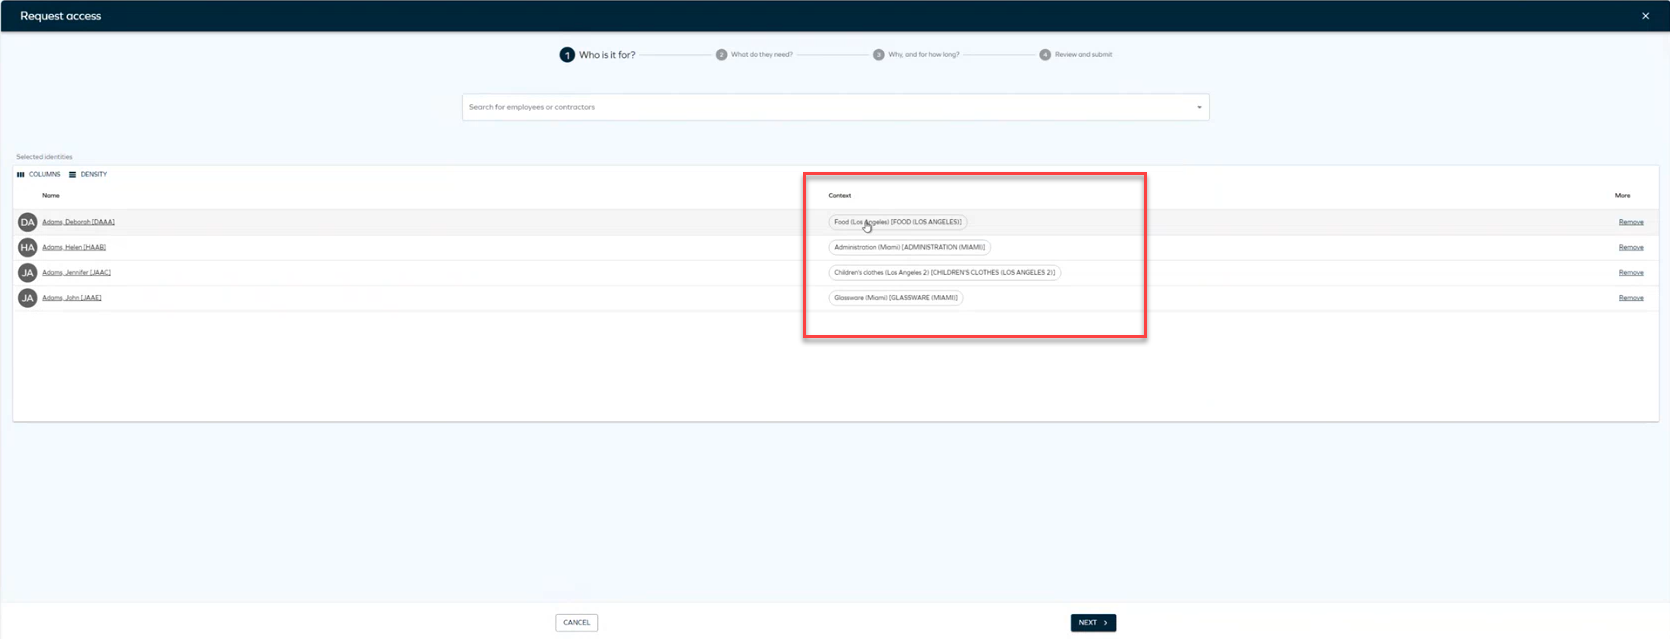
Select the identities for whom you want to request access. Click Add to add as many identities as needed. If you select identities with different context, you will see a diffferent column with the context of each identity.
-
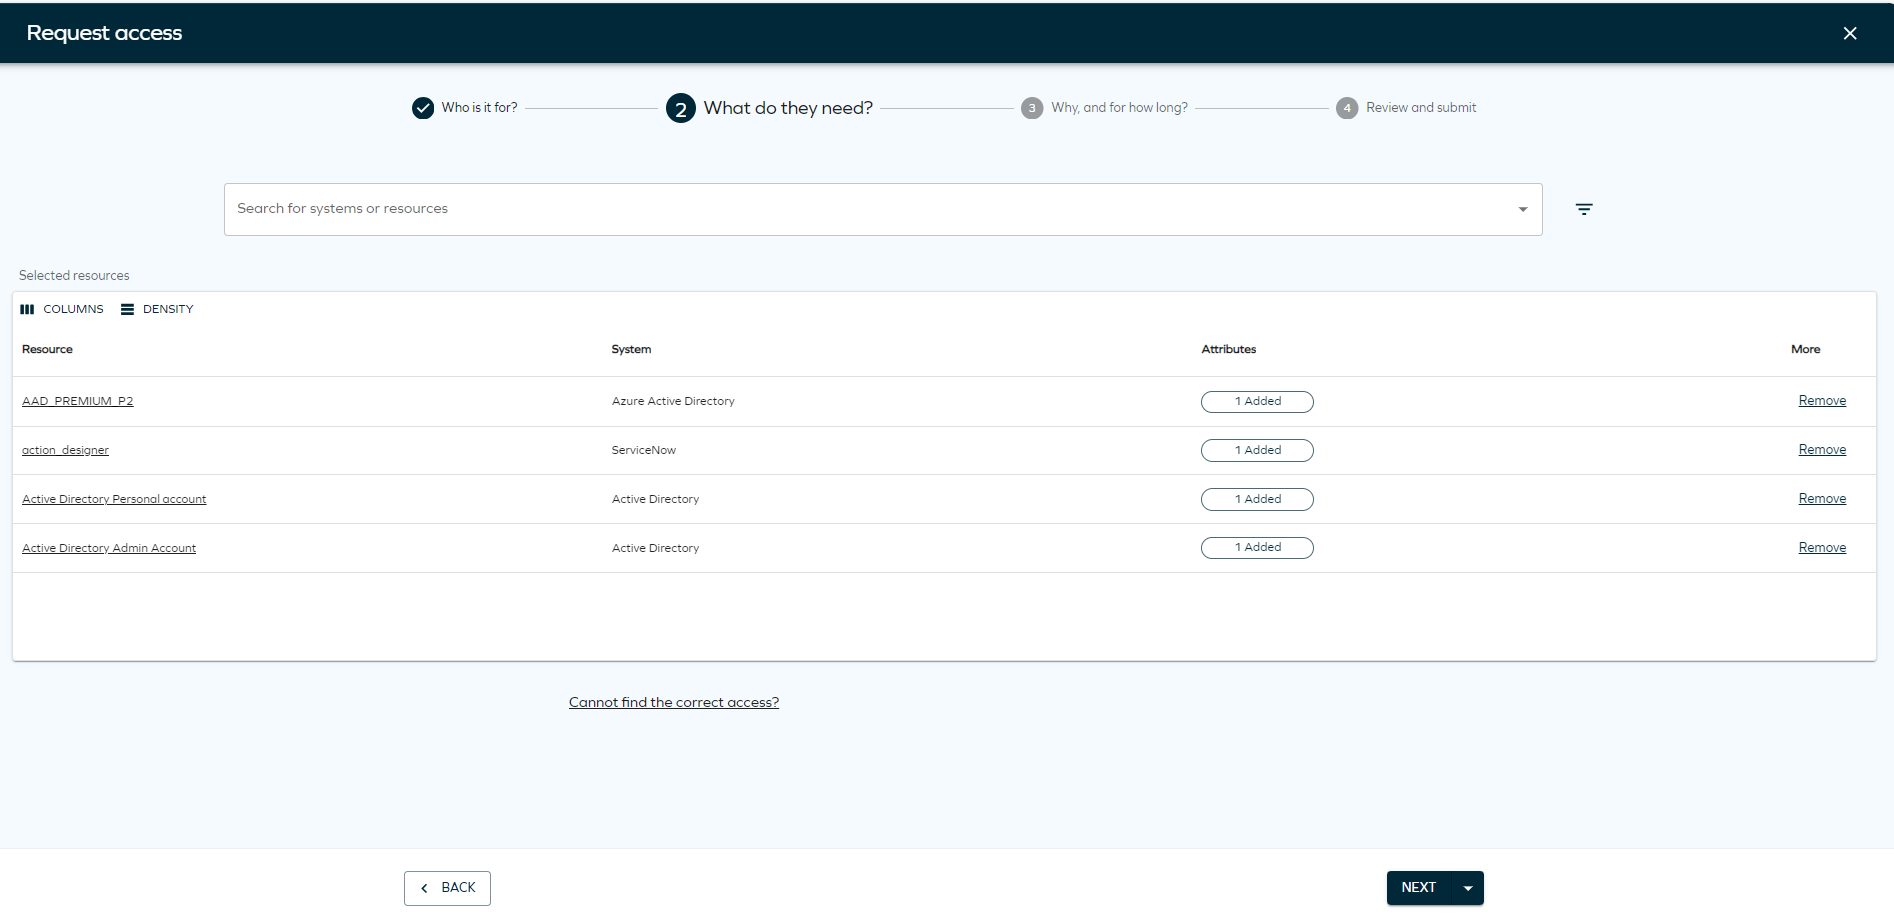
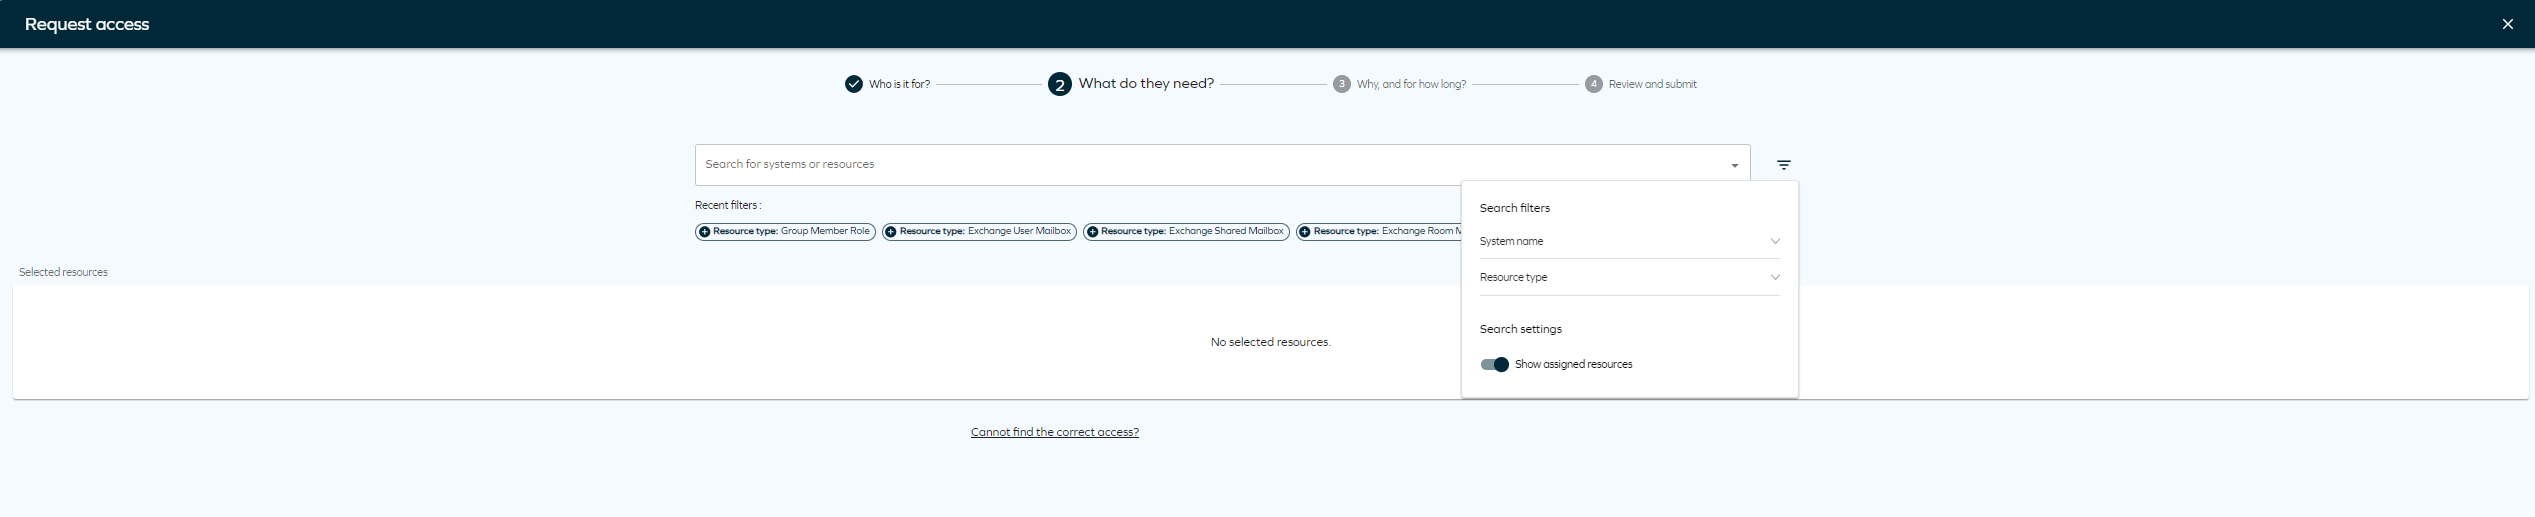
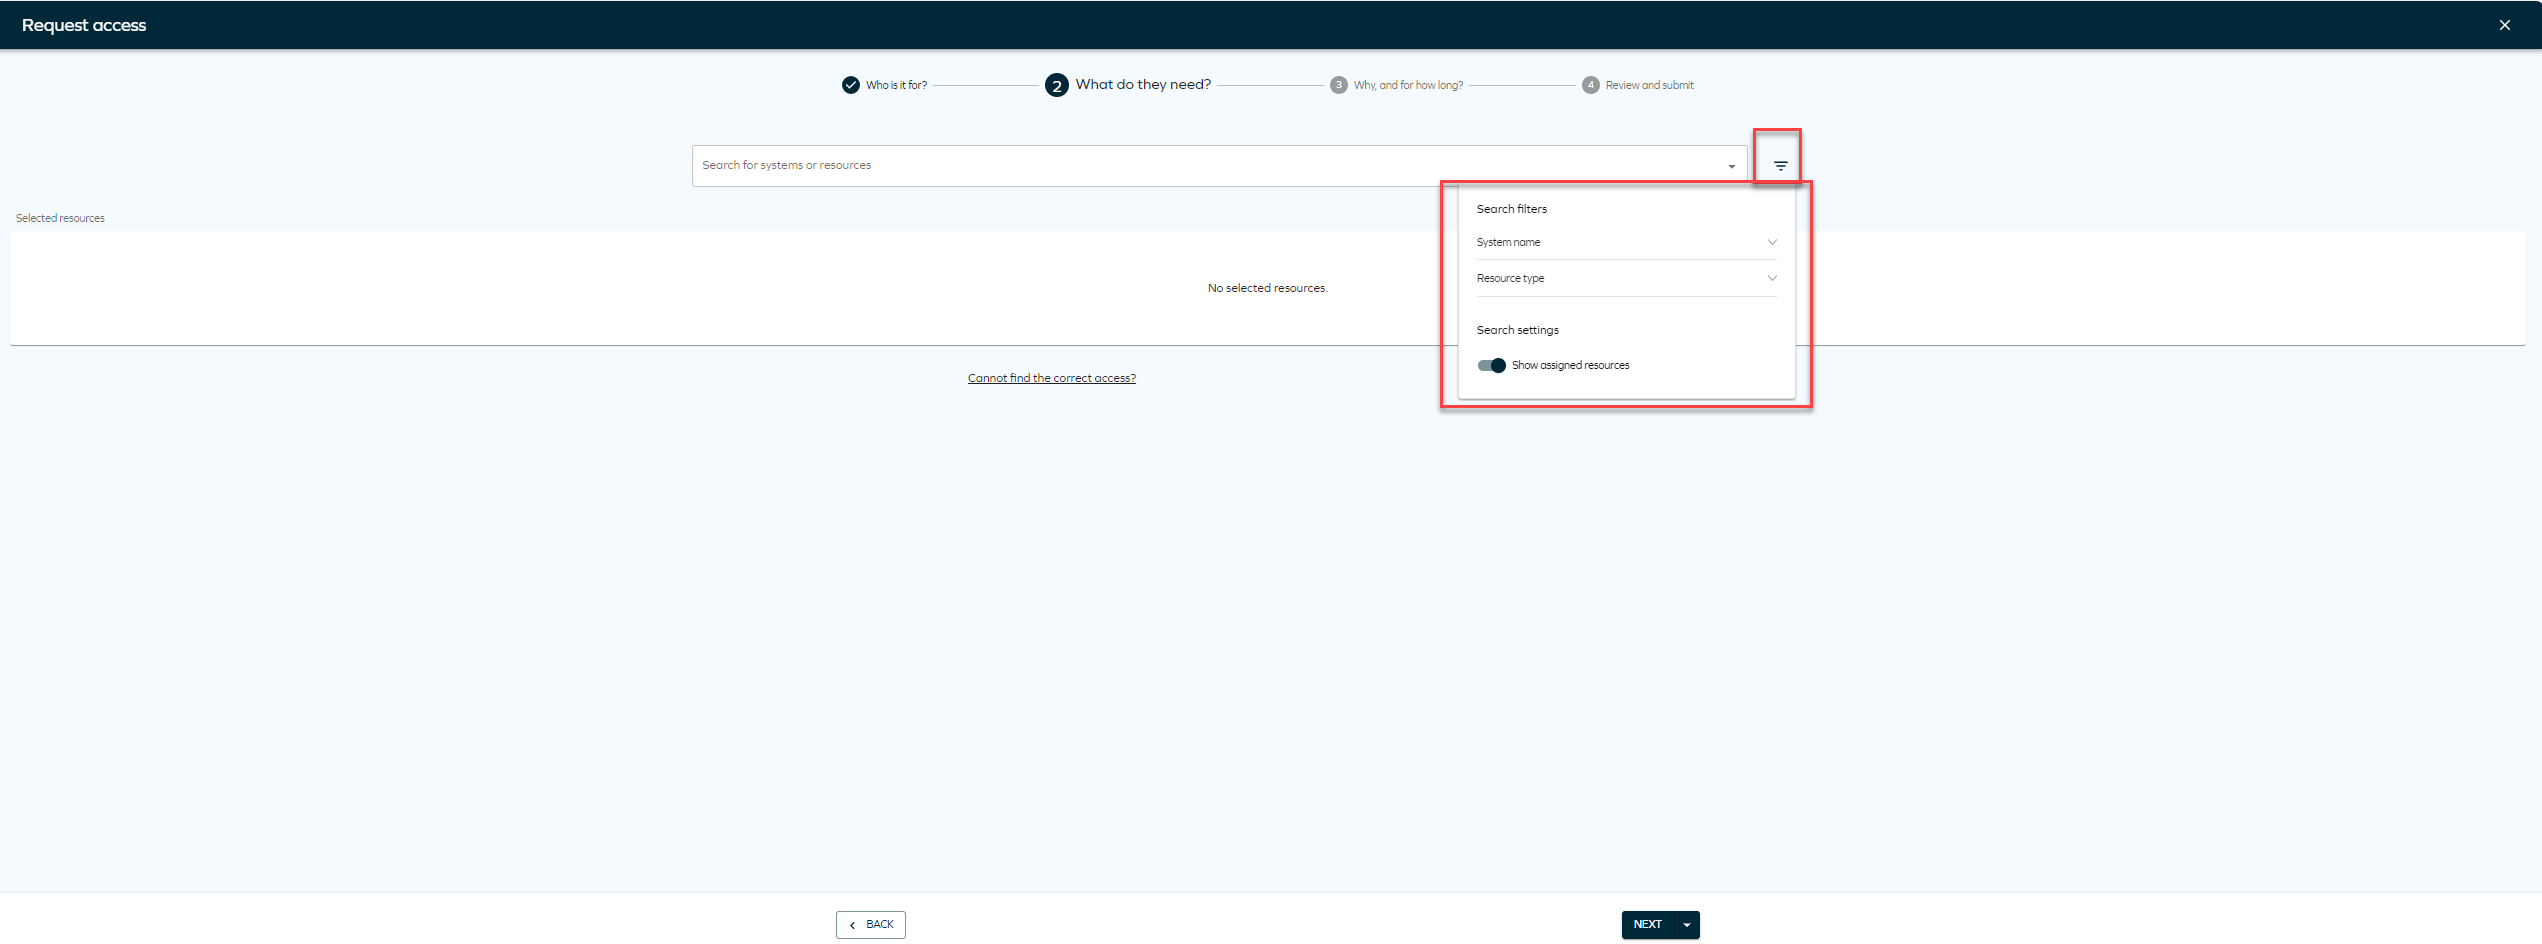
Search for the systems or resources to which you want to provide access. Click Add to include as many resources or systems as you want. You can also select Show assigned resources to display resources assigned to that identity, if applicable. To do that, you need to click the filter icon and select the toggle
Clicking on the filter icon will allow you to select filter by System name or Resource type. You will also find Recent filters that you have used in the panel.
 tip
tipIf you don't find the resource you are looking for, you can click on Cannot find the correct access? to type the access request manually.
 info
info-
You can edit the resources and choose the desired account type for each resource.
-
The Access request process will also take into account Auto-account type configuration. A warning will indicate if a resource cannot be added to the request due to a lack of a valid matching account type.
-
You can view the account type for each beneficiary.
-
You can assign the appropriate account type if a beneficiary matches the resource account type.
-
Multibeneficiary account type assignments are also supported.
-
-
As the final step, review and edit identities and resources. In this step, you can review the access request and use the Remove button to remove an identity and add it again immediately. Click Next to complete the access request.
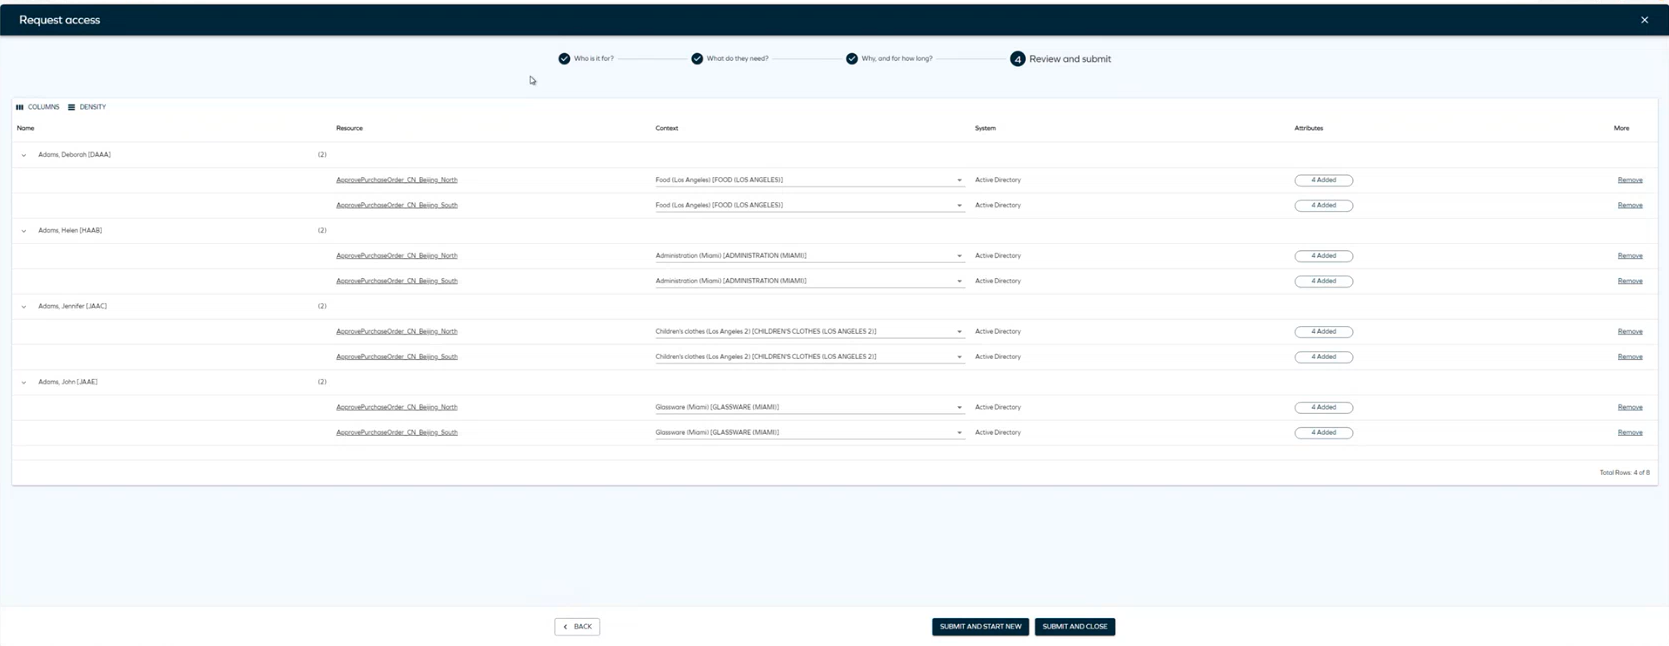
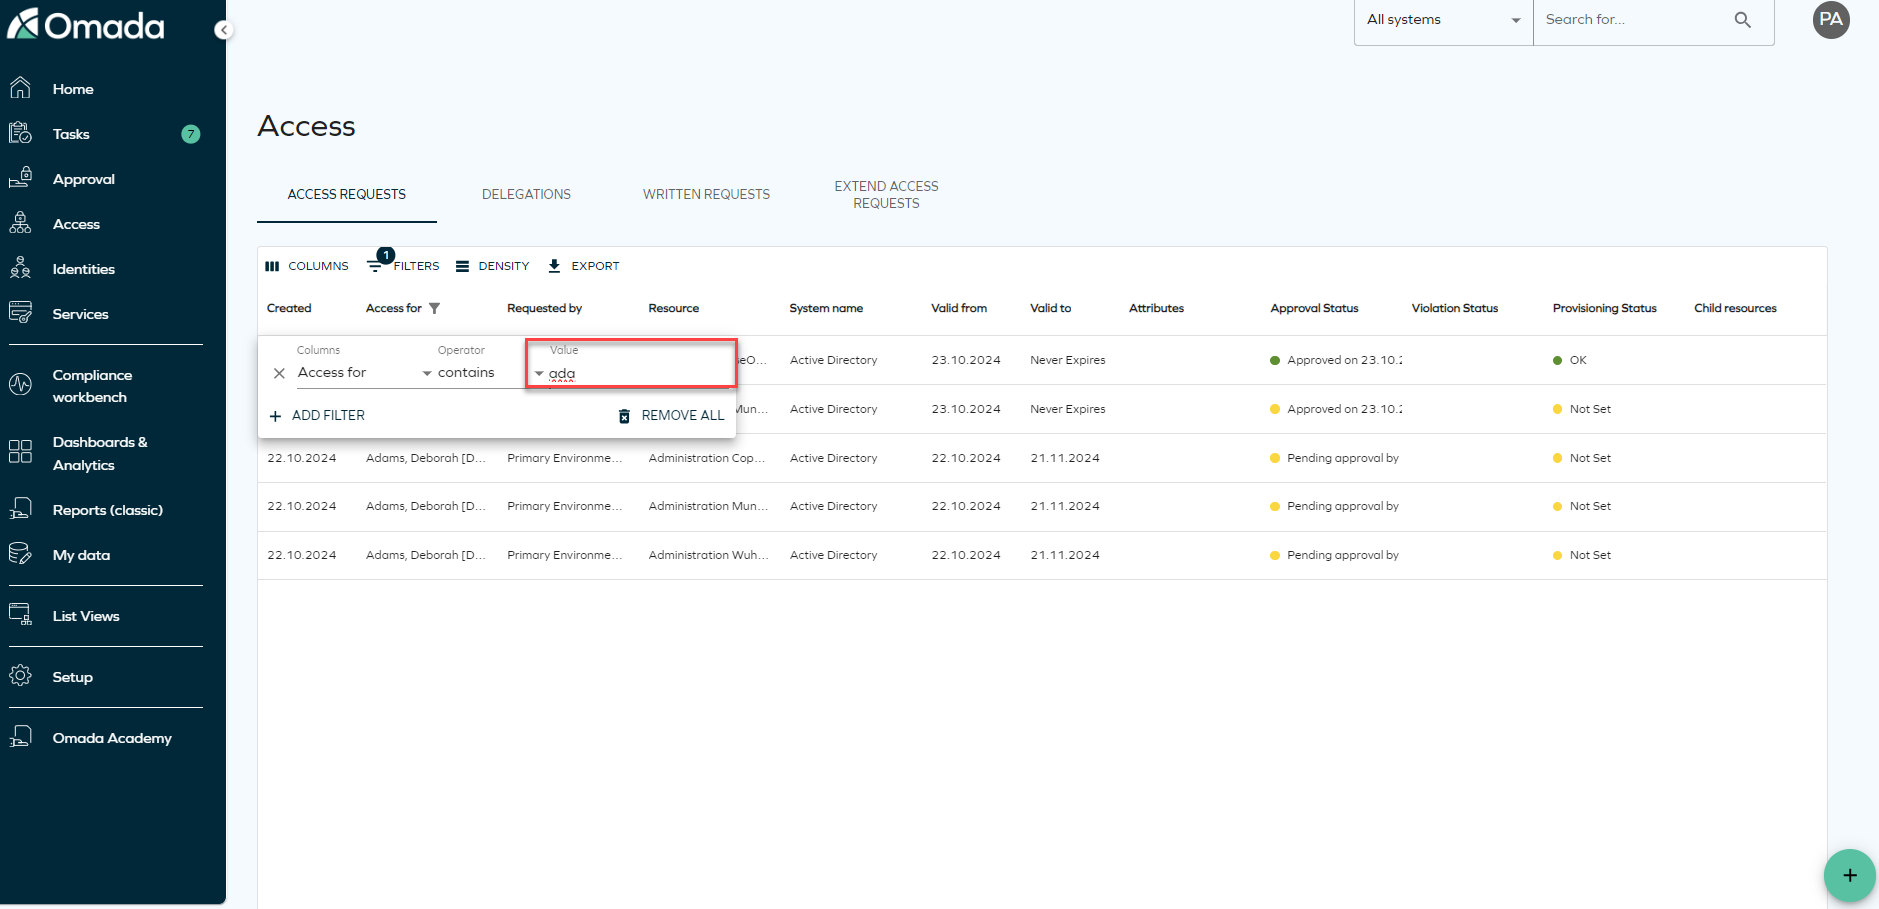
To view your active access requests, navigate to the Access tab in the navigation pane. Here, you will find a list of all your active access requests.

-
You cannot request access for technical identities using this Access request process. If you want to request access for a technical identity, refer to Omada Identity - Legacy Access Request User Guide.
-
Identities can only be assigned a resource if both the identity and the resource share matching account types or if the account is being requested in the same request.
-
Access can be requested for multiple identities only if they share the same business context.
When using the filters, take into account that the search filter operates by matching the first letters of the word you are searching.
Select resources
Assigned resources toggle
On the Access request page, you will find a setting menu to help you filter by System name and Resource type. To sort resources by popularity, you need to enable context on the Access request form, and make sure the customer setting Access request popularity enabled is set to True. You can access the settings menu by clicking the icon next to the Resources dropdown.
Add attributes
When you request access for a resource that requires attributes, a chip is displayed in the Attributes column. Click on Add attributes to assign the necessary attributes to the resource.

Search filtering
You can use the Enable Search Filtering that lets you choose how you want to view your list of resources in the Resource step when requesting access.
Eligibility Filtering added to search query – Technical preview
The Graph API has a new search filtering functionality for Access Request. This change introduces context-based visibility rules for resources, allowing you to pre-filter the resources that can be displayed in Access Request to resources that match the context of the selected identities.
- A resource tagged with Context B and Context C will be visible in search results only if selected beneficiaries are assigned to one or both of these contexts.
- If a beneficiary is added without Context B or context C, the resource will be excluded from the search results.
- Resources without any defined context will always appear in search results, ensuring comprehensive accessibility.
- A warning dialog will appear if you navigate back to step one after selecting resources and attempt to add a new identity. The warning dialog will inform you that the selected resources will be cleared if you proceed.
To access this feature, ensure that the Enable resource eligibility filtering customer setting is enabled. To do that, go to Set up > Administration > More > Customer settings. Look for the customer setting Enable resource eligibility filtering and set it to TRUE.

Approval process launched by timer service – Technical preview
With the LaunchApprovalProcessWithTimerService customer setting, the approval process can be launched by the timer service rather than through the Access request process.
The approval process can have four different statuses. Each status is a value of the Approval process launch status property:
- No approval required
- Approval process launch pending
- Approval process launched
- Approval process launch failed
The statuses depend on the stage of the launch:
-
Access request creation: When you create an access request, the status is set to Approval process launch pending.
infoThe timer service attempts to launch the approval process up to three times.
-
Failure handling:
- If the approval process fails to launch after, the status is set to Approval process launch failed.
- Details of the failure will be stored in the new Log property of the access request data object type.
- An event definition named Approval process launch failure is added. This event definition is configured to send two emails:
- To the requester, notifying them that the launch failed.
- To the Operations Administrators user group. This email contains a link to the failing access request data object and the error log, which will also be stored in the Log property of the access request.
note
The email templates and the event definition can be customized.
-
Retry mechanism:
- Members of the Operations Administrators or Service Desk Agents can reset the status to Approval process launch pending to allow the timer service to retry the launch if the issue causing the failure has been resolved.
- The Access Requests view includes the value of the Approval process launch status property. If you want to change the value:
- Select one or more access requests with a failed state, and click on the context menu in the toolbar to select Mass update.
- In the mass update dialog, select to update the Approval process launch status property and change the value to Approval process launch pending. This enables the timer service to try to launch the process again.
Policy and Risk
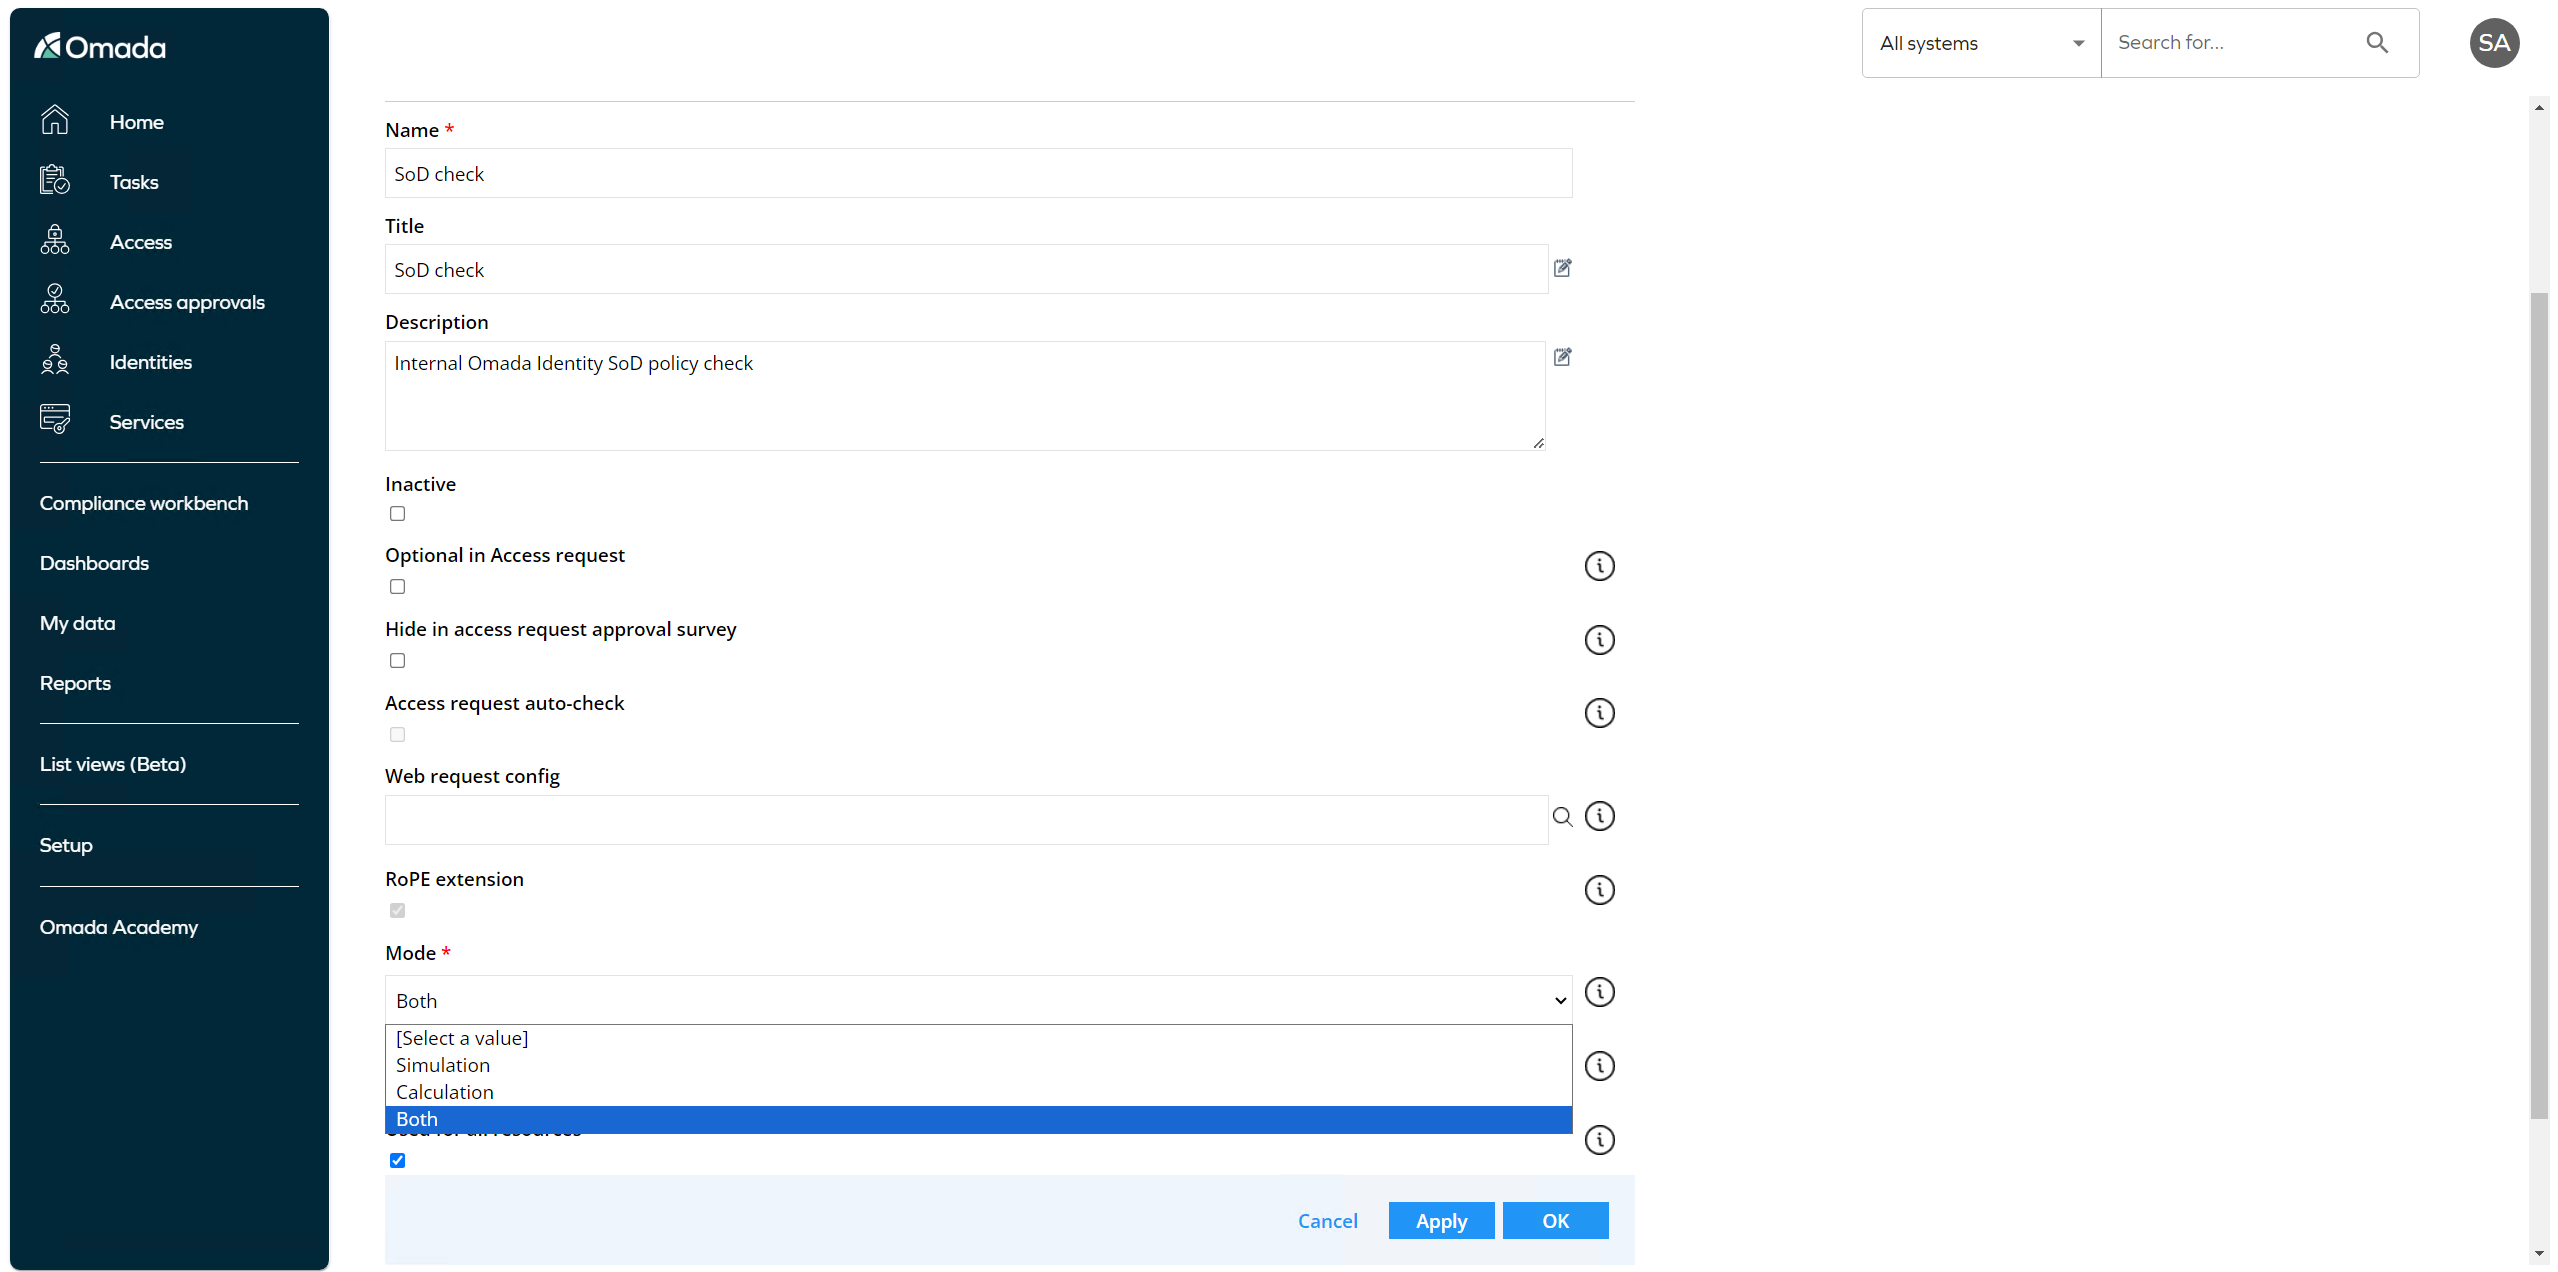
To enable Policy and Risk checks in Access request, go to Setup in the left side menu and look for Policy and Risk checks. To enable the Policy and Risk checks, make sure that:
- The Inactive field is unchecked.
- The policy check is set by default. If you want to make it optional, make sure you select Optional in Access Request field.
- The Mode field is set to Simulation or Both.
With the Policy and Risk checks configured, they will automatically run when clicking the Next button on step 2 in the Access request flow:
If the Policy and Risk check has been configured as Optional in Access Request, then when clicking on the arrow in the Next button, you can manually trigger the Policy and Risk check.

Policy and Risk check panels
The Policy and Risk check panels are displayed in step 4, but they can be performed in step 2 as well. The Peer Access Analysis and SoD/GRC are treated as two different columns in step 4, each opening a panel that shows the results of the relevant check. See below for the relevant details of the panels:
-
Each check (Peer Access Analysis, SoD, and GRC) can be enabled separately and can also be set to Optional/Mandatory.
-
If one or more enabled checks are set to Mandatory, then the checks will run in the background when you click Next in step 2. The results are shown in step 4.
-
If you make any changes to the context or remove/re-add any resource assignments in step 4, the Submit button is disabled until you choose to run the checks again by clicking the Run Risk Check button.
-
If every enabled check is set to Optional, the checks won’t run automatically in step 2, but you can choose to run them using the dropdown arrow next to the Next button in step 2.
-
Any changes made in step 4 don’t prevent you from submitting, but if you make a change, you can choose to re-run the checks using the Run Risk Check button.
SAP GRC risk analysis
Risk analysis in SAP GRC checks assignments for risks and Segregation of Duties (SoD) violations using the Risk Analysis Web Service, specifically targeting the GRAC_RISK_ANALYSIS_WOUT_NO_WS web service. The result is returned to the user in both the Access Request and Access Request Approval processes. This check is performed for the entire Access Request basket in one simulation and is triggered when the user clicks the Run risk check action.
The result of the check is displayed as a snack bar message:
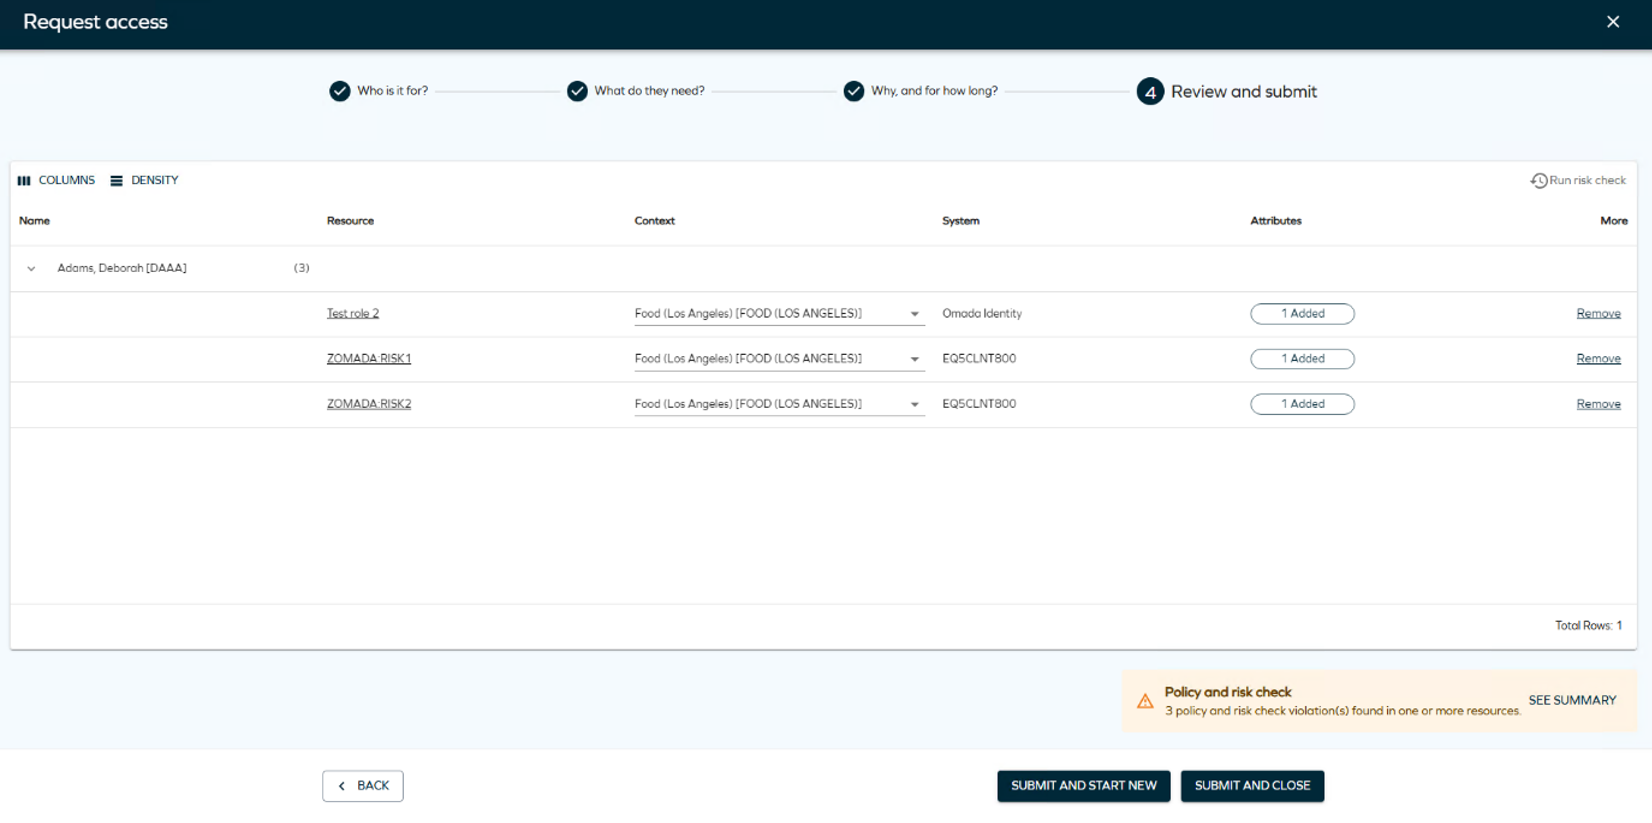
Click See summary to see all risks discovered and details about the resource, identity, risk level, and the SAP GRC system.

Request logic
Only permission resources are included in the actual request to the SAP GRC web service. When running risk analysis for roles created in Omada Identity, the entire hierarchy of the role is traversed to extract all permission level resources and include them in the request to the SAP GRC web service.
When performing the risk analysis for a role or a composite role, the response from the SAP GRC web service will contain a reference to the permissions of an Omada role (or single roles if it's a composite role). In this case, the detected risks will either be flagged on the role or composite resource. Only unique combinations of resource and risks from the SAP GRC web service are presented.
Simulation flag: The request to GRAC_RISK_ANALYSIS_WOUT_NO_WS has the SimulationRiskOnly flag set to true.
Error handling: If the response items from the web service in SAP GRC cannot be matched to a resource in Omada Identity, an exception is returned and logged. This can often be related to a wrong configuration in the Risk analysis data object.
For configuration details, see SAP GRC risk analysis configuration.