System settings
Omada Identity enables you to set a number of system settings in various locations that all relate to how you want your system to look, feel and respond to users of the system.
You can always change these settings, but it may be ideal for the system administrator role to set up many of the settings before anybody else starts using the system. This is because many of the settings not only change how Omada Identity is presented to the users but also alter significant configuration of the system.
Master settings
Master settings include the most important settings of the Omada Identity system. These settings influence the behavior of such elements of the system as authentication, password resets, and monitoring:
- You can find the Master setting in Setup > Administration > More… > Master Settings.
- These settings can be seen and configured only by Platform administrators. Modifying these settings may have system-wide effects so extreme caution is advised.
Customer settings
Customer settings include a variety of types of settings that all alter the system behavior. Many of the system settings are used in the daily and continuous operation of your Omada Identity implementation.
-
You can find the Customer settings in Setup > Administration > More… > Customer Settings.
-
The following types of customer settings are available:
- Customer settings that are visible in the interface and available in a default installation as soon as you have installed the software.
- Customer settings that are hidden.
- Customer settings that are visible in the interface in a default installation but are set as read-only and cannot be cannot and should not be changed.
noteSome customer settings have a default value set, typically for enabling or disabling that particular setting.
The customer settings are divided into several subgroups depending what type of configuration they present. To change a customer setting, go to Setup > Administration > More… > Customer Settings. Click the relevant setting to open its Edit settings dialog box.
You can only make changes in the Value field or the Value checkbox, depending on what type of setting you open. If a setting is read-only, you cannot change anything in the Edit settings dialog box.
For Boolean settings, if the Value checkbox is selected, the setting is set to True. If the checkbox is cleared, the setting is set to False.
Public customer settings
You can make customer settings public by enabling this setting via the Public checkbox that is visible on each individual customer setting. You must select the Public checkbox manually for each customer setting that you want to be publicly available.
You cannot select the Public checkbox directly in the Omada Identity's user interface, but you can do so via the API. Omada recommends that you consider all security implications before making any potential changes.
You can use public customer settings as variables in email templates with the following format:
[CUSTSETTING:<name of public customer setting>]
Public customer settings are available in the client side's data model. You can use the public customer settings for developing Omada Identity extensions in JavaScript via window.appPageVars.custSettings.
View settings
You can apply a number of settings to views in Omada Identity. The settings that you can change for views are for the individual view and not for all views in the entire application.
To edit the settings in a view, click Advanced options > Edit view settings to open a dialog box from which you can edit the view settings.
Configure initial sorting in a view
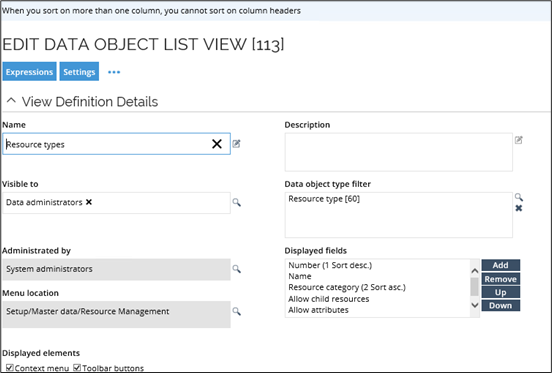
In the View setup, you can configure which column a list view is sorted on initially.
-
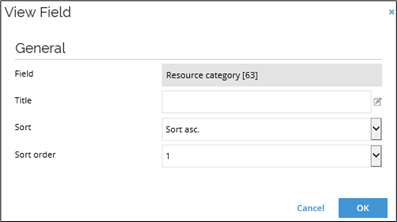
In the Displayed fields list, double-click the field you want to sort on, in this example Resource category. The Edit view field opens.
-
Select a value in the Sort list to decide on the direction in which to sort the columns. The sorting direction can be ascending or descending, Sort asc. and Sort desc. respectively.
-
You can sort up to three columns, but if you select more than one column, a status message appears in the top of the page to inform you that if you make this change, you disable a user's ability to sort the view by clicking the column headers.
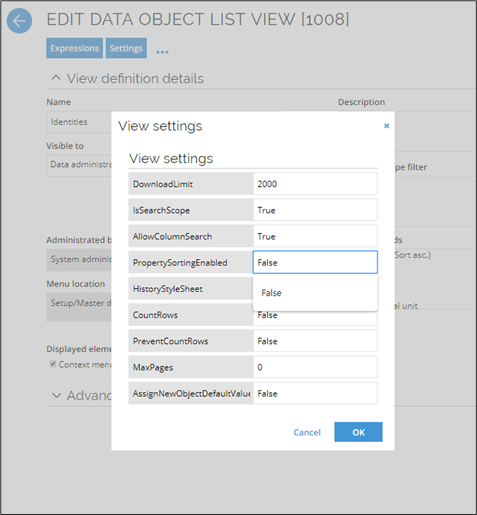
View settings
The following table presents the available settings for a list view:
| Setting | Description |
|---|---|
DownloadLimit | Set the number of objects to display in a download view. |
IsSearchScope | Choose if you want to include the view in the full text search bar. If this setting is not available, you can add it manually. The value must be True or False. |
AllowColumnSearch | If you set this setting to True, you enable the possibility to search in the columns displayed in the view. If this setting is not available, you can add it manually. |
PropertySortingEnabled | If you set this setting to False, the sorting in the view is disabled. In addition, end users cannot sort the columns by clicking the column headers. This may be automatically set to False if the response time exceeds 3 seconds. If you set this setting to True, the sorting will not change to False automatically. The default value is Undefined. |
HistoryStyleSheet | History stylesheet. |
CountRows | If you set this setting to True, you force a count of the number of rows returned from the database. If you set the setting to False or do not set it at all, Omada Identity does not count the number of rows if there are more than 1,000 rows, or the count takes longer than three seconds. |
PreventCountRows | If you set this setting to True, and if the view is not using CountRows=False to count rows already, the user cannot click the question mark (?) to show the count. |
MaxPages | Set the maximum number of pages through which the user can browse. The value default is Unlimited. |
AssignNewObjectDefaultValues | If you set this setting to True, you can assign default property values to new data objects when you create such data objects that correspond to the filters used in the view. For example, you create a new data object from a view that displays resource data objects filtered on ResourceType = AD Groups. The result is that the ResourceType property on the new resource data object is then prefilled with the value AD Groups. |
Managing customer settings in the database table on-prem
For customer settings that are not immediately available in the user interface, you can add them manually in the SQL database table dbo.tblCustomerSetting in Microsoft SQL Server Management Studio (SSMS).
When you edit customer settings in the database tables, you require a Key that indicates the setting’s value. The Key is case-sensitive. Find the relevant Key for hidden customer settings in the Customer settings: Hidden settings section.
The Type column is where you define if the setting should be displayed in the Customer Settings page in Omada Identity by specifying one of the following values:
0 - makes the customer setting available for users to edit in the Omada Identity user interface.
1 - makes the customer setting read-only.