Configure Client Credentials Flow for SMTP Auth in Exchange Online
This page contains third-party references. We strive for our content to always be up-to-date, however, the content referring to external vendors may change independently of Omada. If you spot any inconsistency, please report it to our Helpdesk.
This page describes the steps to configure SMTP Auth in Exchange Online to use Client Credentials.
These configuration steps are based on Microsoft's documentation and are susceptible to change, following Microsoft updates. To have the latest updated version of the configuration, check Microsoft's documentation:
To configure SMTP Auth in Exchange Online to use Client Credentials:
-
Register an application in Microsoft Entra ID:
- Open the Azure Portal and select Microsoft Entra ID.
- Select App registrations, then click +New registration.

-
To register the application:
- Enter a name for the Omada Identity website, for example
SMTP AUTH. - Select the supported account types.
- Click Register.
-
Give the necessary permissions to the application:
- Inside the created application, go to Manage and select API permissions.
- Select +Add a permission.
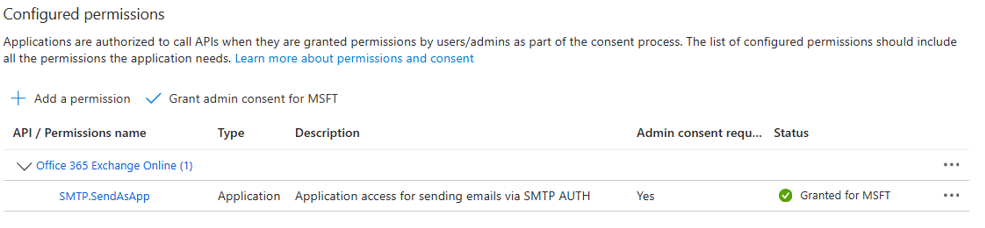
- On the APIs my organization uses tab, filter by Office 365 Exchange Online and select Application permissions. While there, you can filter by SMTP.SendAsApp. Enable this permission and click on Add permissions.
- Once the permission is added, click on Grant admin consent for your organization. (It will contain the name of your organization.)
-
Create a client secret for the application:
- Inside the created application, go to Manage and select Certificates & secrets.
- Select +New client secret and set a description and expiration time.
- Click Add and copy the value of this secret to be used later in the configuration.
-
Register service principals in Exchange Online:
-
Connect to Exchange Online:
- Open a Powershell window as administrator.
noteThe Powershell window can be opened at any Windows system. You will be requested for your credentials to connect to exchange online during the process.
- Run the following commands:
# Install the Exchange Online Management module
Install-Module -Name ExchangeOnlineManagement -Scope CurrentUser
# Import the Exchange Online Management module
Import-Module ExchangeOnlineManagement
#Connect to Exchange Online (you will be requested to login in your account)
Connect-ExchangeOnline -UserPrincipalName your-email@domain.com -ShowProgress $true- Once you are logged in, register the service principal in Exchange Online, executing the next command:
New-ServicePrincipal -AppId <APPLICATION_ID> -ObjectId <OBJECT_ID>note-
<APPLICATION_ID>is the Application ID of the application you created in step 1, and the<OBJECT_ID>is is the Object ID from the Overview page of the Enterprise Application node (Azure Portal) for the application registration. It is not the Object ID from the Overview page of the App Registrations node. Using an incorrect Object ID will cause an authentication failure. -
If you get an error running the
New-ServicePrincipalcmdlet after you perform these steps, it's likely because you don't have enough permissions in Exchange Online to perform the operation. -
Global roles like Exchange Online Administrator or Global Administrator give permissions to perform this actions, but in case you need to limit permissions, you can also be a member of the Organization Management role group in Exchange Online. Specifically, the Role Management role in Exchange Online allows users to view, create, and modify Exchange Online role groups. By default, that role is assigned only to the Organization Management role group. For full information, see Permissions in Exchange Online.
- Grant the service principal full access to the mailbox. Execute the following command (where
<MAILBOX>is the email that will be used as mailbox):
Add-MailboxPermission -Identity <MAILBOX> -User <APPLICATION_ID> -AccessRights FullAccess- Enable SMTP Client Authentication (if not enabled already). In the same Powershell window, execute the next command:
Set-CASMailbox -Identity <MAILBOX> -SmtpClientAuthenticationDisabled $false -
-
Configure sending emails by defining the host name, port, TLS configuration, and authentication method in Omada Identity:
-
Go to Setup > System settings > Configuration objects.
-
Open the configuration object
notificationSettings. -
Set up the port and host name in the XML schema, using the client credentials authentication type:
-
<?xml version="1.0" encoding="utf-8">
<notificationSettings xmlns="http://schemas.omada.net/ois/2022/NotificationSettingsML">
          <smtp>
            <network
              host="smtp.office365.com"
              port="587">
              <azureAdClientCredentials>
                instance="https://login.microsoftonline.com"
                clientId="7A83471E-A8C7-4C06-8120-77B9AA56FA04"
                clientSecret="xxx"
                tenantId="2487ABFA-47FC-4F60-8AF4-2B857B17432C"
                userName="example@megamart.onmicrosoft.com"
                scopes="https://outlook.office365.com/.default"
              />
            </network>
          </smtp>
</notificationSettings>