Import profiles
With the Horizons feature enabled, the way import logs are stored is different. For more information, go to Import history.
This chapter provides detailed information regarding configuring, scheduling, and working with imports and import profiles.
All imports of data to your onboarded systems take place through an import profile. The import profile functionality allows you to decide the systems or system categories to include or exclude from the import profile. In other words, import profiles serve as a type of filter for your imports.
Import profiles allow you to run ad hoc imports and differentiate the frequency of imports between the various external systems that you have added to Omada Identity.
For example, you may have an HR system from which you only want to import data once every day, while you may have an AD system that you want to import data from several times a day. To be able to do this, you could set up one import profile that only imports HR data and another that only imports AD—or at least does not include any HR data.
Find the Import profile view under Setup > Administration > Connectivity > Import profiles.
There are five default import profiles that are available to you in a default installation. You can change the settings for these import profiles, but you cannot remove them.
| Import profile | Description |
|---|---|
| Clean-up import profile | This profile can be used to remove additional data, like logs, from Omada Identity. |
| GDPR anonymization | This profile allows you to enforce the right to be forgotten as required by the EU GDPR. It might be also used to anonymize sensitive data in customer databases before they are copied externally. Anonymization is done according to these principles: Both the current and all the historical versions are anonymized. Names are anonymized, and numbers are appended to them, which makes it possible to distinguish between anonymized objects. Mandatory attributes are overwritten with an anonymization value. Attributes needed for compliance purposes, which do not hold any sensitive data, are preserved.Optional attributes are deleted. Object references are preserved. |
| Import | The overall import profile that imports all types of data from all types of systems. This profile imports all types of data for systems that are ready for import. If you start import from this page, all systems are checked for completed onboarding tasks. If a system does not have all required tasks ready, the system is skipped. |
| Import configuration | Runs when you initially install Omada Identity Data Warehouse and every time you have installed a patch to the system.This profile updates the database schemas in Omada Identity Data Warehouse. If you change the customer settings Maximum Date or Minimum Date, you must also run this import profile. For information about the customer settings, refer to the Customer settings section. |
| Import master data | Imports data from only Enterprise Server. Imports identities created in Enterprise Server, survey results, applications, compliance status and audit trail. |
Import and Synchronization profiles can either run on a schedule or you can start them manually. Because they cannot run at the same time, the following functionality is implemented:
- If an Import profile is already running, then the Synchronization profile aborts.
- If a Synchronization profile is already running when an Import profile is run, the Import profile waits for the Synchronization profile to complete before it proceeds.
In addition, the Import profiles view is equipped with the Reset import status functionality. It enables the user to reset an import in the “running” status that is not responding, for example, due to a system shutdown during the import. Resetting an import changes its status to aborted and unfreezes importing.
on-prem The Omada Identity Synchronization feature imports data, master data, and ownerships from Omada Identity Role and Policy Engine and Omada Identity Enterprise Server to Omada Identity Data Warehouse. In addition, the Omada Identity Synchronization allows you to perform Warehouse to portal synchronization.
Typically, Omada Identity Synchronization is scheduled to run at regular intervals, for example using a SQL Agent job. You can also run it on request.
Run any Synchronization import profile type. If another import profile is already running, then Omada Identity Synchronization aborts the process.
Create a new import profile
- Go to Setup > Administration > Connectivity > Import profiles and click New. The New import profile page opens.
- In the Name field, type a unique name for the import profile. This is a mandatory setting.
- In the System categories field, click the lookup button to select one or more system categories to associate with the import profile, for example Active Directory or Exchange. This field serves as a filter, and you can leave it empty. If you do leave it empty, all system categories are included in the import profile.
- In the Systems field, click the lookup button to select one or more systems to associate with the import profile. Make sure that you select a system that belongs to the system category that you selected in the previous field. In other words, you must map AD systems with the AD system category and so on. This field serves as a filter, and you can leave it empty. If you do leave it empty, all system categories are included in the import profile.
- Click Apply to save the settings. Optionally, you can now click the Start import button at the top of page to start a data import on the basis of the new profile or click OK to close the page. If you click Start import, the Start import dialog box, which you also see when you start an import from the individual system’s page, opens. The import profile is then already selected to use in the import.
Overriding onboarding configuration
In the import profile you can override the onboarding values adding a separate line with the following format, for example: SettingName=NewValue.
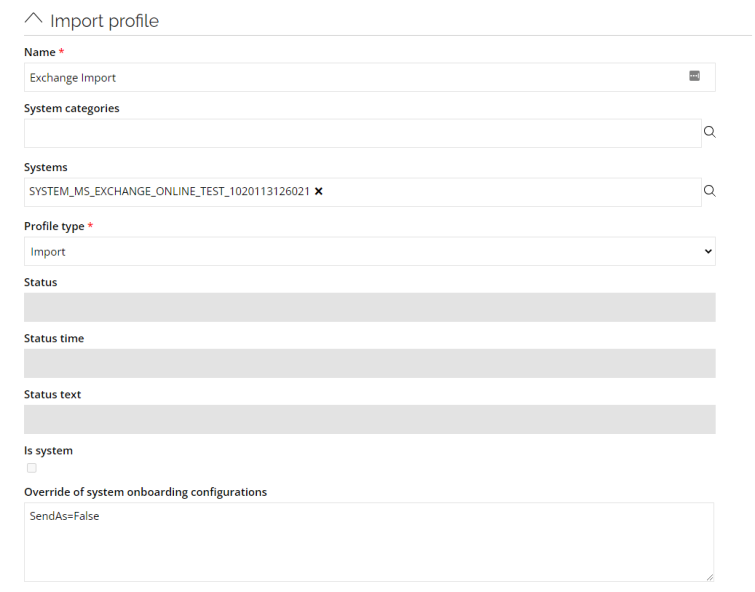
Any of the onboarding values included in the separate line override the existing values in the profile sent to SSIS when the import is started. The onboarding values stored in the Enterprise Server are not altered.
The names of the settings and configuration parameters in Onboarding values xml have to be corresponding.
To find them, go to Setup > Administration > Connectivity > Data Connections.
Some connectivity packages have additional parameters that you can override. You can find information on them in Connectivity Guides.
Reset Import status
- Make sure that the DTExec.exe and the DTExecUI.exe processes are not running. Not doing so runs a major risk of an unrecoverable loss of Omada Data Warehouse data integrity.
- Go to Setup > Administration > Connectivity > Import profiles.
- In the Import profiles view click on the checkbox for the non-responsive Import profile in the “running” status.
- Click on … > Reset Import Status. As a result, the user will be prompted to confirm resetting the import status.
- Press OK in the confirmation dialog to reset the import status. The import is placed in the “aborted” status and importing is unfrozen. A date stamp and the SQL login are displayed in the Status text column of the Import profiles view.
Order of imports
Omada Identity performs parallel staging of the systems in two steps:
- All systems except the ones that trust other systems.
- All systems that trust other systems .
Then, system imports data in a fixed order depending on the data to import:
- Master data.
- Identity data.
- Both (identity data and access rights).
- Systems trusted by another system, for example an Active.
- Directory trusted by an Exchange system.
- All other types of data (in a random order).
Scheduling import jobs
Scheduling import jobs via import profiles
You can set up scheduled import jobs to run at particular times to automate the data import process. You can set up schedules either via the Omada Identity Portal’s Import profiles feature.
Omada Identity includes four event definitions that you can use to schedule import jobs:
- Run ODW synchronization: Event definition to run the Import master data import profile.
- Run ODW import: Event definition to run the Import import profile.
- Run ODW clean-up: Event definition to run the Clean-up import profile.
- Run anonymization profile: Event definition to run the default Data Anonymization profile. The event is triggered by a timer which is deactivated by default but is scheduled to run every day at midnight.
All of the listed event definitions are disabled in the system by default. You must manually enable the event definitions by opening the individual event definition and clearing the Disabled checkbox for the individual event definition.
If you want to, you can also change the timer interval on the event definition if the standard schedule for when the event definition’s timer runs should be different than set up by default in the system.
Schedule import jobs via Import profiles
In the following procedure, Omada assumes that you have some previous experience with setting up event definitions.
- In Omada Identity, go to Setup > Data Management > Event definitions, then open the relevant event definition, for example
- Run ODW import. Because the event definition is disabled by default, clear the Disabled checkbox to enable the event definition.
- Optionally, if you have selected the option This timer executes, click the drop-down list to change the selected timer to a different timer if this is relevant for you. If you want to change the schedule of the timer, go to Setup > Data Management > Timers, click Edit, make the changes, and click OK.
- Ensure that the value of Maximum number of objects handled is set to 1.
- Make sure that the Triggers on object of type drop-down list point to Import profile data objects.
- To make sure that the import is triggered every time the timer expires, click Advanced options and deselect the Event trigger only the first time the filter is passed checkbox.
- When you are done, click OK to save your changes and close the Edit Event definition page. You have now enabled and scheduled the event definition to run the timer for the import profile.
Create a custom timer and event definition to run an import profile
In the following steps, Omada assumes that you have some previous experience with setting up timers and event definitions in Omada Identity.
- On the Timers view, click New to create a new timer, then on the New Timer page specify the relevant settings for the new timer, for example start date, repeat pattern and end date. When you have finished setting up the timer, click OK to finalize creating the timer.
- Go to the Event definitions view and create a new event definition. Give the event definition a name, then in the drop-down list related to the option This timer executes, select the timer that you just created.
- On the Triggers on objects of type drop-down list, make sure to select the Import profile data object.
- To make sure that the import is triggered every time the timer expires, click Advanced options and deselect the Event trigger only the first time the filter is passed checkbox.
- Click Apply to create the event definition and to make the Action buttons in the bottom of the page visible. Click New to open the Select an action to be created dialog box, then choose Execute code method. In the Code Method for Event “[]” dialog box, choose Omda.OE.Solution.OIM.Assembly.dll, and then choose Omada.OE.Solution.OIM.Assembly.ImportProfile in the Class name drop-down list, which also selects the Method name StartImportProfile. There is another StartFullImportProfile code method which resets the source system high-water marks during the import.
Omada Identity uses different set of water marks for inter-component synchronization. Internal high-water marks are always respected during the code method execution.
- Map the importProfileGuidStr parameter of the code method to the UID of the import profile, then click OK to return to the Edit event definition page.
- Click OK when you are done to finish the setup of the event definition. The custom timer and custom event definitions are now configured to allow you to run a custom scheduled import profile.
Operations admins can see when the import profile has started running or has been run, either on the page for the individual system in the Systems view, for example for an Active Directory system, in the import profile’s import history, or on the Operations Dashboard.
Scheduling import jobs via SQL Server Agent on-prem
If you want to run a scheduled import job in SQL Server Management Studio (SSMS), you must make sure that you set up the following configuration when you create a new job in the SQL Server Agent.
To schedule import jobs via SQL Server Agent:
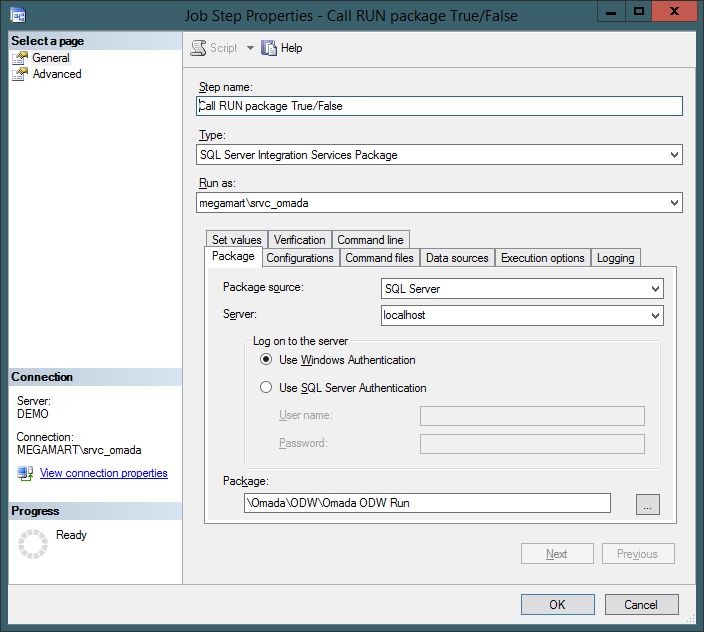
-
Choose the SSIS package Omada ODW Run located under SSIS Package -> ODW as the Package on the Package tab.
-
Find the UID for the individual import profile by holding down CTRL+Shift and right clicking on your mouse, then click Form Data UID to copy the value to the clipboard and click the Set values tab.
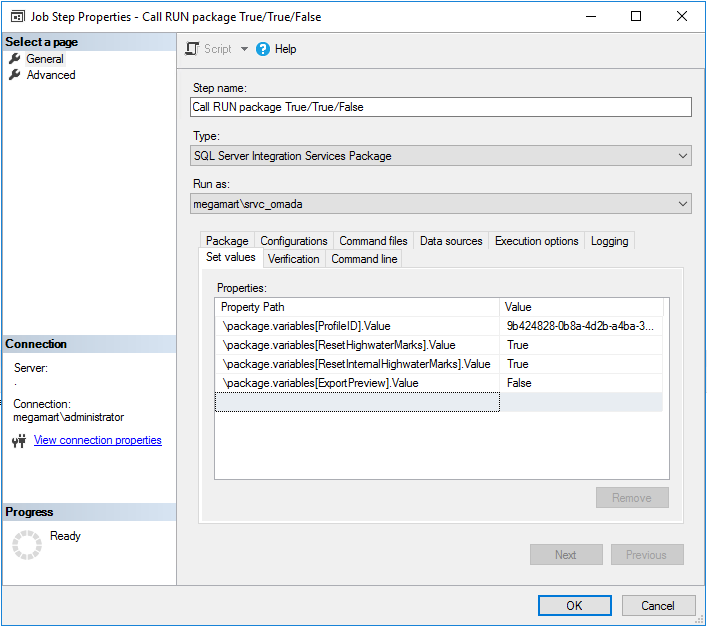
-
In the Property Path column, type \package.variables[ProfileID].Value. Paste the UID for the individual import profile into the Value column.
-
Add \package.variables[ResetHighwaterMarks].Value property. It affects how data is imported from source systems that are configured for the delta import. If set to True, a full import from source systems is enforced. If set to False delta import is attempted if possible.
-
Add \package.variables[ResetInternalHighwaterMarks].Value. The value should be set to True to fully synchronize data between Omada Identity components.
-
Set \package.variables[ExportPreview].Value to False to put the data in the Omada Data Warehouse. If it is set to True, the data is not loaded do Omada Data Warehouse but to a table located in the [preview] schema. They can be viewed only if you have an access to them directly using, for example, SQL Management Studio.
Before you set up any import jobs, you must first perform some system configuration. If SQL Server is configured for AlwaysOn, and failover happens during an import, the source system import that is in progress may fail. If this happens, run the import again.
ODW data clean-up import profile
If you want to, you can enable cleanup of historical data/object versions from the Omada Identity Data Warehouse to minimize database sizes and to follow regulatory demands for deleting data while still being able to trace the data. The latest version of the data is always retained regardless of how long time it has existed.
Enabling and using the clean-up import profile means that the data is effectively purged from the database. When you enable customer settings and run event definitions to delete data, the data will then be gone. You can only be able to restore this data from backups of the system, if you have any.
To complete the Omada Identity Data Warehouse clean-up process, you must run the Clean-up import profile which you can configure using the system default event definition Run ODW clean-up and its default-enabled timer, ODW clean-up schedule. The default time setting for this timer is to complete the cleanup every week (seven days), but you can change this setting if you want to.
You can enable the feature by enabling the Run ODW clean-up event definition after configuring two customer settings in Omada Identity that define how much history to retain and how much to delete at a time. The Customer settings are located in the Omada Identity Portal under Setup > Management > More… > Customer Settings, in the Maintenance category.
Customer settings:
- Age of OIS Data Warehouse object versions to delete (days): the minimum number of days that object versions can have existed, before they should be deleted from Omada Identity Data Warehouse database, for example 365 days (1 year). Objects that have existed for more days than the number that you enter here are included in the clean-up process. The value must be minimum 1 day. The default value is 365 days.
- Maximum batch size of OIS Data Warehouse object versions to delete (days): The maximum number of days of object versions to include in the deletion process, for example an interval of 14 days. The batch size is an operational setting to keep the running time down and to prevent full transaction logs. For this setting to work properly, the number that you set here must be greater than the timer interval that you use to trigger clean-up process, otherwise the clean-up will not keep up with the generation of historical data. If you set this setting to 0, there is no limit on the batch size. The default value is 14 days (two weeks).
- Auto delete warehouse logs: the maximum age of import logs (in days) that are to be preserved after running the Clean-up import profile. When the Clean-up import profile is executed, it deletes all import log data older than the specified number of days. If set to 0, no import logs are deleted during clean-up.
When the Clean-up import profile runs with the default configuration, operations administrators receive an email that informs them when the clean-up import profile has begun running. The operations administrators can also check that the import profile actually has run, either by looking in the import history for the import profile, or on the Operations Dashboard.
Historical snapshots of system data are stored for history reporting purposes. Running the Clean-up import profile does not remove them from the database.
Start import via PowerShell files on-prem
As an alternative to running imports directly in the Omada Identity Portal, you can also use the two PowerShell files ImportAllSystems.ps1 and ImportConfiguration.ps1.
Both files are located in C:\Program Files\Omada Identity Suite\Datawarehouse\Support Files in a default installation.
If you run one of the files or both files, you can follow the import status in the Import profiles view.