Omada Identity Ansible package
The purpose of the Omada Identity Ansible package is to provide you, our partners and customers, with the opportunity to automate the installation of the on-premises version of Omada Identity.
This feature is currently in Technical Preview. The goal of this preview phase is to gather initial customer feedback and ensure the feature reaches necessary parity with the Omada Identity Installation Tool.
What is Ansible?
Ansible is a well-known automation tool. For more information on how to use it alongside Windows servers, you can refer to the official Ansible documentation:
To learn more about getting started with Ansible on Windows and possible limitations, check the Windows Frequently Asked Questions.
-
Linux text editors:
-
WSL Setup Guide: WSL Installation Guide
Use cases with Ansible
The following list covers example use cases for the Ansible package:
Installation of Omada Identity, its components, and post-installation configuration/actions
Installation of Omada Identity components:
- Enterprise Server
- Role and Policy Engine
- Omada Data Warehouse
- Omada Provisioning Service
- Standard collector package deployment
Post-installation tasks:
- Portal initialization with Windows Integrated authentication
- Feature package import
- OPS and RoPE endpoints setup
- Data connections update
- Customer settings
- Service users creation in Omada Identity portal
- Archive DB initialization
- ODW Imports trigger
Upgrade of Omada Identity and post-upgrade configuration/actions
-
Directory backup of Omada components
-
Uninstall and removal of existing directory of Omada components
-
Installation of Omada components:
- Enterprise Server
- Role and Policy Engine
- Omada Data Warehouse
- Omada Provisioning Service
- Standard collector package deployment
-
Post-upgrade tasks:
- Portal initialization
- Feature package import
- Customer settings
- ODW Imports trigger
Configuration of installed components
- PSWencryptionKey
- APISharedSecret
- WebService Endpoints
- Connection Strings
The following components are considered for future implementation:
- Password rotation
- Changeset merging and deployment
- GMSA support
Ansible package file structure
The package contains a structured set of directories and files.
Playbooks
At the core, there are two playbooks:
-
installation_playbook.ymlHere is an example section of a playbook with comments:
---
- hosts: es  # Group of hosts for which role's tasks will run
  roles:     # List of roles which will be executed against the group of hosts
    - es
  tags:      # List of tags for more granular run options
    - es
  vars_files: # List of additional variable files
    - vars/main/main.yml
- vars/main/users.yml -
upgrade_playbook.ymlHere is an example section of a playbook with comments:
---
- hosts: pre_upgrade  # Group of hosts for which the role's tasks will run
  roles:              # List of roles to be executed against the group of hosts
    - pre_upgrade
  tags:               # List of tags for more granular run options
    - pre_upgrade
  vars_files:         # List of additional variable files
    - vars/main/main.yml
    - vars/main/users.yml
Variable files
Playbooks are supported by variable files:
vars/main/users.ymlvars/main/main.yml
These files contain all the information on how the environment should be configured.
Inventories
The environment landscape definition is kept in the hosts inventory file. It describes which Omada components run on which hosts. The path to this file is as follows: inventories/dev/hosts.
Role directories
A role directory represents a general goal to achieve or a topic to handle. For example, the role "es" (Omada Enterprise Server) defines everything needed to support the installation and upgrade tasks of the Omada Enterprise Server component. The "post_installation" role groups together all tasks related to what needs to be done after installing Omada components to initialize the environment and make it ready for consultants.
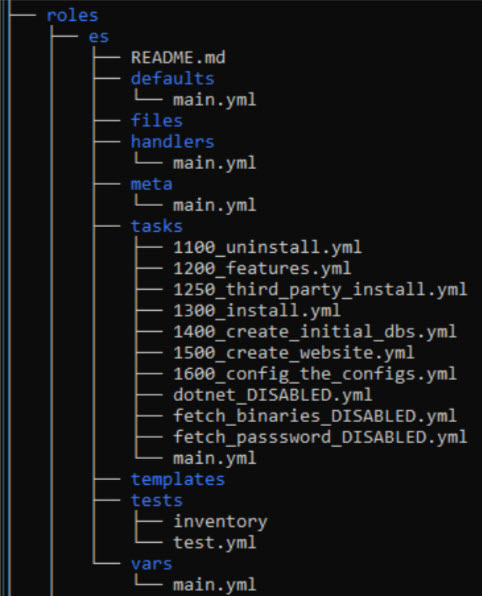
Here is a short explanation of some subdirectories and files typically found in a role directory:
README.md- provides basic information about role requirements and examples of how to use it.defaults/main.yml- contains default values required for the role to work properly.tasks/main.yml- orchestrates all tasks to be run in this role.tasks/*.yml- other YAML files containing specific task or action code.templates- contains Jinja2 template files used for component configuration or other tasks.
Installation and upgrade prerequisites
Before proceeding with the Omada Identity Ansible package installation or upgrade, the following prerequisites are expected to be present and working in the environment:
-
SQL Server DB engine in a supported version
-
SQL Server integration Services in a supported version
-
SQL Server Reporting Services in a supported version
- Connection to the DB engine is configured
- ReportServer endpoint is reachable
- Reports endpoint is reachable
-
Set of domain users for service run purposes
-
SPNs (Server Principal Name) set for:
- Omada Identity portal (forms authentication is not yet supported by the package)
- SSRS (unless you decide to use a specific SSRS access account)
- SQL Server (unless you decide to use local SQL Server accounts)
-
The user used by Ansible to control target Windows Server nodes needs to be a Local Administrator and SYSADMIN in DB engines across the environment.
-
All software and sizing prerequisites are the same as for a standard installation. For more information, refer to the Omada Identity Installation guide.
-
Additionally, an Ansible control node to run Ansible playbooks is required. Furthermore, communication between the Ansible control node and Windows Server nodes in the environment is necessary. Check here for details:
Define hosts file
The optimal approach is to begin by defining your environment's hosts file.
Exemplary host file with comments
app1 ansible_host=app-st01.corporate.com

web1 ansible_host=web-st01.corporate.com

# You can define more servers if needed.
# Just add an alias and define the host and remember to add it to the appropriate group later on.
#web2 ansible_host=web-st02.corporate.com

rope1 ansible_host=web-st01.corporate.com instances=2

#rope2 ansible_host=web-st02.corporate.com instances=2

#vault1 ansible_host=app-st01.corporate.com

#data_preview1 ansible_host=app-st01.corporate.com

db1 ansible_host=db-st01.corporate.com

# Do not modify the controller line below
controller ansible_host=localhost ansible_connection=local

# "es" group of hosts, used to define all hosts where Omada Enterprise Server should be installed
[es]
web1
#web2

# "rope" group of hosts, used to define all hosts where Omada Role and Policy Engine should be installed
# At this moment, only one RoPE Service instance is supported
[rope]
rope1
#rope2

# "ssrs" group of hosts, used to define all hosts where Omada Data Warehouse should be installed to support Reporting feature
[ssrs]
app1

# "ssis" group of hosts, used to define all hosts where Omada Data Warehouse should be installed to support SSIS/import feature
[ssis]
app1

# "odw" group of hosts, used to define all hosts where Omada Data Warehouse should be installed
[odw:children]
ssis
ssrs

# "ops" group of hosts, used to define all hosts where Omada Provisioning Service should be installed
[ops]
app1

#[data-preview]
#data_preview1
#app1

#[vault]
#vault1


# "pre_upgrade" group of hosts, used to define all hosts where the pre_upgrade role should run

[pre_upgrade:children]
es
rope
odw
ops
#data-preview
#vault

# "post_upgrade" group of hosts, used to define all hosts where the post_upgrade role should run

[post_upgrade:children]
es
rope
odw
ops
#data-preview
#vault

# "post_intallation" group of hosts, used to define all hosts where the post_installation role should run
[post_installation:children]
es
rope
odw
ops

# "all" general group of hosts
[all:children]
es
rope
ops
odw
#vault
#data-preview

# vars section, used to define connection details for Windows Server nodes
[post_installation:vars]
ansible_user=corporate\demoadm
ansible_password=test123
ansible_port=5986
ansible_connection=winrm
ansible_winrm_transport=credssp
ansible_winrm_server_cert_validation=ignore
Define variable files
The next step in preparing for the Omada Identity Ansible package installation is to ensure all variables are provided in variable files.
Exemplary vars\main\main.yml file with comments
# NOT IN USE YET

# Source of installation binaries - pick one, comment out the rest
# installation_binaries_UNC: \\corporate\ansible_conf\OmadaInstall
# installation_binaries_FTP: \\corporate\ansible_conf\OmadaInstall
# installation_binaries_WEB: \\corporate\ansible_conf\OmadaInstall
# OMADA_ZIP: "Omada Identity v14.0.14.36 Update 14.zip"
# CURRENT_VERSION: "14.0.16.9"
# TARGET_VERSION: "14.0.16.9"
# NOT IN USE YET

# Do not modify
third_party: "{{ installation_binaries }}\\ThirdParty"
INSTALLERS_PATH: "{{ installation_binaries }}\\Install\\"
LOG_PATH: "{{ installation_binaries }}\\Logs\\"
TIMESTAMP: "{{ lookup('pipe', 'date \"+%Y%m%d_%H%M%S\"') }}"
DB_ACCESS_RIGHTS: db_owner
TIMER_SERVICE: OETSVC
# Do not modify

# Path on the target host where installation binaries are present
installation_binaries: "C:\\OmadaInstall\\"
COLLECTORS_PATH: "{{ installation_binaries }}\\Omada.Connectivity.StandardCollectors.14.0.0.532"
# Full path to the backup directory
BACKUP_PATH: "C:\\OmadaBackup"

# Customer's License Key
LICENSE_KEY: "<<License Key placeholder>>"
CUSTOMER_NAME: "<<Take it from License Key>>"

DRIVE_LETTER: C
ES_INSTALL_RESULT_PATH: "{{ DRIVE_LETTER }}:\\Program Files\\Omada Identity Suite\\Enterprise Server"
OPS_INSTALL_RESULT_PATH: "{{ DRIVE_LETTER }}:\\Program Files\\Omada Identity Suite\\Provisioning Service"
ROPE_INSTALL_RESULT_PATH: "{{ DRIVE_LETTER }}:\\Program Files\\Omada Identity Suite\\Role and Policy Engine"
ODW_INSTALL_RESULT_PATH: "{{ DRIVE_LETTER }}:\\Program Files\\Omada Identity Suite\\Datawarehouse"
PREVIEW_INSTALL_RESULT_PATH: "{{ DRIVE_LETTER }}:\\Program Files\\Omada Identity Suite\\Preview"
VAULT_INSTALL_RESULT_PATH: "{{ DRIVE_LETTER }}:\\Program Files\\Omada Identity Suite\\Vault Service"

BACKUP_LIST: ['{{ ES_INSTALL_RESULT_PATH }}', '{{ OPS_INSTALL_RESULT_PATH }}', '{{ ROPE_INSTALL_RESULT_PATH }}', '{{ ODW_INSTALL_RESULT_PATH }}', '{{ PREVIEW_INSTALL_RESULT_PATH }}', '{{ VAULT_INSTALL_RESULT_PATH }}']
OMADA_REGISTRY: HKLM\SOFTWARE\Omada

# Domain Base Name
# Example Full Domain Name: corporate.com
# Domain: corporate
DOMAIN: corporate
FULL_DOMAIN: "{{ DOMAIN }}.com"
# Data Store DB NetBios Name or DNS alias
DATA_STORE_DB_SERVER: "db-st01"
# Data Store DB access port
DATA_STORE_DB_PORT: 1433

# SSIS DB Server NetBios name
SSIS_DB_SERVER: "app-st01"
# SSIS DB Access Port
SSIS_DB_PORT: "1433"
# SSIS installation path
SSIS_BINN_PATH: 'C:\Program Files\Microsoft SQL Server\140\DTS\Binn\' # It's in a different format than other PATHs on purpose.
# Version of ODW component package based on SSIS version
SSIS_SQL_SERVER_VERSION: "2017"

# Schema names for each Omada component
ES_SCHEMA: "OIS"
SSDDB_SCHEMA: "SSDDB"
ES_ARCHIVE_SCHEMA: "OISA"
ROPE_SCHEMA: "ROPE"
OPS_SCHEMA: "OPS"
ODW_STAGING_SCHEMA: "ODWS"
ODW_MASTER_SCHEMA: "ODWM"
ODW_SCHEMA: "ODW"

# Define authentication type against SQL Server
DB_CONNSTR_AUTHENTICATION: 'Integrated Security=SSPI'
# DB_CONNSTR_AUTHENTICATION: 'User Id={{ DB_USER }};Password={{ DB_USER_PWD }}'

CONNSTR_OPTIONS: "" # Remember to provide ";" at the beginning
CONNSTR_PROVIDER: "Provider=SQLNCLI11"
ES_CONNSTR: "Initial Catalog={{ ES_SCHEMA }};Data source={{ DATA_STORE_DB_SERVER }};{{ DB_CONNSTR_AUTHENTICATION }}{{ CONNSTR_OPTIONS }}"
SSDDB_CONNSTR: "Initial Catalog={{ SSDDB_SCHEMA }};Data source={{ DATA_STORE_DB_SERVER }};{{ DB_CONNSTR_AUTHENTICATION }}{{ CONNSTR_OPTIONS }}"
ES_ARCHIVE_CONNSTR: "Initial Catalog={{ ES_ARCHIVE_SCHEMA }};Data source={{ DATA_STORE_DB_SERVER }};{{ DB_CONNSTR_AUTHENTICATION }}{{ CONNSTR_OPTIONS }}"
ROPE_CONNSTR: "Initial Catalog={{ ROPE_SCHEMA }};Data source={{ DATA_STORE_DB_SERVER }};{{ DB_CONNSTR_AUTHENTICATION }}{{ CONNSTR_OPTIONS }}"
OPS_CONNSTR: "Initial Catalog={{ OPS_SCHEMA }};Data source={{ DATA_STORE_DB_SERVER }};{{ DB_CONNSTR_AUTHENTICATION }}{{ CONNSTR_OPTIONS }}"
ODW_STAGING_CONNSTR: "Initial Catalog={{ ODW_STAGING_SCHEMA }};Data source={{ DATA_STORE_DB_SERVER }};{{ DB_CONNSTR_AUTHENTICATION }}{{ CONNSTR_OPTIONS }}"
ODW_MASTER_CONNSTR: "Initial Catalog={{ ODW_MASTER_SCHEMA }};Data source={{ DATA_STORE_DB_SERVER }};{{ DB_CONNSTR_AUTHENTICATION }}{{ CONNSTR_OPTIONS }}"
ODW_CONNSTR: "Initial Catalog={{ ODW_SCHEMA }};Data source={{ DATA_STORE_DB_SERVER }};{{ DB_CONNSTR_AUTHENTICATION }}{{ CONNSTR_OPTIONS }}"

# Service Users for Omada components
DB_USER: omada_admin_sql # to be used alongside SQL Server user instead of SSPI
ES_SERVICE_USER: srvc_oi_st01 # Timer Service and APP Pool user
ROPE_SERVICE_USER: srvc_rope_st01 # RoPE Service user
OPS_SERVICE_USER: srvc_ops_st01 # OPS Service User
SQL_AGENT_USER: srvc_oi_test01 # SQL Agent User
REPORTING_USER: srvc_oi_test01 # User to access SSRS Server
APP_POOL_USER: srvc_oi_st # Application Pool Service User
SSIS_AGENT_USER: srvc_oi_st01 # Not yet in use
SSRS_ACCESS_USER: srvc_oi_st01 # Not yet in use
ANSIBLE_INSTALLATION_USER: omada_admin # Installation user, later used for the first Omada portal access via Windows Integrated Auth

# Enterprise Server website configuration
# HTTPS is not yet supported
es_mode: http
es_web_config: "Web.config"
es_binding: web-st01
es_app_pool: "{{ es_binding }}"
es_http_binding_port: 80
es_https_binding_port: 443
es_CERTIFICATE_THUMBPRINT: ""

# Role and Policy Engine listener configuration
# HTTPS is not yet supported
rope_mode: http
rope_binding: "oi-rope-test01"
rope_http_binding_port: 8010
rope_https_binding_port: 8011
rope_CERTIFICATE_THUMBPRINT: ""

# Omada Provisioning Service listener configuration
# HTTPS is not yet supported
ops_mode: http
ops_binding: "oi-ops-test01"
ops_http_binding_port: 8000
ops_https_binding_port: 8001
OPS_AUTH_BEHAVIOR: "ProvisioningServiceServiceBehaviorApiSharedSecret"
ops_CERTIFICATE_THUMBPRINT: ""

# SSRS ReportServer WebService endpoint
SSRS_REPORT_SERVER_URL_WS: "http://oi-reporting-test01.corporate.com:80/ReportServer"
# SSRS installation Path at the target host
SSRS_INSTALLATION_PATH: C:\Program Files\Microsoft SQL Server Reporting Services\SSRS\ReportServer

# Update at your best will and knowledge out-of-the-box Customer Settings.
# Customer Setting listed here needs to exist in the table to allow an update.
# Insert statements in case of a missing key are not supported yet.

CUSTOMER_SETTINGS_Value_str:
  - {key: "SSRSUrl", value: "{{ SSRS_REPORT_SERVER_URL_WS }}" }
  - {key: "RoPERemoteApiUrl", value: "{{ rope_mode }}://{{ rope_binding }}.{{ FULL_DOMAIN }}:{{ rope_http_binding_port }}/RoPERemoteApi/" }
  # - {key: "SSISExecutionUser", value: "NULL" }
  # - {key: "SSISExecutionUserPassword", value: "NULL" }
  - {key: "SSISInstallationPath", value: "{{ SSIS_BINN_PATH }}" }
  - {key: "SSISServer", value: "{{ SSIS_DB_SERVER }}" }
  - {key: "SqlAgentJobProxyAccountName", value: "{{ DOMAIN }}\\{{ ES_SERVICE_USER }}" }
  - {key: "SqlAgentJobServerInstance", value: "{{ SSIS_DB_SERVER }}" }
  - {key: "SqlAgentJobSSISServerInstance", value: "{{ SSIS_DB_SERVER }}" }
  - {key: "ItemsPerPage", value: "20,40,200,1000" }

# Set an appropriate value to 1 depending on the import method of your choice
# For a Single Server setup, both must be 0
# For other setups, please use "SqlAgentJobUse" >> 1

CUSTOMER_SETTINGS_Value_bool:
  - {key: "SSISUseKerberos", value: "0" }
  - {key: "SqlAgentJobUse", value: "1" }
Exemplary vars\main\users.yml file with comments
# Provide passwords for service users
ES_SERVICE_USER_PWD: "Onew12345!"
ROPE_SERVICE_USER_PWD: "Onew12345!"
OPS_SERVICE_USER_PWD: "Onew12345!"
APP_POOL_USER_PWD: "Onew12345!"
SSIS_AGENT_USER_PWD: "Onew12345!"
SSRS_ACCESS_USER_PWD: "Onew12345!"

# Provide values
PSW_ENCRYPTION_KEY: "SomeEncryptionKey"
API_SHARED_SECRET: "SomeAPISharedSecret"
The above file examples are shown in plain text, but the recommended approach is to encrypt them using the ansible-vault utility to enhance security. Here's the exemplary encryption:
ansible-vault encrypt vars/main/users.yml

New Vault password:

Confirm New Vault password:

Encryption successful
After encryption, the content of the file looks as follows:
$ANSIBLE_VAULT;1.1;AES256
65326331666563626564336636396536363165386138376S63373638B23366396139323439653664
33653234343662333236386561376S3661356436663139330a3735346S3831626233383938616137
65363436666433313330613661663538306239366630353133656138643465386434326564373163
3064353637336338630a326461623233616337376563636431613866623639626238333433373132
34656266323635383734616539376462643235313464316132626261396135343861323534636265
37666664623537633536353163663239663436626365366662303065623038303364343532323035
37356230343339396535623861393862646130616230643361383636343031306636376165376266
34353961666666366334316239353936333435613764613830626435306436303566613931323333
62613437323933336132636133313338373533336364313363353238373630303463663139303335
34613031666361353761393434346461323331313234326136326164363438653139336137373662
66373463646363303436393035663362363763393162313739363034323030306236316634363564
39323266343966306536633631333263623733393666393832643531623235336433616238636564
61343266616365633163623731663635623564336164656366643862373463323566363630313462
33396234303765383233653661353538396265356666336436343563356136316239326466353563
63613836343664366361633564663639643333373262646130376464333261646236626530366361
64633563633361303631666138626266316439393666313365306235383435376232663234353731
36336431303037306435373263313232616531663231613839656563316462383933633136653066
62343963316162636135353966613732396464313166663139613533393037373330303566336464
363066643231306538376236333835663739
However, furthermore, to edit the file, you need to use ansible-vault:
ansible-vault edit vars/main/users.yml

Vault password:
For information on the ansible-vault, refer to the Protecting sensitive data with Ansible vault documentation.
Upload installation files on all servers
The expectation is to have a single directory containing installation binaries, structured as shown below:
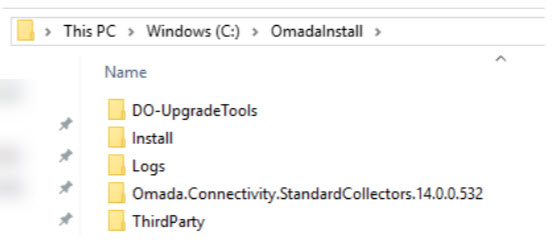
This comprises the standard contents of the installation zip package, along with additional directories for Third-party and Standard Collectors:
-
The Standard Collectors directory results from unzipping the package from Omada Community.
-
The Third-party directory contains all third-party software required for Omada installation.
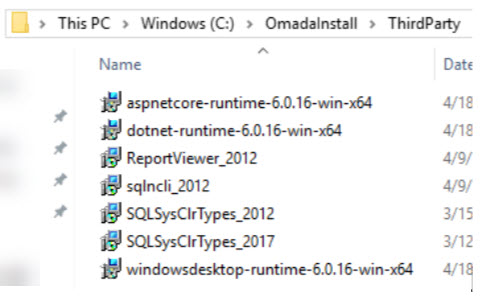
At this moment, the Third-party directory is not provided as a package.
Installation steps
Before proceeding with installation steps, make sure you've completed all tasks described in the Installation and upgrade prerequisites section.
Run installation playbook
Installation playbook can be triggered in various ways.
-
For a holistic approach, use the following command:
ansible-playbook -i inventories/dev/hosts installation_playbook.yml --tags installThis command executes all installation tasks defined in the playbook.
limitationBy default, Ansible is idempotent. However, to accomplish certain Omada-related tasks, maintaining this standard was not feasible. Consequently, there are a few points during installation where if something fails afterward, you need to re-run the installation and skip these points to avoid issues. One known point is the creation and initialization of Enterprise Server-related databases.
To exclude it, run the installation playbook as shown below:
ansible-playbook -i inventories/dev/hosts installation_playbook.yml --tags install --skip-tags initialize_dbsSo far, no other points have been identified, and it's considered safe to simply re-run the installation playbook as shown above.
-
For a more specific approach, use the following command to run the installation for a particular component in Omada Identity:
ansible-playbook -i inventories/dev/hosts installation_playbook.yml --tags install --skip-tags rope,ops,odw,post_installation,post_installation_esDue to the ambiguity of Ansible tags inheritance, this method is the only way to execute installation for just one Omada component. In the example above, the installation is executed solely for the Enterprise Server (the only tag not skipped). Additional examples can be found in the role's README.md file.
To run a playbook with ansible-vault encrypted files, use the following command:
ansible-playbook -i inventories/dev/hosts installation_playbook.yml --tags install --skip-tags rope,ops,odw --ask-vault-pass
To check which tasks will be executed when you are uncertain about tags used, use the following command:
ansible-playbook -i inventories/dev/hosts installation_playbook.yml --tags install --skip-tags rope,ops,odw --list-tasks
Upgrade steps
Prerequisites
Before proceeding with installation steps, make sure you've completed all tasks described in the Installation and upgrade prerequisites section.
The upgrade runbook encompasses steps outlined in the upgrade guides available in the Upgrade guides section.
Software requirements can be reviewed in the Installation guide section.
However, Omada recommends to double-check to ensure all necessary steps are covered, ensuring a seamless upgrade experience.
Run upgrade playbook
Upgrade playbook can be triggered in various ways.
-
For a holistic approach, use the following command:
ansible-playbook -i inventories/dev/hosts upgrade_playbook.yml --tags upgradeThis command executes all upgrade tasks defined in the playbook.
-
For a more specific approach, use the following command to run the upgrade for a particular component in Omada Identity:
ansible-playbook -i inventories/dev/hosts upgrade_playbook.yml --tags upgrade --skip-tags rope,ops,odw,post_upgrade,post_upgrade_esDue to the ambiguity of Ansible tags inheritance, this method is the only way to execute upgrade for just one Omada component. In the example above, the upgrade is executed solely for the Enterprise Server (the only tag not skipped). Additional examples can be found in the role's README.md file.
To run a playbook with ansible-vault encrypted files, use the following command:
ansible-playbook -i inventories/dev/hosts installation_playbook.yml --tags install --skip-tags rope,ops,odw --ask-vault-pass
To check which tasks will be executed when you are uncertain about tags used, use the following command:
ansible-playbook -i inventories/dev/hosts installation_playbook.yml --tags install --skip-tags rope,ops,odw --list-tasks
Considerations and limitations
Known issues and missing features
This consolidated list highlights known issues and features that are not yet implemented or covered in the current setup:
-
Initial surveys import
-
Language packages import
-
SQL Server local account authentication is not yet fully supported:
- Omada components can currently only be installed using integrated authentication towards SQL Server.
- If user/password authentication is defined in connection strings in the
main.ymlvar file, it will overwrite configuration files and data connections to the desired state. - Encryption of connection strings in Datawarehouse\Common\Omada ODW WebService.dtsConfig is not covered yet and needs to be done manually after installation.
- In general, passwords in data connections will not be encrypted.
-
Sometimes after deinstallation of Enterprise Server, deletion of the directory fails, and it needs to be removed manually to ensure proper upgrade. Example error message:
TASK [es : Delete folder]
fatal: [web1]: FAILED! => {"changed": false, "msg": "Failed to delete C:\\Program Files\\Omada Identity Suite\\Enterprise Server\\website\\Themes\\Default\\Infragistics\\structure\\Fonts\\jquery-ui.ttf: Access to the path 'C:\\Program Files\\Omada Identity Suite\\Enterprise Server\\website\\Themes\\Default\\Infragistics\\structure\\Fonts\\jquery-ui.ttf' is denied."}
Need to know
-
Tasks for which errors are ignored on purpose:
-
Certain tasks may result in errors, indicated by red text, for example:
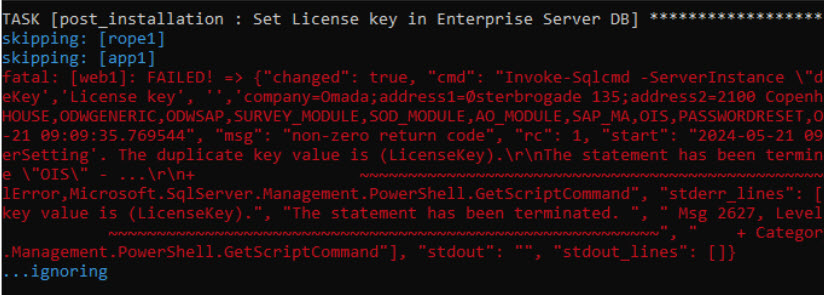
-
The message "...ignoring" signifies that the error has been deliberately ignored, allowing the playbook to continue executing.
-
The
ignore_errorsflag is used to achieve this. However, it's important to review ignored errors, as they may lead to subsequent task failures.
-
-
Re-run tasks creating a log file:
-
Some tasks are designed to run only when a log file is not already created.
-
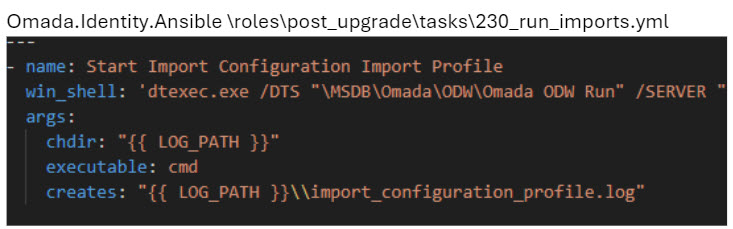
For instance, the task in the
post_upgraderole at Omada.Identity.Ansible\roles\post_upgrade\tasks\230_run_imports.yml creates a log file"{{ LOG_PATH }}\import_configuration_profile.log"during its execution. Subsequently, it won't run again if the log file already exists. -
When re-running such tasks, ensure to delete the existing log file.
-
-
Import product packages default behavior:
-
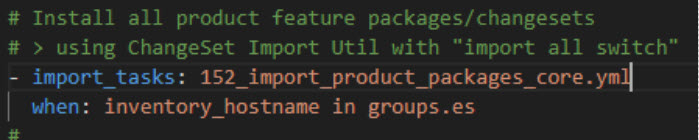
In the
post_installationandpost_upgraderoles, a task is responsible for importing new product features, located at Omada.Identity.Ansible\roles\post_upgrade\tasks\150_import_product_packages.yml. -
By default, it imports all feature packages regardless of the license string. If there are unlicensed features, consider using an alternative task to import only the core set of features, and import the rest through the Omada Identity portal after playbook completion.
-
To switch to the alternative task, edit Omada.Identity.Ansible\roles\post_upgrade\tasks\main.yml, from:

to:
-
-
RoPE multi-instance approach in package:
- The package supports adding multiple RoPE service instances, all using the same directory as the source. Consequently, all instances will utilize the same settings and configuration.
- For example, if specific priority calculation is desired for certain instances, manual configuration is necessary. For more information, refer to the Multiple instances of RoPE section in the Installation guide.