Omada Identity Data Warehouse
The user that installs Omada Identity Data Warehouse must have the following rights and database roles.
- Local Group Settings
- English language
- SSIS Server roles
In Local Group settings, the user must be a member of a group allowed to install software on the system, usually Local Administrators.
The user's Login must have its Default Language set to English (US) in SQL Server.
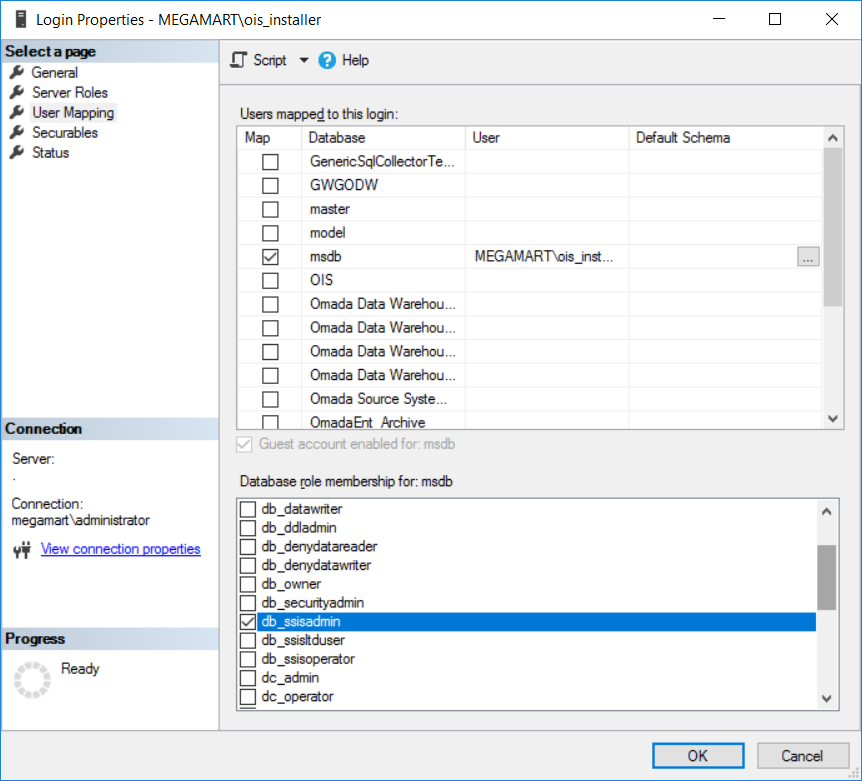
To be able to deploy SSIS packages on the SSIS Server, the user installing the SSIS packages must have the attribute db_ssisadmin in the msdb database in the system databases. This is the case for both single- and multiple server installations.
SSIS Development environment - software prerequisites
Microsoft SQL Server 2019
To perform custom development for the Data Warehouse, if running on Microsoft SQL Server 2019, you must have installed the following software:
- SQL Server Data Tools for Visual Studio 2017 or 2019
Microsoft SQL Server 2017
To perform custom development for the Data Warehouse, if running on Microsoft SQL Server 2017, you must have installed the following software:
- SQL Server Data Tools for Visual Studio 2015 or later
Microsoft SQL Server 2016
To perform custom development for the Data Warehouse, if running on Microsoft SQL Server 2016, you must have installed the following software:
- SQL Server Data Tools for Visual Studio 2015 or later
Run the installer
You must run the installer as an administrator. Launch the Omada Data Warehouse installation wizard by double-clicking the relevant .exe file:
-
Omada Data Warehouse.x64 SQL 2019.exe
-
Omada Data Warehouse.x64 SQL 2017.exe
-
Omada Data Warehouse.x64 SQL 2016.exe
And then click Next.
The installer path is not saved as a part of a configuration file. It is reset once the installer starts.
-
Enter the license key in the License Key field.
-
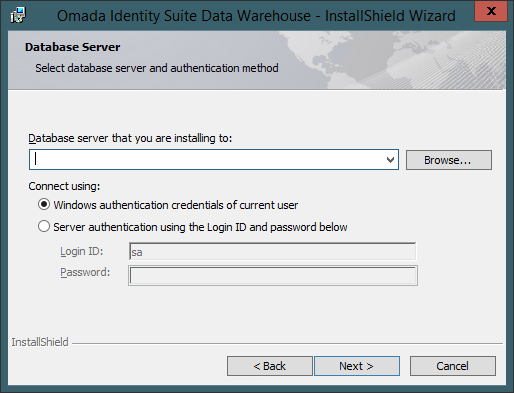
Enter the name of the database server that you are installing the databases on and select an authentication method.
noteIf you are installing to the default instance, you only need to enter the server name. If you are installing to a named instance, you must enter the relevant server name and instance name.
-
Specify names for the Omada Data Warehouse database, the Omada Data Warehouse Staging database, and the Omada Data Warehouse Master database. You can also just use the default names as shown below.

-
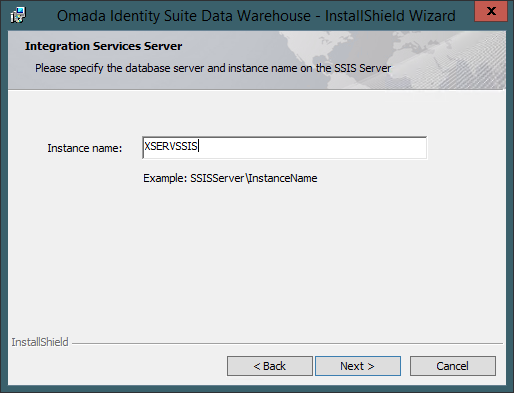
The Omada SSIS packages are stored in the MSDB database of an SQL Server. In the Integration Services Server screen, specify the server and instance name of the SQL Server that contains the MSDB database where you want to locate the package.
-
If the MSDB database is installed on the default instance, you only need to enter the server name.
-
If the MSDB database is installed on a named instance, you must enter the server name and/or instance name. You might have to edit the SSIS Server configuration file if the MSDB is installed on a named instance. See the1.0.1 Edit the SSIS Service Configuration File section .
-
Click Next to install ODW to the default folder on C:\Program Files\Omada Identity Suite\Datawarehouse. If you want to select a different folder, click Change....
-
In the Custom Setup page, you can select which program features to install and specify where they are to be installed to. You can, for example, choose to install all of them on the same server or distribute them on multiple servers.
Source Systems
The Source Systems feature performs the following actions:
- Installs the Omada Identity Data Warehouse databases
- Deploys Microsoft SQL Server Integration Services (SSIS) packages for the selected connectors and points them to the configuration files.
- Installs Omada .NET assemblies in the Global Assembly Cache (GAC).
SQL Server Integration Services is not a clustered or cluster-aware service. For this reason, Omada recommends that you DO NOT install SQL Server Integration Services in a Cluster.
For more information, go to Integration Services (SSIS) in a Cluster
In the recommended scenario, the databases and SSIS packages are run on separate servers, and you would in that case run the installer for Source Systems on the SSIS Server.
Reports
The Reports feature performs the following actions:
- Adds a license key to the Omada Data Warehouse database.
- Deploys SSRS reports to Support Files folder and updates connection strings.
- Deploys the Omada Localization assembly and files.
If SSRS is on a non-default instance, follow the additional steps under the 1.0.1 Install on a non-default SSRS instancesection.
If you cannot run the installer on the server running the SQL Server Report Services, follow the additional steps under the 1.0.1 Manually deploy Omada localization assembly section.
Configuration Files
The Configuration Files (Config Files) feature deploys the SSIS configuration files and updates connection strings. There are no software requirements for this feature.
To install the Configuration Files feature on a different server than the one where you have SQL Server Integration Services (SSIS) installed, you must run the Omada Identity Data Warehouse installer on both servers.
When you have completed this installation on the server where you have installed the Configuration Files feature, locate the Datawarehouse folder. The default location is C:\Program Files\Omada Identity Suite\Datawarehouse. The folder contains these subfolders; Common, Localization, Source Systems, Support Files, and Templates. Set the Datawarehouse folder to Shared.
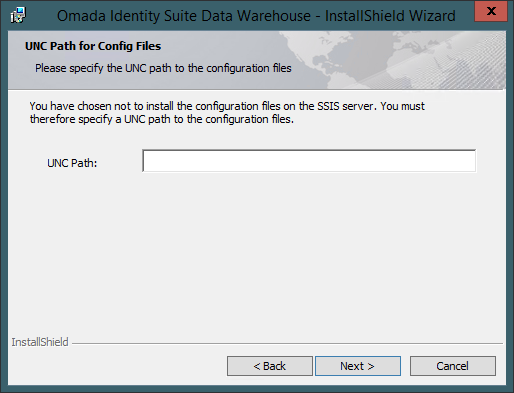
On the server where you have SSIS installed, deselect the Configuration Files feature on the Custom Setup page. When you click Next, you see the UNC Path for Config Files page shown below. Here, you must enter the UNC path to the shared Datawarehouse folder, for example, \\<configfile-server>\Datawarehouse.
You must install the Reports feature to the SQL Server Reporting Services (SSRS) server from which you run the reports. If the server is different from the SSIS server, you must run the ODW installer on both servers.
If there are multiple SSRS instances installed on the target machine, the ODW installer will favor the default instance to apply the necessary file changes.
- On the Custom Setup page, you must also select which Connectors you want to install. Select the Source Systems that you want to import from. Note that you can only use Connectors that you have a valid license for. Click Next.
- You have now entered all the necessary information. Click Install to start the installation of the Omada Identity Data Warehouse software.
- When the installation is complete, click Finish.
- If you have used the default installation path, you can see the Datawarehouse folder under C:\Program Files\Omada Identity Suite.
Omada recommends that you take a backup of the databases before importing data. This provides an easy way to clean the databases if needed.
Edit the SSIS Service Configuration File
If the MSDB database is installed on a named instance, you might have to edit the SSIS Service configuration file.
For more information, see Integration Services Service (SSIS Service).
Install on a non-default SSRS instance
The steps described below allow you to install ODW on a non-default SSRS instance as well as manually install and deploy report on a different server than the installer is run.
-
To support SSRS on a non-default instance, run:
Omada Data Warehouse.x64 SQL 2016.exe/AnoteThe version of the installer depends on the version of the SQL Server used. For SQL Server 2016/2017/2019, respectively, the 2016/2017/2019 version of the installer should be run.
Specify the folder where you want to place the files. This initiates an administrative installation.
-
Go to the registry, and find the following key:
HKEY_LOCAL_MACHINE\SYSTEM\CurrentControlSet\Services\ReportServer where ReportServer is the name of the instance. In the ImagePath property, you can find the path that you need for the next step.

-
Copy the Omada.ODW.SSRS.Utils.dll file into the ReportServer folder.
-
Find the rssrvpolicy.config file, which is located in the parent folder of the bin folder you just found, then add the following CodeGroup before the section with two
</CodeGroup>tags:
<CodeGroup Description="" Name="Omada.ODW.SSRS.Utils" PermissionSetName="FullTrust" class="UnionCodeGroup" version="1">
    <IMembershipCondition PublicKeyBlob=
        "00240000048000009400000006020000002400005253413100040000010001002985C8DE09BDAD0E8706B11719FB09F4C5AD2A74F17984E09408CA709278FF497A9CD1C279DBB4B2C847B8AF0AEA943E37BFE17573BD1D80D843562B5AECBC7F6E2B81F69D5E5FE1BBCA88F53A10EA28114E68A23459900515A6561A1661CFCCD4C2E9C5F159397021883B785042FC5D3C78432F97272F9961AF191089EFD59F"
        class="StrongNameMembershipCondition" version="1">
    </IMembershipCondition>
</CodeGroup>
Manually deploy Omada localization assembly
The Omada Identity Data Warehouse installer deploys the Report localization files and assembly. If the installer cannot be run on the server running the SQL Server Report Services, follow these steps to deploy the files:
-
Copy the Omada.ODW.SSRS.Utils.dll file from the folder C:\Program Files\Omada Identity Suite\Datawarehouse\Support Files on the computer on which the Reports feature was installed.
-
Place the Omada.ODW.SSRS.Utils.dll in the folder ReportServer\bin for the SSRS Server. If you are using a default instance of SQL Server, it is in C:\Program Files\Microsoft SQL Server\MSRS11.MSSQLSERVER\Reporting Services\ReportServer*. If you are using a named instance, replace MSSQLSERVER with the name of the instance.
-
Edit the rssrvpolicy.config file located in the ReportServer folder by inserting the following XML just before the group of two
</CodeGroup>tags.<CodeGroup Description="" Name="Omada.ODW.SSRS.Utils" PermissionSetName="FullTrust" class="UnionCodeGroup" version="1">
<IMembershipCondition PublicKeyBlob=
"00240000048000009400000006020000002400005253413100040000010001002985C8DE09BDAD0E8706B11719FB09F4C5AD2A74F17984E09408CA709278FF497A9CD1C279DBB4B2C847B8AF0AEA943E37BFE17573BD1D80D843562B5AECBC7F6E2B81F69D5E5FE1BBCA88F53A10EA28114E68A23459900515A6561A1661CFCCD4C2E9C5F159397021883B785042FC5D3C78432F97272F9961AF191089EFD59F" class="StrongNameMembershipCondition" version="1">
</IMembershipCondition>
</CodeGroup> -
Copy the Localization folder or its content located in C:\Program Files\Omada Identity Suite\Datawarehouse* on the computer where the Reports feature was installed. Place the folder in main folder for the SSRS server.
-
In Registry Editor, add the following key: [HKEY_LOCAL_MACHINE\SOFTWARE\Omada\Omada Identity Suite\Omada Data Warehouse].
-
Add a multi-string value named SSRS Localization Path. In Value, add the path to the folder. You are now ready to upload the Omada Identity Data Warehouse Reports to the server.
Add a password encryption key
Omada requires that you set a secret password encryption key, so that you do not use the default one. This needs to be done before you enter any credentials that are to be encrypted with this key.
Troubleshooting
Installer does not detect old version of OPS/ODW and will not upgrade
Before Omada Identity 12.3, all previous versions of Omada Provisioning Services and Omada Identity Data Warehouse were installed on a per-user basis, so when you upgrade from a previous version to 12.3, you must do this with the same user that completed the original installation.
If you do not use the same user that completed the OPS/ODW installation, none of these components will be visible in the list of installed programs in the Windows Control Panel's Add/Remove programs.
The upgrade to 12.3 does not solve this issue because the installer cannot change an installation that has been completed on a per-user basis to an installation completed on a per-machine basis.
In Omada Identity v14, it is required to install OPS and ODW on a per-machine basis, that is why you must remove OPS and ODW from your machine, then install them again without completing an upgrading.