Data import
Connection details
| Parameter | Value |
|---|---|
| Base URL | {Base URL} |
| Authentication type | OAuth2 Custom |
| Token endpoint | [Token endpoint] |
| OAuth token type | Bearer |
| Auth request body | grant_type=refresh_token&refresh_token={Refresh token}&client_id={Client id}&client_secret={Client secret} |
| Auth request content type | application/x-www-form-urlencoded |
| Authentication server response format | JSON |
| Access Token Location | access_token |
| Authorization header | Authorization |
| Test connection | Select the checkbox |
Queries and mappings
Workers - identity
Additional fields can be mapped by adding them directly to the mapping configuration.
Parameters
| Tab | Parameter | Value |
|---|---|---|
| General | URL | ccx/api/staffing/v6/ibmsrv_pt1/workers |
| General | Distinct | Yes |
| General | Enabled | Select the checkbox |
| Advanced | HTTP verb | GET |
| Advanced | URL is a DynamicExpresso expression | No |
| Paging | Change paging | No |
In the URL, you can add a query parameter to include or exclude terminated workers:
Include: ccx/api/staffing/v6/ibmsrv_pt1/workers?includeTerminatedWorkers=true
Exclude: ccx/api/staffing/v6/ibmsrv_pt1/workers?includeTerminatedWorkers=false
Mappings
| Destination | Operator | Source |
|---|---|---|
| Business key | Map | id |
| Unique ID | Map | id |
| Name | Map | descriptor |
| Status | Constant | Active |
| First name | Expression | descriptor.Split(' ')[0] |
| Last name | Expression | descriptor.Split(' ')[descriptor.Split(' ').Length - 1] |
| Map | person_email | |
| Job title | Map | primaryJob_descriptor |
| Country | Map | primaryJob_location_country_ISO_31661_Alpha3_Code |
| Employee ID | Map | workerId |
| Type | Constant | Primary |
| Category | Constant | Employee |
Optional:
- You can set the status to either terminated or active by using the following expression:
descriptor.Contains("(Terminated)") ? "Terminated" : "Active". - You can add extra extensions to retrieve work types and additional jobs:
| Destination | Operator | Source |
|---|---|---|
| workType | Map | workerType_descriptor |
| additionalJob | Map | additionalJobs_descriptor |
Supervisory Organizations – context
Additional fields can be mapped by adding them directly to the mapping configuration.
Parameters
| Tab | Parameter | Value |
|---|---|---|
| General | URL | ccx/api/staffing/v6/ibmsrv_pt1/supervisoryOrganizations |
| General | Distinct | Yes |
| General | Enabled | Select the checkbox |
| Advanced | HTTP verb | GET |
| Advanced | URL is a DynamicExpresso expression | No |
| Paging | Change paging | No |
Mappings
| Destination | Operator | Source |
|---|---|---|
| Business key | Expression | "SupervisoryOrganization_" + id |
| Name | Map | descriptor |
| Type | Constant | OrgUnit |
| Short name | Expression | "SupervisoryOrganization_" + id |
Locations – context
Additional fields can be mapped by adding them directly to the mapping configuration.
Parameters
| Tab | Parameter | Value |
|---|---|---|
| General | URL | ccx/api/staffing/v6/ibmsrv_pt1/workers |
| General | Distinct | Yes |
| General | Enabled | Select the checkbox |
| Advanced | HTTP verb | GET |
| Advanced | URL is a DynamicExpresso expression | No |
| Paging | Change paging | No |
Mappings
| Destination | Operator | Source |
|---|---|---|
| Business key | Expression | "Location_" + primaryJob_location_id |
| Name | Map | primaryJob_location_descriptor |
| Type | Constant | Location |
| Short name | Expression | "Location_" + primaryJob_location_id |
Countries – context
Additional fields can be mapped by adding them directly to the mapping configuration.
Parameters
| Tab | Parameter | Value |
|---|---|---|
| General | URL | ccx/api/staffing/v6/ibmsrv_pt1/workers |
| General | Distinct | Yes |
| General | Enabled | Select the checkbox |
| Advanced | HTTP verb | GET |
| Advanced | URL is a DynamicExpresso expression | No |
| Paging | Change paging | No |
Mappings
| Destination | Operator | Source |
|---|---|---|
| Business key | Expression | "Country_" + primaryJob_location_country_ISO_31661_Alpha3_Code |
| Name | Map | primaryJob_location_country_descriptor |
| Type | Constant | Countries |
| Short name | Expression | "Country_" + primaryJob_location_country_ISO_31661_Alpha3_Code |
Job title – context
Additional fields can be mapped by adding them directly to the mapping configuration.
Parameters
| Tab | Parameter | Value |
|---|---|---|
| General | URL | ccx/api/staffing/v6/ibmsrv_pt1/workers |
| General | Distinct | Yes |
| General | Enabled | Select the checkbox |
| Advanced | HTTP verb | GET |
| Advanced | URL is a DynamicExpresso expression | No |
| Paging | Change paging | No |
Mappings
| Destination | Operator | Source |
|---|---|---|
| Business key | Expression | "JobTitle_" + primaryJob_id |
| Name | Map | primaryJob_descriptor |
| Type | Constant | JobTitle |
| Short name | Expression | "JobTitle_" + primaryJob_id |
Supervisory Organization Assignments for Identities – context assignment
This mapping establishes the relationship between workers and supervisory organizations. It ensures that the worker identity is correctly linked to the supervisory organization within Omada.
Parameters
| Tab | Parameter | Value |
|---|---|---|
| General | URL | ccx/api/staffing/v6/ibmsrv_pt1/workers |
| General | Distinct | Yes |
| General | Enabled | Select the checkbox |
| Advanced | HTTP verb | GET |
| Advanced | URL is a DynamicExpresso expression | No |
| Paging | Change paging | No |
Mappings
| Destination | Operator | Source |
|---|---|---|
| Context business key | Expression | "SupervisoryOrganization_" + primaryJob_supervisoryOrganization_id |
| Identity UID | Map | id |
Location Assignments for Identities – context assignment
This mapping establishes the relationship between workers and locations. It ensures that the location is correctly linked to the corresponding worker identity within Omada.
Parameters
| Tab | Parameter | Value |
|---|---|---|
| General | URL | ccx/api/staffing/v6/ibmsrv_pt1/workers |
| General | Distinct | Yes |
| General | Enabled | Select the checkbox |
| Advanced | HTTP verb | GET |
| Advanced | URL is a DynamicExpresso expression | No |
| Paging | Change paging | No |
Mappings
| Destination | Operator | Source |
|---|---|---|
| Context business key | Expression | "Country_" + primaryJob_location_country_ISO_31661_Alpha3_Code |
| Identity UID | Map | id |
Supervisory Organization managers – context owner
This mapping establishes the relationship between managers and supervisory organizations. It ensures that the manager identity is correctly linked to the supervisory organization within Omada.
Parameters
| Tab | Parameter | Value |
|---|---|---|
| General | URL | ccx/api/staffing/v6/ibmsrv_pt1/supervisoryOrganizations |
| General | Distinct | Yes |
| General | Enabled | Select the checkbox |
| Advanced | HTTP verb | GET |
| Advanced | URL is a DynamicExpresso expression | No |
| Paging | Change paging | No |
Mappings
| Destination | Operator | Source |
|---|---|---|
| Context business key | Expression | "SupervisoryOrganization_" + id |
| Identity UID | Map | managers_id |
| Type | Constant | OrgUnit |
Job titles assignments for Identities – Context assignment
The following mapping is currently not part of the standard package. You can add it manually. This mapping establishes the relationship between workers and job titles.
- Open Queries and mappings. Click New.
- Select Context assignment as the object type for your query.
- In the General section, enter the following details:
- URL:
ccx/api/staffing/v6/ibmsrv_pt1/workers - Distinct: Yes
- Description: Job titles and workers
- URL:
- In Mappings, enter the following details:
- Context business key (Expression):
"JobTitle_" + primaryJob_id - Identity UID (Map):
id
- Context business key (Expression):
- Click OK.
Parameters:
| Tab | Parameter | Value |
|---|---|---|
| General | URL | ccx/api/staffing/v6/ibmsrv_pt1/workers |
| General | Distinct | Yes |
| General | Enabled | Select the checkbox |
| Advanced | HTTP verb | GET |
| Advanced | URL is a DynamicExpresso expression | No |
| Paging | Changing paging | No |
Mappings:
| Destination | Operator | Source |
|---|---|---|
| Context business key | Expression | "JobTitle_" + primaryJob_id |
| Identity UID | Map | id |
Advanced configuration
| Parameter | Value |
|---|---|
| Paging mechanism | URL Parameters |
| URL parameters | offset={index}&limit=100 |
| Starting index | 0 |
| Total field | total |
Additional configuration
Perform the following configuration to align Workday's data model with the identity and context structure of Omada Identity. This will ensure correct linking of identities to contextual entities (country/location) that are essential for policies that depend on contextual attributes (for example, location-specific policies). The configuration completes the governance logic.
Modifying the data object type
- In Omada Identity, go to Setup and then Data object types.
- In the Name filtering field, enter
Countries. - Click Properties and then Add.
- Add two properties with the following System names:
OWNERREFandODWBUSIKEY. Click OK.
Creating context type - countries
- In Omada Identity, go to Setup and then Context types. Click New.
- Enter the following details:
- Name: Countries
- Object type: Countries
- Owner property:
Owner [OWNERREF] - Membership property:
Country [COUNTRY]
Import profiles
- In Omada Identity, go to Setup and then Import profiles.
- From the list, select Import. Click Start import and wait until the import is completed.
Omada Identity configuration
- In Omada Identity, go to Setup > All systems, and then select your system.
- Click one of the following options:
- (on-premises) Warehouse to portal mapping
- (cloud) Export queries and mappings
- Open the first Identities data object type and then click Mappings.
- Enter the following details:
- Email: select Map as the operator; search and select Email as Source.
- EmployeeID: select Map as the operator; search and select EmployeeID as Source.
- Perform the following procedure for Location and Countries:
- Location
- Countries
-
Enter the following details:
- Operator:
Lookup - Source (search source field):
ComposedBusinessKey
- Operator:
-
Click Edit. Enter the following details (ensure to change the ContextType to the respective destination you are editing):
- Target key property:
ODWBUSIKEY - Lookup view:
Context assignments - Lookup join field:
IdentityComposedBusinessKey(on-premises) orIdentity_ComposedBusinessKey(cloud) - Lookup value field:
ContextComposedBusinessKey(on-premises) orContext_ComposedBusinessKey(cloud) - Lookup field:
[ContextType]= 'Location'(on-premises) or{context:{type:{eq:"Location"}}}(cloud)
- Target key property:
-
Click OK.
-
Enter the following details:
- Operator:
Lookup - Source (search source field):
ComposedBusinessKey
- Operator:
-
Click Edit. Enter the following details (ensure to change the ContextType to the respective destination you are editing):
- Target key property:
ODWBUSIKEY - Lookup view:
Context assignments - Lookup join field:
IdentityComposedBusinessKey(on-premises) orIdentity_ComposedBusinessKey(cloud) - Lookup value field:
ContextComposedBusinessKey(on-premises) orContext_ComposedBusinessKey(cloud) - Lookup field:
[ContextType]= 'Countries'(on-premises) or{context:{type:{eq:"Countries"}}}(cloud)
- Target key property:
-
Click OK.
Location
- Enable the two data object types named Location. Open the first one and select the Source tab.
- In the Additional filtering (SQL) field, change
Personal AreatoLocation(the complete entry:[Type]='Location').
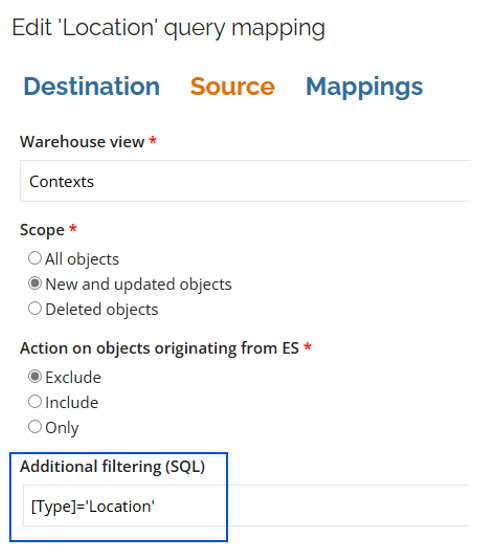
- Click OK.
Countries
- In Warehouse to portal mappings, click New. From the list, select Countries. Click OK.
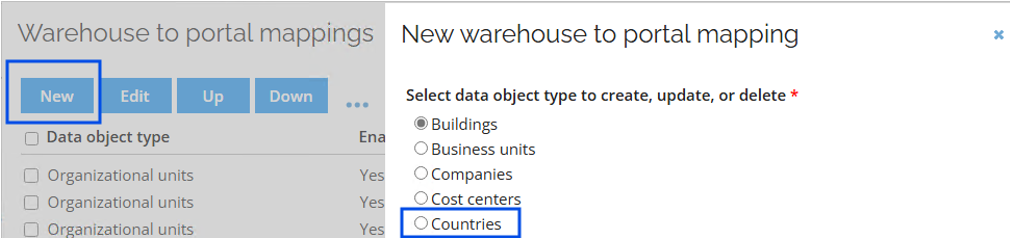
- Open the new Countries data object type.
- Under Destination, enter the following details:
- Operation: Update or create
- Key property: ISO code
- Under Source, enter the following details:
- (on-premises) Warehouse view: Contexts
- (cloud) Entity type: Context
- Scope: New and updated objects
- Action on objects originating from ES: Exclude
- Under Mappings, enter the following details:
- Business key: ComposedBusinessKey (Map)
- ISO code: ShortName (Map)
- Name: Name (Map)
- Click OK.
Adding fields in the identity
Perform the following steps to view the location, country, and employeeID of a specific identity after an import (this procedure can be completed after the import and then followed by an additional import).
- Go to Setup > Identities. Open any identity.
- Press Ctrl + right click and select Form designer. Click OK.
- Click Add existing property, and then OK.
- Select the following fields: Location, Country, and EmployeeID. Click OK.
- Click Apply.
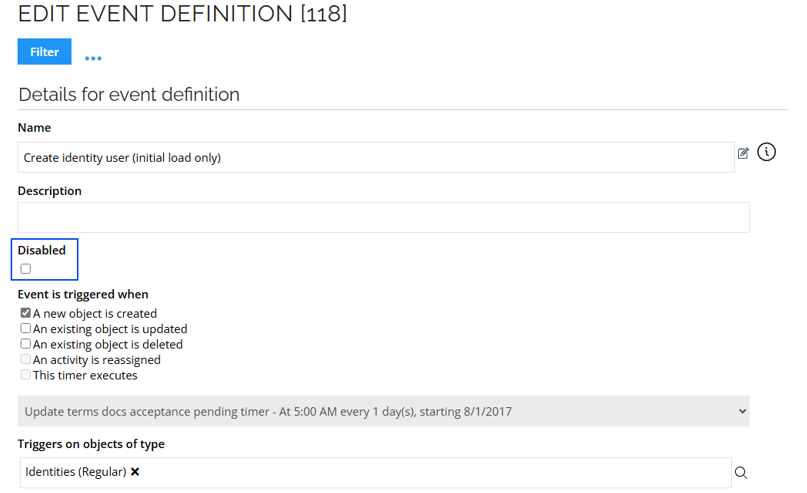
Event definitions
- Go to Setup > Event definitions.
- Search for the event definition: load
- Open the Create identity user (initial load only) event definition.
- Select the Disabled checkbox. Click Apply and OK.
- Go to Setup > Event definitions.
- Search for the event definition: Email
- Open the Generate Email for Identities event definition.
- Select the Disabled checkbox. Click Apply and OK.