Configure context type (Example)
Create a new data object type
For more information, go to Data Object Types
Follow these steps to create a new data object type:
-
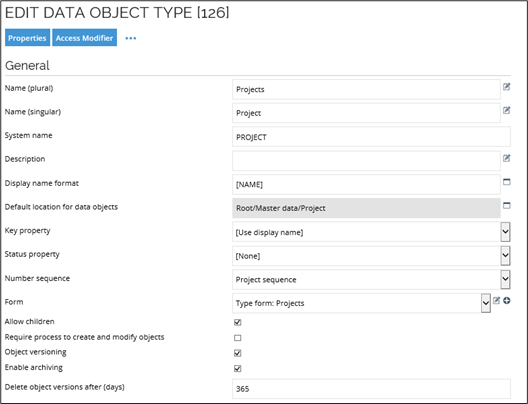
Create a new data object type that should hold project data objects and give it the name Projects in Name (plural) and Project in Name (singular).
-
In the System name field, type the relevant name, for example, PROJECT.
-
Optionally, clear the Require process to create and modify objects checkbox to disable this setting. If you disable this setting, you make users able to create new projects from the Project view. Otherwise, a process is required before you can create a new project.
-
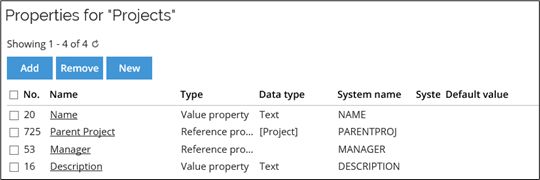
When you have specified the settings for the various fields in the view, click Properties in the upper-left corner to go to the Properties dialog box. From this dialog box, you must make sure that the Projects object type gets the following four properties:
-
Name (should be set by default)
-
Parent project
-
Manager
-
Description
-
-
The Parent project property allow you to create a hierarchy of projects. To create the Parent Project property, click New, then Reference property.
-
Type in the various settings for the property as shown below. It is important that you type the correct name in the setup of the context type.

-
To add the Manager and Description properties, click Add, then locate and select them from the list of properties.
-
Click OK to close the Properties dialog box, then OK to close the data object type view. The new data object type should now appear at the top of in the lists of existing object types.
Move the data object type
After you have created the data object type, go to Setup > Administration > More... > Tree Structure:
- In the Tree Structure list, locate the Projects folder, then right-click and select Move.
- In the Select new tree parent for Project window that opens, click the Master Data folder to ensure that the access rights needed to view and change projects are the same for Project as it is for other types of master data.
Create a view for projects
For more information, go to Views
The next step is to create a new view that data administrators can access, and that shows the project data objects.
-
Go to Setup > Administration > User Interface... > Views, then click New.
-
In the New View list, choose Data Object List View, then click OK.
-
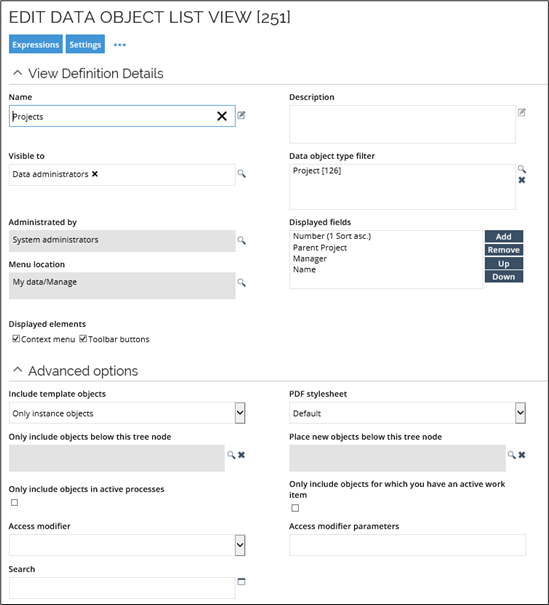
In the New Data object list view, type a Name for the view in addition to an optional Description.
-
In the Administrated by field, click the lookup icon to locate and select System administrators to remove the default Everyone option. If you do not change this setting, you cannot change the settings in the Visible to field which is needed to give data administrators access to the project data object.
-
In the Visible to field, click the lookup icon to locate and select Data administrators.
-
In the data object type filter field, click the lookup icon and select the Projects data object type.
-
In the Displayed fields lists, remove Type, Display name and Created and replace them with Parent Project, Name, and Manager as specified on the Project data object type. When you are done, click OK save your settings and close the view.
Create a context type for projects
For more information, go to Context Types
In this step, you configure the system to treat projects as contexts.
-
Go to Setup > Master Data > Organization > Context types, then click New.
-
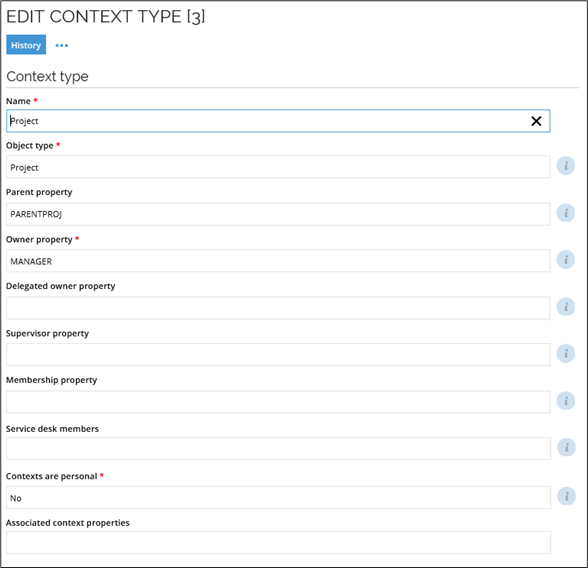
Type in Name, Object Type, Parent property and Owner property as shown in the image below.
The system validates that the settings you type in are valid. If they are not, you cannot save the new context type. When you are done, click OK to save your settings and close the view.
Create a project from the project view
After completing the previous steps, you must then create a new project using the Project view created in earlier in this chapter. To use this step, you must disable the Require process to create and modify objects setting for the Projects object type.
- Click My Data > Projects, then New.
- Type a Name for the project, then click the lookup icon in the Manager field and select one or more relevant users to become the manager of the project. When you have made your selection, click Apply in the bottom-right corner.
- After you have clicked Apply, a new area appears in the bottom of the page. It shows context assignments for the project. When you created the context type earlier in the process, this area was automatically added to the form.
- To create a context assignment, click the + icon at the bottom of the area.
- When you have set up the settings as you want them to be on the page, click OK to save the settings and close the dialog box.
- To check that the identity has access to the project, the relevant identity should check that the project is available to select in the Business Context menu in the Request Access area.