Data import
This section describes the settings allowing you to configure data imports.
Data import
With the Horizons feature enabled, starting data import settings have been changed. For more information, go to Data import.
During the initial import of identities, it is recommended that you disable the event definition Launch onboard employee process and enable the event definition Create identity user (initial load only). If the latter event is not enabled for the initial import, the import may fail, even though it would have been successful with the event enabled.
After the initial import, the event definition Launch onboard employee process can be re-enabled and Create identity user (initial load only) should be then disabled.
-
Make sure that you have set up all mandatory tasks. For account rules, make sure that you have changed the status from Pending to OK, then click Start data import.
-
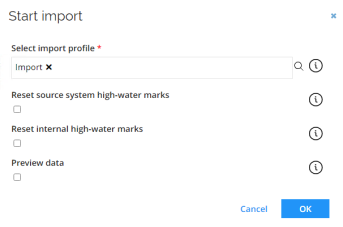
In the Select import profile field, choose an import profile to use. By default, the field should include the System ‘AD’ import profile, which the system generates when you register the first AD system.
-
Optionally, select the Reset internal high-water marks checkbox to force full synchronization between Omada Identity components, for example, master data import and warehouse-to-portal synchronization.
-
Optionally, select the Preview data checkbox to run the import in the preview mode.
-
Click OK to start the import. The import progress page lists each step of its progress.
If you see a green check mark next to each step, that step in the import was successful. A grey check mark means that the data has been staged, but not yet imported.
If you see a red cross, this means something failed in the import. When you have completed all steps in the progress, click Close.
If you click Start data import and the import process takes some time to begin, an error message may appear with the following information: Import request was received, but import was not started. See detailed execution log for details.
In such cases, click and open the Execution log. If the log is empty, then the import may have started anyway. To be sure, start the import again. If you start the import again and you see an error message saying Another import is currently running. Try again later., this means that the first import is running. You can check the SSIS log to see if there were any errors when you started the import. See the Omada Identity – Operations Guide for more information about potential import errors
Next to the Start data import task, you can see the time and date for the Last successful import after you have run the first import for your system. Click the details to see more information about the import.
If the import finishes with the status Import returned a warning and the reason “One or more objects could not be imported”, click the reason text to open the Import errors log. Depending on the Configure import setting Import errors per object, data import may accept a specified number of staging errors per object type. The list of errors can be viewed in the Import errors log. In the Step column, you can choose to see the errors encountered only during staging, only during import, or both. You can also click the ellipsis (...) menu to export the list of errors to a CSV file.
Additionally, if the import finishes with the status Success or Import returned with a warning, the import date and time as well as the snapshot of the imported data are recorded in the database for history reporting and RoPE calculation purposes.
Data import with the Governance for Omada Identity feature enabled
With the Governance for Omada Identity feature enabled, synchronization and data import are distinguished as two separate actions you can perform:
- Start synchronization - This action initiates the Import master data profile, with the visible status reflecting the latest recorded state of the Import master data. Failed export for any of the systems is indicated by the Warning status
- Start data import - This action creates a new import profile with the Omada Identity system category added. Performing this action imports the governance data with the action status reflecting the latest system import. With the Governance for Omada Identity feature enabled, the Preview data and Warehouse to portal synchronization only settings are not visible.
Set up account rules
With the Horizons feature enabled, the settings in the Account rules section are no longer available. For more information, go to Account rules.
Any changes made to the settings in this task apply to all systems of the same category that you import to Omada Identity.
- Click Account rules to open its settings dialog box.
- Add, delete, or move account rules by using the blue action buttons.
- Click the ellipsis (…) next to the blue action buttons and select Settings.
- Select the checkbox. Reinitialize ownership to enable re-initialization of ownership for every import of AD that you initiate.
- Select the checkbox Reinitialize classification to enable that account classifications are initialized again for every import of AD that you initiate.
For instructions on the three different types of account rules that you can add, see the following subsections. By default, one ownership rule and a classification rule are already set up.
Settings available:
- Reinitialize ownership: enable this setting to reinitialize account ownership on each import.
- Reinitialize classification: enable this setting to reinitialize account classification on each import.
Add new classification rule
- In the Account rules for system category “Active Directory” dialog, click New.
- In the Select category for new rule dialog box, select Classification rule, then click OK.
- In the New classification rule dialog box, click the lookup icon next to the Account type field below the General header to select an account type to associate with the classification rule. You can only select one account type per classification rule.
- Select the Enabled checkbox to enable the rule. Enabling rules is a manual process, so if you want the new rule to be in use right away, you must Enable this setting.
- Under the Scope header, select a value in the Scope attribute dropdown list, for example, Account UID.
- In the Scope operator drop-down list, select a value to define the Scope value, for example, Begins with or Matches.
- In the Scope value field, type a valid value, for example, AA.
- In the grey Summary box in the middle of the dialog, a summary lists your selections and specified values. Check that the values that you have specified are correct. When you are satisfied with the values, click OK to save the rule and close the dialog box.
Add new ownership rule – Identity lookup
- In the Account rules for system category ‘system’ dialog box, click New.
- In the Select category for new rule dialog, select Ownership rule, and click OK.
- Under the General headline, in the Type drop-down menu, select Identity Lookup. For Fuzzy, see the Add new ownership rule – Fuzzy section .
- Under Join reason, type a criterion for the identity to join, for example, Exact Match.
- Select the Enabled checkbox to enable the rule. Every time that you make a new rule, you must manually enable this rule yourself by selecting this checkbox.
- Under the Scope header, select a value in the Scope attribute dropdown list, for example, Account UID.
- In the Scope operator drop-down list, select a value for the limit of the Scope value, for example, Begins with or Matches.
- In the Scope value field, type a valid value, for example, AA.
- Under the Identity and account attributes header, select a value in the Account attribute dropdown list, for example, Account UID. Here, you can also use extension attributes specified in Queries and mappings as described in the Extension attributes for template collector section. Optionally, add a prefix and postfix for the account value in their respective fields.
- In the Identity attribute drop-down list, select a value, for example, Identity unique ID. Optionally, add a prefix and postfix for the identity value in their respective fields.
Add new ownership rule – Fuzzy
- In the Account rules for system category “Active Directory” dialog, click New.
- In the Select category for new rule dialog, select Ownership rule, and click OK.
- Under the General headline, in the Type dropdown list, select Fuzzy. For Identity Lookup, see the Add new ownership rule – Identity lookup section.
- Under the Thresholds headline, in the section Join similarity threshold, type a value between 0.0 and 1.0. The closer you set this value to 1, the more similarity there must be between an account and identity attributes when creating an ownership.
- In the Join confidence threshold, also type a value between 0.0 and 1.0. The closer you set this value to 1, the more confident a fuzzy match must be to create an ownership.
- In the Auto-confirm confidence threshold, type a value between 0.0 and 1.0. The closer you set this value to 1, the fewer automatic confirmations of fuzzy matches take place. If you set the value to 1, no fuzzy matches are automatically confirmed.
Fuzzy match and Custom join concepts
When an account is imported, OIS Data Warehouse attempts to identify the identity that owns the account. This can be done using built-in logic to do exact matching and fuzzy matching. The system tries to make a logical reasoning to find out which identity is the most likely to own the account.
Automatically join and classify accounts to RoPE desired state accounts
This feature is disabled by default but can be enabled with a Desired State Account Rule customer setting.
You can join and classify an actual account by matching the actual account name with the RoPE desired state account names. The mechanism runs prior to running the account joining and classification using the account rules configuration.
Technical accounts with arbitrary account names are automatically joined back to the right identity.
To make the values available within ODW, follow these steps:
- Define properties in DataObjectType with
ODWAttributenames. - Mark these properties as Internal in Authoritative Source policies.
- Create the view
Identity_ExtensionMasterData_Customand input required values (e.g., UPN, email). - Perform a Reset HW import for successful account joins.
Please remember that in some cases, you may need to perform two imports initially to ensure the account joins functions correctly.
Configure import (optional)
With the Horizons feature enabled, the import configuration is modified. For more information, go to Import settings.
-
Click Configure import to open its settings dialog box.
-
To represent imported data as objects in Omada Identity, make sure that you enable the setting Prepare data for processing. The setting is enabled by default.
infoThe Prepare data for processing step imports objects from ODW to ES. The performance of this step mainly depends on the scalability and configuration of the ES web server. The more threads are available for processing, the higher should the customer setting Number of concurrent requests be. If objects are very large or require a lot of processing, timeout or size limits may need to be increased on the ES web server side, or the Maximum objects per request setting may need to be decreased.
-
To only import data to the staging database, disable the Store data for reporting setting. The setting is enabled by default. For more information about the use of this setting and what it means for the data import, see the table below.
-
To automatically populate the ComposedBusinessKey column for the security-defining resource with the Resource’s own ComposedBusinessKey during the import, select the Automatically populate security resource business key checkbox.
importantIt is required that you add a mapping for the security resource business key when defining queries and mappings. If you do not do this, you must select the Automatically populate security resource business key checkbox.
-
Set the required number in the Import errors per object field. Set it to 0 to cause system imports from a source system to ODW to fail on the first error. Set it to a positive number to allow a number of data errors during the import without the import failing.
Verification errors (staging errors) discovered during the import are visible in the Import errors log, which is available from the system page in the UI. The collected errors can be exported to a CSV file, allowing for easy sharing with the person responsible for correcting the data in the source system.
| Setting | Description |
|---|---|
| Prepare data for processing | Enable this setting to represent imported data as objects in Omada Identity. The setting is enabled by default. |
| Store data for reporting | Disable this setting to only import data to the staging database. This allows you to inspect the data and adjust the system onboard configuration without storing any history.This setting can be useful for you when you use template collectors, such as LDAP, OData, and REST because it allows you to inspect the result of the configured queries and mappings in the Staging database. Please bear in mind that: The setting is available for all types of collectors. The setting is enabled by default and applies to the full system category. If you disable the setting, the data for the system category is only imported to the staging database no matter what import profile is running it. |
| Automatically populate security resource business key | Select this checkbox to automatically populate the column ComposedBusinessKey for the security-defining resource with the Resource’s own ComposedBusinessKey during the import. The column will be automatically populated only for the resources for which the ComposedBusinessKey for the security-defining resource has not been provided in the source (that is, only the ones with a NULL value for this field, and not the ones with the empty value). |
| Import errors per object | Setting the value to 0 will cause system imports from a source system to ODW to fail on the first error. To allow a number of data errors during the import without the import failing, set the value to a positive number. For example, 100 means that it the maximum of 100 errors is allowed for each of the objects being imported (Account, Resource, and so on).By default, the value is not set (it is empty), which has the same effect as setting it to 0. |
Configure threshold (optional)
With the Horizons feature enabled, the thresholds can be defined in a more flexible way. For more information, go to Thresholds.
- Click Configure import to open its settings dialog box.
- In the Configure import thresholds window, type a number (integer) in percentage for New objects, Modified objects, and Deleted objects to enable thresholds for the import of objects from this system.
The value for each operation is by default set to 0, which means that no threshold calculations take place for the operation(s) until you change the integer.
| Setting | Description |
|---|---|
| New objects | Type an integer number to set a threshold for new objects. When the import process reaches the threshold value that you specify here, the import of new objects is suspended until you have decided if you want to continue or abandon the import. |
| Modified objects | Type an integer number to set a threshold for modified objects. When the import process reaches the threshold value that you specify here, the import of modified objects is suspended until you have decided if you want to continue or abandon the import.Modified objects relate to objects for which you have made at least one change since the last import. |
| Deleted objects | Type an integer number set a threshold for deleted objects. When the import process reaches the threshold value that you specify here, the import of deleted objects is suspended until you have decided if you want to continue or abandon the import. |