Upgrade steps
Before upgrading, make sure that you have followed all required procedures described in the Upgrade guides section.
Upgrade software on all servers where Omada Identity is installed.
Language versions
If you have previously added the Portuguese language to Omada Identity, do not update the database with the Portuguese language. To ensure that Portuguese is not updated in the database, execute this SQL query:
IF NOT EXISTS (
    SELECT 1
    FROM tblCustomerSetting
    WHERE [Key] = 'ExecutedSystemUpdateActions'
    AND (ValueStr LIKE 'AddPortugueseLanguageSupport,%' OR ValueStr LIKE '%,AddPortugueseLanguageSupport,%' OR ValueStr LIKE '%,AddPortugueseLanguageSupport')
)
BEGIN
    UPDATE tblCustomerSetting
    SET ValueStr = ValueStr + ',AddPortugueseLanguageSupport'
    WHERE [Key] = 'ExecutedSystemUpdateActions'
END
Upgrade Omada Identity Enterprise Server portal
Depending on the Omada Identity on-premises deployment, retrieve the connection string either from the IIS application’s web.config file or from the Windows Registry.
To upgrade Omada Identity Enterprise Server:
-
Uninstall the old version of Omada Identity Enterprise Server first, and then install the new version of Enterprise Server. After installation is completed, select the Show the Windows Installer log option. If necessary, save the log file.
-
Run the Omada Enterprise Configuration Utility.
-
When you are prompted, enter the connection string that you saved. Then, click OK.
-
Click OK again to upgrade the database. When the Setup complete message appears, click OK and close the configuration utility.
infoAt this point, in the Windows registry, ensure you enter the
PswEncryptionKeythat you copied. The registry path for thePswEncryptionKeyis HKEY_LOCAL_MACHINE\SOFTWARE\Omada\Omada Identity Suite.
-
web.config file
If you have modified the web.config file, it won't be updated during the upgrade of Enterprise Server. In consequence, the Omada Identity application may not start or you may see the following error(s):
Could not load file or assembly 'Microsoft.Owin, Version=2.1.0.0, Culture=neutral, PublicKeyToken=31bf3856ad364e35' or one of its dependencies.The located assembly's manifest definition does not match the assembly reference.(Exception from HRESULT: 0x80131040)
To fix the problem, go to C:\Program Files\Omada Identity Suite\Enterprise Server\website\web.config and replace the content of <configuration><runtime><assemblyBinding> with the values from the web.config provided in the installer.
Move the customized web.config file into a temporary directory to let the installer copy the new web.config file before replacing the content of the customized web.config.
Upgrade Omada Data Warehouse
- Create a backup of the files Omada ODW WebService.dtsConfig and Omada ODW ConnectionString.dtsConfig.
- Start the Omada Data Warehouse.x64 SQL 20xx installer.
- Follow the upgrade steps in the installation wizard.
- Reapply the previously backed-up files Omada ODW WebService.dtsConfig and Omada ODW ConnectionString.dtsConfig.
Add a new record to dbo.tblApplicationSetting
Add a new record to the dbo.tblApplicationSetting table. This record specifies the path where the Omada Data Warehouse (ODW) is installed.
If the record is not created, the system defaults to the path C:\Program Files\Omada Identity Suite\Datawarehouse\.
To add a record to the table, perform the following script:
INSERT INTO [dbo].[tblApplicationSetting]
([ID], [Key], [Description], [ValueStr], [Type])
VALUES
(
  (SELECT MAX([Id]) + 1 FROM [dbo].[tblApplicationSetting]),
  'installationFolder',
  'The Folder where the ODW is installed',
  '{PathToTheFolder}',
  0
)
Upgrade Omada Role and Policy Engine
- Uninstall the old version of Omada Identity Role and Policy Engine.
- Install the new version.
- Compare the RoPE C:\Program Files\Omada Identity Suite\Role and Policy Engine\Service\ConfigFiles file with the previous version. This is necessary because the file can be altered by the code extension update.
If you have any custom RoPE extensions, you must remove or manually upgrade those before starting Omada Role and Policy Engine Service.
Upgrade Omada Provisioning Service
Before running the OPS installer, make a backup copy of the config file C:\Program Files\Omada Identity Suite\Provisioning Service\Omada.OPS.Service.exe.config. After the update process is finished, make sure that any custom changes you have made to this file are retained.
When upgrading OPS in environments with very large datasets, the migration process triggered during the first start of the service may exceed the default service startup. In such cases, start OPS in console mode after the migration:
Omada.OPS.Service.exe -u
This allows the migration to complete without being constrained by the timeout. After a successful migration:
- Stop the console process.
- Start OPS normally.
- Do not continue running with
-u.
Search for the <service> element with the name "Omada.OPS.Service.WCF.Impl.AllWcfServices" and add the "gateway" endpoint (marked in bold):
<service name="Omada.OPS.Service.WCF.Impl.AllWcfServices" behaviorConfiguration="ProvisioningServiceServiceBehaviorSecure">
<host>
	<baseAddresses>
	<add baseAddress="http://localhost:8000/ProvisioningService/service"/>
	</baseAddresses>
</host>
	<endpoint address="" binding="wsHttpBinding" bindingConfiguration="WindowsSecurity" contract="Omada.OPS.Service.WCF.Interface.IProvisioningService"/>
	<endpoint address="configuration" binding="wsHttpBinding" bindingConfiguration="WindowsSecurity" contract="Omada.OPS.Service.WCF.Interface.Configuration.IProvisioningConfigurator"/>
	<endpoint address="monitoring" binding="wsHttpBinding" bindingConfiguration="WindowsSecurity" contract="Omada.OPS.Service.WCF.Interface.Monitoring.IProvisioningMonitor"/>
	<endpoint address="gateway" binding="wsHttpBinding" bindingConfiguration="WindowsSecurity" contract="Omada.OPS.Service.Gateway.Interfaces.WCF.IGateway" />
	<endpoint address="mex" binding="mexHttpBinding" contract="IMetadataExchange"/>
	<endpoint address="basic" binding="basicHttpBinding" contract="IMetadataExchange"/>
</service>
After running the OPS installer, you need to open the Omada.OPS.Service.exe.config and manually add the new endpoint to the OPS WCF service called gateway.
- Install the new version of Omada Provisioning Service. Use the same service account and password, and point the installer towards the existing database.
- Compare the C:\Program Files\Omada Identity Suite\Provisioning Service\Omada.OPS.Service.exe.config file with the previous version. You must compare the contents of the file. Comparing timestamps is not enough.
Upgrade standard collectors/connectors package
The following standard connectivity is applied with the standard packages:
- REST
- Active Directory
- Flat file CSV
- SQL
- LDAP
- SOAP
- SAP Access Data
- SAP HCM
-
Go to Omada Community and download Omada.Connectivity.StandardCollectors and Omada.Connectivity.StandardConnectors.
-
Extract the contents of the downloaded .zip files to a folder (for example: C:\Users\administrator\Downloads\).
-
Run the
cmd(command line) as the administrator. -
Navigate to the folder where you extracted the package and to the Registration Utility folder within, for example, C:\Users\administrator\Downloads\RegistrationUtility.
-
Register the connectivity using the Register Connectivity tool supplied with the package. Register the Connectivity package using Omada Identity OData API.
Using the integrated authentication, run the following command:
"Omada.SDK.RegisterConnectivity.exe" -F
"
C:\Users\administrator\Downloads
\Omada.Connectivity.
<name>.15.0.0.<XX>\Artifacts\Registration\Registration.xml" -url
"<url>/odata"
where:
-
C:\Users\administrator\Downloads\ is changed to the actual location where you extracted the Connectivity package
-
<name> is the name of the downloaded Connectivity package
-
<XX> is the actual version of the downloaded Connectivity package
-
<url> is the actual URL to your Omada Identity OData API endpoint
If you are a Data Administrator, you can perform the registration in the context of another user. To do so, run the following command:
"Omada.SDK.RegisterConnectivity.exe" -F
"
C:\Users\administrator\Downloads
\Omada.Connectivity.
<name>.15.0.0.<XX>\Artifacts\Registration\Registration.xml" -url
"<url>/odata" -user "<user>" -pwd "<password>"
where:
-
C:\Users\administrator\Downloads\ is changed to the actual location where you extracted the Connectivity package
-
<name> is the name of the downloaded Connectivity package
-
<XX> is the actual version of the downloaded Connectivity package
-
<url> is the actual URL to your Omada Identity OData API endpoint
-
<user> is your actual administrator username
-
<password> is your actual password
-
-
In the command line, navigate to the extracted folder and run the command:
powershell . ./deploy.ps1infoThe deploy.ps1 script copies binaries to the appropriate places. It starts and stops services, if necessary, for example OPS and ES Timer Services. It is necessary to run the script on all servers hosting ES, ODW or OPS.
-
Run the Enterprise Server and go to Setup > Administration > Connectivity > Packages and check if the installed connectivity packages are on the package list.
-
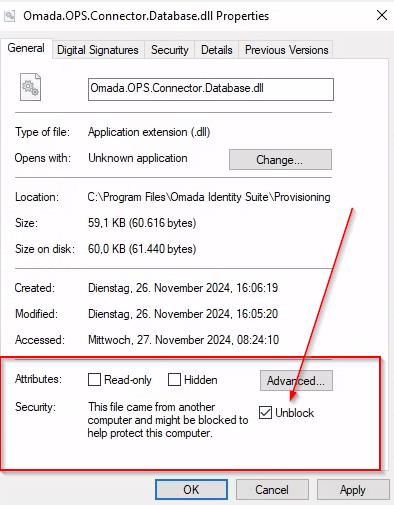
OPTIONAL: Depending on your configuration, some files might be blocked by the security policies. Ensure that all .dll files in the deployment folder are unblocked as presented below:
If you're using the MySQL connector, ensure it's updated to the 8.4.0 version.
Depending on your setup, you may need to upgrade other collector packages installed in your system.
Upgrade Omada Data Preview
- Start the Omada Preview Service installer. Run the installer as an Administrator.
- Follow the upgrade steps in the installation wizard.
If you have custom .NET-based collectors, copy the custom DLL files into the Hosting Service folder to enable the correct functioning of the preview service.
Upgrade third-party libraries
This section does not describe a framework upgrade to .NET 8.
Different components of Omada Identity may require different versions of .NET. This section refers to third-party libraries only. The Enterprise Server, RoPE, Timer Service, and OPS components continue to run on .NET Framework 4.8.
For information on the version of .NET required for installation, see the Checklist before installation section of Omada Identity Installation Tool.
Many of the third-party libraries have been upgraded to more recent major NuGet package versions, often 8.x versions, that are aligned with Microsoft package versioning. While these packages may introduce support for .NET 8, Omada Identity uses the .NET Framework–compatible variants provided by those packages.
Since performing those upgrades may result in breaking changes at the API level, compatibility and integration require exceptional attention.
If your projects include custom code libraries within Enterprise Server or custom connectivity packages that utilize any of the upgraded third-party libraries, you will need to take the following steps:
-
Recompile custom code libraries for Enterprise Server:
- Recompile all custom code libraries against the third-party DLLs located in the
...\Omada Identity Suite\Enterprise Server\website\binfolder. - Ensure that the target framework of your custom code is still compatible.
- Verify that there are no breaking changes or deprecated features that could affect your custom implementations.
- Recompile all custom code libraries against the third-party DLLs located in the
-
Recompile and update Connectivity packages:
- Review and update any custom connectivity packages to ensure compatibility with the updated third-party package versions.
- Verify that no changes have been made to the target framework of connectivity components.
- Test the updated packages thoroughly to confirm that they function correctly with the new library versions.
Verify installed applications (optional)
-
Open the control panel on the server.
-
Select Uninstall program.
-
Verify that all Omada applications are in the appropriate, most current version.
Start the application
During the first startup of the application, a set of update actions are executed. If the first startup of the application is the website, there can be a timeout challenge when applying update actions depending on the amount of data being updated. As such, it it recommended to run the ChangeSetImportUtil.exe command line utility with the -K parameter before starting up the website as it will install all core packages/changesets and apply update actions.
Start the Enterprise Server
- Start the ES portal and application pool.
- Open the ES portal. Allow the required time for the portal to apply automatic updates.
Postrequisites
Perform the following actions:
-
After upgrading, update all Standard Application packages that are already installed to the newest version (otherwise the application will not work as expected). You can update the packages directly from the web UI. The total number of changes in the upgrade and the number of successfully imported packages may differ, since some of the changes are discarded during the upgrade.
-
Execute the following query in the ODW:
IF NOT EXISTS (
    SELECT 1
    FROM sys.columns
    WHERE Name = 'Direct'
      AND Object_ID = OBJECT_ID('ResourceAssignment')
)
BEGIN
    ALTER TABLE [dbo].[ResourceAssignment]
    ADD [Direct] BIT NOT NULL DEFAULT 1;
END;

IF NOT EXISTS (
    SELECT 1
    FROM sys.columns
    WHERE Name = 'Indirect'
      AND Object_ID = OBJECT_ID('ResourceAssignment')
)
BEGIN
    ALTER TABLE [dbo].[ResourceAssignment]
    ADD [Indirect] BIT NOT NULL DEFAULT 0;
END;
-
Start the configuration import either in the ES portal or by using the PowerShell script C:\Program Files\Omada Identity Suite\Datawarehouse\Support Files\ImportConfiguration.ps1.
-
Register the connectivity using the Register Connectivity tool supplied with the package. Register the Connectivity package using Omada Identity OData API.
Using the integrated authentication, run the following command:
"Omada.SDK.RegisterConnectivity.exe" -F
"
C:\Users\administrator\Downloads
\Omada.Connectivity.
<name>.15.0.0.<XX>\Artifacts\Registration\Registration.xml" -url
"<url>/odata"
where:
-
C:\Users\administrator\Downloads\ is changed to the actual location where you extracted the Connectivity package
-
<name> is the name of the downloaded Connectivity package
-
<XX> is the actual version of the downloaded Connectivity package
-
<url> is the actual URL to your Omada Identity OData API endpoint
If you are a Data Administrator, you can perform the registration in the context of another user. To do so, run the following command:
"Omada.SDK.RegisterConnectivity.exe" -F
"
C:\Users\administrator\Downloads
\Omada.Connectivity.
<name>.15.0.0.<XX>\Artifacts\Registration\Registration.xml" -url
"<url>/odata" -user "<user>" -pwd "<password>"
where:
-
C:\Users\administrator\Downloads\ is changed to the actual location where you extracted the Connectivity package
-
<name> is the name of the downloaded Connectivity package
-
<XX> is the actual version of the downloaded Connectivity package
-
<url> is the actual URL to your Omada Identity OData API endpoint
-
<user> is your actual administrator username
-
<password> is your actual password
-
Start ODW
-
In the ES Audit database, reapply the script
CreateObjects.OISAudit.sqllocated in C:\Program Files\Omada Identity Suite\Datawarehouse\Support files.noteIf you used SQL server authentication for the ODW connection strings in the dtsConfig file, you need to encrypt the connection strings first. However, it is recommended that you switch to integrated security instead.
-
Start the Import configuration import profile, either from the ES portal or by using the PowerShell script C:\Program Files\Omada Identity Suite\Datawarehouse\Support Files\ImportConfiguration.ps1.
-
Wait until the configuration import finalizes.
Start Omada Identity Windows services
-
Omada Provisioning Service
-
Check the event log for errors.
-
From the Enterprise Server Portal, go to any system or dashboard where provisioning using Omada Provisioning Service is enabled, and select Commit setting.
noteThe way OPS represents the connector data model in the OPS database has changed. The changes are made to avoid clashes on object type and property types.
-
-
Omada Identity Suite Timer Service
- Check the event log for errors.
Start Omada Role and Policy Engine Service
- Check the event log for errors.