Omada Identity Installation Tool
The Omada Identity Installation Tool creates a reusable configuration file that you can use to install some or all of the Omada Identity components. You can either run the Omada Identity Installation Tool to create a configuration file and to install Omada Identity, or you can use the scripts related to the Omada Identity Installation Tool to run the installation manually.
You can use the Omada Identity Installation Tool on one-, two- and three-server environments. The PowerShell script uses this configuration, and you can also reuse it for future troubleshooting.
By default, the Omada Identity Installation Tool only installs core feature packages. Additional packages must be installed manually by a system administrator from the ES web portal.
You can install optional packages under Setup > Administration > Configuration management > Installed packages.
The Omada Identity Installation Tool uses PowerShell module SQL Server to perform database tasks. If the SQL Server module is not installed on the server, Omada Identity Installation Tool uses NuGet to download and install this module.
If the server is not connected to the internet, the SQL Server module must be installed before the Omada Identity Installation Tool installation.
Components
The Omada Identity Installation Tool contains two components:
- A user interface where you can configure the installation settings.
- A PowerShell script that runs the installation process.
You can use the PowerShell script without using the Omada Identity Installation Tool.
Requirements
The following rights and software components are required for installation:
-
Administrative access rights on the servers on which the software is installed
-
Microsoft SQL Server (versions 2016, 2017, 2019, or 2022)
-
PowerShell version 5.1 or newer
-
IIS version 7.5 or newer
-
SSIS and PSRemoting
If you install Omada Identity components on a machine that already contains installed components but does not have Microsoft SQL, you must install SSIS as a prerequisite.
You must also enable PSRemoting on all involved machines, as the Omada Identity Installation Tool uses this setting to communicate between servers.
-
Powershell module SQL Server
If the servers on which Omada Identity is installed are not connected to the internet, the Powershell module SQL Server has to be installed on them. To verify if the SQL Server is installed, use the following PowerShell command:
Get-InstalledModule SQLServer -ListAvailableTo be able to run the SQL Server PowerShell module on an offline machine, first install the SQLServer module on the online server, and then copy it to the folder C:\Program Files\WindowsPowerShell\Modules on the offline machine.
You can install the SQL Server module with the following PowerShell command:
Install-Module SQLServer -Force -AllowClobberIf the SQLServer module is not installed, the Omada Identity Installation Tool tries to download and install it. Without an internet connection, the installation fails.
If you are installing in a multi-server environment, configure Windows Firewall to allow the communication of the Distributed Transaction Coordinator on all involved machines.
Using SSL
You can configure the Omada Identity Portal to use SSL. You must provide a certificate thumbprint in the Omada Identity Installation Tool configuration tool. Additionally, OPS can also use SSL. See Omada Identity - Advanced Configuration Guide for more information about SSL.
SQL server instances
You can use SQL server instances that do not have the default naming. However, it is not possible to use SSIS instances that do not have the default naming.
PowerShell scripts
The Omada Identity Installation Tool uses PowerShell scripts to perform the installation. To allow the Omada Identity Installation Tool to run the required scripts, you might be required to change the execution policy on your server(s):
-
Open PowerShell.
-
To see the current execution policy settings, run the command:
Get-ExecutionPolicy-List -
To set the execution policy, run the command:
Set-ExecutionPolicy Bypass -
Restart the server.
-
Repeat step 1-4 for any every server used in your setup.
Once you have successfully installed the Omada Identity, you can switch the execution policy back to its original state.
For more information about PowerShell Execution Policy, see the Microsoft help document.
Making changes to security settings
The Omada Identity Installation Tool makes some changes to the security setting during the installation process. This allows you to, for example, use Kerberos as the authentication method.
Any changes to the delegation of the SSIS host must be done before using the Omada Identity Installation Tool in a three-host deployment.
If a user in whose context the installation takes place is not a member of the group Domain Administrators, you must make the following changes manually.
-
Before the configuration of the credentials Delegation is possible, make sure that the following Service Accounts - sPNs - are registered:
-
For the Enterprise Server portal, in the Attribute Editor tab of the Omada Identity service check if the IIS Service Account is set as an sPN.
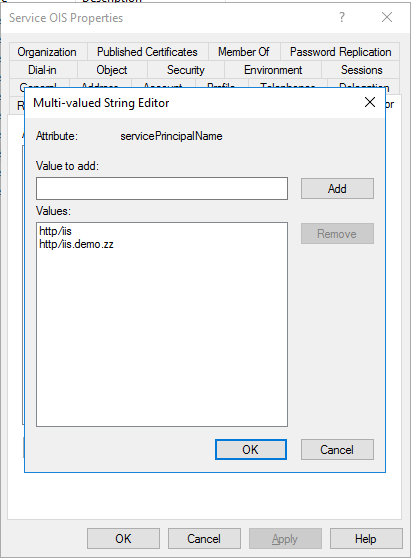
-
-
For the Reporting Service, go to the Attribute Editor tab of the SSRS service and check if the SSRS Service Account is set as an sPN.
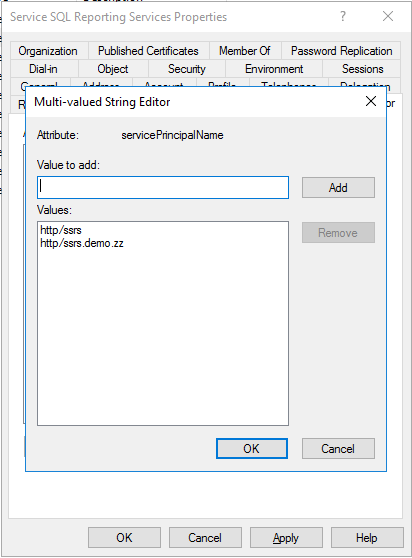
If both SSRS and IIS services are on the same host, you must take care when assigning the sPNs. You should either set both services to use the same sPN and service account or set each service to use its own sPN (which means that they need their own DNS records, as both services use the "http" prefix for their sPNs).
-
For the SQL Service, in the Attribute Editor tab of the SQL server check if the SQL Service Account is set as an sPN.
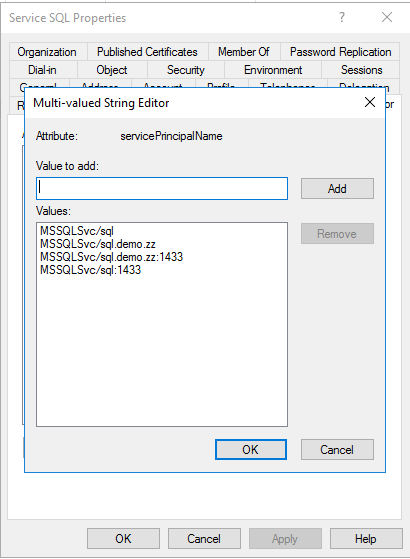
If the required sPNs are not configured, you can do it using the Setspn command in the Domain Controller.
-
Enable Delegation for each of the services:
-
For the Enterprise Server portal, in the Delegation tab of the Omada Identity service (svc_ois), use constrained delegation by selecting Trust this user for delegation to specified services only, then Use Kerberos only and add delegation to the SSRS service (svc_ssrs) and to the SQL Service.
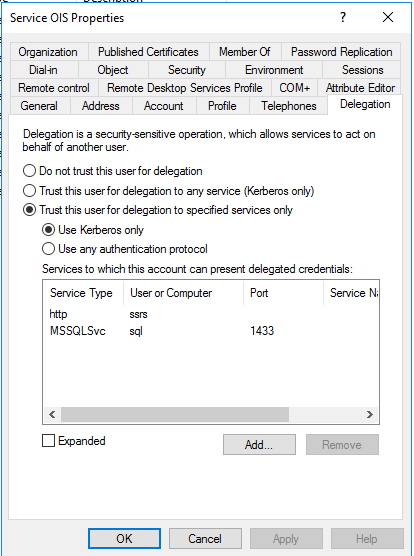
-
-
For the Reporting Service, in the Delegation tab of the SSRS service (svc_ssrs), use constrained delegation by selecting Trust this user for delegation to specified services only, then Use Kerberos only and add delegation to the SQL server (svc_sql).

-
For the SQL Server Integration Services, in the Delegation tab of the SSIS server computer account, use general unconstrained delegation by selecting Trust this computer for delegation to any service (Kerberos only).
noteThis is a Microsoft restriction, related to the requirements of WMI remote execution. If your company's security policy does not allow this setting, you may eliminate the need of enabling it by not using WMI for ODW imports.
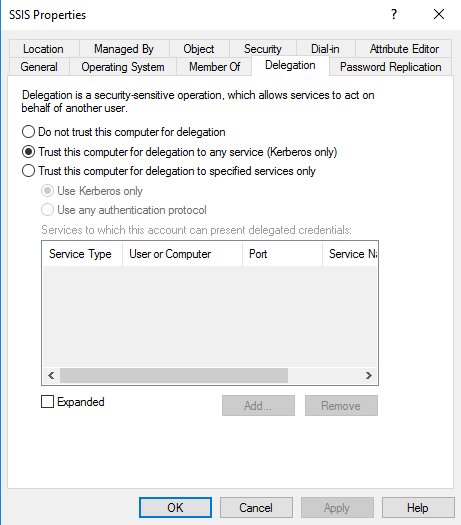 Important
The SSIS host should be restarted after setting the delegation.
Please bear in mind that, for security reasons, this type of unconstrained delegation is NOT recommended in other configurations than the SSIS configuration.
-
Add access rights for the Windows Registry. Do this by modifying the local security policy on the SSIS server.
-
Open the Local Security Policy gpedit.msc editor.
-
Browse to Computer Configuration -> Windows Settings -> Security Settings -> Local Policies -> User Rights Assignments.
-
Find and open Back up files and directories, then add the service user and click OK.
-
Find and open Restore files and directories, then add the service user and click OK.
-
When you use Windows Integrated Authentication with Kerberos on Windows 2016 or newer, you may need to change the ASP.NET authentication function to use the AppPool credentials.
If Kerberos is not working properly, there might be a need for the installer to check sPNs for duplicates. Another typical error is HTTP 400 - bad request, which is caused by large Kerberos tickets that exceed the size limit in the request header.
Checklist before installation
Before starting any installation with the Omada Identity Installation Tool, ensure you have set up or checked the following functionalities. Note that the Omada Identity Installation Tool does not check prerequisites before running.
-
Ensure that the SQL server components are installed.
-
Enable the
PSRemoteon all servers and verify the connection with PowerShell:Enter-PSSession -Credential Get-Credential -ComputerName <remote server name> -
Grant administrative access rights to the user on the servers where the software will be installed.
-
Ensure that PowerShell version 4.0 or newer is installed. Verify with PowerShell:
$PSVersionTable.PSVersion -
Verify that IIS version 7.5 or newer is installed.
-
Ensure that .NET version 4.8 or newer is installed. Verify with PowerShell:
gci 'HKLM:\SOFTWARE\Microsoft\NET Framework Setup\NDP' -recurse | gp -name Version,Release -EA 0 | where { $_.PSChildName -match '^(?!S)\p{L}'} | select PSChildName, Version, ReleaseAlternatively, use the Installed Programs and Features function in Windows to check the installed .Net Framework version.
-
Gather all information required by the Omada Identity Installation Creation Tool.
-
Verify that the binding for Enterprise Server Portal website is correctly created in DNS (Host (A) name). In the command line use ping to check if the name is resolved.
-
Ensure that Active Directory for PowerShell is installed on installation server. Verify with PowerShell:
Import-Module ActiveDirectory -
If AD groups and other AD users haven't been created before installation, ensure that the user performing the installation has domain administrator permissions. If AD groups and other AD users have been created, the Omada Identity Installation Tool doesn't require the user to be an AD administrator.
-
Verify that all SPNs for servers and services are correctly created.
-
Ensure that passwords don't contain
>or<characters. -
If installing on multiple servers, ensure that the drive name used on the installation server is also present on the other servers. For example, if the installation package is located in the
D:\Omadaon the application server, ensure that aD:drive is present on other servers, such as the DB server. -
Configure SSRS, including a connection to an SSRS database and Web service URL.
-
Ensure that the web browser you are using is not running on the installation server.
-
Install SQL server Native Client on the application server, even when running SQL Server 2016/2017/2019.
-
Inform the customer that the user that runs the installation is the first administrator of the Omada Identity Portal. The default administrator account is replaced by the user in whose context installation is being run.
Using and configuring the Omada Identity Installation Tool
The tool creates configuration files to use for installing a new version of Omada Identity.
The tool contains ten steps for the configuration of the installation of the Omada Identity components. The Start page introduces Omada Identity Installation Tool and the tool. The final page contains a summary of your configuration input.
You can find descriptions of the various settings that you can you set on each page in the following sections. At the end of the chapter, you can find instructions for the easiest way to create a configuration file.
You must run the Omada Identity Installation Tool as an administrator.
Common controls
On the top of the application window, you can see:
-
The name of current page/step
-
Progress bar
-
Progress counter
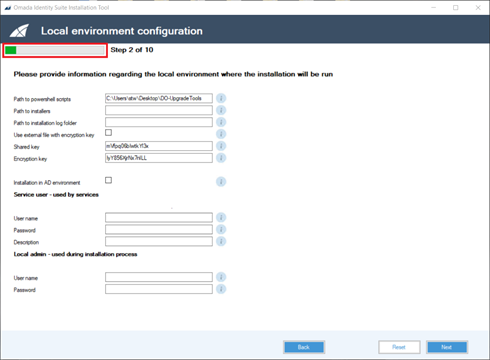
In this example, the step 2 page shows the progress bar.
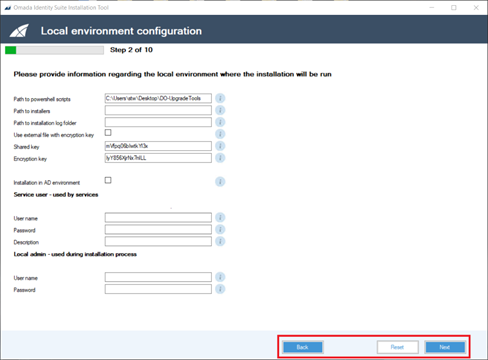
At the bottom of this page, you can find the following functions:
-
A Back button that leads you to the previous page.
-
A Reset button that resets all fields to the state they were in when you started. So, if you loaded the template, it is reloaded, and if you create the configuration from scratch, all values are removed.
-
A Next button that leads you to the next page.
When you reach the last step, you can find the following functions:
-
Back button: to see the previous step.
-
Save file: saves the configuration file.
-
Save and run button: saves and runs the configuration file.
To ensure that installation scripts are executed in the correct order sorting is disabled in all DataGridViews in the UI tool.
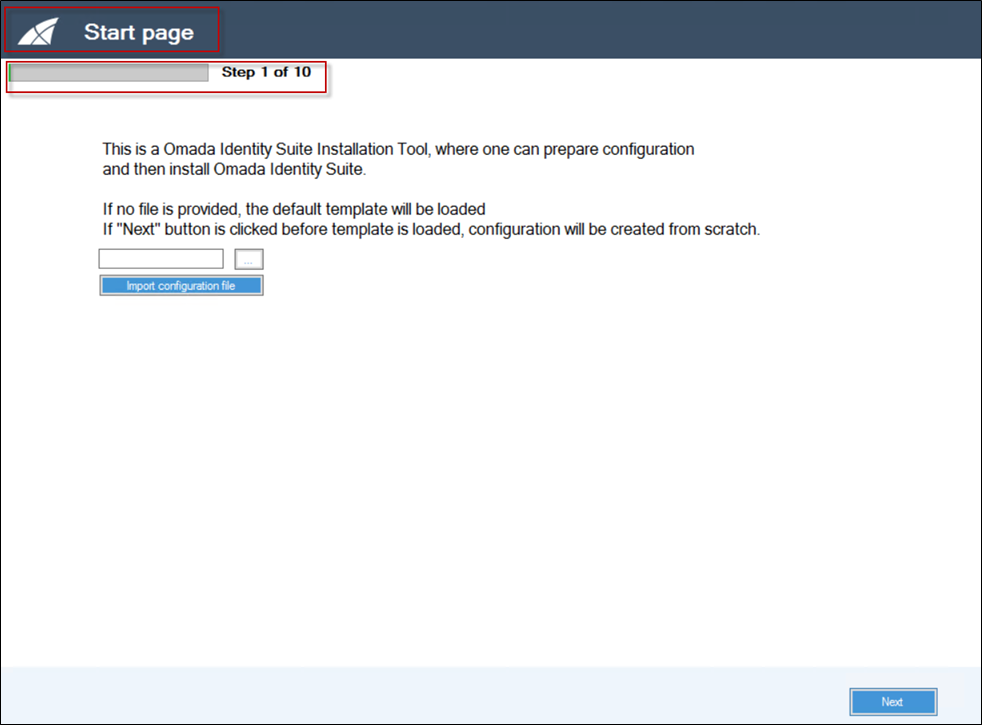
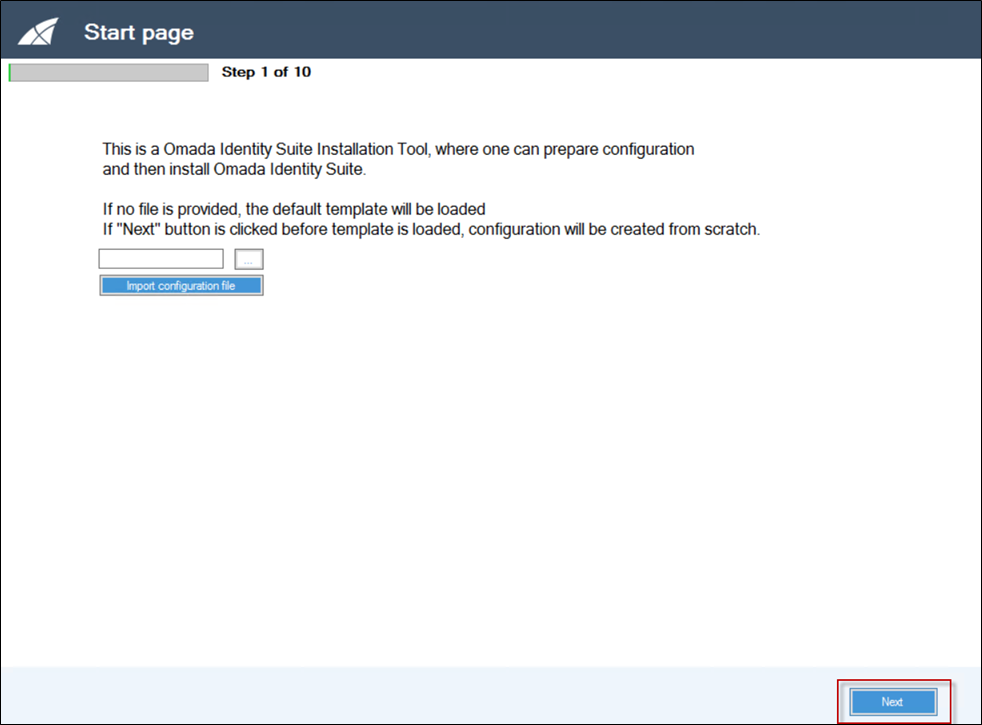
Step 1: Start page
There are three options on this page:
-
To load a default configuration template, do not provide any configuration file and then click Import configuration file. A default template is loaded.
-
Alternatively, select an existing configuration file, and load it by pressing the Import configuration file button.
-
If you click Next without clicking the Import configuration file, an empty configuration is created.
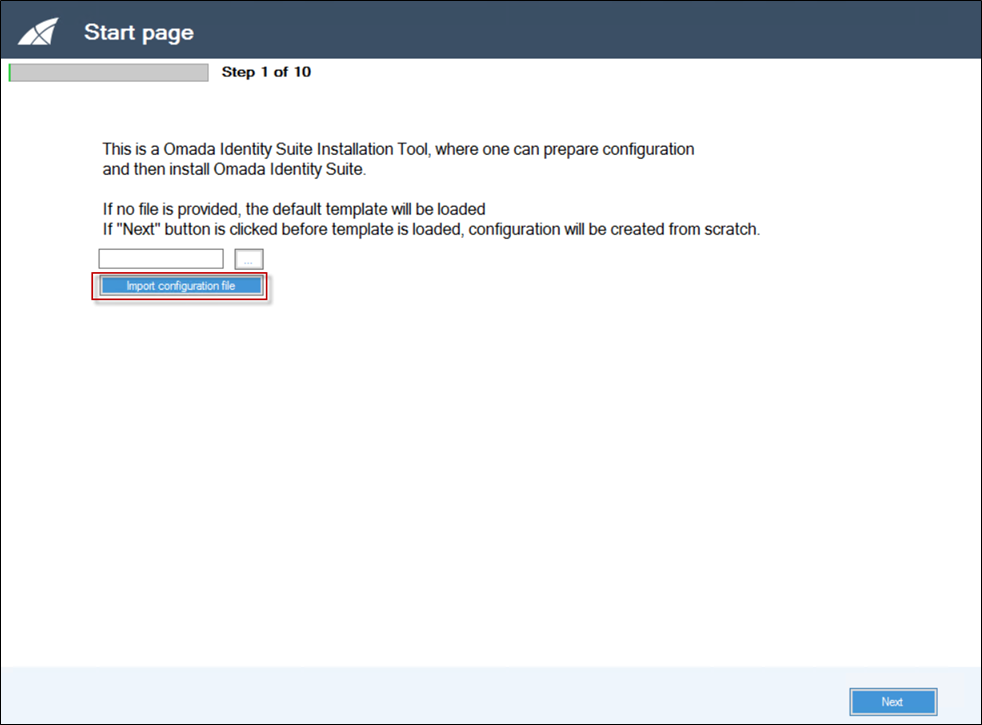
Click the Import configuration file button to load a default configuration.

Click on Next to create this initial configuration.
Step 2: Local environment configuration
Step 2 shows the configuration of the local environment. Type in the required information in the relevant fields/settings. The help button describes the required information in the fields.
| Setting | Description |
|---|---|
| Path to PowerShell scripts | The path where PowerShell scripts required for the installation are placed. |
| Path to installers | The path where the local copy of the installation files is placed. |
| Path to installation log folder | The path where all logs created during script execution are stored. |
| Use external file with encryption key | Check this field to encrypt the Omada Identity Installation Tool passwords with an encryption key from a file store in the folder with the config files. |
| Shared key | The shared API key required for communication between Omada Identity modules. |
| Encryption key | The API encryption key used to encrypt strings in Omada Identity. |
| Installation in AD environment | Select this field to install Omada Identity on an AD enabled environment. If the field is deselected, the installation required username and password instead of integrated security. |
| Encrypt connection string | Select which part of the connection strings used by all Omada Identity components will be encrypted - username, password, both, or none. |
For an Active Directory environment:
| Setting | Description |
|---|---|
| Full domain | The full domain name associated with the user that is used to run Omada services, for example, megamart.com. This means that all Omada services (Timer, RoPE, OPS, Password Reset) run under the same service account. |
| User name | The user name for the service user running Omada services. |
| Password | The password for the service user running Omada services. The passwords that you enter here are encrypted. To use plain text, you must manually edit the configuration files outside of the Omada Identity Installation Tool. |
| Description | An optional description of the service user that runs Omada services. |
| Domain | The name of the domain in which the user is a member. The Omada Identity Installation Tool runs in this context. |
| User name | The name of the user in whose context the Omada Identity Installation Tool is being run. This user must be either: - A member of the domain administrator’s Active Directory group in cases where AD user or AD groups are created during the installation. or - A member of the group local administrators on all involved servers in cases where AD users and AD groups were created before the installation. |
| Password | The password for the specified user. Passwords are stored in cleartext. |
For a non-Active Directory environment:
| Setting | Description |
|---|---|
| Domain | The name of the domain in which the user is a member. This field is not mandatory in non-AD environments. In such scenarios, local user is created/used. |
| User name | The user name for the service user running Omada services. |
| Password | The password for the service user running Omada services. The passwords that you enter here are encrypted. To use plain text, you must manually edit the configuration files outside of the Omada Identity Installation Tool. |
| Description | An optional description of the service user that runs Omada services. |
| User name | The name of the user in whose context the Omada Identity Installation Tool is being run. This user must be a member of the group local administrators on all involved servers. |
| Password | The password for the specified user. Passwords are stored in cleartext. |
Step 3: Microsoft SQL and initial Omada Identity Configuration
| Setting | Description |
|---|---|
| Microsoft SQL Version | Choose the version of Microsoft SQL Server that you want to install with Omada Identity. |
| Microsoft SQL Server | The hostname or IP address, and SQL instance name, of the Microsoft SQL server. |
| Microsoft SSIS Server | The name or IP address of the Microsoft SSIS server |
| Path to SSRS | Server files The path from which SSRS Server files are imported. |
| Database are pre-created | Enable this setting to reuse preexisting databases during Omada Identity installation. The preexisting Databases need to be empty. |
| Install reports on App Server | Enable this setting to install reports on the application server. The default setting is to install reports on the database server. |
| User integrated security for SQL | Enable this setting if you want to use integrated security. |
| User name | The user name of the administrator of the Microsoft SQL Server. When empty, the user in whose context the Omada Identity Installation Tool is run must be in the sysadmin group in Microsoft SQL Server. |
| Password | The password of the administrator of Microsoft SQL Server. Passwords are encrypted in the tool. If you want to use cleartext, you must manually edit the configuration files outside of the UI tool. |
| OIS version | Version 14.x |
| License key | Type or paste your license key for the Omada Identity. |
Step 4+5: Omada Identity Enterprise Server configuration
| Setting | Description |
|---|---|
| Install SQL SysCrl Types | Enable this setting to install this component. |
| Install Report Viewer | Enable this setting to install this component. |
| Database name | The name of the Enterprise Server database. |
| Database user name | The user name for the user that is used by the Omada Identity Enterprise Server database. |
| Database user password | The password for the user that is used by the Omada Identity Enterprise Server database. Passwords are stored in cleartext. |
| Path to changesets | The path from which changeset files are imported. |
| Skip errors during changesets import | Enable this to allow the script to continue to run whether or not changesets were imported correctly. |
| Language version | Select the language version that you want to install with Enterprise Server. If you do not select any language, Enterprise Server is installed in English. |
| IIS application pool | The name of the application pool that the Omada Identity Enterprise Server Portal website uses. The application pool is created during the installation process. |
| IIS website | The name of the Enterprise Server Portal website. The website is created during the installation process. |
| IIS binding | The binding of the website, for example, enterpriseserver. The binding is created during the installation process. |
| Certificate thumbprint | The thumbprint of a certificate used by the Omada Identity Portal. |
| Database scripts to execute | A list of the required SQL scripts to be run during the installation. In a default installation of Omada Identity, the various scripts are located in C:\\Program Files\\Omada Identity Suite\\Enterprise Server\\sql scripts.The correct script files are proposed if you are running installation from a previously created config file or from the default config. If you want to perform a custom installation, you need to provide here the correct paths to your custom script files. |
| Changesets to import | A list of the changesets to be run during the installation process. |
Step 6: Omada Provisioning Service configuration
| Setting | Description |
|---|---|
| Database name | The name of the Omada Provisioning Service Database. |
| Database user name | The user that is used to access the Omada Provisioning Service database. This is only the user name. Do not type the leading domain first. |
| Database user password | The password for the user that is used to access the Omada Provisioning Service database. Passwords are stored in cleartext. |
| Service URL | The URL for the web service responsible for pushing the configuration of the Omada Identity Enterprise Server, for example, http://enterpriseserver/WebService/OPSWebServiceInternal.asmx?op=PushConfiguration |
Step 7+8: Omada Identity Data Warehouse configuration
| Setting | Description |
|---|---|
| Database name | The name of the Omada Identity Data Warehouse database. |
| Staging database name | The name of the Omada Identity staging database. |
| Master database name | The name of the Omada Identity Staging database. |
| Database user name | The user that is used to access the Omada Identity databases. This is only the user name. Do not enter the leading domain first. |
| Database user password | The password of the user that is used to access the Omada Identity Data Warehouse databases. Passwords are encrypted in the UI tool. |
| Admins group name | The Administrators Active Directory group that is used to manage access to ODW reports. This is only the group name. Do not type the leading domain first. |
| Auditors group name | The Auditors Active Directory group that is used to manage access to ODW reports. This is only the group name. Do not type the leading domain first. |
| Users group name | The Users Active Directory group that is used to manage access to ODW reports. This is only the group name. Do not type the leading domain first. |
Step 8 also shows the Omada Identity Data Warehouse configuration. Type in the required information in the fields. Then, click on the Next button.
Omada recommends that you run the configuration import package during the installation. You can set it in this screen as shown below.
| Setting | Description |
|---|---|
| Full path to script | The files with T-SQL scripts that are required to run to configure Omada Identity Data Warehouse fully. |
| Configuration packages to execute | The SSIS packages that are required to run during the process of installation of Omada Identity Data Warehouse. |
| DTS configuration updates | The updates in DTS configuration files that are required to take place before it is possible to use the Omada Identity Data Warehouse. |
Step 9: Omada Identity Role and Policy Engine configuration
| Setting | Description |
|---|---|
| Database name | The name of the database on which the script is run. |
| Database username | The name of the user that is used by the Omada Identity Enterprise Server database. This is only the user name. Do not type the leading domain first. |
| Database user password | The password of the user that is used by the Omada Identity Enterprise Server database. Passwords are encrypted. If you want to use plain text for passwords, you must manually edit the configuration files outside of the Omada Identity Installation Tool. |
| Config sources path | Used for internal Omada purposes. You should not use this for client installations. |
| Number of service instances | The number of RoPE service instances that will be created and configured by the Omada Identity Installation Tool during the Omada Identity installation. |
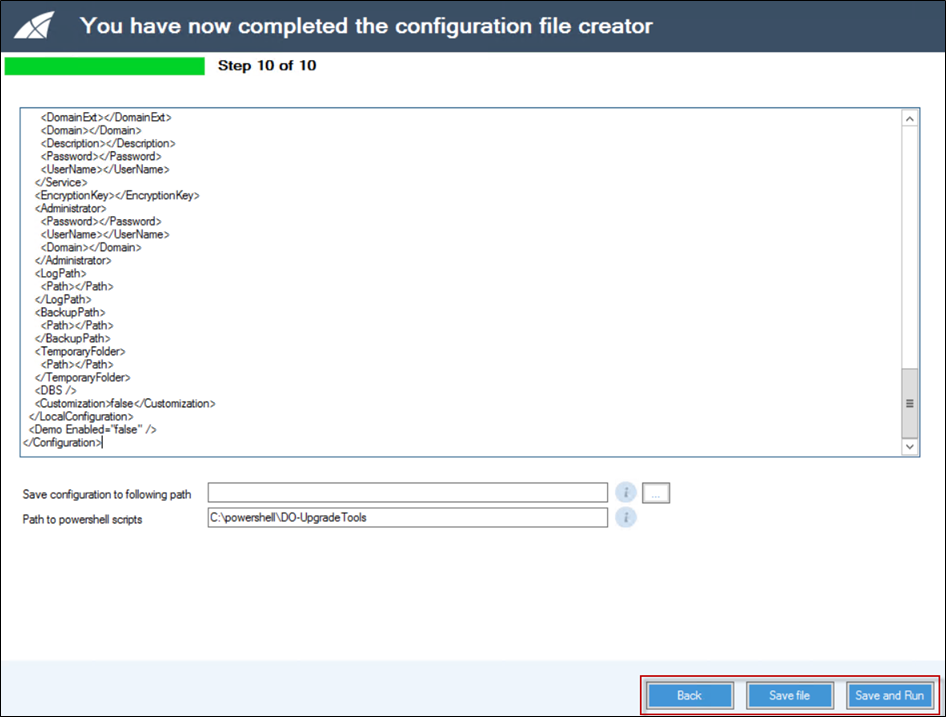
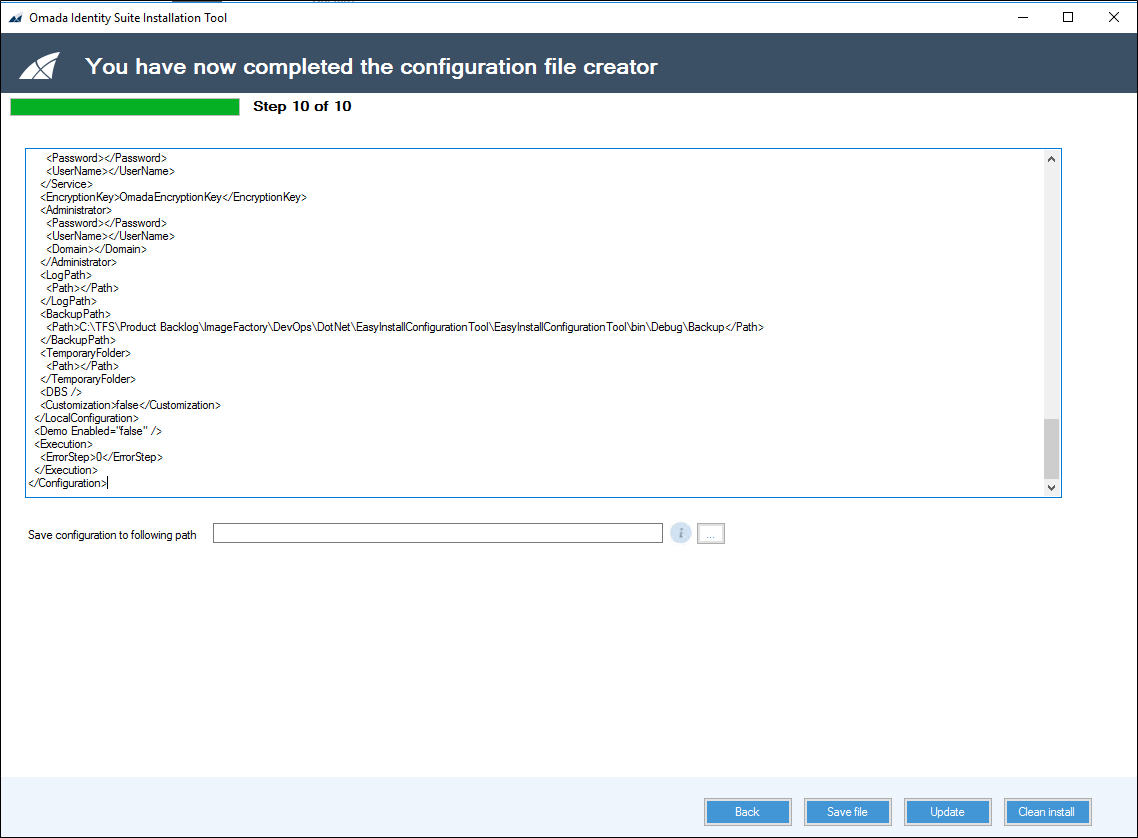
Step 10: Summary
You can find the following buttons when you reach the final step:
- Back button, which leads you to the previous step.
- Save file button, which saves the configuration file.
- Update button, which saves the configuration file and updates current Omada Identity installation.
- Clean install button, which saves the configuration file and runs the installation.
Save the configuration file in step 10 by browsing for the path on which you would like to save the file, then clicking the Save file button.
To run the Omada Identity Installation Tool based on your configuration, you have two options:
- Update current environment by using the Update button.
If you select this option, all of your existing data is maintained in your installation and only Omada Identity components are updated.
- First, uninstall the existing installation and all data associated with the installation, then complete a clean installation of Omada Identity by using the Clean install button.
If you select this option, beware that all databases and data is removed completely, so you should not use this option in a production environment.

Advanced Omada Identity Installation Tool configuration
You can use a PowerShell script without using the Omada Identity Installation Tool to perform the configuration below.
Configuration file
The Omada Identity Installation Tool configuration file contains all the necessary information required to uninstall or install Omada Identity.
The configuration file contains XML data. You should create the configuration file using the provided Omada Identity Installation Tool. In the following section, you can see the settings and values that you can customize for your organization's purposes.
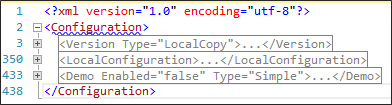
The screenshot below shows three major nodes: Version type, LocalConfiguration, and Demo enabled.
LocalConfiguration
Omada recommends that you provide information regarding the local machine and its configuration here.
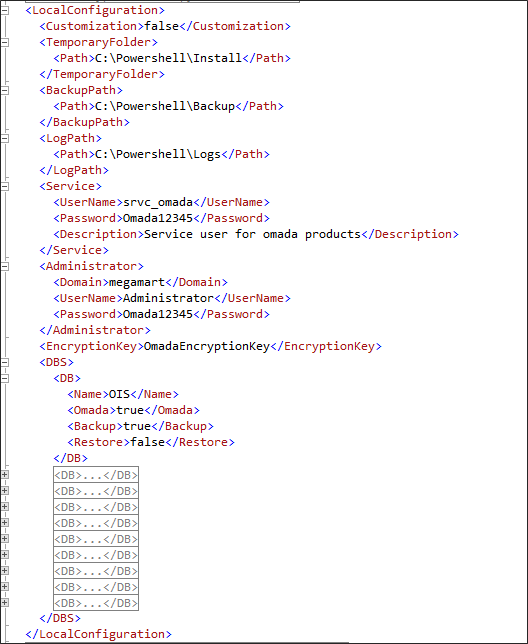
The following sub nodes are required:
| Value | Description |
|---|---|
| Customization | You can add customized changesets or data objects to apply to the script here. |
| TemporaryFolder | The path on which either the local copies of the installation files are placed or the folder from which the installation files are copied from Omada’s private Network Share drop zone. |
| BackupPath | The path where backup copies of databases are stored. |
| LogPath | The path where all logs are created while the script is running is stored. |
| Service | The user name or password that is used for the service user. |
| Administrator | Enter information about the local administrator user here. |
| EncryptionKey | The key required to decrypt packages run by Omada Data Warehouse. |
| DBS | A list of databases used by all Omada components. |
Databases
All databases used by Omada components are listed here.
| Value | Description |
|---|---|
| Name | The name of the database. |
| Omada | Use this parameter to indicate if this is an Omada component database. If you set this setting to True, this database is overwritten during the creation of the demo environment with all systems onboard (Full). |
| Backup | If you set this setting to True, the database is backed up during uninstallation. |
| Restore | If you set this setting to True, the database is restored after its Omada component has been upgraded. |
Version
This is where sub nodes containing configuration information about Omada Identity are placed.
The main node is:
<Version Type="LocalCopy">
You can use one of the following values for the Type property:
| Value | Description |
|---|---|
| LocalCopy | All installation files are placed on the local disk. |
| Specific | Provide the version of all Omada Identity components and the network path to the Omada Identity versions repository. During the installation process, you must also specify credentials. |
| Newest | The newest versions of the Omada Identity components are downloaded from Omada’s private Network Share drop zone. You must provide the network path to the Omada Identity versions repository. During the installation process, you must also specify credentials. |
Below the main node, you must provide the following nodes:

| Node | Description |
|---|---|
| MSSQL | Information about the MS SQL server used during installation. |
| OIS | Information about the Omada Identity. |
| ES | Information about the Enterprise Server (ES). |
| OPS | Information about the Omada Provisioning Service (OPS). |
| ODW | Information about the Omada Identity Data Warehouse (ODW). |
| RoPE | Information about Omada Identity Role and Policy Engine (RoPE). |
MSSQL
For MSSQL, you must provide the following subnodes:
| Subnode | Description |
|---|---|
| Version | 2016, 2017, or 2019. |
| VersionNo | 12, 13, 14, or 15. |
| Server | For example, localhost. |
| AdministratorPassword | The password for the administrative user. |
| IntegratedSecurity | If you set this setting to True, you should provide a user and a password. The situation where this property is set to False has not been tested. |
Enterprise Server
You can enable or disable this node. If it is set to True, the installation or uninstallation is performed. If it is set to False, there is no installation or uninstallation.

You must provide the following subnodes:
| Subnode | Description |
|---|---|
| Version | Required only when the version is set to Specific. |
| DropFolder | Required when the version is set to Specific or Newest. |
| Name | The name of the Enterprise Server software. |
| Exe | The name of the installer file. |
| InstallationPath | The path to which the Enterprise Server is installed. |
| Database BName | The name of the Enterprise Server database. |
| AuditDBName | The name of the Enterprise Server audit database. |
| AuditDBInitialScript | The script responsible for creating the object in the audit database. |
| SourceSystemDBName | The name of the source system’s database. |
| DBUser | The user that is used to access the Enterprise Server database. |
| DBPassword | The password for the user that is used to access the Enterprise Server database. |
| DBInitialScripts | The initial SQL scripts. A node with subnodes. See section 5.1.2.4.1 for more information. |
| Features | The Enterprise Server features that must be installed. |
| IISAppPool | The name of the application pool that the Enterprise Server Portal website uses. |
| IISWebSite | The name of the Enterprise Server Portal website. |
| IISBinding | The binding of the website. |
| Changesets | Information about the changesets to apply. The node enables or disables merging of changesets in one step. The value can be either True or False. If you set this setting to True, files with changesets are applied to the Enterprise Server after installation. A node with subnodes. Example: If there are multiple changeset files in one step, they can be firstly merged into one file and then imported, making this process faster. Changeset files require some time for the Enterprise Server service to process changes before next changeset file can be imported or installation can be continued. Find the argument is in the node Configuration -> ES. |
| ChangesetsCustomer | The name of the customers that are used during the import of changesets. |
| ChangesetsPath | The path from which changesets are imported. |
| DataObjects | Information about the data objects to apply. The data objects are only applied when Customization is set to True. Node with subnodes (see section 0). |
| InstallSQLSysClrTypes2012 | If you set this setting to True, you should place the .msi file in the support files subfolder of the Enterprise Server target path. The Enterprise Server installer does this. |
| InstallReportViewer2012 | If you set this setting to True, you should place the .msi file in the support files subfolder of the Enterprise Server target path. The Enterprise Server installer does this. You can use the Report Viewer 2015 instead of 2012 version. To do so, follow the steps described in the Omada Identity post-installation activities section. |
| TimerServiceName | The name of the Windows service that the Enterprise server installs. The name is hardcoded into the installer. |
| DisableReportServerForceSSL | If you set this setting to True, it changes the configuration of Reporting Server so that forced SSL is disabled. Enterprise Server reports do not work over SSL on demo or training environments, due to an invalid certificate. |
| SurveyTemplates | If you set this setting to True, the survey template upload tool is used. The following information is necessary to provide: <ToolPath>C:\Program Files\Omada Identity Suite\Enterprise Server 12\website\bin\SurveyRemplateImporterUtil.exe</ToolPath> <SurveyTemplatesPath>C:\Program Files\Omada Identity Suite\Enterprise Server 12\Survey templates</SurveyTemplatesPath> |
| LanguageVersion | The name of the language pack that you want to use in Enterprise Server. The language packs are provided in the Enterprise Server installer. Example: <LanguageVersion>danish_Language_pack-.xml</LanguageVersion> |
| RsOnAppServer | If you set this setting to True, you install the reports on the application server. By default, reports are installed on the database server. In cases where you are running an upgrade, this parameter is ignored. Example: <RsOnAppServer>false</RsOnAppServer> |
DBInitialScripts
The subnodes for the DBInitialScripts node should contain the following information:
<DBInitialScripts>
    <Script>
        <DBName>OIS</DBName>
        <Step>2.2.1</Step>
        <ScriptPath>C:\Program Files\Omada Identity Suite\Enterptise Server\Sql scripts\dbcr.sql</ScriptPath>
    </Script>
    <Script>
        <DBName>Omada Source System Data DB</DBName>
        <Step>2.2.1</Step>
        <ScriptPath>C:\Program Files\Omada Identity Suite\Enterprise Server\Sql scripts\CreateSourceSystemDataDB.sql</ScriptPath>
    </Script>
    <Script>
        <DBName>OIS</DBName>
        <Step>2.2.1</Step>
        <ScriptPath>C:\Powershell\DO-UpgradeTools\Private\ES\InitialUpdates.sql</ScriptPath>
    </Script>
    <Script>
        <DBName>OIS</DBName>
        <Step>2.2.2</Step>
        <ScriptPath>C:\Powershell\DO-UpgradeTools\Private\ES\InitialUpdates_Customization.sql</ScriptPath>
    </Script>
</DBInitialScripts>
| Subnode | Description |
|---|---|
| DBName | The name of the database on which the script is run. |
| Step | The step in the installation script from which the script should run. The script runs from this step until the last step of the installation script. |
| ScriptPath | The path to the script. |
Changesets
The sub nodes for this node should contain the following information:
<Changesets Enable="true" SkipErrors="true" CopyToLocalPath="true" OverwriteSuggestedPackages="true">
    <!-- currently changesets are applied in steps: 2.6, 6.1.1, 6.1.2, 7.2.1, 7.2.2, 7.3, 7.6, 8.1, 8.3 -->
    <Changeset>
        <Name>suggestedpackage.xml</Name>
        <Step>6.1.1</Step>
    </Changeset>
    <Changeset>
        <Name>srvc_omada.xml</Name>
        <Step>6.1.1</Step>
    </Changeset>
    <Changeset>
        <Name>configchanges_GridChanges.xml</Name>
        <Step>6.1.1</Step>
    </Changeset>
</Changesets>
| Subnode | Description |
|---|---|
| Name | The name of the XML file that contains the changesets to be applied. Changesets are applied in order from the first sub node to the last one. |
| Step | The step in the installation script from which the script should run. The script runs from this step until the last step of the installation script. |
The changesets node itself has following properties:
| Property | Description |
|---|---|
| Enabled | Decides if the changeset is applied. |
| SkipErrors | Decide if any errors during the import should stop the script. |
| CopyToLocalPath | Decide if the files to import the changesets should be copied to the local path. |
| ScriptPath | The path to the script. |
DataObjects
The subnodes for this node should contain the following information:
<DataObjects OverwriteFiles="true" SourcePath="C:\powershell\DO-UpgradeTools\Private\DataObjects" ToolPath="C:\Program Files\Omada Identity Suite\Enterprise Server 14\website\...">
    <DataObject>
        <Name>Resource Assignments.xml</Name>
        <Step>7.5</Step>
    </DataObject>
    <DataObject>
        <Name>AssignmentPolicyWithoutExchange.xml</Name>
        <Step>8.2.1</Step>
    </DataObject>
    <DataObject>
        <Name>AssignmentPolicy.xml</Name>
        <Step>8.2.2</Step>
    </DataObject>
    <DataObject>
        <Name>ResourceFolderOISandAD.xml</Name>
        <Step>8.4.1</Step>
    </DataObject>
</DataObjects>
| Subnode | Description |
|---|---|
| Name | The name of the XML file with DataObjects to apply. DataObject files are applied from the first subnode to the last one. |
| Step | The step in the running installation script. During this step, scripts are run from first to last. |
The DataObjects node has the following properties:
| Property | Description |
|---|---|
| OverwriteFiles | Information regarding whether local copies of data object files should be overwritten by the files in the script folder. |
| SourceFolder | The path folder with data object files. Used when the OverwriteFiles property is set to true. |
| ToolPath | The path to the tool used to import data object files. |
| FilesPath | The path to the local folder where data object files are stored. |
Omada Provisioning Service
You can enable or disable the Omada Provisioning Service node. If you disable the node, nothing happens in regard to OPS.
<Version>12.0.271</Version>
<DropFolder>\\ovms09\drop\OPS\Dev\Next Release\OPS.Dev.Next</DropFolder>
    <Name>Omada Provisioning Service</Name>
    <Exe>Omada Provisioning Service.exe</Exe>
    <DBName>ProvisioningService</DBName>
    <DBUser>megamart\srvc_omada</DBUser>
    <DBPassword>*********</DBPassword>
    <ServiceName>Omada ProvisioningService</ServiceName>
    <PushConfigurtationWebService>http://enterpriseserver/WebService/OPSWebServiceInternal.asmx?op=PushConfigration</PushConfigurationWebService>
You must provide following subnodes:
| Subnode | Description |
|---|---|
| Version | Only required if the version is set to Specific. |
| DropFolder | Required when you have set the version to Specific or Newest. |
| Name | The name of the Omada Provisioning Service software. |
| Exe | The name of the installer file. |
| DBName | The name of the Omada Provisioning Service database. |
| DBUser | The user who accesses the Omada Provisioning Service database. |
| DBPassword | The password for the user who accesses the Enterprise Server database. |
| ServiceName | The name of the Windows Service that is installed on the Enterprise Server. The name is hardcoded into the installer. |
| PushConfigurationWebService | The URL for the web service responsible for pushing the configuration. |
Omada Identity Data Warehouse
You can enable or disable the Omada Identity Data Warehouse node. If you disable the node, nothing happens in regard to the Omada Identity Data Warehouse.
<Version>12.0.716</Version>
<DropFolder>\\server\drop\common\ODW\Rel\v12.0</DropFolder>
<Name>Omada Identity Suite Data Warehouse</Name>
<Exe>Omada Data Warehouse .x64 SQL 2012.exe</Exe>
<SSISInstance>localhost</SSISInstance>
<DBUser>User name</DBUser>
<DBPass>Password</DBPass>
<ODWProductDatabase>Omada Data Warehouse</ODWProductDatabase>
<ODWProductDatabaseStaging>Omada Data Warehouse Staging</ODWProductDatabaseStaging>
<ODWProductDatabaseMaster>Omada Data Warehouse Master</ODWProductDatabseMaster>
<InstallationPath>C:\Program Files\Omada Identity Suite\Datawarehouse</InstallationPath>
<UploadReports Enabled="true">C:\Program Files\Omada Identity Suite\Datawarehouse</UploadReports>
<DtsConfigUpdates>
    <Update>
        <File>Common\Omada ODW WebService.dtsConfig</File>
        <ParentNode>/DTSConfiguration/Configuration</ParentNode>
        <ParentElementValue>\Package.Varialbes[User::WebServiceURL].Properties[Value]</ParentElementValue>
        <ParentElementKey>Path</ParentElementKey>
        <KeyAttribute>ConfiguredValue</KeyAttribute>
        <KeyValue>http://enterpriseserver/webservice/dataobjectexchangewebservice.asmx</KeyValue>
    </Update>
    <Update>...</Update>
    <Update>...</Update>
    <Update>...</Update>
    <Update>...</Update>
</DtsConfigUpdates>
<ConfigurationPackages>...</ConfigurationPackages>
<DBScripts>
    <Script>
        <DBName>Omada Data Warehouse</DBName>
        <Step>3.5.1</Step>
        <ScriptPath>C:\Powershell\DO-UpgradeTool\Private\ODW\CustomResourceView.sql</ScriptPath>
    </Script>
</DBScripts>
</ODW>
You must provide the following subnodes:
| Subnode | Description |
|---|---|
| Version | Only required if you set the version to Specific. |
| DropFolder | Required subnode when you set the version to Specific or Newest. |
| Name | The name of the Omada Identity Data Warehouse software. |
| Exe | The name of the installer file. |
| SSISInstance | The name of the SSIS Instance. |
| DBUser | The name of the database user. |
| ODWProductDatabase | The name of the Omada Identity Data Warehouse’s product database. |
| ODWProductDatabaseStaging | The name of the Omada Identity Data Warehouse’s staging database. |
| ODWProductDatabaseMaster | The name of the Omada Identity Data Warehouse’s master database. |
| InstallationPath | The path to which the Omada Identity Data Warehouse is installed. |
| UploadReports | If you enable this setting, the reports are loaded into the database. |
| UploadReportsToolPath | If you have enabled UploadReports, you must provide the path. |
| DtsConfigUpdates | These are changes in the dts configuration files. A node with subnodes. |
| ConfigurationPackages | These packages are supposed to run after the Omada Data Warehouse is installed. A node with subnodes. |
| DBScripts | Additional scripts, which should be applied to the database. A node with subnodes. |
DtsConfigurationUpdates
The subnodes for this node should conatin the following information:
| Subnode | Description |
|---|---|
| File | The path to the file that is to be changed. The path is created with the previously provided InstallationPath as a parent path. |
| ParentNode | The parent node of a node that is being updated. |
| ParentElementValue | The values of the parent element. |
| ParentElementKey | The key for the parent element. |
| KeyAttribute | The attribute name. |
| KeyValue | The attribute value. |
<Configuration ConfiguredType="Property" Path="\Package\Variables[User::UseDefualtCredentials].Properties[Value]" ValueType="Boolean">
    <ConfiguredValue>True</ConfiguredValue>
</Configuration>
A node in the configuration file:
<Update>
    <File>Common\Omada ODW WebService.dtsConfig</File>
    <ParentNode>/DTSConfiguration/Configuration</ParentNode>
    <ParentElementValue>\Package.Variables[User::UseDefaultCredentials].Properties[Value]</ParentElementValue>
    <ParentElementKey>Path</ParentElementKey>
    <KeyAttributes>ConfiguredValue</KeyAttributes>
    <KeyValue>True</KeyValue>
</Update>
ConfigurationPackages
The subnodes for this node should conatain the follwing information:
| Subnode | Description |
|---|---|
| Step | The step in the script during which the package runs. |
| PackageName | The name of the package to run. |
| Arguments | An optional additional argument to pass to the package. |
DBScripts
The subnodes for this node should contain the following information:
| Subnode | Description |
|---|---|
| Step | The step in the script during which the package runs. |
| DBName | The name of the database in which the script runs. |
| ScriptPath | The path to the script. |
Role and Policy Engine
You can enable or disable this node.
<Version>12.0.225</Version>
<DropFolder>\\server\drop\PolicyEngine\Rel\V12.0</DropFolder>
<Name>Omada Identity Suite Role and Policy Engine</Name>
    <Exe>OIS Role and Policy Engine.exe</Exe>
    <RoPEProductDatabase>RoP</RoPEProductDatabase>
    <DBUser>User name</DBUser>
    <DBUserPassword>Password</DBUserPassword>
    <RoPEServiceName>RoPE1.1</RoPEServiceName>
    <InstallationPath>C:\Program Files\Omada Identity Suite\Role and Policy Engine</InstallationPath>
    <ConfigFilesSourcePath>C:\Powershell\DO-upgradeTools\Private\RoPE</ConfigFilesSourcePath>
    <ConfigFiles>
        <File>
            <Name>Omada.OE.Custom.OIMDEMO.Policy|EngineExtension.dll</Name>
            <Target>Service</Target>
        </File>
        <File>
            <Name>EngineConfiguration.Config</Name>
            <Target>Service\ConfigFiles</Target>
        </File>
    </ConfigFiles>
</RoPE>
</Version>
<LocalConfiguration>
    <Customization>true</Customization>
    <TemporaryFolder>
        <Path>C:\Powershell\Install</Path>
    </TemporaryFolder>
    <BackupPath>
        <Path>C:\Powershell\Backup</Path>
    </BackupPath>
    <LogPath>
        <Path>C:\Powershell\Logs</Path>
    </LogPath>
    <Service>
        <UserName>srvc_omada</UserName>
        <Password>Omada12345</Password>
        <Description>Service user for omada products</Description>
        <Domain>megamart</Domain>
        <DomainExt>com</DomainExt>
    </Service>
    <Administrator>
        <Domain>megamart</Domain>
        <UserName>Administrator</UserName>
        <Password>Omada12345</Password>
    </Administrator>
    <EncryptionKey>OmadaEncryptionKey</EncryptionKey>
    <DBS>
    </DBS>
</LocalCpnfiguration>
When you have disabled an installation or uninstallation of the Omada Identity RoPE, you must provide the following subnodes:
| Subnode | Description |
|---|---|
| Version | Only required when you set the version to Specific. |
| Dropfolder | Required subnode when you set the version to Specific or Newest. |
| Name | The name of the Omada Identity Role and Policy Engine. |
| Exe | The name of the installer file. |
| RoPEProductDatabase | The Role and Policy Engine database name. |
| DBUser | The Role and Policy Engine user name. |
| DBUserPassword | The Role and Policy Engine database user password. |
| RoPEServiceName | The name of the Role and Policy Engine service. |
| InstallationPath | The path on which the Role and Policy Engine is installed. |
| ConfigFilesSourcePath | The path where configuration files copy after the installation. This is where they are then stored. |
| ConfigFiles | The list of files to copy after installation. A node with sub nodes. |
ConfigurationFiles
The subnodes for this node should contain the gollowing information:
| Subnode | Description |
|---|---|
| Name | The name of the configuration file. |
| Target | Target subpath: a child path of the InstallationPath property. |
Scripts
Here you can find information on how to run the scripts manually with the previously configured configuration files. To run the described scripts you must import a PowerShell module with them.
Import-Module C:\powershell\do-upgradeTools\DO-UpgradeTools.psm1
Invoke-OmadaUpgrade
This script requires you to provide two parameters. See a description of the parameters in the table below.
| Parameter | Description |
|---|---|
| Action | Two values are permitted: Uninstall and Upgrade. In the first case, only the uninstall script is called. In the second case, after this script is finished, the second script is run. The second script installs a new version of Omada Identity. |
| XMLPath | The path to the XML configuration file. |
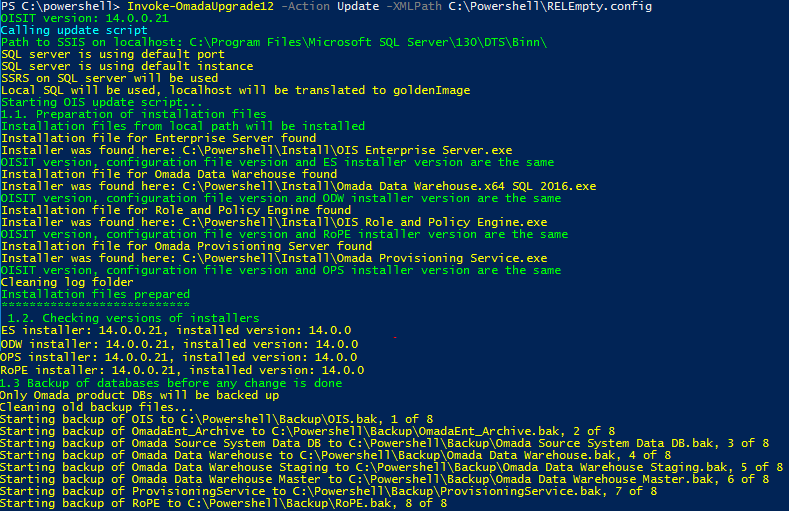
Invoke-OmadaUpgrade -Action Upgrade -XMLPath \"C:\powershell\DO-UpgradeTools\Private\install.config\"
Once the script starts, you should just let the script run until it is finished. The usual run time is about five minutes.
Invoke-OmadaInstall
You must provide one parameter for this script:
| Parameter | Description |
|---|---|
| XMLPath | The path to the XML configuration file. |
Invoke-OmadaInstall -XMLPath \"C:\PowerShell\DO-UpgradeTools\Private\install.config\"
After the script has started, the usual run time is about 30 minutes.
Invoke-OmadaUpdate
This script requires that you provide the following parameter:
| Parameter | Description |
|---|---|
| XMLPath | The path to the XML configuration file. |
Invoke-OmadaUpdate -XMLPath \"C:\PowerShell\DO-UpgradeTools\Private\installv12.config\"
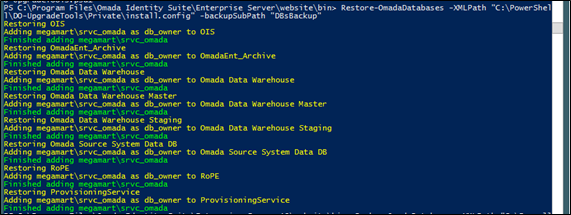
Backup-OmadaDatabases
This script requires you to provide this parameter:
| Parameter | Description |
|---|---|
| XMLPath | The path to the XML configuration file. |
This script also accepts the following parameters:
| Parameter | Description |
|---|---|
| backupAll | Two values are permitted: True and False. When it is set to True, all databases from the configuration file with restore enabled are backed up. When it is set to False, only databases used by the Omada components are backed up. |
| backupSubPath | Sub-path of the TempPath, which is set in the configuration file where backup files are placed. |
Restore-OmadaDatabases
This script requires that you provide the following parameter:
| Parameter | Description |
|---|---|
| XMLPath | The path to the XML configuration file. |
Partial installation of Omada Identity
You can configure the scripts to only install some of the Omada Identity components. You can enable or disable each node in the configuration file separately.
<ES Enabled="true">...</ES>
<OPS Enabled="true">...</OPS>
<ODW Enabled="true">...</ODW>
<Rope Enabled="true">...</RoPE>
Any step that is not included in the table below will always run and does not depend on enabled/disabled components.
| Step | All components enabled | ES | ODW | OPS | RoPE |
|---|---|---|---|---|---|
| 1.3 Checking Enterprise Server prerequisites | X | X | |||
| 1.5 Configuration of separate DB\SSIS server (if this is a multi-server installation) | X | ||||
| 2 Enterprise Server installation | X | X | |||
| 3 Omada Data Warehouse installation | X | X | |||
| 4 Role and Policy Engine installation | X | X | |||
| 5 Omada Provisioning Service installation | X | X | |||
| 6.1 Changesets import | X | X | |||
| 6.2 AuditDB configuration | X | ||||
| 6.5 Additional changes in RoPE configuration files | X | X | |||
| 6.6 Additional changesets import | X | X | |||
| 6.8 Creation of task for daily import\export | X |
You cannot install RoPE without a working instance of Enterprise Server.
Utilizing the scripts
Here you can find information on how to properly utilize the Omada Identity Installation scripts.
Installing a new version of Omada Identity
Before you start
- Check if the installation files are copied and verified.
- Verify if the connection string is prepared.
- If required, verify if relevant Windows features are installed.
- Old log files are removed.
- If required, separate DB/SSIS server is configured.
- The local user is checked or created.
-
Initiate the script with the following parameters:
Invoke-OmadaUpgrade -Action Upgrade -XMLPath "C:\powershell\DO-UpgradeTools\Private\install.config" -
The running script performs following actions:
- All services are stopped, based on the enabled attributes of the Omada software components from the configuration file.
- If enabled, databases are backed up.
- The Role and Policy Engine is uninstalled.
- The Role and Policy Engine Database is deleted.
- The Omada Provisioning Service is uninstalled.
- The Omada Provisioning Service database is deleted.
- The Omada Identity Data Warehouse is uninstalled.
- The Omada Identity Data Warehouse database is deleted.
- The Omada Identity Data Warehouse Master database is deleted.
- The Omada Identity Data Warehouse Staging database is deleted.
- The Enterprise Server web page is removed.
- The Enterprise Server app pool is removed.
- The Enterprise Server is uninstalled.
- The Enterprise Server database is deleted.
- The Enterprise Server Audit database is deleted.
- The Enterprise Server Source System database is deleted.
- The Enterprise Server database login is deleted.
noteIf a target of any step is missing, for example, if not all components are installed, the corresponding step in the process is skipped. However, the script continues to run.
-
The installation script is called.
-
For the Omada Identity Enterprise Server following actions are performed:
- The Enterprise Server is installed.
- The Enterprise Server is configured.
- Any relevant additional tools are installed.
- The website is created.
- The proxy account in Microsoft SQL is created.
- Changesets are imported.
-
For the Omada Identity Data Warehouse following actions are performed:
- Omada Identity Data Warehouse is installed.
- Additional database users are created.
- DTS configuration files are changed.
- The DCOM is configured.
- The Omada Identity Data Warehouse is configured.
- The relevant reports are loaded.
-
For the Omada Identity Role and Policy Engine (RoPE) following actions are performed:
- Omada Identity RoPE is installed.
- Database users are created.
-
The Omada Provisioning Service (OPS) is installed.
-
Following additional system configuration is performed:
- Changesets are imported.
- The Audit database is configured.
- The Services startup type is changed.
- The reporting server is reconfigured.
- Additional databases are restored if this setting is enabled
- A job for daily import and export is created.
- Final restart of services.
- Newly created databases are backed up.
This procedure may take up to about 20 minutes to complete.
Updating the exisitng Omada Identity installation
-
Initiate the script with the following parameters:
Invoke-OmadaUpdate -XMLPath "C:\PowerShell\DO-UpgradeTools\Private\install.config"All components enabled in the configuration file are upgraded.
-
Backup for databases is created.
-
The Enterprise Server is upgraded.
-
The Omada Identity Data Warehouse is upgraded.
-
The Omada Identity Role and Policy Engine is upgraded.
- Backup for configuration files is created.
- The Omada Identity Role and Policy Engine is uninstalled.
- The Omada Identity Role and Policy Engine is installed.
- The Omada Identity Role and Policy Engine DB is updated.
- The Omada Identity Role and Policy Engine configuration files are updated.
-
The Omada Provisioning Service is upgraded.
-
Additional configuration is performed.
-
Reports are uploaded
-
Surveys are uploaded
-
This procedure may take up to about 20 minutes to complete.
Uninstalling the existing Omada Identity
-
Initiate the script with the following parameters:
Invoke-OmadaUpgrade -Action Uninstall -XMLPath "C:\powershell\DO-UpgradeTools\Private\install.config" -
The running script performs following actions:
- All services are stopped, based on the enabled attributes of the Omada software components from the configuration file.
- If enabled, databases are backed up.
- The Role and Policy Engine is uninstalled.
- The Role and Policy Engine Database is deleted.
- The Omada Provisioning Service is uninstalled.
- The Omada Provisioning Service database is deleted.
- The Omada Identity Data Warehouse is uninstalled.
- The Omada Identity Data Warehouse database is deleted.
- The Omada Identity Data Warehouse Master database is deleted.
- The Omada Identity Data Warehouse Staging database is deleted.
- The Enterprise Server web page is removed.
- The Enterprise Server app pool is removed.
- The Enterprise Server is uninstalled.
- The Enterprise Server database is deleted.
- The Enterprise Server Audit database is deleted.
- The Enterprise Server Source System database is deleted.
- The Enterprise Server database login is deleted.
noteIf a target of any step is missing, for example, if not all components are installed, the corresponding step in the process is skipped. However, the script continues to run.
Creating databases backup
-
Initiate the script with the following parameters:
Backup-OmadaDatabases -XMLPath "C:\PowerShell\DO-UpgradeTools\Private\install.config"The script creates backup for all databases utilized by the Omada Identity components.
-
Call the script with the following parameters to back up all databases that are configured for backup in the configuration file.
Backup-OmadaDatabase -backupAll true -XMLPath "C:\PowerShell\DO-UpgradeTools\Private\install.config"
Restoring databases
-
Initiate the script with the following parameters to restore all databases, utilized by the Omada Identity components, that have the Restore parameter set to true:
Restore-OmadaDatabases -XMLPath "C:\PowerShell\DO-UpgradeTools\Private\install.config" -
Call the script with the following parameters to restore all databases that are configured to be restored in the configuration file:
Restore-OmadaDatabases -restoreAll true -XMLPath "C:\PowerShell\DO-UpgradeTools\Private\install.config"
Troubleshooting
Error handling
All steps and substeps should present user-friendly error messages. Error messages are shown in a red color.
In case of errors, and once you have fixed any such errors, you must run the script Invoke-OmadaUpgrade12 with either the Uninstall or the Upgrade action enabled.

Installation log storage
All logs from installers, changeset imports, data object imports and package run files are available in the folder specified in the configuration file.

Reusing a service username that was removed from AD
If Kerberos is used by Omada Identity, in the case of reinstalling Omada Identity on a server on which there previously existed a version of Omada Identity installed via the Omada Identity Installation Tool, an installation will fail if one attempts to reuse the old installation's service username and that username is removed from AD. To prevent it, a new username should be used for the reinstallation.