Omada Identity Enterprise Server
Here you can find information on how to:
- Install Omada Identity Enterprise Server
- Configure the Windows and SQL Server platforms
- Initial configurations needed for the Enterprise Server.
In addition to installation and configuration information, you can also find information on the SQL Server configurations and settings for different setup scenarios. Information about security and licensing are also provided as well as general tips and troubleshooting.
If you are upgrading the software to a new major version, there are two rules:
- You cannot skip a major version. For example, if you want to upgrade from Omada Identity v11.1 to Omada Identity v14, you must first upgrade to Omada Identity v12.3.
- You must always be on the latest patch version before upgrading to a new major version, for example the latest patch for v12.3.xxx.
Enterprise Server Installation
Here is a single-tier installation of Enterprise Server described.
If you upgrade to a new patch release, you are not prompted for any details. To add new features, run the installer a second time after the upgrade.
Install Enterprise Server
Before you begin the installation process, make sure that you have installed Microsoft.NET Framework 4.8.
-
Double-click the OIS Enterprise Server.exe file to launch the installation wizard. Once the Preparing to install screen is replaced by the Welcome page of the installation wizard, click Next.
-
Click Next to install the software to the default destination folder, which is C:\Program Files\Omada Identity Suite\Enterprise Server 14. Alternatively, click Change to specify a different folder.
-
Specify the user for which the application pool and services are going to run (for Service Account only), then click Next.
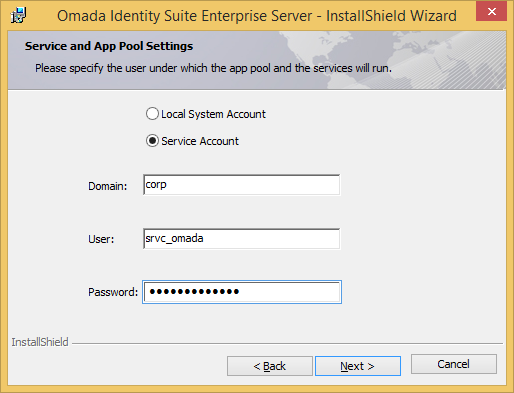 note
noteRefer to the CIAM Installation and Configuration guide to learn more about creating a CIAM Service Account.
-
Select the software you would like to install, then click Next.
-
Click Install. The program features that you selected are now installed. Click Next when the process completes. Click Finish to complete the installation.
Command line installation
You can run a silent installation from the command prompt. The following example installs all features to the default installation path, using a named user as the account that is going to run the Omada Services.
OIS Enterprise Server.exe /v\"INSTALLDIR=\"C:\Program Files\Omada Identity Suite\Enterprise Server 14\" SERVICETYPE=\"2\" SERVICEDOMAIN=\"test\"SERVICEUSER=\"testservice\"SERVICEPASSWORD=\"xxxx\" /qn\" /s
Use SERVICETYPE="1" to use the Local System Account as the account that is going to run the Omada Services. You can change to another user at a later time you need to.
You can specify which features to install by adding an ADDLOCAL parameter with a comma-separated list of the features to install. The following features are available:
- Omada_Enterprise
- PasswordReset
The following example shows how to install Omada_Enterprise and Tools.
OIS Enterprise Server.exe /v\"INSTALLDIR=\"C:\\Program Files\Omada Identity Suite\Enterprise Server 14\" ADDLOCAL="Omada_Enterprise,Tools" SERVICETYPE=\"2\" SERVICEDOMAIN=\"test\" SERVICEUSER=\"testservice\" SERVICEPASSWORD=\"xxxx\" /qn\" /s
You can test the parameters by running the command without /qn and /s. This opens the install wizard with the specified parameters inserted, enabling you to confirm the settings.
Installing different versions of the Enterprise Server
If you need to run different versions of Enterprise Server, you should manually install the software in a distinct folder by typing:
Start > Run > **msiexec /a OIS Enterprise Server.exe**
This command is necessary because you can only have one Timer Service running. It should work for all databases.
This is only necessary for installations within the same minor versions of Enterprise Server. For this release, that means 14.0.x-versions.
When you configure each website with different ports (or different IP addresses), each website can then run 'independently'. The IISRESET command affects all websites.
Create a database
Because Enterprise Server requires an empty database, you must create a database in SQL Server. For detailed instructions on how to create a database, see Install IIS and create a database.
- In SQL Server Management Studio, create a new database and give it a name, for example, Omada Identity.
- Make sure that the service account running the Enterprise Server is assigned the db_owner role for the database.
- If the user who is accessing the Enterprise Server database is not allowed to have the db_owner role because of company or SQL Server policy:
- Install the db_omada role on the SQL server using the script db_omada.sql.
- Grant the user who is accessing the Enterprise Server database the following roles: db_omada, db_datareader, and db_datawriter.
While creating the ES database, you must make sure that you have turner ON both read_commited_snapshot and allow_snapshot_isolation settings in the ES database before you use the Omada Identity software. This setting is required for proper operation of the ES.
Create a connection to the database
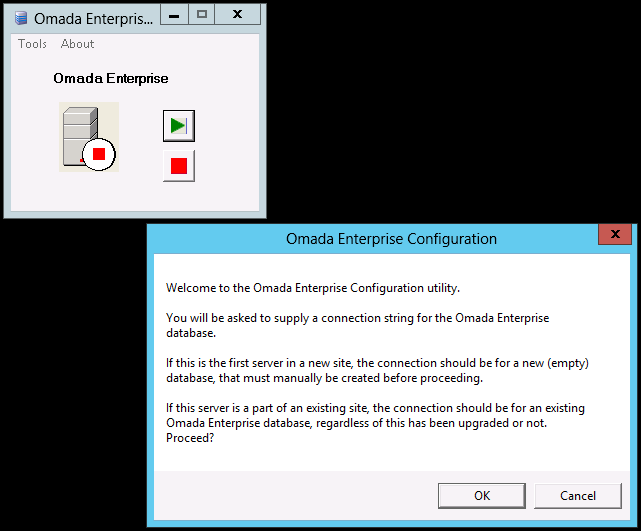
After you have installed Enterprise Server, you must use the Omada Enterprise Configuration utility to connect your installation to the database.
-
In Windows, click the Windows button, then select Configuration to open the utility.
-
Click OK in the welcome dialog box. The program prompts you for the connection string to connect to the Omada Identity database. This is the one that you created earlier.
-
Enter the connection string, and then click OK.
-
Click OK to confirm that the latest database version is to be installed. The program now creates tables, views, and stored procedures for the Omada Enterprise database.
-
Enter the name of your company, and then click OK. Note that you must type in the same name as the Company Name in your license key. Click OK to finish the configuration.
Omada recommends that you make backups of the Enterprise Server database on at least a daily basis, preferably more often. This is both common and best practice. Database backups can be performed automatically by configuring a SQL Agent job.
Specify a connection string for the source system's data database
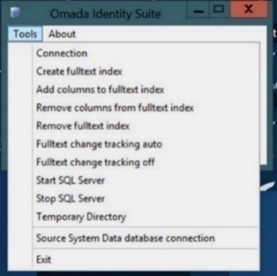
To specify a connection string for the source system database, go to Tools -> Source System Data database connection.
You must create the source system data's database before yoy specify the connection string, otherwise you will receive an error.
Set-up the Web Application in IIS
Now that you have installed Enterprise Server, you must create and configure the Omada Identity web application.
Edit IIS Settings
-
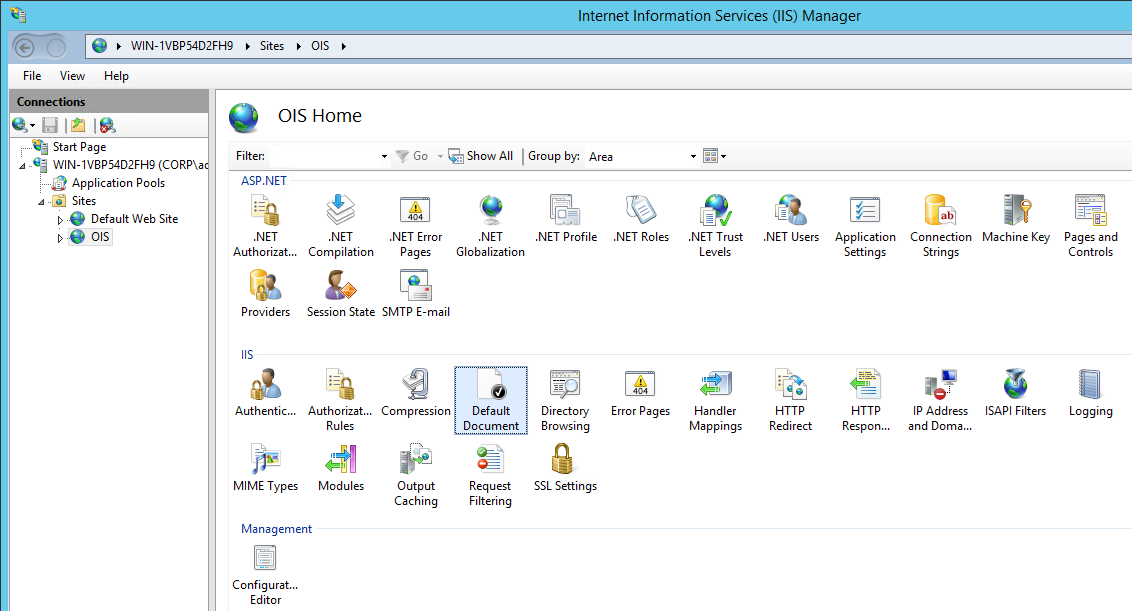
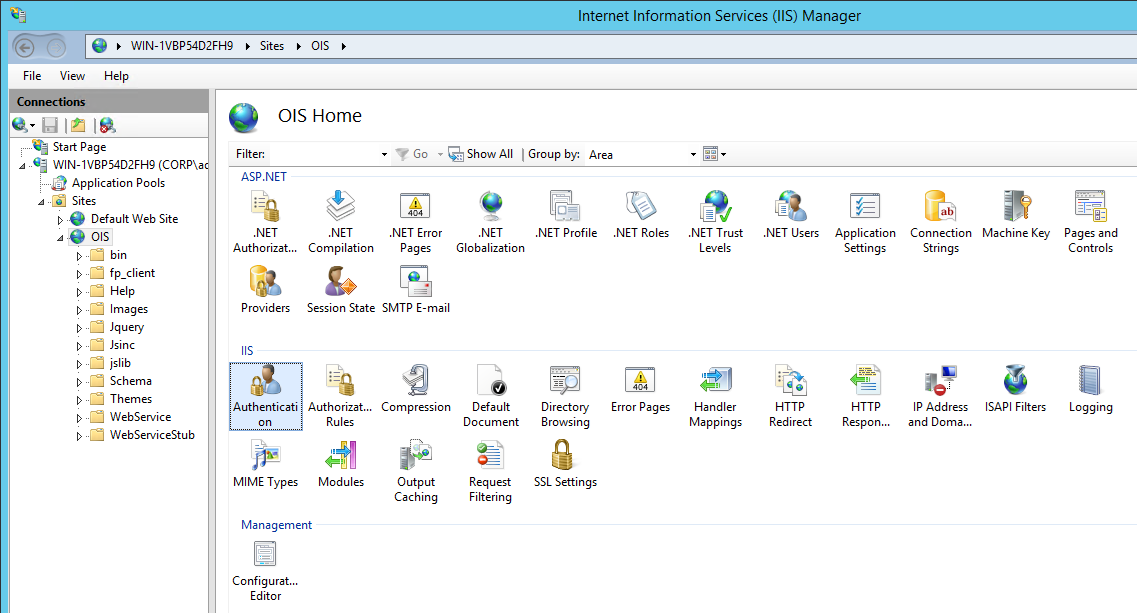
In Windows, click Start -> Administrative Tools to open Internet Information Services (IIS) Manager, then expand the menu in the navigation pane on the left.
-
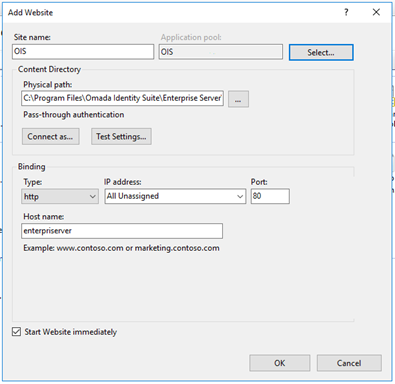
Right-click Sites and select Add Website.
-
In the Add Website dialog, type OIS as the Site name and C:\Program Files\Omada Identity Suite\Enterprise Server\website as Physical path, then click OK.
-
An associated application pool is automatically created. Click Application Pools. OIS now appears on the list.
-
Right-click the OIS application pool and select Advanced Settings.
-
In the Advanced Settings dialog, specify the settings as shown in the image below.
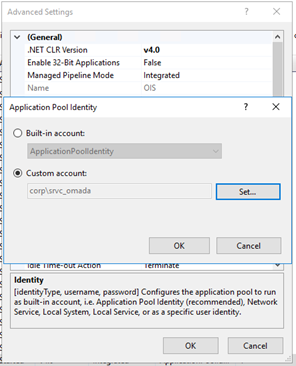
-
In the Set Credentials dialog, enter the service username and password. After confirming the password, click OK.
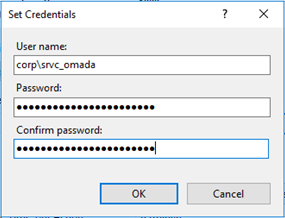
-
The service user name is now displayed in the Identity field. Click OK.
Edit Default Document settings
-
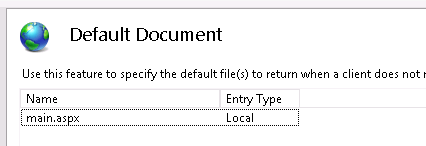
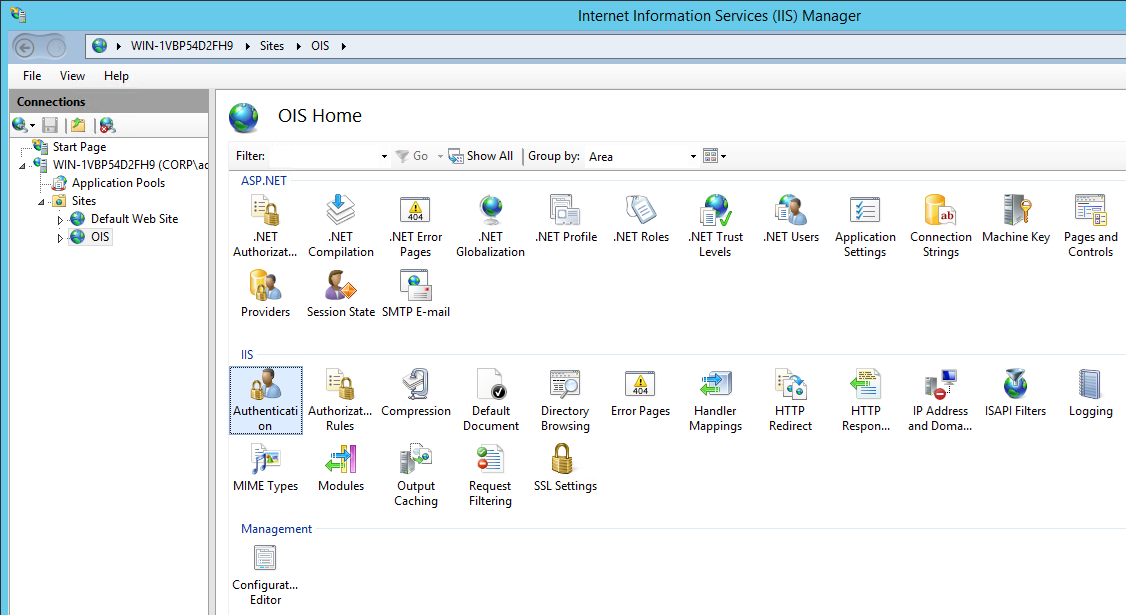
Next, you must edit the Default Document settings and the Authentication settings for the OIS site. Start by double-clicking Default Document in the IIS section.
-
On the Default Document page, right-click and select Add, and add main.aspx as a default document. Remove the other entries.
-
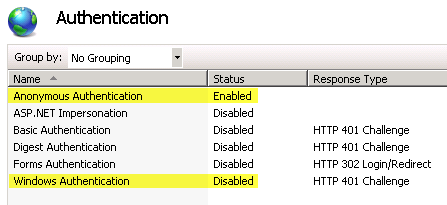
Return to the OIS Homepage and double-click Authentication in the IIS section.
-
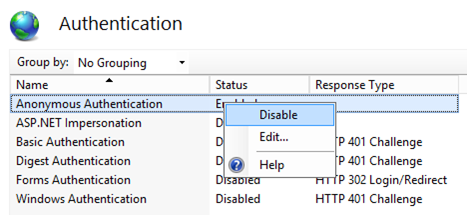
Right-click Anonymous Authentication and select Disable.
-
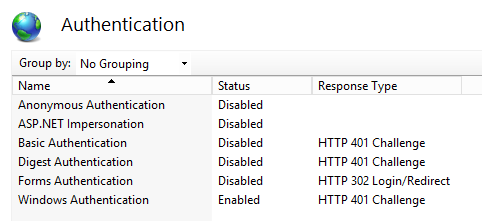
Right-click Windows Authentication and select Enable. The Authentication page should look like this:
-
In the IIS section, right-click and select Basic Setting, then in the Edit Site dialog, click Select to use OIS as the application pool and click Test Settings.

-
Click OK to save your settings.
Authenticate Users
If you want the Portal to authenticate users with user name and password, you can disable Integrated Windows Authentication. The following steps describe how to do this.
-
Open the Internet Information Services (IIS) Manager, go to Home, and double-click Authentication.
-
Enable Anonymous Authentication and disable Windows Authentication.
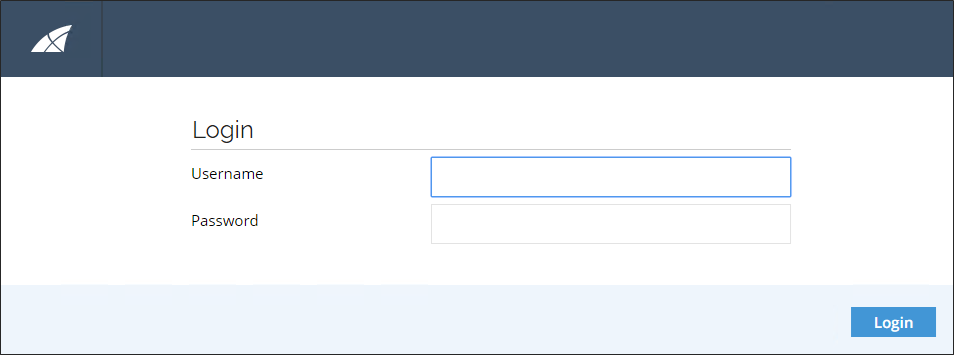
Log on to the application
By default, only one user named Administrator, with an empty password, is available for you to log in with.
The user table in Omada Identity also contains of three other artificial users that are used by the system only.
- ACTUSER is used in filter expressions to express a variable being replaced with the active user during the evaluation.
- SYSTEM is the user who executes the code when it is not running in the context of an interactive user in a web browser. For example, the timer service and RoPE are running in the context of the system user. Also, CodeMethods can be configured to run as the system user.
- NONE is used as assignee on activities that do not have any other assignee yet.
There are two different approaches to how you can log on as an administrator to the application. They are described in the following sections.
Use anonymous authentication
If you have enabled anonymous authentication, perform the following steps to log on with a user name and password:
-
Open your web browser, and connect to the web server, for example,
http://localhost/OmadaEnterprise/main.aspx. -
Enter Administrator as the user name. Do not enter a password.
Use integrated Windows authentication
To log on with Integrated Windows authentication, log on to the web server (console or Remote Desktop) with the Administrator user.
- Open your web browser on the web tier and connect to the local web server.
To avoid using the Administrator user, you can log into the application using anonymous authentication and manually create accounts in Enterprise Server for a few relevant users, before enabling Windows Authentication.
License keys
You must install a license key for each installation. The key is stored in the database, and you normally just need to install it once for each database. However, if the license conditions change, new license key installations might be necessary.
Request a license key
To request a license key, contact your account manager or the Omada sales department at sales@omada.net. You must submit the following information to obtain a key:
- Company Name
- Address (multiple if applicable)
- Contact person
- License key type (normal, demo, or trial)
- Number of Users
- Number of Process Templates
- Number of Identities
License key types
There are three different types of license keys that you can request for Omada Identity.
| Setting | Description |
|---|---|
| Normal | A normal license key enables you to use the system without any time limits. You must upgrade this license key each time you install a new version of Omada Identity. |
| Demo | A demo license key is meant for Omada partners so that partners can demonstrate Omada Identity for a third-party company or individual. Demo license keys have a time limit, so you must update this type of license key after the license has expired. |
| Trial | A trial license key is meant for potential customers and partners who request a demonstration of how the system works. The trial license key has a time limit and will expire. |
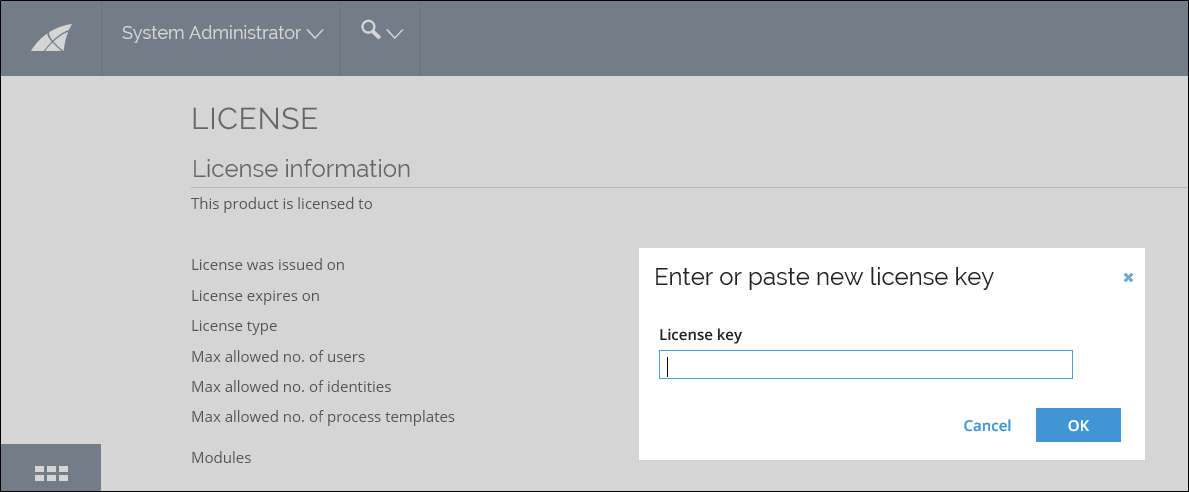
Install or update a license key
-
Log in to the Omada Identity Portal.
-
Follow the step in the top of the screen to enter a license key.
-
Paste your new license key into the field and click OK. Your license is now updated.
Only Platform administrators can update the Omada Identity license keys.
The Omada Identity API documentation is where you can find documentation of the built-in collection of code methods, public JavaScript and other information written by Omada developers.
This documentation is available in compiled HTML format (.chm file). You must run this file locally on your computer. If you do not run the file from your local machine, Windows does not allow you to open the file.
You can find the compiled HTML format (.chm file) of the Omada API Documentation Site at the following default location: C:\Program Files\Omada Identity Suite\Enterprise Server\documentation\OIS-X 12 documentation.chm.
Service User Rights
Logging on as a Service
You must give the service account(s) used for the Omada Identity Services the right to Log on as a service in Local Policies.
Database owner
The service account(s) used for the Omada Identity Services must have the db_owner role in the Enterprise Server database.
If the user who is accessing the Omada Identity Enterprise Server database is not allowed to have the db_owner role because of company or SQL Server policy, do the following:
- Install the db_omada role on the SQL server using the script db_omada.sql.
- Grant the user who is accessing the Enterprise Server database the following roles: db_omada, db_datareader, and db_datawriter.
Access to the MSDB database
The service account(s) used for the Omada Identity Services must have the following role memberships for the MSDB database:
- db_datareader
- db_ssisadmin
If SQL Agent is used, also the following role is required:
- SQLAgentOperatorRole
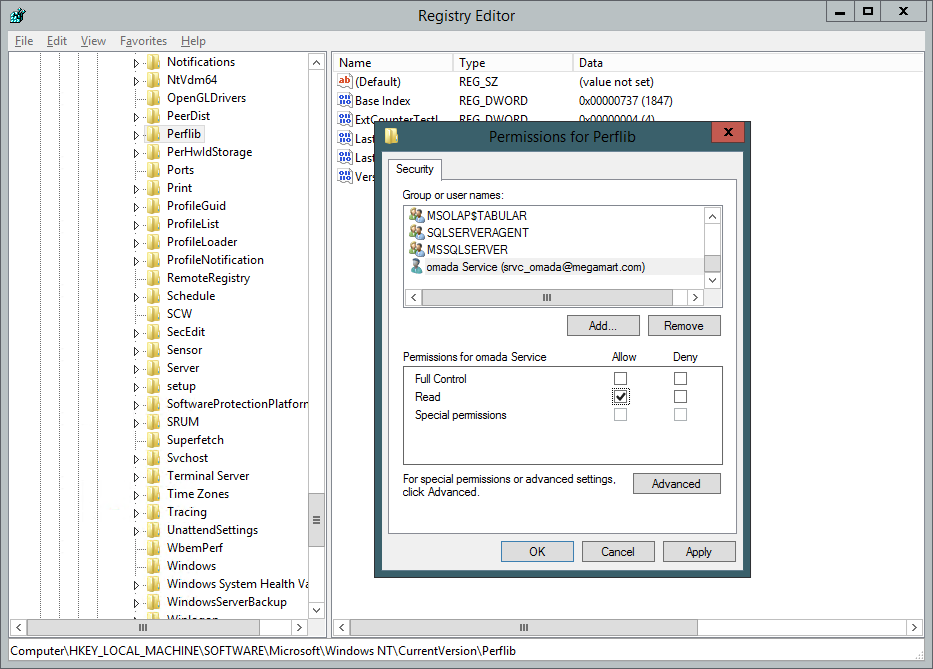
Set read Access to Perflib Registry Key
The service account(s) used for running the Omada Identity Services the IIS Application Pool must have Read Access to the following registry key:
HKLM\SOFTWARE\Microsoft\Windows NT\CurrentVersion\Perflib
This is for the Key Performance counters to run. This is set in the permissions for the registry key in the Registry Editor.
-
Right-click the registry key, and select Permissions...
-
Click Add... and search for the service account.
-
Select Read in the Permissions section and click Apply.
Full-text indexing
A full-text index is by default enabled in the Enterprise Server if the SQL Server full-text service is installed on the database tier. The full-text index improves the scalability and performance of the search function. If it is not enabled, there might be performance issues when the data set reaches a certain point.
Omada recommends that full-text index is enabled in the production environment. It can be disabled for the development and test environments.
-
To configure the full-text indexing, start the Omada Enterprise Configuration utility by clicking Start -> Configuration.
-
In the Tools menu, click Create full text index.
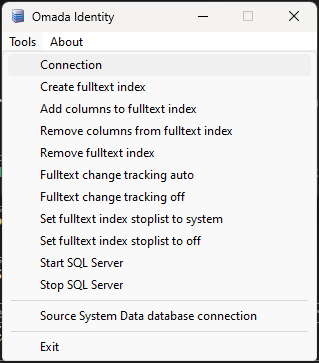
-
Then click Add Columns to full text, followed by Full text change tracking auto.
-
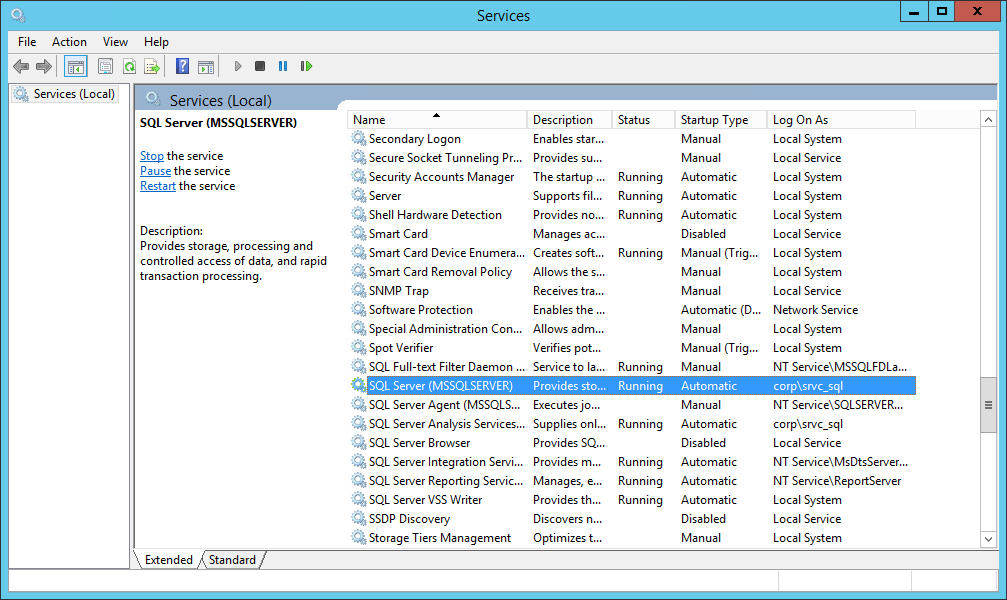
Go to Services and make sure that the MSSQLSERVER service is set to Automatic startup in case the server requires a restart.
-
In Enterprise Server, go to Setup -> Administration -> Other -> Customer Settings, then set the Disable Searching in the FTI setting to False and click OK.
Initial configuration
The Enterprise Server installation installs two services:
- Omada Identity Timer Service
The default startup type of these services is Manual. For this reason, you may want to change this property for the Timer Service and the Role Engine Service. See the image below:
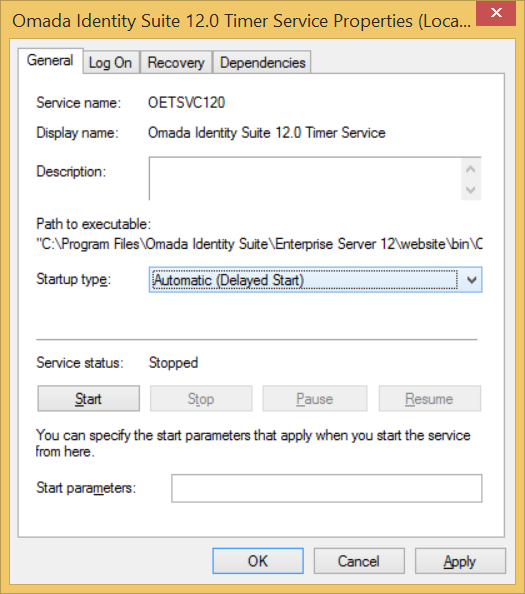
The services are set to manual startup by default. After an installation, upgrade, or patch has been applied, you must start the Timer Service and any other services that you require.
If you are using Microsoft Security Support Provider Interface (SSPI), you must assign a specific user to two of these services.
The service account(s) used for the Omada Services must be given the right to Log on as a service in Local Policies and the db_owner role in the Enterprise Server database.
Those services requires configuring the following settings to ensure that the software reflects local preferences.
- Customer settings
- Master settings
- Host Header configuration
- Language settings
To configure the customer settings, go to Setup ->Administration -> More... -> Customer Settings.
The most relevant customer settings to configure are listed in the table below.
| Setting | Description |
|---|---|
| Mail sender | The email address that you provide here is used as the From address for any emails that are sent from the system. |
| Support email | Type the email address used for reporting errors. |
| Support email (auto) | Type the email address to which automatic, system-generated error reports should be sent. |
| Website URL | Type the full URL to the site. Example: http://OIS.somecompany.com/ |
| Disable full text index searching | If you set this setting to False, you enable the full-text search. |
When enabling OpenID or SAML, you must perform additional mandatory changes to tblCustomer and tblCustomerAuth. These tables must be edited using SQL Management Studio.
Any changes to authentication settings take immediate effect, and precipitate changes may lock out the user changing the Master Settings out of the Omada Identity system.
There are particular Enterprise Server parameters which can modified in ES Portal via the Master Settings table.
You can find the Master setting in Setup > Administration > More… > Master Settings.
These settings can be seen and configured only by Platform administrators. Modifying these settings may have system-wide effects so extreme caution is advised.
Authentication
| Interface Name | Key | Description |
|---|---|---|
| Identity username property system names | IdentUserNameProps | The master setting can be populated with system names of Identity properties which can be used as used names when logging on to the ES. The list is comma-separated. For CIAM the value can be LIVEID, GOOGLEID, FACEBOOKID, LINKEDINID. |
| Customer name | CustomerLogon | The customer’s name. If specified, this customer name is always used during login. On non-integrated authentication schemes in the application, the user should provide this as the Domain name, for example, Omada\Administrator. |
| Domain logon name | DomainNameLogon | The domain name login. Use the domain as the customer during login. This property must only be set to True when you use Windows Authentication to identify the instance of Enterprise Server. For all other scenarios, it must be set to False. |
| Host header logon | HostHeaderLogon | Host header logon. Use the host header of the request as the customer. You must only set this setting to True when you are using HostHeader to identify the instance of Enterprise Server. For all other scenarios, it must be set to False. If you are logging in anonymously, it should be set to False as a default. You must also configure The HostHeader on the IIS and DNS servers. |
| OpenID nonce cookie name | OpenIDNonceCookieName | The name of the OpenID nonce cookie. |
| OpenID Claim Types | OpenIDClaimTypes | Comma separated list of claim types to search for in a JWT token to derive the username. The first one with a value will be returned. For Microsoft Entra ID v1 it should be upn for users from the directory and email for liveid users. For Google it should be email. For general-purpose authorization system it can be sub. It can also be given_name. For Microsoft Entra ID v2.0 tokens it should be azp. It can also be preferred_username. |
| Qualified username | QualifiedUserName | When set to False (default), the username used in authentication is the account without the domain prefix (DOM\cso) or email domain postfix (cso@dom.com). When set to True, the username is the username as presented by the authentication system, for example, DOM\cso or cso@dom.com. |
| Qualified username legacy | QualifiedUsernameLegacy | When enabled, usernames presented as an email address (e.g. cso@dom.com) during the authentication are transformed to the legacy format, e.g. dom\cso. This setting only takes effect when the QualifiedUsername setting is set to false. |
| SAML name ID policy format | SAMLNameIDPolicyFormat | The NameID format in the SAML request. For AzureAD it should be "urn:oasis:names:tc:SAML:1.1:nameid-format:emailAddress" For ForgeRock it should be "urn:oasis:names:tc:SAML:1.1:nameid-format:unspecified" For PingFederate and Okta, it can be one or the other. |
| SAML request ID cookie name | SAMLRequestIdCookieName | The name of the SAML request id cookie. |
| Session cookie name | SessionCookieName | The name of the session cookie. |
| Use secure session cookies | SecureSessionCookie | Disabling secure session cookies compromises security and can only be done on non-production environments. This setting is by default set to True. Together with the correct setting of IIS to use HTTPS. it allows Omada Identity cookies to have the ‘Secure’ flag. |
Environment
| Interface Name | Key | Description |
|---|---|---|
| Enable SignalR Sql Scaleout option | EnableSignalRSqlScaleOut | The SignalR component uses the Enterprise Server SQL database for scaling out. |
| Enable SignalR ServiceBus Scaleout option | EnableSignalRServiceBusScaleOut | The SignalR component uses the Azure ServiceBus for scaling out. |
| Event Hub Connection String | EventHubConnectionString | Connection string to Azure Event Hub, including name of the Event Hub |
| Is the environment an OIS SaaS environment | IsOISaaS | Is true if the environment is a SaaS environment. |
| SignalR Azure ServiceBus Connection String | SignalRServiceBusConnectionString | Connection string to the Azure ServiceBus using be SignalR scale out option. |
If you want to use the _SignalR ServiceBus ScaleOut_ option with Azure Managed Identity Authentication, you then must use the _SignalRServiceBusConnectionString_ master setting, that is,
_Endpoint=sb://<servicebusname>.servicebus.windows.net/;Authentication=Managed Identity;Audience=https://servicebus.azure.net_
For more information on authentication and authorization of an application with Microsoft Entra ID, refer to the Microsoft Azure documentation.
Mail settings
| Interface name | Key | Description |
|---|---|---|
| SMTP server | SMTPServer | The SMTP server used for relaying email messages to users. The default value is localhost. Be careful when you set this setting on test environments with real email addresses. From version 14.0.14 onwards, this setting is deprecated, and its functionality is covered by the notificationSettings configuration object. |
Misc
| Interface Name | Key | Description |
|---|---|---|
| Default portal page | RedirectURL | Can optionally be configured with a URL to an index page which will replace the main.aspx page. |
| Enable anonymous approval of mobile access requests | AnonMobileReqApprv | Allow users to access the portal anonymously with a token sent by mails, when approving requests for access. |
Monitoring
| Interface Name | Key | Description |
|---|---|---|
| Enable Application Insights | AppInsightsEnabled | Controls whether Application Insights is enabled. |
| Start performance counters | StartPerfCounters | When set to false, the OIS performance counters are not initialized. This can improve the startup time of the OIS windows services |
Password reset
| Interface Name | Key | Description |
|---|---|---|
| AD client | PWRADCLIENT | Enables user password verification via an AD client identified by the PWRADSYSTEMID customer setting. Exactly one password verification and one password reset client is required. |
| Azure AD client | PWRAZUREADCLIENT | Enables user password verification via an Microsoft Entra ID client identified by the PWRAZURESYSTEMID customer setting. Exactly one password verification and one password reset client is required. |
| Basic client | PWRBASICCLIENT | Enables user password reset and verification via Basic Client (local ES database). Exactly one password verification and one password reset client is required. |
MIM client on-prem | PWRFIMCLIENT | Deprecated starting from the 15.0.3 on-prem release. Enable user password reset via MIM client identified by the PWRFIMMAUID customer setting. Exactly one password verification and one password reset client is required. |
| LDAP client | PWRLDAPCLIENT | Enables user password verification via LDAP client identified by the PWRLDAPSYSTEMID customer setting. Exactly one password verification and one password reset client is required. |
| OPS client | PWROPSCLIENT | Enables user password reset via the Omada Provisioning Service. Exactly one password verification and one password reset client is required. |
Passwords
| Interface Name | Key | Description |
|---|---|---|
| Max logon attempts | MaxLogonAttempts | Maximum number of failed logon attempts using the ES password before the user is inactivated. |
| Max password age | MaxPasswordAge | Maximum number of days between an ES authentication password change. |
| Password age warning | PasswordAgeWarning | Days before the password expiry where we issue a warning on the logon page. |
Security
| Interface Name | Key | Description |
|---|---|---|
| Enables verification of the request source origin | VerifyRequestOrigin | Enables or disables the verification of the request source origin to prevent Cross-Site Request Forgery. |
System
| Interface Name | Key | Description |
|---|---|---|
| Application version | AppVer | The major/minor version of the application. You should never modify this setting. The exact build version, for example, 14.0.0.42 is not shown here, but you can find the build version on the About page in Omada Identity. |
| Database patch version | DbVer | The database patch version. You should never modify this setting. The version is updated for every SQL script change. |
| DB locking scheme | LockMode | When the value is set to 1, access to the main object tables is serialized using a table lock. Under normal circumstances, Omada does not recommend enabling this lock mode. Possible values are: 0=Normal, 1=Serialized. |
Code methods
| Interface name | Key | Description |
|---|---|---|
| Temporary Directory | TempDir | Add a temporary directory required by the UtilityCodeAssembly.Main.SaveDataObjCSV() and SaveDataObjCSVExtended() Code Methods (see note below). |
The TempDir master setting is not installed by default, and can be added with the following SQL statement: The master setting can be populated with system names of Identity properties which can be used as used names when logging on to the ES. The list is comma-separated.
For CIAM the value can be LIVEID, GOOGLEID, FACEBOOKID, LINKEDINID.
INSERT INTO \[tblMasterSetting\] (\[Key\],\[Name\],\[Description\],\[ValueStr\],\[ValueInt\],\[ValueDateTime\], \[ValueBool\],\[Type\])VALUES('TempDir','Temporary Directory','','C:\\OmadaEnt_Temp',NULL,NULL,NULL,0)
It is important that you check the SMTPServer setting.
When enabling OpenID or SAML, you must perform additional mandatory changes to tblCustomer and tblCustomerAuth. These tables must be edited using SQL Management Studio.
Any changes to authentication settings take immediate effect, and precipitate changes may lock out the user changing the Master Settings out of the Omada Identity system.
Working with the authentication settings
The following Master Settings directly affect the way the authentication to the application is performed.
| Setting | Interface Name |
|---|---|
| IdentUserNameProps | Identity username property system names |
| OpenIDClaimTypes | OpenID claim types |
| QualifiedUserName | Qualified username |
| SAMLNameIDPolicyFormat | SAML name ID policy format |
| SecureSessionCookie | Use secure session cookies |
Please exercise caution when editing these settings as uncareful changing of them may prevent proper authentication in Omada Identity.
There are 3 settings: HostHeaderLogon, DomainNameLogon, and CustomerName that are used to map a request to a customer in tblCustomer or tblCustomerAuth. Changing these settings take the following precautions:
- When using the CustomerName setting, the master setting value must map to the customer name in tblCustomer or tblCustomerAuth.
- When using HostHeaderLogon, the entire hostname in the URL must map to an entry in tblCustomerAuth.
- When using DomainNameLogon, the domain name of the user logging in with Single Sign-On must map to an entry in tblCustomerAlias.
If the AuthenticationType column in the tblCustomer is set to Forms or Basic authentication, the authentication implicitly relays on the password in the Enterprise Server database.
Omada does not recommend using Basic authentication in production environments. Basic authentication does not provide the same level of security as the Integrated authenticated options. In consequence, if the Basic authentication is used, your Omada Identity installation will not be protected against, for example, password reuse.
When using Forms-based authentication, SAML-based authentication, or OpenID-based authentication on a WebSite without SSL enabled, then the master setting SecureSessionCookie must be set to False. Doing so will lower WebSite security because it will be possible to hijack sessions by intercepting network packages and it is not recommended by Omada.
With the master setting IdentUserNameProps it is possible to configure a property on the Identity object to be used when matching with the username provided by the authentication mechanism.
With the OpenIDClaimTypes and SAMLNameIDPolicyFormat it is possible to configure which attributes from the IdP or token that are used in the during the authentication.
When you want to provide different addresses to access different environments running on the same machine, use the Host Header Logon (HostHeaderLogon) configuration.
For example, this configuration applies when the following addresses are running on the same server: http://development/OIS, http://test/OIS, and http://quality/OIS.
To make this configuration, you need to:
-
Create DNS records that point to the server's IP address.
You can either do this on the DNS Server or in the host file for every client machine. By default, the host file is located at C:\WINDOWS\SYSTEM32\DRIVERS\ETC\host. For example, create the following three records:
- 192.168.0.1 development
- 192.168.0.1 quality
- 192.168.0.1 test
-
Configure IIS
-
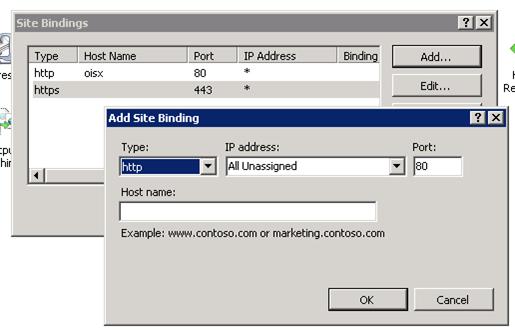
Open the IIS Manager, go to <Server name> -> Web Sites, and find the appropriate site name. Right-click the site name and select Edit Bindings....
-
In the Site Bindings dialog box, click Add....
-
Add the hosts manually as illustrated in the following image:
-
Each environment must have an alias configured in the table dbo.tblCustomerAuth, which associates the name used on the host header to the database connection in the table dbo.tblCustomer.
-
Set the available languages in Enterprise Server by activating the language in the tblLanguage table.

-
Set the Disabled flag to False for languages that you want to be available in the system. Culture specifies the language shown in Omada Identity.
-
Note that not all languages are available in a default installation. The following language options are currently available:
- en-US (US English)
- da-DK (Danish)
- de-DE (German)
- sv-SE (Swedish)
- nl-NL (Dutch)
- fr-FR (French)
- nb-NO (Norwegian)
- pl-PL (Polish)
- es-MX (Spanish)
- pt-PT (Portuguese)
Maintain the Omada platform
To ensure that Omada Identity runs well, it is important that there is a continuous maintenance of the SQL server. Because schedules vary from customer to customer, the requirements listed here are only basic requirements.
A more advanced setup of maintenance plans should be discussed between the customer's IT department and Omada Consultants.
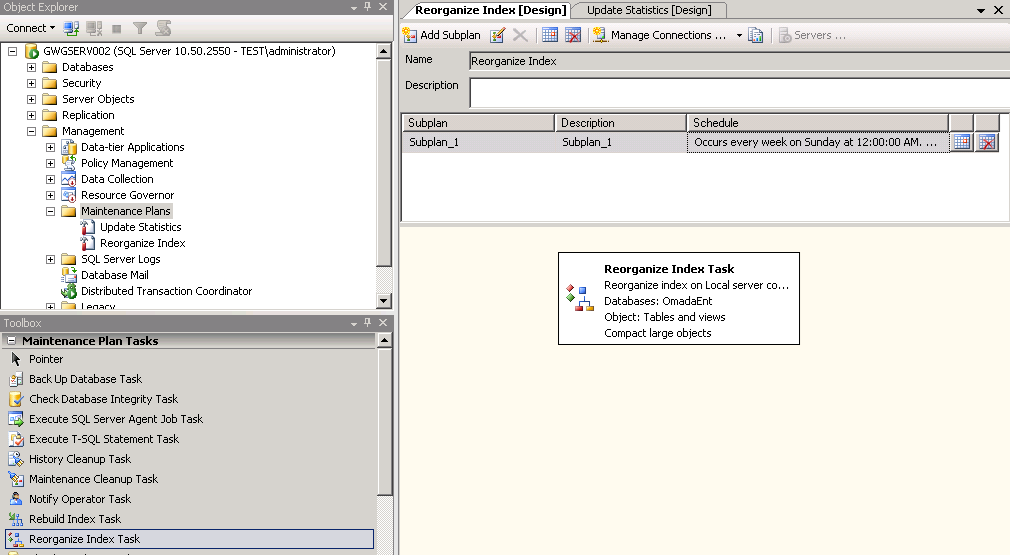
Set up SQL server maintenance plans
From the SQL Server Management Console, you can set the database maintenance plans to match the local requirements and service windows. You can do this in Management -> Maintenance Plans.
-
Set up a plan to update the statistics on a regular basis, preferably every night.
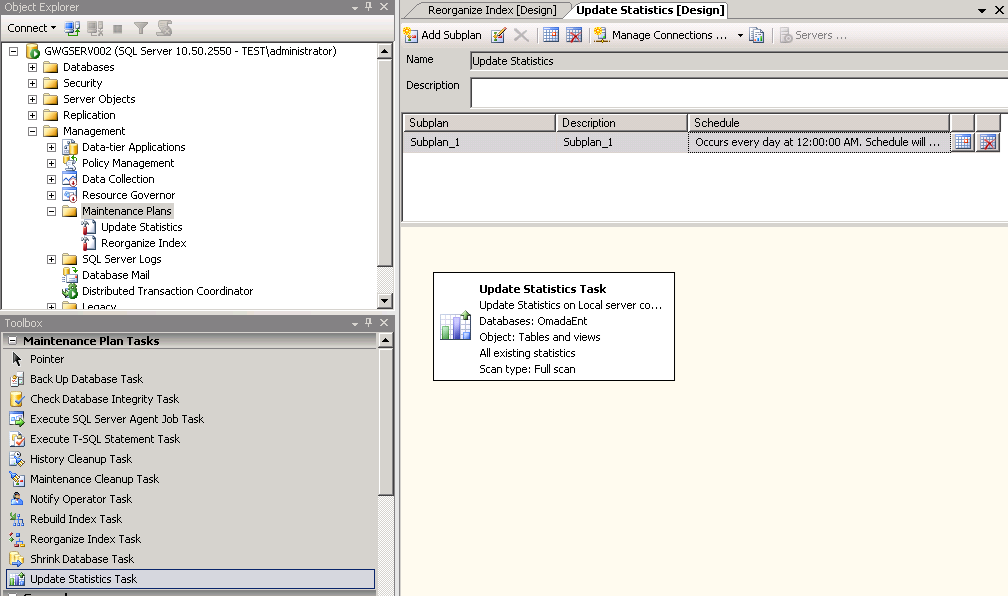
-
Set up another plan to reorganize data and index pages at least once a week.
Using SSPI
Using the Security Support Provider Interface (SSPI) requires configuring following settings.
Configure Active Directory settings
-
Create an Active Directory service account to be used for the integrated authentication between the web or application server and the SQL Server.
-
Log on to the Domain Controller with Domain Admin rights and execute the following command:
Setspn --s HTTP/<webserver fqdn> <DOMAIN>\<service account>
Configure Web/Application server settings
-
Add the newly created AD account to the local user group IIS_IUSRS on the web server.
-
Set up an application pool in the IIS to use the newly created AD service account. Setting up an application pool in IIS is described at the end of this section.
-
Change the Enterprise Server web application to use the newly created application pool.
-
Change the connection string to:
Initial Catalog=<db name>;Data Source=<db server name>\<DB INSTANCE>;Integrated Security=SSPI;ExampleInitial Catalog=OISTST;Data Source=DBSRV01\TST;Integrated Security=SSPI; -
Run the following command in the folder C:\inetpub\AdminScripts:
cscript adsutil.vbs set w3svc/NNTAuthenticationProviders "Negotiate"
Authentication with Kerberos on Windows 2016 or newer
When you use Windows Integrated Authentication with Kerberos on Windows 2016 or newer, you may need to change the ASP.NET authentication function to use the AppPool credentials.
-
Open a command prompt and enter:
cd %windir%\system32\inetsrv

appcmd.exe set config -
section:system.webServer/security/authentication/windowsAuthentication -
useAppPoolCredentials:ture
Alternatively, you can disable the IIS authentication kernel mode authentication.
- In Internet Information Services (IIS) Manager, expand the local computer's node, expand Sites, and click the website.
- In the center pane, under IIS, double-click Authentication.
- Click Windows Authentication.
- In the right-side pane, under Actions, click Advanced Settings.
- Clear the check box Enable Kernel-mode authentication. Click OK.
SQL Server Settings
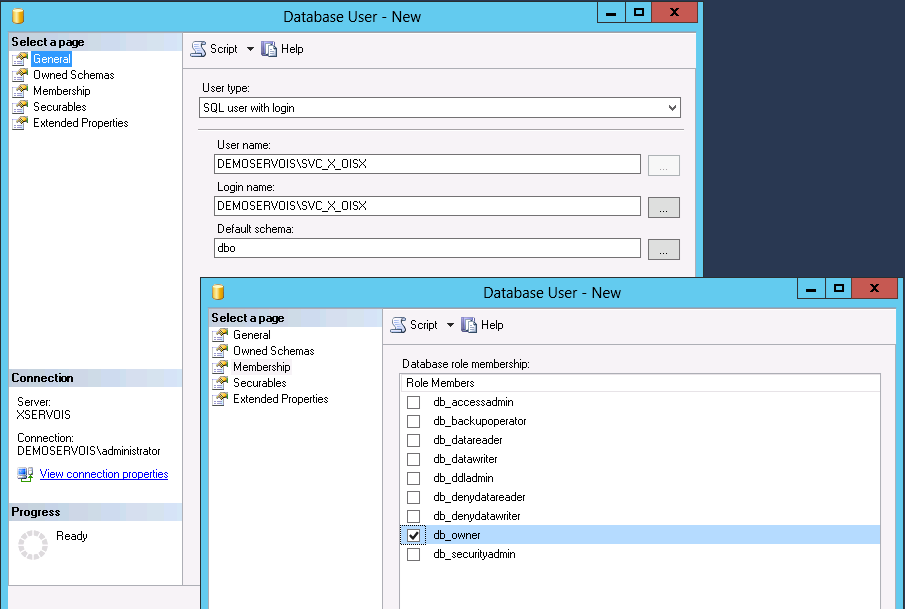
- On the SQL Server instance, you must create a new login equal to the newly created AD service account.
- Go the Enterprise Server database and create a new user with the newly created login.
- Assign the database role membership db_owner to the newly created user.
Omada Identity Windows Services
After configuring all the settings listed here, you must change the Timer Service to use the newly created Active Directory service account.
Remember to set the Windows services as described here, each time you apply a patch to Enterprise Server.
Configuring SSL
-
Start Internet Information Services Manager, then select the relevant server and double-click Server Certificates in the main pane.

-
In the right-side menu, click one of the available options to launch a wizard that helps you create a request for a server certificate. The request is delivered to a certificate authority that can grant a certificate. The response is brought back to the wizard, and the certificate is then installed.
noteThe certificate's common name must match the DNS common name on the Web server, typically using certificate authorities, such as VeriSign or Thawte. However, internal solutions often choose an internal certificate authority, which requires that all internal PCs must have the appropriate root certificate installed. This is Omada's best practice advice.
It is critical that you select the correct setup to match your security and usability needs. Therefore, contact your own IT support to ensure that the best solution is chosen for your enterprise.
-
After the certificate is installed, select the website, and open the Site Bindings dialog. Click Add and create an https site binding using the installed certificate.
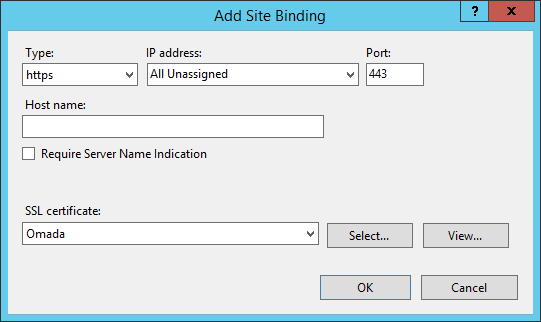
-
Select SSL Settings in the main pane and select Require secure channel (SSL). If you enable this setting, all network traffic is encrypted with the server certificate.
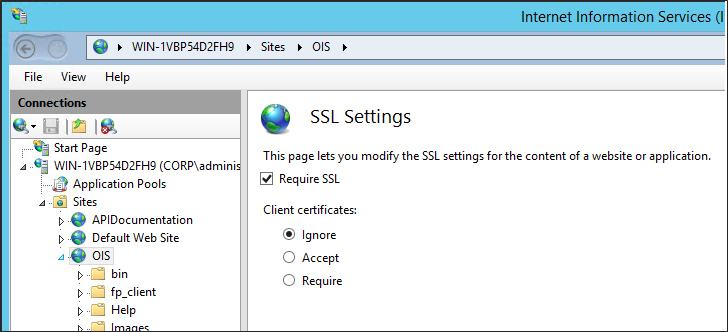
The described solution does not cover client certificates.
Check the system security
When your Enterprise Server installation is complete, you can apply security to the installation.
-
Change any blank passwords that were used during installation into secure passwords. Your company should already have a password policy in place. Omada recommends following password best practices such as:
- Periodic password changes and no recycling of passwords
- No dictionary words or names
- Minimum 6 characters
- No passwords that contain user names, real names, or company names
- The inclusion of English uppercase and lowercase characters (A-Z and a-z), Base 10 digits (0-9), and symbols found on the keyboard such as ! $, #, or %.
-
Contact your auditors to include your Enterprise Server installation in future routine audits that include security checks.
Right after the Omada Identity is installed, the PswEncryptionKey has the default value DefaultEncryptionKey. You need to change this value as soon as possible after the installation, preferably before performing any other actions within Omada Identity.
The PswEncryptionKey change must be performed manually in all the places where it is used.
For more information of PswEncryptionKey, please refer to Password encryption key
The following table shows a sample checklist for ensuring the security of your implementation:
| Action | Notes | Result |
|---|---|---|
| Change the PswEncryptionKey from the default one. | Refer to Password encryption key | |
| Change administrator password from <blank>. | See the password best practices described in step 1 above. | |
| Use SSPI connection instead of username/password. | To avoid having the username and password stored in clear text in the registry. | |
| Activate SSL. | Optimize security. |
This is security for your environment and is therefore unrelated to the security settings within the installation. For information about security in Omada Identity, go to Security settings
Omada Identity audit database
Omada Identity Audit Database is designed specifically for reporting purposes. This chapter explains how to configure the database.
Configure the audit database
-
Create an empty SQL Server database and name it, for example, OmadaEnt_Archive.
-
Enable SNAPSHOT_ISOLATION in the archive database:
ALTER DATABASE OmadaEnt_Archive SET ALLOW_SNAPSHOT_ISOLATION ON

ALTER DATABASE OmadaEnt_Archive SET READ_COMMITTED_SNAPSHOT ON -
Grant the db_owner role permissions to access the archive database for the Enterprise Server service account user (when you use integrated security) or for a SQL user.
-
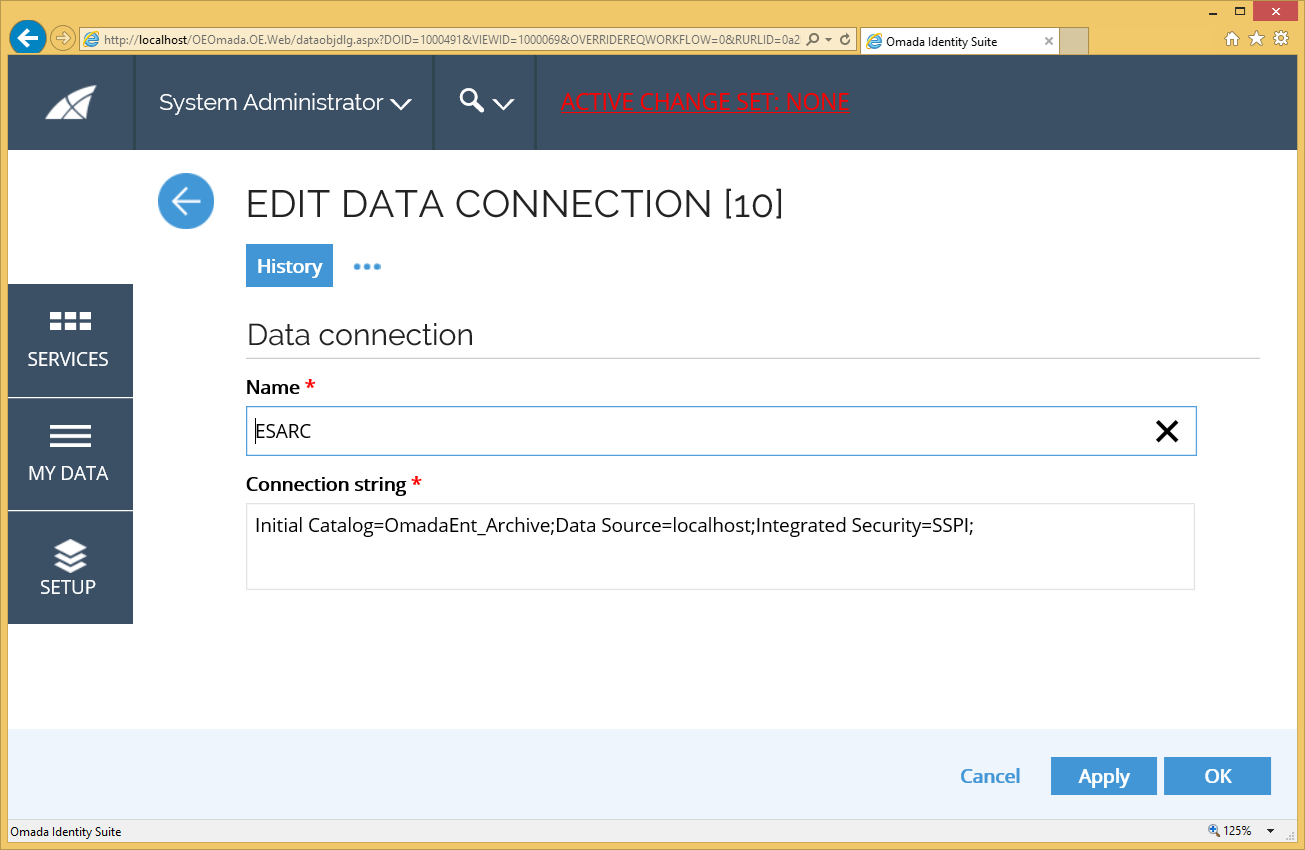
Go to Setup -> Connectivity -> Data Connections.
-
Open the connection ESARC and edit the ADO connection string accordingly.
Configure object types for auditing
- In the Data Object Type dialog box, configure the object types that should be replicated to the audit database by ticking the Enable archiving checkbox.
- When an object type is configured to be replicated to the audit database then a table named "tbl[system name of object type]", for example "tblIdentity", is created in the audit database.
Database schema
The database schema in the Omada Identity Auditing Database goes through maintenance automatically. If you make any changes to the Enterprise Server's object model, for example, when you add a property binding to a data object type, you must restart the Omada Identity Timer Service to refresh the target schema.
-
DataObjects
DataObject versions are stored in a table that is named according to the configuration, for example, tblIdentity for identity objects. Columns in these tables are named according to their System Name property.
There is a _DELETETIME column in each table. In this column, NULL indicates the current value.
-
Multivalued properties
Multivalue reference properties and multivalue set properties have their own reference table in the auditing database. For example, the Manager property on the tblIdentity is stored in a tblIdentity_MANAGER table.
-
Set and multilingual property values
Set property values and multilingual text property values get a column for each configured language. For the type Identity, there is an Identity Status property that is transported into the columns IDENTITYSTATUS_ENGLISH and IDENTITYSTATUS_DANISH, when the English and Danish languages are requested.
-
Data object types with built-in properties
When special built-in data object types, namely Users, Processes, and Activities, are included in the configuration, their properties are handled as indicated in the following table.
Data Object Type Properties Archived Users _USERNAME Processes _State, _Target, _AbsDuration and _Duration Activities _State, _Process, _FirstActiveTime, _ActiveTime, _AbsDuration, _AbsDuration2, _Duration2 -
UserGroup memberships
Enterprise Server internal UserGroup memberships are stored in the table tblUser_MemberOf, where the _DELETETIME column indicates whether the row has a current value.
Limitations
File attachments are not stored in the Omada Identity Audit Database.
Reference property attribute values are not covered by the archive feature. Most notoriously, resource assignment attribute values are not represented in the archive database.
Install IIS and create a database
Omada Identity Enterprise Server requires an empty database, so you must create one in SQL Server.
While creating the ES database, you must make sure that you have turned ON both read_committed_snapshot and allow_snapshot_isolation settings in the ES database before you use the Omada Identity software. This setting is required for proper operation of the ES.
-
Click Start -> All Programs -> Microsoft SQL Server -> SQL Server Management Studio.
-
Click Connect. The server type must be Database Engine, Server name is (local), and Authentication must be set to Windows Authentication.
-
Right-click Databases and then click New Database.
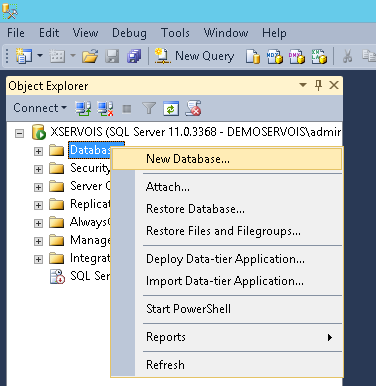
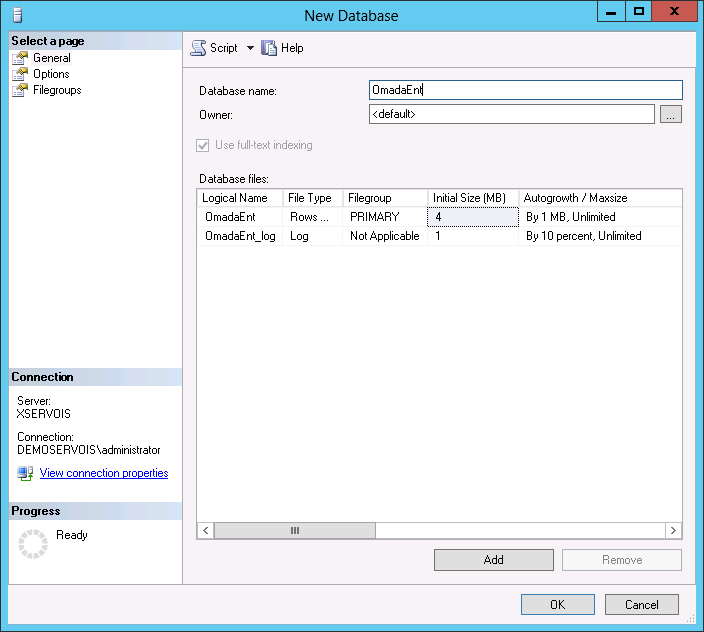
-
Enter OmadaEnt as the database name and, if necessary, change the default location of the database files. Click OK to create the database.
-
Make sure that the service account running Enterprise Server is assigned the db_owner role for the database.
If the user who is accessing the Enterprise Server database is not allowed to have the db_owner role because of company or SQL Server policy, do the following:
- Install the db_omada role on the SQL server using the script db_omada.sql.
- Grant the user who is accessing the Enterprise Server database the following roles: db_omada, db_datareader, and db_datawriter.
Install IIS on Windows Server
This section describes how to install IIS on Windows Server and how to configure IIS on installations with remote users.
For information about configuring application pools in IIS, see the Set-up the Web Application in IIS.
For security reasons, you may need to add the installation URL to your web browser local intranet zone.
Install IIS on Windows Server 2016 and later
- Click Start -> Administrative Tools -> Server Manager to start the Server Manager.
- Click Manage -> Add Roles & Features to open the Add Roles & Features Wizard.
- In the Installation type page, select either Role-based or Feature-based installation.
- Select the correct server in the Select destination server page.
- On the Server Roles page, select Application Server and Web Server (IIS). The pop-up window Add features required for Web Server (IIS) may appear when you select Web Server (IIS). In this case, click Add Features in the pop-up, and then click Next on the Select Server Roles page.
- On the Select features page, make sure that .NET Framework 4.8 (including ASP.NET 4.8) is installed. If it is not, you must install it. Click Next.
- Read the informational message for Application Server and click Next.
- Select Web Server (IIS) Support in the Select role services page. Click Next.
- Read the informational message for Web Server Role (IIS) and click Next.
- In the Select role page, review the Role services that you have selected to be installed. Click Next.
- In the Confirm installation selections page, select Restart the destination server automatically if required, and click Install.
- When the installation is complete, the Installation Results page opens. Check that the Web Server role services were installed successfully and click Close.
Install IIS on Windows Server 2008
- Start the Server Manager by clicking Start -> Administrative Tools -> Server Manager.
- In the tree view select Roles.
- In the Roles Summary pane click Add Roles to start the Add Roles wizard.
- On the Before You Begin page click Next.
- On the Select Server Roles page select Application Server and click Next.
- On the Application Server page click Next.
- On the Select Role Services page select Web Server (IIS) Support and then click Next.
- On the Web Server (IIS) page click Next.
- On the Select Role Services page, leave the default configuration as it is, and click Next.
- On the Confirm Installation Selections page read the informational messages and click Install to start the installation.
- The Installation Progress page now shows you the features that are being installed and the progress of the installation.
- When the installation is complete the Installation Results page opens. Check that the Web Server role services were installed successfully and click Close.
Configure IIS on Installations with Remote Users
Omada recommends that you enable content expiration on the IIS instance for installations with remote users because this improves performance.
-
Open the HTTP Response Headers in the main pane for the website in question and click the tab Set Common Headers....
-
Select Expire Web content and set the number of days that can elapse before expiry.
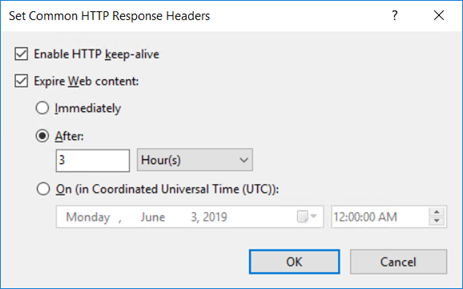
For slow networks Omada recommends setting the Web content expiration time to 7 days. In such cases, 7 days before planned upgrade, the cache need to be set to 3 hours and increased right after the finished upgrade.
Tips and troubleshooting
If you experience frequent restarts, set the following to True:
Aspnet.config = <legacyUnhandledExceptionPolicy enabled="false" />
If you have problems uninstalling an Omada service, use the following:
.netv2.0\\installUtil -i OmadaOeservice.exe
If the user who is accessing the Enterprise Server database is not allowed to have the db_owner role because of company or SQL Server policy, do the following:
- Install the db_omada role on the SQL server using the script db_omada.sql. Grant the user who is accessing the Enterprise Server database the following roles: db_omada, db_datareader, and db_datawriter.
Security software blocking network traffic between web browser and web server
Under some circumstances, if the Omada Identity was not deployed with the use of HTTPS protocol (as recommended), anti-virus software or other security components can block the HTTP network traffic. Consequently, such a block causes issues between the end user's web browser and the ES web server. For example, it may cause problems during the import of changesets, which simply stops without further progress.
This issue has been identified, for instance, when using F-Secure's browser plugin in combination with it's Advanced Network Protection feature. In such a situation, the issue can be resolved by adding the HTTP site to the exclude list of the F-Secure client or turning off the Advanced Network Protection completely.
However, Omada recommended solution is to deploy Omada Identity utilizing HTTPS.
Installing updates
The following tip simplifies your update installation procedure.
- Store a backup of the connection string under a key called ConnStr_ in the registry editor: HKEY_LOCAL_MACHINE -> SOFTWARE -> Omada -> Omada Enterprise.
If a backup connection string exists, it is recovered during the installation and the Omada Timer service also starts.
Remember to update your backup copy when changing the real connection string. Be careful when you manually change anything in the registry.
Later uninstalls of Enterprise Server does not clear the registry of Enterprise Server content. The program works with the Omada Windows Server Component certification.
Web farms
When you deploy to an installation where Enterprise Server is load-balanced between several web servers with, for example, WNLB, you must add a machineKey to the Web.config file.
The machineKey section should be added to the bottom of the system.web section:
    <system.web>

    ....

    <machineKey ....>

    </system.web>
The change to the Web.config file must be made after each Enterprise Server patch release because when you apply a new patch, manual edits are overwritten.
For more information about configuring machineKey, see Web Farm Deployment Considerations at How To: Configure MachineKey in ASP.NET 2.0.
Batch jobs
With batch jobs, consider the web.config setting <httpRuntime executionTimeout="90">
You should set the value to the time it takes for batch jobs to run. Otherwise, the jobs may not finish. The value of 300 is a good starting point.