Constraint data setup
The SoD functionality contains many different features and workflows. This section covers the following use case examples with instructions on how to use these features: resources and business processes, constraints, and compensating controls.
Resources and business processes
In your organization, you may want access to specific resources to be mutually exclusive, for example, you may want to make sure that someone with the ability to create purchase orders cannot also approve them.
In Omada Identity, you can configure constraints on any or all of your resources according to the needs of your organization. You can also combine resources to be a part of your organization's business processes.
The purpose of business processes is to combine resources with a function in the organization, meaning the type of role that the person with an identity in Omada Identity might have in your organization. Examples of such functions could be back office, or operations.
You can then add constraints between business processes so that an identity cannot perform any duties in more than one function.
If a constraint between two business processes exists, any resource of one business process combined with any resource of the other business process results in a violation. Create business processes to save your organization from adding constraints for each possible resource combination.
To set up business processes and add resources, you must log on as a data administrator.
Create a business process
- Go to Setup > Master Data > Organization > Business processes.
- Click New, then type the name of a Business process ID and a Name.
- Optionally, select a Parent business process and an Owner via the lookup icons.
- Click Apply to save your changes and continue editing or OK to save and exit the form.
Add a resource to a business process
- Go to Setup > Master Data > Resource Management > Resources.
- Select a single resource, then click Edit.
- Go to the Advanced section, then under Business processes, find and select any relevant processes via the lookup icon.
- Click Apply to save your changes and continue editing the resources or click OK to save your changes and exit the page.
Constraints
The term Constraint covers a feature that enables you to specify that a combination of resources or business processes is considered a violation of established policies. When a constraint is set up, managers must review each violation of constraints.
As a data administrator, you can find the Constraints view by clicking Setup > Master Data > Policies... > Constraints. In this view, you can see an overview of your constraints.
Constraints can also be displayed by the Constraint owner's user group. To see the details of the constraints you own, navigate to My data > Manage > My Constraints.
The Constraint owners user group members can only see the details of the owned constraints. You cannot edit constraints. The My Constraints view is administered by the System Administrators user group members only.
In a default installation, there are no constraints set up, so your organization must define and create constraints before this functionality can be used.
Creating a new constraint
To set up constraints, you must log on as a data administrator.
-
Go to Setup > Master data > Policies > Constraints. Click New to create a new constraint.
-
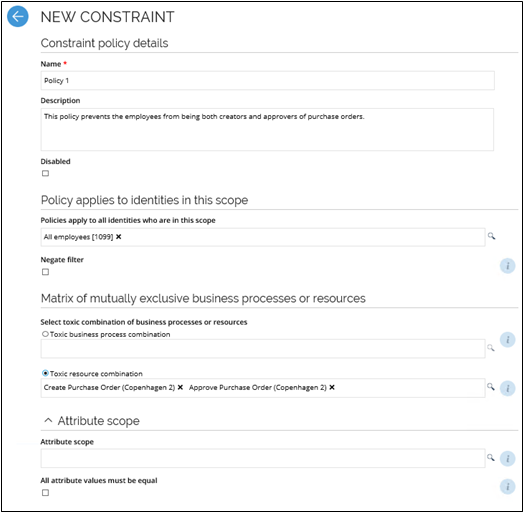
Type a name for the new constraint (and add a description, if relevant). Select if the constraint should be disabled, for example, if you do not want this constraint to be active right away.
-
In the Owner field, select an owner of the new individual constraint. The owner can be a user or a user group. The selected owner is automatically added to the Constraint Owners user group.
-
From the Risk level field select one of four values. The constraint risk classification category is used to classify constraint policies according to the risk violations of the constraint present to the organization. The classification tags are: Critical, High, Medium, Low. Tags are limited to constraints only.
-
Under the header Policies apply to all identities which are in this scope, specify the identities that the constraint should cover.
- The dropdown list shows all views that are filtered by the identity data object type. You can create a custom view or reuse an existing view with more filters to apply to the constraint, for example, you can apply constraints to identities in a particular organizational unit or with a particular job title.
-
When you select a scoping view and click it, a Definition of the data object view window will pop up. Click the three-dot icon and select Other policies using this view to see all the constraints and assignment policies that are configured with the same scoping view.
-
Optionally, select Negate filter to apply the policy to all identities that are not in the selected scope.
-
Under the header Matrix of mutually exclusive business processes or resources, add either one or more business processes and/or resources that constitute a toxic combination.
-
Optionally, under the Attribute scope header, you can add attributes to only enable the constraint for objects where the attribute values match.
-
When more than one attribute is in scope, select All attributes must be equal to specify that all attributes must be equal. If you do not select this setting, one matching attribute is enough for the constraint to be applied. When you are done, click OK to save your settings and finish creating the new constraint.
When you create a new constraint, this constraint may cause some already existing resource assignments to violate the constraint.
An existing resource assignment that causes a violation is not immediately deprovisioned. Instead, it awaits the result of the evaluation process. Until the evaluation process is complete, the resource assignment is in the state Pending deprovisioning.
This functionality allows you to add or update constraints without immediately starting a deprovisioning process.
Constraint settings
The table presents the available settings when you create a new constraint:
| Setting | Description |
|---|---|
| Name | Give the constraint a name. |
| Description | Describe the constraint. Optional. |
| Disabled | Specify if the constraint should be disabled, to begin with. If you choose this setting, the constraint will not take effect until you activate the constraint. |
| Policies apply to all identities who are in this scope | Choose the group of identities for which the constraint applies. |
| Negate filter | Applies the constraint to all identity groups that are not in the group selected under Policies apply to all identities who are in this scope. |
| Select a toxic business process or resource combination | Choose what processes and/or resource combinations you want to be mutually exclusive, so that these combinations are considered toxic. |
| Attribute scope | If you want the constraint to only apply to certain attributes, you can select these attributes here. This setting is optional. This allows you to create a constraint, for example, for Create Purchase Order and Approve Purchase Order, but a violation is only calculated if the Cost Center attribute matches the two resources. |
| All attributes must be equal | Enable this setting if you want every applied attribute to be equal for the constraint to apply. |
Usage of constraints
Two or more resources
A typical scenario is to create a constraint that specifies that you cannot have two specific duties, as having both would result in a security risk for the organization. Such a relationship of duties is known as a toxic combination, for example, it should not be possible for any identity to create Purchase Orders and approve them, too. Here, you have two conflicting duties (that is, resources) that constitute a toxic combination. A similar relationship can be also set up for more than two resources. If such a constraint is in force, any attempt at provisioning both resources to one identity will result in a violation.
Two or more business processes (direct)
You can set up a toxic combination of two business processes, which will prevent the provisioning of resources from both business processes to the same identity.
For example, the resource "Cash machine -- system administrator" is classified as belonging to the business process "Back office", and the resource "Operate cash machine" belongs to the business process "Front office". If there is a constraint on the business process level, you will not be able to provide both resources to one identity without creating a violation.
Two or more business processes (multi-level resources)
You can set up a toxic combination of two business processes, which will prevent the provisioning of parent roles and child resources from both business processes to the same identity.
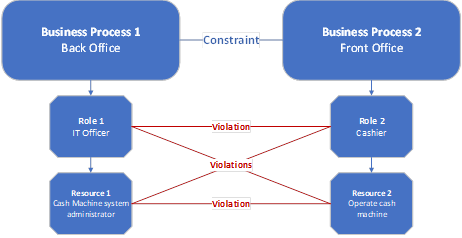
For example, the resource "Cash machine -- system administrator" is classified as belonging to the role "IT Officer", which in turn belongs to the business process "Back office", and the resource "Operate cash machine" is classified as belonging to the role "Operator", which in turn belongs to the business process "Front office". If there is a constraint on the business process level, all these combinations will result in a violation:
-
Combination of the parent roles
-
Combination of the child resources
-
Combination of one parent role and a child resource from the other role
In the Omada Identity data model, both roles and resources are of the same Data Object Type "Resource".
Child resources in business process constraint
If there is a constraint on at least two business processes that are assigned with parent resources, the violation will not be triggered while requesting the resource, unless all child resources will be considered.
A violation will be triggered only when you make an access request for:
- All parent resources,
- All child resources.
The violation will not be triggered when you request for:
- One child resource of one parent resource and all child resources from another parent resource.
- At least one parent resource and one child resource of another parent resource.
Two or more business processes (multi-level business process hierarchy)
If there are multiple business process levels, a constraint on two or more parent business processes will result in violations on the resource level, even if the resources are assigned to child business processes.
For example, if you have a business process "IT officer" that belongs to another business process, called "Back office", and a business process "Cashier" that belongs to another business process, called "Front Office", there will be violations if you try to provide an identity with resources from both "IT officer" and "Cashier" even if the constraint is only set up for "Back office" and "Front office".
Identity filter -- single business process
It is also possible to use the identity filter in the Policy that applies to identities in this scope part of the constraint creation form to select the identity types that cannot be assigned a given business process or resource. In this case, a single business process or a single resource can be selected, rather than a combination of two or more.
For example, if you choose that a constraint policy applies only to identities with the job title "Developer" and the business process "Production environment", you will create a violation if you try to assign an identity with the job title "Developer" with the business process "Production environment" or with any resources belonging to this business process.
Compensating controls
In cases where a manager chooses to allow a violation of a constraint that has been set up by the company, the manager or security officer must provide a suggested plan for compensating for the violation. In Omada Identity, this suggested plan is known as Compensating Controls.
Compensating controls are text fields in which you can describe your plan. For example, you can describe the manual actions that you should take to make sure that the violation is not permanent or that you still provide checks and balances for the constraint.
Because each organization may have separate rules on how to protect security rights in their systems, Omada Identity does not include any default compensating controls. You must set up any compensating control by yourself.
You can assign one or more relevant compensating controls to each constraint. The assignment can be done in the Compensating controls field in the Edit constraint form.
Assigning specific compensating controls to a constraint will affect what the manager sees in Evaluate identity violations tasks when allowing or resolving violations. If you perform the Allow action on a constraint level, the system will display only relevant (assigned) compensating controls, thus making the manager's task easier, removing the risk of selecting incorrect or irrelevant controls.
If no compensating controls are assigned to a constraint, any of the existing compensating controls will be available for selection when allowing or resolving violations of that constraint.
If the same resource belongs to a different, already defined constraints, which can be mitigated using different compensating controls, then while allowing this resource in the Resolve dialog, the user will be able to select any of the compensating controls that were assigned to constraints, which contain that specific resource.
We defined two constraints and the user violates only Toxic constraint 1:
Toxic constraint 1 with resources
ApprovePurchaseOrder_CN_Beijing_North and ApprovePurchaseOrder_CN_Beijing_South and compensating controls Comp1 and Comp2.
Toxic constraint 2 with resources ApprovePurchaseOrder_CN_Beijing_North and CreatePurchaseOrder_CN_Beijing_North and compensating control Comp3.
In the Evaluate violation task, the user will be able to select between Comp1 and Comp2 when allowing on constraint level. However, in the Resolve dialog, it will be possible to select between Comp1, Comp2
and Comp3, if the user wants to allow ApprovePurchaseOrder_CN_Beijing_North (because this resource belongs also to Toxic constraint 2). Only Comp1 and Comp2 will be available if the user wants to allow ApprovePurchaseOrder_CN_Beijing_South in the Resolve dialog, as this resource belongs to only one constraint.
If the same resource belongs to two constraints and one of them does not have any compensating control assigned, then if the user wants to allow that resource in the Resolve dialog in the Evaluate identity violations task, it will be possible to select between all compensating controls in the system.
In the situation where the SoD evaluation process was completed for an identity and the violations were mitigated using a specific compensating control, which was later unassigned from the constraint, the user will have to select a new relevant compensating control when it is time to reevaluate the violations (assuming that the user still wishes to allow those violations).
Deleting compensating control data objects can result in errors when RoPE calculates identities that violate constraints for which the compensating controls were used during the SoD evaluation process.
Create a compensating control
To create compensating controls, you must log on as a data administrator.
- Find the Compensating controls view by clicking Setup > Master Data > Policies... > Compensating Controls.
- Click New, then add a name and description.
- Optionally, click the box icon next to the Description field and add text values for other languages.
- Click Apply to apply your changes and continue working in the form or click OK to save all changes and close the form.
Compensating controls settings
The following table presents the available compensating controls settings:
| Setting | Description |
|---|---|
| Name | Type a name for the compensating control. |
| Description | Type a description for the compensating control, for example, to specify why this compensating control should be valid in your organization. |