Exemplary configuration
This section describes an example of how to use code methods. It is based on a process created to let employees update their data in Omada Identity, including name and email address.
Step 1 - Preparing the process template
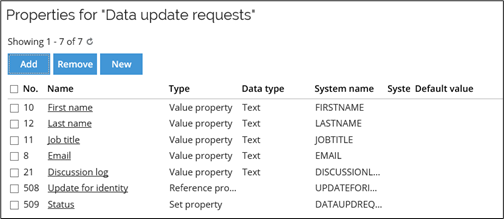
In this example, you create a data object type called Data Update requests. Here, you must enable the setting Require process to create and modify objects. The following image shows the properties that are added to this data object type:
When this data object type is complete, you can create a process template based on this data object type. The following image shows a process template that is used for creating new data objects based on the Data Update request data object type.
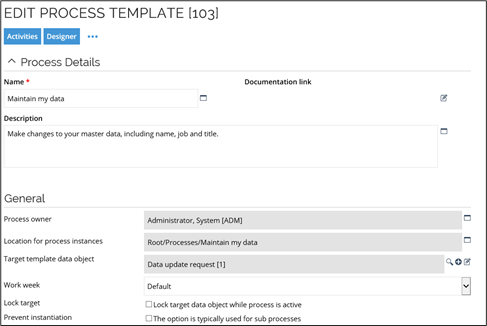
The process has two activities defined:
- Maintain my data, and
- Approve changes.
When you have set up the data object type and the process template is working, you can set up the code method. You define the code method on the transition. This means that when the control moves from the first activity to the second activity, the code method is activated to carry out the action you have configured it to do.
Code methods in a process
After you have configured the code method, process, and data object, you should run the process to test the code method.
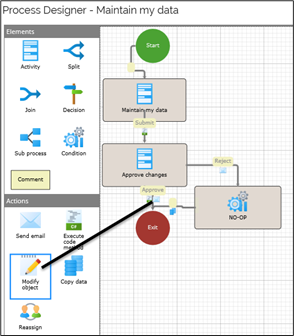
This section describes how to use code methods in a process, including how to assign and configure them for a transition. In this example, the default Maintain my data process, available in the Omada Identity Packaged Solution, is the basis for the following description.
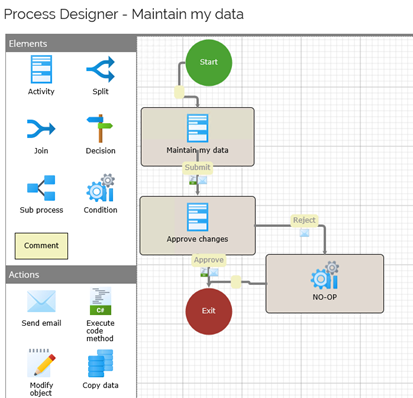
The Process Designer shows the basic layout or workflow with all the activities from start to finish. In this particular case, you need more activities, in particular, a mechanism to move from start to finish in a process.
This is where you need transitions and event definitions. They are the components that ensures a step-by-step move through a process. Where you place an event definition and the actions they trigger, such as code methods, are vital for fulfilling the business logic requirement.
Adding a code method to a process
To add a code method to a process, you must create an event definition that can run an action such as a code method. The event definition is located in a transition of a process.
Define an event definition for a transition
-
Open the Process Designer by clicking Setup > Administration > Process templates.
-
Locate the process Maintain my data, click it to open it, then click Designer to see the process as shown in the image above.
-
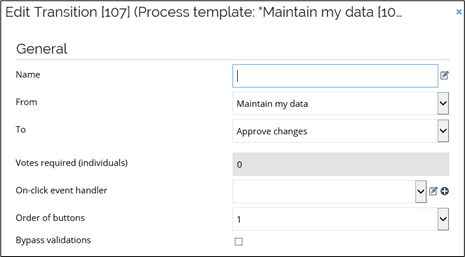
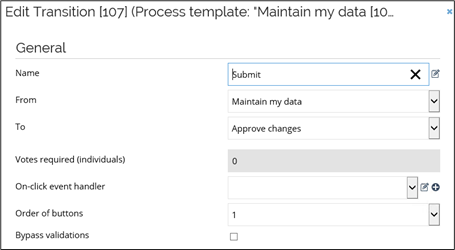
Double-click the first transition to open the dialog box from which you can configure the transition.
-
Type a name for this transition. In this case, write Submit - use short names to keep your process design easy to read.
-
Click New to open the dialog box for the event definition. The event definition dialog box is where you describe the events and actions that should take place on this particular transition.
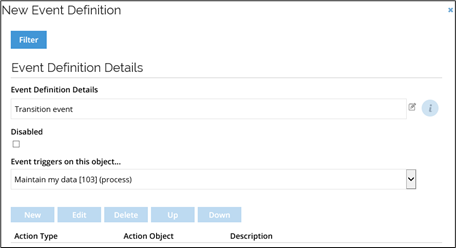
-
Type a name for event definition in the Event definition details field. You do not have to name the event definition, but it may help identify this particular event and contribute to general documentation best practices.
-
In the Event triggers on this object... list, choose the object that should trigger the event, but you must be sure that you select a proper object.
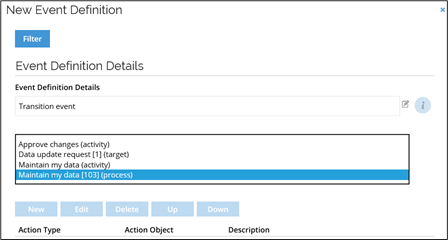
-
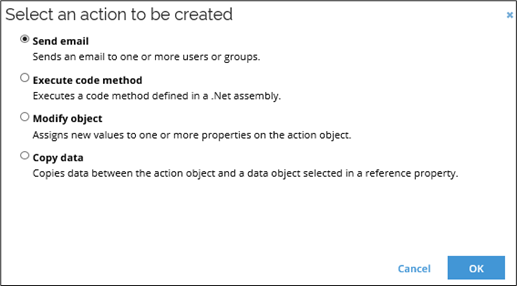
Click Apply after you select your object. The area listing actions is then activated in the bottom of the dialog box, then click New to open the Select an action to be created window to see a list of actions that you can add. The available actions are:
- Send email
- Execute code method
- Modify object
- Copy data
- Reassign activity
-
Choose the action that you want to take place when the event is triggered. Depending on what type of action you choose, you are sent to another window from which you can specify the details for the action.
When you select the object that triggers an event, you must know which object type the code method is written for and know what you expect to happen with this action. Consider the logic of your process. Otherwise, your process does not give you the expected results, for example, if the code method concerns the reassignment of an activity, the action object is typically the activity to be reassigned.
For more information, see the Omada Identity ES API documentation help file. Click here to go to the code method documentation file.
Add a code method to an event definition
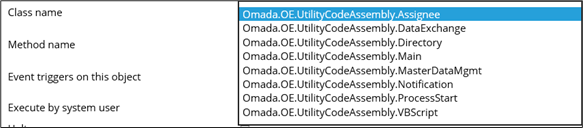
A code method resides in a class, which, in turn, is located in an assembly. When you prepare your code method for the event definition, you first choose the assembly, then the class name, and finally the method name. You must choose them in this order because each set of parameters depends on the choice made in the previous selection.
-
Choose Execute code method and click OK.
-
In the Code Method for Event dialog box, choose the Assembly to use along with several parameters.
- The list menu shows only the assemblies that are in Omada Identity. If the assembly that you want to use is not listed, you must add the assembly to Omada Identity before you can continue.
-
In the Class name list, choose a class name to associate with the assembly.
-
In the Method name list, choose a code method from the class.

-
In the Event triggers on this object list, choose the object on which the event triggers.

Once you have made selections for Assembly, Class name, Method name and Event triggers on this object settings, enable or disable the setting Execute by System user to configure if the system user should use this code method.
If you enable this setting, the logs show that the system user performed this action instead of the logged-in user. If you do not enable this setting, the identity logged into Omada Identity performs this action. Note that the security setup plays a vital role here. The process can fail if the identity chosen to perform an action does not have the authorization to do so.
-
Enable the Halt on error setting to make a code method validate data, or if it does not make sense to continue if an error occurs.
Omada recommends that you always enable the Halt on error setting. However, if a timer triggers the code method, you should not enable the Halt on error setting. This is to ensure that all results are logged.
After you have selected the code method to use with this action, the lower half of this dialog box displays the properties that belong to the chosen object. In this example, there is only one property listed. Clicking the question mark icon, shows a popup message with a description of the parameter as defined in the class where the code method is implemented.

The system presents the parameters for the code method that you have selected. You must map those parameters to the object so that the process is going to work. You can map the parameters either to values or to properties. The mapped value or properties is passed as a parameter to the relevant code method. Mapping means that you have to identify the system name of the property in question or a property on the data object type used in the process that is affected by this action.
-
If you want the selected code method for the event to be executed as an internal operation, regardless of the source of the change, check the Always run as internal operation.
This means that any changes triggering the event, and thus causing the code method to execute, will be treated as an Internal operation when the Authoritative source policies are evaluated, for example, if the change is triggered by an ODW import (which is usually an External operation) the change will be still treated as an Internal operation.
Horizons feature enabledWith the Horizons feature enabled, the Authoritative Source Policies are not used to determine which source system is authoritative for the property on the Identity, Context, or Resource objects in ODW. For more information, go to Authoritative Source Policies.
-
When you are finished with configuring your code method action, click OK.
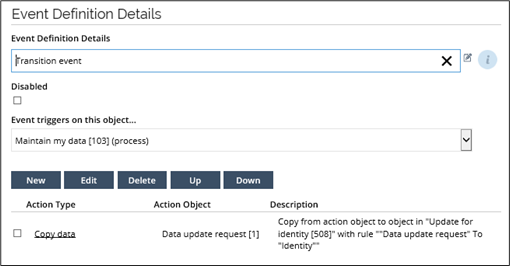
In the Event Definition page, the action you configured is now listed. The type, the code method, is listed in addition to the action object for this action, the description, or the full path to the code method in use.
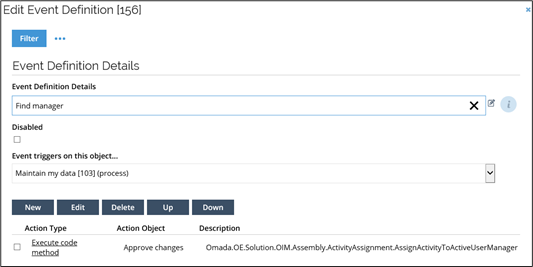
If required, you can add more actions for this event definition, such as an email notification. Make sure that your list of actions to run is in the correct logical order. If you add or delete actions, you can rearrange or sort the actions to run by clicking the Up or Down links, so the event definition actions behave as planned.
-
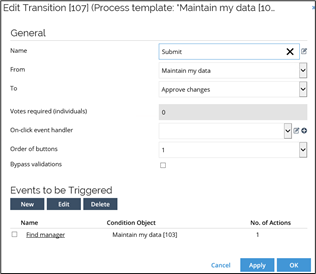
When you are done, click OK to save the dialog box and return to the transition view from which you started. On the transition view, the event definition is listed, as well as the object that it is triggered on, the Condition object. The number of actions that you defined for the event definition is also listed.
When you click OK, you have defined the event definition and the actions that apply to this transition.
Creating a copy action
The process that you are creating must transfer collected information from one object to another. To do this, you must create a copy rule that defines the data to copy from one data object to another. The copy action ensure that it copies the data between the properties available on the action object and the same properties that are available on the data object copied to.
Copy rules are activated through a copy data action. In contrast, copy actions are actions triggered by an event definition.
You can copy data between the action object and a referenced object. To do this, you use a copy action with an associated copy rule. This creates a simple point-and-click configuration compared to the equivalent code methods actions. Note that in some situations, it is a better solution to use a code method to copy data to and from a master data object.
Create a copy rule
Follow these steps to create a copy rule:
-
Go to Setup > Administration > Copy Rules, then click Copy Rules. On this page, the copy rules available are listed.

-
Click New to open the Copy Rule page.
-
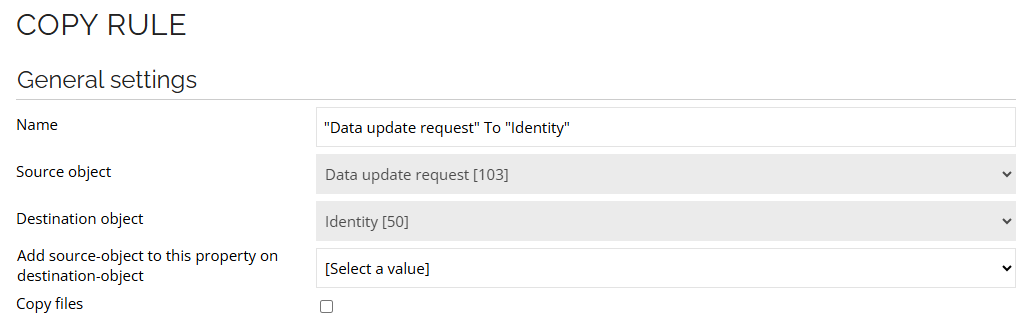
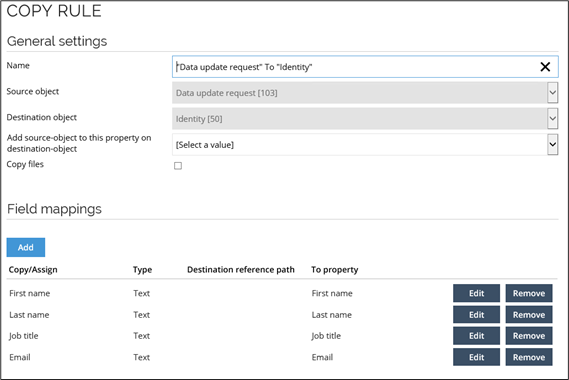
In the Name field, do not type your own name for the rule. The reason for this is that the objects that you select in the Source object and the Destination object fields populate the Name field. Use the Source object and the Destination object fields to select the object from which to copy and the object to which to copy data.
-
When you have chosen Source object and Destination object, click Apply. In the Field mappings section, you can add, edit, and remove mappings between the fields on the source object and the destination object selected.
-
Click Add to add a mapping for each property on the source object that you want to copy.
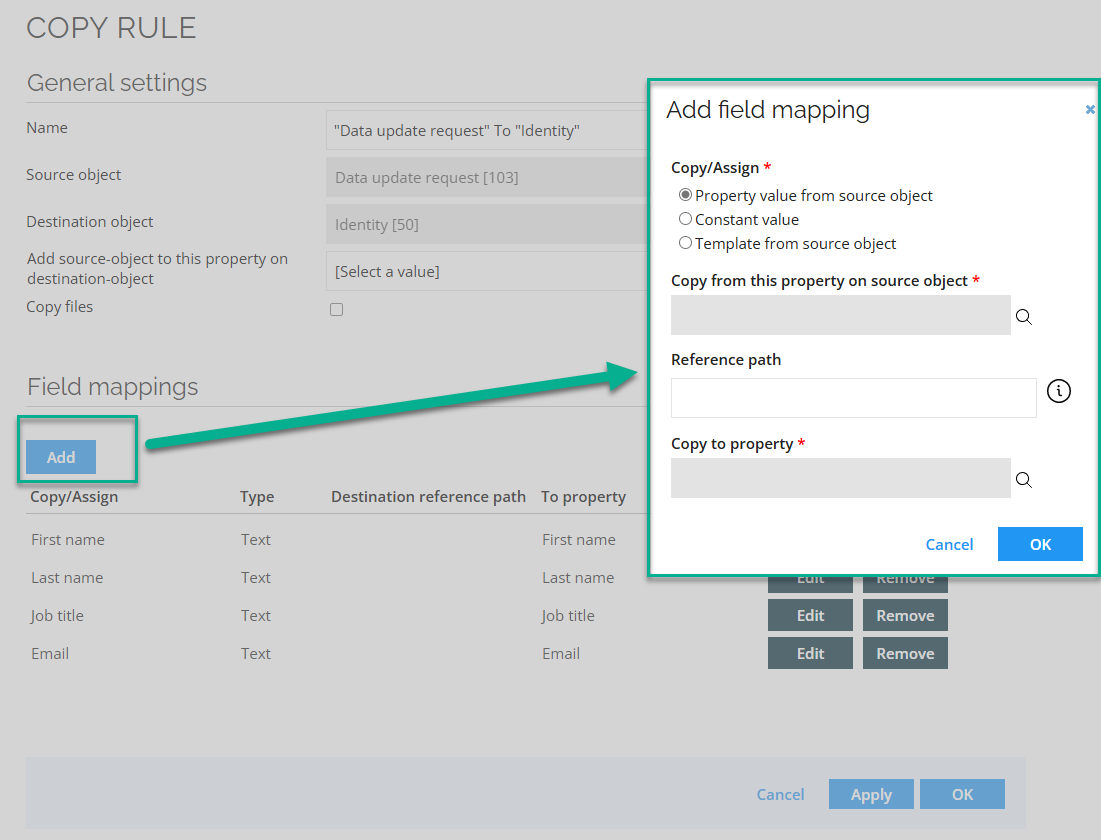
Select the equivalent property on the Destination object that receives this data. The image above shows how the Email property on the Source object is being mapped to the Email property on the Destination object.
You can also copy a constant value to the Destination object. To do so, select Constant value in the Copy/Assign field and select a constant type. The value type of the constant value must match the value of the selected property on the Destination object.
Template from source object can be used to build text values based on fixed text parts and property values. To retrieve property values, put the system name of the property in square brackets, for example: "This is fixed text, this is the first name: [FIRSTNAME], and this is the last name: [LASTNAME]".
The results are shown in the following image. Click Apply to save your work.
-
When you have finished saving, the setup of the copy rule is complete. Click OK to save your copy rule.
Adding a copy action to an event definition
The purpose of this process is to allow end-users to update their data. When you collect data, you can transfer that data from the object that collects data to an object that our system recognizes. This is the Data update request object.
This process now requires a copy action from which this ‘data transfer’ takes places. This action must be run by an event definition that is triggered on a transition in the process.
The logical moment to do this is after the manager has approved this contractor. After the approval has taken place, the administrative work can begin. That means that you must copy the data from the dialog box in which you specified the details for the end-user to an identity object.
The copy rule is already in place. To make it work, you must add it to the copy action that gets activated on the transition after the manager’s approval. Before you can do this, you must prepare an event definition on the transition, similar to how you already set up another event definition previously in this section.
To add a copy action to an event definition, follow these steps:
-
In the new event definition, select Copy data as the action that the event definition runs. The Copy Action dialog box opens.

-
In the Copy list, select the direction of the copy action, in this example From action object to selected object in property.
-
In the Action object list, select Data update request as the action object from which the copy action should copy.
-
In the Copy data to object selected in list, select Update for identity as the object to which the data should be copied.
-
In the Copy rule to be used list, select Data update request to Identity and click OK.

Results
Your process is complete, but the results of the collected information can be difficult to display. Create a new view that makes the information easily accessible.
View the results
-
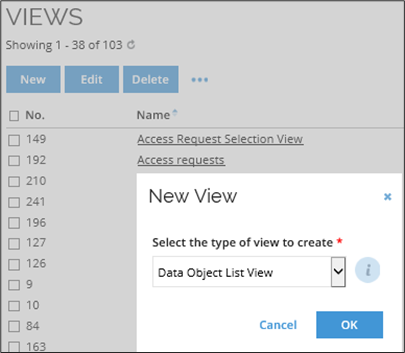
Go to Setup > Administration > User Interface... > Views. In the Views list, click New, then create a Data Object List View.
-
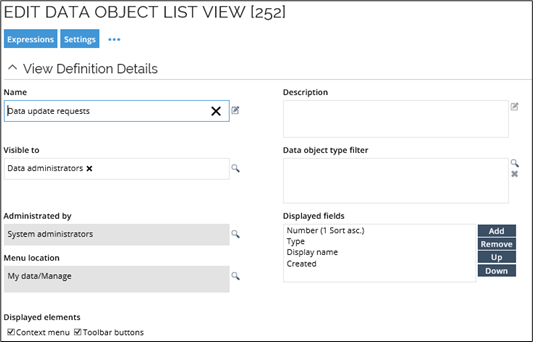
Specify the settings for the new view in Data Object List View dialog box with details that customize the view to your requirements.
-
In the Name field, type a name for your view, and then choose who manages the view in the Administrated by field. You can choose any user or user group that has the appropriate security rights, but it should make sense in relation to the process.
-
In the Visible to field, select a user or a user group that should be able to see this view in the UI. Similar to what you specified in the Administrated by field, choose the relevant user or user group carefully.
-
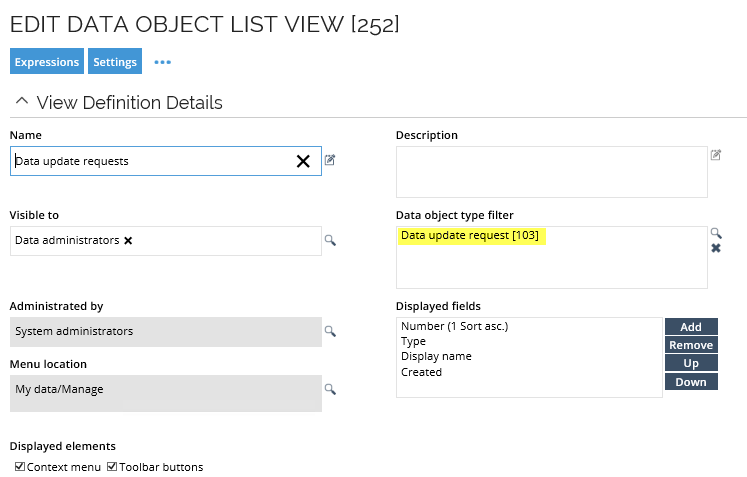
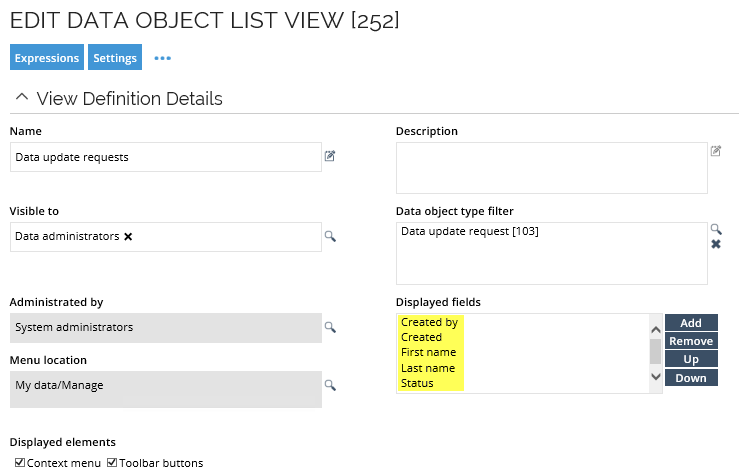
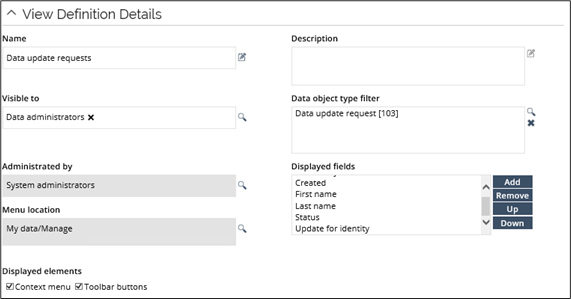
In the Data object type filter, select Data update request. Do this to filter the view. This filter allows you to set up the view to only show data that comes from the selected data object, Data update request.
-
In the Displayed Fields list, select the fields from the chosen data object type that you want to display in your view. After you add them to the list, you can rearrange them and select a field to use for sorting the view. For this particular view, you should select Created by, Created, First name, Last name, Status, and Update for identity.
-
The data object list view is now ready to save and use. The data update request view should look like this.
-
To see how the view looks, go the Data update requests view.

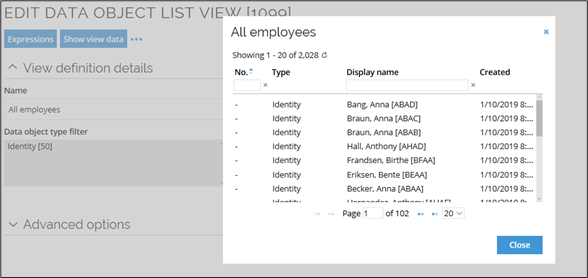
Clicking the Show view data UI Action in the Edit Data Object List View opens a read-only pop-up dialog showing all the data in the view. This can be used, for instance, to inspect all the identities in a Policy Scope view.
Working with event definitions
Code methods are triggered by an action that is part of an event definition.
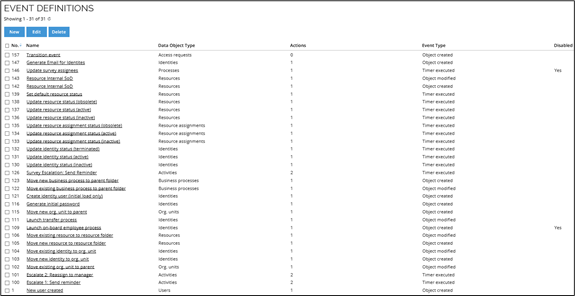
You can see a list of existing event definitions in Setup > Administration > Data Management... > Event Definitions. This is also the page where you can create event definitions.
In the Process designer, you can also add actions to a transition through the drag-and-drop method. This adds an event definition automatically to your process so that you do not have to prepare it before creating your action.
The actual content of an event definition dialog box varies according to the type of event definition. You can use an event definition to decide when an event is triggered, the data object types that are affected, and whether any filter expressions are in use.
This event defined in the example below triggers on a data object:
An event definition can also define the actions that are to run when the event is triggered. The event that is defined below triggers when an existing object is updated. It is possible to select multiple triggers.

To add code methods to event definitions, click New under Actions to be executed. An event definition can run several different actions. The examples shown in this chapter all require that you have selected the Execute code method action. When you select the Execute code method dialog box, you can choose the assembly, the class, and the method that the event definition should run.
Other actions that trigger code methods are when an object is created, when an activity is reassigned, when a timer triggers and, in the example in this chapter, and a transition event.
Any filters that you use can be complex. Some examples of filters can be:
- The data object types taken into consideration
- Values or intervals of values for value properties
- Inclusion for set or reference properties
- Boolean operators between these expressions