Omada Provisioning Service
Omada Provisioning Service runs a Windows Service.
Run service under a service account. If you are using a service account, have the credentials of the user at hand before starting the installation.
Database
The Omada Provisioning Service installer creates the necessary database as part of the installation. If this is not needed, you can create the database yourself. Do not add any database tables. The Omada Provisioning Service installer creates all the necessary tables and more.
The installation process of the OPS database automatically configures the database to enable the snapshot setting. This setting is required for proper operation of the OPS.
If you decide to create the OPS database manually, you must make sure that you have turned ON both read_committed_snapshot and allow_snapshot_isolation settings in the OPS database before you use the Omada Identity software.
Namespace reservation
The Omada Provisioning Service installer creates a namespace reservation for http://+:8000/ProvisioningService/Service/ for the selected service account selected during installation.
If the account is changed later on, you should manually update the namespace reservation.
The following command shows the current namespace reservation:
netsh http show urlacl http://+:8000/ProvisioningService/Service/
The following command deletes an existing namespace reservation:
netsh http delete urlacl http://+:8000/ProvisioningService/Service/
The following command adds a new namespace reservation:
netsh http add urlacl http://+:8000/ProvisioningService/Service/ user="domain\user"
If the service is running as Local System Account, the user is of the type BUILTIN\.
User rights for installing the Omada Provisioning Service
The user that installs OPS must have the following rights and database roles.
Local group settings
In the Local Group settings, the user must be a member of a group that is allowed to install software on the system, usually Local Administrators.
SQL server roles
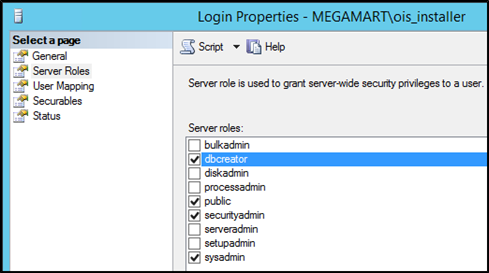
To be able to create the database during the installation, the user must have the server role dbcreator.
If an empty database has been created before to the installation process is started, the user installing the Omada Provisioning Service must have the server role dbowner in the database.
To install OPS on an SQL Server instance, the installing user must have sysadmin and securityadmin permissions for the service account.
Configuring SSL
During the installation of OPS, the Windows Communication Foundation (WCF) Services are configured by default to run over HTTP, however, it is recommended that you use the more secure SSL protocol.
To configure SSL, firstly, the service configuration file must be changed so that it can instruct the service to use the SSL protocol, then you must update the OPS instance in ES.
Lastly, you must verify that the certificate is correctly linked to the port.
Change the service configuration file
-
Using a text editor, open the Omada.OPS.Service.exe.config file located in the C:\Program Files\Omada Identity Suite\Provisioning Service folder.
-
Comment out or remove the following element:
<service name="Omada.OPS.Service.WCF.Impl.AllWcfServices" behaviorConfiguration="ProvisioningServiceServiceBehaviorSecure"> -
Right after the element listed in step 2, you can find the following section commented out. Ensure you uncomment it as follows:
<service name="Omada.OPS.Service.WCF.Impl.AllWcfServices" behaviorConfiguration="ProvisioningServiceServiceBehaviorSecureHttps">
The default port number is 8001.
The next sub procedure to configure SSL is to update the OPS instance in Enterprise Server.
Update the OPS instance in ES
-
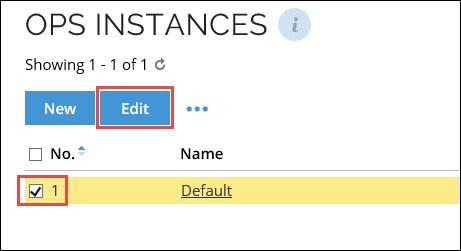
In the Omada Identity Portal, go to Setup -> Administration -> Connectivity -> OPS Instances.
-
In the OPS Instances view, click the checkbox next to the default instance to select it and click Edit.
-
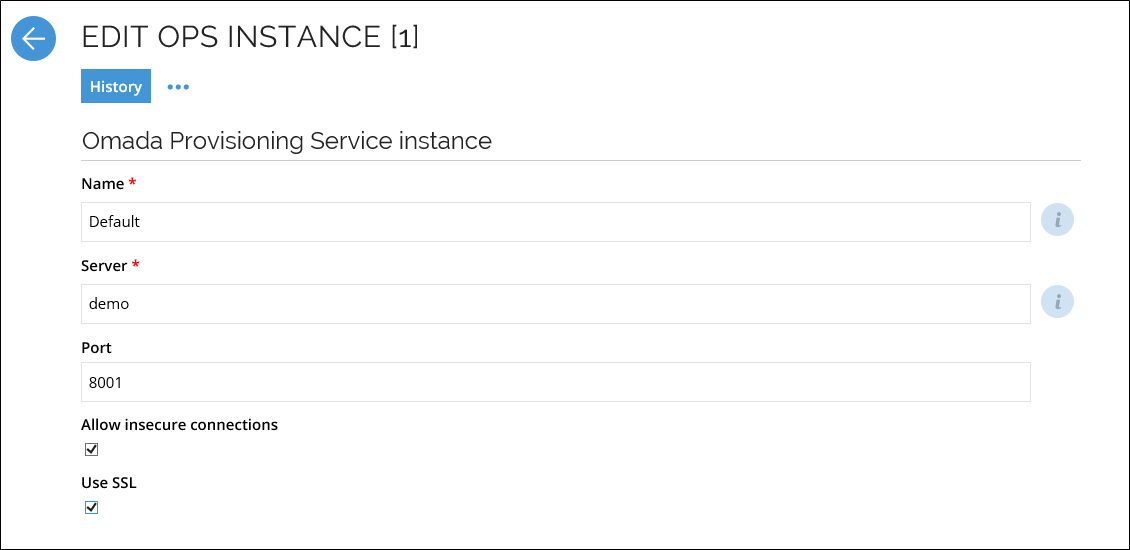
In the Edit OPS Instance view, check the Use SSL checkbox.
-
In the Port field, change the value to 8001.
noteEnsure that in the Server field you specify the server hosting the service.
When you use the SSL protocol, IP addresses cannot be specified.
In the next sub procedure, you must verify the connection by verifying that the certificate is correctly linked to the port.
Verify the connection
If you are upgrading the OPS from v12.1 to v12.2, v12.3 or v14, you must add the reservation manually as shown in step 1 of this procedure.
If you do a clean install of Omada Identity, you do not have to perform this step.
-
The installer makes a URL reservation for HTTPS on port 8001. To add the reservation manually, on the OPS server, open a command prompt and enter the following command, ensuring that you change the value of the highlighted user parameter to the name of the service running the OPS service.
netsh http add urlacl url=https://+:8001/ProvisioningService/Service/ user=xxxxx\srvc_omada -
You must now import your SSL certificate to the server where OPS is installed.
Before you import your SSL certificate, you must ensure that the certificate either has a private key or is located in the following path in the Windows certificate store:
(Local Computer)\Personal\Certificates
If you don't do this, you may see the following error:
SSL Certificate add failed, Error: 1312 A specified logon session does not exist. It may already have been terminated.
In the command prompt, you can import your certificate by running the following PowerShell command, ensuring you change the highlighted part with the location of where you saved your SSL certificate.
Import-Certificate -filepath [c:\mycert.cert] -certStorelocation cert:\currentuser\my
-
To get the thumbprint of your certificate, run the following PowerShell command:
Get-ChildItem -path cert:\currentuser\MynoteEnsure you copy or write down the thumbprint, as you will need it for the next step in the procedure.
-
Bind the SSL certificate to the OPS service using the following command, ensuring that you replace the certhash value with the thumbprint value obtained in step 3:
netsh http add sslcert ipport=0.0.0.0:8001
certhash=d32d8ff70fb4c27977fada0ce2d41facddd9c0d9
appid={86521b84-b247-4a15-b698-9d0bcc61e520} -
After you have performed all the steps in this procedure, you must restart the OPS service.
Install the Omada Provisioning Service
-
Double-click the file Omada Provisioning Service.exe to launch the installation wizard. The first screen is a welcome screen. Click Next to continue the installation.
-
Select the destination folder. By default, this is located on C:\Program Files\Omada Identity Suite\Provisioning Service. To change the destination folder, click Change..., and browse to the desired location. Click Next.
-
Enter the name of the database server that you are installing the database on and select an authentication method. Omada recommended that you connect using Windows authentication using credential of current user.
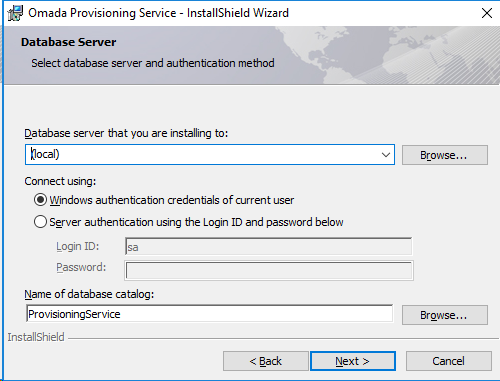
-
Specify the name of the database. You can either use a manually created, empty database or a new database. You can use the default name as shown. Click Next.
-
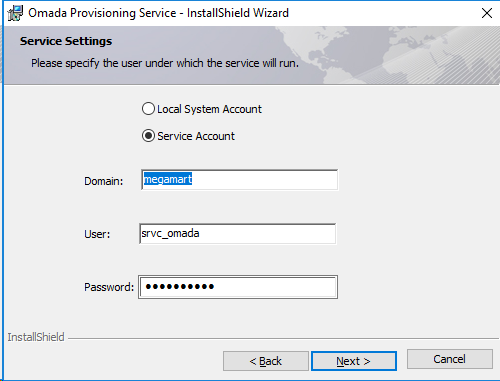
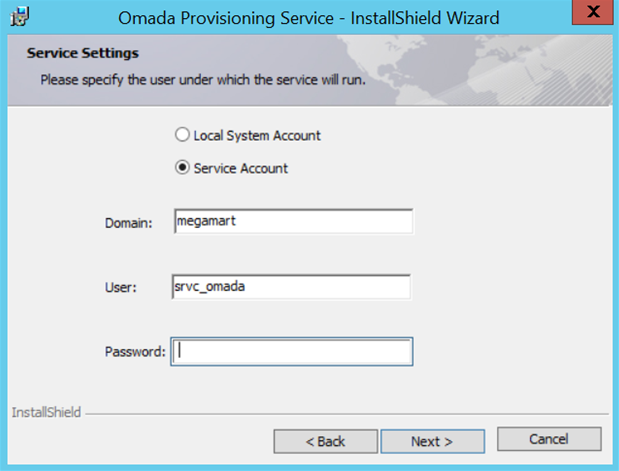
Specify if you wish to run the service in the context of Local System Account or a Service Account. Omada recommends that you run the service in the context of a dedicated Service Account. If you choose Service account, enter the credentials. The credentials are only stored as part of the Windows service registration.
-
In Custom Setup, you can select which features you want to install.
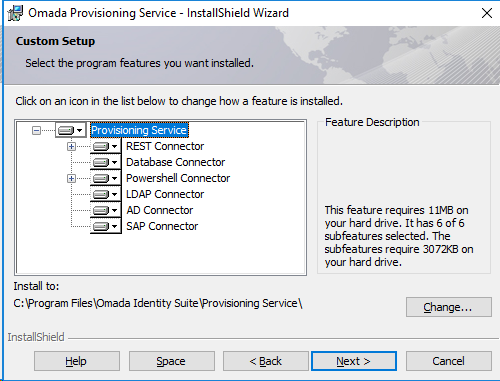
The Provisioning Engine installs the service, database and the connectors for the AD, SAP, PowerShell, Database, and LDAP (if selected).
-
Click Next, then click Install. The program features that you selected have now been installed. Click Finish to close the installation wizard.
-
Start the Omada Provisioning Service in Administrative tools -> Services on the server. The Omada Provisioning Service is not started as part of the installation.
Troubleshooting
Installer displays warning for service account
When a warning for a service account is shown, click Yes and continue with the installation.
Alternatively, close the installer and before you restart it, ensure you right-click on the installer file and click Run as administrator.
Installer does not detect old version of OPS/ODW and will not upgrade
See the Installer does not detect old version of OPS/ODW andwill not upgrade section.
Unable to start the Omada Provisioning Service
If the Omada Provisioning Service does not start, open the Event Viewer, and look for entries where the source is OPS. Review any errors.
Missing namespace reservation
If you get the error below while following the steps in the previous section, the namespace reservation is wrong or missing. In that case, see the Namespace reservation section for information on how to create the correct reservation.
HTTP could not register URL http://+:8000/ProvisioningService/service/
The reservation must be made against the user-account that is running the service.
Unable to login to database
If the service account does not have sufficient rights to open the Provisioning Service database, the following error appears:
Cannot open database \"ProvisioningService\" requested by the login.
The login failed.

Login failed for user \'megamart\srvc_omada\'
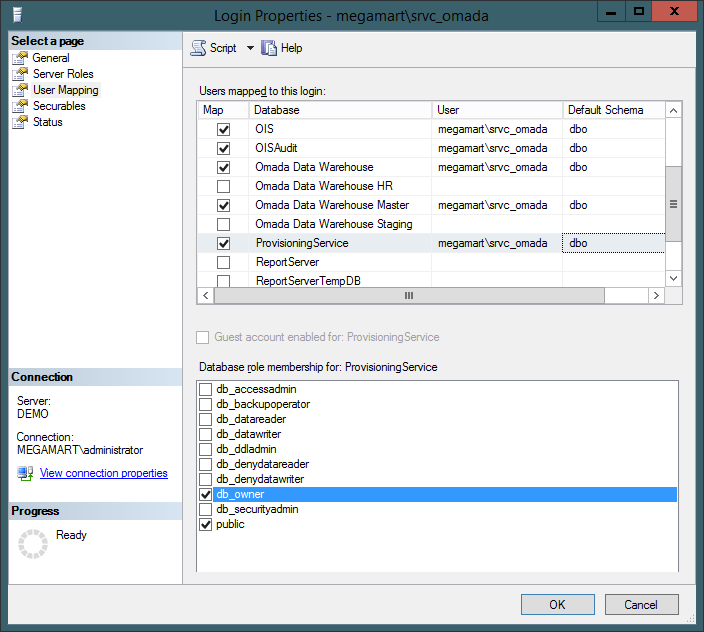
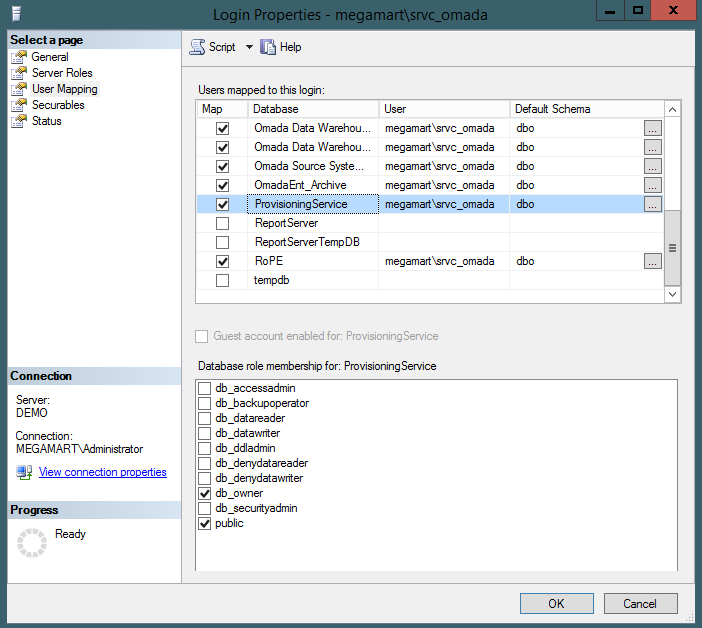
Use Microsoft SQL Server Management Studio to give the login for the service account db_owner rights to the provisioning service database.
Omada DEMO/DEV System: Performance issue
If the performance of Omada Identity on VMWare virtualization is very poor, read the instructions in the below link to check for a solution: https://communities.vmware.com/thread/524842?start=0&tstart=0
You can also try to disable Receive Segment Coalescing.
Error installing OPS as a service user
When you run the OPS installer as a service user, the following error may appear:
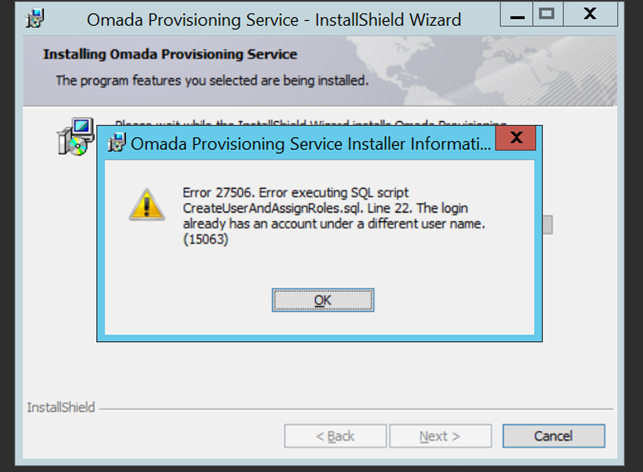
To solve the issue that causes this error message:
-
Create the ProvisioningService database. Skip this step if the database already exists.
-
Change the owner of the database to someone else than service user:
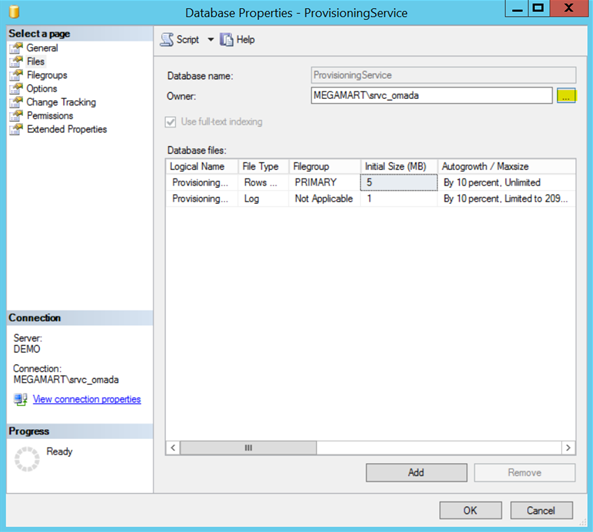
-
Make sure that service user has db_owner rights for the ProvisioningService database:
-
Run the installer again as a service user. The service user is the user name that you enter in the User: field in the installation process:
Omada Identity Timer Service not starting automatically
If a new environment is being set up using Omada Identity v14, and one or more Omada Identity windows services are running on the same box as the SQL Server, it is possible to improve the startup progress by having the Omada Identity Windows services depend on the SQL Server Windows service using the following commands for the Timer Service, OPS and RoPE, accordingly.
sc config OETSVC depend=MSSQLSERVER

sc config "Omada ProvisioningService" depend=MSSQLSERVER

sc config RoPE_0 depend=MSSQLSERVER
Note that the sc command will only work in Windows CMD.
Running these commands will overwrite the previous dependencies of the three services. Before you run these commands, it is recommended that you open the Services application, go to the properties of a given service, and take note of the current dependencies. If you want to keep the current dependencies, add them to the commands listed above, preceded by a slash.
For example, if the Timer Services had the dependency on the Windows Management Instrumentation (WMI) Performance Adapter service, use the following command:
sc config OETSVC depend=MSSQLSERVER/wmiApSrv