Provisioning
This section describes the settings allowing you to configure provisioning. Provisioning can be enabled for systems containing Access Rights, Identity data or both.
Enable provisioning
-
Click the Enable provisioning task to open its settings dialog.
-
In the Method for accounts dropdown list, select the provisioning method to use for provisioning accounts. If you select None, you disable provisioning of account assignments.
infoStep relevant for systems containing Access right or both Access rights and Identity data.
-
In the Method for assignments dropdown list, select the provisioning method to use for provisioning assignments. If you select None, you disable provisioning of permission assignments.
infoStep relevant for systems containing Access right or both Access rights and Identity data.
-
If you select Omada Provisioning Service, you must choose a Provisioning connector from the dropdown list.
-
If you select AWS (Template), CyberArk (Template), Generic database connector (Template), LDAP connector (Template), Microsoft Azure Active Directory (Template), PowerShell connector (Template), REST connector (Template), Salesforce (Template), SAP GRC Relay Connector (Template), SCIM V2.0 (Template), ServiceNow (Template), ServiceNow ITSM Relay Connector (Template), SOAP Connector (Template), Workday Connector (Template), or Custom connector, you must type a name for the relevant connector.
infoIf you have chosen one of the Template connectors and given it a new name, you will be configuring and saving a copy of the template connector. This means that your version is stored in Omada Identity, so that when Omada rolls out changes to the template connectors, your configurations remain intact in your own version.
-
If you select the Custom connector, you must also type the Connector ID for the relevant custom connector. See more information in the Custom Development Guide.
-
Select or clear the Use default configuration checkbox. If you enable this setting, any task mappings that you have made are overwritten once you start enabling provisioning. The setting is enabled by default.
Be aware that RoPE will start submitting the provisioning jobs to OPS as soon as provisioning is enabled. This will happen regardless of whether the settings have been already committed to OPS or not. Similarly, when you modify the settings, the provisioning jobs are still being submitted to OPS even if the new settings have not been committed to OPS yet.
| Setting | Description |
|---|---|
| Method for accounts | Select the provisioning method to use to provision assignments. You can select: None (no provisioning of assignments takes place) Omada Provisioning Service Manual provisioning Microsoft Identity Manager (MIM) |
| Provisioning connector | Select a provisioning connector, for example SAP, Active Directory or PowerShell. Only available if you choose Omada Provisioning Service as Method for accounts. |
| Use default configuration | Select the checkbox to use the default configuration. If you enable this option, it overwrites any existing configuration. |
| Name | Type the name of the connector to use. This setting only applies to and is only visible for: Generic database connector LDAP connector PowerShell connector Custom connector |
| Connector ID | Type the unique name for the Connector ID. Only applies to and visible if you have selected Custom connector as the Provisioning connector. |
Troubleshooting
If changes to a property do not trigger a provisioning task, check whether attribute value reconciliation is configured. For details, see the Troubleshooting section of Attribute level reconciliation.
Specify general settings
- Under the Provisioning tasks, click General settings to open its settings dialog box.
- Select the Enable password reset checkbox to enable password reset through Omada Identity.
- The Password policy field allows you to select a policy to which passwords in a defined system must adhere. For example, must contain digits or must have a minimum length of a given number of characters.
- In the Provisioning claims validity field, type a value for the number of days you want a provisioning claim to be valid. The default value is two days. If the value is not configured or set to 0, by default, the value is set to 2. Setting the value to -1 prevents the claims from being expired.
- In the Failed provisioning claims validity field, type a value for the number of days you want a failed provisioning claim to be valid. Enable Account deletion unsupported if accounts cannot be deleted in the target system.
Relevant for systems containing Access right or both Access rights and Identity data.
| Setting | Description |
|---|---|
| Enable password reset | Enable self-service password reset for the system. |
| Password policy | Choose a password policy to associate with the system, for example if you want to enforce a certain password length or the use of specific characters. |
| Provisioning claims validity | Type the number of days for which a provisioning claim is valid. If this field is set to 0 or empty, the provisioning claim is not valid and the provisioning call is sent once more. |
| Account deletion unsupported | Enable Account deletion unsupported option if accounts are not to be deleted in the target system. Enabling this instructs the system to perform provisioning updates rather than de-provisioning. The provisioning update task will contain information on disabling the account. |
Configure threshold
-
Under the Provisioning tasks, click Configure thresholds to open its settings dialog box. This dialog box includes three operations: Create tasks, Update tasks, and Delete tasks.
infoConfiguring thresholds is not available for relayed provisioning when the relay connector is used.
-
In the Value column for each of the tasks, type an integer number to specify the number of tasks to accept within the defined interval, for example, 100. If you set the value to zero, you disable thresholds. This is also the default value set in the system.
-
In the Interval column, type an integer number to represent the hours, minutes and seconds (00:00:00) for the time interval within which the number of tasks may be provisioned, for example, 00:05:00 to make the time interval five minutes. If the value that you set for the operation is reached within this time interval, OPS stops provisioning immediately.
When you specify thresholds in OPS, Omada recommends that you set Create tasks values higher than Update tasks. You should also set a higher .value for both of these tasks than for Delete tasks.
| Operation | Setting | Description |
|---|---|---|
| Create tasks | Value / Interval | Type an integer number to set a threshold for create tasks. This is the number of create tasks to accept within the defined interval. Set the value to zero to disable the thresholds. / The time interval during which the system measures the defined threshold value for the delete tasks. |
| Update tasks | Value / Interval | Type an integer number to set a threshold for create tasks. This is the number of update tasks to accept within the defined interval. Set the value to zero to disable the thresholds. / The time interval during which the system measures the defined threshold value for the delete tasks. |
| Delete tasks | Value / Interval | Type an integer number to set a threshold for create tasks. This is the number of delete tasks to accept within the defined interval. Set the value to zero to disable the thresholds. / The time interval during which the system measures the defined threshold value for the delete tasks. |
Configure the data model
All provisioning connectors have a data model that can describe the objects that it can provision and update in the target system.
- Click the Data model task to open its settings dialog box.
- To add or delete any defined functions, you must review or change the entered configuration, depending on the connector type that you have chosen.
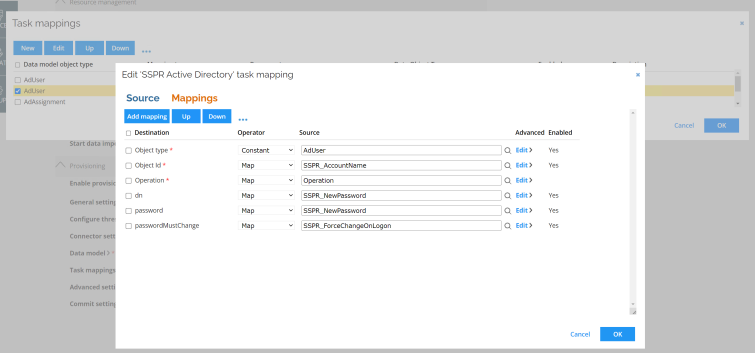
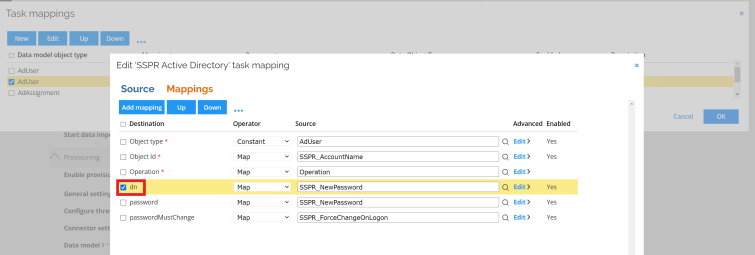
Specify task mappings
You can use task mappings to specify how properties of assignments calculated by the Role and Policy Engine should be mapped to objects and properties in the connector model. For more information, see the Task mappings section.
To configure the task mappings:
-
Click the Task mappings task to open its settings dialog box.
-
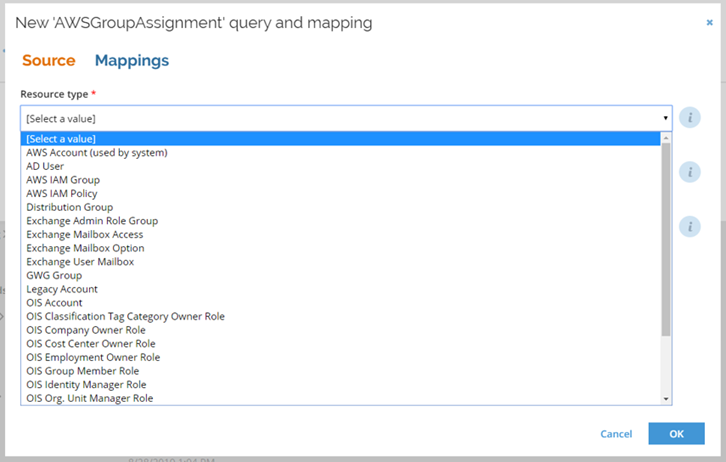
In the Task mappings dialog box, select the checkbox for the Resource type that you want to edit and click the Edit button. Alternatively, click the New button to create a new task mapping. The task mapping edit window will open.
infoFor generic connectors, no template task mappings are provided out of the box. You must define the data model and task mapping objects that are configured for the particular system that you want to connect to. The system will add any required fields to all the new task mappings, but you need to add mappings for all other relevant fields. When creating a new task mapping, you need to select either a data model object type or a template task mapping.
-
Select the resource type. Use the dropdown to select one of the resource types. Resources that are used by the system will be displayed above all the other resource types and suffixed by the (used by system) indicator.
-
Select the appropriate mapping type (Assignment, Password Reset, or Resource), and, optionally, add a description.
-
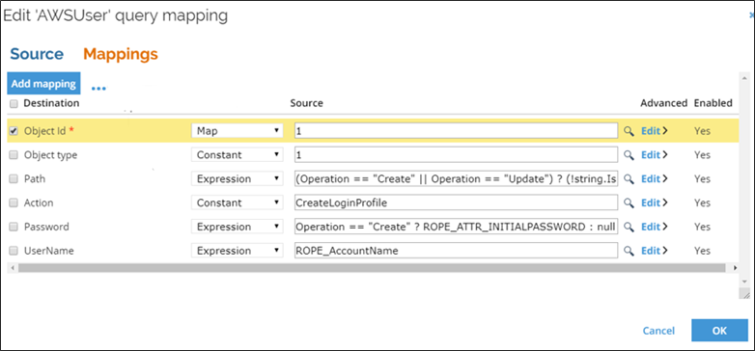
To create mappings, navigate to the Mappings tab, click the Add mappings button, and fill in the required fields.
infoWhen performing a lookup for a source field for a mapping, when the Operator is selected and equal to Map, apart from the built-in selections, only the resources where the dataType matches the destination dataType are selected.
 info
infoTask mapping UI uses the displayName attribute for properties in the data model, if defined, both in the task mapping editor and the mapping destination lookup. This has no functional impact and is used only to make the use of the task mapping UI easier.
You should take care when changing the name attribute in the data model, as the task mapping UI will not load any field mappings that refers to a non-existing attribute. If you need to change the name attribute for a property in the data model, and you already have one or more mappings for it, you can follow one of these steps:
Add the mapping again to the relevant task mappings. Change the attribute in the task mapping object (Setup > Administration > Connectivity > Task mappings).
Implement a displayName attribute and save the Task mapping with it before changing the name attribute, then use the function called Change destination to reload the destination. This will update the name attribute in the task mapping object.
-
To open the advanced settings, click any of the Edit links in the Advanced column. The following advanced options are available:
- Data type: the data type for the property.
- Action: defines how the value should be added to the property (add, remove, modify).
- Multi valued: defines whether the property can contain multiple values.
- Clear existing values: defines whether to clear existing values of the property (visible only for multi valued properties).
- Map null values: normally, when the value of an expression is set to NULL, it is not sent to the target system. When mapNull is set to true, the null value will be sent in order to clear the value in the target system.
-
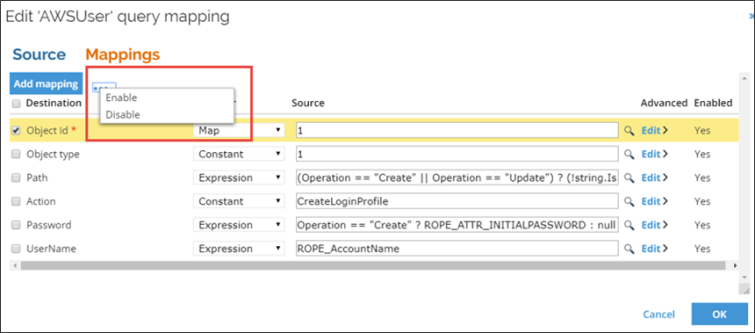
To enable or disable a given mapping, click the ellipsis icon and select Enable or Disable from the menu. Object Id and Object type are required mappings and cannot be disabled.
When saving task mappings in the query mapping editor, all comments will be removed from the existing task mappings XML. The task mapping UI doesn't allow hardcoded passwords in clear text to be mapped to data model properties with data type "secureStringType".
Instead, use a calculated attribute like ROPE_ATTR_INITIALPASSWORD. Alternatively, the hardcoded password can be encrypted using StringEncrypter tool.
Task mappings for resource type settings
| Setting | Description |
|---|---|
| Provisioning attribute set | Click the lookup icon to select an attribute set that has provisioning relevance. If you do not select any attribute sets here, all assignment attributes are considered relevant to provisioning. |
| Post validity | Type a number of days in which calculated assignments for resources of this type are included after the validity period ends |
| Exclusively managed | Make assignments for the resources be deprovisioned if they do not have a Desired state reason. |
| Reconcile on attribute level | Enable provisioning updates in case of any discrepancies in the provisioning attributes in the Omada Identity Data Warehouse. |
| Review jobs | Enable this setting to allow manual reviews of jobs before the jobs are run. |
Edit map destination
Follow these steps to edit the map destination:
-
Open the mapping editor grid.
-
Select a single mapping item that you want to edit.
-
Click the ellipsis menu and select Change destination.
-
Select a new mapping in the popup window.
-
To save the changes, exit all pop-up dialogs by clicking the OK button.