Javi – Omada AI assistant
Javi is an AI-powered assistant that can help you with a variety of identity and access management activities. It complements Omada Identity by allowing for expedited handling of access requests and approvals. You can ask Javi questions about Omada, including technical questions related to documentation and processes. Multiple languages are supported. Javi is an optional paid feature.
Core features and functionalities
You can ask Javi to perform the following actions:
- Access request – submit and manage access requests
- Access approval – approve access requests
- Q&A – get answers to questions about Omada Identity and technical documentation
- Scheduled notifications – receive notifications for pending approval requests
How Javi integrates with collaboration platforms
Javi integrates with supported collaboration platforms to provide a conversational interface for identity governance tasks. While the core functionality is the same, onboarding and installation steps vary by platform.
Refer to the platform-specific pages for detailed instructions:
Omada configuration prerequisites
Javi requires specific backend configuration in Omada Identity before it can be used through a collaboration platform (Microsoft Teams or Slack). The following steps ensure that Javi can retrieve resource information and communicate securely with Omada Identity.
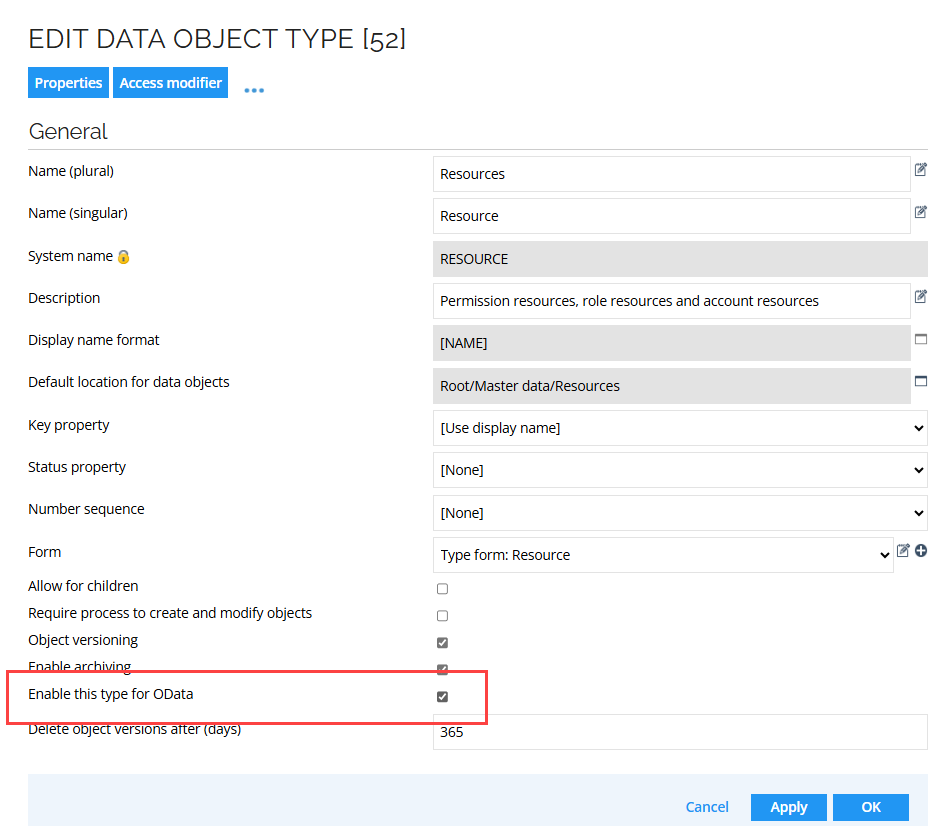
Enable OData for Resource Data Object Type
To allow Javi to retrieve requestable resources:
-
In Omada Identity, navigate to Setup > Data Object Types > Resources.
-
Select the Enable this type for OData checkbox.
IP Address whitelisting
Javi requires IP whitelisting to allow secure impersonation requests. To update the whitelist:
- Log into Omada as a System Administrator.
- Go to Setup > Administration > System Settings > Customer Settings.
- In the Customer IAM section, locate IP mask for portal servers.
- Add the following IP ranges (do not overwrite the existing values, append new entries as needed):
EU zone
20.8.1.*, 20.8.2.*, 20.31.72.*, 20.31.76.*, 20.31.78.*, 20.31.79.*, 20.76.176.*, 20.86.237.*, 20.103.101.*, 20.103.102.*
US zone
172.171.168.*, 172.214.4.*, 172.171.169.*, 20.119.16.*, 172.171.170.*, 172.214.1.*, 172.214.7.*, 172.214.3.*, 172.214.2.*
- Click OK.
A user that is a member of the Administrators group cannot be used in the impersonation scenarios.
Best practices
-
State your intent at the beginning. Avoid adding any further details at first. "I want to request access", "Show me my pending approvals" should be sufficient.
-
Avoid ambiguities. For example, you have just requested to see your pending approvals. You then ask to review further five most recent items from the list. Finally, you enter
Give me more info on the first 3. Javi will be confused about the first 3 resources - whether they refer to the first or the second overview. -
Maintain relevance to the most recent turn. For example, you are requesting access to a resource. Javi has gathered your business context and selected resources, and is now asking you for the reason. Instead of providing the reason, you respond
I want access to resource [a second resource] to carry out a project. Javi may be confused over which action to perform next. -
Avoid abrupt shifts of scope. For example, you are in the process of making an access request. You have asked Javi to help you select a business context for your request. If you ask Javi at that point
What are the approval requests pending to that context?, Javi will most likely be confused. -
Use the search or find keywords. If Javi is having trouble retrieving information (such as your pending approvals, resources for requesting access, resource ids for requesting access, your business contexts etc.) use the keywords.
-
Paraphrase your prompt. When Javi is not returning the desired response, try asking in a different way using alternative phrasing.
-
Be conscious of memory capacity when requesting access. Avoid requesting access to more than 2 (possibly 3) resources per request. Maintain a step-by-step, fast conversation flow when filling in the requirements for the access request:
- Select context.
- Find resource_A.
- Find resource_B.
- State the reason.
- Confirm the summary.
- Make a request.
-
Avoid overloading your prompt. Your prompt should focus on performing a single step. For example, if you want to request access to multiple resources during an access request, search for them one by one using one turn per resource search.
Troubleshooting
| Problem | Solution |
|---|---|
| Javi does not respond | Confirm IP whitelisting and OData are correctly configured. |
| User cannot access Javi | Ensure a valid identity exists and the configured identity-mapping attribute is populated. |
| Access requests not working | Verify that Resource is enabled for OData. |