Installing Cloud Application Gateway
This section provides detailed information on the prerequisites, installation, registration, and optional configuration of the CAG.
System requirements
The following general and deployment-method-specific requirements need to be fulfilled to properly operate the CAG.
The Provisioning Worker Service and Import Worker Service each consume between 30 to 50 MB of memory when in the idle state. Each individual Provisioning Worker utilizes around 10 MB of memory when in idle state, with the demanded capacity increasing with running imports or performed provisioning tasks. It is especially impacted by large amounts of data imports with CustomRowFilter configured that might also contain nested URLs.
General conditions
Before you initiate the deployment process, make sure that the following conditions are met:
- Operating System - Windows Server 2022 is required, with all editions supported
- .Net Framework - Version 4.8 is required for the legacy libraries and integrations
- .NET Runtime - Version 8.0x is required
Deployment-specific conditions
The following conditions must be met based on the chosen deployment variant.
- Physical server installation
- Virtual machine installation
- Fulfill the general conditions.
- Copy the application files and follow the deployment script or initiate the installer.
- Configure the Windows Firewall and, if it applies, the Internet Information Services (IIS).
- Provision a virtual machine with a minimum capacity of:
- 2 vCPUs
- 16 GB of RAM
- 20 GB of memory drive
- Ensure that the available bandwidth is between 10 and 12 Mbps.
- Use a supported virtualization hypervisor, for example, the VMware ESXi or Hyper-V.
- Copy the application files and follow the deployment script or initiate the installer.
- Configure the Windows Firewall and, if it applies, the Internet Information Services (IIS).
Following measurements are basis for the deployment conditions.
CPU and memory utilization
| Activity | CPU usage (%) | Memory (MB) |
|---|---|---|
| Idle | 0.1 | 40 |
| Light Load (20 rec/min) | 2–3 | 45–50 |
| Nominal Load (80 rec/min) | ~7 | ~60 |
| High Load (160 rec/min)* | ~12–14 | ~70 |
Per instance bandwidth summary
| Load level | Records/min | Total KB/s |
|---|---|---|
| Idle | 0 | 0.217 |
| Light | 20 | 3.58 |
| Medium | 80 | 13.78 |
| High | 160 | 27.45 |
| Heavy | 320 | 54.58 |
Total bandwidth for 20 instances
| Load level | Total KB/s | Total Mbps |
|---|---|---|
| Idle | 0.217 × 20 = 4.34 KB/s | ~0.034 Mbps |
| Light | 3.58 × 20 = 71.6 KB/s | ~0.56 Mbps |
| Medium | 13.78 × 20 = 275.6 KB/s | ~2.15 Mbps |
| High | 27.45 × 20 = 549.0 KB/s | ~4.29 Mbps |
| Heavy | 54.58 × 20 = 1,091.6 KB/s | ~8.54 Mbps |
System resources estimates for 20 instances
| Mode | Total CPU usage (all cores) | Total RAM usage |
|---|---|---|
| Idle | ~2% (20 × 0.1%) | ~800 MB (20 × 40 MB) |
| Active | ~140% (20 × 7%) | ~1.3 GB (20 × 60 MB) |
| Peak | ~240–280% | ~1.5 GB |
Minimum required permissions for service accounts
By default, the provided PowerShell script registers the Windows Service to run under the Local System context. You can optionally configure the service to run under a dedicated service account instead.
-
Log On as a Service
The service account must be granted “Log on as a service” user right to run Windows services.
-
NTFS File System Permissions
-
Assign the following file permissions to the service account on relevant directories:
- Read, Write, Modify, Delete
-
Apply to:
-
Service installation directories
-
Worker process directories
-
Connectivity package directories
-
Backup directory
-
noteEnsures operational access for read/write, configuration changes, and file management.
-
-
Service Control Rights
The service must be able to start and stop itself. Ensure necessary Start/Stop service permissions are granted.
-
Private Key Access
-
Provide the service account with access to key material required for private key usage.
-
Refer to the Registration process documentation for exact file or store locations.
-
-
Trusted Certificate Authority
-
The host system must trust the internal CA that signs service binaries and scripts.
-
Import the CA’s public certificate into trusted root certification authorities store.
-
Credentials for each source or target system are managed during system onboarding in Omada Identity Cloud.
For details on required permissions, go to the Connectors section.
Installing Cloud Application Gateway
Installation and enabling the CAG solution consists of the following main steps:
Downloading Cloud Application Gateway components
For guidance on how to enable or migrate to the CAG solution, contact the Omada Support.
The solution is available for download from the Cloud Management Portal for Horizons-enabled instances.
-
Go to the environment overview and from the extended view, download the
.zipformat file for the CAG.
-
Unpack the .zip format file and run the installer following the instructions.
After downloading the package from the Cloud Management Portal, extract all files to the desired location.
By default, the downloaded .dll format files are blocked by Microsoft to protect the users unit from malicious exposure. To allow the CAG solution to work correctly make sure that files in the Connectivity folder are unblocked.
The files can be unblocked by using the PowerShell command Unblock-File, similar to Get-ChildItem "C:\Path\To\Your\Folder" -Recurse | Unblock-File.
CAG is organized into three subfolders:
- Connectivity - contains the required libraries for all the Connectivity Packages provided by Omada
- Import - contains the required files for the Import Worker Service
- Provisioning - contains the required files for the Provisioning Worker Service
Do not change the folder structure.
Refer to the prerequisites sections in the Connectors documentation for any drivers that might be required to be installed on the server where you have deployed the CAG.
Registration
Before the initial startup, the CAG requires registration to the Omada Identity Cloud.
For guidelines on the registration process, go to the Security documentation.
- Perform the initial CAG registration on a primary VM, following the guidelines in the Security documentation.
- To register a CAG on an additional VM, clone the CAG setup from the primary VM:
- Export the private key from the primary VM.
- Import the private key into the additional VM.
- If the additional VM needs to connect to a different target system, update the
InstanceGroupIdsetting in theappsettings.Customer.jsonfile. No further re-registration is required.
For more details on instance groups, see the Instance groups section.
Registering Worker Services
The Cloud Application Gateway consists of two main components: the Import Worker Service and the Provisioning Worker Service. Both services can be operated in two ways:
- As a command-line application (useful for troubleshooting)
- As an installed Windows service (recommended deployment)
Each service has to be initiated individually.
When registering or starting the Worker or the Provisioning Service as a console application, running it from a standard Command Prompt or PowerShell session is a recommended practice. Avoid using tools such as PowerShell ISE, as they can interfere with console output. Proper console output is required for specific operations, for example when registering a private key using a certificate file.
- Import Worker Service
- Provisioning Worker Service
- Console mode - the service is started from the
Import\Worker Service\Omada.Identity.Import.WorkerService.exefile. - Windows service - to add it as a Windows service execute the
Import\WorkerSetup.ps1script with administrative rights.
- Console mode - the service is started from the
Provisioning\Worker Service\Omada.Identity.Provisioning.WorkerService.exefile. - Windows service - to add it as a Windows service execute the
Provisioning\WorkerSetup.ps1script with administrative rights.
Omada recommends saving and closing all configuration files before initiating the Import and the Provisioning Worker Services. Leaving the files open may prevent the files replacement during the auto-update process.
Uninstalling Cloud Application Gateway
To uninstall Cloud Application Gateway, you need to remove related Windows Services and delete folders created during the installation process.
You can remove Windows Services with the SC DELETE <servicename> console command.
Additional configuration
Here you can find configuration guidelines for some of the CAG features.
Over-the-air upgrade
When an upgrade is available, the update process is conducted automatically on any local CAG instance.
You can configure the time interval for services to check for available updates in the following places:
-
For the Provisioning worker:
appsettings.Customer.jsonExample value
{
"AutoUpdate" : {
"IntervalSeconds" : "15",
"ReleaseChannel": "stable"
}
} -
For the Import worker:
appsettings.Customer.jsonExample value
{
"AutoUpdate": {
"IntervalSeconds": 0,
"ReleaseChannel": "stable"
}
}
For both examples the auto-update check is configured to happen every 15 seconds.
Setting the value to 0 results in disabling the auto-update feature. It can result in the Cloud Application Gateway not working properly if the last updated version is no longer supported.
It includes the creation of a backup of the currently installed version of the Worker Service. You can define where the backup is stored by configuring the History.Path in the appsettings.Customer.json file.
 "History": {
    "Path": "../OmadaProvisioningWorkerHistory"
 }
Proxy support
You can configure proxy connection in the appsettings.Customer.json, for importing, to connect with the target system. It is not used when communicating with the Horizons Cloud Services.
{
   "Proxy" : {
     "Address": "http://proxy.example.com:8080", // Proxy server address
     "Username": "user", // Username for proxy authentication
     "Password": "password", // Password for proxy authentication
     "BypassOnLocal": false, // Determines if proxy should be skipped on local request
     "BypassHosts": [] // Hosts to bypass, can be an array of strings or regex patterns
   }
}
Heartbeat mechanism
Heartbeat is applied to both the Import Worker and Provisioning Worker.
- Import Worker
- Provisioning Worker
Default interval is set to 5 minutes and can be configured in the appsettings.json file.
| parameter | value |
|---|---|
| File | appsettings.json |
| Section | serviceconfiguration |
| Key | HeartbeatIntervalMinutes |
"serviceconfiguration": {
  "HeartbeatIntervalMinutes": 5
}
Default interval is set to 5 minutes and can be configured in the appsettings.json file.
| parameter | value |
|---|---|
| File | appsettings.json |
| Section | HeartbeatSettings |
| Key | IntervalMinutes |
"HeartbeatSettings": {
  "IntervalMinutes": 5
}
To apply changes to the appsettings.json file, restart the service.
You can adjust both intervals to accommodate performance or monitorin needs.
Heartbeat widget in the Operations dashboard
To enable the Heartbeat widget in the Operations Dashboard, go to Setup -> Dashboards and edit the configuration by adding the below section to the xml.
{
  name: 'SystemHeartbeats',
  refreshRate: 3600,
  title: S_OperationsDashboard_Text_SystemHeartbeatsWidget_Name,
  infoText: S_OperationsDashboard_Text_SystemHeartbeatsWidget_Info,
  hideTitle: false,
  height: 440,
  params: { },
  isHiddenEvaluator: function() { return !appPageVars.useCAG; }
}
Logging
Logs for worker process, import and provisioning Worker Services are stored in log targets. You can set them in the XML-based LogConfiguration of the appsetting.Customer.json file, where you specify the targets.
You can find more information on how to set the LogConfiguration in the Event logging section.
Message: Import Worker Service is available
Metadata:
- ipAddress
- machineName
- serviceName
- timestamp
- uptime
- version
Instance groups
Instance groups allow you to organize your systems based on shared characteristics such as infrastructure, for example Azure-hosted systems. All newly onboarded systems are automatically assigned to the Default instance group. Creating additional instance groups enables more efficient resource allocation and improves overall CAG performance.

- To access instance groups, go to Setup>Connectivity configuration>Cloud Application Gateway Instance Groups.
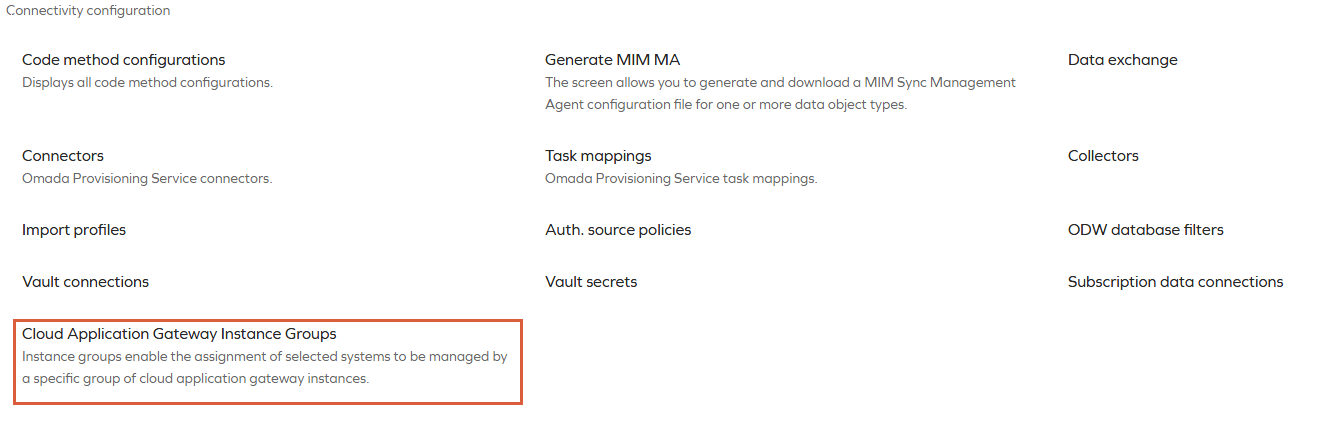
- There you can see a list of existing instance groups.

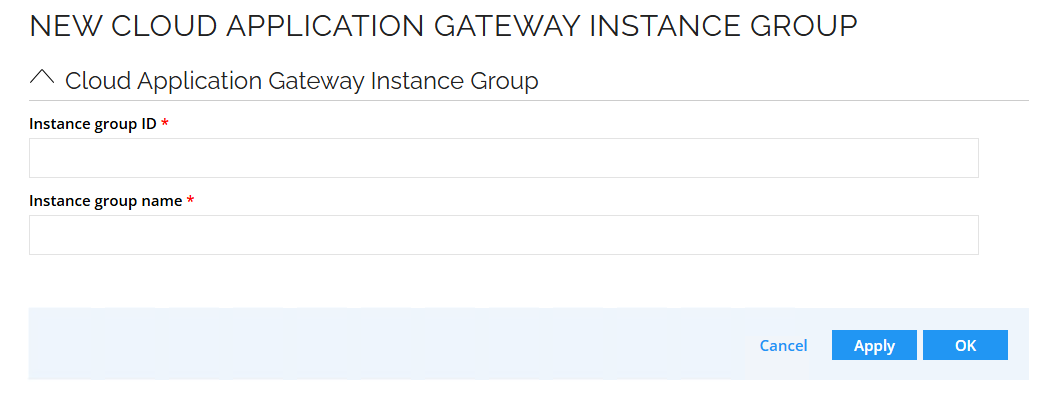
- You can add new group
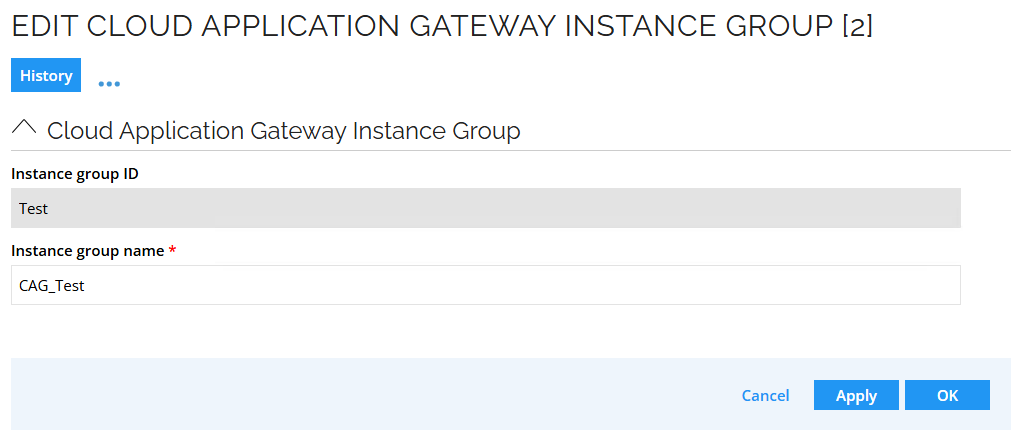
- You can edit exisiting group
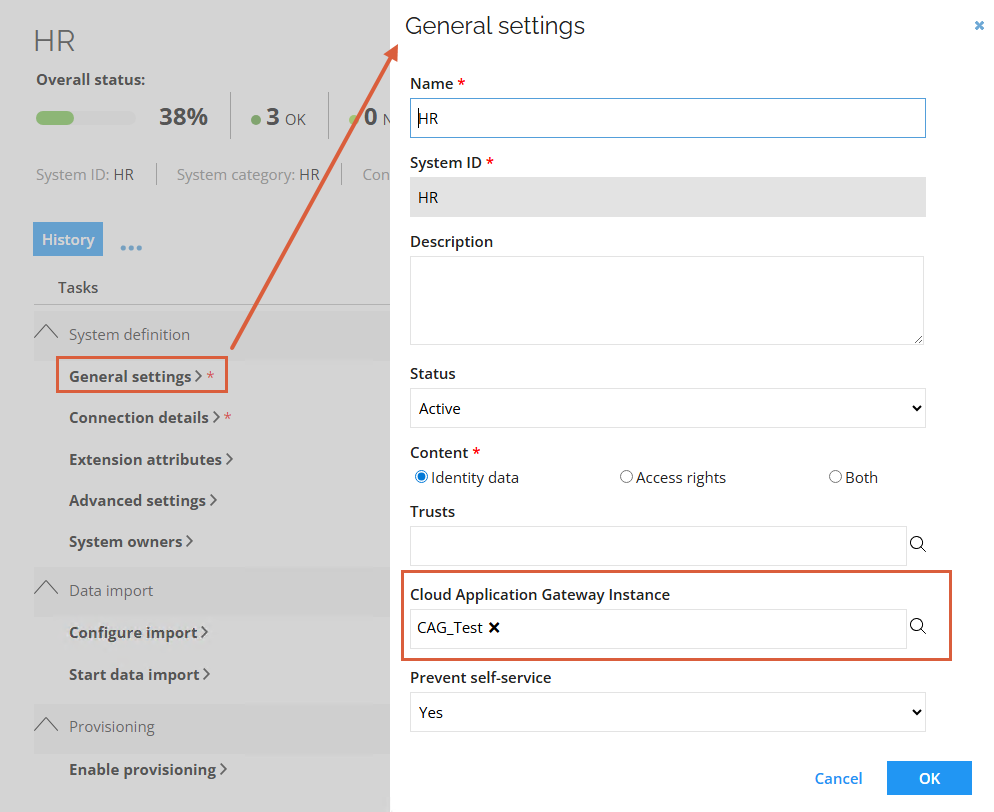
- To assign a system to an instance group, configure the Cloud Application Gateway instance setting in the General setting of a system.
-
To assign a Provisioning Worker Service to an instance group, configure the InstanceGroupId value in the CloudApplicationGatewayConfiguration section in the file appsettings.Customer.json.
-
To assign an Import Worker Service to an instance group, configure the InstanceGroupId value in the CloudApplicationGatewayConfiguration section in the file appsettings.Customer.json.
InstanceGroupId setting
You can access the InstanceGroupId setting in the appsettings.Customer.json configuration file. By configuring the setting to a specific group ID you can assign the Worker service, either Import or Provisioning, to a specific Instance Group. If you do not configure the InstanceGroupId setting, it has the Default value.
"CloudApplicationGatewayConfiguration": {
...
"InstanceGroupId": "Default"
}
Only systems assigned to the instance group configured in the InstanceGroupId setting undergo the staging step and are processed in the import process.
Registering Cloud Application Gateway for a specified instance group
You can register the Cloud Application Gateway for a specified instance group. This way, multiple instance groups can be hosted within a single environment with an autonomous and independent registration, authentication, and key management with separate public keys for each instance group. This separation provides an additional security layer when required, helping contain potential vulnerabilities within a specific instance group.
Changing the Cloud Application Gateway group for an onboarded system with a configured password may cause import failures. This occurs because the password is encrypted with the key from the original group and cannot be decrypted with the key from the new group.
After changing the group, go to the system's configuration page, re-enter the password, and save the Connection details. To ensure the password is encrypted with the new key, run the Test connection action.
Configuring security
Registration process
In the appsettings.Customer.json file you can choose the storage method of the private key. The following options are available:
- As an environment variable
"CloudApplicationGatewayConfiguration" : { ... , "PrivateKeyLocation" : "EnvironmentVariable" }
The private key is encrypted with ASP.NET Core Data Protection. The DataProtectionKeyLocation defines the storage of the protection keys within the machine. This allows multiple users on the machine to access the private keys and register or run CAG services.
Learn more about the ASP .NET Core Data Protection
The HKEY_LOCAL_MACHINE registry location requires administrator permissions during the CAG registration process.
- Stored using vault service
"CloudApplicationGatewayConfiguration" : { ... , "PrivateKeyLocation" : "VaultService" }
-
Registration command (applies to both methods) Use the following command in PowerShell to register the worker:
.\Omada.Identity.Import.WorkerService.exe --Operation=registerIf you prefer to use keys from a certificate, use:
.\Omada.Identity.Import.WorkerService.exe --Operation=register --FileName="C:\Certs\MyAppCert.pfx"ImportantYou can use the command for either Import or Provisioning Worker, but not for both. Ensure that "CloudApplicationGatewayConfiguration":"PrivateKeyLocation" is set to the same value for both import and provisioning workers.
It is required that the "CloudApplicationGatewayConfiguration":"PrivateKeyLocation" for import and provisioning worker is set to the same value.
Vault service integration
Vault service integration allows you to securely store and retrieve the private key as a secret in a vault service. CAG workers support the following vault services, each offering multiple authentication methods:
- Azure Key Vault
- Hashicorp
- Managed Identity - applies if the worker is deployed on Azure platform.
- Requires only key vault url address.
- Does not require credentials.
- Is suited for Azure-hosted environments.
- Client credentials - utilizes app registration with
clientIdandclientSecret.- Requires tenant id, client id, and a client secret.
- Requires client secret to be stored in configuration file.
- TLS certificates - a mTLS authentication with the certificate attached to the request to access vault.
- Requires tenant id, client id, and either certificate path and password (the certificate is taken from the PFX file) or certificate thumbprint with storage location.
- AppRole - method with the required role id and secret id provided in the environment variables.
- Requires vault URL, role id, and a secret id.
- Vault agent - based on a token retrieved from the location specified by the vault agent.
- Requires vault URL and token file path, where vault agent saves the token.
- TLS certificate - mTLS authentication with the certificate attached to the request to access vault.
- Requires vault URL, certificate path, and certificate password (the certificate is taken from the PFX file) or certificate thumbprint with storage location.
- JWT or OIDC - based on a token from the identity provider.
- Requires vault URL and a toke.
For more information, go to the Vault Service section.
To replace the existing private key, include the --Force=true component in the command, for example .\Omada.Identity.Import.WorkerService.exe --Operation=register --Force=true. Beforehand, unregister the public key with the assistance of the Omada support and make sure that you have a confirmation that it was successful. Otherwise, the attempt to replace private key results in an error.
The --Force=true option only works if the public key is unregistered and you have expired private key stored.
After the change the worker is not initiated automatically. To do so, run it without any parameters.
Key Export and Import for EnvironmentVariable Storage Type
When using the EnvironmentVariable storage type, and migrating Cloud Application Gateway (CAG) workers to a different machine, you need to manually export and import the private key.
This step is not required when using the VaultService storage type, as vaults are accessible across multiple machines.
- Exporting the key on the source machine
- Importing the key on the target machine
Use the following command to export the key:
.\Omada.Identity.Import.WorkerService.exe --Operation=export --FileName="Cag_Key"
this generates a file named Cag_Key.omadaKey.
Transfer the .omadakey file to the target machine, then run:
.\Omada.Identity.Import.WorkerService.exe --Operation=import --FileName="Cag_Key.omadakey"
The --FileName parameter can be either:
-
A relative path to the current working directory, or
-
An absolute path to the .omadakey file.