Data preview
The Data Preview feature helps system owners prepare queries and mappings for target systems. You can preview target data in the portal without running an import. You can also include logs in a preview and view them in the portal.
The Data Preview feature is supported only by .NET-based query collectors, for example, REST collector, Microsoft Active Directory collector, or OData collector.
The first version of the Data Preview Service is available in English only. Labels and captions in the preview UI remain in English even when a user selects another language.
You can preview data from the Queries and Mappings task in the system configuration.
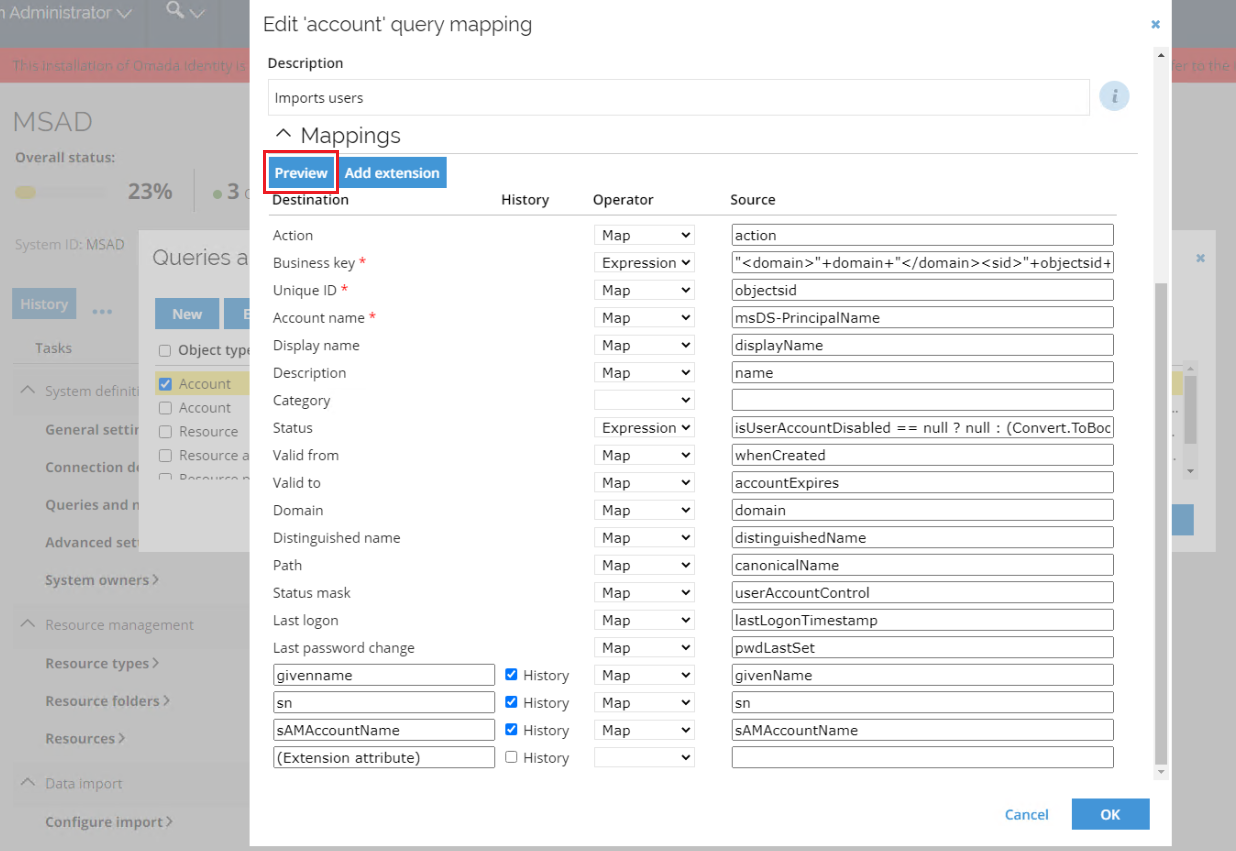
To preview data:
-
Go to Queries and Mappings in the system you want to configure.
-
Select the query you want to preview.
-
Select Preview.
-
The preview opens in a new Preview query window.
The preview displays a separate column for each mapping, so it may contain many columns. To make a row easier to read, the value in the first column is presented as a link.
The Lookup operator in Mappings previews only its input, not the final result. The lookup result, such as a business key or composed key, is visible only during data import.
Select the link to open the Row details window, which shows all mappings for that row.
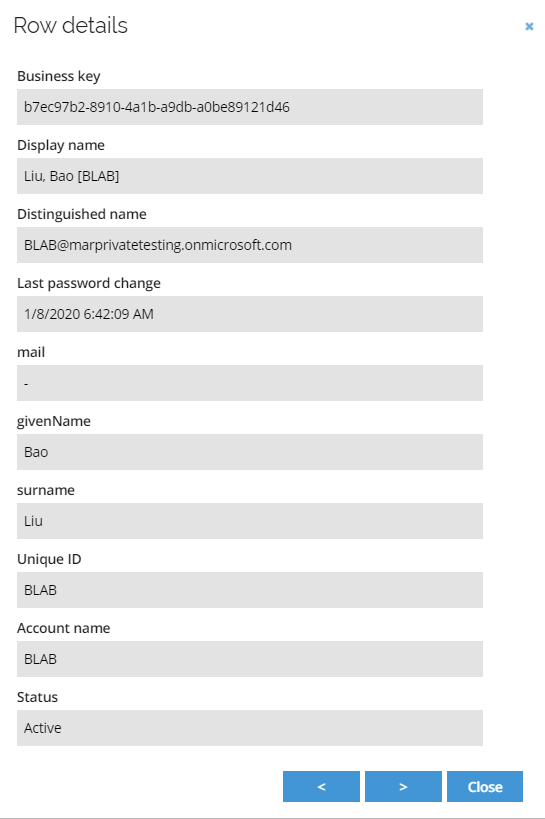
In the bottom-right corner of the window, select Close to close it. Use the < and > buttons to view the previous or next row. You can navigate only between rows on the same page.
The Preview button is also available in the Edit query mapping dialog box.
To cancel a preview while it is being generated, select Cancel on the loading screen.
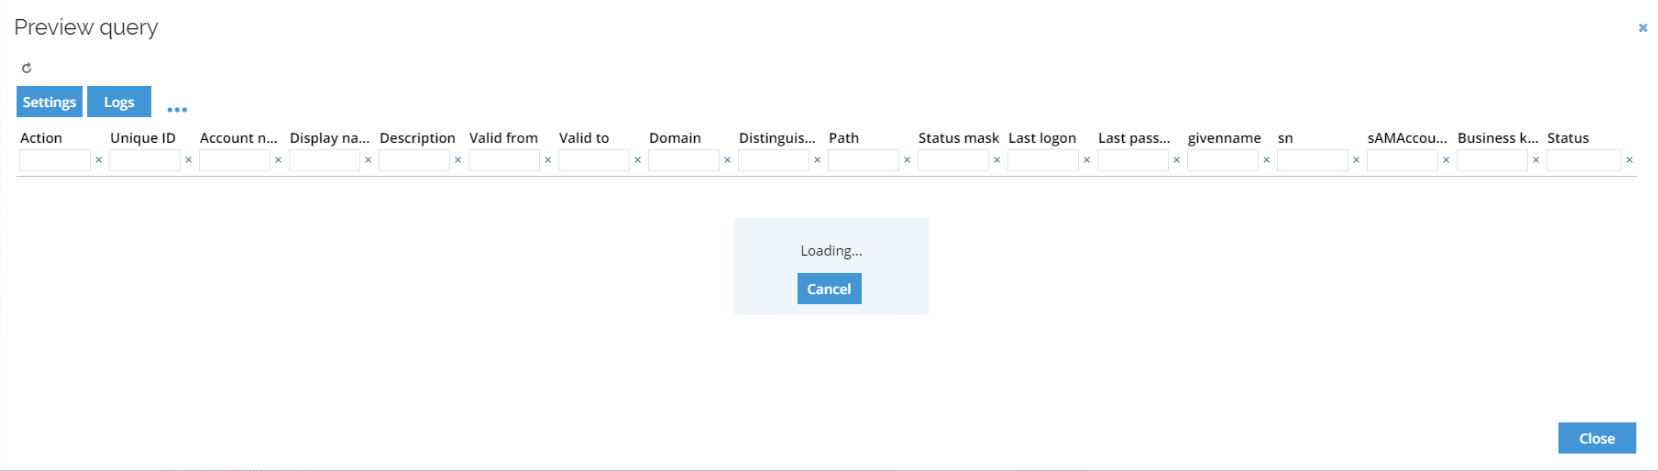
A canceled preview displays only the data downloaded from the target system before cancellation.
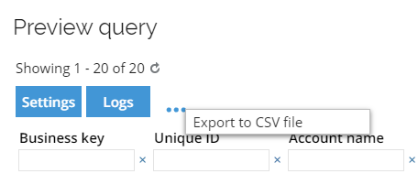
Select the ellipsis menu, then Export to CSV file, to download the preview as a CSV file.
Preview settings
Use the Settings button in the Preview query window to configure the preview.
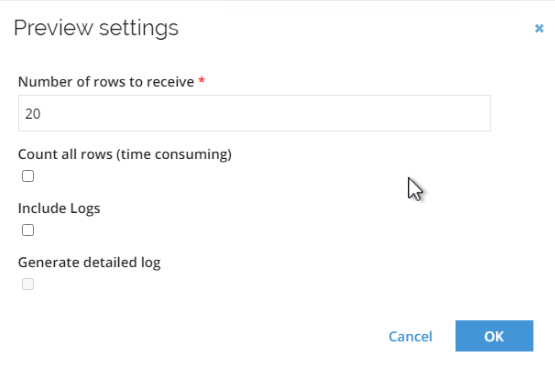
The available settings are:
| Setting | Description |
|---|---|
| Number of rows to receive | Sets the maximum number of rows returned by the collector and displayed in the preview. The Data Preview Service requests pages of data until it reaches this limit or loads all available rows. The limit is 1,000 rows. |
| Count all rows (time-consuming) | Fetches all pages and counts the total number of rows. The total appears below the Preview query title in the format "Showing [x] - [y] of [z]". The total is counted even if Number of rows to receive is set to a lower value. Because the collector retrieves all data from the source system to count the rows, this setting takes significantly longer than retrieving only the configured number of rows. |
| Include Logs | Includes preview logs. A large number of logs can require significant additional network traffic. |
| Generate detailed log | Includes detailed logs, including debug logs. Use this setting only for troubleshooting because it adds considerable network traffic. |
Staging preview
Paging is an important part of the preview functionality. If a collector does not support data paging, the preview may display no data if you select Cancel while the request is being processed.
Data paging in the preview window requires no additional configuration. You can set the page size in the preview dialog, but this does not affect how the collector downloads data.
You can set the number of rows to process and display in the Settings dialog.
How this works depends on whether the collector supports paging:
-
For collectors that support paging, the service downloads only the pages needed to display the configured number of rows.
-
For collectors that do not support paging, the service downloads all data and then displays the configured number of rows.
This difference affects preview performance and the amount of data downloaded from the target system.
Data preview logs
If you enable Include Logs in Preview settings, the Preview query window displays a Logs button.
Select Logs to open a window with the logs generated during the preview, including logs from the collector.
The Logs window displays the logs in a grid that you can sort.
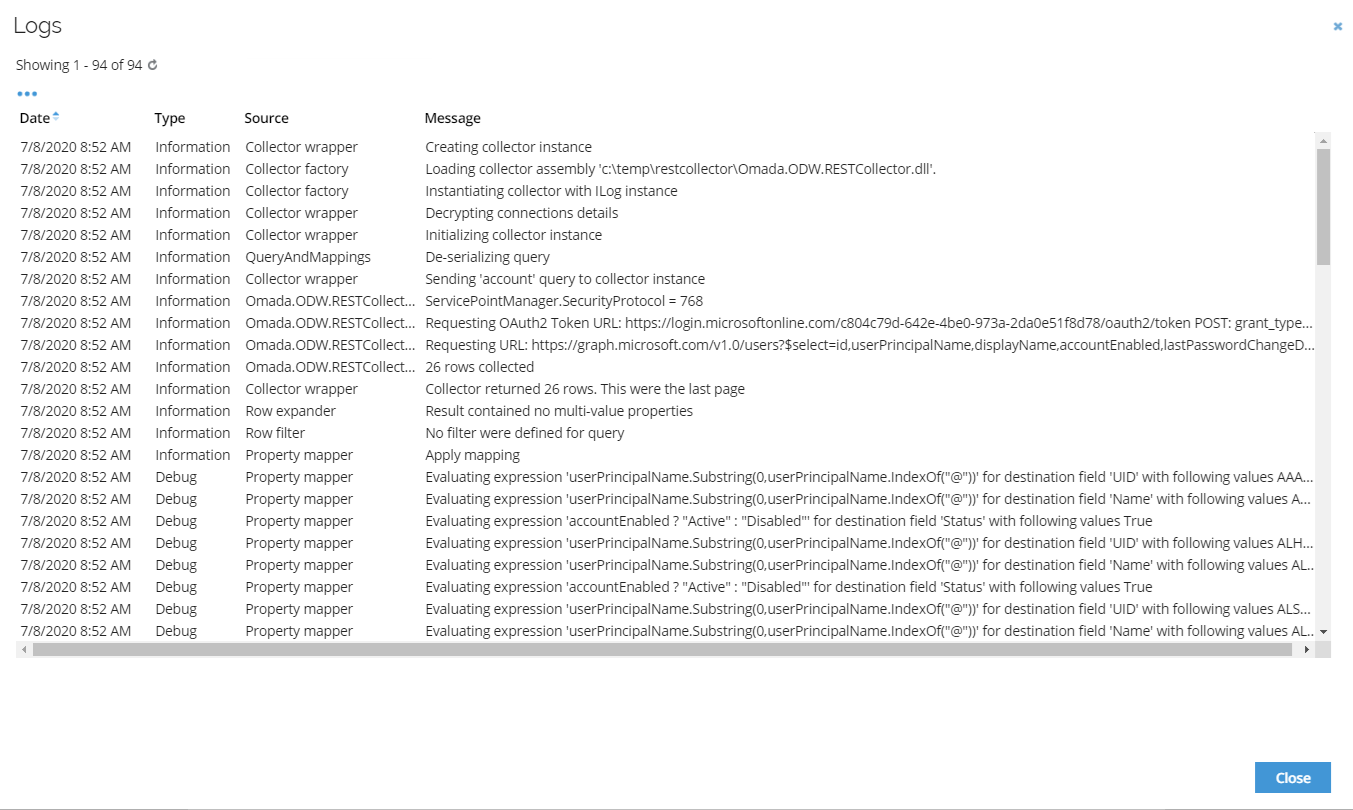
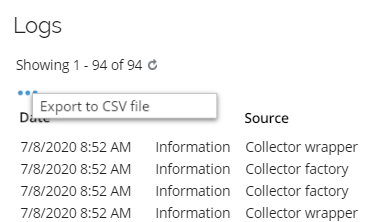
Select the ellipsis menu, then Export to CSV file, to download the logs as a CSV file.
Data Preview Service installation on-prem
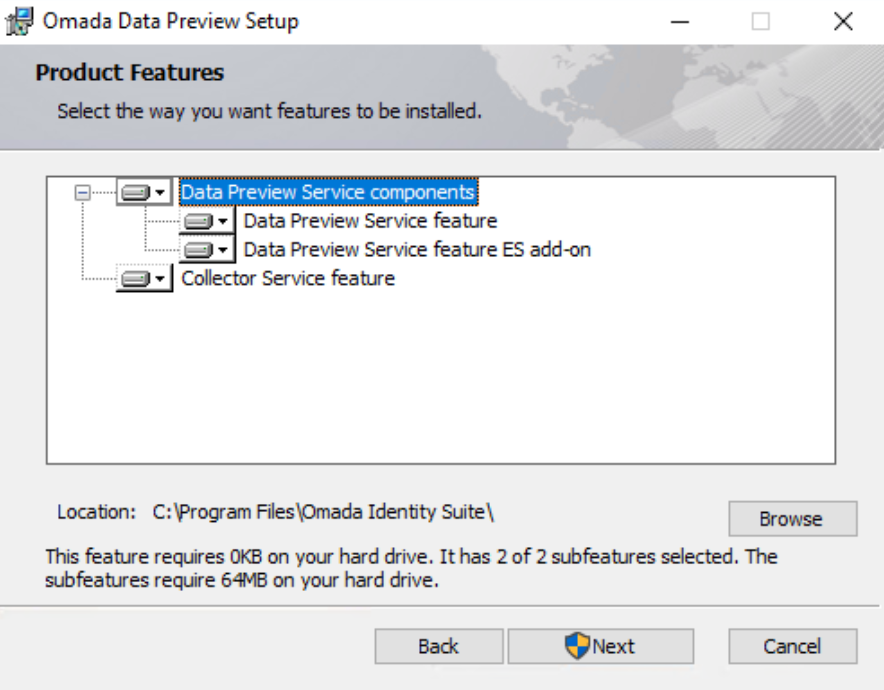
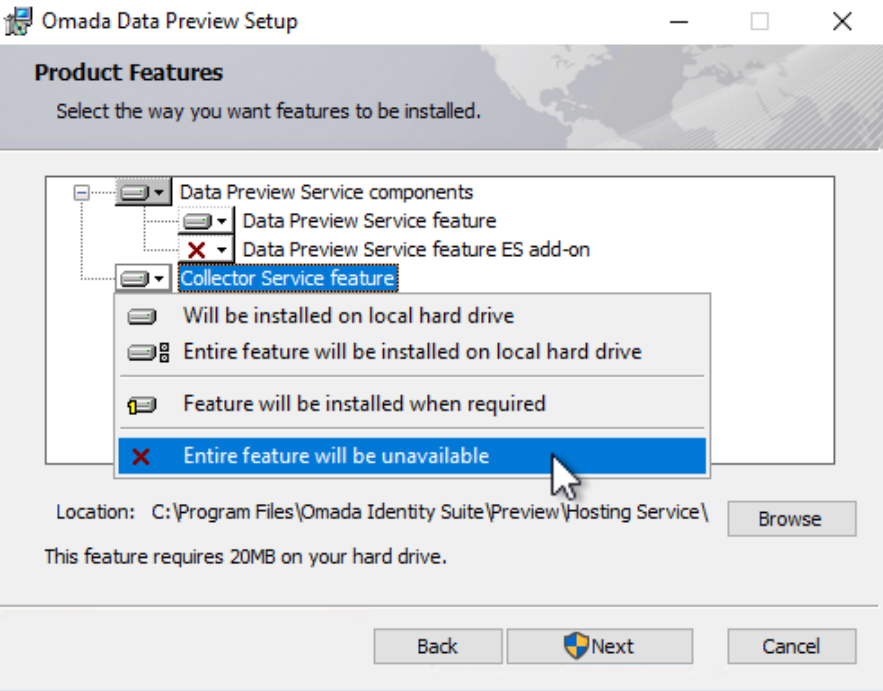
Omada Data Preview Service consists of two services that appear as separate features in the installer’s Product Features window: the Data Preview Service and the Collector Service. The Add-on for Data Preview Service feature adds the files that Enterprise Server needs to display preview data.
Data Preview Service feature
The Data Preview Service is a Windows service that generates previews from data received from the Collector Service. It communicates with the Collector Service and Enterprise Server using gRPC.
Requirement: ASP.NET Core Runtime 10.0.x.
The .NET version required by this service must not be lower than the version required by other Omada Identity installations.
Add-on for Data Preview Service feature
This feature adds the files Enterprise Server needs to display preview data and communicate with the Data Preview Service. It uses gRPC for communication.
Requirement: Enterprise Server version 14.0.8 (Update 8) must be installed before you install this feature.
Collector Service feature
The Collector Service is a Windows service that hosts collector DLLs. It is built on .NET Framework 4.8 and uses gRPC to communicate with the Data Preview Service.
Requirements:
- .NET Framework
4.8 - Access to the collector assemblies
Installation process on-prem
Install the Data Preview Service using the standard Windows installer. Follow these steps:
-
Download the latest Data Preview installer from the Omada Community.
-
Open an elevated command prompt and start the installer as an administrator.
infoIf you run the installer without administrator privileges, it may fail to start the installed Windows services.
-
In the first step, choose which features to install. To exclude a feature, set it to Unavailable.
 tip
If Omada Identity Suite is installed on a drive other than C:, install the services on that same drive.
-
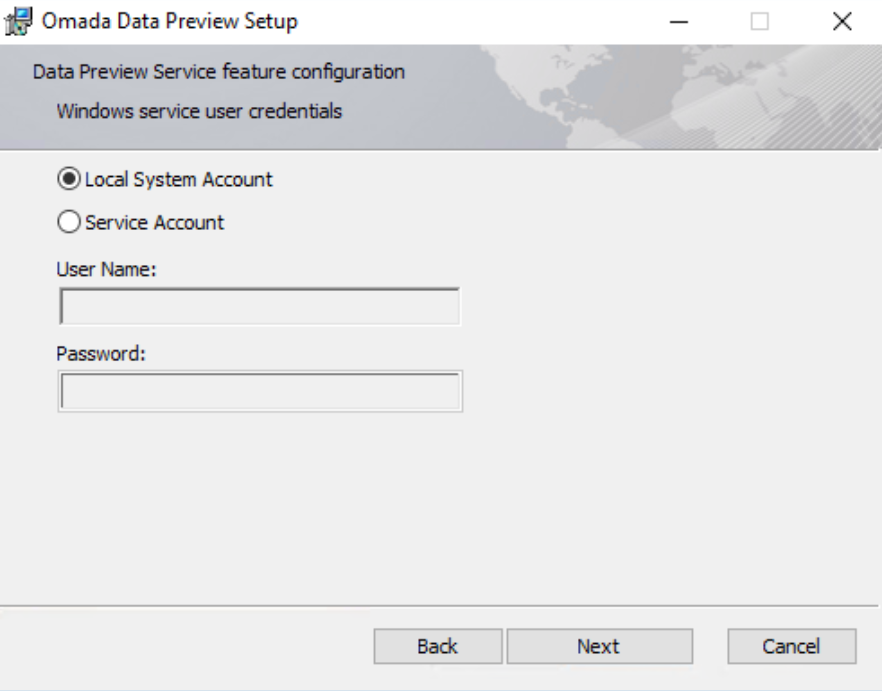
For each of the Data Preview Service and Collector Service features, select the Windows account that will run the service: Local System Account or Service Account.
-
When you select Local System Account, the User Name and Password fields are disabled.
-
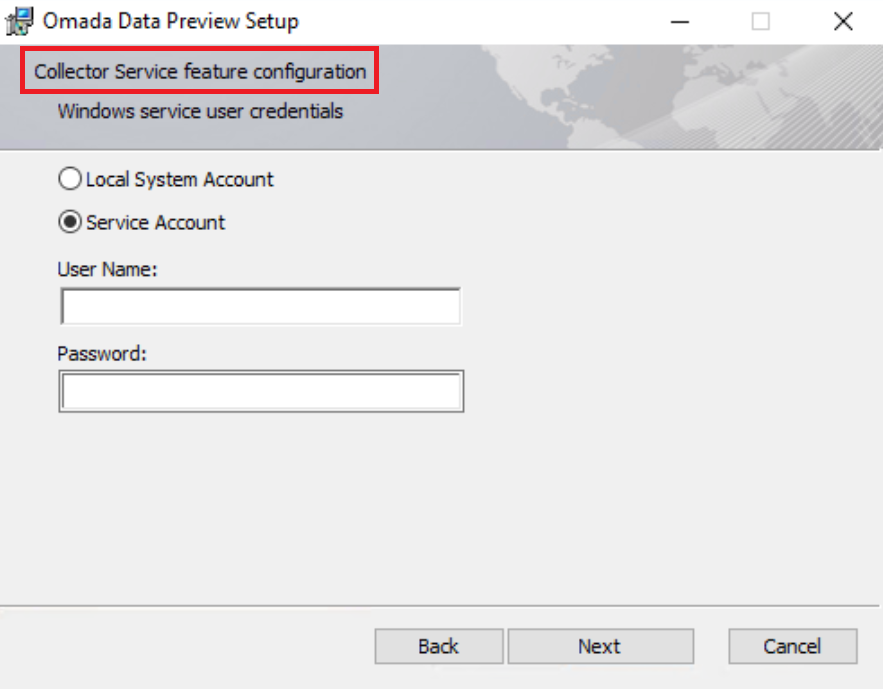
When you select Service Account, enter the account credentials in the User Name and Password fields.
 note
Use a service account if a connector needs integrated security, such as the SQL Query connector.
-
The description in each installer window identifies the service being configured.
-
-
The Add-on for Data Preview Service feature requires no additional installation steps.
-
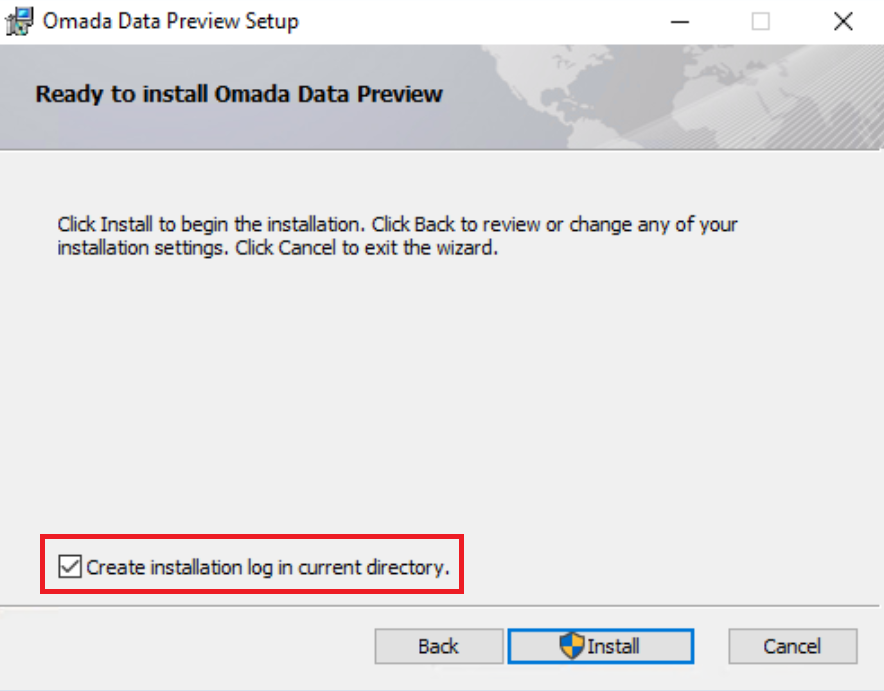
In the final installer window, select Create installation log in current directory to save the installation log in the folder containing the MSI installer.
Uninstalling the service on-prem
If you no longer need the Omada Data Preview Service, you can uninstall it. To uninstall the service:
-
Stop the website on which the Enterprise Server is hosted.
-
Uninstall Omada Data Preview from the Control Panel.
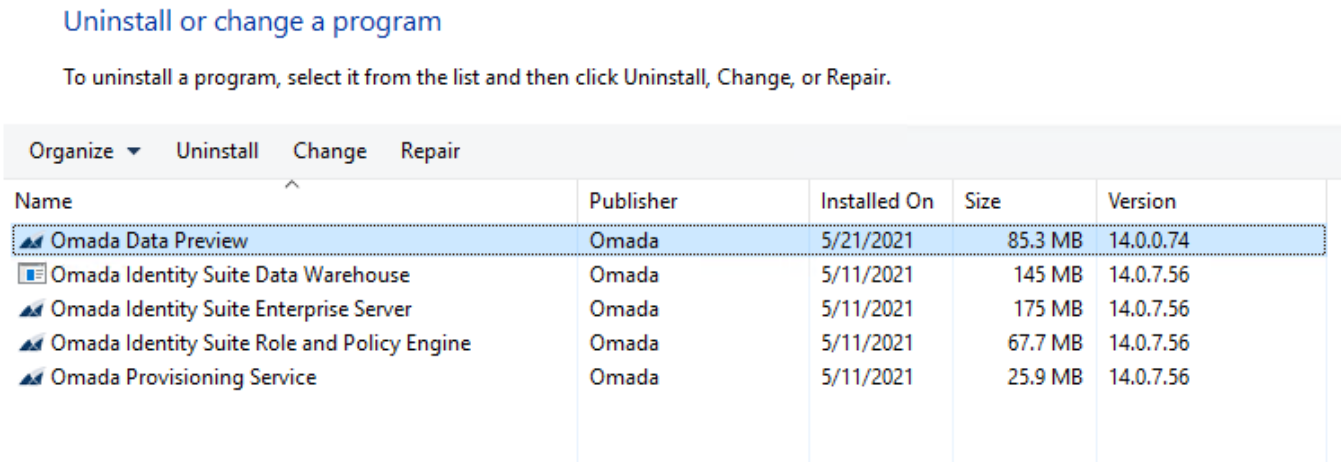
-
Restart the previously stopped website.
Uninstalling removes the service files and the Preview button from the UI. The data object form still refers to the JavaScript file installed by the Data Preview Service.
This reference does not affect the system, but you can remove it as follows:
-
Navigate to any system details page.
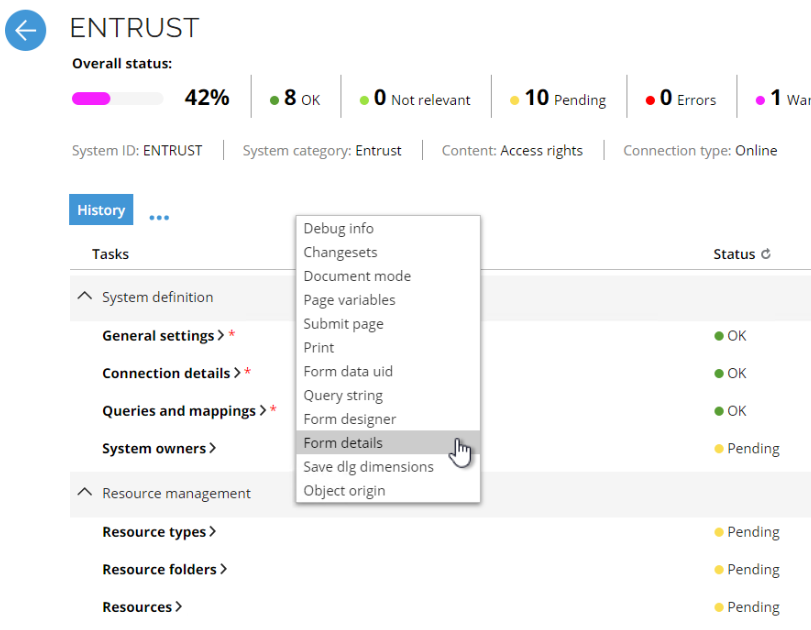
-
Press Ctrl and right-click the page and select Form details.
-
Select Script files.
-
Remove the
jsinc/OIM.SystemOnboarding.DataMapping.Preview.QandM.jsentry.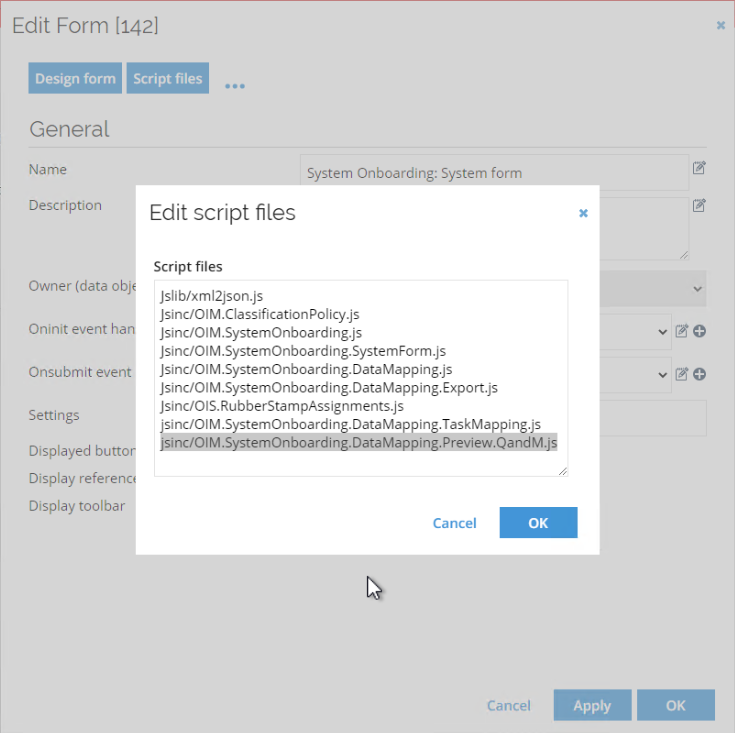
The customer settings created during installation are also not removed. They do not affect the system and can be removed directly from the Enterprise Server database with this statement:
DELETE FROM [OIS].[dbo].[tblCustomerSetting]
WHERE [Category] = 'Data Preview Service'
Data Preview Service configuration on-prem
Service location
The locations of the Preview and Collector services are defined by four parameters: Data Preview Service host, Data Preview Service port, Collector Service host, and Collector Service port. The diagram shows how the services and parameters relate.

These parameters are defined in both the service configuration files and Omada Identity customer settings.
Configuration in customer settings
Configure the Data Preview Service and Collector Service locations through customer settings. Find them under Administration → More → Customer settings, in the Data Preview Service section.
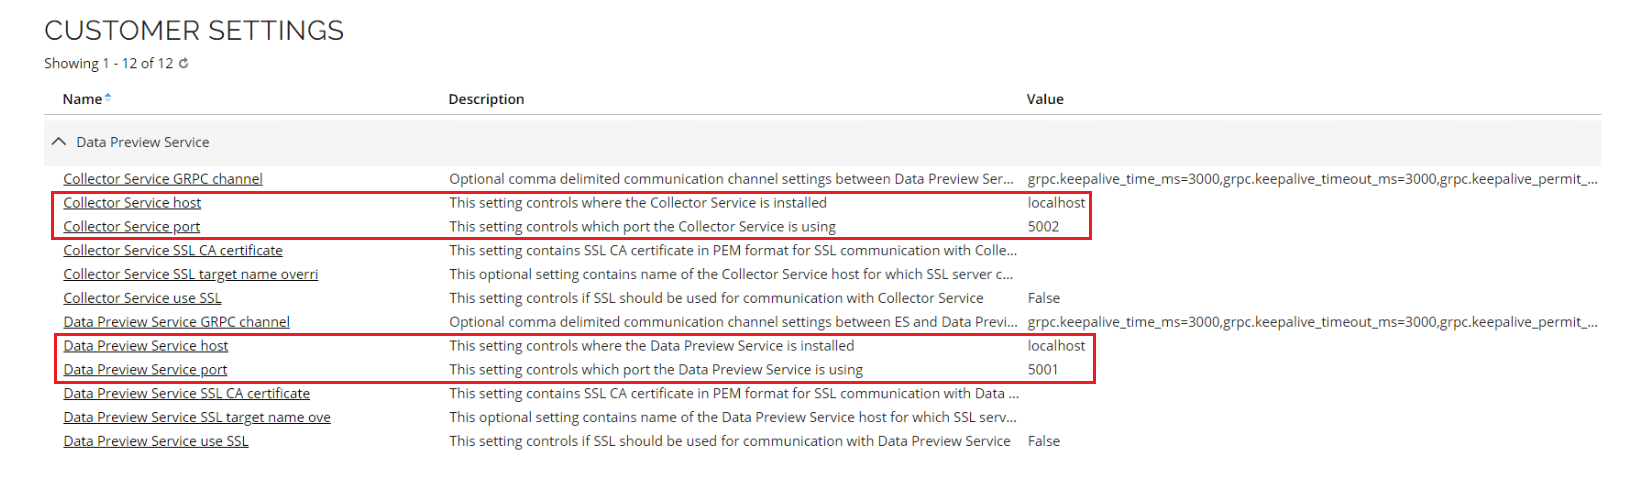
The available customer settings are:
| Setting | Description | Default value |
|---|---|---|
| Collector Service host | Host name or IP address of the computer where the Collector Service is installed. | localhost |
| Collector Service port | Port used by the Collector Service endpoint. | 5002 |
| Data Preview Service host | Host name or IP address of the computer where the Data Preview Service is installed. | localhost |
| Data Preview Service port | Port used by the Data Preview Service endpoint. | 5001 |
The port numbers in customer settings must match those in the configuration files for the Preview and Collector Services.
Configuration in config files
Configure Data Preview Service
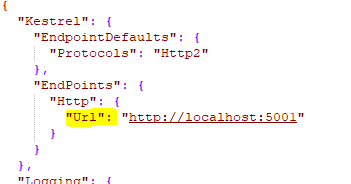
The Data Preview Service configuration file is named appsettings.json. Configure the host and port in the URL endpoint setting.
Configure Collector Service
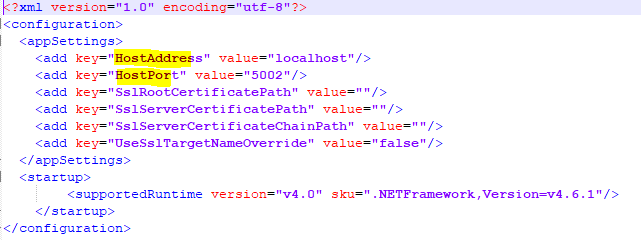
The Collector Service configuration file is named Omada.ODW.Staging.HostingService.exe.config. Configure the address and port in the HostAddress and HostPort application settings.
Service secure communication on-prem
You can secure communication between the Data Preview Service and the Enterprise Server by using TLS 1.2.
Secure communication is optional. You can configure it between selected components, for example, between the Preview and Collector Services.
Although the names of the secure communication settings refer to SSL, the protocol used is TLS 1.2.
Configure Data Preview Service
Configuration in config file
You can enable the TLS 1.2 protocol for the Data Preview Service by modifying its configuration file. The configuration file of the Data Preview Service is named appsettings.json.
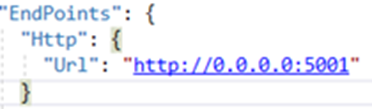
To enable TLS 1.2, you need to remove the default node:
Replace it with an HttpsFromPem node:
{
  "EndPoints": {
    "HttpsFromPem": {
      "Url": "https://localhost:5001",
      "Certificate": {
        "Path": "C:\\SslCertificates\\server.crt",
        "KeyPath": "C:\\SslCertificates\\server.key"
      }
    }
  }
}
Where:
Pathis the full path to the certificate chain in Privacy-Enhanced Mail (PEM) format.KeyPathis the full path to the private key for the SSL certificate in PEM format.
Configuration from computer store
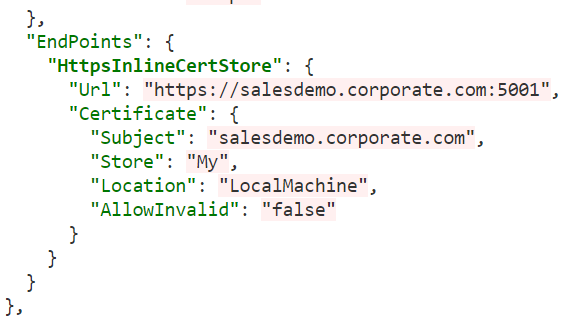
To enable TLS 1.2 using a certificate from the computer store, remove the default endpoint node as described above and replace it with an HttpsInlineCertStore node:
Configuration in customer settings
Configure TLS 1.2 for the Data Preview Service through customer settings. Find them under Administration → More → Customer settings, in the Data Preview Service section.
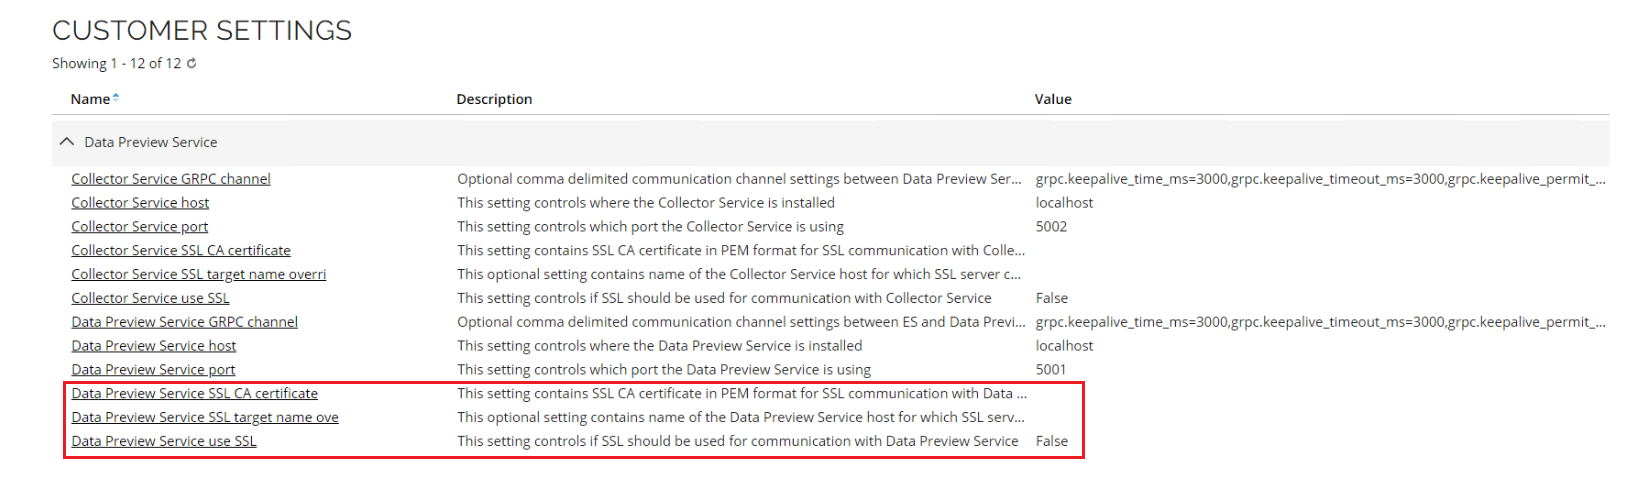
The available customer settings are:
| Setting | Description | Default value |
|---|---|---|
| Data Preview Service SSL CA certificate | CA certificate in PEM format for SSL communication with the Data Preview Service. | - |
| Data Preview Service SSL target name override | Optional name of the Data Preview Service host for which the SSL server certificate was created. | - |
| Data Preview Service use SSL | Controls whether SSL is used for communication with the Data Preview Service. | False |
Configure Collector Service on-prem
Configuration in config files
To enable TLS 1.2 for the Collector Service, modify the configuration file named Omada.ODW.Staging.HostingService.exe.config.
To enable TLS 1.2, you need to add the following keys:
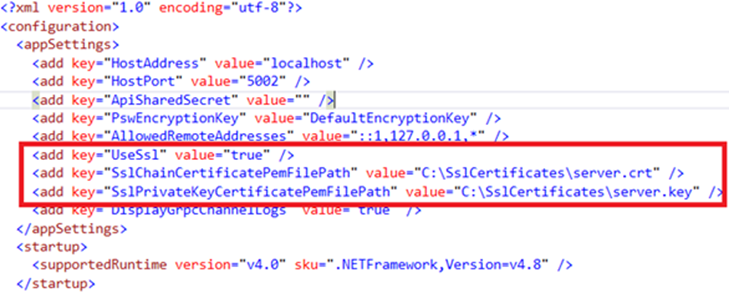
- Set
UseSsltoTrue. SslChainCertificatePemFilePathis the full path to the certificate chain in PEM format.SslPrivateKeyCertificatePemFilePathis the full path to the private key for the SSL certificate in PEM format.
Configuration in customer settings
Configure TLS 1.2 for the Collector Service through customer settings. Find them under Administration → More → Customer settings, in the Data Preview Service section.
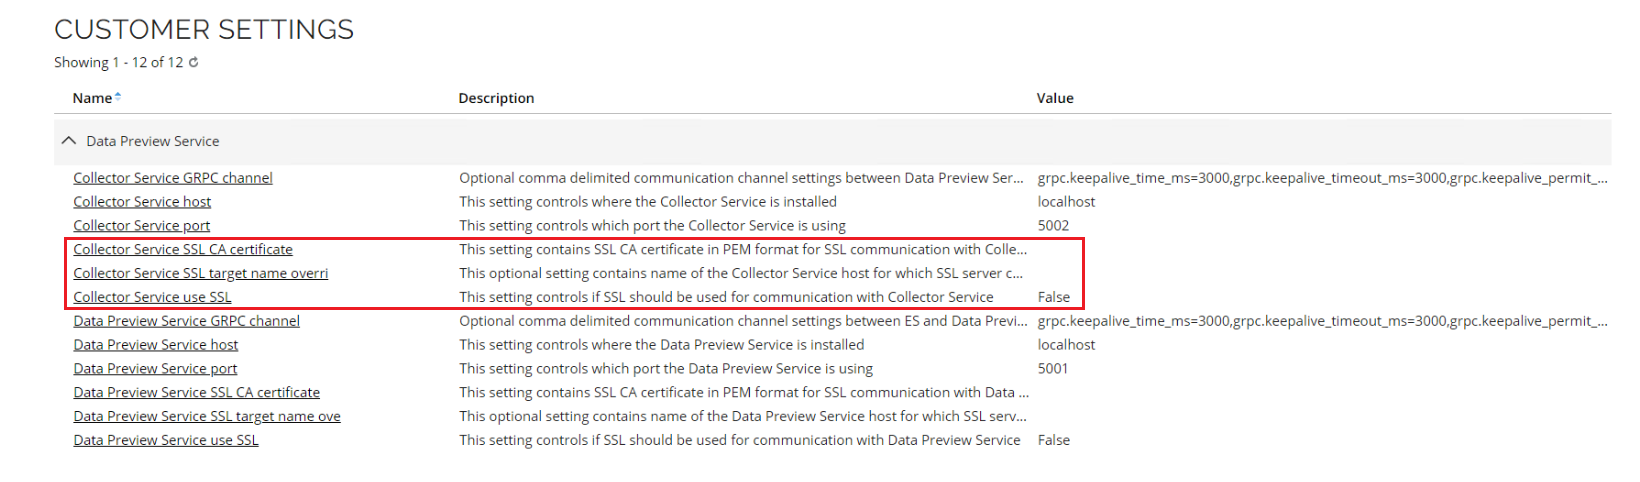
| Setting | Description | Default value |
|---|---|---|
| Collector Service SSL CA certificate | CA certificate in PEM format for SSL communication with the Collector Service. | - |
| Collector Service SSL target name override | Optional name of the Collector Service host for which the SSL server certificate was created. | - |
| Collector Service use SSL | Controls whether SSL is used for communication with the Collector Service. | False |
When deploying the services, make sure that the required network connectivity is available. In restrictive environments, you may need to update firewall rules to allow traffic on the configured service ports.
Authorize communication using ApiSharedSecret on-prem
The preview process requires two authorization steps.
Required authorizations
First, authorize Enterprise Server to communicate with the Data Preview Service.
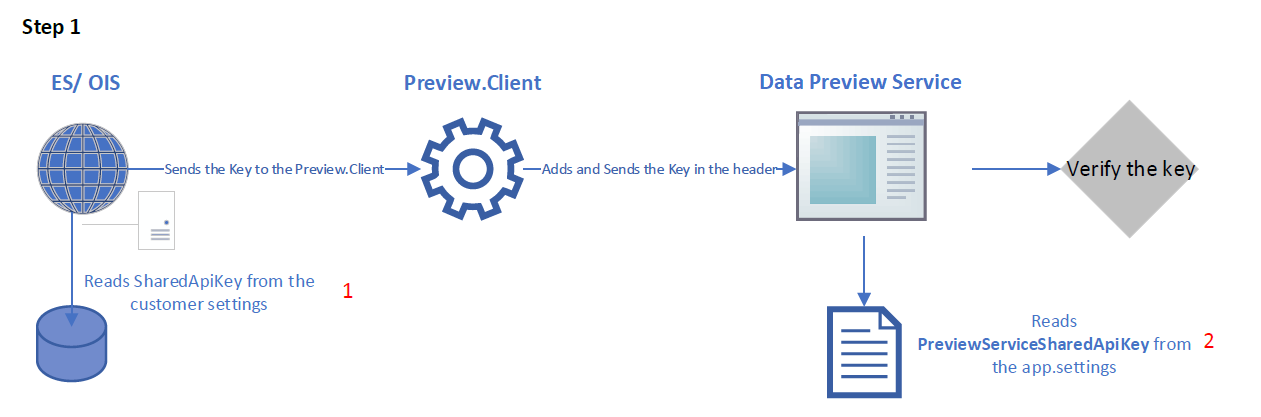
Then, authorize the Data Preview Service to communicate with the Collector Service.
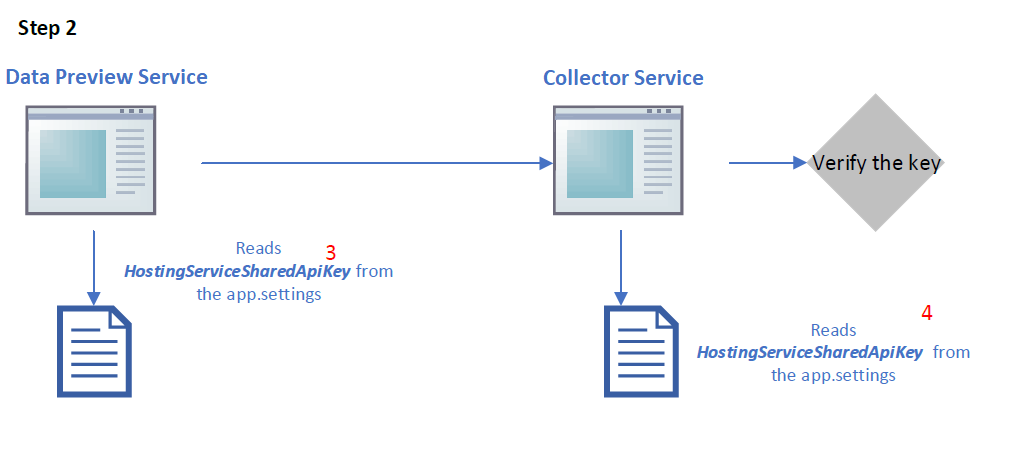
By default, the authorization keys are empty and the services use their default values. The PswEncryptionKey keys are set to DefaultEncryptionKey.
Authorization configuration process
To configure authorization for the Data Preview Service:
-
Generate the
ApiSharedKeywithStringEncrypter.exe. -
Configure the Data Preview Service
ApiSharedKeycustomer setting in Enterprise Server. -
Enter
ApiSharedSecretandPswEncryptionKeyinappsettings.jsonunderCommunicationSettings/AuthenticationSettings. -
Enter the
ApiSharedSecretandPswEncryptionKeyin theApp.configfile of the Collector Service. -
Alternatively, enter
ApiSharedSecretandPswEncryptionKeyin the Windows registry. This alternative applies only to the Data Preview Service client’sPswEncryptionKey.
IP address whitelisting on-prem
This configuration option limits which clients can communicate with the services. The Data Preview Service and Collector Service are secured and configured individually.
Data Preview Service
The clients who can access the Data Preview Service instance should be limited to the servers hosting the Enterprise Server. The IP addresses must be defined in the CommunicationSettings/AuthenticationSettings/AllowedRemoteAddresses setting in the appSettings.json file for the Data Preview Service.
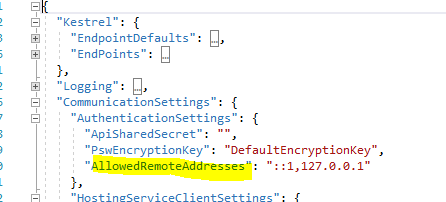
Use an address format that corresponds to the Data Preview Service host setting in customer settings:
- If the Data Preview Service host uses IPv4, configure
AllowedRemoteAddresseswith IPv4 addresses. For the default settings, use127.0.0.1. - If the Data Preview Service host uses IPv6 or a host name, configure
AllowedRemoteAddresseswith IPv6 addresses. For the default settings, use::1.
Multiple addresses should be separated by commas.
You can use wildcards only at the beginning or end of an address. For example, 10.17.92.* allows addresses in the specified subnet.
You can leave the value empty to disable the validation.
Collector Service
Limit access to the Collector Service to the servers running the Data Preview Service. Define the allowed IP addresses in the AllowedRemoteAddresses app setting in Omada.ODW.Staging.HostingService.exe.config.
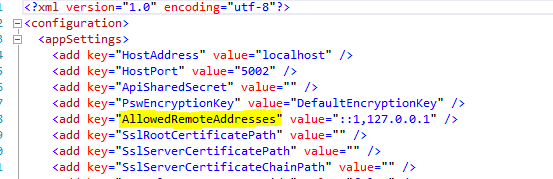
Use an address format that corresponds to the Collector Service host setting in customer settings:
- If the Collector Service host uses IPv4, configure
AllowedRemoteAddresseswith IPv4 addresses. For the default settings, use127.0.0.1. - If the Collector Service host uses IPv6 or a host name, configure
AllowedRemoteAddresseswith IPv6 addresses. For the default settings, use::1.
Multiple addresses should be separated by commas.
As with the Data Preview Service, you can use wildcards only at the beginning or end of an address. For example, 10.17.92.* allows addresses in the specified subnet.
You can also leave the value empty to disable the validation.