Changeset Import Utility
Omada provides a command-line utility for importing the configuration changes to the target systems. The Changeset Import Utility must be available in the /bin folder of the Enterprise Server application server, and you must log on to the application server of the target system for the import.
If you set up a common Transport Directory according to our recommendation, make sure that the Transport Directory is available or mapped on the application server.
This import utility has a log functionality, test mode, and silent mode to support automatic/scheduled deployment.
System recommendations
Omada recommends that you add the path to the /bin folder of the Enterprise Server installation. Add the path as the Variable value to the Windows environment variable Path, so that you are not required to go to the /bin folder to run the Changeset Import Utility command tool.
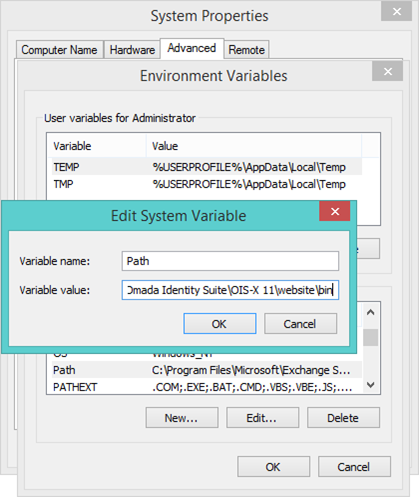
To make the changes to the Environment Variables take effect, log off and then back on again.
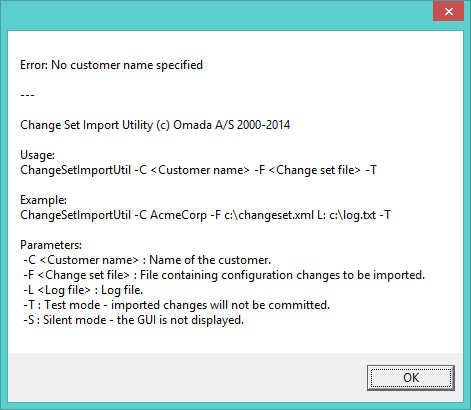
Available commands��
The following list presents the available commands:
-
–C
<Customer name>- the name of the customer. -
–F
<Changeset file>- the file containing configuration changes to be imported. -
–L
<Log file>- the log file. -
–T - test mode. Imported changes are not committed.
-
–S - silent mode. The GUI is not displayed.
-
-K - installs all core packages/changesets and applies update actions.
-
-N
<Feature package name>- imports the feature packages provided as a comma-separated list of names. By default, this command will always include the Foundation feature package, for example:changesetimportutil.exe -C localhost -N ACCESSREQ_APPROVAL_ED2,ACCESSREQ_ED2,APPONBOARDING,BUSINESS_CONTEXTS,ACCESS_DELEGATION,EMERGENCY_LOCKOUT,ESCALATION,EXCHANGE_INTEGRATION,IDENTITY_LIFECYCLE,MAINTAIN_OWN_DATA,MANUAL_PROVISIONING_ED2,ODW_INTEGRATION,OIS_MANAGEMENT,PASSWORD_RESET,OPS_INTEGRATION,ROPE_INTEGRATION,SOD_CONCEPT_ED2,SURVEY_FEATURE,CONTROLPOLICYMGMT,ANALYTICS,POLICY_RISKCHECK,VAULT_INTEGRATION,SUBSCRIPTION_INTEGRATION,EXTENDACCESSREQUEST
The command line use for the Changeset Import Utility is as follows:
ChangeSetImportUtil –C <Customer name> –F <Changeset file> –T, for example:
ChangeSetImportUtil –C AcmeCorp –F c:\changeset.xml –L c:\log.txt –T
You can also view these commands online. To do this, you should open a command prompt (and if no environment variable has been created), go to the /bin folder of the Enterprise Server installation. Type changesetimportutil, and the following message box displays:
Testing imports
Before you import the configuration changes to a target system, the Changeset Import Utility allows you to test the import.
To import a changeset in test mode to a target system, use the command-line utility with the customer-specific parameters, such as:
Changesetimportutil –C OIM_QA –F "C:\Program Files\Omada Identity Suite\Enterprise Server 12\ChangeSets\test.xml" –T
The Changeset Import Utility opens. The user interface of this utility presents the changes contained in the changeset:
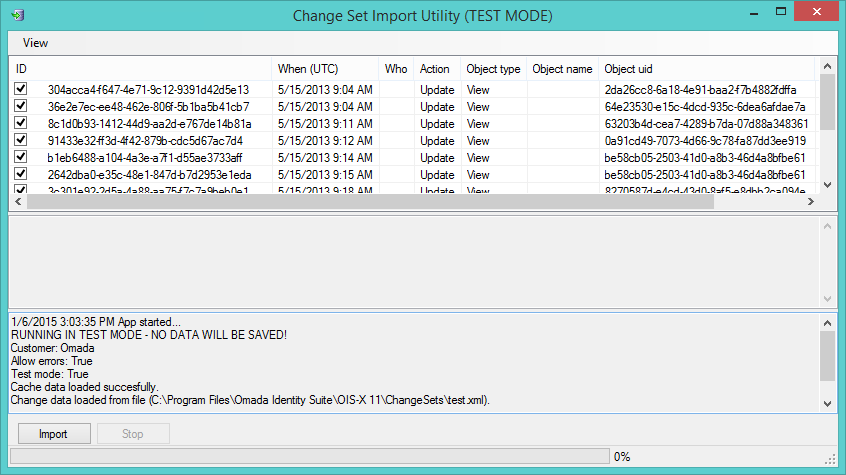
When you click Import, you simulate the import of the changes. Enterprise Server checks if you can import the changes, and the results are displayed in the Success column. The result can be either Success or Failure.
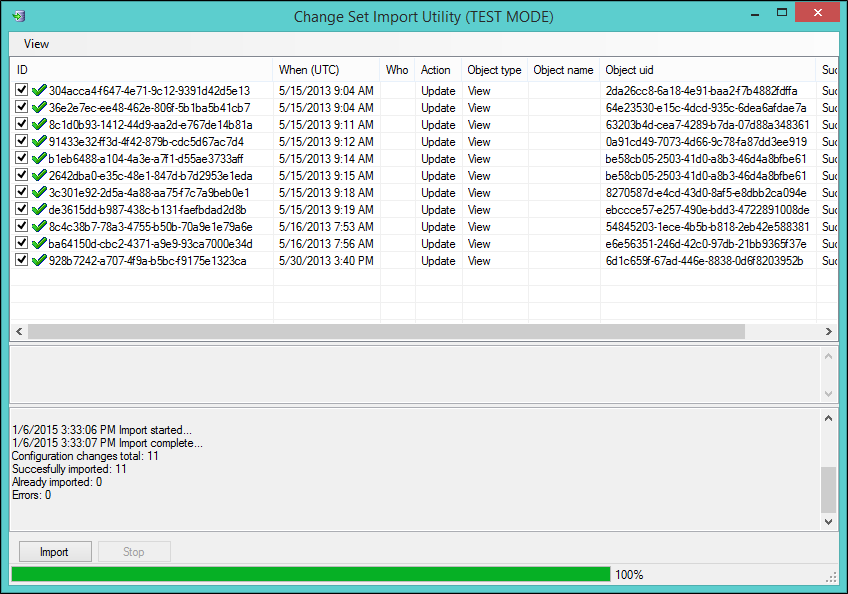
If the status for the changeset changes is Success, you can import the changes to the target system.
Importing changeset to a target system
To import a changeset to a target system, use the command-line utility with the customer-specific parameters to open the Changeset Import Utility.
Changesetimportutil –C OIS_QA –F "C:\Program Files\Omada Identity Suite\Enterprise Server 12\ChangeSets\test.xml"
Merging changeset files
The Change Set Merge Utility merges or combines several changeset files into one changeset. This allows you to import these files at the same time.
The Change Set Merge Utility is located in /bin as ChangeSetMergeUtil.exe. It takes the following parameters when you use it from the command line:
| Argument | Description |
|---|---|
| -I <input file directory> | The directory of the input files that contain configuration changes to be merged. |
| -O <output file name> | The output file containing the merged result. |
| -S | The user interface is not displayed. |
| -N | No compression is made of the resulting merge file. |
Using Change Set Merge Utility
If you did not create an environment variable, such as suggested previously in this chapter, open a command prompt and go to the /bin folder of the Enterprise Server installation. From here, type changesetmergeutil to open the Change Set Merge Utility.
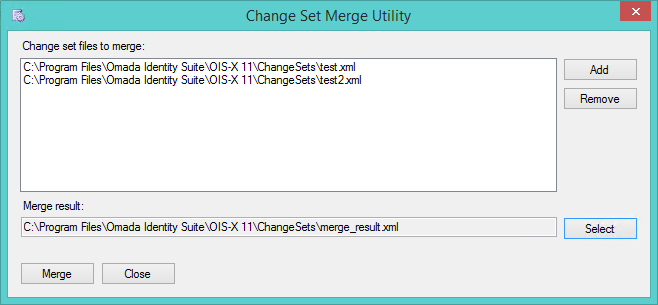
Click Add to locate and select the changeset files that you want to merge.
When your changeset files list is complete, click Select to choose an output file for your merged result and a location for that output file. The system suggests the file name merge_result.xml. You can change this to suit your organization’s purposes or standards.
After you select the merge result file, click Merge to merge your files. You now have a single XML file that you can work with.
When you import all your files at the same time, all changes are imported in the correct order and one database transaction. Omada recommends that you import all files at the same time, instead of importing each file one by one.
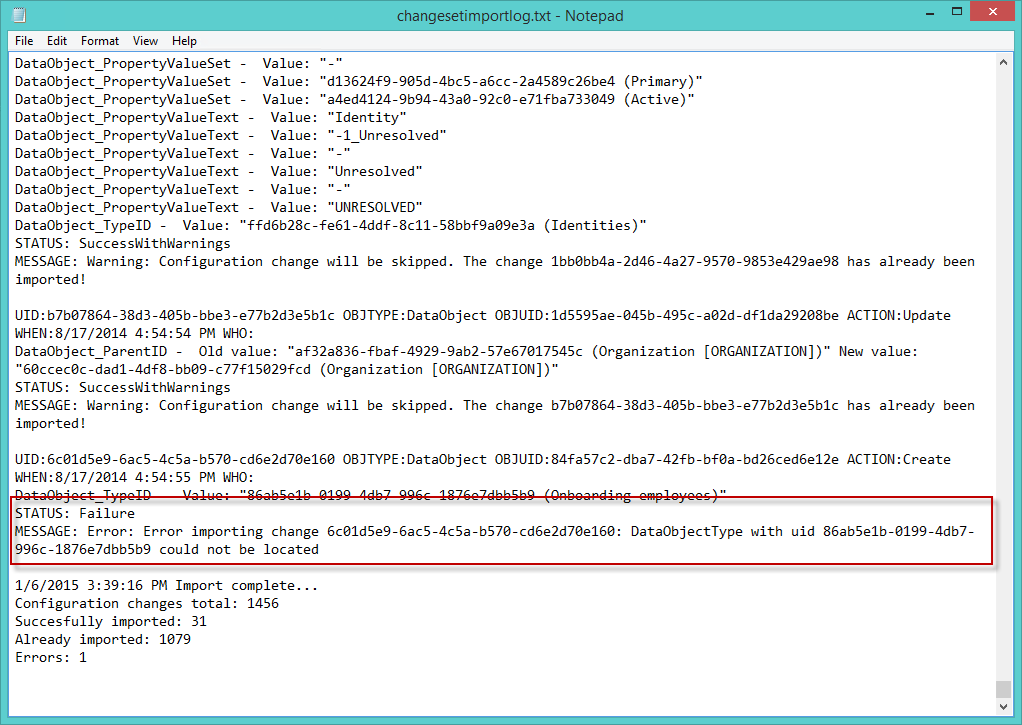
Logging
The Changeset Import Utility provides a log feature so that you can analyze and document the imports. To activate the logging functionality, type –L <filename>, for example:
Changesetimportutil –C OIS_QA –F "C:\Program Files\Omada Identity Suite\Enterprise Server 12\ChangeSets\test.xml" –L C:\Logs\changesetimportlog.txt
The utility displays information about each import.
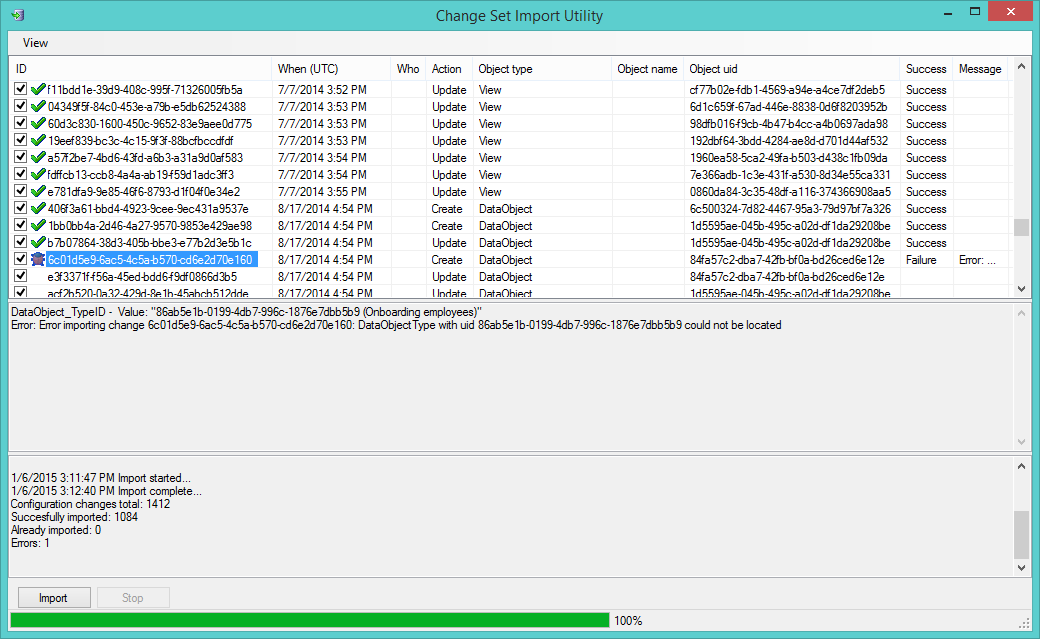
In this example, the Changeset Import Utility could not import the highlighted change because this import includes a change that has a dependency on an object that does not exist in the target system. You can read the error description in the log file.