Governance
The governance processes cover the tasks and data that provide reports for documentation and investigation – who approved what, where, and why.
The governance processes enable large and complex organizations to efficiently perform ad hoc, and periodic reviews of users’ access rights, while continuously reconciling those rights against potential regulatory requirements.
Within the information security sphere, the control-driven processes in this chapter ensure compliance with governance requirements such as:
- ISO 27000 international standard.
- The European Union’s General Data Protection Regulation (EU GDPR).
- The Control Objectives for Information and Related Technologies (COBIT).
Data classification in relation to IGA is related to risk management and control of access to data such as critical customer information, personal data, and others.
Reporting
The Omada Data Warehouse (ODW) uses Microsoft SQL Server Reporting Services (SSRS) for reporting purposes, offering historical reporting capabilities. A log report also shows at which point changes were made to data.
Apart from SSRS, the Omada Identity analytics platform also includes the SQL Server Analysis Services (SSAS) Tabular Model that contains data from the Omada Data Warehouse (ODW). The SSAS Tabular Model provides measures for reporting and performing fast analytics on identity and access data. The model uses the DAX query language for querying the Omada Identity portal.
Generate a report
Goal and description
The goal of generating reports is to extract historical data from a data repository to find information for relevant objects.
In the IGA field, reporting is typically used to review identity access to resources and systems. The review of data can be done through reports or the monitoring of current data lists.
Depending on the purpose of the reporting, in Omada Identity there are many ways to view and create a report. For example:
- Dashboards that show live data in the View, KPI, and Charts widgets.
- Data objects list views that show data objects in Omada Identity.
- ODW reports that show historical reporting.
On the one hand, dashboards and Data Objects list views display live data, showing the state of the system at the moment it's consulted/queried. On the other hand, ODW reports only show historical data.
Dashboards
Omada Identity features configurable dashboards that enable the display of relevant content for different types of users. A dashboard consists of widgets that you can use to view the following data:
- Views widget showing the contents of a view.
- Chart widget showing a chart based on data in a data source object, for example, a SQL Query.
- Key Performance Indicator (KPI) widget.
In Omada Identity, a KPI is a comparison that's returned from a scalar data source or a data object counter with a number of thresholds and determines the status of the KPI. Selected KPIs also offer a possibility of performing a drill-down to the data source. The status can be green, yellow, or red.
Object Data list views
A view in Enterprise Server defines how information is displayed to the user about data objects, activities, processes, and others. The most common views are Object Data list views, where you can define the type of objects to include and the fields of information to display. For example, you can apply filters and access modifiers to the information.
For reporting purposes, the Object Data list views can be downloaded in the .csv or .pdf format.
Analytics capabilities
The Analytics capability ensures that Assignment data from RoPE are delivered directly to the Analytics database instead of passing through an import from the source system. This mechanism reduces the time in processes when data can be incorporated in Peer Access Analytics dashboards and KPIs.
The near real-time analytics timer allows Platform Admins to configure timers that override the default requirements of frequency which are set to 15-60 minutes.
ODW reports
ODW reports are used to view historical data and provide an audit trail on who had access to what at any point in time. SSRS reports can also show changes that have happened over a specific period.
Report types and views
There are different types of ODW reports:
- Point-in-time reports that show data at a specific point in time.
- Log reports that show attribute changes for an object.
ODW has a Reporting layer that consists of a set of database views. All ODW reports and other end-user queries must go through the reporting layer. The views in the reporting layer simplify queries by making available, attributes from multiple dimensions.
For example, an account view not only includes account attributes, but also includes attributes from the system that contains the account and attributes from the identity that owns the account.
The views are also used to enforce data security. Users with the Auditor role can query views with access to all data, while users with the Reader role can query views that only return data that the user owns.
The operations reports that show details on the ODW import and export, query the dbo.sysssislog table directly, and not through a view.
- Point-in-time queries
Every version of an object has an effective, as well as an expiration time that's truncated to whole minutes. The effective time of a version is set to 1 minute later than the expiration time of the previous version, therefore there is a 1 minute gap between the two versions. Due to this gap, it's required that point-in-time queries are truncated to whole minutes. Otherwise, if the query is between two versions, the object is not returned.
- Time-period queries
Queries that can be filtered on a specific time-period can return the same object more than once if multiple versions of the object exist in the time-period. However, this is not always desired. For example, if a query must return the number of objects instead of the number of object versions.
An example of time-period queries is when a report must show the number of resource assignments that existed for a resource during a specific month.
Because each resource assignment has a distinct ObjectID attribute, the query
must use COUNT(DISTINCT(ObjectID)) to return the correct result.
Stakeholder(s) in the process
- The identity that's generating the report.
Pre-conditions
- Data must be available in Omada Identity.
- Relevant security settings must be configured in Omada Identity, accordingly.
Post-conditions
- Users can access reports and export data.
Data objects
- Any data objects can be used.
Process flow
-
The user browses to a relevant report and chooses any optional parameters, such as system, account, resource, identity, or context.
-
The system checks if the user has permission to read the data from the database, and if so, it shows the data in the report.
noteDifferent types of reporting can have different permission requirements.
-
Optionally, the user can save the report in the following formats for later review:
- .xls
- .csv
- .pdf, and others.
-
Reporting provides a comprehensive data overview across systems and applications to answer essential questions such as:
- Who has access to what, and why?
- When did they obtain the access rights?
- Who approved access rights, or when was the access removed? among other criteria.
The reporting and analytics functionalities can discover violations, and if any are found, find out who approved them.
- Analytics can be the foundation for efficient role-mining. Role-mining means determining instances of similar specific access requests or special functions, so new roles can be added.
- Audit-ready reports enable easy compliance with auditors’ requirements. There are predefined Key Figures and Key Performance Indicators (KPIs) available, enabling inspection of the compliance level of identities and systems. In addition, auditors can get on-demand access to reports, including insights for the logging of processes and approvals. By default, the system provides an automatic time-stamp functionality to log specific actions at a given time.
Frequency of process runs
- When necessary.
- Standard reports show the data in a predefined format, and after it's viewed, it can be exported into different formats.
- Custom reports can be relevant for certain types of data and users.
For more information about reports, refer to Reports.
For more information about the analytics platform in ES, refer to Advanced Analytics.
Surveys
In Omada Identity, surveys allow managers to review and provide attestations for their users’ access rights to information, applications, and other resources contained within IT systems.
In a survey, respondents receive survey questions as work items that they must answer through the My work items view.
It helps organizations manage user-access rights in compliance with government regulatory laws, industry-specific standards, internal security requirements, and SoD policies.
Design certification campaign
In Omada Identity, certification campaigns (also known as review, attestation, and recertification) are used to periodically verify that access rights, policies, role definitions and Master Data in the system are valid.
To do this, Omada Identity provides a module to design certification campaigns. The most common certification campaigns survey all identities’ access to resources in the target systems.
The module provides many default certification campaigns. However, own certification campaigns can be defined considering the following information:
- Determine the purpose of the campaign. For example, what data is to be certified and by whom? How often should the campaign run?
- Determine the actions to be taken when responses are submitted, and what happens when answers are not given.
- Design notification and reminders to determine who can monitor and administer the campaign. Changes to the report may be relevant.
- Design the Data model and technical definition of the campaign.
- Test-run the campaign and make relevant changes.
- To encourage responses, consider the amount of data presented to the users responding to the campaign.
The following table shows standard OOTB surveys with their respective reference to the Omada Process Framework.
| Survey | Reference to process framework |
|---|---|
| Approve requested access | Approval of access requests process. You can find more information about this process in the Access management chapter. |
| Access review for managers | Access review for managers process. You can find more information about this process further in this chapter. |
| Access review for resource owners | Access review for resource owners process. You can find more information about this process further in this chapter. |
| Account ownership review | Account ownership process. You can find more information about this process further in this chapter. |
| Classification survey | Apply classification tags to data object process. You can find more information about this process further in this chapter. |
| Deleted Context survey | N/A |
| Resource classification survey | Apply classification tags to data object process.You can find more information about this process further in this chapter. |
| Manage control policy exceptions | Manage control policy expectations survey. |
| Manage control policy exceptions with ownership | Manage control policy exceptions with ownership survey. |
| Review joined identities | Apply review joined identities in ODW. |
| Resource classification survey | Apply review and manage classification surveys. |
| System classification survey | Apply classification tags to data object process. You can find more information about this process further in this chapter. |
| Transfer ownership survey | Transfer ownership process. You can find more information about this process further in this chapter. |
| Transfer identity assignments | Transfer identity assignments process. |
| User Mailbox access review | User mailbox access review process. You can find more information about this process further in this chapter. |
| Role certification survey | Resource owners can Keep or Remove the resources for roles. |
The survey types of Access review for managers and Access review for resource owners are similar in functionality.
Administer certification campaigns
In Omada Identity, Survey Administrators and System Administrators can both administer and monitor a running survey campaign. By default, a System Administrator can initiate and assign surveys.
Security settings must be changed to ensure other user groups can also administer surveys.
In addition, Survey Administrators can perform the following tasks:
- Determine how to start the survey campaign. For example, it can be based on a regular time schedule (start a campaign every 6 months), it can also be manually started or be event-based. The administrator can also set the scope of the campaign. For example, which data to survey.
- Launch a campaign and monitor the progress of the survey, including respondents and their answers.
- Reassign questions if requested by the respondent.
- Monitor the start and progress of automatically launched surveys.
- Optionally, save and send reports to stakeholders (for example, external auditors).
- Optionally, and if not all questions have been answered, close the survey when the deadline is met.
Reminders and notifications are sent automatically, as included in the definition
of the campaign.
Moreover, surveys are initiated automatically through survey schedules.
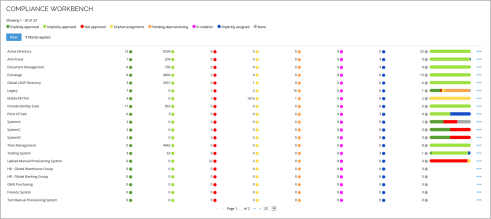
If you want to launch or initiate a survey manually, you can do it through the Services Dashboard or the Compliance Workbench.
Launch a survey
By default, you can launch a survey from the Compliance Workbench view, where you can see the current assignment status listed on a per-system basis.
To launch a survey for a system:
- In the Compliance Workbench, in the list of systems, on the right-most-hand side, click the three dots, as shown on the screenshot.

-
Click the survey that you want to initiate. For example, Access review for managers.
tipThe organization can set up more surveys to suit its needs.
-
In the Compliance Status section, select the relevant compliance status.

- Click OK. In the Initiate Survey view, you can configure your survey to include options that are relevant for the manager to review. For example, you can set a deadline for the survey to be completed.
If Create verdict for multicontext assignments only if all decisions are identical is selected, we only create a verdict if it's the last assignment that we're making decisions on. If there are opposite decisions for the assignment (in different contexts), we don't create the verdict but expire the assignment. If decisions are the same, we create only one verdict.

- When your selections are ready, click Generate survey data.
- In the Verify view, you must verify your choices. To make any changes to the survey, click Go back. To continue and send the relevant tasks to the individual manager, click Launch survey tasks.
Surveys view
A Survey view allows to track the progress of a survey. Survey Administrators can access it through the following location: My Data > Manage > My Surveys.
Operation Administrators can also access the surveys view through the following location: Setup > Operations > Surveys.
To access this view, you must be a member of the Auditors, Data Administrators, System Administrators, or System Owners group.
Close a survey
When a survey respondent has answered all survey questions in all workflow steps, the survey closes automatically.
The status of the survey is then set to Complete, and any system actions that the System administrator may have configured for the system are run. For example, deprovisioning of access rights for non-answered survey questions.
A survey can also close before the survey respondent has answered all questions in the survey. This may be relevant if, for example, the questions of the survey are no longer relevant, or if the survey includes questions that were added by accident.
The following procedure can only be performed by a Survey Administrator.
To close a survey, follow these steps:
- In the Surveys view, select the relevant survey and then click the three dots.
- Click Edit and then click Close Survey.
- Click OK.
At this point, all work items are closed, the process is canceled, and any configured system actions are run.
When the survey closes, the Survey Administrator receives a confirmation message, and the survey changes its status to Completed on the Surveys view.
Generate survey report
Optionally, you can generate and download a report of the questions in the survey, in the PDF or CSV format.
Survey assignees, Administrators, and Auditors can all generate reports.
In these reports, assignees can only view the questions that are assigned to them, while Survey Administrators and auditors can view all questions.
To generate a survey report, in the Survey questions view, click Download PDF or Download CSV.

Reassign a survey
In certain cases, it may be necessary to reassign one or more survey questions to a different user than the original survey assignee.
The following procedure can only be performed by a Survey Administrator.
To reassign a survey:
- In the Survey questions view, select the survey questions that you want to reassign, then click Reassign.
- In the dialog box that opens, select one or more users to assign the questions to.
Create a Survey Template
Optionally, you can create a survey with the Survey Template process. This configuration allows you to create a new survey template. It supports the use of custom JavaScript files for forms used in the workflow steps.
The interface has seven tabs that you need to fill in before your survey is ready for publishing:
| Tab | Description |
|---|---|
| General | Determines what data is preloaded in the survey UI. |
| Survey object | Here, you can add properties that will be available on the target survey object. |
| Data sources | Data source or sources that the survey object will be loaded from. Here, you can define child object reference properties that will be used for parent/child surveys. |
| Workflow | Here, you can define the number and order of steps that the survey objects will be processed in. |
| Forms | Here, you can define the form survey respondents use when they edit the survey objects and answer any survey-specific questions. |
| Grids | Her,e you can efine the column in the grids that are presented to the users who perform the workflow tasks. |
| Post action | Defines the post-action to execute the survey. |
After filling in the tabs, you need to review and confirm your survey template configuration in the eighth Finalize step before publishing the template.
Respond to campaign questions
When a Survey Administrator starts a survey, all survey questions are assigned to the responsible person. If no responsible person was found, the question remains unassigned and can be manually assigned by the Survey Administrator.
The following is the generic workflow:
- The user receives a task to recertify data, for example, access rights for managed identities.
- The user reviews the data presented, and if necessary, acquires additional information.
- The user enters the response and can submit the answers. The respondent is presented with the progress of the campaign and can see how much of the task is still outstanding.
If the respondent believes that they are not the appropriate person to respond to a question in the campaign, they can contact the administrator to reassign the question.
Workflow example: Access reviews
When a manager receives an Access review task, the task appears in the Tasks area of the user’s main page.
The workflow for access reviews is similar to the access request approval
workflow described in the Approval of access requests process.
The difference
between the two workflows is that, in the Action column, the two possibilities for
answers to access requests are labeled Keep and Remove, compared to Approve
and Reject. The progress bar shown at the top of the Access review page is also
different. The manager does not have to answer every access review item at the
same time but can answer some items at a certain point in time and return to
answer more items later.
The progress bar helps you keep track of your submitted answers. Every time that a manager submits an answer to one or more items where you have clicked Keep or Remove, the progress bar displays the percentage of completion in green and the progress percentage increases.

The progress bar only changes when you submit answers, and not when you click Keep or Remove.
The Access review task remains open until the manager has submitted an answer to every item that appears in this task. When the manager has completed all of the answers, they must click Submit to return to the main page.
The green notification bar informs that the task has been completed successfully.
The following table includes Access review survey view descriptions.
| Column | Description |
|---|---|
| Status | Shows a status bar for the relevant access request. When you approve or reject the access request, the state and color of the status bar change accordingly. |
| Identity | Lists the identity that requested the access. |
| Resource | Lists the resource that the employee has requested access to. |
| Account name | Lists the identity’s account name, typically initials. |
| Attributes | Assignment-related Attributes and Attribute values. |
| Action | Allows you to keep or allow the access request. The reviewer must always choose either one. Each time an answer is submitted, the progress bar increases its green color, and the percentage goes up. |
| Action comment | Allows you to add a comment to describe the decision. For example, a manager or responsible person can write to explain to the employee why the manager has rejected an access rights request. |
| Details | Opens a pop-up window where you can see all the details of the access rights request. You can also fill in the options Make Actions and Action comment to make decisions about these two actions from here. |
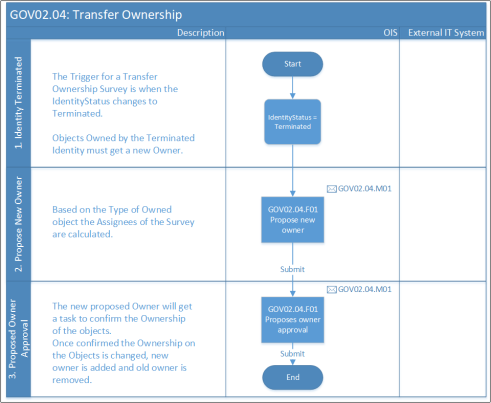
Transfer ownership
The Transfer ownership process is useful before or when an identity is terminated. Afterwards, objects must be reassigned. Before an identity is terminated, all ownership of objects must be reassigned or transferred.
Stakeholder(s) in the process
The survey starts automatically, and the assignees are calculated based on the type of each of the owned objects. The survey currently manages the following ownerships:
| Ownership | Description |
|---|---|
| Technical identity | The system owner for the related system |
| (Human) Identity | The manager of the identity |
| Org. Unit | The manager of the Org. Unit |
| Resource | The manager of the resource owner |
| Resource folder | The manager of the owner of the resource folder |
| System | The manager of the system owner |
| Constraint | The constraint owner |
Pre-conditions
- An identity with ownership is terminated or is going to be terminated.
Post-conditions
- All ownership is reassigned.
- Manual owners are not removed in the Transfer Ownership survey. They need to be manually removed.
Data objects
- All owned objects of the terminated identity.
- Previous owner.
- New owners.
- Constraint owner.
Process flow
- Identity is terminated.
- Survey is triggered to transfer ownership.
- Proposal of new owners.
- New owner to accept the proposal.
- Ownership is changed.
Frequency of process runs
- The process begins when an identity is terminated.
If the ownership of an object is under control of the Omada Identity Management feature, and the owner is stated as an explicit owner that originates from the ODW, the survey cannot be used for removing the current ownership.
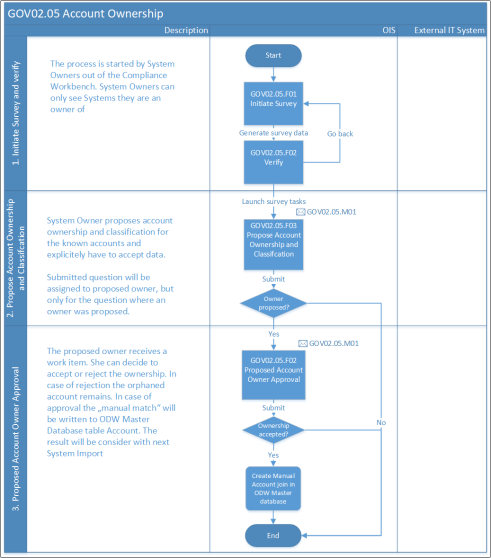
Account ownership
The Account Ownership process is used to manually define an owner for an orphaned account where system-specific rules configured in Omada Identity could not identify an owner.
This can be necessary when data quality is not optimal and defined account ownership rules don't cover all accounts in a target system.
In an Account Ownership review survey, the System Owner can propose an owner and an account type for the accounts that are included in the survey. The survey is initiated by the System Administrator or someone else in the management group, then the System Owner answers the survey.
Potential results are manually proposed owners, but the process can also serve as input for deprovisioning activities as orphaned accounts might be old, and the person that previously owned the account has already left the company or organization.
Stakeholder(s) in the process
- System owner.
- Proposed owner.
Pre-conditions
- Target system data has been imported.
- Account ownership and classification rules are correctly defined.
- RoPE calculation has taken place.
Post-conditions
- Account ownership and classification are manually set.
- Report of accounts that cannot be matched for deprovisioning/ data cleanup has been created.
Data objects
- Identity
- Resource
- System
Process flow
- In the Compliance Workbench, the System Owner reviews the orphaned assignments.
- The System Owner initiates an Account Ownership review.
- The System Owner proposes owners for the accounts where they have the necessary knowledge.
- The proposed Account Owner accepts or rejects the ownership.
Frequency of process runs
- When necessary.
Only a System Owner can start the survey out of their Compliance Workbench. System Administrators and Data Administrators can launch a survey for all systems.
The following table describes the columns in the System Owner/ Account Ownership view.
| Column | Description |
|---|---|
| Status | Shows a status bar indicating whether the survey respondent has accepted the data or not. |
| System | Lists the system that the account is linked to. |
| Account name | Lists the name of the account that you want to propose an owner to. |
| Last logon | Shows the last time that someone logged on to that account. |
| Last password change | Shows the time when someone last changed the password for that account. |
| Proposed account owner | Propose an owner for the account. |
| Account type | Select the type of the account you're handling, for example, a personal account. |
| Accept data | Select what data to include in the survey response. |
| Details | Opens a popup window with details about the relevant item. |
| Name | Name of the survey. For example: Account ownership survey for M365x78775. |
| Description | A description of the survey. For example: survey for assigning ownership to accounts for unconfirmed owner. |
| Deadline | Deadline for answering the survey. |
| Survey admins | Lists the System Owners for the survey. Note that this field is prefilled with System Owners. |
| System or application | Lists the scope of the system or application. For example: M365x787754. |
| Accounts in systems with tags in this category | This field filters systems based on classification tag category. |
| Accounts in systems with the following tags | Filter systems based on classification tag. |
Access review for managers
Managers use this process to recertify (or regularly review) assignments for all their managed identities.
The Access Review for Managers process can be initiated either automatically, based on a previously set schedule, or manually by System Owners, Data Administrators, or System Administrators. Moreover, surveys can be scoped by System, Org. Unit (OU), specific resources or Compliance Status, to include accounts and is based on classification tags.
Managers get a recertification survey to decide whether to keep or remove the scoped access of all managed identities in scope. For assignments associated with a context, questions will be assigned to the context owners.
On the one hand, direct assignments, or assignments with only an Actual state reason to be removed, are immediately expired and deprovisioned.
On the other hand, kept assignments with a Desired state will remain as they are, while kept assignments without a previous Desired state get an assignment verdict which equals the Desired state.
The decisions regarding surveys are stored in Omada Identity and it includes information about the decision, comments, and a timestamp.
If Create verdict for multicontext assignments only if all decisions are identical is selected, we only create a verdict if it's the last assignment we're making decisions on. If there are opposite decisions for the assignment (in different contexts), we don't create the verdict but expire the assignment. If decisions are the same, we create only one verdict.
Stakeholder(s) in the process
- Beneficiary Identity
- Manager
- Process initiator
Pre-conditions
- Each identity must have a manager, either through the context an assignment is for, directly on the identity, or through their primary context type.
Post-conditions
- Assignments are recertified or deprovisioned.
Data objects
- CARA/CPRA
- Identity
- Resource Assignment
Process flow
- The process is triggered on schedule or on-demand by the System Owner or Data/ System Administrators.
- The Process initiator scopes the survey.
- Scheduled surveys can be assigned for review before they're distributed.
- Manager answers survey questions and submit answered questions.
- Direct assignments or assignments with only an actual reason are immediately expired in case of a decision to Remove.
- A kept assignment without a previous Desired state gets an assignment verdict which equals a desired state.
- Deprovision request for expired assignments is sent.

Frequency of process runs
- Based on a predefined schedule or when necessary.
- The process might be triggered on a schedule, for example, once a year.
- The criticality of resources or identity categories (employee vs contractor) can shorten the review cycles.
- Escalation should be considered.
- In a large organization, surveys might be divided by organization.
The following table shows the fields in the Initiate Survey and Scoping views description.
| Field | Description |
|---|---|
| Name | Name of the survey. |
| Description | A description of the survey. |
| Deadline | Deadline of the survey. |
| Survey admins | List of survey administrators. |
| System | System filter. |
| Organizational unit | OU filter. |
| Resources to include | Filter to recertify assignments in specific resources. |
| Include account assignments | Checkbox that defines if account assignments are part of the survey. |
| Assignments with tags in this category | Filter on classification tag category. |
| Assignments with following tags | Filter on classification tag. |
| Resource Risk Level | Filter on resource risk level. |
| Identity Risk Level | Filter on identity risk level. |
Access review for resource owners
The Access review for resource owners process is very similar to the Access review for managers process.
The biggest difference is that the owner of the assigned resources is assigned to perform the recertification task. Additionally, the Access review for managers takes the resource assignment context into account to enable assigning survey questions to the context owner instead of the primary manager of the identity, when a resource assignment has a context assigned.
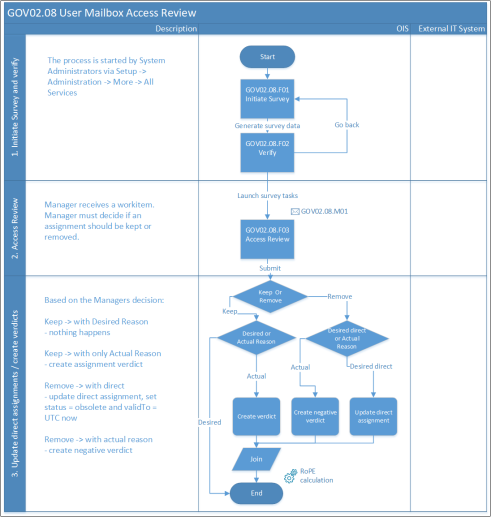
User mailbox access review
This is a survey for reviewing calculated resource assignments for access to Exchange user mailboxes. Questions are assigned to the managers of the identities that the assignments are for.
Omada Identity provides advanced connectivity for Microsoft Exchange. In addition to managing mailboxes, Omada Identity supports three commonly used permissions on mailboxes:
- Send As
- Send on Behalf
- Full Access
The purpose of this process is to recertify access to Exchange user mailboxes.
Stakeholder(s) in the process
- Identity with access to another mailbox.
- Identity with mailbox ownership.
- Manager of identity with access to another mailbox.
Pre-conditions
- Each identity has a manager, either directly on the identity or via their primary context type.
Post-conditions
- Assignments are recertified or deprovisioned.
Data objects
- CPRA
- Identity
- Resource Assignment
Process flow
- The User mailbox access review process is triggered on schedule or via System Owner or via Data System Administrators.
- The Process initiator scopes the survey.
- Scheduled surveys can be assigned for review before they're distributed.
- Manager answers the survey question and submits it.
- Direct assignments or assignments with only an Actual state reason to be removed, are immediately expired and deprovisioned.
- Kept assignments with a Desired state will remain as they are, while kept assignments without a previous Desired state get an assignment verdict which equals a Desired state.
- Deprovision requests for expired assignments are sent.
Frequency of process runs
Based on schedule or when needed.
Reference
The following table shows the fields in the Initiate view descriptions.
| Field | Description |
|---|---|
| Name | Name of the survey. For example: Account ownership survey for M365x78775. |
| Description | A description of the survey. For example: Survey for assigning ownership to accounts for unconfirmed owner. |
| Deadline | Deadline for answering the survey. |
| Survey admins | Lists the Survey administrators or process initiators for the survey. Please note that this field is prefilled with the Process initiator(s). |
| System | System filter. |
| Organizational unit | Filter based on the Org. Unit (OU). |
| Resources | Filter based on specific resources. |
| Resources to include | Allows you to filter to recertify assignments for specific resources. |
| Compliance status | Allows you to filter on compliance status. |
| Include account assignments (checkbox) | Defines if account assignments are part of the survey or not. |
| Assignments with tags in this category | Allows you to filter on classification tag category. |
| Assignments with following tags | Allows you to filter on classification tags. |
Control policies
Control policies provide a framework for detecting and reacting to inconsistencies within the system by correcting them or introducing appropriate controls. This helps ensure the high quality of master data and entitlement data in the system.
Types of exceptions that can be detected by means of control policies are objects that don't have an owner, roles without proper descriptions or mandatory fields defined, or circularities in the role hierarchy (for example, when two roles are incorrectly set up as each other's parent role). If an issue is detected by a policy, a Control Policy exception workflow is launched and assigned to the policy owner, or other configurable user, so that the issue can be addressed in a structured way.
Control policies can be created and configured by Master data administrators in the ES Portal. To access the control policies in order to create, configure or delete them, log in as a data administrator and navigate to Setup > Master Data > Policies > Control Policies.
Reference
The following table shows the properties that apply to creating, modifying, or terminating a control policy.
| Property | Description |
|---|---|
| Name | The name of the policy. |
| Description | The description of the policy. |
| Owner | The owner(s) of the policy. The owner of a control policy is assigned to deal with policy exceptions if it's not possible to derive a more specific user or group. See the Resolver reference path row in this table for details on how to derive such a user. |
| Data object type | Specifies the type of data objects that the control data set contains. Must be specified regardless of whether the control data set type is “Data object query” or “SQL query”. |
| Data set type | Selection of the type of the data set. The data set can be a Data object query or an SQL query. |
| Data set view | Selection of a Data set view for the Data object query. |
| Data source data set | Selection of the Data source data set for the SQL query. |
| Mode | One or more of the following values: Preventive, Detective, Corrective. |
| Inactive | Can be used to set the policy to Inactive. Inactive policies are not enforced by Omada Identity. |
| Resolver reference path | Specifies a data object reference path to a user or user group. Is used to (with a data object that violates the policy as starting point) derive who should address the exception. The outcome of evaluating the path must be users and/or user groups. The possibilities and limitations of specifying a resolver path are the same as in survey templates. This means that, for example, possible to specify a group using Group: System administrators. |
| Schedule | Specifies a schedule for when the policy will be evaluated. Is only considered if the policy has the Detective mode. The schedule is defined by a timer data object. |
| Policy type | Selection of the policy type. The policy type is used in the Policy Dashboard. The possible types are: - Unspecified - Identity - Resource - Other Master Data - Sensitive Access - Privileged Access - Training |
| Max violations | Maximum number of unhandled exceptions (violations) that must exist for the policy. If a policy is evaluated and new exceptions are discovered, then those won't be recorded if the total amount of open exceptions exceeds the specified max value. If the value is set to 0, there is no maximum. |
| Exception description template | Template used for composing a description for a policy exception. The template can contain property variables from the Data object type. |
| Corrective action | Specifies a corrective action that will be executed if a violation is detected. The corrective action is a Copy Rule. It's only considered if the policy has the Corrective mode. |
| Survey template | A survey template can be added in this field. This survey is used to handle the found policy exceptions. Surveys must be defined for a CTRPOLICYEXCEPTION data object. If no survey is specified, the default template is used. |
Preventive control policies
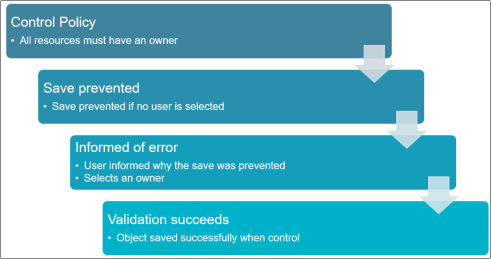
In the Preventive mode, data objects are evaluated against the control policies at the point of their creation or modification. If the new object violates the policy, its creation will be prevented, and an error will be shown. No exception data objects will be created, as the change will be prevented from happening.
Detective control policies
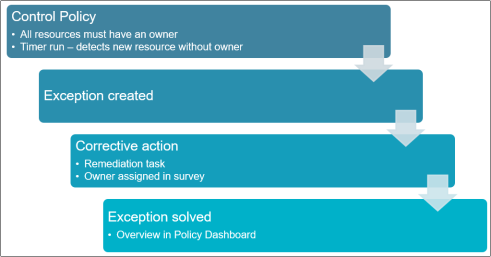
When a Detective policy is evaluated, and a violation is detected, an exception data object is created, and the survey for managing exceptions is launched (if a survey instance already exists, the new exception object is added to the running survey).
Detective policies should have a schedule defined, but they can be also run ad-hoc. The schedule refers to a Timer object which determines when the policy should be evaluated.
If a data problem is detected, Omada Identity creates an exception, launches a control policy survey, and assigns this survey to a user that can address the problem.
The standard survey template uses the UpdateDataObjectSurveyPostActionHandler
survey post-action handler. This post-action ensures that the exception object is updated
with the status, comment, and compensating control selected in the survey. it's
recommended to use this post action and create a custom post action to perform
additional actions.
The standard survey template is installed with the Enterprise Server.
You can also create custom survey templates to be used with a Control Policy. it's recommended that you base the custom templates on the standard control policy template.
Corrective control policies
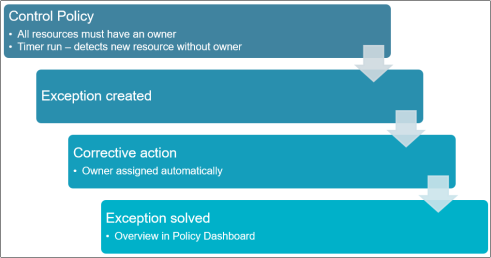
In this mode, Omada Identity will attempt to fix a detected issue automatically. This feature is especially intended for correcting missing data issues, for example, systems without an owner or resources without a description.
If a control policy has the Corrective mode, then it must refer to a copy rule object in the Corrective Action property. The copy rule must have the same source-object and destination-object type, and that object type must be the one selected for the policy.
The Corrective mode can only be used together with the Detective mode.
Monitoring
As Control policies detect problems with master data and access rights, any such detected problems are called Policy exceptions. You can monitor the Policy exceptions through a dedicated view available from Setup > Operations > Policy Exceptions. The Policy Exceptions view presents the list of all detected exceptions, regardless of the exception status.
You can also use the Policy Dashboard that provides a graphical overview of exceptions. it's available under Setup > Operations > Policy Dashboard.
Note: The Policy Exceptions view is not used for resolving exceptions. they're resolved via survey tasks, available from the My Tasks view.
Reconciliation
Reconciliation is the comparison of the Actual State (in the target system) against the Desired State (of data) in Enterprise Server.
In Omada Identity, RoPE performs reconciliation on resource assignments, which then compares the Desired State as defined in Enterprise Server, and the Actual State data available in ODW.
The Attribute level reconciliation concept allows you to configure RoPE to compare the attribute values. If these attribute values don't match, RoPE assigns the provisioning status Pending update and takes appropriate actions.
RoPE displays this information in the Compliance Workbench, which then can be imported into ODW, for example, to report on historical compliance status.
Reconcile Desired and Actual state
In Omada Identity, RoPE performs reconciliation on resource assignments, which then compares the Desired State as defined in Enterprise Server, and the Actual State data available in ODW.
The Attribute level reconciliation concept allows you to configure RoPE to compare the attribute values. If these attribute values don't match, RoPE assigns the provisioning status Pending update and takes appropriate actions.
RoPE displays this information in the Compliance Workbench, which then can be imported into ODW, for example, to report on historical compliance status.
Compliance status
RoPE calculates a compliance status for all Calculated Resource Assignments (CRA).
The compliance status shows if an assignment has been either implicitly or explicitly approved. The compliance status can be seen in all pages where RoPE-calculated assignments are shown, including ODW reports.
The following table includes an overview of compliance statuses:
| Status | Description |
|---|---|
| Explicitly approved | The CRA is the outcome of a direct assignment, or it has been approved in a verdict survey. |
| Implicitly approved | The CRA is the outcome of a policy or it’s a child of an assigned enterprise or application role. |
| Not approved | The CRA only exists in the connected system – there is no Desired state for it. |
| Orphan assignment | The CRA belongs to the unresolved identity or ODW is uncertain of its ownership. |
| Pending deprovisioning | The CRA is waiting to be deprovisioned. |
| In violation | The CRA violates a constraint. However, it has not disabled it because a pending evaluation procedure exists for the violation. |
| Implicitly assigned | An implicitly assigned enterprise or application role which is not in violation. |
| None | Implicit assignments are created for enterprise and application roles if RoPE detects that an identity is assigned to all the contents of the role – but not the role itself. |
Compliance Workbench
The Compliance Workbench is a user interface for System Owners and Auditors to help make a system or application compliant. It shows an overview of the compliance status of all resource assignments for a system or application.
RoPE computes a compliance status for all calculated assignments, and the status further indicates if an assignment has been implicitly or explicitly approved.
The status indicates the state of all resource assignments based on the Actual state (from ODW data) and on the Desired state as defined by Assignment and SoD policies, approvals and survey results.
Actions can then be taken based on the status of the resource assignments. The Compliance Workbench fulfills the following main tasks:
- It shows resource assignments grouped per system and their compliance status.
- It provides a fast overview of the compliance state of all systems included.
Moreover, this interactive dashboard allows the users to:
- Get detailed information about the resource assignments.
- Start recertification, for example, access or account ownership survey.
Data classification
Data classification can help companies or organizations comply with data security regulations such as the EU GDPR and others, by tagging certain data object types.
Adding classifications can provide the organization with the ability to establish a risk- management strategy, including relevant risk controls.
Classification tags and classification tag categories (a group of classification tags) can be added for the following data object types:
- Systems
- Contexts
- Resource
- Resource Folders
- Identities
Administer classification tags
The goal of the Administer classification tags process is to define classification categories, and to establish concrete classification tags in those categories.
A classification tag category is a group of classification tags. For example, a classification category labeled Very Sensitive Information could be created.
After one or more classification tag categories have been created, classification tags can be created, which allow the organization to divide the data into more levels.
Identities, systems, resources, resource folders, context and other objects can be classified so they can manage other processes. For example: how often should assignments be certified or if based on the classification, whether security settings are appropriate or not.
Classification tag categories and classification tags can be added to certain Object Data Types to help organizations comply with security regulations such as the EU GDPR and provide accountability in relation to it.
Classifications gives an organization the ability to establish a risk-management strategy, including relevant risk controls.
By default, Omada Identity has a few predefined classification tags and classification tag categories to get started. This is because the type of classification that you must set may be different depending on the type of business or national context in which your organization operates under.
What must be complied with in one country or type of organization may not be the same in a different country or organization.
Stakeholder(s) in the process
- Data Administrators can create and maintain Classification tag categories and Classification tags.
Pre-conditions
- N/A
Post-conditions
- Classification tags and categories are created.
Data objects
- Classification Tag Category
- Classification Tag
Process flow
-
In Omada Identity:
- Data Administrators manually create and maintain the objects in Omada Identity.
- System Administrators can perform Data Exchange to do a mass upload/modification.
-
Outside Omada Identity:
- Review applicable laws and regulations pertaining to the organization and determine which data must be classified.
- Perform data mining to identify and analyze potential classification categories and tags.
- Validate classification categories regarding classification objectives
- Perform risk assessment of a new classification in relation to the laws and regulations.
- Select classification owners who can approve classification of an object.
- Describe new classifications regarding business objectives and purpose (request and review).
- Initiate classification campaigns for objects that must be classified.
Frequency of process runs
- When necessary.
-
The classification of data can be mandated by regulations that apply to the relevant company/organization. Classification must then be performed and maintained to ensure requirements are met.
-
The following list outlines potential laws and regulations that organizations should be aware of when implementing Omada Identity.
- EU GDPR (EU General Data Protection Regulation)
- ISO 27001 – IT Security
- ISO 20000 – Service Management
- MaRisk (Mindestanforderungen an das Risikomanagement – Minimum Requirements for Risk Management)
- Basel III
- SOX (Sarbanes–Oxley Act of 2002)
- COBIT (Control Objective for Information and Related Technology Standards)
- ITIL (Information Technology Infrastructure Library)
- Other company-specific policies
- HIPAA (Health Insurance Portability and Accountability Act of 1996)
This is not an exhaustive list and other regulations may apply.
EU GDPR classification tags
Classification tags allow you to further divide data into different levels of security. In the context of the EU General Data Protection Regulation classification category, you can add classification tags for the following:
- Personal data
- Personal sensitive data
- High-risk data
- Medium-risk data
- Low-risk data
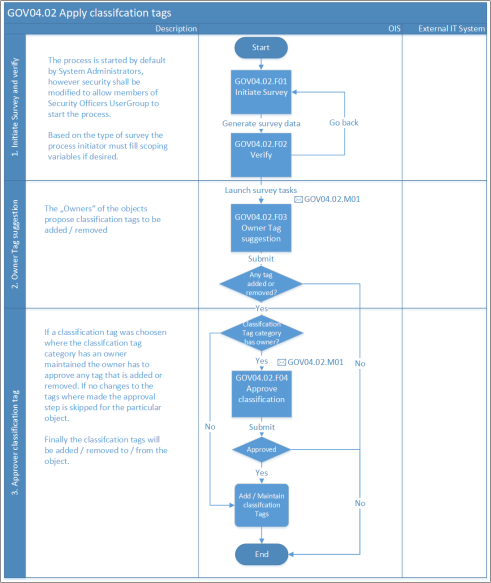
Apply classification tags to a data object
- A Security officer can start a survey, asking data owners of relevant objects to classify objects by tagging them with predefined classification tags.
When you have set up the classification tag categories and classification tags required for the organization, the next step is to tag the data object types.
It's considered best practice to run surveys when working with classification.
Out-of-the-box, Omada Identity delivers the following 3 predefined surveys:
- Classification survey
- Resource classification survey
- System classification survey
Changes to classifications are maintained in Audit Trail reports.
Stakeholder(s) in the process
- Security officer
- Owners of objects
Pre-conditions
- Classification tags and Classification tag categories must be setup.
- Classification tag category owners must be defined.
Post-conditions
- Objects in scope of the survey are classified.
- Views and reports show assigned classification tags.
Data objects
- Resource
- Resource Folder
- System
- Identity
- Context
Process flow
By default, only System Administrators can start a survey, however, it's recommended to allow Security officers to start the surveys.
- Survey(s) can be started through Menu > Setup > Administration > More > All Services.
- Depending on the type of survey (Resource, System, all objects), the scoping of the survey has to be done.
- Survey questions are previewed.
- The survey is started.
- A user receives a task to classify data.
- User selects the classification and can submit the answers. The respondent is presented with the progress of the campaign and can see how much of the task is still outstanding.
- If the respondent doesn’t think they are the correct person to respond to Classify an object, they can contact the administrator to reassign the question.
- When submitting the classification, it will go to an approver, who reviews and either approves or rejects the classification.
Frequency of process runs
- When scheduled or when necessary.
- It's important to determine who the correct people are to classify and approve the classifications.
- Classification tags might be respected in case of incident response, for example in case of identity theft Omada Identity can log all system accounts that are classified as being high-risk.
The following table shows object types and the respective owners responsible for them.
| Ownership | Assignee/ Object type |
|---|---|
| Identity | IDENTITYOWNER or MANAGER |
| Resource | OWNER |
| Resource Folder | OWNER |
| Context | OWNER |
| System | OWNER |
Advanced risk score
It's important for organizations to have an overview of what risk each employee represents to the company, based on their access rights.
In order to help determine which staff members have access to resources that represent a high risk to the organization, the Advanced Risk Score feature in Omada Identity can be used to calculate risk scores of resources, roles and identities on the basis of how the systems, resources and identities are classified. This can be necessary, for example, when a user requests access to additional resources, and there is a need of reviewing the user's risk level before the decision to approve the request is taken.
The risk score expresses what risk a given identity, resource or assignment represents from a security perspective. Risk scores, which are presented as a number, can be then expressed as user-friendly ranges called risk levels (for example: high, medium, low). Risk levels are displayed, for example, in the approval workflow to assist the approver.
Viewing risk scores
Risk scores and risk levels can be inspected in the following places in the Omada Identity portal:
| Place | Description |
|---|---|
| Resource form | In the Advanced section, the calculated Risk score and Risk level is displayed. |
| Identities view | A Risk level column has been added to the view. |
| Identity form | In the Identity details section, the calculated Risk level is displayed. |
| Access request approval surveys | Risk level information is accessible from the level of Identity and Resource pop-up forms. It's also possible to add Resource and Identity Risk level columns to the survey tasks. |
| Access review surveys | Risk level information is accessible from the level of Identity and Resource pop-up forms. The goal is to assist the approver in deciding whether to approve or reject a request. |
| Reports | Risk level information is available in a number of the standard reports: Resource details (WRE002), Identity details (WID002), Identity change log (WID003). |
Risk configuration
Omada Identity calculates risk scores of resources and identities based on the classification tags that are associated with Systems, Resources, Resource folders, Identities and Business contexts (such as Org. units).
Each parameter that's used in your risk model can be set up as a classification tag category (for example, Criticality). The different values within a parameter are defined as classification tags. Each tag in a given category (for example, Critical, and Non- Critical within the category Criticality) is assigned a Risk Value.
You can also adjust each classification tag category with a Risk weight factor. By using the Risk weight, you can use the same risk value scale across all tags within different categories (for example 1-100), while still being able to adjust the impact that the different parameters or categories have on the total risk score.
Systems are classified according to the parameters relevant to them (in this case, the criticality of the system). Systems are typically classified by their criticality, but other categories can be added, if needed.
Systems are not considered as risks themselves, but are used as input for the risk score calculation of the resources in the system.
Resources are classified according to the type of data involved, as well as the access level that the resource grants. Other categories can be added if needed. The resource risk score is the sum of the classification tags for the resource itself plus the system it relates to.
Risk calculation
Based on all the resource assignments for an identity, both resources and roles, the identity will be assigned a risk score that's equal to the highest risk score of the resource assignments for the identity.
Additional risk classification tags can be added directly to the identity, if the person is representing a special kind of risk that's not directly related to the individual resource assignments. These will be added to the risk score derived from the resource assignments.
A typical scenario would be an identity that has numerous resources assigned within the same system, causing the combination of the resources to have a higher risk level than an identity that has only a single resource assigned.
A resource belongs to a system which is classified as Non-Critical, it provides Write access, and the Data Classification is Confidential.
The following image shows system and resource classification tags.
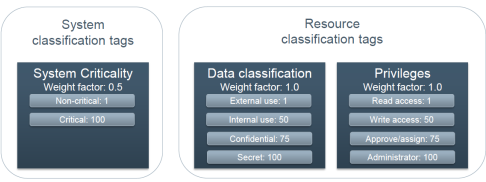
The risk score in this example is: (1x0.5) + (75x1.0) + (50x1.0) = 125.5.
Risk levels
In most views, risk scores are being categorized and displayed as a risk level instead. The risk levels are ranges of risk scores.
Risk levels are used to:
- Categorize a wide range of risk scores into groups
- Simplify the display of the risk in different contexts
The thresholds that control into which risk level a given risk score is translated are configured in the configuration object named Risk level thresholds.
There are different risk levels for resources and identities in the configuration object. This is needed if the classification tags (consequently, the risk scores) are assigned directly to identities or indirectly via context assignments.
Segregation of duties
The Segregation of duties (SoD) module enables you to:
- Define enforceable policies for granting access.
- Detect policy violations based on defined rules and policies to ensure critical access combinations are not granted without risk evaluations and approvals.
- Ensure that dispensations to violations are periodically re-evaluated.
Evaluate violation
The goal of evaluating violations is to detect policy violations based on defined rules and policies to ensure that critical access combinations are not granted without risk evaluations and approvals. The SoD module is used to define policies (such as Create, Modify or Terminate a constraint policy) for toxic combinations of access rights assigned to the same person, detect any violations, and evaluate them to determine if they should be allowed or blocked.
The SoD module also ensures that dispensations to violations are periodically re- evaluated, and that policy violations during the request of access and assignments became effective before they were provisioned to the target system.
In addition, the module allows for a fine-grain definition of constraints, based on a mutually exclusive Business Process matrix or a mutually exclusive Resource matrix.
It's also possible to evaluate constraints on resource or identity level. Business processes allows you to associate multiple resources with a business process, allowing the definition of SoD constraints for a particular job or function. This can save you from adding constraint rules for every possible resource combination.
The SoD module also supports a mitigation workflow, powered by the Business Process engine, where a Security officer and/or manager can evaluate all violations for an identity with the possibility of overriding selected violations.
Omada Identity also validates if a new role or an updated role would include permissions that would violate an SoD conflict; Omada Identity prevents this by displaying an error message with the violated constraints and related permission resource.
Changes to classifications are maintained in Audit Trail reports.
Stakeholder(s) in the process
- Identity with toxic resource combination.
- Manager.
- Security officer.
Pre-conditions
- Compensating Controls must be defined.
- Constraints must be defined.
Post-conditions
- Toxic resource combination exception is approved, or the violation has been resolved.
Data objects
- Compensating Controls
- Constraints
- CARA/CPRA
- Identity
Process flow
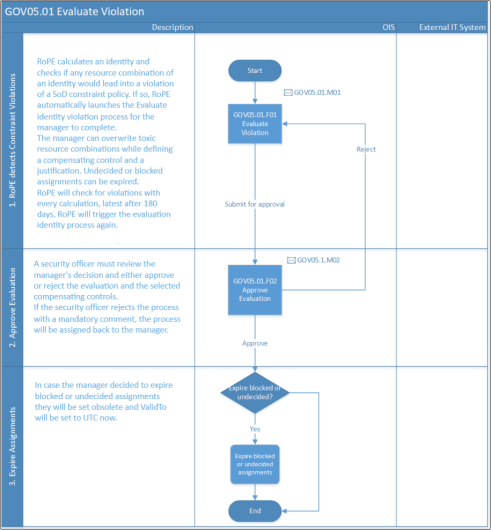
- RoPE calculates identity and detects a toxic resource combination based on an SoD constraint.
- If the violation is due to a newly assigned resource, then RoPE does not create a provisioning task before the violation is set to allow or resolved.
- When a violation related to an assignment that's already provisioned is detected, for example, because a new Constraint was created, then RoPE does not immediately create a deprovisioning task, but waits until the violation is set to allow or resolved.
- The manager gets a task to approve or resolve the violation. Approving a violation requires a justification and selection of a compensating control.
- After the manager submitted the user group, Security officers receive a task to approve the evaluation. Security officers cannot resolve the manager’s decision; however, they can reject the task and send it back to the manager with a comment.
- Once the evaluation is approved by Security officers, approved toxic combinations are provisioned/kept. In case of resolved conflicts, assignments are disabled or deprovisioned.
Frequency of process runs
- Whenever RoPE detects a toxic combination, or when a previous evaluation has expired. (The default value is 180 days).
- It's important to determine who the correct people are to classify and approve the classification tags.
- Classification tags might be respected in case of incident response, for example in case of identity theft, Omada Identity can log all system accounts that are classified as to be of a high-risk.
The following table shows the descriptions of fields in the Evaluate identity violation view:
| Field | Description |
|---|---|
| Expiration | Evaluation is valid until the specified date. |
| Identity | Name of the identity. |
| All violated policies | A list with all the policies the user has violated. |
In the Evaluate identity violation view, in the bottom pane, a manager can click Allow, to have the ability to resolve blocked assignments. Then, the manager must also select a predefined Compensating Control and enter a justification for it and click OK.
When each violation has been decided, the manager should click Submit for approval to proceed to the review process.
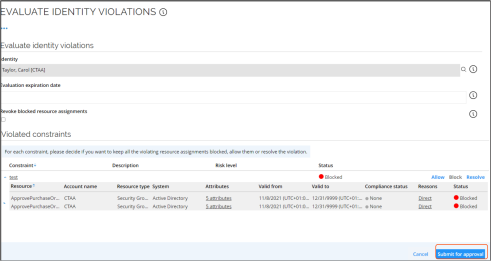
When this checkbox is selected, the blocked resource assignments are expired (the Valid To date is set to yesterday, and the status is set to Obsolete) when the evaluation is approved by the Security officer.
Display violations by constraint
The following is an example of how to display violations by constraint.
To open the constraint:
- In the Constraints view, click the relevant name. For example: Trading System single assignment policy.

- Click on Violations to display which identities are affected by the constraint.
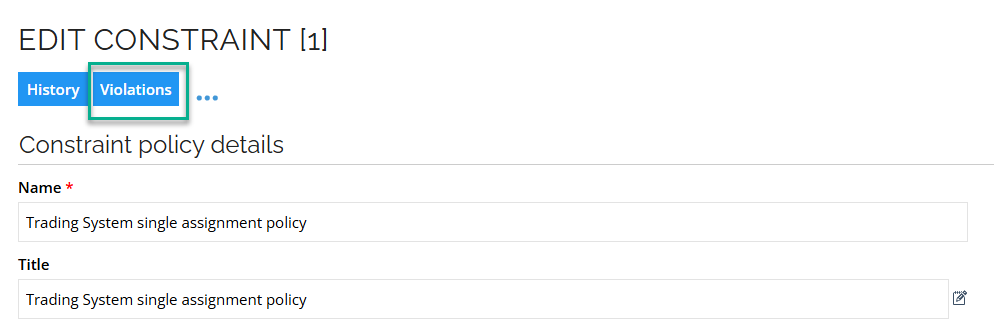
The status displays the overall approval status of the decisions for the violated constraint. If all assignments are blocked, the status is Blocked. If all are allowed, then the status is Allowed. If some are blocked, then the status is Resolved.
Compensating Controls
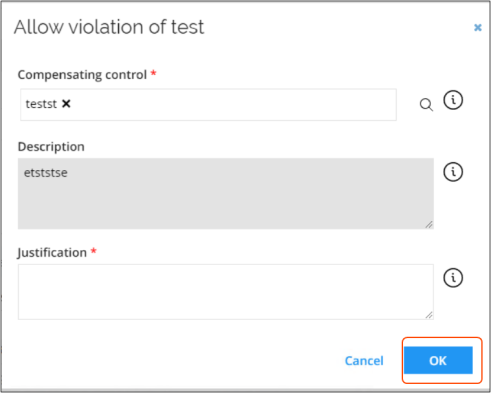
While evaluating SoD violations, the manager must select which compensating control to use when clicking Allow to approve a violation of the constraints and policies set up in their system.
When clicking the Allow button, the manager must select the compensating control, explain consequences, and state the reason for allowing the violation.
Compensating Controls must be configured before evaluating violations. it's not possible to configure a new compensating control while evaluating a violation of a constraint.
The Compensating controls process is maintained manually in Omada Identity through Master Data Management.
You can find the compensating control objects in the following path: Setup > Master data > Policies > Compensating controls.