Technical documentation standards
Technical guidelines
File naming convention
-
When adding new files to the repo, make sure that all letters are written lowercase. This includes topics, graphics, etc., for example,
create-assignment-policy.md. -
File names must be unique.
-
Separate the words in the file name using hyphens " - ", for example,
create-assignment-policy. -
In metadata for id, also use lower case, for example,
id: id-of-the-document.
Agreements regarding the connectivity guides:
-
Files for each Connectivity should be split into 3 markdown files:
-
<connectivity name>.md -
<connectivity name>-connector.md -
<connectivity name>-collector.md
for example,
-
mijnCaress.md -
mijn-collector.md -
mijn-connector.md
-
-
Tags should be used as follows:
File name Tags mijnCaress Connectivity; mijnCaress mijn-connector Connectivity; mijnCaress; Connector mijn-collector Connectivity; mijnCaress; Collector
Metadata in .md files
When adding a new .md file, make sure that you include metadata at the top of the file, for example:
---
id: id-of-the-document
title: Document title
sidebar_position: 1 # specify the file's sidebar position
toc_min_heading_level: 2
toc_max_heading_level: 5
tags:
    - Test
---
Tagging policy
- Limit the number of used tags to three.
- Check out the list of existing tags and use them accordingly.
- When creating a new tag, it should be related with the document title and represent the most relevant keyword that reflects the document content.
Marking document as draft
Add the draft:true tag in the file metadata, for example:
---

id: identityprocessplus

title: IdentityPROCESS+

sidebar_position: 3

draft: true

tags:

    - IdentityPROCESS+

---
Graphics
Use simple images, charts, and tables:
- Remember that the screen width may be limited to a few inches. Simplify content for easy readability and comprehension.
- Opt for straightforward images and trim unnecessary details. Always include descriptive alt text for images conveying essential information.
- Approach infographic creation with care. Offer readers the option to view infographics in an application that allows for zooming into specific sections. Structure infographics into concise segments that can be enlarged and viewed on small screens. Alternatively, integrate individual sections of the infographic into text and provide a link to the complete version.
- Streamline charts and graphs for seamless viewing on small screens. Keep chart titles, metric labels, and axis labels concise.
Technical requirements
-
Use the Omada theme in Snagit.
-
To highlight something on an image, use the Coral color from our palette, that is, #F3750D.
Deleting local branches
If you want to delete local branches from VSC to clean up the list of already merged branches:
-
Open VSC and use the Shift+Ctrl+p shortcut. This will open a search bar and Access all available commands based on your current context.
-
Select Git: Delete branch (if you don't see this option, type that in the search bar).
-
Select a branch to delete.
Markdown guidelines
To learn about the most important Docusaurus concepts, make sure to read the Docusaurus Guides.
Here are the most important guidelines to follow regarding Docusaurus and Markdown:
-
Make sure code examples, snippets, commands are marked as inline code
-
In the
<details>component, do not use HTML paragraph tag, that is,<p> -
When using the
<details>component, make sure to add a descriptive title as this component's content is not crawled by our search -
Do not use
{ }unless you'll mark it as inline code -
Do not use
< >characters unless you'll mark it as inline code -
Do not add https links in
< > -
Docusaurus v3 uses Markdown Directives as a generic way to provide support for admonitions, and other upcoming Docusaurus features. As such, do not use
:inside a text unless you'll mark it as inline code -
Admonitions:
- warning is displayed in yellow
- danger in red
- caution admonition is deprecated
-
To change the title of the admonitions, use square brackets, for example:
Custom title of admonition
Adding links
When adding links to the /docs directory, use the relative file paths with the .md extension. It then nicely supports linking within a version. You can do that in VSC similarly to adding images, just insert / and VSC will prompt you with folders, files, and # headings. The trick part is that we need to remember to remove /docs directory from the path.
Here is the example of how links should look like:
[OAuth Auhentication](/getting-started/authentication-sso/OAuth.md)
[Policy exceptions](/configuration/policies/control-policies/control-policies#policy-exceptions)
When adding links to the documentation in the /connectivity directory, use full relative file paths with the .md extension, for example:
[Thresholds](/docs/process-flow/import-onboarding/task-and-settings/import-onboarding-tasks-and-settings-threshold)
Adding images
There's a designated folder for storing images, located at static/img. Initially, ensure you add the image to this folder. If it doesn't exist already, create a sub-folder corresponding to the section where you intend to use the image.
When inserting an image into the document, use the following HTML component:
<img src="/img/cloud-portal/customer-contact-details.png" width="650"/>
In Visual Studio Code (VSC), when you type /, it should prompt suggestions for what you intend to add, for example:
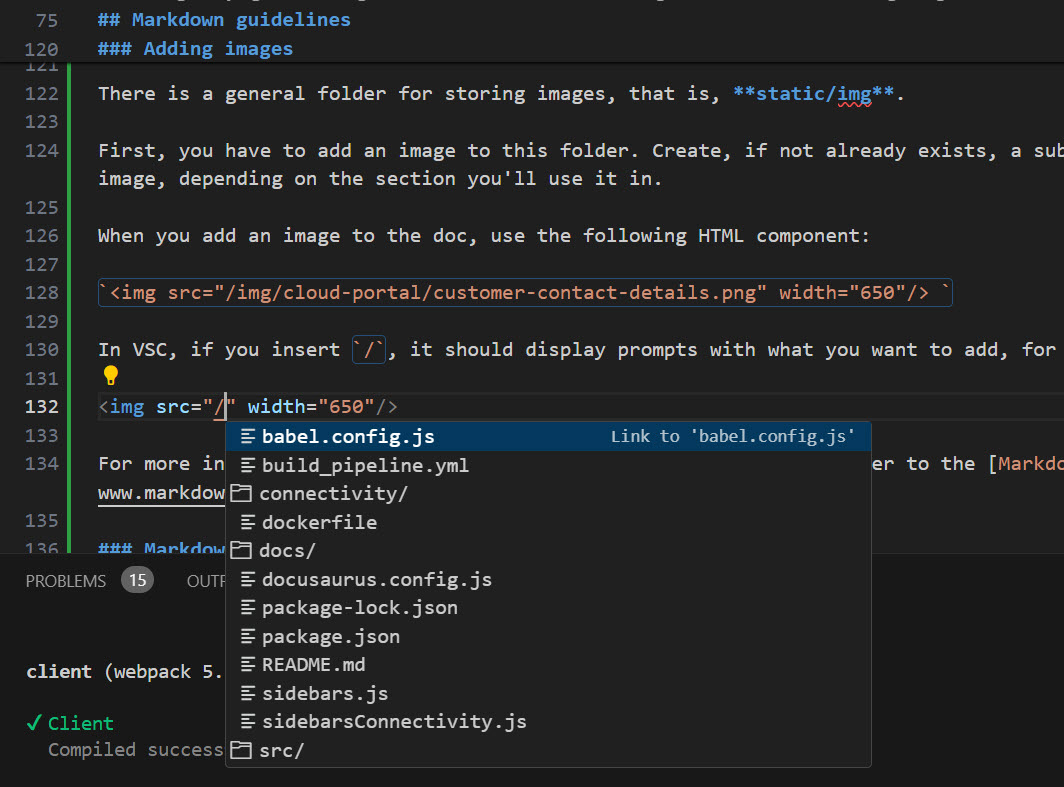
The correct image path doesn't include the /static name folder. Make sure to remove it from the path.
For more information on on adding images in a certain document, refer to the Markdown guide.
Creating subfolders
To have a subfolder with separate pages:
-
Create a folder and name it accordingly, for example, attributes.
-
Inside that folder, create a new file and name it exactly the same as the folder is name AND add an extension, for example,
attributes.md. -
Add doc metadata to the file and create a new file in that folder.
-
The new file will have separate metadata that apply to that newly created folder, but the most important is the new sidebar position, for example:
---

id: example

title: example

sidebar_position: 1

toc_min_heading_level: 2

toc_max_heading_level: 5

---
Markdown tips and known issues
-
To create line breaks, use the following HTML component:
<br/> -
To make an expandable list, use:
<details>

<summary><b>INSERT_TITLE</b></summary>

Some text

</details> -
To create tabs, use:
import Tabs from '@theme-original/Tabs'
import TabItem from '@theme-original/TabItem'


<Tabs>

  <TabItem value="enter-tab-title">

Add text

  </TabItem>

</Tabs> -
To generate a ToC of docs in a regular doc page, use:
import DocCardList from '@theme-original/DocCardList'


<DocCardList /> -
Admonitions - remember to close this and put
:::at the end -
Adjust heading levels -> use the ascending order - page title is always h1
-
Check whether the numbering in lists is correct
-
If you insert an image or a note inside of a list, make sure it's indented
- If you add an unordered list inside an ordered list, also make sure it's indented
-
Insert empty lines (by clicking enter) between images, headlines, and such -> it sometimes causes issues with displaying the text and the code is then clearer
On-premises documentation guidelines
In the Cloud documentation, you'll find sections or notes dedicated to on-premises-specific information. These segments are readily identifiable by a distinct green badge and clear labeling. Currently, this is our established approach due to certain technical constraints.
While our on-premises documentation typically comprises specific guides like installation or upgrade manuals, there are instances where a document in the Cloud version may incorporate on-premises-specific sections, denoted by the green badge. We strive to ensure this does not impede usability; however, we welcome any feedback for improvement.
The green badge serves as a visual guide, aiding users in swiftly identifying and navigating to content pertinent to their deployment model. It signifies tailored information tailored to their specific setup, enhancing their experience with our documentation.
Marking on-prem content
When handling on-prem specific content, follow this best practices:
-
For on-prem specific documents have them in a dedicated folder in project structure. Use the
draft: trueattribute in the document frontmatter to hide cloud management portal documents in on-prem version folders and on-prem in cloud folder.---
id: id-of-the-document
title: Document title
draft: true
sidebar_position: 1 # specify the file's sidebar position
toc_min_heading_level: 2
toc_max_heading_level: 5
tags:
- Test
--- -
Have on-prem related information in a separate paragraph if it's a part of a larger document.
-
In tables, aggregate on-prem entries in single section. Add the following tag:
<sup className="on-prem-list">on-prem</sup>, for example:title 1 title 2 cloud cloud cloud cloud cloud cloud on-prem <sup className="on-prem-list">on-prem</sup>on-prem <sup className="on-prem-list">on-prem</sup>on-prem <sup className="on-prem-list">on-prem</sup>on-prem <sup className="on-prem-list">on-prem</sup> -
To use it for the on-prem headings, import the following component to the file:
import Badge from '@site/src/components/badge.js';To add it to the headings, insert the following tag:
<Badge>on-prem</Badge>, for example:---
id: data-object-cleanup
title: Data Object Cleanup tool (on-prem)
sidebar_position: 3
toc_min_heading_level: 2
toc_max_heading_level: 5
tags:
- Operations
- Transport system
- Changesets
---
import Badge from '@site/src/components/badge.js';
# Data Object Cleanup tool <Badge>on-prem</Badge> -
For marking on-prem content inside a details tab or a note, for example, use the following tag
<sup className="on-prem-list">on-prem</sup>.